Posts Tagged ‘default passwords’

Recover lost / forgotten root password for CentOS 7 Linux / Boot CentOS 6 into Single User mode to reset admin pass

Friday, September 27th, 2024

centos-community-enterprise-operating-system-logo.

If you have some old CentOS 7 Virtual machine hanging for a long time and you don't remember the root password or you don't remember where you have stored it, but you have something important as data left over, you might need to recover root password for your CentOS 7 Virtual Machine.

I recently had to resolve that issue and here is the few easy steps to take to recover the lost root password.

Assuming you have tried to boot the VM and the VM boots fine and your few attempts to input manually some default passwords of yours failed, next 

1. Reboot the Virtual Machine to the GRUB boot menu


grub.png

The GRUB boot screen should appear and be there for few secs

2. Edit the boot loader kernel options ( add add rd.break enforcing=0 )


How to reset root password on CentOS Linux - Clouvider

Press 'e' to Edit the boot loader and modify the boot commands options passed to the linux kernel.

In GRUB edit mode:

add rd.break enforcing=0


to the end of the line starting with linux at the end of passed parameters list as shown in the picture.

When done editing, press Ctrl-x (Control button x key simultaneously) to boot with changed parameters.

ALTERNATIVE WAY TO BOOT THE SYSTEM INTO ROOT WITHOUT PASSWORD PROMPT:

Alternative options to use instead of add rd.break.enforcing=0 are to substitute the rhgb quiet kernel option with init=/bin/bash

Edit CentOS Grub Boot Menu Entries rhgb quiet options shot

Modify kernel parameters pass init=/bin/bash to kernel to boot emergency mode centos linux


As you might wonder for the meaning of the passed 2 parameters:

rd.break breaks the boot process at initramfs while
enforcing=0 disables the SELinux (which often enabled by default on CentOS).

Another way is to 

3. Boot in CentOS emergency mode and Reset the root password
 

When done editing, press Ctrl-x to boot with changed parameters.

As you might wonder for the meaning of the passed parameters:

rd.break breaks the boot process at initramfs while
enforcing=0 disables the SELinux (which often enabled by default on CentOS).

Whence system boots up with the modified kernel options cmd, the switch_root prompt will appear.
As the emerency mode boots the filesystem into read-only mode under /sysroot default directory, in order to be able to
modify the MD5 root password stored hash inside RO mounted /sysroot/etc/shadow you need to remount the Filesystme
in read-write mode.

To Remount the read-only file system /sysroot in write mode:

# mount -o remount,rw /sysroot

As the /sysroot is not the root directory to be able to use a standard passwd command you need to make /sysroot
as the default root folder for the booted linux by chrooting into it.
 

  • Generate MD5 password manually (for Hardcore masochistic admins 🙂 )

If you're a hard core linux sysadmin of course, generate your own new md5 password and directly modify /etc/shadow copy pasting the md5 string.

If you want to manually generate the md5 string, you can do it depending on the required encryption algorithm with:

For (md5, sha256, sha512) encrypted pass

# openssl passwd -6 -salt xyz  yourpass

For   (md5, sha256, sha512) encrypted pwd

# mkpasswd –method=SHA-512 –stdin

For (des, md5, sha256, sha512) encrypted pw

# perl -e 'print crypt("YourPasswd", "salt", "sha512"),"\n"'


Once the string is generated;

# vim  /etc/shadow


and exchange the old with new string for MD5

  • Change password with chroot (the easy common way)

remount read write the filesystem in emergency single user mode CentOS LINUX

# chroot /sysroot

That should drop you into another shell bash-4.x


Reset root user password in CentOS 7

# passwd
Changing password for user root.
New password:
Retype new password:

We need have to sync the entire filesystem we have to use the sync command, for novice sys admins who never heard about this command, below
short description:

The Linux sync command synchronizes cached data to permanent storage.
This data includes modified superblocks, modified inodes, delayed reads and writes, and others. sync uses several system calls:

sync()
syncfs()
fsync()
fdatasync()


For example, the sync command utilizes the sync() system call to write all buffered modifications to file data and metadata to an underlying storage device.

As a Linux systems administrator or developer, understanding the sync command can be crucial for efficient file synchronization. Additionally, sync can be helpful after crashes or when the file system becomes corrupted.

In this tutorial, we’ll explore the various aspects of the sync command. Also, we’ll see how we can use sync in different scenarios.

# sync

# exec /sbin/init

Try out the root password after booting normally into CentOS and the new set administrator pass should work.


Resetting forgotten (lost) root password on CentOS 6

The process is absolutely the same except on the Step 1 (in the modification of GRUB boot menu by pressing e key), add to

rhgb quiet

at the end one 'S'

This S character means 'boot CentOS into Single user mode'

rhgb quiet S


Go to single user mode on CentOS 6 Linux in boot loader S kernel setting

Then, press ENTER key and press b key to boot CentOS 6 into to single user mode.
 

Howto remote access Windows PC which is behind Vivacom ADSL (Commtrend SmartAX MT882 router) modem with VNC server

Wednesday, May 11th, 2011

I had been assigned the not easy task to make a Windows XP Pro which is located behind an ADSL modem to be remotely accessible via VNC

The Windows is connected to the Bulgarian Vivacom Intrnet provider through their ADSL service and hence there is an ADSL router modem which is configured to disallow all inbuond connections by default.

The Windows Pro PC where the VNC server was needed to be accessible did not have a real IP address (e.g. was assigned a virtual IP address by the ADSL modem.

The exact ADSL model used to connect the computer via a lan cable to the internet was Huawei SmartAX MT882

As the device is owned by Vivacom (the ex BTK tele communication company) I did not have any admin user and pass credentials for the ADSL modem to configure the ADSL router to do a port NAT forwarding of port 5800 and 5900 used by the VNC software I installed on the PC (TightVNC)

Nevertheless the missing user and password I decided to check in google if I can find some default passwords that Vivacom ADSL modems are configured to work with

After a few minutes spend in Google I already had found few passwords which were said to work fine with the Vivacom ADSL router.
Here are the passwords I found for the Vivacom ADSL Internet modems:

ZTE ZXDSL 832
username: root
password:GSrootaccess

ZTE ZXDSL 831
username:root
password:GSrootaccess

ZTE
username:root
password:831access

Huawei SmartAX MT882
username:root
password:MT882rootaccess

ZTE ZXDSL-531b
username: root
password:warmWLspot

I tried some old school brute force techniques 😉 by trying all the passwords via the ADSL web interface located on http://192.168.1.1 (I was not sure which model the Vivacom ADSL modem is as on the router there was nothing written concerning the modem type but only the Vivacom logo was present.

After a bit of time I already knew that the ADSL modem model, user and pass was:

Huawei SmartAX MT882
-------------------------------
user: root
pass: MT882rootaccess

My next step was to configure port forwarding for the SmartAX MT882 ADSL in order to achieve from modem’s web administrator I had to follow the menus:

Advanced Setup -> Virtual Servers
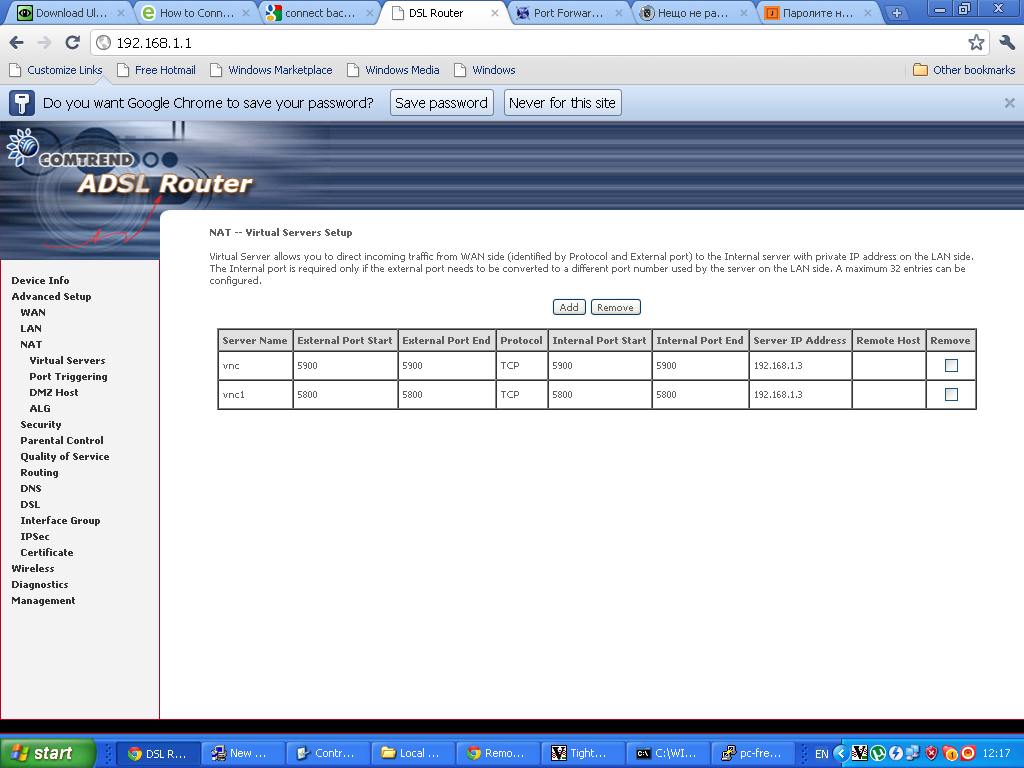
ADSL virtual servers menu screen

Next in the NAT — Virtual Servers section I pressed the Add button to create new automatic redirection (port forwarding) rule.
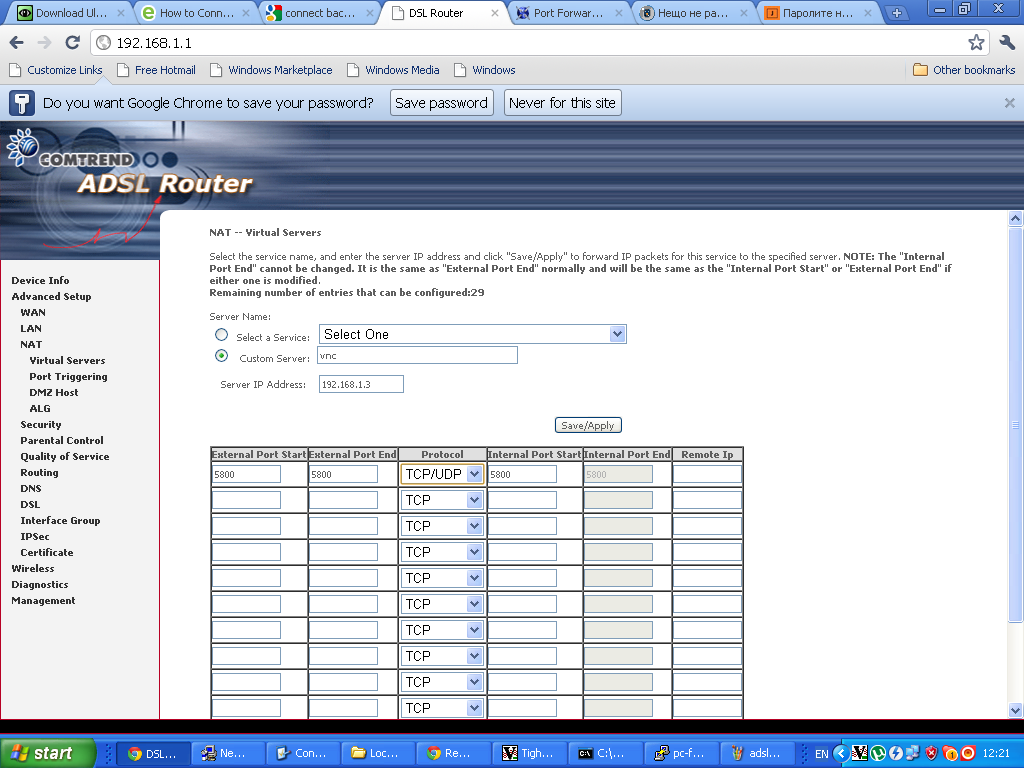
Virtual Server port forwarding screenConfiguring ADSL SmartAX MT882 TightVNC NAT port redirection screenTightVNC requires also NAT port redirection rule for port 5900 in order to be able to connect to the VNC server behind the dsl, so analogically I added a Virtual Server NAT rule for port 5900.

Note that the private IP address of the Windows host was assigned by the ADSL router to the ip 192.168.1.3

Further on I expected the adsl port forwarding created rule would now allow me to connect to the VNC server on the pc located behind the dsl firewall, but I was wrong… even though all seemed to be configured just fine in the ADSL router still the port unmbers 5800 and 5900 were showing up as closed during nmap scan as well as a simple telnet connection to port 5800 and 5900 failed to get established.

My logical assumption was that some configured Firewall on the Windows PC is blocking port connections to 5800 and 5900 thus I decided to check the default Windows Firewall settings as a first possible cause for the vnc ports being blocked.

I did that via the Windows menus:

Start -> Settings -> Control Panel -> Windows Firewall

However weirly enought it seemed the Windows Firewall was disabled e.g. the Off (not recommended) option was set for the firewall.

A bunch of other lookup over all the running system and services on the windows hosts I have found the PC is protected by NOD32 Antivirus – Personal Firewall

The default behaviour of NOD32’s Persnal firewall was extremely restrictive and I found it’s causing a port filter of the 5800 and 5900 vnc connection ports.

To solve the filtering nod32 did I had to open NOD32 and navigate to the following menus:

Setup -> Personal Firewall -> Configure rules and Zones

In the Zone and rule setup menu config window I had to further press on:
New button to add new personal firewall rule.

In the New rule: menu I filled in the following info:
In the General tab:

Name: vnc
Direction: Both
Action: Allow

In the tab Local

I pressed over the Add Port

Number: 5800

in the Remote tab once again I had to fill in:
Number: 5800

Then to confirm settings just pressed OK

Next on I added in the same manner an allow rule for port 5900.

After this settings I restarted the NOD32 firewall to make sure the new settings takes place by pressing over the Personal firewall button Disable filtering: allow all traffic and right after enabling the firewall once again.

Now remote tightvnc connections to the Windows XP Pro pc works like a charm once again, Thanks God 😉





