Posts Tagged ‘disable’

Fix “There Has Been a Critical Error on Your Website” wordpress error

Friday, December 2nd, 2022

there-has-been-a-critical-error-on-your-website-wordpress-critical-error-fix

Say you have a shiny working WordPress based website withtout any monitoring set for years but suddenly, you open the site and you get the terrifying error:
 

There Has Been a Critical Error on Your Website

That is quite of a stress for sure. As in the first few minutes you don't understand how this has happened since, you did not touched the perfeclty working site for a very, very long time.
Then you start to debug into the apache / nginx access.log, error.log and mysql mysql.err etc. franticly trying to figure it out the normal ideas pop-up immediately into mind, whether you have a recent backup for the website's database. If you have pair of high availability webservers service or backup databases that serve the traffic via a separate standby instance of the service, you might try to switch off the official service and see whether the standby Webserver / SQL server instance would serve the website fine.
However, if this is not an option and you have no standby backup service as a recovery Plan B option already set. Your only option is to continue to debug what is wrong.
Then the next thing to do is to check whether you don't have a Web Caching or Proxy in front of your webservers that are preventing you to see a recent version of the website and give you some old cache or you don't have an ISP proxy that is giving you some unreal results. That is easily seenable from the Webserver logs. If this is neither the case the next thing is to:
 

Enable WordPress (wp-config.php) Debug mode

By default for Security reasons the WordPress PHP execution debug mode is switched off inside wp-config.php.
When there are odd pages with the WordPress based blog or site however this can easily be changed by modifying the WP_DEBUG true|false value.

To do so edit with a text editor such as vim / nano / mcedit  wp-config.php or if no SSH access to the remote machine, use SFTP / FTP transfer protocol copy the file to your desktop and inspect it and make sure the WP_DEBUG / WP_DEBUG_DISPLAY / WP_DEBUG_LOG has following values:

define( 'WP_DEBUG', true );

define( 'WP_DEBUG_DISPLAY', false );

define( 'WP_DEBUG_LOG', true );

Reloading the Browser window tab with There is a critical error on Your website, you should get some Errors or Warnings like:
 

Warning: Illegal string offset 'parent_slug' in /var/www/websitecom/wp-content/plugins/photo-gallery/booster/main.php on line 180

Warning: Illegal string offset 'slug' in /var/www/websitecom/wp-content/plugins/photo-gallery/booster/main.php on line 180


Then you can temporary disable the problematic problem in that case for example the photo-gallery and recheck the website, and then restore from backup snapshot the respective plugin files version from a moment, when the website was working.

If this doesn't solve it and more plugins are crashing and you can't find an easy way to work-around it you miss a backup, you might try to


Disable all WordPress active plugins

Disable your plugins from the dashboard, visit Plugins > Installed Plugins and tick the checkbox at the top of the list to select them all.
Then click Bulk Actions -> Deactivate, which should be enough to disable any conflicts and restore your site.

You can do essentially the same thing through SSH / FTP session.

Step 1: Log in to your site with SSH / FTP.
Step 2: Open the wp-content folder to find your plugins.
Step 3: Rename the plugins folder to plugins_old and verify that your site is working again via SSH run commands:

# cd  path_to/plugins; mv plugins plugins_old

or rename via FTP client
Step 4: Rename the folder back to “plugins”. The plugins should be disabled still, so you should be able to log in to your dashboard and activate them one by one. If
the plugins reactivate automatically, rename individual plugin folders with _old until your site is restored.

Raise the PHP Memory Limit

Sometimes, a low PHP limitation causes critical errors on WP based blogs and sites, if necessery raise up the memory limitation via:

define( 'WP_MEMORY_LIMIT', '128M' );

Change Max Upload File Size and Text Processing function limits

To increase the max upload file size, add this code to wp-config.php:

ini_set('upload_max_size' , '256M' );

ini_set('post_max_size','256M');

And to fix the breaking of large pages on your site, add this code:

ini_set('pcre.recursion_limit',20000000);
ini_set('pcre.backtrack_limit',10000000);

Clear up any caches

If you use some session caching of the website on the machine such as memcached / ncache / redis / varnish or an haproxy or any proxy in front of the webserver to do some kind of High availability could produce strange  unexpected Critical errors on Your Website, thus restarting such services or cleaning up any cache would be advisable if you have such.
 

What Causes "There Has Been a Critical Error on Your Website" error?


The reason could be practically anything as WP is a kind of multi-comonent free and a bit of bloatware. The general ones could be  from a missing database table / table fields to a messed up plugin after update a disappeared critical plugin or essential wordpress PHP file, but in my specific case the reason was simple the Plugins Auto-update, which I have had the stupidity to enable.

The WordPress Automatic Updates, though saving you effort and Protecting your website in most cases against recent bugs and Exploits and increasing the WP security level, often causes issues and from my personal experience it is not recommended so better avoid it. Again next time you implement any automation to your server make sure you put some kind of monitoring.

Even if you decide to enable it make sure you do it the right way and not like me, by enabling some Monitoring to the WordPress site via Zabbix / Nagios / Cacti / monit  etc to be sure you get notified immediately if the WordPress based site is down.

How to disable haproxy log for certain frontend / backend or stop haproxy logging completely

Wednesday, September 14th, 2022

haproxy-disable-logging-for-single-frontend-or-backend-or-stop-message-logging-completely-globally

In my previous article I've shortly explained on how it is possible to configure multiple haproxy instances to log in separate log files as well as how to configure a specific frontend to log inside a separate file. Sometimes it is simply unnecessery to keep any kind of log file for haproxy to spare disk space or even for anonymity of traffic. Hence in this tiny article will explain how to disable globally logging for haproxy and how logging for a certain frontend or backend could be stopped.

1. Disable globally logging of haproxy service
 

Disabling globally logging for haproxy in case if you don't need the log is being achieved by redirecting the log variable to /dev/null handler and to also mute the reoccurring alert, notice and info messages, that are produced in case of some extra ordinary events during start / stop of haproxy or during mising backends etc. you can send those messages to local0 and loca1 handlers which will be discarded later by rsyslogd configuration, for example thsi can be achieved with a configuration like:
 

global     log /dev/log    local0 info alert     log /dev/log    local1 notice alert  defaults log global mode http option httplog option dontlognull


<level>    is optional and can be specified to filter outgoing messages. By
           default, all messages are sent. If a level is specified, only
           messages with a severity at least as important as this level
           will be sent. An optional minimum level can be specified. If it
           is set, logs emitted with a more severe level than this one will
           be capped to this level. This is used to avoid sending "emerg"
           messages on all terminals on some default syslog configurations.
           Eight levels are known :
             emerg  alert  crit   err    warning notice info  debug


By using the log level you can also tell haproxy to omit from logging errors from log if for some reasons haproxy receives a lot of errors and this is flooding your logs, like this:

    backend Backend_Interface
  http-request set-log-level err
  no log


But sometimes you might need to disable it for a single frontend only and comes the question.


2. How to disable logging for a single frontend interface?

I thought that might be more complex but it was pretty easy with the option dontlog-normal haproxy.cfg variable:

Here is sample configuration with frontend and backend on how to instrucruct the haproxy frontend to disable all logging for the frontend
 

frontend ft_Frontend_Interface
#        log  127.0.0.1 local4 debug
        bind 10.44.192.142:12345
       
option dontlog-normal
        mode tcp
        option tcplog

              timeout client 350000
        log-format [%t]\ %ci:%cp\ %fi:%fp\ %b/%s:%sp\ %Tw/%Tc/%Tt\ %B\ %ts\ %ac/%fc/%bc/%sc/%rc\ %sq/%bq
        default_backend bk_WLP_echo_port_service

backend bk_Backend_Interface
                        timeout server 350000
                        timeout connect 35000
        server serverhost1 10.10.192.12:12345 weight 1 check port 12345
        server serverhost2 10.10.192.13:12345 weight 3 check port 12345


As you can see from those config, we have also enabled as a check port 12345 which is the application port service if something goes wrong with the application and 12345 is not anymore responding the respective server will get excluded automatically by haproxy and only one of machines will serve, the weight tells it which server will have the preference to serve the traffic the weight ratio will be 1 request will end up on one machine and 3 requests on the other machine.


3. How to disable single configured backend to not log anything but still have a log for the frontend
 

Omit the use of option dontlog normal from frontend inside the backend just set  no log:

backend bk_Backend_Interface
                       
 no log
                        timeout server 350000
                        timeout connect 35000
        server serverhost1 10.10.192.12:12345 weight 1 check port 12345
        server serverhost2 10.10.192.13:12345 weight 3 check port 12345

That's all reload haproxy service on the machine and backend will no longer log to your default configured log file via the respective local0 – local6 handler.

OpenVZ enable or disable auto start on Linux Hypervisor host boot for Virtual Machine containers

Wednesday, July 7th, 2021

howto-add-virtual-machine-to-auto-start-with-vz-openvz-linux-containers-4-logo-slogan-vertical-big

To make OpenVZ / Virtuozzo Hypervisor servers and you are not sure whether your configured container virtual machines are configured to automatically boot on Linux Physical OS host boot in case of restart after patch update set or after unexpected shutdown due to Kernel / OS bug a hang or due to some electricity Power outage.

To check what is your current configuration for Virtual Environment on CentOS Linux you need to check inside /etc/sysconfig/vz-scripts/VEID.conf
You need to check the value for inside the file

ONBOOT="" 

To get the exact ID of "VEID.conf of the current openvz guest VM containers exec:

[root@openvz vz-scripts]# vzlist -a
      CTID      NPROC STATUS    IP_ADDR         HOSTNAME
       300         23 running   10.10.10.1     VirtualMachine1
       301         25 running   10.10.10.2     VirtualMachine2

[root@openvz ~]# cd /etc/sysconfig/vz-scripts
[root@gbapp2 vz-scripts]# pwd
/etc/sysconfig/vz-scripts

[root@openvz vz-scripts]# grep -i ONBOOT 300.conf 301.conf
300.conf:ONBOOT="yes"
301.conf:ONBOOT="yes"

If you happen to have configured ONBOOT="no" you will need to the change to respective VEID.conf:

vi /etc/sysconfig/vz-scripts/VEID.conf

search for

ONBOOT=”no”

and change to

ONBOOT=”yes”

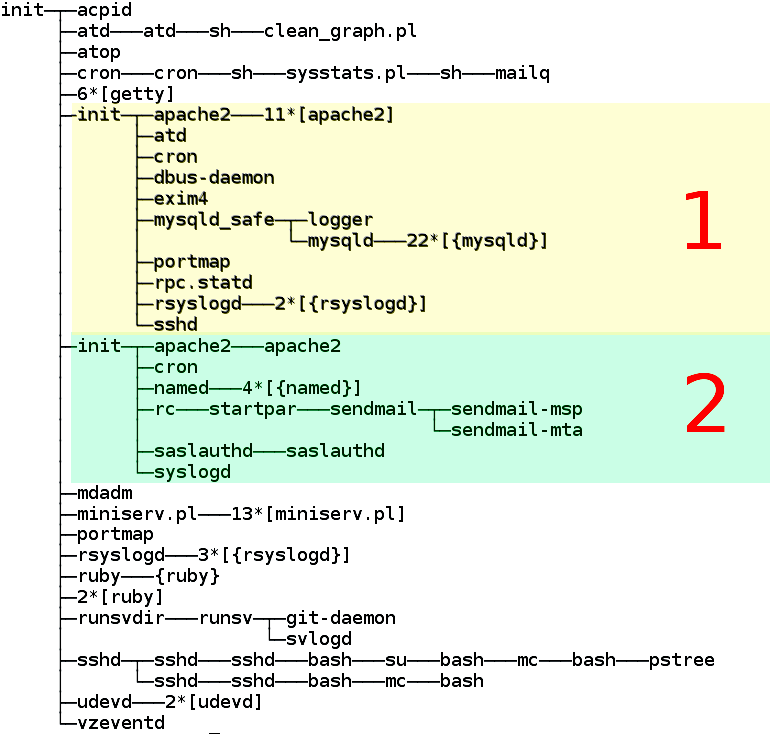
OpenVZ_virtuozzo-standard-process-tree-landscape

OpenVZ server process tree. The colors of the virtual severs are indicated by colors.

OpenVZ Quick cheat sheet commands

This change will auto-start the VPS container next time the host Hypervisor node is rebooted.
If you happen to have daily work with OpenVZ legacy systems like I do you might find also useful the following OpenVZ Cheatsheet pdf document.

A miniature quick cheatsheet for OpenVZ Virtualion, in case if you are like me and you have to use various virtualization technologies and tend to forget is as below:

vzlist                               # List running instances
vzlist -a                            # List all instances


vzctl stop <instance>
vzctl start <instance>
vzctl status <instance>

vzctl exec <instance> <command>      # Run a command

vzctl enter <instance>               # Get console

vzyum <instance> install <package>   # Install a package


# Change properties
vzctl set <instance> –hostname <hostname> –save
vzctl set <instance> –ipadd <IP> –save
vzctl set <instance> –userpasswd root:<password> –save

If need to get more insight on how OpenVZ Virtualization does work on a low level and stretch out its possibilities, an old but useful document you might want to check is OpenVZ-Users-Guide PDF.


If you need it to hava e copy of it openvz_cheat_sheet.txt.

Stop haproxy log requests to /var/log/messages / Disable haproxy double logging

Friday, June 25th, 2021

haproxy-logo

On a CentOS Linux release 7.9.2009 (Core) I've running haproxies on two KVM virtual machines that are configured in a High Avaialability cluster with Corosync and Pacemaker, the machines are inherited from another admin (I did not install the servers hardware) and OS but have been received the system for support.
The old sysadmins seems to not care much about the system so they've left the haprxoy with Double logging one time under separate configured log in /var/log/haproxy/haproxyprod.log and each Haproxy TCP mode flown request has been double logged to /var/log/messages as well. As you can guess this shouldn't be so because we're wasting Hard drive space so to fix that I had to stop haproxy doble logging to /var/log/messages.

The logging is done under a separate local pointer local6 the /etc/haproxy/haproxyprod.cfg goes as follows:
 

[root@haproxy01 ~]# cat /etc/haproxy/haproxyprod.cfg

global
    # log <address> [len ] [max level [min level]]
    log 127.0.0.1 local6 debug


The logging is handled by rsyslog via the local6, so obviously to keep out the logging from /var/log/messages
The logging to the separate log file configuration in rsyslog is as follows:

local6.*                                                /var/log/haproxy/haproxyprod.log

It turned to be really easy to prevent haproxy get its requests log to /var/log/messages all I had to change is under /etc/rsyslogd.conf

local6.none config has to be placed for /var/log/messages the full line configuration in /etc/rsyslog.conf that stopped double logging is:

# Don't log private authentication messages!
*.info;mail.none;authpriv.none;cron.none;local5.none;local6.none                /var/log/messages


Disable server side includes (SSI) in Apache on Debian GNU / Linux to Improve minor Apache performance

Thursday, November 29th, 2012

Disalable Apache Server-side includes on debian Linux disable SSI for better performance and security
By default Apache deb installable binary on Debian GNU / Linux is shipped with Apache version  (Apache 2.2.16-6+squeeze6) is configured to be able to process Server Side Include (SSIs) scripts.

For those who don't know what is a Server-Side Includes it a way giving  possibility for inclusion through .shtml or even .html files (if configured) to dynamically include and process external scripts. Most admins should have already seen SSI scripts, but it is possible they don't even know it is SSI. An example code from an SSI script looks something like:

<!--#include file="footer.html" -->

<!--#exec cgi="/cgi-bin/foo.cgi" --> <!--#exec cmd="ls -l" -->

As of time of writting (on Debian stable codename Squeeze – and I guess the unstable one too).

In Debian.BG one of my previous employment companies SSI was used on a few website Projects;  However nowadays SSI's are not so popular as they used to be and many websites using mostly PHP for a programming backend don't use / need the Server Side Includes at all. Thus it is recommended on such servers where SSIs aren't used and not planned by company to be used in short future to disable SSI  (.shtml) support completely. As the popular saying says "less is more" – having enabled SSI hanging their is simply a waste of Apache resources and just another hanging unused feature from security stand point is not good.

 SSI .shtml support in Debian is enabled via /etc/apache2/mods-available/mime.conf, not  through apache2.conf because of the modular Apache Debian build structure.

Thus to disable server-side parsing on Debian (and I guess other debian derivatives);

  • Edit /etc/apache2/mods-available/mime.conf

vim /etc/apache2/mods-available/mime.conf

  • Look for file section:

#
# Filters allow you to process content before it is sent to the client.
#
# To parse .shtml files for server-side includes (SSI):
# (You will also need to add "Includes" to the "Options" directive.)
#
AddType text/html .shtml
AddOutputFilter INCLUDES .shtml
 

  • Comment out .shtml mime directives to:

#
# Filters allow you to process content before it is sent to the client.
#
# To parse .shtml files for server-side includes (SSI):
# (You will also need to add "Includes" to the "Options" directive.)
#
##AddType text/html .shtml
##AddOutputFilter INCLUDES .shtml

  •   Apply changes, with the usual apache restart:

debian:~# apache2ctl -k restart

Don't expect that disabling SSI will give a great boost to the webserver but it will definitely, do a minor performance improvement. This should be noticable on  Webserver hosts (using apache2-mpm-prefork) with thousands of Apache forks, on a little home Webserver perf change is unnoticeable.


How to disable Microsoft Widnows XP annoying Updates Available / Updates disabled notification

Sunday, September 30th, 2012

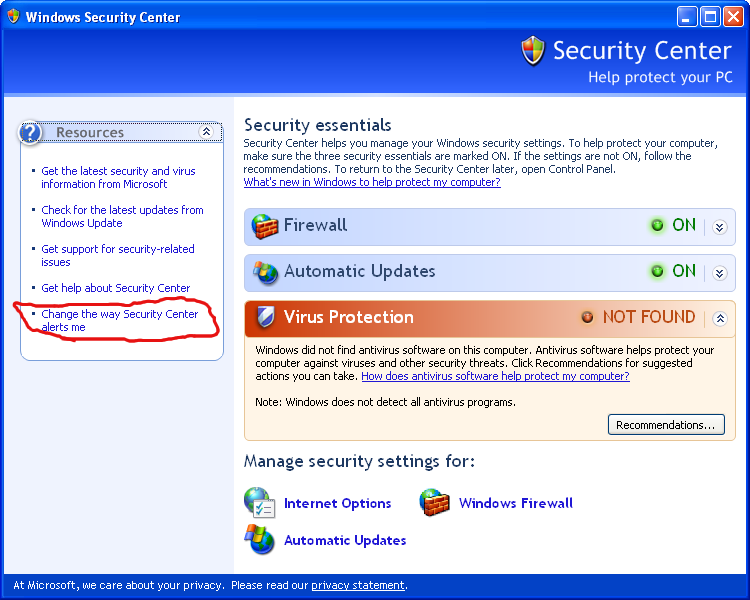
veryone knows, how M$ Windows updates the PC at stake. Besides that you know if updates are Disabled, the annoying picture showing a red like X under bottom left (Start menu panel) corner. Even if updates are Enabled often on the bottom part there is the yellow ! sign pushing the user to update:

Microsoft Windows Your Computer might be at risk menu screenshot

Thanksfully there is work around. To remove notification use:


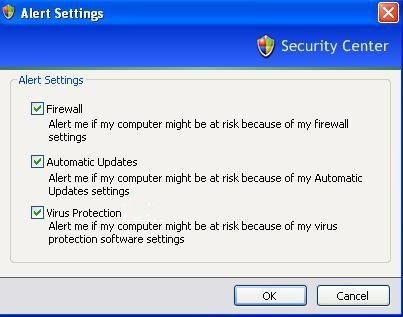
Start (Menu) -> Control Panel -> Security Center -> Change the way Security center alerts me

Microsoft Windows XP SP3 Security Center - Change the way Security Center alerts me

Windows XP alert settings change disable automatic updates

No more update notifications. Enjoy 🙂

Disable Apache access.log and error.log logging on Debian Linux and FreeBSD

Tuesday, September 25th, 2012

Disable Apache logging Debian and FreeBSD Linux logo

Many times disabling logging on a busy websites is quite beneficial, especially if more than few Gigabytes are written in Apache visitors log (access.log) every day. Too much visitors to Apache webserver could pose significantly increase disk writes and be negative for overall server performance.

Disabling the log is handy also for websites which already integrate a different type of visitors logging lets say – via MySQL, PostgreSQL (SQL) …

From security perspective disabling logging is a very stupid idea thought, however on systems which are experiencing high load and you need to sacrifice logging to reduce a bit the load (especially if you cannot afford to get a new server hardware), disabling it is an option.

1. Disabling access.log and error on Debian Linux

a) Disabling access.log logging
As most Debian users already know on Debian GNU Linux Apache logs all incoming (port 80) Apache requests to /var/log/apache2/access.log and /var/log/apache2/error.log

Disabling logging is very simple, just comment out line in /etc/apache2/sites-enabled/000-default:


CustomLog ${APACHE_LOG_DIR}/access.log combined

to


#CustomLog ${APACHE_LOG_DIR}/access.log combined

Then restart the webserver to re-read new config value:


# /etc/init.d/apache2 restart
....

Of course this is one of the ways to disable access.log logging. Other ways are to make logging gets logged in good old /dev/null. To use /dev/null forwardingp put Customlog /dev/null in /etc/apache2/sites-enabled/000-default


CustomLog /dev/null

In Debian Lenny and older Debian releases Customlog Apache directive is found in /etc/apache2/apache2.conf.

b) Disabling error.log logging

Same procedure applies for disabling error.log, comment out default ErrorLog directive, restart Apache and you’re done:


ErrorLog ${APACHE_LOG_DIR}/error.log

should become:


ErrorLog /dev/null

Usually just comming ErrorLog ${APACHE_LOG_DIR}/error.log is supposed to work, unfortunately for reason on Debian Squeeze this worked not commenting it and restarting Apache failed to restart apache with error:


# /etc/init.d/apache2 restart
Restarting web server: apache2 ... waiting (2)No such file or directory: apache2: could not open error log file /etc/apache2/logs/error_log.
Unable to open logs
Action 'start' failed.
The Apache error log may have more information.
failed!

Thus to disalbe error.log you need to add ErrorLog /dev/null in /etc/apache2/apache2.conf and once again restart Apache.


ErrorLog /dev/null


# /etc/init.d/apache2 restart

Bear in mind that if you use some custom virtualhosts which has the ErrorLog directive in (let’s say /etc/apache2/sites-enabled/{website-domain.com,website-domain1.com} etc. you need to change there too.
2. Disabling access.log and error.log logging on FreeBSD
On FreeBSD to disable access.log add CustomLog /dev/null to /usr/local/etc/httpd.conf and just like on Linux restart Apache:


freebsd# /usr/local/etc/rc.d/apache2 restart
....

Disaling error.log on BSD is done by changing:


ErrorLog /var/log/httpd-error.log

to


ErrorLog /dev/null

BTW disaling error.log is quite a stupid idea but in some situation, where you don’t update software versions and don’t change often webserver script interpreter and (processed) server side executables / PHP scripts it could be ok.
Still it is much better to change the amount of Apache logged information and keep error.log logging by changing:


LogLevel crit

Using LogLevel crit, will prevent Apache from logging numerous not so useless warnings in error.log, so if you have a very busy server with high loads you better use it.

Don’t expect that disabling logging will drastically improve performance usually even on Apache servers which serve more than 20 000 of requests daily disabling access.log / error.log could would probably reduce load with from 00.1 to maximum 2-3 percentage.

Disable DNS recursion and AXFR requests in BIND on Debian Linux and FreeBSD / How to test a nameserver if AXFR requests are allowed with dig command

Monday, March 15th, 2010

I am playing with bind on a newly configured server and therefore doing my best to configure the nameserver in a good manner. In that manner of thoughts I remembered about the good old “recursion” which could pose a security hole in your DNS systems. I won’t buffle on how bad it is for a BIND domain resolver to have Domain recursion switched on, there is plenty of information you can read further online. Anyways here is a brief overview on recursion:
Recursive DNS is essentially the opposite of Custom DNS. Custom DNS is an authoritative DNS service that allows others to find your domain, and Recursive DNS allows you to resolve other people’s domains.

So considering the above definition if you decide to leave the default behaviour of the Bind nameserver (which by the way is also default behaviour of many other DNS servers including Microsoft DNS), this would mean that your DNS will be left open for the whole world to be able to serve resolve requests for any domain name requested by end users. In other words somebody out there might decide to use your nameserver to resolve all internet domains, like: google.com, yahoo.co.uk etc.

It is wise to enable recursion only for localhost on your bind name server, So to achieve that on Debian:
Open /etc/bind/named.conf.options and insert into it
Right before the options {

acl recurseallow { 1.2.3.4; 127.0.0.1; };

Also in the options {} include the following lines:

allow-recursion { recurseallow; };recursion yes;

On FreeBSD you need to include the same in /var/named/etc/namedb/named.conf by default or any other location if you have some specific named.conf file location.

Another truly Vital things to include in /etc/bind/named.conf.options on Debian Lenny among options {} is:

auth-nxdomain no;

Including this in the options {} configuration block would completely disable AXFR transfer requests on your nameserver on FreeBSD the procedure is absolutely analogous, just open /var/named/etc/namedb/named.conf and include the auth-nxdomain no; in the options configuration block.

To stress out the importance of disable AXFR it’s important to know that if you don’t disable the AXFR which is enabled by default in many nameservers out there you’re risking that a malicious person could list the whole zone files for each and every of the configured domains in the DNS server and consequently the attacker can learn a lot about the DNS topology of your network etc.
So to complete the article I’m gonna give an example on how the dig command can be used in order to check a certain DNS server if it has enabled the AXFR requests (e.g. if it’s vulnerable to this type of DNS information leak).

dig @somenameserver.net somedomainname.net axfr

In the above example somenameserver.net = is a random name server hosting a specific DNS domain
somedomainname.net = is the DNS domain name / (a.k.a. zone file) hosted on somenameserver.net

If everything is configured properly in your the namesever you’re running the axfr test against you should see something like:

; <<>> DiG 9.6.1-P1 <<>> @somenameserver.net somedomainname.net axfr
; (1 server found)
;; global options: +cmd
; Transfer failed.

Disable default Thunberbird annoying Display Images blocking (Display Pictures in Thunderbird by default)

Friday, September 11th, 2009

Since quite some time I’m experiencing this annoying behaviour on side of Thunderbird. Every time I receive a new mail which includes embedded html code with pictures, Thunderbird blocks them until I explicitly select the picture and allow it to display or either allow picture displaying for the whole domain for the future references. Today I decided at last to put an end to this boredom and look for a solution.
Here is the way I changed this terrible behaviour:
1. Go to Thunderbird “Edit -> Preferences -> Advanced -> General -> Config Editor”2. Look for the variables record mailnews.message_display.disable_remote_imageuse the mouse to select “toggle” value to switch the default value from”true” to “false”.That should be it. END—–