Posts Tagged ‘domain’
Monday, February 28th, 2022 
Say you have recently run a new KVM Virtual machine, have connected via VNC on lets say the default tcp port 5900
installed a brand new Linux OS using a VNC client to connect, such as:
TightVNC / RealVNC if connecting from Windows Client machine or Vncviewer / Remmina if connecting from Linux / BSD and now
you want to turn off the VNC VM listener server either for security reasons to make sure some script kiddie random scanner did not manage to connect and take control over your VM or just because, you will be only further using the new configured VM only via SSH console sessions as they call it in modern times to make a buziness buzz out of it a headless UNIX server (server machines connected a network without a Physical monitor attached to it).
The question comes then how can be the KVM VNC listener on TCP port 5900 be completely disabled?
One way of course is to filter out with a firewall 5900 completely either on a Switch Level (lets say on a Cisco equipment catalist in front of the machine) or the worst solution to locally filter directly on the server with firewalld or iptables chain rules.
1. Disable KVM VNC Port listener via VIRSH VM XML edit
The better way of course is to completely disable the VNC using KVM, that is possible through the virsh command interface.
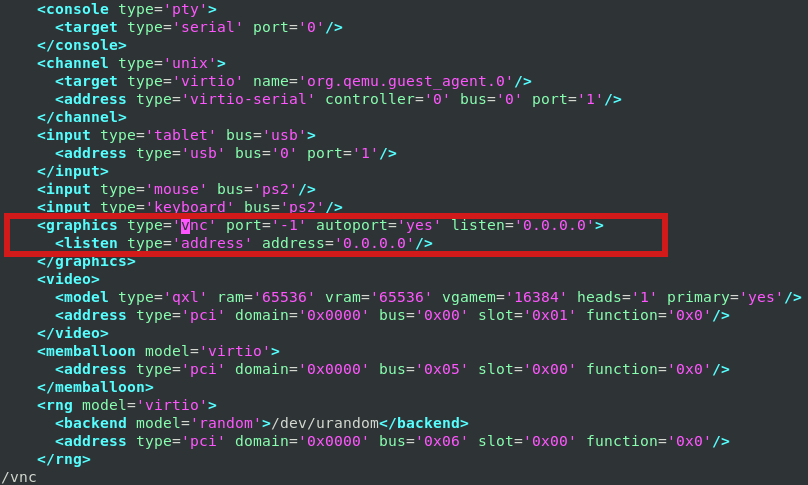
By editing the XML Virtual Machine configuration and finding the line about vnc confiuguration with:
root@server:/kvm/disk# virsh edit pcfreakweb
Domain pcfreakweb XML configuration not changed.
like:
<graphics type='vnc' port='5900' autoport='yes' listen='0.0.0.0'>
<listen type='address' address='0.0.0.0'/>
and set value to undefined:
port='-1'
Modifying the XML however will require you to reboot the Virtual Machine for which XML was editted. This might be not possible
if you have a running production server already configured with Apache / Proxy / PostgreSQL / Mail or any other Internet public service.
2. Disable VNC KVM TCP port 5900 to a dynamic running VM without a machine reboot
Thus if you want to remove the KVM VNC Port Listener on 5900 without a VM shutdown / reboot you can do it via KVM's virsh client interface.
root@server:/kvm/disk# virsh
Welcome to virsh, the virtualization interactive terminal.
Type: 'help' for help with commands
'quit' to quit
virsh # qemu-monitor-command pcfreakweb –hmp change vnc none
The virsh management user interface client, can do pretty much more of real time VM changes, it is really useful to use it if you have KVM Hypervisor hosts with 10+ Virtual machines and it if you have to deal with KVM machines on daily, do specific changes to the VMs on how VM networks are configured, information on HV hardware, configure / reconfigure storage volumes to VMs etc, take some time to play with it 🙂
Tags: address, apache2, domain, help, kvm, machines, none, port, root, root server, tcp, terminal, user interface, virsh, Vncviewer Remmina, welcome, Windows Client, xml
Posted in Curious Facts, Linux, Virtual Machines | No Comments »
Thursday, April 7th, 2011 
Just wanted to say that I'm quite satisfied with Godaddy's SSL certificate generation.
SSL certs generation with Godaddy is dramatically more easy and intuitive than with certs bought from Enom.com.
To generate a new certificate with Godaddy, login to your godaddy account, press My Account -> SSL Certificates
Godaddy does grant you new credits whenever you have purchased a new ssl certificate for them, 1 credit is equal to one certificate.
You later use this credit to get your SSL certificate which will appear in the list of ssl certificates.
To manage the new certificate I had to press over Manage Certificate
Next over 3 steps it's necessery to place a newly generated CSR file to generate the CSR file I issued:
/usr/bin/openssl genrsa -des3 -out www.domain.com.key 2048

Enter pass phrase for www.domain.com.key:
debian:~# /usr/bin/openssl req -new -key /home/hipo/www.domain.com.key -out /home/hipo/www.domain.com.csr
There is a field which requires you to paste in the newly generates csr file with the above command in Godaddy's SSL generation step 2.
Step 3 does not require anything special.
After this steps if the domain for which an SSL cert is generated doesn't contain some specific banned words which prohibits automatic approval of a certificate an email is received in the email set for the godaddy account.
After Godaddy approves the generation of the respective ssl cert it starts appearing in the menu: Manage Certificates -> Certificates tick over to choose the common name of your certificate and a button a bit above with a green down arrow will turn green.
Press over it and you will be offered a menu whether you can choose the version of the webserver for which you will need the newly generated SSL certificate to install on.
In my case it was Apache so I choose Apache, gt the certificate put it and install it to apache and restart Apache and you're done.
For some more thorough instructions on how to install a SSL certificate I recommend you to check my previous article here
Tags: apache, arrow, automatic approval, bit, Button, cert, certificate, certificate generation, Certificates, certs, com, command, Credit, csr, des3, doesn, domain, email, enom, file, generation, generation step, genrsa, godaddy, hipo, home, login, Manage, menu, name, nbsp, necessery, openssl, paste, phrase, Press, ssl certificate, ssl certificates, usr bin, version, webserver, www
Posted in Everyday Life, System Administration, Various, Web and CMS | 1 Comment »
Saturday, August 21st, 2010 
In my previous post I've blogged how to install and configure Trac on Debian
The next logical question for me was how to use trac with multiple user accounts.
Thanksfully this happened to be very easy. All I had to do to setup different trac users was to add different Apache htaccess authentication accounts.
Consequently you will be logged in in Trac's interface after you login with your Apache htaccess user and password with the same user as provided in the Apache authentication dialog.
Of course to create the required Trac login accounts, you need to first have setup an Apache AuthType Basic declaration.
For example you will have to add something similar to:
<Location "/">

AuthType Basic

AuthName "Trac - projects"

AuthUserFile /etc/apache2/trac.passwd

Require valid-user

</Location>
your Apache virtualhost or domain configuration file.
In order to add the two users user1 and user2 then I simply had to add the users with the htpasswd Apache password tool.
debian:~# htpasswd -c /etc/apache2/trac.passwd user1

debian:~# htpasswd -c /etc/apache2/trac.passwd user2
Thanks God this was easy 🙂
Tags: apache, apache authentication, apache htaccess, apache password, apache virtualhost, apache2, authentication dialog, AuthType, AuthUserFile, configuration file, configure, course, dialog, domain, domain configuration, file, god, How to, How to add/create user accounts to be used with Trac (issue tracking system) on Linux, htaccess authentication, htpasswd, interface, issue, Linux, logical question, login, lt, order, passwd, password, password tool, question, quot, setup, something, system, Thanksfully, tool, trac, user accounts, Virtualhost
Posted in Linux, System Administration, Web and CMS | No Comments »
Saturday, November 12th, 2011 
I'm rescuing some files from one unbootable Windows XP using a livecd with Hirens Boot CD 13
In order to rescue the three NTFS Windows partitions files, I mounted them after booting a Mini Linux from Hirens Boot CD.
Mounting NTFS using Hirens BootCD went quite smoothly to mount the 3 partitions I used cmds:
# mount /dev/sda1 /mnt/sda1

# mount /dev/sda2 /mnt/sda2

# mount /dev/sdb1 /mnt/sdb1
After the three NTFS file partitions are mounted I used smbclient to list all the available Network Shares on the remote Network Samba Shares Server which by the way possessed the NETBIOS name of SERVER 😉
# smbclient -L //SERVER/

Enter root's password:

Domain=[SERVER] OS=[Windows 7 Ultimate 7600] Server=[Windows 7 Ultimate 6.1]
Sharename Type Comment
——— —- ——-
!!!MUSIC Disk
ADMIN$ Disk Remote Admin
C$ Disk Default share
Canon Inkjet S9000 (Copy 2) Printer Canon Inkjet S9000 (Copy 2)
D$ Disk Default share
Domain=[SERVER] OS=[Windows 7 Ultimate 7600] Server=[Windows 7 Ultimate 6.1]
Server Comment
——— ——-
Workgroup Master
——— ——-
Further on to mount the //SERVER/D network samba drive – (the location where I wanted to transfer the files from the above 3 mounted partitions):
# mkdir /mnt/D

# mount //192.168.0.100/D /mnt/D

#
Where the IP 192.168.0.100 is actually the local network IP address of the //SERVER win smb machine.
Afterwards I used mc to copy all the files I needed to rescue from all the 3 above mentioned win partitions to the mounted //SERVER/D
Tags: admin, admin c, boot cd, bootcd, Canon, canon inkjet, cd 13, Comment, copy, default, default share, Disk, domain, domain server, drive, hirens boot cd, ip, livecd, local network, location, machine, Master, Mini, mini linux, mnt, mount dev, music disk, nbsp, netbios, netbios name, network ip address, network shares, NTFS, os windows, partitions, password, printer canon, Printer Canon Inkjet S9000 Copy, Remote, remote admin, remote server, rescue, root, samba shares, sda, sdb, Server Comment, server os, server windows, Sharename, unbootable, Windows, windows files, windows pc
Posted in Everyday Life, Linux, System Administration, Windows | 1 Comment »
Thursday, March 25th, 2010 I faced the task of generating official Validated SSL Certificates by in mydaily duties as a System Administrator at cadiaholding.com . Though generating self-signedSSL certificate is comparatively easy task. It was a pain in the ass setting Apache version 2.2.9-10+lenny6to correctly serve pages through https:// protocol over openssl version 0.9.8g-15+lenny6.I’ll try to go through the whole process of Generating the certificate in order to help some other Debianusers out there to face less setbacks in such a simple task as installing a Trusted SSL Certificate issued(bought) by RapidSSL. Even though this article will mostly deal with SSL certificate issued by RapidSSL,it should be not a problem to apply this methodogy with Verisign or some of the other Geotrust issuedSecure Socket Layer certificates.
In generating the Validated certficate I used enom which is a domain name,ssl certificates, email and hosting company whole-saler.
Fron emon’s website after logging in and using the web interface, there are two major things required to fill inin order to issue your Trusted SSL certificate.
1. Fill in in a form a CSR file, this is usually generated on the Linux server using the openssl.
To issue the CSR file required by Enom use the following commands:
a. First we generate an DES3 RSA encrypted key which we will use next to generate the opeensl CSR file required by ENOM.
debian:~# /usr/bin/openssl genrsa -des3 -out www.domain.com.key 2048

Enter pass phrase for www.domain.com.key:
You’ll be required to fill in a pass-phrase that will be later be required to fill in before Apache servers starts or restarts,so make sure you fill something you either remember or you keep the password stored in a file.
You have to change also the www.domain.com.key in accordance with your domain name.
Now as we already have a proper generated DES3 RSA key afterwards it’s necessery to generate the CSR file with the openssl command line frontend.
So here is how:
debian:~# /usr/bin/openssl req -new -key /home/hipo/www.domain.com.key -out /home/hipo/www.domain.com.csr
Again in the above example change all the paths and file names as you wish.
It’s necessery that the end user fill in a number of questions related to the Certificate Signing Request.
Herein I’ll list what kind of prompts will emerge after executing the above command:
Enter pass phrase for /home/hipo/www.domain.com.key:

You are about to be asked to enter information that will be incorporated

into your certificate request.

What you are about to enter is what is called a Distinguished Name or a DN.

There are quite a few fields but you can leave some blank

For some fields there will be a default value,

If you enter '.', the field will be left blank.

-----

Country Name (2 letter code) [AU]:

State or Province Name (full name) [Some-State]:

Locality Name (eg, city) []:

Organization Name (eg, company) [Internet Widgits Pty Ltd]:

Organizational Unit Name (eg, section) []:

Common Name (eg, YOUR name) []:

Email Address []:

Please enter the following 'extra' attributes

to be sent with your certificate request

A challenge password []:

An optional company name []:
Note that you’ll hav eto fill in the pass phrase previously entered during the generation of the www.domain.com.key file.
In case if you’d like to read more thoroughly on the subject of howto create a Certificate Signing Request or (CSR) as we called it on multiple times, you can read About Certificate Signing Request (CSR) Generation Instructions – Apache SSL more in depth here
2. Hopefully following the above instructions you’ll now have a file named www.domain.csrJust open the www.domain.scr and copy paste it’s content to the ENOM website CSR * webform.
3. Further on select your Webserver type on Enom’s website:In our case we have to select Apache + ApacheSSL
4. What follows next is filling in your company contact information This is also required for proper certificate generation, you have to think twice before you fill in this data, take a note this can’t be changed later on without issuing a brand SSL new certificate.
Apart from the 3 major above requirements to fill in Enom there are some few more radio buttons to use to make some selections according to your personal preferences, however I won’t take time to dig in that and I’ll leave this to you.
After all the above is fulfilled you’ll have to submit your certificate details and choose an email address to which you will receive in a minute a RapidSSL Certificate Request Confirmation
Following a link from the email, will show you some basic information about the certificate about to be generated. That’s your final chance to cancel the issued Trusted Certificated.
If you’re absolutely sure the information about to enter the certificate is correct then you’ll have to follow a link and approve the certificate.
You’ll be informed that you’ll receive your certificate either through Certifier website (e.g. Enom’s website) or via another email.
I thought it’s more probable I receive it via email but anyways I was wrong. More thank 4 hours has passed since the certificate was issued and is available via Enom’s interface but I haven’t received nothing on my mail.
Therefore my friendly advice is to check about your brand new shiny Trusted Certificate on Emom’s website. I had mine ready in about 10 minutes after the CSR was issued.
Assuming that you’ve succesfully obtained the SSL Trusted certificate from RapidSSL what follows is setting up the certificate.
Initially I tried using documentation from RapidSSL website called Installing your SSL Certificate / Web Server Certificate / Secure Server Certificate from RapidSSL.com
I tried to configure one of my Virtualhost as shown in their example inserting in my /etc/apache/sites-available/www.domain.com file, few directives within the VirtualHost something like the shown below
SSLEngine on

# domain.com.crt cointains the Trusted SSL certificate generated and obtained by you from RapidSSL

SSLCertificateFile /etc/apache2/ssl/www.domain.com.crt

# www.domain.com.key contains the file used to generate the CSR file as described earlier in this post

SSLCertificateKeyFile /etc/apache2/ssl/www.domain.com.key
It is also possible insetad of using the SSLCertificateFile and SSLCertificateKeyFile directvies directives in Apache config to use:
Another alternative is to use
SSLCertificateFile /etc/ssl/certs/your-domain-name.crt
SSLCertificateKeyFile /etc/ssl/certs/your-domain-name.key
SSLCACertificateFile /etc/ssl/certs/gd_bundle.crt
The key file is the one generated earlier on the server and handed to the SSL regisrar, the files:
your-domain-name.crt and gd_bundle.crt files are provided by RapidSSL or from whatever SSL registrater the SSL was purchased.
After trying the above configuration and restarting apache with:
/etc/init.d/apache2 restart
Apache failed to start, it might be helpful to somebody out there the error I had in my apache error.log:
The error.log red the following:
[warn] RSA server certificate is a CA certificate (BasicConstraints: CA == TRUE !?)
After some 30 minutes or an hour of Googling on the error I came to the conclusion that the error is caused, becauseApache is supposed to work with .PEM files instead of the classical .CRT and .KEY files asnormally approached in most of the other Unix operating systems.
It took me a bit more of reading on the internet to find out that actually the .pem files so widely adopted in Debian simply contain both the www.domain.com.key file and the www.domain.com.crt key simply pasted one after another, this I also observed from the default Apache self-signed certificate that I believe comes with debian /etc/apache2/ssl/apache.pem .
So I copied both the content of my www.domain.com.key and www.domain.com.crt and store it in one file:
/etc/apache2/ssl/www.domain.com.pem
Also the following configuration:
SSLEngine on

SSLCertificateFile /etc/apache2/ssl/www.domain.com.pem
had to go in your
/etc/apache2/sites-enabled/www.domain.com
Last thing that’s left is to restart your Apache;
/etc/init.d/apache2 restart
Apache will prompt you for your certificate password entered by you during the www.domain.com.key generation. Type your password and with a bit of luck and hopefully with God’s help you’ll be having a Trusted Certificate on your webserver.
Last step is to check if the certificate is okay accessing your domain https://www.domain.com.
Well this is the end of the article, hope you enjoy.If you do please leave your comments, any corrections are also welcomed 🙂
Tags: administrator, apache servers, apache version, apache2, certficate, certificate, Certificates, com, company, contact, csr, DES, des3, domain, domain name, email, emon, enom, file, generation, geotrust, hipo, Hopefully, hosting company, howto, information, key, key file, lenny, linux server, methodogy, multiple times, necessery, official, openssl, pain in the ass, password, phrase, rapidssl, RSA, setbacks, socket layer, ssl certificate, system administrator, usr bin, verisign, web interface, whole saler, www
Posted in Computer Security, System Administration, Web and CMS | 30 Comments »
Thursday, July 12th, 2012 I've recently noticed one of the qmail SMTP servers I adminster had plenty of logged spammer emails originating from yahoo.com.tw destined to reache some random looking like emails (probably unexisting) again to *@yahoo.com.tw
The spam that is tried by the spammer is probably a bounce spam, since it seems there is no web-form or anything wrong with the qmail server that might be causing the spam troubles.
As a result some of the emails from the well configured qmail (holding SPF checks), having a correct existing MX, PTR record and even having configured Domain Keys (DKIM) started being marked, whether emails are sent to *@yahoo.com legit emails.
To deal with the shits, since we don't have any Taiwanese (tw) clients, I dediced to completely prohibit any emails destined to be sent via the mail server to *@yahoo.com.tw. This is done via /var/qmail/control/badmailto qmail control variable;
Here is content of /var/qmail/control/badmailto after banning outgoing emails to yahoo.com.tw;;;
qmail:~# cat /var/qmail/control/badmailto

[!%#:\*\^]

[\(\)]

[\{\}]

@.*@

*@yahoo.com.tw
The first 4 lines are default rules, which are solving a lot of badmailto common sent emails. Thanks God after a qmail restart:
qmail:~# qmailct restart

....
Checking in /var/log/qmail-sent/current, there are no more outgoing *@yahoo.com.tw destined emails. Problem solved …
Tags: Auto, bounce, cat, checks, com, common, configured, control, control variable, default rules, dkim, domain, Draft, god, legit, mail, mail server, mx, outgoing emails, plenty, ptr, Qmail, qmailct, reache, Result, shits, smtp servers, spam, spammer, SPF, twThe, var, well, Yahoo, yahoo com tw
Posted in Qmail, System Administration | 1 Comment »
Thursday, April 5th, 2012 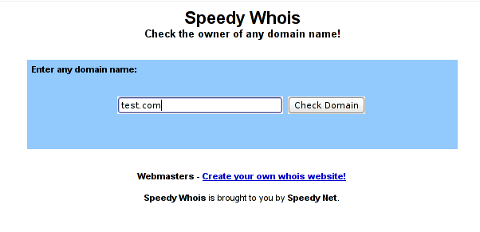
I've been planning to run my own domain WHOIS service, for quite sime time and I always postpone or forgot to do it.
If you wonder, why would I need a (personal) web whois service, well it is way easier to use and remember for future use reference if you run it on your own URL, than wasting time in search for a whois service in google and then using some other's service to get just a simple DOMAIN WHOIS info.
So back to my post topic, I postpopned and postponed to run my own web whois, just until yesterday, whether I have remembered about my idea to have my own whois up and running and proceeded wtih it.
To achieve my goal I checked if there is free software or (open source) software that easily does this.
I know I can write one for me from scratch, but since it would have cost me some at least a week of programming and testing and I didn't wanted to go this way.
To check if someone had already made an easy to install web whois service, I looked through in the "ultimate source for free software" sourceforge.net
Looking for the "whois web service" keywords, displayed few projects on top. But unfortunately many of the projects sources was not available anymore from http://sf.net and the project developers pages..
Thanksfully in a while, I found a project called SpeedyWhois, which PHP source was available for download.
With all prior said about project missing sources, Just in case if SpeedyWhois source disappears in the future (like it probably) happened with, some of the other WHOIS web service projects, I've made SpeedyWhois mirror for download here
Contrary to my idea that installing the web whois service might be a "pain in the ass", (like is the case with so many free software php scripts and apps) – the installation went quite smoothly.
To install it I took the following 4 steps:
1. Download the source (zip archive) with wget
# cd /var/www/whois-service;
/var/www/whois-service# wget -q https://www.pc-freak.net/files/speedywhois-0.1.4.zip
2. Unarchive it with unzip command
/var/www/whois-service# unzip speedywhois-0.1.4.zip
…
3. Set the proper DNS records My NS are using Godaddy, so I set my desired subdomain record from their domain name manager.
4. Edit Apache httpd.conf to create VirtualHost
This step is not mandatory, but I thought it is nice if I put the whois service under a subdomain, so add a VirtualHost to my httpd.conf
The Virtualhost Apache directives, I used are:
<VirtualHost *:80>
ServerAdmin hipo_aT_www.pc-freak.net
DocumentRoot /var/www/whois-service
ServerName whois.www.pc-freak.net
<Directory /var/www/whois-service
AllowOverride All
Order Allow,Deny
Allow from All
</Directory>
</VirtualHost>
Onwards to take effect of new Webserver configs, I did Apache restart
# /usr/local/etc/rc.d/apache2 restart
Whenever I have some free time, maybe I will work on the code, to try to add support for logging of previous whois requests and posting links pointing to the previous whois done via the web WHOIS service on the main whois page.
One thing that I disliked about how SpeedyWHOIS is written is, if there is no WHOIS information returned for a domain request (e.g.) a:
# whois domainname.com
returns an empty information, the script doesn't warn with a message there is no WHOIS data available for this domain or something.
This is not so important as this kind of behaviour of 'error' handling can easily be changed with minimum changes in the php code.
If you wonder, why do I need the web whois service, the answer is it is way easier to use.
I don't have more time to research a bit further on the alternative open source web whois services, so I would be glad to hear from anyone who tested other web whois service that is free comes under a FOSS license.
In the mean time, I'm sure people with a small internet websites like mine who are looking to run their OWN (personal) whois service SpeedyWHOIS does a great job.
Tags: Auto, code, contrary, domain, domain web, domain whois, download, Draft, free software, goal, google, idea, info, information, installation, minute, mirror, nbsp, open source software, pain in the ass, personal domain, personal web, programming, project, project developers, quot, scratch, scripts, Search, service projects, sime, software, software php, someone, SpeedyWHOIS, Thanksfully, time, top, topic, Virtualhost, wasting, wasting time, way, web service, web whois, wget, while, whois, whois web, yesterday
Posted in Everyday Life, System Administration, Web and CMS | 5 Comments »
Thursday, November 22nd, 2007 A friend of Mine Marto a.k.a. (Amridikon) has regged a domain for pc-freak. So www.pc-freak.net is now upcheck his Development Studio dhstudio http://dhstudio.euPc-Freak’s site can be accessed from
https://www.pc-freak.net//crew/ :)END—–
Tags: Amridikon, Crew, development, dhstudio, domain, end, freak, friend, hostead, Marto, mine, nbsp, net, site, Studio, upcheck, website
Posted in Everyday Life | No Comments »
Friday, January 26th, 2007 Well Praise the LORD. I was able to cheat today on the International Law exam. I know this is not very christian but you know. I was ill and in the end why should I know by heart things that I don’t know in my daily life. The exam continued for 2 hours. After that I went home, because I had to upload the file data and sql data of one new domain we started hosting today http://eurohold.bg. Everything in uploading file data and sql data went smoothly. After that I did a change in the DNS for the planex.bg domain to use their own mail server. And right now I’m trying to emulate some sort of DEC machine with homerx, but I can’t find out the password for it. Will google around to check about it. Today I feel much better than yesterday, well thanks God you rule! Blessings in the name of Jesus Christ 😛
Tags: better than yesterday, bg domain, blessings, change, Cheated, christian, data, DEC, domain, everything, exam, file, google, heart, home, homerx, jesus christ, life, mail server, name, name of jesus, nbsp, own mail, password, planex, Praise, sort, sql data, today, upload
Posted in Everyday Life | No Comments »
Thursday, January 5th, 2012 While configuring JWchat domain, I've come across around an error:
pcfg_openfile: unable to check htaccess file, ensure it is readable
The exact error I got in /var/log/apache2/error.log looked like so:
[crit] [client xxx.xxx.xxx.xxx] (13)Permission denied: /var/lib/ejabberd/.htaccess pcfg_openfile: unable to check htaccess file, ensure it is readable, referer: http://jabber.mydomain.com/
The error message suggested /var/lib/ejabberd/.htaccess – is missing or not readable, however after checking i've seen .htaccess existed as well as was readable:
debian:~# ls -al /var/lib/ejabberd/.htaccess

-rw-r--r-- 1 www-data www-data 114 2012-01-05 07:44 /var/lib/ejabberd/.htaccess
At first glimpse it seems like the message is misleading and not true, however when I switched to www-data user (the user with which Apache runs on Debian), I've figured out the error meaning of unreadability is exactly correct:
www-data@debian:$ ls -al /var/lib/ejabberd/.htaccess

ls: cannot access /var/lib/ejabberd/.htaccess: Permission denied
This permission denied was quite strange, especially when considering the .htaccess is readable for all users:
debian:~# ls -al /var/lib/ejabberd/.htaccess

-rw-r--r-- 1 www-data www-data 114 2012-01-05 07:44 /var/lib/ejabberd/.htaccess
After a thorough look on what might go wrong, thanksfully I've figured it out. The all issues were caused by wrong permissions of /var/lib/ejabberd/.htaccess .You can see below the executable flag for all users (including apache's www-data) is missing :
debian:/var/lib# ls -ld /var/lib/ejabberd/drw-r--r-- 3 ejabberd ejabberd 4096 2012-01-05 07:45 /var/lib/ejabberd/
Solving the error, hence is as easy as adding +x flag to /var/lib/ejabberd :
debian:/var/lib# chmod +x /var/lib/ejabberd
Another way to fix the error is to chmod to 755 to the directory which holds .htaccess:
From now onwards pcfg_openfile: unable to check htaccess file, ensure it is readable err is no more 😉
Tags: apache, Auto, Cannot, cause and solution, client, domain, Draft, drw, ejabberd, ERROR, error message, exact error, first glimpse, glimpse, htaccessAfter, jwchat, ld, lib, log, look, message, pcfg, Permission, readableThe, solution, unreadability, var, way, www data, xxx
Posted in Linux, System Administration, Various, Web and CMS | No Comments »


How rescue unbootable Windows PC, Windows files through files Network copy to remote server shared Folder using Hirens Boot CD
Saturday, November 12th, 2011I'm rescuing some files from one unbootable Windows XP using a livecd with Hirens Boot CD 13
In order to rescue the three NTFS Windows partitions files, I mounted them after booting a Mini Linux from Hirens Boot CD.
Mounting NTFS using Hirens BootCD went quite smoothly to mount the 3 partitions I used cmds:
# mount /dev/sda1 /mnt/sda1# mount /dev/sda2 /mnt/sda2
# mount /dev/sdb1 /mnt/sdb1
After the three NTFS file partitions are mounted I used smbclient to list all the available Network Shares on the remote Network Samba Shares Server which by the way possessed the NETBIOS name of SERVER 😉
# smbclient -L //SERVER/Enter root's password:
Domain=[SERVER] OS=[Windows 7 Ultimate 7600] Server=[Windows 7 Ultimate 6.1]
Sharename Type Comment
——— —- ——-
!!!MUSIC Disk
ADMIN$ Disk Remote Admin
C$ Disk Default share
Canon Inkjet S9000 (Copy 2) Printer Canon Inkjet S9000 (Copy 2)
D$ Disk Default share
Domain=[SERVER] OS=[Windows 7 Ultimate 7600] Server=[Windows 7 Ultimate 6.1]
Server Comment
——— ——-
Workgroup Master
——— ——-
Further on to mount the //SERVER/D network samba drive – (the location where I wanted to transfer the files from the above 3 mounted partitions):
# mkdir /mnt/D# mount //192.168.0.100/D /mnt/D
#
Where the IP 192.168.0.100 is actually the local network IP address of the //SERVER win smb machine.
Afterwards I used mc to copy all the files I needed to rescue from all the 3 above mentioned win partitions to the mounted //SERVER/D
Tags: admin, admin c, boot cd, bootcd, Canon, canon inkjet, cd 13, Comment, copy, default, default share, Disk, domain, domain server, drive, hirens boot cd, ip, livecd, local network, location, machine, Master, Mini, mini linux, mnt, mount dev, music disk, nbsp, netbios, netbios name, network ip address, network shares, NTFS, os windows, partitions, password, printer canon, Printer Canon Inkjet S9000 Copy, Remote, remote admin, remote server, rescue, root, samba shares, sda, sdb, Server Comment, server os, server windows, Sharename, unbootable, Windows, windows files, windows pc
Posted in Everyday Life, Linux, System Administration, Windows | 1 Comment »