Posts Tagged ‘Enabling’

How to install BASH and use shell scripting on Windows ?

Thursday, June 26th, 2025

install-bash-on-windows-run-and-use-shellscripting-on-windows-howto

Bash (Bourne Again SHell) is definitely a technology that will stay for years to come its simplicity and multi-platoformness is a factor that will definitely continue for many years thus even though it is mostly used on Linux / BSD / Unix, its application on Windows OS-es nowadays is perhaps increasing. Hence since so many people use Winodws nowdays (for work) it is really useful to have Bash set-up on Windows host machine.
In this article, I'll shortly explain how this is done, the article will not have anything too much interesting for the advanced admin or dev ops guy, but I hope people who are entering the business of system administration and high level computing and still orienting might benefit from it.

To install and use Bash shell terminal in Windows there are at least 3 ways:

  • Use Git Bash (Download and install it directly precompiled on WIndows)
  • Use Windows WSL emulation (install some Linux distro)
  • Use Virtualbox / Vagrant / VMware / Hyper-V emulation and install VM from public ISO image.

As a Free Software Lover, I would recommend and  always prefer to use the Free Software alternative if that is possible and thanksfully usually I use and install Git Bash or completely install Cygwin (Full set of Linux tools to run like native on Windows together with  Mobaxterm) together.


1. Installing Git Bash on Windows (uses MinGW Minimalist GNU for Windows)

Some might prefer to not use Microsoft for managing their bash especially the more freedom in mind people who like GNU and Free software and people.

MinGW is well known among free and open source enthusiasts.
It includes a port of the GNU Compiler Collection (GCC), GNU Binutils for Windows (assembler, linker, archive manager), a set of freely distributable Windows specific header files and static import libraries which enable the use of the Windows API, a Windows native build of the GNU Project's GNU Debugger, and miscellaneous utilities.

MinGW does not rely on third-party C runtime dynamic-link library (DLL) files, and because the runtime libraries are not distributed using the GNU General Public License (GPL), it is not necessary to distribute the source code with the programs produced, unless a GPL library is used elsewhere in the program.


MinGW can be run either on the native Microsoft Windows platform, cross-hosted on Linux (or other Unix), or "cross-native" on Cygwin.


To install Bash via Git, you can use Git for Windows, which includes Git Bash — a lightweight Bash emulator.


Steps to Install Git Bash on Windows
 

a. Download Git for Windows

Go to the official Git website:

https://git-scm.com/download/win

The download should start automatically.

b. Run the Installer

  • Open the downloaded .exe file
  • Follow the installation prompts

Recommended Settings:

  • Select components: Keep default
  • Editor: Choose your preferred text editor (e.g., Notepad++ or Vim)
  • Adjust PATH environment: Choose “Git from the command line and also from 3rd-party software”
  • Choose SSH executable: Use Built-in OpenSSH
  • Choose HTTPS transport backend: Use the default (OpenSSL)
  • Configure line endings: Select “Checkout Windows-style, commit Unix-style line endings”
  • Terminal emulator: Choose “Use MinTTY (the default terminal)”

Click Next through the remaining steps and then Install.

c. Launch Git Bash

After installation:

  • Press Windows key, type "Git Bash"
  • Click to launch the terminal

Now you're using a Bash shell on Windows.

Perhaps most common way is to use Windows Subsystem for Linux (WSL), people follow. WSL is a technology which is native Windows but gives MS Windows the opportunity to act in a way similar to docker containers. WSL lets you run a full Linux environment (including Bash) directly on Windows without using a virtual machine and is really fast and easy on Machine system resources. 


 2. Installing WSL bash easy from Windows 10 / 11 using  Win GUI menus


Steps to install WSL on Windows 10 / 11

Microsoft has since only continued to improve its Windows Subsystem for Linux, and an update in a Windows 10 preview build back in mid-2020 made it easier to install Bash.

That method also works the same as on Win 10 as well as on Win 11.
To install Bash shell emulation, hence open Windows Terminal as an admin user. You can do this by right-clicking the Windows icon and selecting “Windows Terminal (Admin)” from the power user menu.

(If you’re on Windows 10, you should see it listed as “Windows Powershell (Admin)” in the menu.)


windows-run-powershell-from-start-menu-screenshot


To complete WSL install with Virtualized Ubuntu OS

In Windows Terminal, run this command:

PS C:\Users\MyUser> wsl –install

Once everything is downloaded needed to run WSL emulation and Ubuntu Linux distribution,  Restart the PC.

Once your PC rebooted, installation will continue automatically.

After Ubuntu installed successfully, you’ll next be prompted to create a username and password and Ubuntu will fire up, and you will have your bash in Windows


Install-WSL-linux-subsystem-for-windows-from-powershell-prompt-screenshot


a. Enabling and Intalling BASH via command line (if WSL Linux subsystem for Windows is not enabled on Windows


It might be your Windows has no configured Windows Subsystem for Linux, hence if that is the case you will need to enable it following below few steps.

b. Enable WSL via dism.exe cmd

Open PowerShell as Administrator and run:

Powershell

PS C:\Users\MyUser> wsl –install

This installs WSL 2 and a default Linux distribution (like Ubuntu).

If you're on Windows 10 or on a PC where whoever installed the OS has not installed the Win Subsystem for Linux, you may need to manually enable WSL:

Launch Powershell

PS C:\Users\MyUser> dism.exe /online /enable-feature /featurename:Microsoft-Windows-Subsystem-Linux /all /norestart

PS C:\Users\MyUser> dism.exe /online /enable-feature /featurename:VirtualMachinePlatform /all /norestart

Then restart your computer and run:

from the Windows Magnifier run Powershell and type in PS1 prompt:

PS C:\Users\MyUser> wsl –set-default-version 2

c. Installing other Linux Distribution (different from Ubuntu)

If not already installed during wsl –install, open the Microsoft Store and search for:

  • Ubuntu
  • Debian
  • Kali Linux
  • etc.

Click Install on the one you want.

d. Launching WSL / Bash terminal

Once installed:

  • Open Start Menu
  • Search for your Linux distro you just installed (e.g., “Ubuntu”)
  • Launch it

This opens a Bash shell where you can run Linux commands, like in regular Linux but on your Microsoft Windows OS.
 

Sum it up

What we learned is how to install bash via Bash Git and start using it to have more hybrid environment Windows / Linux. The article explained the two main methods using GIt Bash and using embedded Windows emulator WSL with an emulated Linux distro.

Enjoy ! 🙂


Set all logs to log to to physical console /dev/tty12 (tty12) on Linux

Wednesday, August 12th, 2020

tty linux-logo how to log everything to last console terminal tty12

Those who administer servers from the days of birth of Linux and who used actively GNU / Linux over the years or any other UNIX knows how practical could be to configure logging of all running services / kernel messages / errors and warnings on a physical console.

Traditionally from the days I was learning Linux basics I was shown how to do this on an old Debian Sarge 3.0 Linux without systemd and on all Linux distributions Redhat 9.0 / Calderas and Mandrakes I've used either as a home systems or for servers. I've always configured output of all messages to go to the last easy to access console /dev/tty12 (for those who never use it console switching under Linux plain text console mode is done with key combination of CTRL + ALT + F1 .. F12.

In recent times however with the introduction of systemd pretty much things changed as messages to console are not handled by /etc/inittab which was used to add and refresh physical consoles tty1, tty2 … tty7 (the default added one on Linux were usually 7), but I had to manually include more respawn lines for each console in /etc/inittab.
Nowadays as of year 2020 Linux distros /etc/inittab is no longer there being obsoleted and console print out of INPUT / OUTPUT messages are handled by systemd.
 

1. Enable Physical TTYs from TTY8 till TTY12 etc.


The number of default consoles existing in most Linux distributions I've seen is still from tty1 to tty7. Hence to add more tty consoles and be ready to be able to switch out  not only towards tty7 but towards tty12 once you're connected to the server via a remote ILO (Integrated Lights Out) / IdRAC (Dell Remote Access Controller) / IPMI / IMM (Imtegrated Management Module), you have to do it by telling systemd issuing below systemctl commands:


 # systemctl enable getty@tty8.service Created symlink /etc/systemd/system/getty.target.wants/getty@tty8.service -> /lib/systemd/system/getty@.service.

systemctl enable getty@tty9.service

Created symlink /etc/systemd/system/getty.target.wants/getty@tty9.service -> /lib/systemd/system/getty@.service.

systemctl enable getty@tty10.service

Created symlink /etc/systemd/system/getty.target.wants/getty@tty10.service -> /lib/systemd/system/getty@.service.

systemctl enable getty@tty11.service

Created symlink /etc/systemd/system/getty.target.wants/getty@tty11.service -> /lib/systemd/system/getty@.service.

systemctl enable getty@tty12.service

Created symlink /etc/systemd/system/getty.target.wants/getty@tty12.service -> /lib/systemd/system/getty@.service.


Once the TTYS tty7 to tty12 are enabled you will be able to switch to this consoles either if you have a physical LCD / CRT monitor or KVM switch connected to the machine mounted on the Rack shelf once you're in the Data Center or will be able to see it once connected remotely via the Management IP Interface (ILO) remote console.
 

2. Taking screenshot of the physical console TTY with fbcat


For example below is a screenshot of the 10th enabled tty10:

tty10-linux-screenshot-fbcat-how-to-screenshot-console

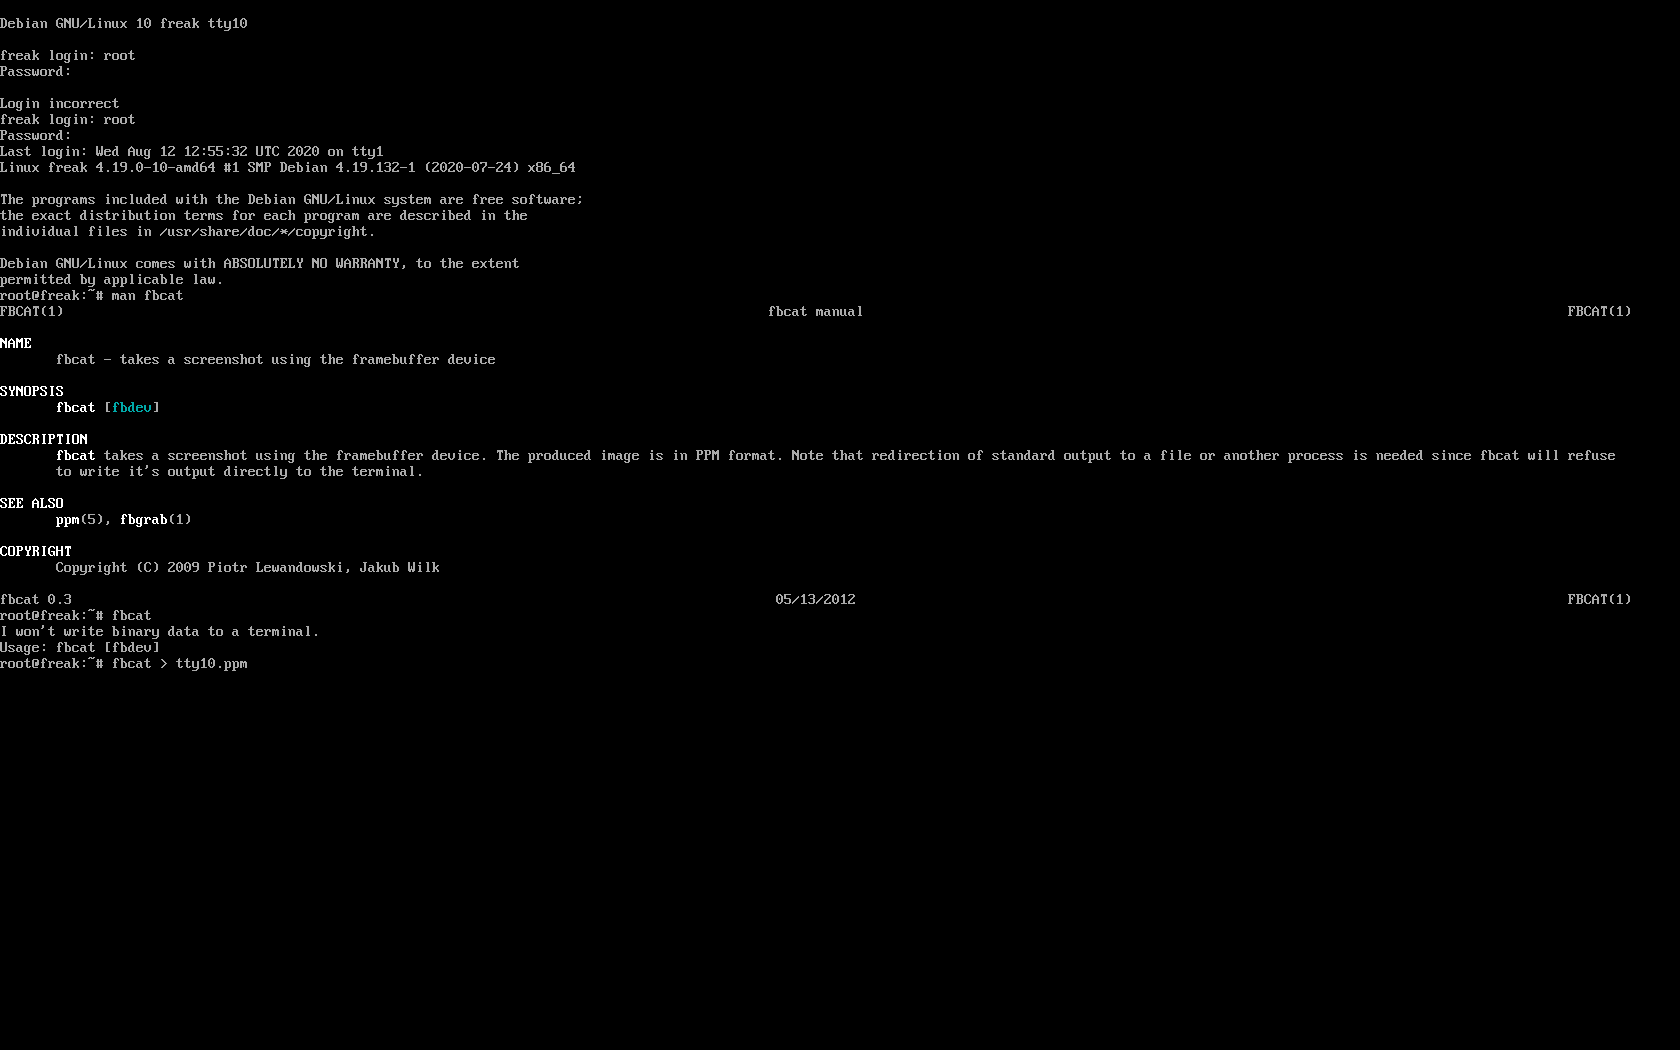
As you can in the screenshot I've used the nice tool fbcat that can be used to make a screenshot of remote console. This is very useful especially if remote access via a SSH client such as PuTTY / MobaXterm is not there but you have only a physical attached monitor access on a DCs that are under a heavy firewall that is preventing anyone to get to the system remotely. For example screenshotting the physical console in case if there is a major hardware failure occurs and you need to dump a hardware error message to a flash drive that will be used to later be handled to technicians to analyize it and exchange the broken server hardware part.

Screenshots of the CLI with fbcat is possible across most Linux distributions where as usual.

In Debian you have to first instal the tool via :
 

# apt install –yes fbcat


and on RedHats / CentOS / Fedoras

# yum install -y fbcat


Taking screenshot once tool is on the server of whatever you have printed on console is as easy as

# fbcat > tty_name.ppm


Note that you might want to convert the .ppm created picture to png with any converter such as imagemagick's convert command or if you have a GUI perhaps with GNU Image Manipulation Tool (GIMP).

3. Enabling every rsyslog handled message to log to Physical TTY12


To make everything such as errors, notices, debug, warning messages  become instantly logging towards above added new /dev/tty12.

Open /etc/rsyslog.conf and to the end of the file append below line :
 

daemon,mail.*;\
   news.=crit;news.=err;news.=notice;\
   *.=debug;*.=info;\
   *.=notice;*.=warn   /dev/tty12


To make rsyslog load its new config restart it:


# systemctl status rsyslog


rsyslog.service – System Logging Service
   Loaded: loaded (/lib/systemd/system/rsyslog.service; enabled; vendor preset: enabled)
   Active: active (running) since Mon 2020-08-10 04:09:36 EEST; 2 days ago
     Docs: man:rsyslogd(8)
           https://www.rsyslog.com/doc/
 Main PID: 671 (rsyslogd)
    Tasks: 4 (limit: 4915)
   Memory: 12.5M
   CGroup: /system.slice/rsyslog.service
           └─671 /usr/sbin/rsyslogd -n -iNONE


авг 12 00:00:05 pcfreak rsyslogd[671]:  [origin software="rsyslogd" swVersion="8.1901.0" x-pid="671" x-info="https://www.rsyslo
Warning: Journal has been rotated since unit was started. Log output is incomplete or unavailable.


systemctl restart rsyslog


That's all folks navigate by pressing simultaneously CTRL + ALT + F12 to get to TTY12 or use ALT + LEFT / ALT + RIGHT ARROW (console switch commands) till you get to the console where everything should be now logged.

Enjoy and if you like this article share to tell your sysadmin friends about this nice hack  ! 🙂


How to “Enabling your blog posts posted to nanoblogger to be also imported to your wordpress”

Saturday, October 17th, 2009

I wanted to simulatenously have all my nanoblogger posts imported as well to my wordpress on www.pc-freak.net/blog .
To achieve that I’ve came with a small shell script.
Here is the script itself import_to_wordpress.sh .
The script depends on the nb_2_wordpress.py script.
To make my import_to_wordpress.sh script execute every I have a new entry in nanoblogger I’ve edited my nb
bash script which is part of nanoblogger and I’ve inserted the line:
/usr/local/sbin/import_to_wordpress.sh, right before the last “exit 0” command statement.
So now everytime I use nb -a entry to blog a new entry the content of my entry goes to my wordpress as well,
quite cool 😀

Enabling .cgi scripts to execute whenever invoked in Apache

Friday, January 15th, 2010

I wanted to enable .cgi execution on my apache server.
I wanted to set a custom .cgi script to execute as a DirectoryIndex
In order to achieve that I had to add the following to my VirtualHost directive
AddHandler cgi-script .cgi .pl