Posts Tagged ‘exe’

How to disable Windows pagefile.sys and hiberfil.sys to temporary or permamently save disk space if space is critically low

Monday, March 28th, 2022

howto-pagefile-hiberfil.sys-remove-reduce-increase-increase-size-windows-logo

Sometimes you have to work with Windows 7 / 8 / 10 PCs  etc. that has a very small partition C:\
drive or othertimes due to whatever the disk got filled up with time and has only few megabytes left
and this totally broke up the windows performance as Windows OS becomes terribly sluggish and even
simple things as opening Internet Browser (Chrome / Firefox / Opera ) or Windows Explorer stones the PC performance.

You might of course try to use something like Spacesniffer tool (a great tool to find lost data space on PC s short description on it is found in my previous article how to
delete temporary Internet Files and Folders to to speed up and free disk space
 ) or use CCleaner to clean up a bit the pc.
Sometimes this is not enough though or it is not possible to do at all the main
partition disk C:\ is anyhow too much low (only 30-50MB are available on HDD) or the Physical or Virtual Machine containing the OS is filled with important data
and you couldn't risk to remove anything including Internet Temporary files, browsing cookies … whatever.

Lets say you are the fate chosen guy as sysadmin to face this uneasy situation and have no easy
way to add disk space from another present free space partition or could not add a new SATA hard drive
SSD drive, what should you do?
 

The solution wipe off pagefile.sys and hiberfil.sys

Usually every Windows installation has a pagefile.sys and hiberfil.sys.

  • pagefile.sys – is the default file that is used as a swap file, immediately once the machine runs out of memory. For Unix / Linux users better understanding pagefile.sys is the equivallent of Linux's swap partition. Of course as the pagefile is in a file and not in separate partition the swapping in Windows is perhaps generally worse than in Linux.
  • hiberfil.sys – is used to store data from the machine on machine Hibernation (for those who use the feature)


Pagefile.sys which depending on the configured RAM memory on the OS could takes up up to 5 – 8 GB, there hanging around doing nothing but just occupying space. Thus a temporary workaround that could free you some space even though it will degrade performance and on servers and production machines this is not a good solution on just user machines, where you temporary need to free space any other important task you can free up space
by seriously reducing the preconfigured default size of pagefile.sys (which usually is 1.5 times the active memory on the OS – hence if you have 4GB you would have a 6Gigabytes of pagefile.sys).

Other possibility especially on laptop and movable devices running Win OS is to disable hiberfil.sys, read below how this is done.


The temporary solution here is to simply free space by either reducing the pagefile.sys or completely disabling it


1. Disable pagefile.sys on Windows XP, Windows 7 / 8 / 10 / 11


The GUI interface to disable pagefile across all NT based Windows OS-es is quite similar, the only difference is newer versions of Windows has slightly more options.


1.1 Disable pagefile on Windows XP


Quickest way is to find pagefile.sys settings from GUI menus

1. Computer (My Computer) – right click mouse
2. Properties (System Preperties will appear)
3. Advanced (tab) 
4. Settings
5. Advanced (tab)
6. Change button
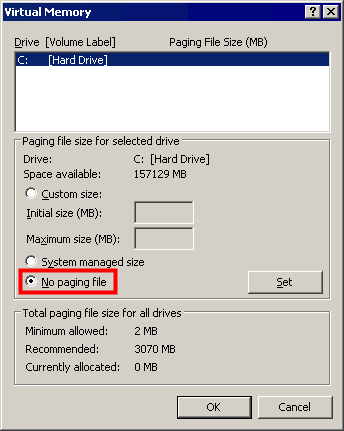
windows-xp-pagefile-disable-screenshot

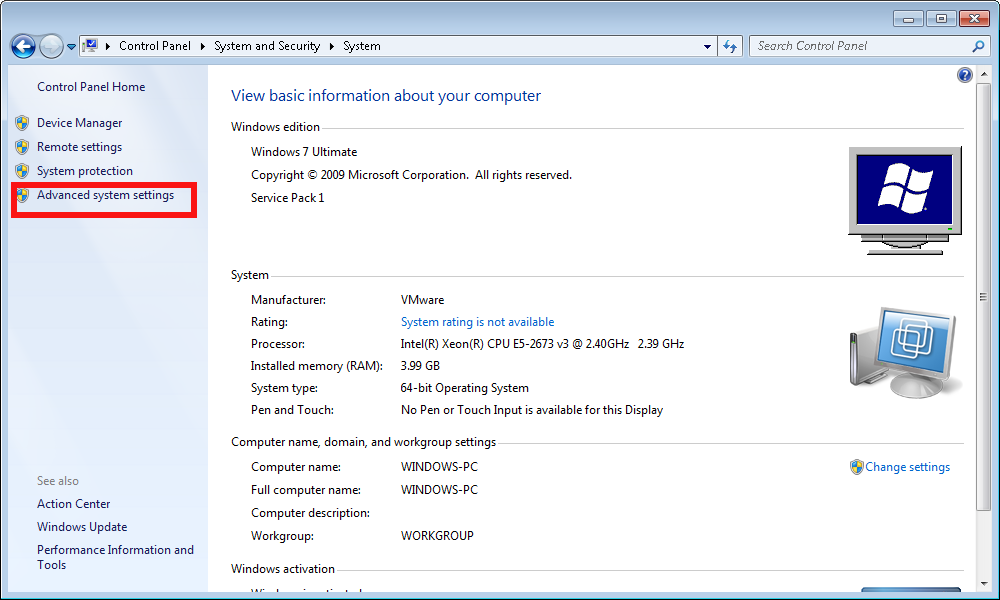
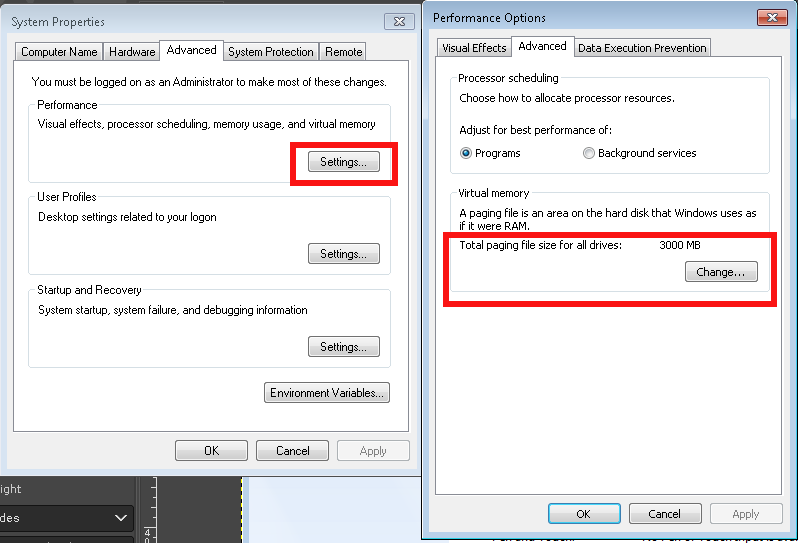
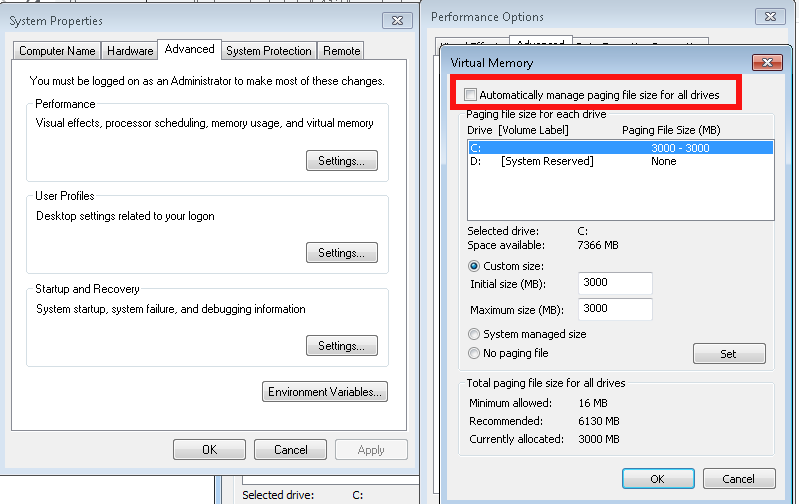
1.2 Disable pagefile on Windows 7


advanced-system-settings-control-panel-system-and-security-screenshot

windows-system-properties-screenshot-properties-advanced-change-Virtual-memory-pagefile-screenshot

system-properties-performance-options
 

Once applied you'll be required to reboot the PC
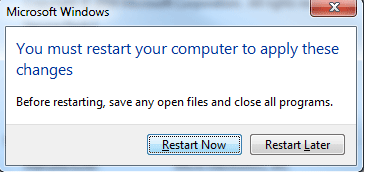
How-to-turn-off-Virtual-Memory-Paging_File-in-Windows-7-restart


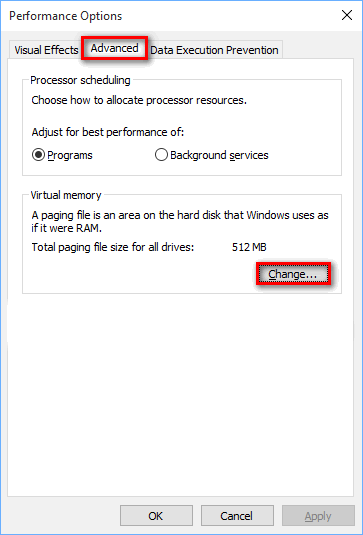
1.3 Disable Increase / Decrease pagefile.sys on Windows 10 / Win 11
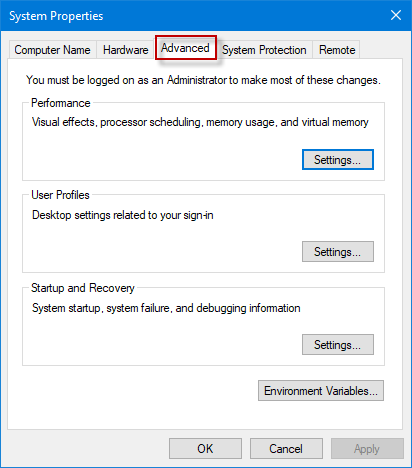
 

open-system-properties-advanced-win10

win10-performance-options-menu-screenshot

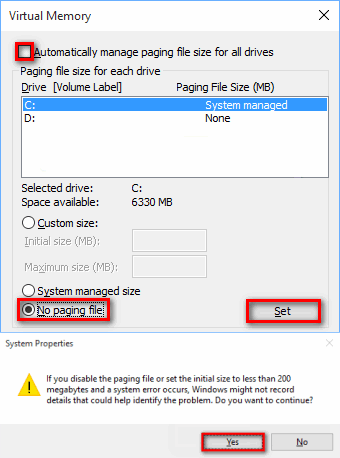
configure-virtual-memory-win-10-screenshot


1.4 Make Windows clear pagefile.sys on shutdown

On home PCs it might be useful thing to clear up ( nullify) pagefile.sys on shutdown, that could save you some disk space on every reboot, until file continuously grows to its configured Maximum.

Run

regedit

Modify registry key at location


HKEY_LOCAL_MACHINE\SYSTEM\CurrentControlSet\Control\Session Manager\Memory Management
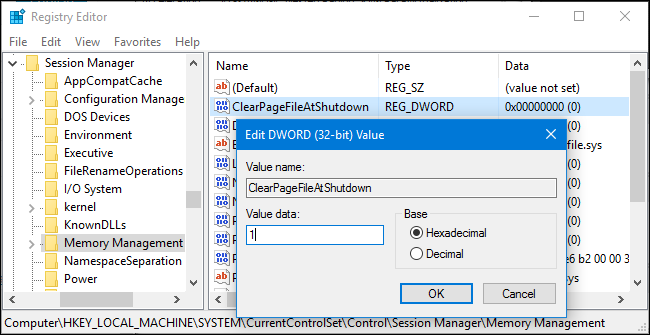
windows-clean-up-pagefile-sys-file-on-shutdown-or-reboot-registry-editor-value-screenshot

You can apply the value also via a registry file you can get the Enable Clearpagefile at shutdown here .reg.
 

2. Manipulating pagefile.sys size and file delete from command line with wmic tool 

For scripting purposes you might want to use the wmic pagefile which can do increase / decrase or delete the file without GUI, that is very helpful if you have to admin a Windows Domain (Active Directory)
 

[hipo.WINDOWS-PC] ➤ wmic pagefile /?

PAGEFILE – Virtual memory file swapping management.

HINT: BNF for Alias usage.
(<alias> [WMIObject] | [] | [] ) [].

USAGE:

PAGEFILE ASSOC []
PAGEFILE CREATE <assign list>
PAGEFILE DELETE
PAGEFILE GET [] []
PAGEFILE LIST [] []


[hipo.WINDOWS-PC] ➤ wmic pagefile
AllocatedBaseSize  Caption          CurrentUsage  Description      InstallDate                Name             PeakUsage  Status  TempPageFile
4709               C:\pagefile.sys  499           C:\pagefile.sys  20200912061902.938000+180  C:\pagefile.sys  525                FALSE


[hipo.WINDOWS-PC] ➤ wmic pagefile list /format:list

AllocatedBaseSize=4709
CurrentUsage=499
Description=C:\pagefile.sys
InstallDate=20200912061902.938000+180
Name=C:\pagefile.sys
PeakUsage=525
Status=
TempPageFile=FALSE
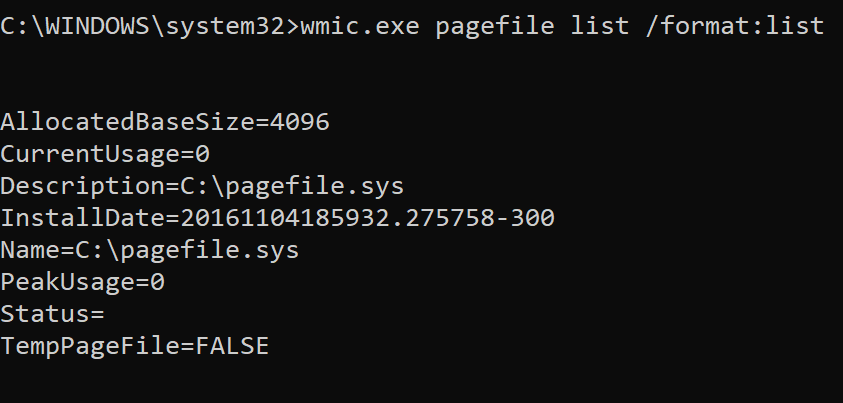
wmic-pagefile-command-line-tool-for-windows-default-output-screenshot


  • To change the Initial Size or Maximum Size of Pagefile use:
     

➤ wmic pagefileset where name="C:\\pagefile.sys" set InitialSize=2048,MaximumSize=2048

  • To move the pagefile / change location of pagefile to less occupied disk drive partition (i.e. D:\ drive)


    Sometimes you might have multiple drives on the PC and some of them might be having multitudes of gigabytes while main drive C:\ could be fully occupied due to initial install bad drive organization, in that case a good work arount to save you space so you can work normally with the server is just to temporary or permanently move pagefile to another drive.

wmic pagefileset where name="D:\\pagefile.sys" set InitialSize=2048,MaximumSize=2048


!! CONSIDER !!! 

That if you have the option to move the pagefile.sys for best performance it is advicable to place the file inside another physical disk, preferrably a Solid State Drive one, SATA disks are too slow and reduced Input / Output disk operations will lead to degraded performance, if there is lack of memory (i.e. pagefile.sys is actively open read and wrote in).
 

  • To delete pagefile.sys 
     

➤ wmic pagefileset where name="C:\\pagefile.sys" delete


If for some reason you prefer to not use wmic but simple del command you can delete pagefile.sys also by:

Removing file default "Hidden" and "system" file attributes – set for security reasons as the file is a system file usually not touched by user. This will save you from "permission denied" errors:
 

➤ attrib -s -h %systemdrive%\pagefile.sys


Delete the file:
 

➤ del /a /q %systemdrive%\pagefile.sys


3. Disable hibernation on Windows 7 / 8 and Win 10 / 11

Disabling hibernation file hiberfil.sys can also free up some space, especially if the hibernation has been actively used before and the file is written with data. Of course, that is more common on notebooks.
Windows hibernation has significantly improved over time though i didn't have very pleasant experience in the past and I prefer to disable it just in case.
 

3.1 Disable Windows 7 / 8 / 10 / 11 hibernation from GUI 

Disable it through:

Control Panel -> All Control Panel Items -> Power Options -> Edit Plan Settings -> Change advanced power settings


 like shown in below screenshot:
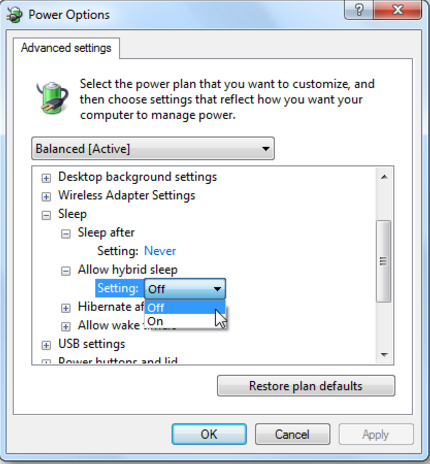
Windqows-power-options-Advanced-settings-Allow-Hybrid-sleep-option-menu-screenshot


3.2 Disable Windows 7 / 8 / 10 / 11 hibernation from command line

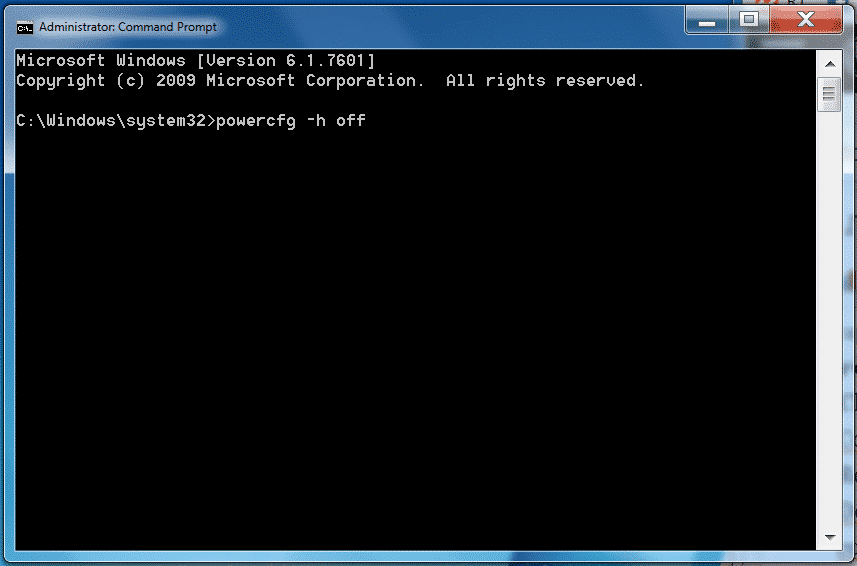
Disable hibernation Is done in the same way through the powercfg.exe command, to disable it
if you're cut of disk space and you want to save space from it:

run as Administrator in Command Line Windows (cmd.exe)
 

powercfg.exe /hibernate off

If you later need to switch on hibernation
 

powercfg.exe /hibernate on


disable-hiberfile-windows-screenshot

3.3 Disable Windows hibernation on legacy Windows XP

On XP to disable hibernation open

1. Power Options Properties
2. Select Hibernate
3. Select Enable Hibernation to clear the checkbox and disable Hibernation mode. 
4. Select OK to apply the change.

Close the Power Options Properties box. 
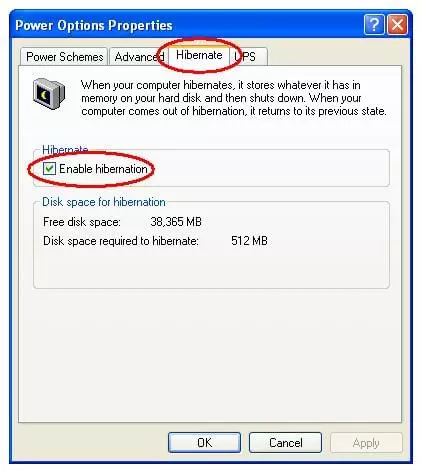
enable-disable-hibernate-windows-xp-menu-screenshot

To sum it up

We have learned some basics on Windows swapping and hibernation and i've tried to give some insight on how thiese files if misconfigured could lead to degraded Win OS performance. In any case using SSD as of 2022 to store both files is a best practice for machines that has plenty of memory always try to completely disable / remove the files. It was shown how  to manage pagefile.sys and hiberfil.sys across Windows Operating Systems different versions both from GUI and via command line as well as how you can configure pagefile.sys to be cleared up on pc reboot.
 

Set Domain multiple alias (Aliases) in IIS on Windows server howto

Saturday, October 24th, 2020

https://www.pc-freak.net/images/microsoft-iis-logo

On Linux as mentioned in my previous article it is pretty easy to use the VirtualHost Apache directive etc. to create ServerName and ServerAlias but on IIS Domain multiple alias add too me a while to google.

<VirtualHost *>
ServerName whatevever-server-host.com
ServerAlias www.whatever-server-host.com whatever-server-host.com
</VirtualHost>


In click and pray environments as Winblows, sometimes something rather easy to be done can be really annoying if you are not sure what to do and where to click and you have not passed some of the many cryptic microsoft offered ceritification programs offer for professional sysadmins, I'll name a few of them as to introduce UNIX guys like me to what you might ask a M$ admin during an interview if you want to check his 31337 Windows Sk!lls 🙂


  • Microsoft Certified Professional (MCP)
  • Microsoft Technology Associate (MTA) –
  • Microsoft Certified Solutions Expert (MCSE)-
  • Microsoft Specialist (MS) etc. –

A full list of Microsoft Certifed Professsional program here

Ok enough of  balling.

Here is  how to  create a domain alias in IIS on Windows server.

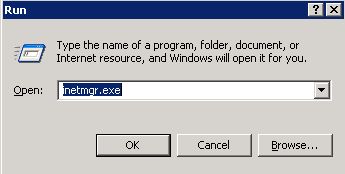
Login to your server and click on the START button then ‘Run’¦’, and then type ‘inetmgr.exe’.

Certainly you can go and click trough the Administrative tools section to start ISS manager, but for me this is fastest and easiest way.

create-domain-alias-on-windows-server-1a
 

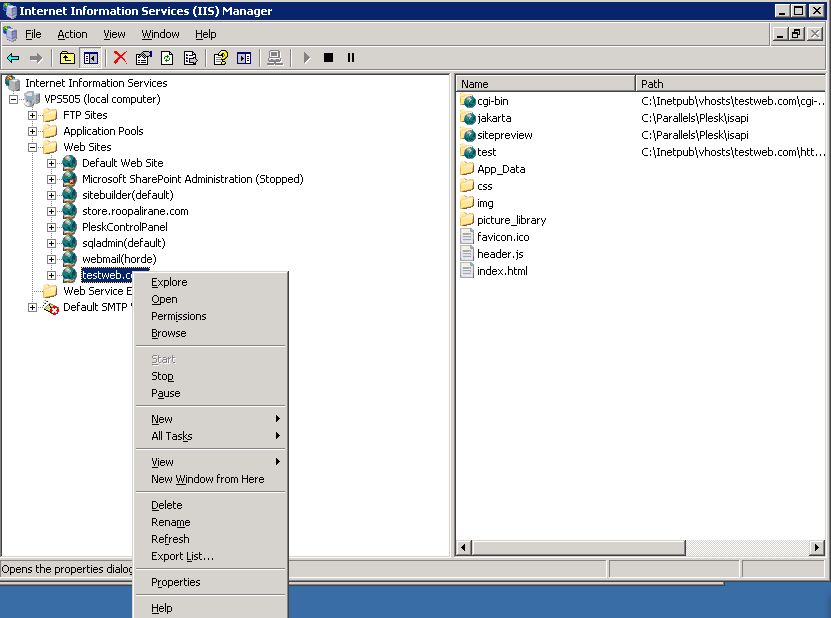
Now expand the (local computer), then ‘Web Sites’ and locate the site for which you want to add alias (here it is called additional web site identification).

Right click on the domain and choose ‘Properties’ option at the bottom.

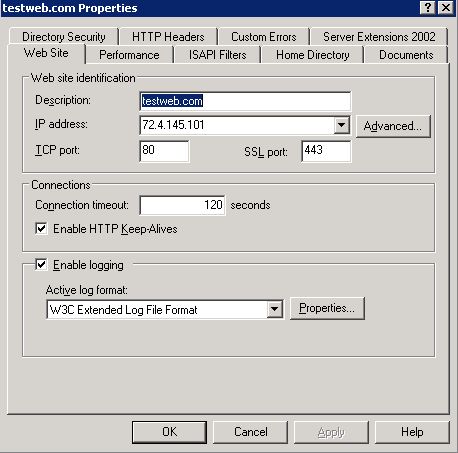
This will open the properties window where you have to choose ‘Web Site’ and then to locate ‘Website identification‘ section. Click on the ‘Advanced’¦’ button which stands next to the IP of the domain.

create-domain-alias-on-windows-server-2a
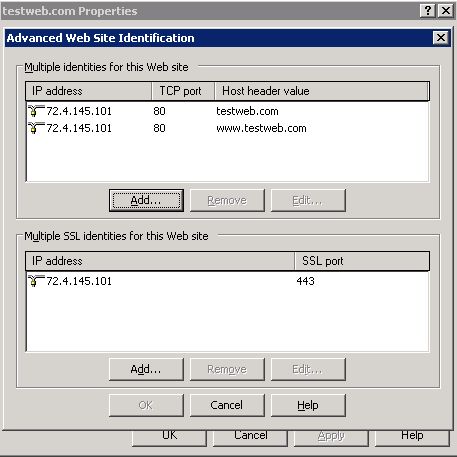
Advanced Web site identification window (Microsoft likes to see the word ‘Advanced’ in all of the management menus) will be opened, where we are going to add a new domain alias.

create-domain-alias-on-windows-server-3a.png

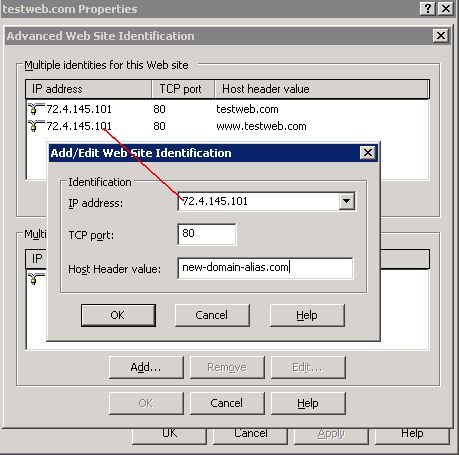
Click on the ‘Add’¦’ button and ‘Add/Edit website (alias)identification’ window will appear.

create-domain-alias-on-windows-server-4a.png

Make sure that you will choose the same IP address from the dropdown menu, then set the port number on which your web server is running (the default is 80), write the domain you want, and click ‘OK’ to create the new domain alias.

Actually click ‘OK’ until you have ‘Advanced Web site identification’ and the domain properties windows closed.

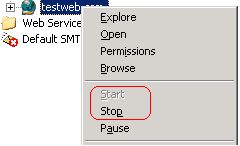
Right click on the domain again and ‘Stop’ and ‘Start’ the service.
This will be enough the IIS domain alias to start working.

create-domain-alias-on-windows-server-5a


Another useful thing for novice IIS admins that come from UNIX is a domain1 to domain2 redirect, this is done with writting an IIS rule which is an interesting but long topic for a limited post as like this, but just for the reference of fun to let you know this exist.

Domain 1 to Domain 2 Redirect
This rule comes handy when you change the name of your site or may be when you need to catch and alias and direct it to your main site. If the new and the old URLs share some elements, then you could just use this rule to have the matching pattern together with the redirect target being

domain1-to-domain2-redirect-iis

That's all folks, if you enjoyed the clicking laziness you're ready to retrain yourself to become a successful lazy Windows admin who calls Microsoft Support everyday as many of the errors and problems Windows sysadmins experience as I heard from a friend can only be managed by M$ Support (if they can be managed at all). 

Yes that's it the great and wonderful life of the avarage sysadmin. Long live computing … it's great! Everyday something broken needs to get fixed everyday something to rethink / relearn / reupdate and restructure or migrate a never ending story of weirdness.

A remark to  make, the idea for this post is originated based on a task I had to do long time ago on IIS, the images and the description behind them are taking from a post originally written on Domain Aliasing in IIS originally written by Anthony Gee unfortunately his blog is not available anymore so credits goes to him.

Start Stop Restart Microsoft IIS Webserver from command line and GUI

Thursday, April 17th, 2014

start-stop-restart-microsoft-iis-howto-iis-server-logo
For a decomissioning project just recently I had the task to stop Microsoft IIS  on Windows Server system.
If you have been into security for a while you know well how many vulnerabilities Microsoft (Internet Information Server) Webserver used to be. Nowadays things with IIS are better but anyways it is better not to use it if possible …

Nomatter what the rason if you need to make IIS stop serving web pages here is how to do it via command line:

At Windows Command Prompt, type:

net stop WAS

If the command returns error message to stop it type:

net stop W3SVC

stop-microsoft-IIS-webservice
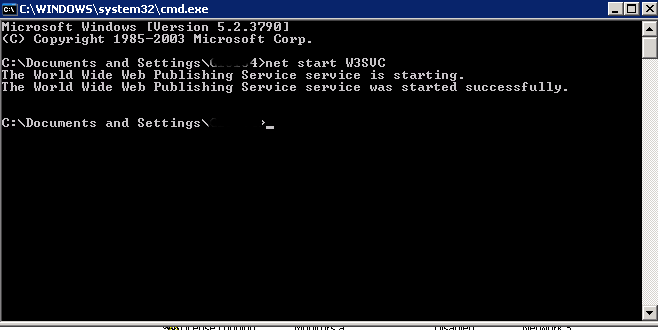
Just in case you have to start it again run:

net start W3SVC

start-restart-IIS-webserver-screenshot

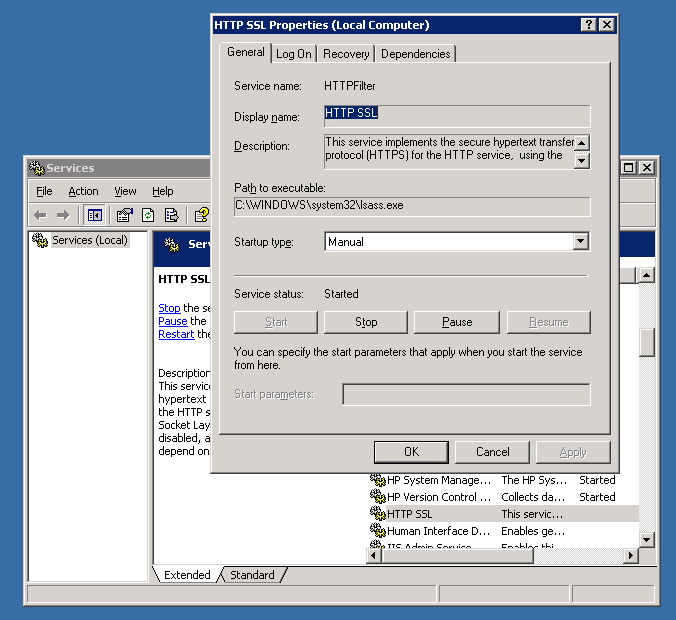
For those who prefer to do it from GUI interface, launch services.msc command from Windows Run:

> services.msc

services-msc-stop-microsoft-iis-webserver

In list of services lookup for
IIS Admin Service and HTTP SSL
a) (Click over it with right mouse button -> Properties)
b) Set Startup type to Manual
c) Click Stop Button

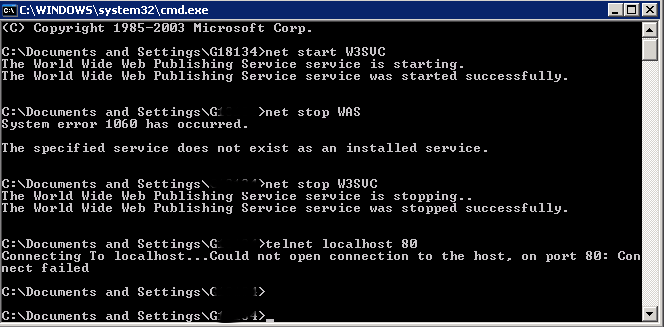
You're done now IIS is stopped to make sure it is stopped you can run from cmd.exe:

telnet localhost 80

when not working you should get 'Could not open connection to the host. on port 80: Connection failed' like shown up in screenshot.

How to shutdown Windows after 1, 2, 3, 4 etc. X hours with a batch script – Shutdown / Reboot / Logoff Windows with a quick command

Wednesday, August 17th, 2016

https://www.pc-freak.net/images/windows-pc-server-shutdown-after-3-5-hours-howto-shutdown-windows-with-command-batch

I recently wondered how it is possible to shutdown Windows in some prior set time lets say in 30 minutes, 1 hour, 3 hours or 8 hours.

That's handy especially on servers that are being still in preparation install time and you have left some large files copy job (if you're migration files) from Old server environment to a new one
or if you just need to let your home WIndows PC shutdown to save electricity after some time (a very useful example is if you're downloading some 200GB of data which are being estimated to complete in 3 hours but you need to get out and be back home in 2 or 4 days and you don't want to bother connecting remotely to your PC with VNC or teamviewer then just scheduling the PC / server to shutdown in 3 hours with a simple is perfect solution to the task, here is how:

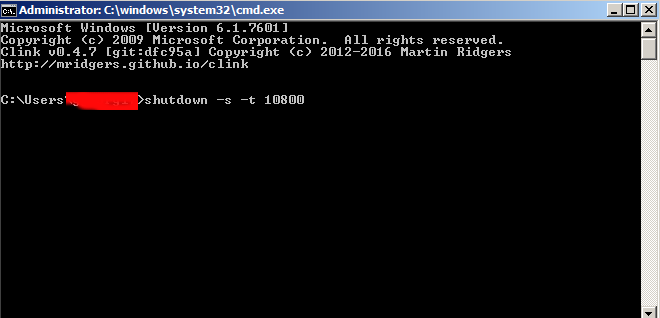
1. Open Command Prompt (E.g. Start menu -> Run and type CMD.EXE)

2. Type in command prompt


shutdown -s -t 10800


If you by mistake has typed it to shutdown earlier and suddenly you find out your PC needs to be running for a short more time in order to cancel the scheduled Shutdown type:


shutdown -a


Shutdown Windows command -s flag has also a possibiltiy to not shutdown but just logoff or if you just need to have the system rebooted a reboot option:


options    effect
-l         to log off
-r         to reboot

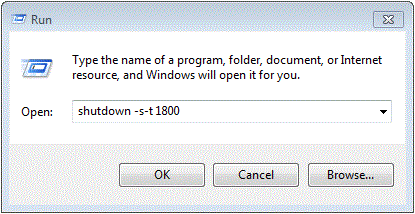
If you need to shutdown the PC after half an hour use instead the command:


shutdown -s -t 1800


shutdown-windows-pc-with-command-in-half-an-hour-screenshot.gif


Half an hour is 1800 seconds for one hour delayed shutdown use 3600 for 3 hours, that would be 3*3600 10800, for 5 hours 5*3600 = 18000 seconds and so on


An alternative way to do it with a short VBscript, here is an example:

Set objShell = CreateObject("WScript.Shell")

Dim Input
Input = "10:00"

'Input = InputBox("Enter the shutdown time here.","", "10:00")

For i = 1 to 2

CurrentTime = Time & VbCrLf

If Left(CurrentTime,5) = Input Then

objShell.Run "shutdown -s -t 00", 0
WScript.Quit 1

Else

WScript.Sleep 1000

End If

i=i-1

Next

Enjoy

Windows XP multicore not detected after CPU update – XP Enable multicore after singlecore install

Friday, April 8th, 2016

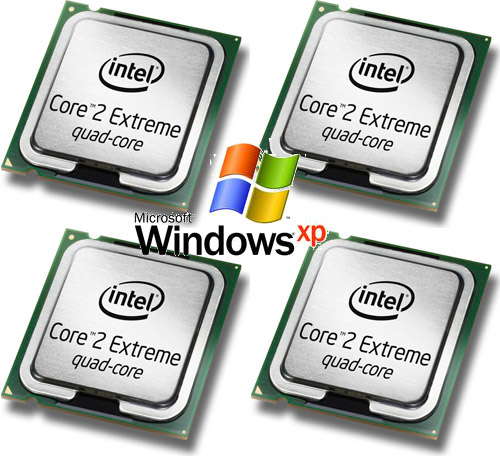
windows-xp-add-multicore-with-command-after-multiple-cpu-not-detected
These days it is not common to install Windows XP however for some old unsupproted applications that still work on XP in many countries  in Africa, Asia, Europe and even America. Custom patched Windows XP is still heaveily used for some corporate businesses in accounting and on airports and other government institutions even to these day, I'm aware of Windows still heavily used especially in  Russia, Belarus,Ukraine, Kazakhstan, Armenia, Bulgaria etc.

Hence still there is plenty of softwares designed to work XP the good old Win XP and thus often XP needs to be emulated on VMs though officially not supported any longer  by Microsoft (its Support lifecycle End was for a last time on April 14, 2009).

Now I guess these days I guess nobody doesn't install and use Windows XP on a normal hardware PC Desktop / laptop but XP is continually installed on Virtual machine servers VMWare / VirtualBox.

Hence if you happen to have already migrated or installed some old Windows XP operating systems under VMWare for a corporate clients single core machine (no matter virtual or physical) and the client requires an update of hardware of the Virtual Machine you will be surprised that even though you add a second / third etc. core (new CPUs) the virtual machine hardware and restart the Windows XP installation.

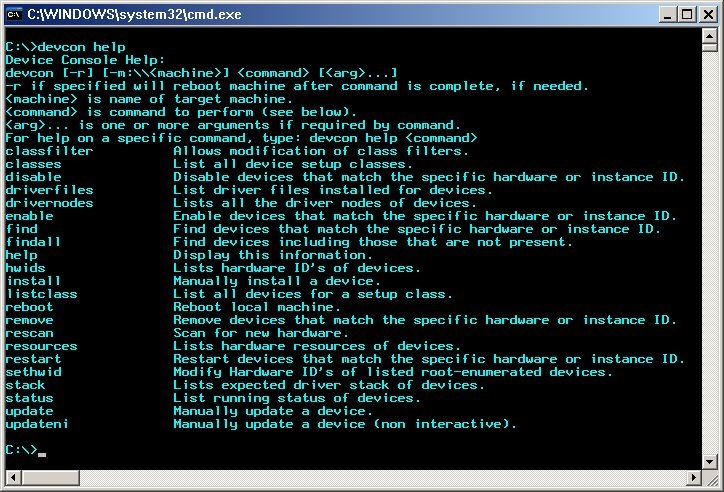
It seems XP is designed to remember the install time CPU model hardware so once the VM and doesn't have a way to update its HAL (Hardware Abstraction Layer) definitions if you install it in Virtualbox thus to make XP recognize the extra added CPU cores it is necessery to do a small hack with a devcon.exe utility downloadable from Microsoft site to do the trick

1. Download the command line devicemanager utility (devcon.exe) from Microsoft Development Network MSDN here.

Note that it will work only if you use the correct version depending whether XP is  (x86/x64) bit install so check it out from My Computer -> Properties.

windows-xp-multicore-not-detected-enable-add-multicore-after-singlecore-windows-xp-install-with-devcon-exe

2  Next. Execute the following 2 commands:

    devcon sethwid @ROOT\ACPI_HAL\0000 := +acpiapic_mp !acpiapic_up
    devcon update c:\windows\inf\hal.inf acpiapic_mp

devcon.exe will  let the automatic hardware detection find out the extra CPU (multicores) added.
Wait 'till you get prompted for a reboot.
Be brave Reboot! 🙂

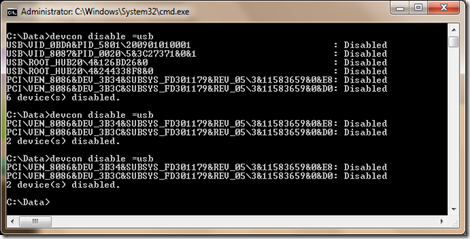
There is pretty much more fun useful things you can do with devcon.exe such as disabling USBs from command line,

DEVCON-command-DisableUSB_on-windows-xp-7-8-howto

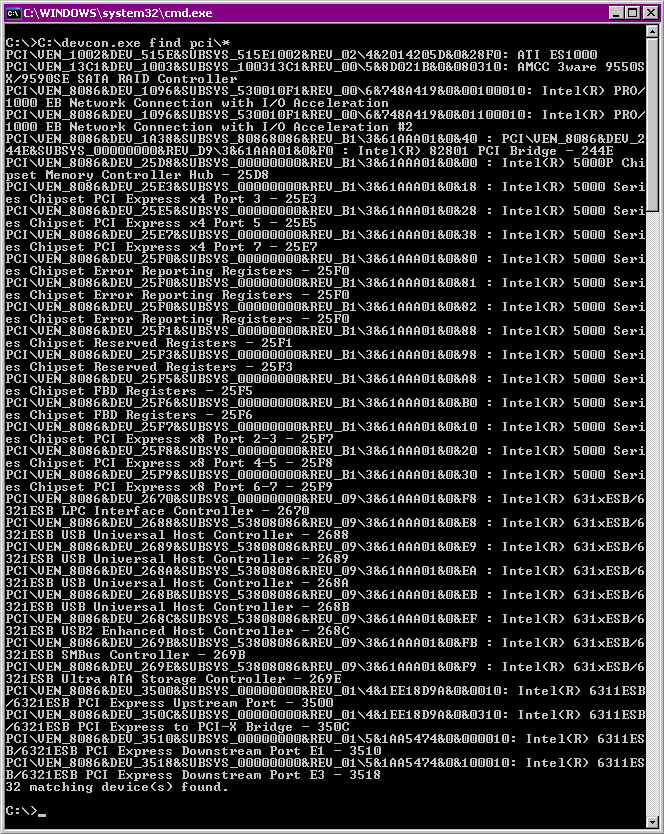
listing your PCI devices and so on:

devcon-windows-command-to-list-pci-devices-on-xp7-win8-win10

You should now see all cores, hooray cores will appear in Task Manager / System Information.

Check Windows Operating System install date, Full list of installed and uninstalled programs from command line / Check how old is your Windows installation?

Tuesday, March 29th, 2016

when-was-windows-installed-check-howto-from-command-line
Sometimes when you have some inherited Windows / Linux OS servers or Desktops, it is useful to be aware what is the Operating System install date. Usually the install date of the OS is closely to the date of purchase of the system this is especially true for Windows but not necessery true for Liunx based installs.

Knowing the install date is useful especially if you're not sure how outdated is a certain operating system. Knowing how long ago a current installation was performed could give you some hints on whether to create a re-install plans in order to keep system security up2date and could give you an idea whether the system is prone to some common errors of the time of installation or security flaws.


1. Check out how old is Windows install?

Finding out the age of WIndows installation can be performed across almost all NT 4.0 based Windowses and onwards, getting Winblows install date is obtained same way on both Windows XP / Vista/  7  and 8.

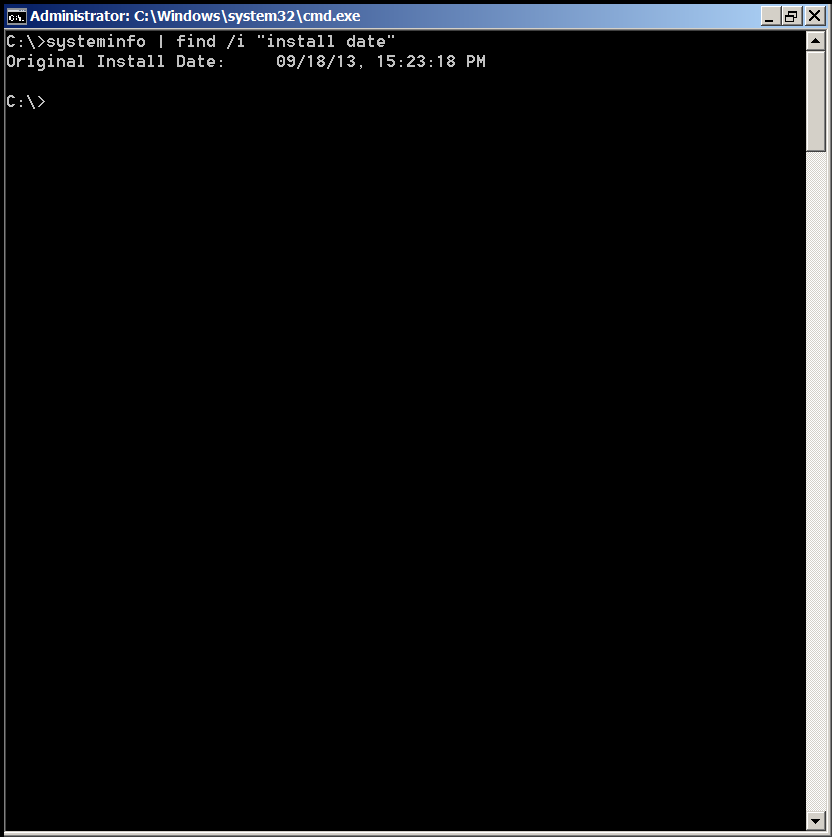
Besides many useful things such as detailed information about the configuration of your PC / notebook systeminfo could also provide you with install date, to do so just run from command line (cmd.exe).
 

C:\Users\hipo> systeminfo | find /i "install date"
Original Install Date:     09/18/13, 15:23:18 PM


check-windows-os-install-date-from-command-line-howto-screenshot

If you need to get the initial Windows system install date however it might be much better to use WMIC command to get the info:


C:\Users\hipo>WMIC OS GET installdate
InstallDate
20130918152318.000000+180


The only downside of using WMIC as you can see is it provides the Windows OS install date in a raw unparsed format, but for scripters that's great.

2. Check WIndows Installed and Uinstalled software and uptime from command line

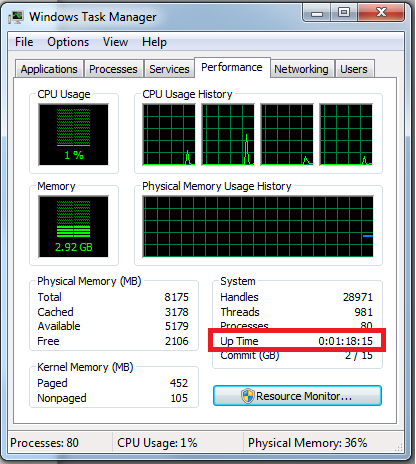
One common other thing next to Windows install date is what is the Windows uptime, the easiest way to get that is to run Task Manager in command line run taskmgr

windows-task-manager-how-to-check-windows-operating-system-uptime-easily

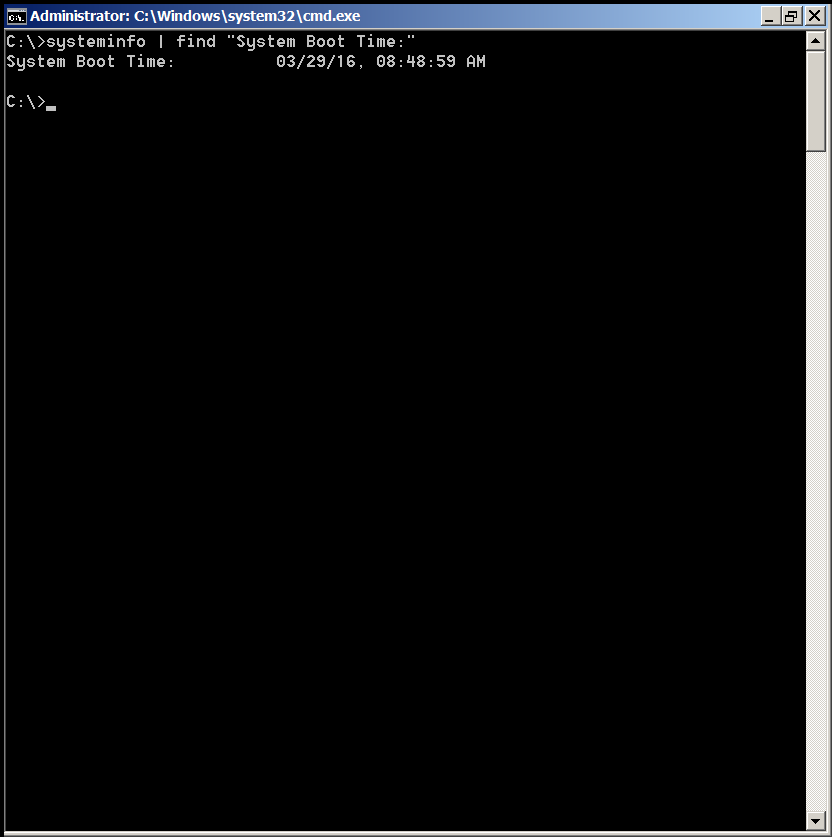
For those who want to get the uptime from windows command line for scripting purposes, this can be done again with systeminfo cmd, i.e.:


C:\> systeminfo | find "System Boot Time:"
System Boot Time:          03/29/16, 08:48:59 AM


windows-os-command-to-get-system-uptime-screenshot

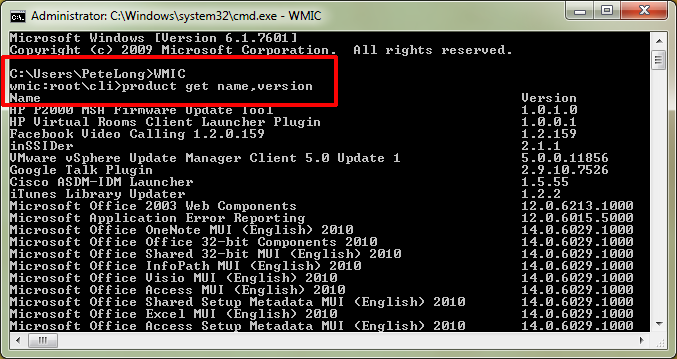
Other helpful Windows command liners you might want to find out about is getting all the Uninstalled and Installed programs from command line this again is done with WMIC


C:\> wmic /OUTPUT:my_software.txt product get name


get-a-full-list-of-installed-software-programs-on-windows-xp-vista-7-8-command-howto-screenshot

Alternative way to get a full list of installed software on Windows OS is to use Microsoft/SysInternals psinfo command:


C:\> psinfo -s > software.txt
C:\> psinfo -s -c > software.csv


If you need to get a complete list of Uinstalled Software using command line (e.g. for batch scripting) purposes, you can query that from Windows registry, like so:


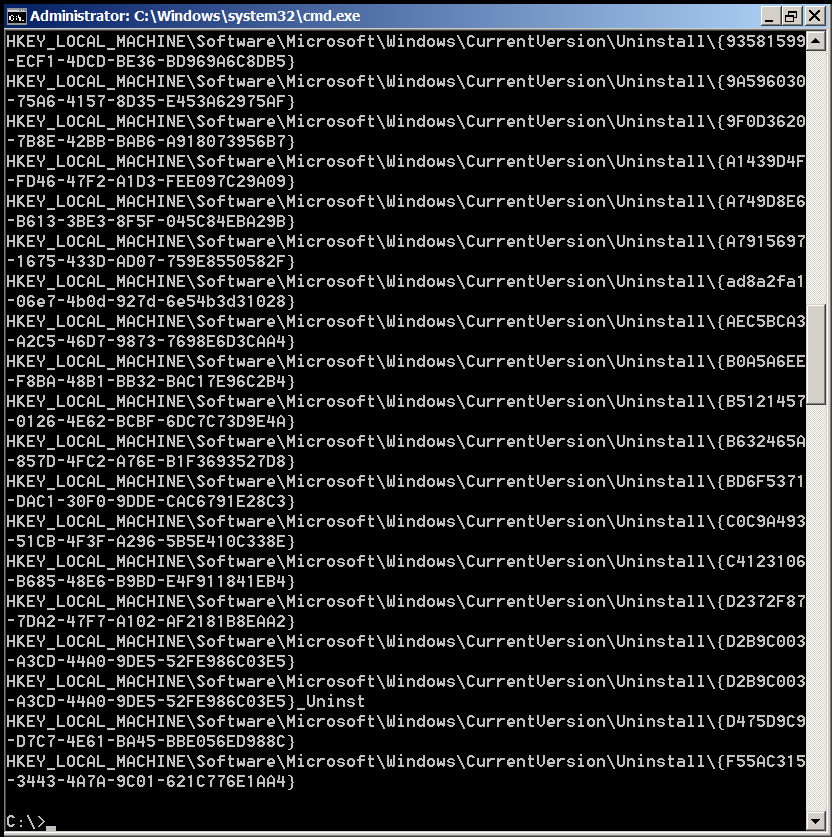
C:\>reg query HKEY_LOCAL_MACHINE\Software\Microsoft\Windows\CurrentVersion\Uninstall


Command Output will be something like on below shot:

windows-OS-show-get-full-list-of-uninstalled-programs-using-a-command-line-screenshot

Well that's all folks 🙂


Start Event Viewer from Command Line (Prompt) – eventvwr.msc to Debug Windows server issues

Friday, November 6th, 2015

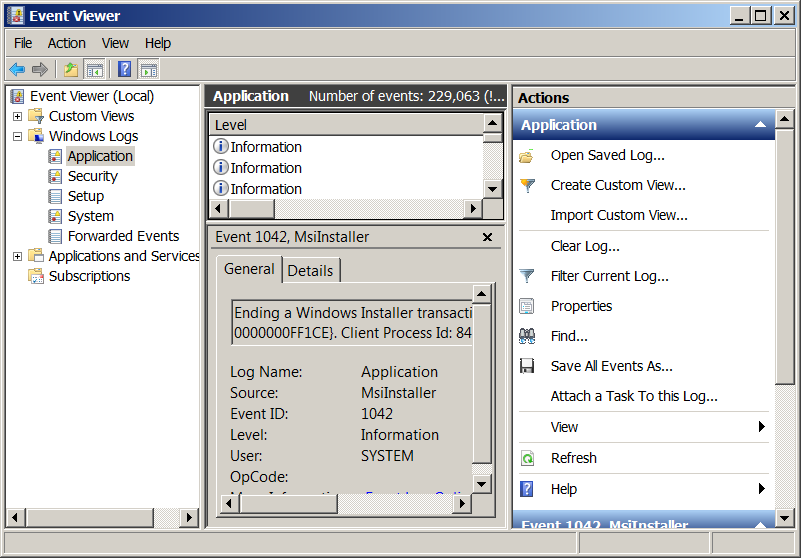
eventvwrmsc-event-viewer-windows-7-screenshot-view-windows-log-and-dianose-errors

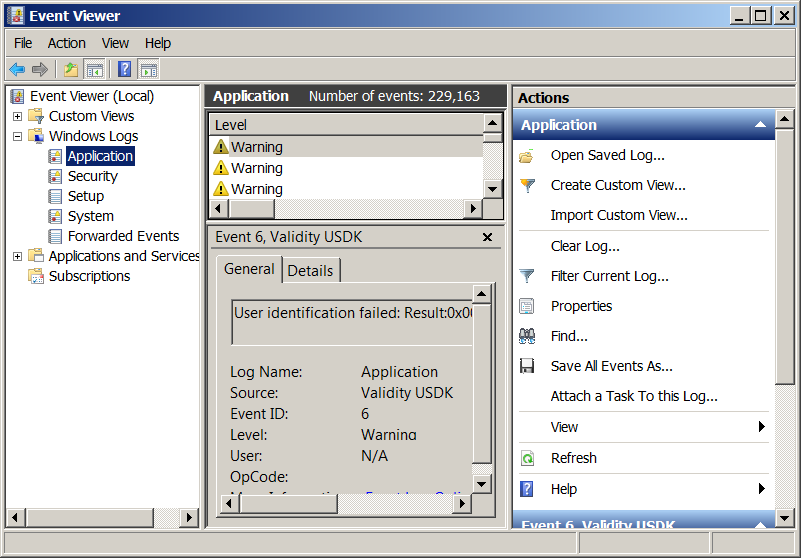
If you’re a sysadmin which needs to deal with Microsoft Windows servers locally or remotely via Remote Desktop RDP client (MSTSC.EXE) or inside a Windows Domain Controller, you will have to frequently debug Windows isseus or Application caused errors by reviewing debug information stored in Event Logs.

Event Viewer is a precious tool to debug often errors with missing libraries or failing programs on Windows boot and thus on M$ Windows it is the Swiss Army knife of sysadmin.
However as staring Event Viewer using the GUI menus, takes a lot of step and looses you time, e.g., you have to navigate to menus:

1. Start button Picture of the Start button
2. clicking Control Panel
3. clicking System and Security
4. clicking Administrative Tools
5.then double-clicking Event Viewer.‌
6. Granting Administrator permission required If you’re prompted for an administrator password or confirmation

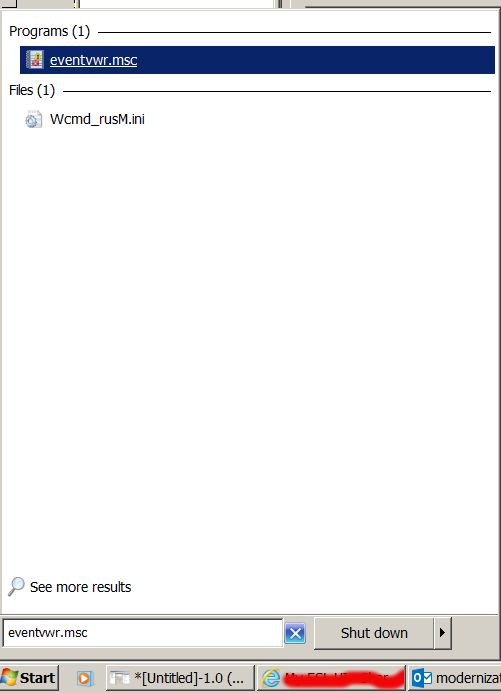
It is much handier to just start it with a shortcut:

Press Windows (Button) + R
– To invoke run prompt

and type:

eventvwr.msc

In case if you’re running eventvwr.msc to connect to remote Windows Server run from command prompt (cmd.exe):

eventvwr-run-from-command-prompt-with-a-smart-shortcut-to-save-time-when-administrating-windows-servers

eventvwr.msc /computer=OTHER_Computer_Name

event-viewer-log-reader-and-debug-tool-for-windows-PC-and-windows-servers-adminsitration

Windows add / delete services command sc.exe create/delete – Create or Delete services

Thursday, April 9th, 2015

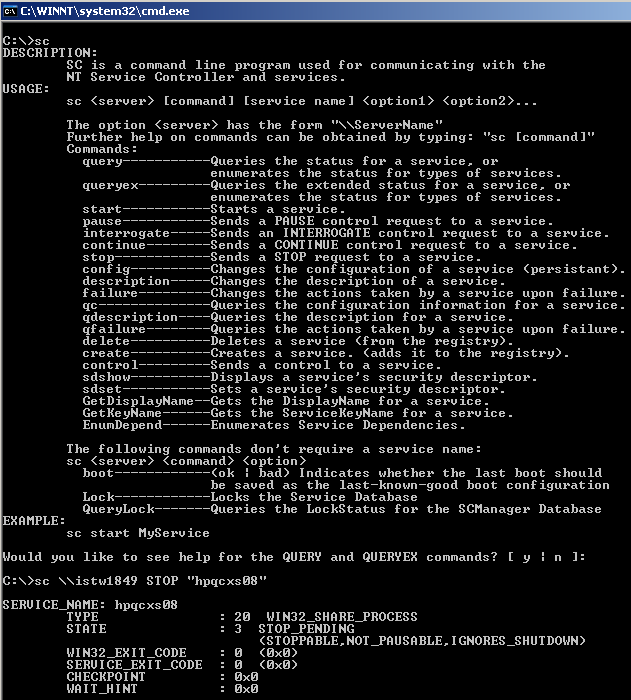
sc-exe-command-line-program-to-create-delete--service-start-stop-service-on-ms-windows
If you end up in situation where you need to delete or create services from current existing ones with a batch script because it is existing on multiple servers and you want to automate / deploy it via batch (.bat) script you will have to use sc.exe tool – Service Controller Command Tool

SC.EXE command  is standard windows console tool to create and delete services. If you want to create a new service, you can use the "create" parameter.

1. Deleting Service with Windows Service Controller Tool

Deleting service is very easy to do you just have to know the service you like to remove not to be listed or Automatically start

sc delete SERVICE_NAME_TO_BE_REMOVED


Below is a real time example on how to remove Apache webserver configured to auto-start


sc.exe delete ApacheService

[SC] DeleteService SUCCESS

2. Create / Add service to existing to auto start on Windows

Before running sc.exe create command with arguments for service you will need to know following info:

  • What will be the Service Name: A single word to name the new service.
  • Full Binary Path: The path name where the executable program for new service is currently located.
  • Dispaly Name for service: A short name for the new service.


C:\Windows>sc.exe create ApacheService 
   binPath= "C:\local\apache\bin\httpd.exe -k runservice" 
   DisplayName= "Apache Server"


[SC] CreateService SUCCESS


Once service is added to be showing in services.msc GUI  you can start the newly added Apache service with:


C:\Windows>sc.exe start ApacheService


SERVICE_NAME: ApacheService
   TYPE               : 10  WIN32_OWN_PROCESS
   STATE              : 2  START_PENDING
                      (NOT_STOPPABLE,NOT_PAUSABLE,IGNORES_SHUTDOWN)
   WIN32_EXIT_CODE    : 0  (0x0)
   SERVICE_EXIT_CODE  : 0  (0x0)
   CHECKPOINT         : 0x2
   WAIT_HINT          : 0x7530
   PID                : 2552
   FLAGS              :


To stop the ApacheService or any other service:


C:\Windows>sc.exe stop ApacheService

SERVICE_NAME: ApacheService
   TYPE               : 10  WIN32_OWN_PROCESS
   STATE              : 3  STOP_PENDING
                      (NOT_STOPPABLE,NOT_PAUSABLE,IGNORES_SHUTDOWN)
   WIN32_EXIT_CODE    : 0  (0x0)
   SERVICE_EXIT_CODE  : 0  (0x0)
   CHECKPOINT         : 0x4
   WAIT_HINT          : 0x7530


To get the status of a running service lets say the recently ran ApacheService:

C:\Windows>sc.exe query ApacheService


SERVICE_NAME: ApacheService
   TYPE               : 10  WIN32_OWN_PROCESS
   STATE              : 4  RUNNING
                      (STOPPABLE,NOT_PAUSABLE,IGNORES_SHUTDOWN)
   WIN32_EXIT_CODE    : 0  (0x0)
   SERVICE_EXIT_CODE  : 0  (0x0)
   CHECKPOINT         : 0x0
   WAIT_HINT          : 0x0


As you see from above output the STATE of service is RUNNING. If Apache Webserver was not running you will get an error like:

[SC] EnumQueryServicesStatus:OpenService FAILED 1060:
The specified service does not exist as an installed service.


Enjoy sc-ing 🙂

Migrate VMWare Linux Virtual Machine to Virtualbox – Convert VMware .VMX to .OVF (Open Virtual Format)

Monday, June 2nd, 2014

migrate_vmware-virtual-machine-toto-virtualbox-vmx-to-ovf-migration

VMWare Virtual Machines are usually stored in OVA Format  which is bundle of OVF(Open Virtualization Format) and in multiple *.VMDK files.
Though other Virtual Machines are supposed to also support these "open virtualization format", different VM vendors implement and support it differently, therefore though in theory VirtualBox and QEMU are said to support OVA Format. Attempts to import such usually will fail. In this little article I will explain how VMWare stored (exported) VirtualMachine machine can be succesfully imported to VirtualBox.
 

1. Locate where is Virtualbox .vmx files from Window search or via dir command

I'm a console guy, so I prefer looking for VMWare's .vmx from command line:
 

C:\Users\GGEORGI7> cd c:\ C:\> dir /s *.vmx


Volume in drive C is PC COE
Volume Serial Number is XXXX-XXXX

Directory of C:\Users\ggeorgi7\Documents\Virtual Machines\Debian 7

06/02/14 11:06 AM 2,687 Debian 7.vmx
05/28/14 15:44 PM 370 Debian 7.vmxf
2 File(s) 3,057 bytes


2. Switch to wherever the VMWare virtualmachine .vmx file is located


C:\> cd \Users\ggeorgi7\Documents\Virtual Machines\Debian 7
 

N.B. !Make sure the VMWare Virtualmachine is Shutdown (if it is Suspended converted file will not be properly implemented inside VirtualBox!). Whether the migrated virtualhost is suspended, launch VMWare, restore its state and Shut it down properly before starting migration with ovftool.
 

3. Remove Vmware-tools, Reset Display settings and Input D (before exporting to OVF) in VMWare

a) Remove vmware-tools

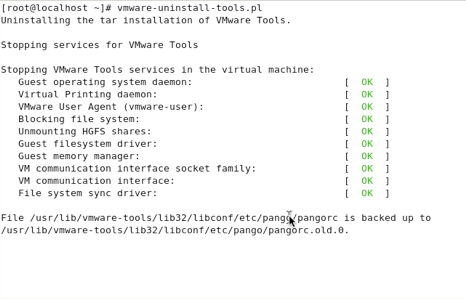
Vmware-tools kernel modules and stuff compiled specific for VMWare are no longer needed and might pose issues, thus it is always a good idea if previously installed in VMWare to wipe them out with cmd:

vmware-uninstall-tools.pl

uninstall-vmware-tools-linux-screenshot-migrating-vmware-to-virtualbox
b) Reset Display Device and Input Devices

Inside VMWare virtual machine Linux host, before shutting it down run:

mv /etc/X11/xorg.conf /etc/X11/xorg.conf.vmware

c) Remove Incomptable devices

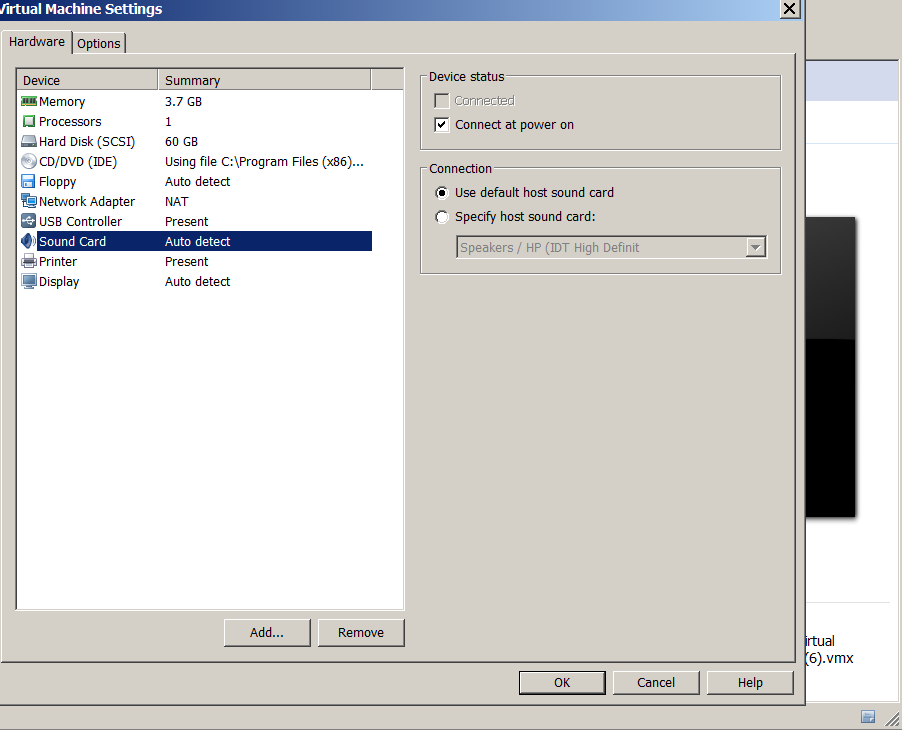
To prevent issues with sound – its necessary to remove VMWare device created for soundcard, in order to let VirtualBox create its soundcard device on 1st boot after migration. To do so click on Virtual Machine and from context menu click Settings then in  Hardware tab select Sound Card and Remove:
 

Settings -> Hardware -> Sound Card (Click Remove)

vmware-migration-remove-soundcard-to-make-work-sound-work-in-virtualbox


4. Make a Clone (Backup) of Virtual Machine

Its always a good idea to create backup of VMWare VM to be migrated just in case something goes wrong during migration, so you have a way to step back to the already working one. Once files are copied it might be a good idea to use use some archiver like PeaZip or 7-Zip to save some disk space.
 

mkdir SomeFolder
copy Path_To_Virtual_Machine Folder_for_Backup_Virtual_Machine


In my case this was


mkdir \Temp\VMWare-machine-backup
C:\>copy "C:\Users\ggeorgi7\Documents\Virtual Machines\Debian 7"\ c:\Temp\VM
ware-machine-backup

Restoring later VMWare VirtualMachines in case of some failure is done by simply copying backuped files to VMWare Working Directory folder

In case if Wondering

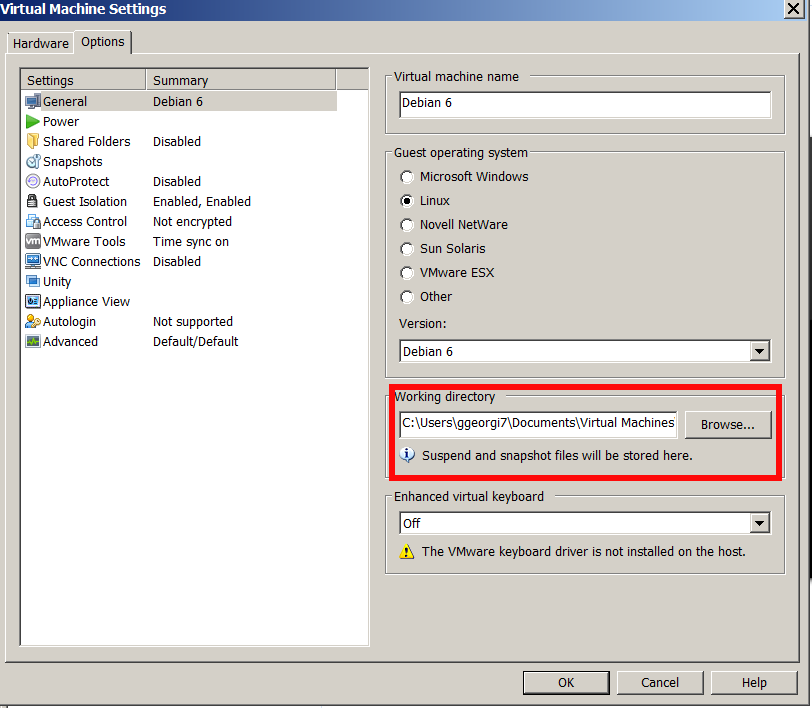
Where is stored VMWare Virtual Machines?


Check in:
 

VM -> Settings -> Options


vmware-working-directory-folder-where-are-stored-vmware-virtualmachines

5. Use VMWare ovftool.exe to convert .VMX to Open Virtualization Format (.OVF)


Though export from .VMX to .OVF it can be also done from VMWare GUI from:
 

File -> Export to OVF

Anyways I think it is better to do it via OVFTool console tool:

The most common location for  VMWare Workstation is:
 

C:\Program Files (x86)\Vmware\Vmware Workstation\OVFTool


For VMware Player it is:

C:\Program Files (x86)\Vmware\Vmware Player\OVFTool

Very important thing to mention here is you have to be cautious, Never to run together VMWare and VirtualBox.
!! Before proceeding to next OVTool .vmx to .ovf migration Shutdown the VirtualMachine and as a best practice close VMware completely.

cd Location-directory-ofOVFTool
ovftool.exe Path-folder-to_VMVM_file.vmx Path-folder_to_VM_exportVM_file_export.ovf

C:\> cd "\Program Files (x86)\VMware\VMware Workstation"\OVFTool
C:\Program Files (x86)\VMware\VMware Workstation\OVFTool>ovftool.exe "\Users\ggeorgi7\Documents\Virtual Machines\Debian 7\Debian 7.vmx" C:\Users\ggeorg i7\vmware-debian-export.ovf


vmware-ovftool-convert-vmware-linux-virtual-machine-to-virtualbox


Convertion will take about 30 minutes on a normal computer hardware lets say (Dual Core PC 2Ghz with 4 Gb of RAM).
If you get a “failed to open disk” error during convertion, its likely that the virtual machine is still running or wasn’t shut down properly – boot the virtual machine and perform a shut down.

6. Launch VirtualBox, Install Guest Additions to enable Copy / Paste and USB support in Virtual Machine

After the process completes, you can boot the virtual machine. If you haven't earlier uninstalled vmware-tools  uninstall VMware Tools, and install VirtualBox’s Guest Additions (in order to allow Copy / Paste between VirtualBox and guess OS).
 

7. Launch VirtualBox and Import exported .OVF

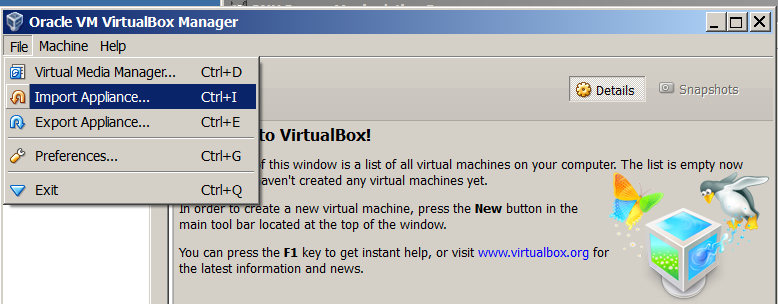
Once Virtual Machine is exported, to import it into VirtualBox, launch VirtualBox and choose:
 

File -> Import Appliance


virtualbox-import-vmware-old-virtual-machine-to-new-linux import vmware appliance

virtualbox-import-vmware-previously-installed-virtual-machine-linux import appliance virtualbox
 

Windows: VMWare Start / Stop from command line stop-vmware.bat / start-vmware.bat script

Wednesday, June 4th, 2014

vmware_start-stop-from-command-line-on-windows-os-bat-script
I'm experimenting with different Virtual Machines these days, because often running VMWare together with other Virtual Machines (like VirtualBox) might be causing crashes or VM instability – hence it is always best to have VMWare completely stopped. Unfortunately VMWare keeps running a number of respawning processes (vmnat.exe, vmnetdhcp.exe, vmware-authd.exe, vmware-usbarbitrator64.exe) which cannot be killed from Task Manager with Process KillEnd Tree option. Thus to make this services stop it is necessery run from cmd.exe (which is Run as Administrator):
 

NET STOP "VMware Workstation Server"
NET STOP "VMware USB Arbitration service"
NET STOP "VMware NAT Service"
NET STOP "VMware DHCP Service"
NET STOP "VMware Authorization Service"

If you will be doing regular START / STOP of VMWare on Windows servers it will be handy to create a little batch script stop-vmware.bat containing:
 

@ECHO OFF
NET STOP "VMware Workstation Server"
NET STOP "VMware USB Arbitration service"
NET STOP "VMware NAT Service"
NET STOP "VMware DHCP Service"
NET STOP "VMware Authorization Service"


Later whether it is necessery to start VMWare from Windows command line execute above services in reverse order (to prevent from getting warnings or errors on vmware dependent services.

NET START "VMware Authorization Service"
NET START "VMware DHCP Service"
NET START "VMware NAT Service"
NET START "VMware USB Arbitration service"
NET START "VMware Workstation Server"

To script it as a start script create file start-vmware.bat with:
 

NET START "VMware Authorization Service"
NET START "VMware DHCP Service"
NET START "VMware NAT Service"
NET START "VMware USB Arbitration service"
NET START "VMware Workstation Server"


Of course it is possible to also stop / start VMWare from GUI's Windows Services interface by righclicking on services with VMWare names and selecting "Start" / "Stop".