Posts Tagged ‘ext’

How to check /dev/ partition disk labeling in Debian GNU / Linux

Thursday, December 8th, 2011

The usual way that one is supposed to check a certain partition let’s say /dev/sda1 disk UUID (Universal Unique Identifier) label is through a command:
vol_id /dev/sda1

For reason however Debian does not include vol_id command. To check the UUID assigned disk labels on Debian one should use another command called blkid (part of util-linux deb package).

blkid will list all block device attributes so it doesn’t specifically, passing any partition as argument.
Here is an example output of blkid :

server:/root# blkid
/dev/sda1: UUID="cdb1836e-b7a2-4cc7-b666-8d2aa31b2da4" SEC_TYPE="ext2" TYPE="ext3"
/dev/sda5: UUID="c67d6d43-a48f-43ff-9d65-7c707a57dfe6" TYPE="swap"
/dev/sdb1: UUID="e324ec28-cf04-4e2e-8953-b6a8e6482425" TYPE="ext2"
/dev/sdb5: UUID="1DWe0F-Of9d-Sl1J-8pXW-PLpy-Wf9s-SsyZfQ" TYPE="LVM2_member"
/dev/mapper/computer-root: UUID="fbdfc19e-6ec8-4000-af8a-cde62926e395" TYPE="ext3"
/dev/mapper/computer-swap_1: UUID="e69100ab-9ef4-45df-a6aa-886a981e5f26" TYPE="swap"
/dev/mapper/computer-home: UUID="2fe446da-242d-4cca-8b2c-d23c76fa27ec" TYPE="ext3"


How to check any filesystem for bad blocks using GNU / Linux or FreeBSD with dd

Monday, November 28th, 2011

Check any filesystem partition for BAD BLOCKS with DD on GNU Linux and FreeBSD

Have you looked for a universal physical check up tool to check up any filesystem type existing on your hard drive partitions?
I did! and was more than happy to just recently find out that the small UNIX program dd is capable to check any file system which is red by the Linux or *BSD kernel.

I’ll give an example, I have few partitions on my laptop computer with linux ext3 filesystem and NTFS partition.
My partitions looks like so:

noah:/home/hipo# fdisk -l
Disk /dev/sda: 160.0 GB, 160041885696 bytes
255 heads, 63 sectors/track, 19457 cylinders
Units = cylinders of 16065 * 512 = 8225280 bytes
Sector size (logical/physical): 512 bytes / 512 bytes
I/O size (minimum/optimal): 512 bytes / 512 bytes
Disk identifier: 0x2d92834c
Device Boot Start End Blocks Id System
/dev/sda1 1 721 5786624 27 Unknown
Partition 1 does not end on cylinder boundary.
/dev/sda2 * 721 9839 73237024 7 HPFS/NTFS
/dev/sda3 9839 19457 77263200 5 Extended
/dev/sda5 9839 12474 21167968+ 83 Linux
/dev/sda6 12474 16407 31593208+ 83 Linux
/dev/sda7 16407 16650 1950448+ 82 Linux swap / Solaris
/dev/sda8 16650 19457 22551448+ 83 Linux

For all those unfamiliar with dddd – convert and copy a file this tiny program is capable of copying data from (if) input file to an output file as in UNIX , the basic philosophy is that everything is a file partitions themselves are also files.
The most common use of dd is to make image copies of a partition with any type of filesystem on it and move it to another system
Looking from a Windows user perspective dd is the command line Norton Ghost equivalent for Linux and BSD systems.
The classic way dd is used to copy let’s say my /dev/sda1 partition to another hard drive /dev/hdc1 is by cmds:

noah:/home/hipo# dd if=/dev/sda1 of=/dev/hdc1 bs=16065b

Even though the basic use of dd is to copy files, its flexibility allows a “trick” through which dd can be used to check any partition readable by the operating system kernel for bad blocks

In order to check any of the partitions listed, let’s say the one listed with filesystem HPFS/NTFS on /dev/sda2 using dd

noah:/home/hipo# dd if=/dev/sda2 of=/dev/null bs=1M

As you can see the of (output file) for dd is set to /dev/null in order to prevent dd to write out any output red by /dev/sda2 partition. bs=1M instructs dd to read from /dev/sda2 by chunks of 1 Megabyte in order to accelerate the speed of checking the whole drive.
Decreasing the bs=1M to less will take more time but will make the bad block checking be more precise.
Anyhow in most cases bs of 1 Megabyte will be a good value.

After some minutes (depending on the partition size), dd if, of operations outputs a statistics informing on how dd operations went.
Hence ff some of the blocks on the partition failed to be red by dd this will be shown in the final stats on its operation completion.
The drive, I’m checking does not have any bad blocks and dd statistics for my checked partition does not show any hard drive bad block problems:

71520+1 records in
71520+1 records out
74994712576 bytes (75 GB) copied, 1964.75 s, 38.2 MB/s

The statistics is quite self explanatory my partition of s size 75 GB was scanned for 1964 seconds roughly 32 minutes 46 seconds. The number of records red and written are 71520+1 e.g. (records in / records out). This means that all the records were properly red and wrote to /dev/null and therefore no BAD blocks on my NTFS partition 😉

How to enable AUTO fsck (ext3, ext4, reiserfs, LVM filesystems) checking on Linux boot through /etc/fstab

Tuesday, July 12th, 2011

How to auto FSCK manual fsck screenshot

Are you an administrator of servers and it happens a server is DOWN.
You request the Data Center to reboot, however suddenly the server fails to boot properly and you have to request for IPKVM or some web java interface to directly access the server physical terminal …

This is a very normal admin scenario and many people who have worked in the field of remote system administrators (like me), should have experienced that bad times multiple times.

Sadly enough only a insignifant number of administrators try to do their best to reduce this down times to resolve client stuff downtime but prefer spending time playing the ztype! game or watching some porn website 😉

Anyways there are plenty of things like Server Auto Reboot on Crash with software Watchdog etc., that we as sysadmins can do to reduce server downtimes and most of the manual human interactions on server boot time.

In that manner of thougts a very common thing when setting up a new Linux server that many server admins forget or don’t know is to enable all the server partition filesystems to be auto fscked during server boot time.

By not enabling the auto filesystem check options in Linux the server filesystems did not automatically scan and fix hard drive partitions for fs innode inconsistencies.
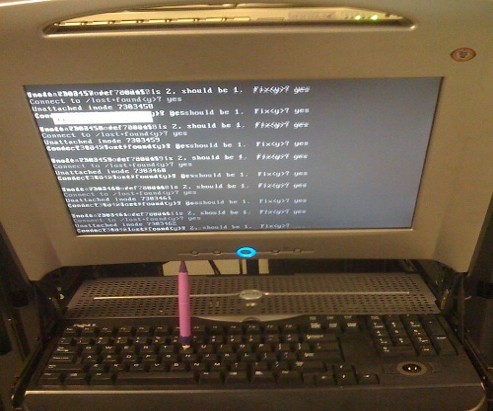
Even though the filesystems are tuned to automatically get checked on every 38 system reboots, still if some kind of filesystem errors are found that require a manual confirmation the boot process is interrupted and the admin ends up with a server which is not reachable remotely via ssh !

For the remote system administrator, this times are a terrible times of waitings, prayers and hopes that the server hardware is fine 😉 as well as being on hold to get a KVM to get into the server manually and enter the necessery input to fsck prompt.

Many of this bad times can be completely avoided with a very simple fix through /etc/fstab by enabling all server partitions containing any filesystem to be automatically checked and fixed in case if inconsistencies or errors are found by fsck.ext3, fsck.ext4, fsck.reiserfs etc. commands.

A very typical default /etc/fstab file you will find on many servers should look something like:

/dev/sda8 / ext3 errors=remount-ro 0 1
tmpfs /dev/shm tmpfs defaults 0 0
devpts /dev/pts devpts gid=5,mode=620 0 0
sysfs /sys sysfs defaults 0 0
proc /proc proc defaults 0 0
/dev/sda1 /home ext3 defaults 0 0

Notice the line:
/dev/sda1 /home ext3 defaults 0 0

The first column in the example contains the device name, the second one its mount point, third its filesystem type, fourth the mount options, fifth (a number) dump options, and sixth (another number) filesystem check options. Let’s take a closer look at this stuff.

The ones which are interesting to enable auto fsck checking and error resolving is provided usually by the last sixth variable (filesystem check option) which in the above example equals 0 .

When the filesystem check option equals 0 this means the auto fsck and repair for the respective filesystem is disabled.
Some time in the past the dump backup option (5th option in the example) was also used but as far as I can understand today it’s not that important in modern GNU/Linux distributions.

Now having the above sample crontab in order to enable the fsck file checking on Linux boot for /dev/sda1 , we will need to modify the above line’s filesystem check option be 2, e.g. the line would afterwards look like:

/dev/sda1 /home ext3 defaults 0 2

Setting the 2 as an option for filesystem check is necessery for every filesystem which is not mounted as a root filesystem /

In above example /etc/fstab you already see that auto filesystem fsck is enabled for root partition:

/dev/sda8 / ext3 errors=remount-ro 0 1
(notice the 1 in the end of the line)

Finally a modified version of the default sample /etc/fstab which will check the extra /dev/sda1 /home partition would look like so:

/dev/sda8 / ext3 errors=remount-ro 0 1
tmpfs /dev/shm tmpfs defaults 0 0
devpts /dev/pts devpts gid=5,mode=620 0 0
sysfs /sys sysfs defaults 0 0
proc /proc proc defaults 0 0
/dev/sda1 /home ext3 defaults 0 2

Making sure all Linux server partitions has the auto filesystem check option enabled is something absoultely necessery!
Enabling the auto fsck on servers always makes me sleep calmer 😉
Hope it helps your too. 🙂