Posts Tagged ‘Failed’

How to mount LVM partition volume on Linux

Wednesday, August 22nd, 2018

lvm-logical-volume-logical-volume-groups

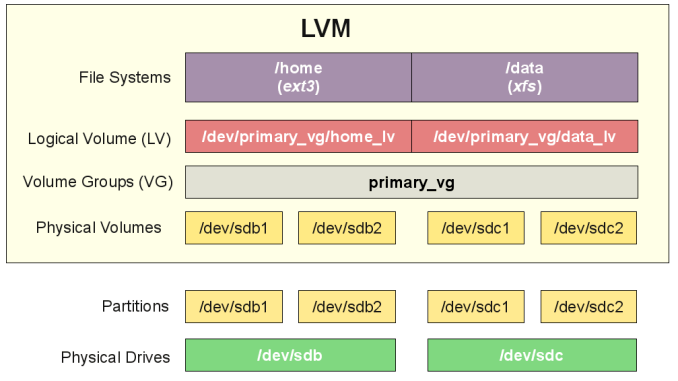
(LVM) = Logical Volume Manager is a device mapper offering logical volume management for the Linux kernel. Virtually all modern GNU / Linux distributions has support for it and using LVM is used among almost all Hosting Providers on (dedicated) backend physical and Virtual XEN / VMWare etc. servers because it provides the ability to merge a number of disks into virtual volumes (for example you have a number of SSD Hard Drives on a server that are under a separate /dev/sda1 /dev/sda2 /dev/sdb3 /dev/sdb4 etc. and you want all the HDDs to appear as a single file system this is managed by Linux LVM.

Logical-volume-manager-linux-explained-diagram.svg

Picture sources Wikipedia

The use of LVM is somewhat similar to RAID 0 disk arrays, where the good about it it allows the removal and addition of hard disks in real time (broken hard disks) on servers to be replaced without service downtime as well as dynamic HDD volume resizal is possible. LVM allows also relatively easy encryption of multiple HDD volumes
with single password.

Discs can be organized in volume groups (so lets say 2 of the server Attached conventional Hard Disks, SCSI or SSDs can be attached to LVM1 and another 3 Hard Drives could be attached to LVM2 group etc.

LVM has been an integral part of Linux kernel since 1998.

lvm is available for install via apt, yum, dhf etc. under a package called lvm2, so to install it on Debian / Ubuntu Fedora Linux (if it is not already installed on the servers with).


– Install LVM2 On Debian / Ubuntu
 

debian:~# apt-get install –yes lvm2


– Install LVM2 on Fedora / CentOS (Redhat RPM based distros)


[root@centos ~]:# yum install -y lvm2


or

[root@fedora ~]:#  dhf install -y lvm2


I. Mounting LVM2 on Linux server after broken DISK change part of a LVM Volume

For example the HDD faileddue to bad sectors and physical HDD head damage damage  – the easiest way to figure that out if the server is running smartd or via a simple HDD test check from BIOS  ( as the ROOT partition is on a LVM it fails to boot properly. You have changed the broken HDD with a brand new and you need to remount the LVM either physically on the server console or remotely via some kind of BIOS KVM interface).

In my experience working for Santrex this was a common sysadmin job, as many of the Virtual Client servers as well as others irons situated in various DataCenters, were occasionally failing to boot and the monitoring system was reporting about the issues and we had to promptly react and bring the servers up.

Here is shortly how we managed to re-mount the LVM after the SSDs / HDDS were substituted:

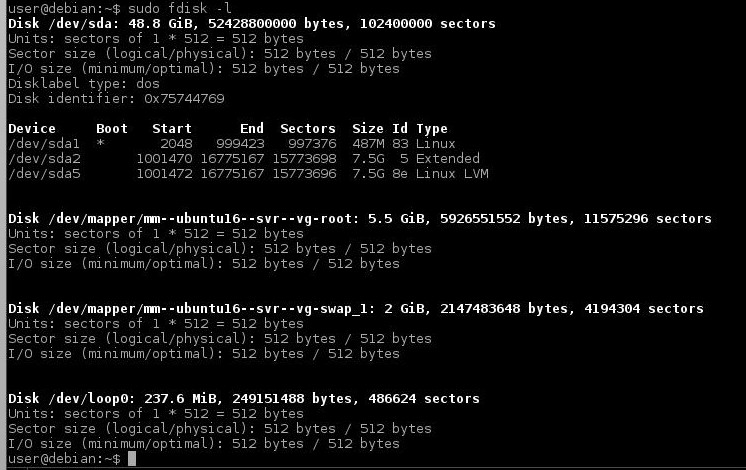
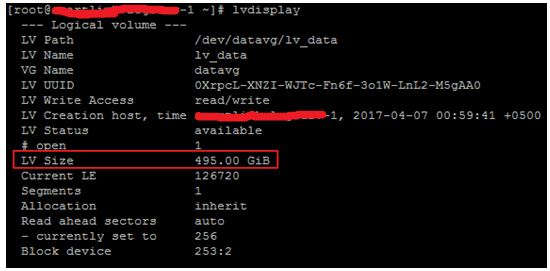
    1.1. Execute fdisk, vgscan / lvdisplay command

fdisk-lvm-screenshot

lvdisplay-screenshot

vgscan scans all supported LVM block devices in the system for VGs (Virtual Groups)

vgscan-vgchange-screenshot-lvm

    1.2. Next issue vgchange command to activate volume
 

vgchange -ay


    1.3. Type lvs command to get information about logical volumes


lvs


    1.4. Create a mount point using the mkdir command

      That's because we wanted to check the LVM will get properly mounted on next server reboot).
   
     1.5. Mount an LVM volume using
 

server:~# mount /dev/mapper/DEVICE /path/to/mount_point


     1.6. To check the size of the LVM (mount points, mounted LVM /dev/names sizes and the amount of free space on each of them use)
 

server:~# df -T

Maximal protection against SSH attacks. If your server has to stay with open SSH (Secure Shell) port open to the world

Thursday, April 7th, 2011

Brute Force Attack SSH screen, Script kiddie attacking
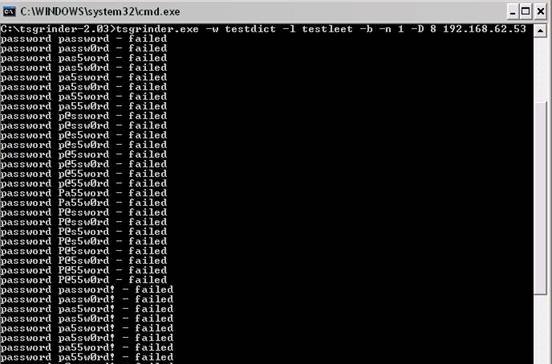
If you’re a a remote Linux many other Unix based OSes, you have defitenily faced the security threat of many failed ssh logins or as it’s better known a brute force attack

During such attacks your /var/log/messages or /var/log/auth gets filled in with various failed password logs like for example:

Feb 3 20:25:50 linux sshd[32098]: Failed password for invalid user oracle from 95.154.249.193 port 51490 ssh2
Feb 3 20:28:30 linux sshd[32135]: Failed password for invalid user oracle1 from 95.154.249.193 port 42778 ssh2
Feb 3 20:28:55 linux sshd[32141]: Failed password for invalid user test1 from 95.154.249.193 port 51072 ssh2
Feb 3 20:30:15 linux sshd[32163]: Failed password for invalid user test from 95.154.249.193 port 47481 ssh2
Feb 3 20:33:20 linux sshd[32211]: Failed password for invalid user testuser from 95.154.249.193 port 51731 ssh2
Feb 3 20:35:32 linux sshd[32249]: Failed password for invalid user user from 95.154.249.193 port 38966 ssh2
Feb 3 20:35:59 linux sshd[32256]: Failed password for invalid user user1 from 95.154.249.193 port 55850 ssh2
Feb 3 20:36:25 linux sshd[32268]: Failed password for invalid user user3 from 95.154.249.193 port 36610 ssh2
Feb 3 20:36:52 linux sshd[32274]: Failed password for invalid user user4 from 95.154.249.193 port 45514 ssh2
Feb 3 20:37:19 linux sshd[32279]: Failed password for invalid user user5 from 95.154.249.193 port 54262 ssh2
Feb 3 20:37:45 linux sshd[32285]: Failed password for invalid user user2 from 95.154.249.193 port 34755 ssh2
Feb 3 20:38:11 linux sshd[32292]: Failed password for invalid user info from 95.154.249.193 port 43146 ssh2
Feb 3 20:40:50 linux sshd[32340]: Failed password for invalid user peter from 95.154.249.193 port 46411 ssh2
Feb 3 20:43:02 linux sshd[32372]: Failed password for invalid user amanda from 95.154.249.193 port 59414 ssh2
Feb 3 20:43:28 linux sshd[32378]: Failed password for invalid user postgres from 95.154.249.193 port 39228 ssh2
Feb 3 20:43:55 linux sshd[32384]: Failed password for invalid user ftpuser from 95.154.249.193 port 47118 ssh2
Feb 3 20:44:22 linux sshd[32391]: Failed password for invalid user fax from 95.154.249.193 port 54939 ssh2
Feb 3 20:44:48 linux sshd[32397]: Failed password for invalid user cyrus from 95.154.249.193 port 34567 ssh2
Feb 3 20:45:14 linux sshd[32405]: Failed password for invalid user toto from 95.154.249.193 port 42350 ssh2
Feb 3 20:45:42 linux sshd[32410]: Failed password for invalid user sophie from 95.154.249.193 port 50063 ssh2
Feb 3 20:46:08 linux sshd[32415]: Failed password for invalid user yves from 95.154.249.193 port 59818 ssh2
Feb 3 20:46:34 linux sshd[32424]: Failed password for invalid user trac from 95.154.249.193 port 39509 ssh2
Feb 3 20:47:00 linux sshd[32432]: Failed password for invalid user webmaster from 95.154.249.193 port 47424 ssh2
Feb 3 20:47:27 linux sshd[32437]: Failed password for invalid user postfix from 95.154.249.193 port 55615 ssh2
Feb 3 20:47:54 linux sshd[32442]: Failed password for www-data from 95.154.249.193 port 35554 ssh2
Feb 3 20:48:19 linux sshd[32448]: Failed password for invalid user temp from 95.154.249.193 port 43896 ssh2
Feb 3 20:48:46 linux sshd[32453]: Failed password for invalid user service from 95.154.249.193 port 52092 ssh2
Feb 3 20:49:13 linux sshd[32458]: Failed password for invalid user tomcat from 95.154.249.193 port 60261 ssh2
Feb 3 20:49:40 linux sshd[32464]: Failed password for invalid user upload from 95.154.249.193 port 40236 ssh2
Feb 3 20:50:06 linux sshd[32469]: Failed password for invalid user debian from 95.154.249.193 port 48295 ssh2
Feb 3 20:50:32 linux sshd[32479]: Failed password for invalid user apache from 95.154.249.193 port 56437 ssh2
Feb 3 20:51:00 linux sshd[32492]: Failed password for invalid user rds from 95.154.249.193 port 45540 ssh2
Feb 3 20:51:26 linux sshd[32501]: Failed password for invalid user exploit from 95.154.249.193 port 53751 ssh2
Feb 3 20:51:51 linux sshd[32506]: Failed password for invalid user exploit from 95.154.249.193 port 33543 ssh2
Feb 3 20:52:18 linux sshd[32512]: Failed password for invalid user postgres from 95.154.249.193 port 41350 ssh2
Feb 3 21:02:04 linux sshd[32652]: Failed password for invalid user shell from 95.154.249.193 port 54454 ssh2
Feb 3 21:02:30 linux sshd[32657]: Failed password for invalid user radio from 95.154.249.193 port 35462 ssh2
Feb 3 21:02:57 linux sshd[32663]: Failed password for invalid user anonymous from 95.154.249.193 port 44290 ssh2
Feb 3 21:03:23 linux sshd[32668]: Failed password for invalid user mark from 95.154.249.193 port 53285 ssh2
Feb 3 21:03:50 linux sshd[32673]: Failed password for invalid user majordomo from 95.154.249.193 port 34082 ssh2
Feb 3 21:04:43 linux sshd[32684]: Failed password for irc from 95.154.249.193 port 50918 ssh2
Feb 3 21:05:36 linux sshd[32695]: Failed password for root from 95.154.249.193 port 38577 ssh2
Feb 3 21:06:30 linux sshd[32705]: Failed password for bin from 95.154.249.193 port 53564 ssh2
Feb 3 21:06:56 linux sshd[32714]: Failed password for invalid user dev from 95.154.249.193 port 34568 ssh2
Feb 3 21:07:23 linux sshd[32720]: Failed password for root from 95.154.249.193 port 43799 ssh2
Feb 3 21:09:10 linux sshd[32755]: Failed password for invalid user bob from 95.154.249.193 port 50026 ssh2
Feb 3 21:09:36 linux sshd[32761]: Failed password for invalid user r00t from 95.154.249.193 port 58129 ssh2
Feb 3 21:11:50 linux sshd[537]: Failed password for root from 95.154.249.193 port 58358 ssh2

This brute force dictionary attacks often succeed where there is a user with a weak a password, or some old forgotten test user account.
Just recently on one of the servers I administrate I have catched a malicious attacker originating from Romania, who was able to break with my system test account with the weak password tset .

Thanksfully the script kiddie was unable to get root access to my system, so what he did is he just started another ssh brute force scanner to crawl the net and look for some other vulnerable hosts.

As you read in my recent example being immune against SSH brute force attacks is a very essential security step, the administrator needs to take on a newly installed server.

The easiest way to get read of the brute force attacks without using some external brute force filtering software like fail2ban can be done by:

1. By using an iptables filtering rule to filter every IP which has failed in logging in more than 5 times

To use this brute force prevention method you need to use the following iptables rules:
linux-host:~# /sbin/iptables -I INPUT -p tcp --dport 22 -i eth0 -m state -state NEW -m recent -set
linux-host:~# /sbin/iptables -I INPUT -p tcp --dport 22 -i eth0 -m state -state NEW
-m recent -update -seconds 60 -hitcount 5 -j DROP

This iptables rules will filter out the SSH port to an every IP address with more than 5 invalid attempts to login to port 22

2. Getting rid of brute force attacks through use of hosts.deny blacklists

sshbl – The SSH blacklist, updated every few minutes, contains IP addresses of hosts which tried to bruteforce into any of currently 19 hosts (all running OpenBSD, FreeBSD or some Linux) using the SSH protocol. The hosts are located in Germany, the United States, United Kingdom, France, England, Ukraine, China, Australia, Czech Republic and setup to report and log those attempts to a central database. Very similar to all the spam blacklists out there.

To use sshbl you will have to set up in your root crontab the following line:

*/60 * * * * /usr/bin/wget -qO /etc/hosts.deny http://www.sshbl.org/lists/hosts.deny

To set it up from console issue:

linux-host:~# echo '*/60 * * * * /usr/bin/wget -qO /etc/hosts.deny http://www.sshbl.org/lists/hosts.deny' | crontab -u root -

These crontab will download and substitute your system default hosts with the one regularly updated on sshbl.org , thus next time a brute force attacker which has been a reported attacker will be filtered out as your Linux or Unix system finds out the IP matches an ip in /etc/hosts.deny

The /etc/hosts.deny filtering rules are written in a way that only publicly known brute forcer IPs will only be filtered for the SSH service, therefore other system services like Apache or a radio, tv streaming server will be still accessible for the brute forcer IP.

It’s a good practice actually to use both of the methods 😉
Thanks to Static (Multics) a close friend of mine for inspiring this article.

How to deb upgrade PHP 5.3.3-7 / MySQL Server 5.1 to PHP 5.4.37 MySQL 5.5 Server on Debian 6.0 / 7.0 Squeeze / Wheezy GNU / Linux

Thursday, February 12th, 2015

how-to-deb-upgrade-mysql-server-5.1-to-mysql-5.5-php-5.3-to-php-5.4-5.5-upgrade-howto-on-old-stable-debian-squeeze-wheezy

I've been still running Debian Squeeze 6.0 GNU / Linux on few of the Linux / Apache / MySQL servers I'm administrating and those servers are running few Wordperss / Joomla websites which lately face severe MySQL performance issues. I tried to optimize using various mysql performance optimization scripts such as mysql-tuner.pl, Tuning-primer.sh and Percona Toolkit – a collection of advanced command-line tools for system administrators and tech / support staff to perform a variety of MySQL and system tasks that are too difficult or complex to perform manually. Though with above tools and some my.cnf tunizations I managed to achieve positive performance improvement results with above optimizations, still I didn't like how MyQSL served queries and since the SQL server is already about 5 years old (running version 5.1) and the PHP on sever is still at 5.3 branch, I was advised by my dear colleague Anatoliy to try version update as a mean to improve SQLserver performance. I took seriously the suggestion to try upgrade as a mean to resolve performance issues in this article I will explain in short what I had to do to make MySQL upgrade a success

Of course to try keep deb installed software versions as fresh as possible possible deb packagse, I'm already using Debian Back Ports (for those who hear it a first time Debian Backports is a special repository for Stable versioned Debian Desktop and Servers  – supporting stable releases of Debian Linux) which allows you to keep install packages versions less outdated (than default installable software which usually are way behind latest stable package versions with 2-5 years).

If you happen to administer Stable Debian servers and you never used BackPorts I warmly recommend it as it often includes security patches of packages part of Debian stable releases that reached End Of Support (EOS) and already too old even for security updates to be issued by respective Debian Long Term Suport (LTS) repositories.

If you're like me and still in situation to manage remotely Debian 6.0 Squeeze and its the first time you hear about BackPorts and Debian LTShttps://wiki.debian.org/LTS/ to start using those two add to your /etc/apt/sources.list below 3 lines

Open with vim editor and press shift+G to go to last line of file and then press I to enter INSERT mode, once you're done to save, press (ESC) then press : and type x! in short key combination for exit and save setting in vim is 
 

Esc + :x! 


debian-server:~# vim /etc/apt/sources.list
deb http://http.debian.net/debian squeeze-lts main contrib non-free
deb-src http://http.debian.net/debian squeeze-lts main contrib non-free
deb http://http.debian.net/debian-backports squeeze-backports main

If you haven't been added a security updates line in /etc/apt/sources.list make sure you add also:


deb http://security.debian.org/ squeeze/updates main contrib non-free
deb-src http://security.debian.org/ squeeze/updates main contrib non-free


Then to apply latest security updates and packages from LTS / Backports repository run the usual:


debian-server:~# apt-get update && apt-get –yes upgrade
….

If you need to search a package or install something from just added backports repository use:


debian-server:~# apt-cache -t squeeze-backports search "mysql-server"
auth2db – Powerful and eye-candy IDS logger, log viewer and alert generator
torrentflux – web based, feature-rich BitTorrent download manager
cacti – Frontend to rrdtool for monitoring systems and services
mysql-server-5.1 – MySQL database server binaries and system database setup
mysql-server-core-5.1 – MySQL database server binaries
mysql-server – MySQL database server (metapackage depending on the latest version)


To install specific packages only with all their dependencies from Backports while keeping rest of packages from Debian Stable:


debian-server:~# apt-get install -t squeeze-backports "package_name"

In same way you can also search or install specific packages from LTS repo:


debian-server:~# apt-get search -t squeeze-lts "package_name"

debian-server:~# apt-get install -t squeeze-lts "package_name"

Latest mysql available from Debian BackPorts and LTS is still quite old 5.1.73-1+deb6u1 therefore I made an extensive research online on how can I easily update MySQL 5.1 to MySQL 5.5 / 5.6 on Debian Stable Linux.
 

Luckily there were already DotDeb deb repositories for Debian LAMP (Linux / Apache  / MySQL / PHP / Nginx ) running servers prepared in order to keep the essential Webserver services up2date even long after distro official support is over. I learned about existence of this repo thanks to a Ryan Tate's post who updates his LAMP stack on TurnKey Linux which by the way is based on slightly modified official stable Debian Linux releases packages

To start using DotDeb repos add in /etc/apt/sources.list (depending whereh you're on Squeeze or Wheeze Debian):


deb http://packages.dotdeb.org squeeze all
deb-src http://packages.dotdeb.org squeeze all

or for Debian Wheezy add repos:


deb http://packages.dotdeb.org wheezy all
deb-src http://packages.dotdeb.org wheezy all


I was updating my DebianLatest MySQL / PHP / Apache release to Latest ones on (6.0.4) Squeeze so added above squeeze repos:

Before refreshing list of package repositories, to authenticate repos issue:


debian-server:~# wget -q http://www.dotdeb.org/dotdeb.gpg
debian-server:~# apt-key add dotdeb.gpg

Once again to update my packages from newly added DodDeb repository


debian-server:~# apt-get update

Before running the SQL upgrade to insure myself, I dumped all databases with:


debian-server:~# mysqldump -u root -p -A > /root/dump.sql

Finally I was brave enough to run apt-get dist-upgrade to update with latest LAMP packages


debian-server:~# apt-get dist-upgrade
Reading package lists… Done
Building dependency tree
Reading state information… Done
Calculating upgrade… Done
The following packages will be REMOVED:
  mysql-client-5.1 mysql-server mysql-server-5.1
The following NEW packages will be installed:
  libaio1 libmysqlclient18 mysql-client-5.5 mysql-client-core-5.5 python-chardet python-debian
The following packages will be upgraded:
  curl krb5-multidev libapache2-mod-php5 libc-bin libc-dev-bin libc6 libc6-dev libc6-i386 libcurl3 libcurl3-gnutls libcurl4-openssl-dev libevent-1.4-2
  libgssapi-krb5-2 libgssrpc4 libjasper1 libk5crypto3 libkadm5clnt-mit7 libkadm5srv-mit7 libkdb5-4 libkrb5-3 libkrb5-dev libkrb53 libkrb5support0 libmysqlclient-dev
  libxml2 libxml2-dev locales mysql-client mysql-common ntp ntpdate php-pear php5 php5-cgi php5-cli php5-common php5-curl php5-dev php5-gd php5-imagick php5-mcrypt
  php5-mysql php5-odbc php5-recode php5-sybase php5-xmlrpc php5-xsl python-reportbug reportbug unzip

50 upgraded, 6 newly installed, 3 to remove and 0 not upgraded.
Need to get 51.7 MB of archives.
After this operation, 1,926 kB of additional disk space will be used.
Do you want to continue [Y/n]? Y

As you see from above output above command updates Apache webservers / PHP and PHP related modules, however it doesn't update MySQL installed version, to update also MySQL server 5.1 to MySQL server 5.5


debian-server:~#  apt-get install –yes mysql-server mysql-server-5.5

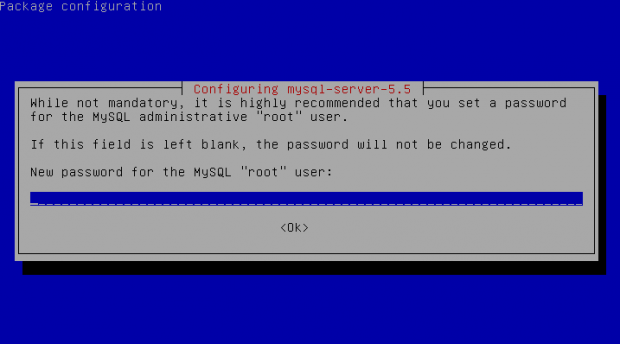
You will be prompted with the usual Debian ncurses text blue interface to set a root password to mysql server, just set it the same as it used to be on old upgraded MySQL 5.1 server.

Well now see whether mysql has properly restarted with ps auxwwf


debian-server:~#  ps axuwwf|grep -i sql
root     22971  0.0  0.0 112360   884 pts/11   S+   15:50   0:00  |                   \_ grep -i sql
root     19436  0.0  0.0 115464  1556 pts/1    S    12:53   0:00 /bin/sh /usr/bin/mysqld_safe
mysql    19837  4.0  2.3 728192 194552 pts/1   Sl   12:53   7:12  \_ /usr/sbin/mysqld –basedir=/usr –datadir=/var/lib/mysql –plugin-dir=/usr/lib/mysql/plugin –user=mysql –pid-file=/var/run/mysqld/mysqld.pid –socket=/var/run/mysqld/mysqld.sock –port=3306
root     19838  0.0  0.0 110112   700 pts/1    S    12:53   0:00  \_ logger -t mysqld -p daemon.error

In my case it was running, however if it fails to run try to debug what is going wrong on initialization by manually executing init script /etc/init.d/mysql stop; /etc/init.d/mysql start and look for errors. You can also manually try to run mysqld_safe from console if it is not running run:


debian-server:~# /usr/bin/mysqld_safe &

This should give you a good hint on why it is failing to run
 

One more thing left is to check whether php modules load correctly to do so issue:


debian-server:~# php -v
Failed loading /usr/lib/php5/20090626/xcache.so:  /usr/lib/php5/20090626/xcache.so: cannot open shared object file: No such file or directory

Failed loading /usr/lib/php5/20090626/xdebug.so:  /usr/lib/php5/20090626/xdebug.so: cannot open shared object file: No such file or directory


You will likely get an exception (error) like above.
To solve the error, reinstall xcache and xcache-debug debs


debian-server:~# apt-get purge php5-xcache php5-xdebug

Now PHP + MySQL + Apache environment should be running much smootly.
debian-squeeze-wheeze-update-install-mysql-sevver5.55-620x344-howto

Upgrading the MySQL server / PHP library to MySQL server 5.6 / PHP 5.5 on Wheeze Linux is done in very much analogous ways all you have to do is change the repositories with above wheeze 7.0 ones and to follow the process as described in this article. I haven't tested update on Wheezy yet, so if you happen to try my article with wheezy reports and got a positive upgrade result please drop a comment.
GNU / Linux: Resuming failed / interrupted – scp, sftp, ftp)file or directory upload with rsync

Saturday, October 20th, 2012

Rsync SSH Logo Linux Continue failed upload logo

You probably wondered how and if it is possible to Continue / Resume interrupted SFTP / FTP, SCP commands file transfer ?

Continuing a failed Upload is something, very useful especially for people like me who use Linux over wireless and there are constant failures with Internet, or just have to move quickly from a Wireless location to another one while sftp user@host upload was in progress. SFTP protocol was not planned with a continues upload in mind, just like web HTTP proto (POST) file upload was not. Thus there is no direct way to continue file upload using some embedded SCP / FTP protocol feature.
This is really bad especially, if you’re uploading some enormous 10 Gigabytes files and upload interrupts on 95% percentage 😉

Thanksfully though default protos does not support continues downloads rsync does!

there is a possibility to continue SCP failed uploads!
Using rsync, you can continue uploading any failed upload nomatter the protocol supports resume or not 🙂

To continue an (interrupted) SCP, SFTP (SSH) or (FTP) proto transmission with rsync


# rsync --rsh='ssh' -av --progress --partial interrupted_file_name_to_be_uploaded.rar root@UPLOAD-HOST.COM:/root

If you need to resume failed upload to SSH server running on unusual port number use, let’s say SSH listening for connections on port 2202:


# rsync --rsh='ssh -p 2202' -av --progress --partial interrupted_file_name_to_be_uploaded.rar root@UPLOAD-HOST.COM:/root

For efficiency of upload for lage files it is also useful to use rsync’s file compression capabilities with -z switch:


# rsync --rsh='ssh -p 2202' -avz --progress --partial interrupted_file_name_to_be_uploaded.rar root@UPLOAD-HOST.COM:/root

Sometimes its necessery to resume a failed ( upload ) transfer of a directory with some sub directory structure to do so:


# rsync --rsh='ssh -p 22' -avztrlpog --progress --partial interrupted_file_name_to_be_uploaded.rar root@www.pc-freak.net:/root

Here is short explained each rsync switches you see above:


-e ssh rsync will use ssh client instead of rsh
-z compress file transfer
-t preserve time (other attributes as owner or permissions are also possible)
-l copy symlinks as symlinks
-r recursive into subdirectories
-p preserve permissions
-o preserve owner
-g preserve group
-v verbose

-tplog key switches are very useful as they will keep file creation and modification times, exact permissions, owner and group permissions and copy symlinks correctly.

How to Repair Ubuntu Linux which failed due to computer switch off during update :)

Tuesday, August 28th, 2012

My sister tried updating her Ubuntu to a newer version 12.04 (Precise Pangolin) but in the middle of the dist-update process had to go out and hence closed her notebook thinking the update would continue by itself. I’m not fully aware what happened next, maybe the battery charge went down, maybe the computer entered sleep mode in the middle of some important package update or whatever. The result however on next opening OF her Ubuntu powered Acer Aspire 5736Z was Ubuntu unable to boot properly.
The boot up failed in the middle of booting the BootSplash (from some of the /etc/init.d … init scripts)

. The BootSplash status was therefore failing and on the screen the GUI cursor appeared refreshing every few seconds, whether on every refresh the screen become blank, the hard drive was reading on and on, continuously as well. Since the screen was keeping mostly blank I had no way to see exactly why the hard drive was scraping on and on….

My first guess was to try to boot the Ubuntu in single user mode (without GUI environment) and then complete the interrupted packages apt-get dist-upgrade.

In the old days of RedHat and probably nowdays in Fedora, I remember entering single user mode was easy just press I button few times on OS boot in non-interactive mode. The I (boot single-mode) shortcut however is not compatible with Deb based distros (as I found out by trying it out unsuccesfully).

Actually during booting process, this notebook did not even prompted the GRUB menu with even simple choice to choose an old kernel or something, hence I took a quick look on the net how can I make the GRUB menu appear on Ubuntu!.
As I read the reason why GRUB menu did not appear on the laptop boot was due to very short GRUB (select) boot timeout delay set.

Therefore to make the GRUB prompt (select) prompt appear in Ubuntu it is necessery to:

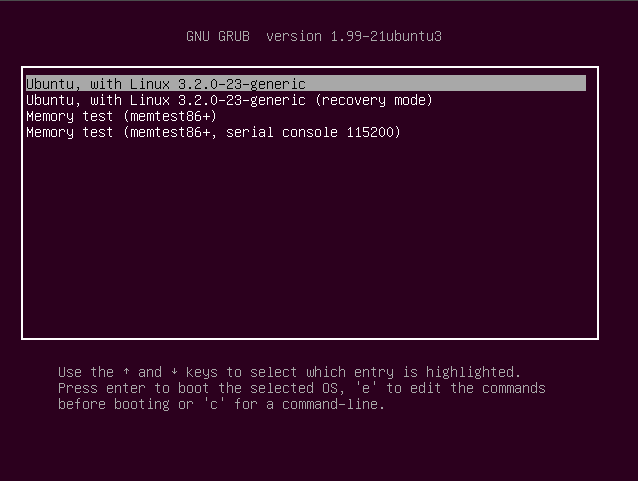
1. Hold continously the SHIFT key at boot

Ubuntu Linux version 12.04 GRUB boot textscreen picture

Once the textmode GRUB selection screen appears, as I read in instructions in blogs one has to:
HIT e key, over default boot-up kernel, e.g.:

Ubuntu, with Linux 3.2.0-23-generic

Now to boot Ubuntu in single user mode as I red it is necessery to modify near line:

linux /boot/vmlinuz-3.2.0-24-generic root=UUID=bc6f8146-1523-46a6-8b\6a-64b819ccf2b7 ro quiet splash

to something like:

linux /boot/vmlinuz-3.2.0-24-generic root=UUID=bc6f8146-1523-46a6-8b\6a-64b819ccf2b7 ro single quiet splash
initrd /boot/initrd.img-3.2.0-24-generic

Then finally to load up with the changed GRUB options, I have pressed Ctrl+X
Unfortunately this didn’t work on this totally bugged Ubuntu. After continuously looking for way to boot in sigle user or textmode (without X server), I found another blog recommending to change: quiet splash words with text in grub kernel load-up options ..

In my case none of the ways worked out so I finally decided to do it the “old-fashioned” classical way to recover Ubuntu, e.g. – by using Ubuntu Install CD, booting in “Try Ubuntu” mode and using the good old chroot cmd.

Fixing the failed updates Ubuntu, came up to booting with Ubuntu Install CD with option: Try Ubuntu without any change of your computer, further on once the CD boot up, I entered console and inside console used commands similar to one of my previous posts – How to mount /proc, /dev and chroot in Linux

Ubuntu fix was up-to to issuing :

# mkdir /mnt/recover
# chroot /dev/sda1 /mnt/recover
root@ubuntu:~# mount /proc
root@ubuntu:~# mount /proc/pts
root@ubuntu:~# mount -a
root@ubuntu:~# mount /dev
root@ubuntu:~# dpkg-reconfigure -a
root@ubuntu:~# apt-get update
....
root@ubuntu:~# apt-get --yes upgrade
....
root@ubuntu:~# apt-get --yes dist-upgrade
....

Onwards during the apt-get upgrade and apt-get dist-upgrade few questions poped up asking me if I would like to replace some files with their new versions on each questions I substituted the files with the new maintainer version. Then finally after PC restart my sis Ubuntu boot up now fine with the latest Ubuntu version 12.04.

The Trigger for this site my failed university studies

Monday, April 2nd, 2012

The computer Freak absolute trigger old computer laptop like looking

What triggered the creation of this website is my many failed university studies. Everywhere in  each and every university I studied, teachers tried to impose (project) their world view on the student. This is a very bad in my personal view, because once you graduate instead of being determined in what you want to do with your life on the contrary you start to loose the way and be dependent on someone's idea of life.

I've been  in 2 technical professional universities, one economic and one Business administration oriented university. I've seen a lot of different life-views. In each and every of this educational institutions I was expecting to be "blessed" with a good stand to find my way in life. In most of the time all of the universities, seriously disappointed me.

The good think from failure is that it makes you learn, so I believe my failure to fit to education systems is rooted in the fact, I'm a  too much freedom thinking person. Current educational system is completely hostile to freedom thinkers and if you're determined to learn more than the usual with a desire to preserve your identity and freedom you will most likely not fit in any educational system. Taking out the human's freedom starts in very early stage in school. Teachers just grab you and push you in a line and try to shape you as a clay. This wouldn't be a bad think if they have a good stand base like a good understanding on who they're. Unfortunately most of people in this age, doesn't have any idea, who they're, where they come from and why they live. This is because of lacking faith in God. Later in the university, situation become even worser as you're put in some kind of track which often is not up-to-date and doesn't respond to what you will need once you have graduated

Honestly I was amazed that  within universities, where it was supposed I should meat intelligent people with a profound interest in different fields, I mostly met people who just followed the scheduled universities program and rarely was interested in scientific matters or in any research and development.

I believe this kind of educational becoming more dumb is rooted in the lack of people to hold their traditions and their strong faith in God and God providence for life.