Posts Tagged ‘Files’

How to mount ISO image files in Graphical Environment (GUI) on Ubuntu and Debian GNU/Linux

Saturday, January 14th, 2012

Mounting ISO files in Linux is easy with mount cmd, however remembering the exact command one has to issue is a hard task because mounting ISO files is not a common task.

Mounting ISO files directly by clicking on the ISO file is very nice, especially for lazy people uninitiated with the command line 😉

Besides that I'm sure many Windows users are curious if there is an equivallent program to DaemonTools for Linux / BSD*?

The answer to this question is YES!
There are two major programs which can be used as a DaemonTools substitute on Linux:

These are FuriousISOMount and AcetoneISO
AcetoneISO is more known and I've used it some long time ago and if I'm correct it used to be one of the first ISO Mount GUI programs for Linux. There is a project called GMount-ISO / (GMountISO) which of the time of writting this article seems to be dead (at least I couldn't find the source code).

Luckily FuriousISOMount and AcetoneISO are pretty easy to install and either one of the two is nowdays existing in most Linux distributions.
Probably the programs can also be easily run on BSD platform also quite easily using bsd linux emulation.
If someone has tried something to mount GUIs in Free/Net/OpenBSD, I'll be interesting to hear how?

1. Mount ISO files GUI in GNOME with Furius ISO Mount

FuriousISOMount is a simple Gtk+ interface to mount -t iso9660 -o loop command.

To start using the program on Debian / Ubuntu install with apt;

debian:~# apt-get install furiusisomount
The following extra packages will be installed:
fuseiso fuseiso9660 libumlib0
The following NEW packages will be installed:
furiusisomount fuseiso fuseiso9660 libumlib0

To access the program in GNOME after install use;

Applications -> Accessories -> Furious ISO Mount

Screenshot ISO Mount Tool Debian GNU/Linux Screenshot
 

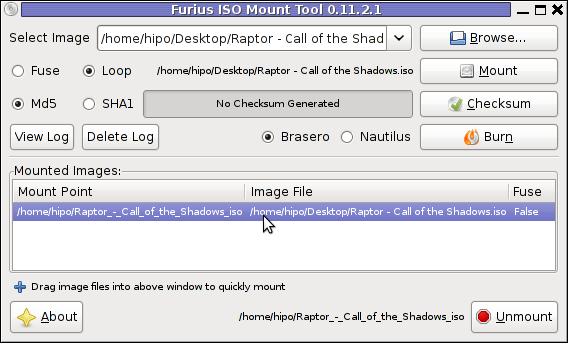
When mounting it is important to choose Loop option to mount the iso instead of Fuse

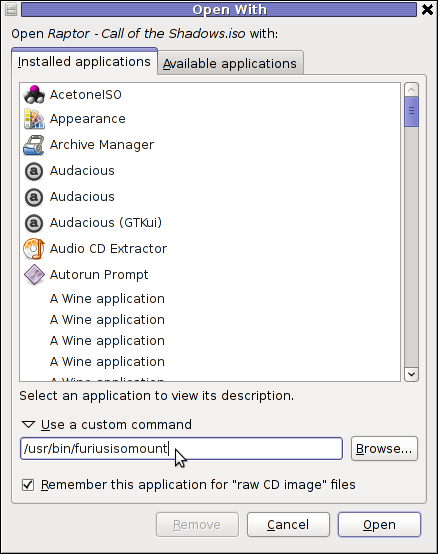
After the program is installed to associate the (.iso) ISO files, to permanently be opened with furiusisomount roll over the .iso file and choose Open With -> Other Application -> (Use a custom command) -> furiusisomount

GNOME Open with menu Debian GNU / Linux

2. Mount ISO Files in KDE Graphical Environment with AcetoneISO

AcetoneISO is build on top of KDE's QT library and isway more feature rich than furiousisomount.
Installing AcetoneISO Ubuntu and Debian is done with:

debian:~# apt-get install acetoneiso
The following NEW packages will be installed:
acetoneiso gnupg-agent gnupg2 libksba8 pinentry-gtk2 pinentry-qt4
0 upgraded, 6 newly installed, 0 to remove and 35 not upgraded.
Need to get 3,963 kB of archives.
After this operation, 8,974 kB of additional disk space will be used.
...

Screenshot Furius ISO Mount Tool Debian GNU/Linux ScreenShot

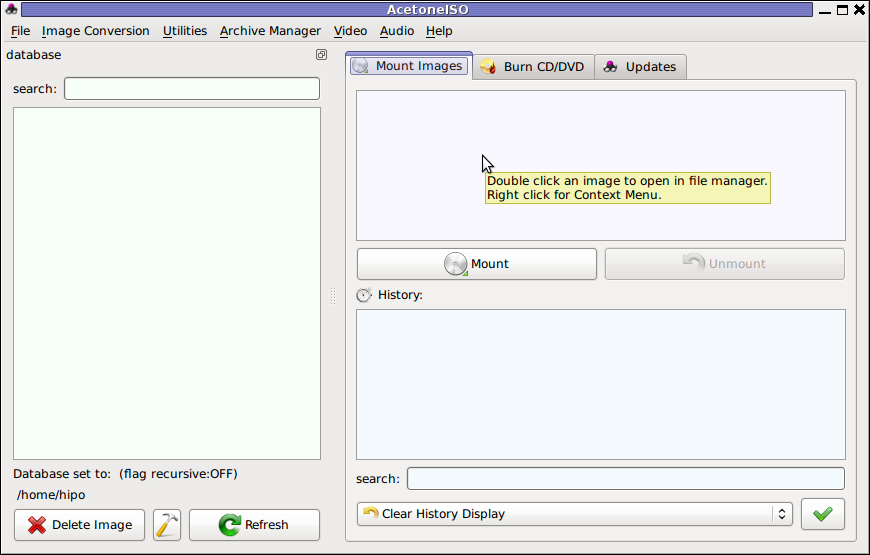
AcetoneISO supports:
 

  • conversion between different ISO formats
  • burn images to disc
  • split ISO image volumes
  • encrypt images
  • extract password protected files

Complete list of the rich functionality AcetoneISO offers is to be found on http://www.acetoneteam.org/viewpage.php?page_id=6
To start the program via the GNOME menus use;

Applications -> Accessories -> Sound & Video -> AcetoneISO

I personally don't like AcetoneISO as I'm not a KDE user and I see the functionality this program offers as to rich and mostly unnecessery for the simple purpose of mounting an ISO.

3. Mount ISO image files using the mount command

If you're a console guy and still prefer mounting ISO with the mount command instead of using fancy gui stuff use:

# mount -t iso9660 -o loop /home/binary/someiso.iso /home/username/Iso_Directory_Name


How to print simple text pages on Linux in console with old LPR parallel port attached printer

Tuesday, February 7th, 2012

LPT parallel port pinout diagram with explanations

Many younger people, might not know lpr command, historically it was heavily used for printing in the early GNU / Linux days.
lpr ships the text to be printed to the printer which is physically attached on LPT (Line Print Terminal) parallel port . Those who lived the DOS era surely know in those "ancient" days, everyone who wanted to print has to use the LPT parallel port

Present time, everyone knows there is almost no modern printer that is attached to the PC via LPT port but rather the USB port is used for communication between the printer the computer.
Nevertheless The USB printers on Linux are managed by CUPS, the lpr command is still functional shipping the text to be printed via CUPS (cups-lpd daemon).
Before cups-lpd was introduced the service managing the print jobs was lpd
Hence lpr is still functional.

To print a plain text file of one page with lpr on Linux:

linux:~# cat text-file-to-print.txt | lpr

For multiple printers to switch between multiple printers there is the PRINTER shell variable:

linux:~# export PRINTER=printer-Name-and-Type

To print a really long text file (a book in TXT) the pr command comes handy. As you can read in the cmd manual pr converts text files for printing

Lets say you would like to have a 60 lines of text per printed page, the cmd to issue is:

linux:~# pr -l60 text-file-to-print.txt | lrp

All queued printing jobs can be reviewed with the lpq, if you have a printer attached try:

linux:~# lpq
lp is ready and printing
Rank Owner Job Files Total Size
active hipo 1 text-file-to-print.txt 62045 bytes

Since some years it is pretty rare for people to use lpq, since most of the parallel printing is managed by CUPS server, what most people use nowdays to check the printer queue is lpstat : e.g.

linux:~# lpstat
...

Printing status and all things related to queued jobs for printing gets logged in /var/log/lpr.log

There is even more simplistic way to print directly to the printer (if the printer is attached via a LPT port) through the kernel /dev/lp, for example:

linux:~# cat text-file-to-print.txt >> /dev/lp

For more than one printer attached the naming of /dev/lp, might probably be /dev/lp0, /dev/lp1 etc.
The lprm command also exists in case if you would like to cancel a printjob in the queue. Lets say I want to cancel a job in the queue with Job ID 5:

linux:~# lrpm 5
...

To cancel a current running job in the middle the /usr/bin/cancel command exists.

An interesting historic fact is that nowdays opening lpr, lpq or any of the other tools for simple text mode printing one sees on top of the page Apple Inc.

Lets clear this up CUPS (Common Unix Printing System) (open source) printing platform is not owned by Apple, since it is licensed under GPL2 and LGPL. The reason why the Apple Inc. shows up in man pages is because in year 2007, the founder of CUPS printing server Michael Sweet hired him to work for Apple Inc. "purchasing" the CUPS source. However as we know they did not really purchased the code, because the code was already belonging to the community (licensed under GPL2). Apple however as a marketing trick used the fact that Sweet worked for them and as probably as a matter of marketing asked him to place the Apple Inc. in the copyright source and manual areas. Obviously this is not true, since Apple Inc. does not hold copyright for CUPS as CUPS can be copied by anyone (its open source) 😉

Most of the people will never print using this commands, since printing is now, ages ahead, anyways for simple people (like me), who just need to print a text with no special fonts or graphics text printing is just great.

Text printing is also a good learning experience for Linux novices and is good to be known just as a piece of UNIX history.

How to set up Path to .exe GNUWin32 binary files in Windows XP / Vista / 2003 / 2008 (Setting PATH to executables on Windows)

Tuesday, August 23rd, 2011

I’ve been working on a servers running Windows 2003 and Windows 2008 these days.
As I wanted to be more flexible on what I can do from the command line I decided to install GNUwin (provides port of GNU tools), most of which are common part of any Linux distribution).
Having most of the command line flexibility on a Windows server is a great thing, so I would strongly recommend GNUWin to any Windows server adminsitrator out there.

Actually it’s a wonderful thing that most of the popular Linux tools can easily be installed and used on Windows for more check GnuWin32 on sourceforge

One of the reasons I installed Gnuwin was my intention to use the good old Linux tail command to keep an eye interactive on the IIS server access log files, which by the way for IIS webserver are stored by default in C:WindowsSystem32LogFilesW3SVC1*.log

I’ve managed to install the GNUWin following the install instructions, not with too much difficulties. The install takes a bit of time, cause many packs containing different parts of the GNUWin has to be fetched.

To install I downloaded the GNUWin installer available from GNUWin32’s website and instructed to extracted the files into C:Program FilesGnuwin
Then I followed the install instructions suggestions, e.g.:

C:> cd c:Program FilesGnuWin
C:Program FilesGnuWin> download.bat
...
C:Program FilesGnuWin> install c:gnuwin32
...

After the installation was succesfully completed on the two Windows machines, both of which by the way are running 64 bit Windows, it was necessery to add the newly installed GNU .exe files to my regular cmd.exe PATH variable in order to be able to access the sed, tail and the rest of the gnuwin32 command line tools.

In order to add C:GnuWin32bin directory to the windows defined Command line Path , I had to do the following:

a. Select (Properties) for My Computer

Start (button) -> My Computer (choose properties)

b. Select the My Computer Advanced (tab)

Then, from the My Computer pane press on Advanced tab

c. Next press on Environment Variables

Windows environment variables screenshot

You see in above’s screenshot the Environment Variables config dialog, to add the new path location in System Variables sectiom, between the list I had to add the c:GNUwin32bin path locatiion. To find I pressed on Edit button scrolled down to find the Variable and hence added at the end of the long list defined paths.
After adding in GNUwin, the Windows path looks like this:

C:Program Files (x86)EWANAPI;C:WINDOWSsystem32;C:WINDOWS;C:WINDOWSSystem32Wbem;C:Program Files (x86)IntelNGSMSMPFiles;C:Program Files (x86)Microsoft SQL Server100ToolsBinn;C:Program FilesMicrosoft SQL Server100ToolsBinn;C:Program FilesMicrosoft SQL Server100DTSBinn;C:Program Files (x86)Microsoft SQL Server100ToolsBinnVSShellCommon7IDE;C:Program Files (x86)Microsoft Visual Studio 9.0Common7IDEPrivateAssemblies;C:Program Files (x86)Microsoft SQL Server100DTSBinn;C:WINDOWSsystem32WindowsPowerShellv1.0;C:gnuwin32bin

Further on, I launched the tail command to intercatively take an eye on who is accessing the IIS webserver.
Sadly this worked not, trying to use tail with the IIS ex10116.log log;

C:WindowsSystem32LogfilesW3SVC1> tail -f ex10116.log

Spit an error tail: ex10116.log: Bad file descriptor

Since I couldn’t use tail -f I looked for alternative and a quick search led me to Tail 4 Win32 . Lest the name suggests it is supposed to work on 32 bit arch Windows the version on tailforwin32’s website is working perfectly fine on 64 bit Windows as well.
What it does is to simulate a normal tail -f command inside a very simplistic window interface. You see it in action with opened IIS log on below’s screenshot:

GUI Tail for Windows screenshot

Finally my goal is achieved and I can take an eye interactively on IIS logs. End of the article, hope it wasn’t too boring 😉

How to list all files and directories in Windows XP drive and save it to a file

Friday, December 10th, 2010

Yesterday I had this thing, by accident because of some misconfiguration of the domain controller here in the university. I can read some files and folders which were belonging to students and teachers here in the university. We had some great fun with my good old friend David. In checking up some trashy stuff. It was rather interesting that one of the directory listings actually contained all the teachers computer usernames with it, therefore I needed a quick way to make all the files listing stored in a file in order to be able to later have this usernames listing stored in an MySQL or some other kind of database, after consulting few websites I came to the command to list all files and directories in the mapped sharing.

We first used the net use //workgroup/ J: to map the sharing in the workgroup and later we used the dir command as shown below to list all files and directories and store the data in a file.
So here is how you can also come with all your files and directories in your Windows drive stored in a file:

dir J: /s > c:somepathj_file.txt

Now if the files and directory is not too long you will have everything stored in j_file.txt in a couple of minutes time, however in our case the directory listing was huge so we had to wait for an hour and still the file was filling in 🙂

Howto delete multiple files in Linux and FreeBSD / How to deal with “Argument list too long” error while deleting many files in directory

Wednesday, April 7th, 2010

Linux has some Limitations on the number of files you can delete within a directory, therefore if you try to delete let’s say 100000 files with a quarantine mails from spamassassin.
In that case you are about to face an error Argument list too long . The amount of files you can delete in Linux is tied with something specified by a file:
/usr/include/linux/limits.h
This limitation is a limitation caused by kernel_limits. In order to check the limitation on your Linux distribution, you have to execute the command:

egrep ARG_MAX /usr/include/linux/limits.h

You should receive a result on most Linux distrubutions similar to:
#define ARG_MAX 131072 /* # bytes of args + environ for exec() */

The 131072 is actually a default limitation on Debian GNU/Linux as well.The reason for the error is that the the maximum number (in bytes) of the arguments to a command could be equal max to the ARG_MAX defined in the limits.h.
For instance rm -f * in a directory with 40000 fileswould be evaluted as rm -f file1 file2 file3 … file40000. Therefore at a certain point the maximum limitation of 131072 bytes long for arguments or 128KB is about to be reached and then the command let’s say ls * would refuse to list the files in the directory showing up the annoying Argument list too long error.
There are a couple of ways to deal with that unpleasant situation.

1. You can use the linux find command to delete the files, you have to execute after changing dir (cd) to the directory where the multiple files are located:
find . -exec rm -fr {} ; 2. Second approach to the problem is passing the xargs command to find .
For instance execute the command:

find . -name "*" -print | xargs rm

3. In FreeBSD to get around the “Argument list too long” problem”, in bash shell you have to execute:

for files in *.*; do rm -f $files; done

4. Another possible way is to increase the ARG_MAX value in limits.h though this approach in my personal belief could have a negative impact on some productive servers, therefore it’s not a recommended.
Yet if you desire to do so simply edit /usr/include/linux/limits.h and change the ARG_MAX to your value of choice.

Fix to a problem with Varnish Cache not showing Apache’s .htm files extension on FreeBSD

Thursday, April 1st, 2010

I’m running my Apache server behind a Varnish Cache server. At most of the time all works okay, however today I’ve noticed a significant problem.
The problem consists in the fact that whenever I have directory listing enabled for some directory and I have dropped some .htm files, the htm files wouldn’t open as a proper html but instead the following message appears on click over some of the htm files:.

You have choosen to open 1.htm
which is a: PTHML file
from: http://myurl.com/
What should firefox do with this file?
(*) Open With (Browse ...)
( ) Save File ...

Here is also a screenshot of the error You have choosen to open … which is a: PHTML file:
you have choosen to open ... which is a PHTML file

At the beginning I though the error is caused by Apache and it was kind of weird since Apache my Apache serves a bunch of .html files without any issues.
It took me a while to realize that actually the problem is caused by the Varnish Cache server.
I digged my head into Varnish configuration, in hope to find something mentioned in the documentation but I couldn’t find anything meaningful there.
So after a while I decided to start experimenting with Apache.
Invoking the files directly on the port where I have Apache listening prooved me that Apache doesn’t have any problems with passing the .htm files content with a proper Application Type.
But anyways since I couldn’t find nothing in Varnish documentation, I’ve tried changing some stuff into my Apache configuration until finally I solved it!
The whole issue got solved by simply adding the following line in my Apache configuration file httpd.conf in my case on my FreeBSD

AddHandler application/x-httpd-php .htm .html .phtml

A simple Apache and Varnish restart and Hoooray, It Works again! 😀

Howto Burn ISO files in Windows (XP, 2003, Vista)

Friday, September 18th, 2009

I was looking for a way to burn CDs under Windows Vista. After some looking in Google I found cdburnerxp probably the apps is quite decent, unfortunately I couldn’t use it to properly burn an iso of ubuntu. Thus I looked for a software which does ISO burning in Windows and I came across isorecorder which hopefully would work correctly. END—–

Open Microsoft Office 2007 .docx files in 64 bit Ubuntu Jaunty with odf-converter-integrator

Saturday, September 19th, 2009

Recently I had to make Ubuntu system to properly deal with Microsoft Office 2007 XML based .docx file format.
I achieved that in the following way:
1. Use the following odf-converter-integrator download link to download odf-converter-integrator-chocolate. The release offered in my case was odf-converter-integrator-chocolate_0.1.4-1b_amd64.deb.
2. Next install it with:
dpkg -i odf-converter-integrator-chocolate_0.1.4-1b_amd64.deb
Sounds simple eh? Indeed it is. Now you’re ready to open docx files with your 64 bit Ubuntu Jaunty GNU/Linux natively in OpenOffice.
END—–

Open Microsoft Office 2007 .docx files in amd64 Debian (Squeeze / Sid) Unstable with odf-converter-integrator

Saturday, September 19th, 2009

After my upgrade to Debian Unstable I experienced problems with opening the microsoft office 2007 .docx files.
The error message that poped up every time I tried opening a docx file was:
Read-Error. Data could not be read from the file
I wasted some time looking for people who experienced the same issue and possible solution to the situation.
Unfortunately I couldn’t find any fix online until I found the fix on my own experimenting installing different versions of the odf-converter-integrator.
First I’ve tried updating my current installed odf-converter-integrator version, which was odf-converter-integrator 0.2.1.
I’ve upgraded to a version odf-converter-integrator_0.2.2_i386.deb.
Unluckily that the problem persisted, so I tried some other suggested possible work arounds, none of which worked.
I was sure there should be a way to make it work so I continued trying stuff until I FOUND THE SOLUTION.
The solution was as simple as downloading odf-converter-integrator_strawberry_0.2.3-2_i386.deb from the odf-converter-integrator download page
And next install it executing:
dpkg -i –force-all odf-converter-integrator_strawberry_0.2.3-2_i386.deb
Hooray opening docx works corretly on my Debian Unstable now! I bet it works for you as well 🙂 Praise the Lord!
END—–

Convert doc files to plain text (txt) in terminal / console (tty) on GNU / Linux

Sunday, September 20th, 2009

I was looking for a way to convert Microsoft .doc files to plain text (txt) in Linux directly through terminal.
After some lookup in Google Groups I found ANTIWORD! .
Luckily Debian comes even with a package containing the nice nifty program.
Here is the description of antiword – Converts MS Word files to text, PS and PDF
Fun, desciprtion Eh? 🙂 Ain’t it?
There are some other ways to Convert doc files to plain text, for instance you could use the command catdoc , for example to convert simple .doc to .txt file usecatdoc -a whitepaper.doc.
Another way to convert .doc files to .txt mostly used by developers is via the wvware (nothing to do with vmware!:)) utility.
wvware could directly convert it to html. For example:
wvWare file.doc >file.htmlor
wvText file.doc file.txt
.A lot of things I’ll skip here are well explained in the article Viewing Word files at the command line .
END—–