Posts Tagged ‘firewall’

Scanning ports with netcat “nc” command on Linux and UNIX / Checking for firewall filtering between source and destination with nc

Friday, September 6th, 2019

scanning-ports-with-netcat-nc-command-on-Linux-and-UNIX-checking-for-firewall-filtering-between-source-destination-host-with-netcat

Netcat ( nc ) is one of that tools, that is well known in the hacker (script kiddie) communities, but little underestimated in the sysadmin world, due to the fact nmap (network mapper) – the network exploratoin and security auditing tool has become like the standard penetration testing TCP / UDP port tool
 

nc is feature-rich network debugging and investigation tool with tons of built-in capabilities for reading from and writing to network connections using TCP or UDP.

Its Plethora of features includes port listening, port scanning & Transferring files due to which it is often used by Hackers and PenTesters as Backdoor. Netcat was written by a guy we know as the Hobbit <hobbit@avian.org>.

For a start-up and middle sized companies if nmap is missing on server usually it is okay to install it without risking to open a huge security hole, however in Corporate world, due to security policies often nmap is not found on the servers but netcat (nc) is present on the servers so you have to learn, if you haven't so to use netcat for the usual IP range port scans, if you're so used to nmap.

There are different implementations of Netcat, whether historically netcat was UNIX (BSD) program with a latest release of March 1996. The Linux version of NC is GNU Netcat (official source here) and is POSIX compatible. The other netcat in Free Software OS-es is OpenBSD's netcat whose ported version is also used in FreeBSD. Mac OS X also comes with default prebundled netcat on its Mac OS X from OS X version (10.13) onwards, on older OS X-es it is installable via MacPorts package repo, even FreeDOS has a port of it called NTOOL.

The (Swiss Army Knife of Embedded Linux) busybox includes a default leightweight version of netcat and Solaris has the OpenBSD netcat version bundled.

A cryptography enabled version fork exists that supports that supports integrated transport encryption capabilities called Cryptcat.

The Nmap suite also has included rewritten version of GNU Netcat named Ncat, featuring new possibilities such as "Connection Brokering", TCP/UDP Redirection, SOCKS4 client and server support, ability to "Chain" Ncat processes, HTTP CONNECT proxying (and proxy chaining), SSL connect/listen support and IP address/connection filtering. Just like Nmap, Ncat is cross-platform.

In this small article I'll very briefly explain on basic netcat – known as the TCP Army knife tool port scanning for an IP range of UDP / TCP ports.


1. Scanning for TCP opened / filtered ports remote Linux / Windows server


Everyone knows scanning of a port is possible with a simple telnet request towards the host, e.g.:

telnet SMTP.EMAIL-HOST.COM 25


The most basic netcat use that does the same is achiavable with:


$ nc SMTP.EMAIL-HOST.COM 25
220 jeremiah ESMTP Exim 4.92 Thu, 05 Sep 2019 20:39:41 +0300


Beside scanning the remote port, using netcat interactively as pointing in above example, if connecting to HTTP Web services, you can request remote side to return a webpage by sending a false referer, source host and headers, this is also easy doable with curl / wget and lynx but doing it with netcat just like with telnet could be fun, here is for example how to request an INDEX page with spoofed HTTP headers.
 

nc Web-Host.COM 25
GET / HTTP/1.1
Host: spoofedhost.com
Referrer: mypage.com
User-Agent: my-spoofed-browser


2. Performing a standard HTTP request with netcat


To do so just pype the content with a standard bash integrated printf function with the included end of line (the unix one is \n but to be OS independent it is better to use r\n  – the end of line complition character for Windows.


printf "GET /index.html HTTP/1.0\r\nHost: www.pc-freak.net\r\n\r\n" | nc www.pc-freak.net 80


3. Scanning a range of opened / filtered UDP ports


To scan for lets say opened remote system services on the very common important ports opened from UDP port 25 till, 1195 – more specifically for:

  • UDP Bind Port 53
  • Time protocol Port (37)
  • TFTP (69)
  • Kerberos (88)
  • NTP 123
  • Netbios (137,138,139)
  • SNMP (161)
  • LDAP 389
  • Microsoft-DS (Samba 445)
  • Route BGP (52)
  • LDAPS (639)
  • openvpn (1194)


nc -vzu 192.168.0.1 25 1195


UDP tests will show opened, if no some kind of firewall blocking, the -z flag is given to scan only for remote listening daemons without sending any data to them.


4. Port Scanning TCP listening ports with Netcat


As prior said using netcat to scan for remote opened HTTP Web Server on port 80 an FTP on Port 23 or a Socks Proxy or MySQL Database on 3306 / PostgreSQL DB on TCP 5432 is very rare case scenario.

Below is example to scan a Local network situated IP for TCP open ports from port 1 till 7000.


# nc -v -n -z -w 5 192.168.1.2 1-7000

           nc: connect to host.example.com 80 (tcp) failed: Connection refused
           nc: connect to host.example.com 20 (tcp) failed: Connection refused
           Connection to host.example.com port [tcp/ssh] succeeded!
           nc: connect to host.example.com 23 (tcp) failed: Connection refused


Be informed that scanning with netcat is much more slower, than nmap, so specifying smaller range of ports is always a good idea to reduce annoying waiting …


The -w flag is used to set a timeout to remote connection, usually on a local network situated machines the timeout could be low -w 1 but for machines across different Data Centers (let say one in Berlin and one in Seattle), use as a minimum -w 5.

If you expect remote service to be responsive (as it should always be), it is a nice idea to use netcat with a low timeout (-w) value of 1 below is example:
 

netcat -v -z -n -w 1 scanned-hosts 1-1023


5. Port scanning range of IP addresses with netcat


If you have used Nmap you know scanning for a network range is as simple as running something like nmap -sP -P0 192.168.0.* (to scan from IP range 1-255 map -sP -P0 192.168.0.1-150 (to scan from local IPs ending in 1-150) or giving the network mask of the scanned network, e.g. nmap -sF 192.168.0.1/24 – for more examples please check my previous article Checking port security on Linux with nmap (examples).

But what if nmap is not there and want to check a bunch 10 Splunk servers (software for searching, monitoring, and analyzing machine-generated big data, via a Web-style interface.), with netcat to find, whether the default Splunk connection port 9997 is opened or not:


for i in `seq 1 10`; do nc -z -w 5 -vv splunk0$i.server-domain.com 9997; done


6. Checking whether UDP port traffic is allowed to destination server


Assuring you have access on Source traffic (service) Host A  and Host B (remote destination server where a daemon will be set-upped to listen on UDP port and no firewall in the middle Network router or no traffic control and filtering software HUB is preventing the sent UDP proto traffic, lets say an ntpd will be running on its standard 123 port there is done so:

– On host B (the remote machine which will be running ntpd and should be listening on port 123), run netcat to listen for connections


# nc -l -u -p 123
Listening on [0.0.0.0] (family 2, port 123)


Make sure there is no ntpd service actively running on the server, if so stop it with /etc/init.d/ntpd stop
and run above command. The command should run as superuser as UDP port 123 is from the so called low ports from 1-1024 and binding services on such requires root privileges.

– On Host A (UDP traffic send host


nc -uv remote-server-host 123


netcat-linux-udp-connection-succeeded

If the remote port is not reachable due to some kind of network filtering, you will get "connection refused".
An important note to make is on some newer Linux distributions netcat might be silently trying to connect by default using IPV6, bringing false positives of filtered ports due to that. Thus it is generally a good idea, to make sure you're connecting to IPV6


$ nc -uv -4 remote-server-host 123


Another note to make here is netcat's UDP connection takes 2-3 seconds, so make sure you wait at least 4-8 seconds for a very distant located hosts that are accessed over a multitude of routers.
 

7. Checking whether TCP port traffic allowed to DST remote server


To listen for TCP connections on a specified location (external Internet IP or hostname), it is analogous to listening for UDP connections.

Here is for example how to bind and listen for TCP connections on all available Interface IPs (localhost, eth0, eth1, eth2 etc.)
 

nc -lv 0.0.0.0 12345


Then on client host test the connection with


nc -vv 192.168.0.103 12345
Connection to 192.168.0.103 12345 port [tcp/*] succeeded!


8. Proxying traffic with netcat


Another famous hackers use of Netcat is its proxying possibility, to proxy anything towards a third party application with UNIX so any content returned be printed out on the listening nc spawned daemon like process.
For example one application is traffic SMTP (Mail traffic) with netcat, below is example of how to proxy traffic from Host B -> Host C (in that case the yandex current mail server mx.yandex.ru)

linux-srv:~# nc -l 12543 | nc mx.yandex.ru 25


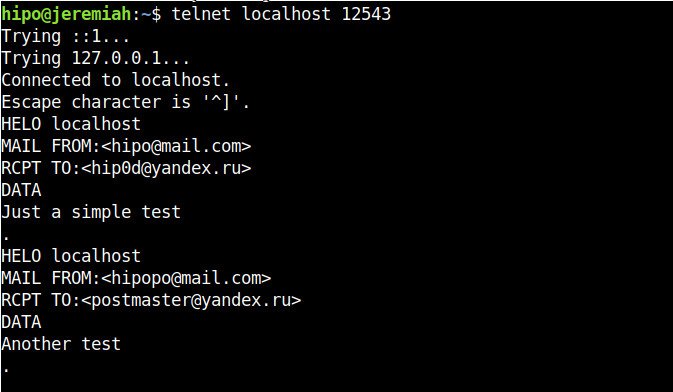
Now go to Host A or any host that has TCP/IP protocol access to port 12543 on proxy-host Host B (linux-srv) and connect to it on 12543 with another netcat or telnet.

to make netcat keep connecting to yandex.ru MX (Mail Exchange) server you can run it in a small never ending bash shell while loop, like so:


linux-srv:~# while :; do nc -l 12543 | nc mx.yandex.ru 25; done


 Below are screenshots of a connection handshake between Host B (linux-srv) proxy host and Host A (the end client connecting) and Host C (mx.yandex.ru).

host-B-running-as-a-proxy-daemon-towards-Host-C-yandex-mail-exchange-server


Host B netcat as a (Proxy)

Host-A-Linux-client-connection-handshake-to-proxy-server-with-netcat
that is possible in combination of UNIX and named pipes (for more on Named pipes check my previous article simple linux logging with named pipes), here is how to run a single netcat version to proxy any traffic in a similar way as the good old tinyproxy.

On Proxy host create the pipe and pass the incoming traffic towards google.com and write back any output received back in the named pipe.
 

# mkfifo backpipe
# nc -l 8080 0<backpipe | nc www.google.com 80 1>backpipe

Other useful netcat proxy set-up is to simulate a network connectivity failures.

For instance, if server:port on TCP 1080 is the normal host application would connect to, you can to set up a forward proxy from port 2080 with

    nc -L server:1080 2080

then set-up and run the application to connect to localhost:2080 (nc proxy port)

    /path/to/application_bin –server=localhost –port=2080

Now application is connected to localhost:2080, which is forwarded to server:1080 through netcat. To simulate a network connectivity failure, just kill the netcat proxy and check the logs of application_bin.

Using netcat as a bind shell (make any local program / process listen and deliver via nc)


netcat can be used to make any local program that can receive input and send output to a server, this use is perhaps little known by the junior sysadmin, but a favourite use of l337 h4x0rs who use it to spawn shells on remote servers or to make connect back shell. The option to do so is -e

-e – option spawns the executable with its input and output redirected via network socket.

One of the most famous use of binding a local OS program to listen and receive / send content is by
making netcat as a bind server for local /bin/bash shell.

Here is how

nc -l -p 4321 -e /bin/sh


If necessery specify the bind hostname after -l. Then from any client connect to 4321 (and if it is opened) you will gain a shell with the user with which above netcat command was run. Note that many modern distribution versions such as Debian / Fedora / SuSE Linux's netcat binary is compiled without the -e option (this works only when compiled with -DGAPING_SECURITY_HOLE), removal in this distros is because option is potentially opening a security hole on the system.

If you're interested further on few of the methods how modern hackers bind new backdoor shell or connect back shell, check out Spawning real tty shells article.


For more complex things you might want to check also socat (SOcket CAT) – multipurpose relay for bidirectional data transfer under Linux.
socat is a great Linux Linux / UNIX TCP port forwarder tool similar holding the same spirit and functionality of netcat plus many, many more.
 

On some of the many other UNIX operating systems that are lacking netcat or nc / netcat commands can't be invoked a similar utilitiesthat should be checked for and used instead are:

ncat, pnetcat, socat, sock, socket, sbd

To use nmap's ncat to spawn a shell for example that allows up to 3 connections and listens for connects only from 192.168.0.0/24 network on port 8081:

ncat –exec "/bin/bash" –max-conns 3 –allow 192.168.0.0/24 -l 8081 –keep-open


9. Copying files over network with netcat


Another good hack often used by hackers to copy files between 2 servers Server1 and Server2 who doesn't have any kind of FTP / SCP / SFTP / SSH / SVN / GIT or any kind of Web copy support service – i.e. servers only used as a Database systems that are behind a paranoid sysadmin firewall is copying files between two servers with netcat.

On Server2 (the Machine on which you want to store the file)
 

nc -lp 2323 > files-archive-to-copy.tar.gz


On server1 (the Machine from where file is copied) run:
 

nc -w 5 server2.example.com 2323 < files-archive-to-copy.tar.gz


Note that the downside of such transfers with netcat is data transferred is unencrypted so any one with even a simple network sniffer or packet analyzier such as iptraf or tcpdump could capture the file, so make sure the file doesn't contain sensitive data such as passwords.

Copying partition images like that is perhaps best way to get disk images from a big server onto a NAS (when you can't plug the NAS into the server).
 

10. Copying piped archived directory files with netcat


On computer A:

export ARIBTRARY_PORT=3232
nc -l $ARBITRARY_PORT | tar vzxf –

On Computer B:

tar vzcf – files_or_directories | nc computer_a $ARBITRARY_PORT


11. Creating a one page webserver with netcat and ncat


As netcat could listen to port and print content of a file, it can be set-up with a bit of bash shell scripting to serve
as a one page webserver, or even combined with some perl scripting and bash to create a multi-serve page webserver if needed.

To make netact serve a page to any connected client run in a screen / tmux session following code:


while true; do nc -l -p 80 -q 1 < somepage.html; done


Another interesting fun example if you have installed ncat (is a small web server that connects current time on server on connect).
 

ncat -lkp 8080 –sh-exec 'echo -ne "HTTP/1.0 200 OK\r\n\r\nThe date is "; date;'


12. Cloning Hard disk partitions with netcat


rsync is a common tool used to clone hard disk partitions over network. However if rsync is not installed on a server and netcat is there you can use it instead, lets say we want to clone /dev/sdb
from Server1 to Server2 assuming (Server1 has a configured working Local or Internet connection).


On Server2 run:
 

nc -l -p 4321 | dd of=/dev/sdb


Following on Server2 to start the Partition / HDD cloning process run


dd if=/dev/sdb | nc 192.168.0.88 4321


Where 192.168.0.88 is the IP address listen configured on Server2 (in case you don't know it, check the listening IP to access with /sbin/ifconfig).

Next you have to wait for some short or long time depending on the partiiton or Hard drive, number of files / directories and allocated disk / partition size.

To clone /dev/sda (a main partiiton) from Server1 to Server2 first requirement is that it is not mounted, thus to have it unmounted on a system assuming you have physical access to the host, you can boot some LiveCD Linux distribution such as Knoppix Live CD on Server1, manually set-up networking with ifconfig or grab an IP via DHCP from the central DHCP server and repeat above example.


Happy netcating 🙂
Create SSH Tunnel to MySQL server to access remote filtered MySQL port 3306 host through localhost port 3308

Friday, February 27th, 2015

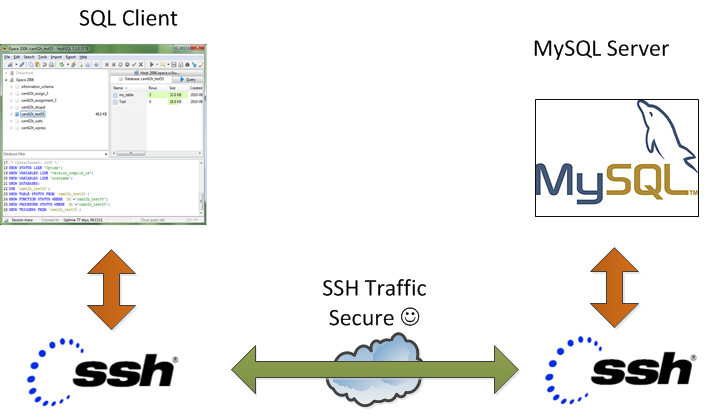
create_ssh_tunnel_to-mysql_server-to-access-remote-filtered-mysql-on-port-3306-secure_ssh_traffic
On our Debian / CentOS / Ubuntu Linux and Windows servers we're running multiple MySQL servers and our customers sometimes need to access this servers.
This is usually problem because MySQL Db  servers are running in a DMZ Zone with a strong firewall and besides that for security reasons SQLs are configured to only listen for connections coming from localhost, I mean in config files across our Debian Linux servers and CentOS / RHEL Linux machines the /etc/mysql/my.cnf and /etc/my.cnf the setting for bind-address is 127.0.0.1:
 

[root@centos ~]# grep -i bind-address /etc/my.cnf 
bind-address            = 127.0.0.1
##bind-address  = 0.0.0.0


For source code developers which are accessing development SQL servers only through a VPN secured DMZ Network there are few MySQL servers witha allowed access remotely from all hosts, e.g. on those I have configured:
 

[root@ubuntu-dev ~]# grep -i bind-address /etc/my.cnf 

bind-address  = 0.0.0.0


However though clients insisted to have remote access to their MySQL Databases but since this is pretty unsecure, we decided not to configure MySQLs to listen to all available IP addresses / network interfaces. 
MySQl acess is allowed only through PhpMyAdmin accessible via Cleint's Web interface which on some servers is CPanel  and on other Kloxo (This is open source CPanel like very nice webhosting platform).

For some stubborn clients which wanted to have a mysql CLI and MySQL Desktop clients access to be able to easily analyze their databases with Desktop clients such as MySQL WorkBench there is a "hackers" like work around to create and use a MySQL Tunnel to SQL server from their local Windows PCs using standard OpenSSH Linux Client from Cygwin,  MobaXterm which already comes with the SSH client pre-installed and has easy GUI interface to create SSH tunnels or eventually use Putty's Plink (Command Line Interface) to create the tunnel

Anyways the preferred and recommended (easiest) way to achieve a tunnel between MySQL and local PC (nomatter whether Windows or Linux client system) is to use standard ssh client and below command:
 

ssh -o ServerAliveInterval=10 -M -T -M -N -L 3308:localhost:3306 your-server.your-domain.com


By default SSH tunnel will keep opened for 3 minutes and if not used it will automatically close to get around this issue, you might want to raise it to (lets say 15 minutes). To do so in home directory user has to add in:
 

~/.ssh/config

ServerAliveInterval 15
ServerAliveCountMax 4


Note that sometimes it is possible ven though ssh tunnel timeout value is raised to not take affect if there is some NAT (Network Adress Translation) with low timeout setting on a firewall level. If you face constant SSH Tunnel timeouts you can use below bash few lines code to auto-respawn SSH tunnel connection (for Windows users use MobaXterm or install in advance bash shell cygwin package):
 

while true
do
 
ssh -o ServerAliveInterval=10 -M -T -M -N -L 3308:localhost:3306 your-server.your-domain.com
  sleep 15
done


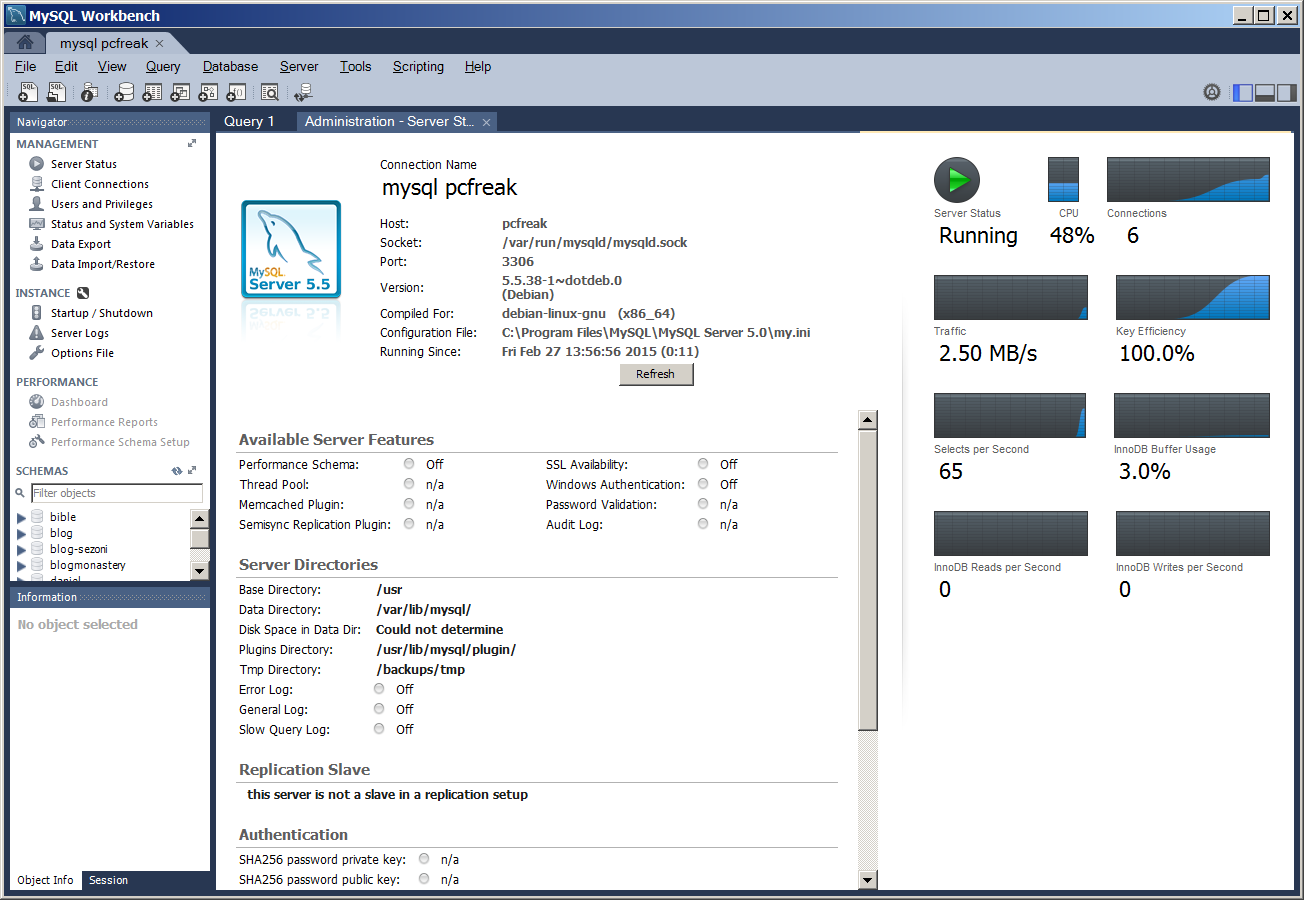
Below is MySQLBench screenshot connected through server where this blog is located after establishing ssh tunnel to remote mysql server on port 3308 on localhost

mysql-workbench-database-analysis-and-management-gui-tool-convenient-for-data-migratin-and-queries-screenshot-

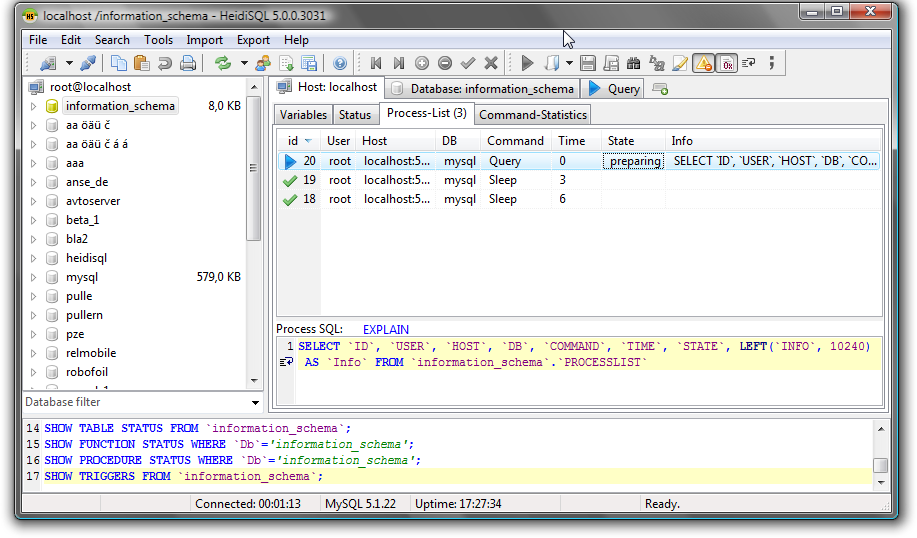
There is also another alternative way to access remote firewall filtered mysql servers without running complex commands to Run a tunnel which we recommend for clients (sql developers / sql designers) by using HeidiSQL (which is a useful tool for webdevelopers who has to deal with MySQL and MSSQL hosted Dbs).

heidisql-show-host_processlist-screenshot

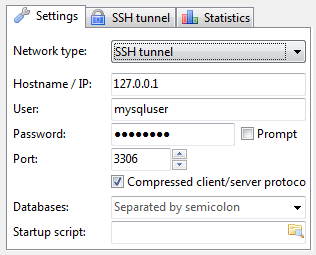
To connect to remote MySQL server through a Tunnel using Heidi:

mysql_connection_configuration-heidi-mysql-gui-connect-tool


In the ‘Settings’ tab

1. In the dropdown list of ‘Network type’, please select SSH tunnel

2. Hostname/IP: localhost (even you are connecting remotely)

3. Username & Password: your mysql user and password

Next, in the tab SSH Tunnel:

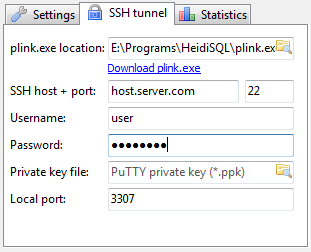
1. specify plink.exe or you need to download it and specify where it’s located

2. Host + port: the remote IP of your SSH server(should be MySQL server as well), port 22 if you don’t change anything

3. Username & password: SSH username (not MySQL user)


heidi-connection_ssh_tunnel_configuration-heidi-sql-tool-screenshot
 

Windows key Shortcuts and Commands List every Win admin / support must know

Tuesday, November 25th, 2014

windows-XP-vista-7-8-server-2003-rc2-2012--full-complete-keyboard-shortcuts-list
If you're a system administrator of Windows Servers or or just a PC support in a small company and you have to fix PCs running Microsoft Windows XP / 7 / 8  daily, sooner or later you will be interested into how to optimize your windows maintainance work to be able to do more adminsitration work for less time.

M$ Windows OS has evolved a lot over the past 10+ years and many of the features available GUI are now either possibile to be done via a standard commands and the GUI interfaces. Various adminsitration and common daily work simplification goodies are now accessible through quick access shortcuts and commands.

Virtually all Windows operating system environment could be now customized by using such shortcuts, this reduces the multitude of annoying double clicks which are truely pissing off sysadmins and tech-supports involved in  Windows Ticket solving.

Win Shortcuts and Commands helps to:

  • Quickly invoke almost all System Settings available from Windows Control Panel
  • Access all admins tools GUIs throguh command
  • Speed up Opening Video, Pictures, Documents, Downloads folders start Windows Update, Configure Printers / Fax / Add Sharings

etc..

A lot of the commands were new to me thus I decided to try out all of the commands in command prompt (cmd). Many of the tools down-mentioned were news to me and let me understand better on Windows Internals, so if you time try them out.
 

Function Comand
Open Documents Folder Start menu -> Search (Type documents)
Open Videos folder Start -> Search (Type videos)
Open Downloads Folder Start -> Search (Type downloads)
Open Favorites Folder favorites
View Recent messages of your PC Start menu -> Search (Type recent)
Open Recent Folder N/A
Open Pictures Folder Start menu -> Search (Type pictures)
Windows Sideshow control.exe /name Microsoft.WindowsSideshow
Windows CardSpace (Windows ID Manager) control.exe /name Microsoft.cardspace
Windows Anytime Upgrade Start menu -> Search dialog (Type WindowsUpdate)
Taskbar and Start Menu control.exe /name Microsoft.TaskbarandStartMenu
Troubleshooting control.exe /name Microsoft.Troubleshooting
User Accounts (Run user accounts Interface) control.exe /name Microsoft.UserAccounts
Adding a new Device devicepairingwizard
Add Hardware Wizard hdwwiz
Advanced User Accounts Management netplwiz
Advanced User Accounts (Authorization Mgr) azman.msc
Windows Backup and Restore sdclt
Bluetooth File Transfer fsquirt
Calculator calc
Certificates Manager certmgr.msc
Change Computer Performance Settings systempropertiesperformance (Remove visual effects)
Change Data Execution Prevention Settings systempropertiesdataexecutionprevention
Change Data Execution Prevention Settings printui
Character Map charmap
ClearType Tuner cttune (Make text onscreen more readable)
Color Management colorcpl
Command Prompt cmd
Component Services comexp.msc
Component Services dcomcnfg
Computer Management Interface compmgmt.msc
Computer Management Interface compmgmtlauncher
Connect to Network Project via Network netproj
Connect to a Projector displayswitch (Alias for Fn key + F4)
Run Control Panel command control
Create A Shared Folder Wizard shrpubw
Create a System Repair Disc recdisc
Credential Backup and Restore Wizard credwiz
Data Execution Prevention systempropertiesdataexecutionprevention
Date and Time timedate.cpl
Default Location locationnotifications
Device Manager devmgmt.msc
Device Manager hdwwiz.cpl
Device Pairing Wizard devicepairingwizard
Diagnostics Troubleshooting Wizard msdt
Digitizer Calibration Tool tabcal
DirectX Diagnostic Tool dxdiag
Disk Cleanup cleanmgr
Disk Defragmenter dfrgui
Disk Management diskmgmt.msc
Display (Change font size of text onscreen) dpiscaling
Display Color Calibration dccw
Display Switch displayswitch
DPAPI Key Migration Wizard dpapimig
Driver Verifier Manager verifier
Ease of Access Center utilman
EFS Wizard rekeywiz
Event Viewer eventvwr.msc
Fax Cover Page Editor fxscover
File Signature Verification sigverif
Font Viewer fontview
Game Controllers joy.cpl
Windows Getting Started Iface gettingstarted
IExpress Wizard iexpress
Another alias for Getting Started irprops.cpl
Install or Uninstall Display Languages lusrmgr
Internet Explorer iexplore
Run Internet Explorer Internet Options inetcpl.cpl
iSCSI Initiator Configuration Tool iscsicpl
Language Pack Installer lpksetup
Local Group Policy Editor gpedit.msc
Local Security Policy secpol.msc
Local Users and Groups lusrmgr.msc
Location Activity locationnotifications
Magnifier magnify
Malicious Software Removal Tool mrt (Might be not existent on some Windows versions)
Manage Your File Encryption Certificates rekeywiz
Math Input Panel mip
Microsoft Management Console mmc
Microsoft Support Diagnostic Tool msdt
Mouse main.cpl
NAP Client Configuration napclcfg.msc
Narrator narrator
Network Connections ncpa.cpl
New Scan Wizard wiaacmgr
Notepad notepad
ODBC Data Source Administrator odbcad32
ODBC Driver Configuration odbcconf
On-Screen Keyboard osk
Paint mspaint
Pen and Touch tabletpc.cpl
People Near Me collab.cpl
Performance Monitor perfmon.msc
Performance Options systempropertiesperformance
Phone and Modem telephon.cpl
Phone Dialer dialer
Power Options powercfg.cpl
Presentation Settings presentationsettings
Print Management printmanagement.msc
Printer Migration printbrmui
Printer User Interface printui
Private Character Editor eudcedit
Problem Steps Recorder psr
Programs and Features (Install / Uninstall) appwiz.cpl
Protected Content Migration dpapimig
Region and Language intl.cpl
Registry Editor regedit
Registry Editor 32 regedt32
Remote Access Phonebook rasphone
Remote Desktop Connection mstsc
Resource Monitor resmon
Resultant Set of Policy rsop.msc
SAM Lock Tool syskey
Screen Resolution desk.cpl
Securing the Windows Account Database syskey
Services services.msc
Set Program Access and Computer Defaults computerdefaults
Share Creation Wizard shrpubw
Shared Folders fsmgmt.msc
Snipping Tool snippingtool
Sound mmsys.cpl
Sound recorder soundrecorder
SQL Server Client Network Utility cliconfg
Sticky Notes stikynot
Stored User Names and Passwords credwiz
Sync Center mobsync
System Configuration msconfig
System Configuration Editor sysedit
System Information msinfo32
System Properties sysdm.cpl
System Properties (Advanced Tab) systempropertiesadvanced
System Properties (Computer Name Tab) systempropertiescomputername
System Properties (Hardware Tab) systempropertieshardware
System Properties (Remote Tab) systempropertiesremote
System Properties (System Protection Tab) systempropertiesprotection
System Restore rstrui
Task Manager taskmgr
Task Scheduler taskschd.msc
Trusted Platform Module (TPM) Management tpm.msc
User Account Control Settings useraccountcontrolsettings
Utility Manager utilman
Version Reporter Applet winver
Volume Mixer sndvol
Windows Action Center wscui.cpl
Windows Activation Client slui (Runs on Windows license activation time)
Windows Anytime Upgrade Results windowsanytimeupgraderesults
Windows CardSpace infocardcpl.cpl
Windows Disc Image Burning Tool isoburn (Command line tool to burn images)
Windows DVD Maker dvdmaker (N/A on Windows 7, 8)
Windows Easy Transfer migwiz (N/A on many Windows versions)
Run Windows Explorer explorer
Windows Fax and Scan wfs
Windows Features optionalfeatures
Windows Firewall firewall.cpl
Windows Firewall with Advanced Security wf.msc
Windows Journal journal (N/A on Windows 7)
Windows Media Player wmplayer (N/A on many Windows releases)
Windows Memory Diagnostic Scheduler mdsched (Check your PC memory on next boot)
Windows Mobility Center (Stats) mblctr
Windows Picture Acquisition Wizard wiaacmgr
Windows PowerShell powershell
Windows PowerShell ISE powershell_ise
Windows Remote Assistance msra
Windows Repair Disc recdisc
Windows Script Host wscript
Windows Update wuapp
Windows Update Standalone Installer wusa
Show Windows Version winver
WMI Management wmimgmt.msc
WordPad write
XPS Viewer xpsrchvw


Most of above commands works fine with Windows XP, Vista and Windows 7 / 8, Windows 2003 / 2012, however some cmds are missing across some win versions.

Here is list of other useful Windows shortcut keys:
 

General keyboard shortcuts

  • Ctrl+C (Copy)
  • Ctrl+X (Delete selected item and save a copy to the clipboard)
  • Ctrl+V (Paste)
  • Ctrl+Z (Undo)
  • Delete (Delete) 
  • Shift+Delete (Delete the selected item permanently without moving the item to the Recycle Bin) 
  • Ctrl while dragging an item (Copy the selected item)
  • Ctrl+Shift while dragging an item (Create a shortcut to the selected item)
  • F2 key (Rename the selected item)
  • Ctrl+Right Arrow (Move the cursor to the beginning of the next word) 
  • Ctrl+Left Arrow (Move the cursor to the beginning of the previous word) 
  • Ctrl+Down Arrow (Move the cursor to the beginning of the next paragraph) 
  • Ctrl+Up Arrow (Move the cursor to the beginning of the previous paragraph) 
  • Ctrl+Shift with any arrow key (Highlight a block of text) 
  • Shift with any arrow key (Select more than one item in a window or on the desktop, or select text in a document) 
  • Ctrl+A (Select all) 
  • F3 key (Search for a file or a folder)
  • Alt+Enter (View the properties for the selected item) 
  • Alt+F4 (Close the active item, or exit the active program) 
  • Alt+Enter (Display the properties of the selected object) 
  • Alt+Spacebar (Open the shortcut menu for the active window) 
  • Ctrl+F4 (Close the active document in programs that enable multiple documents to be open at the same time) 
  • Alt+Tab (Switch between the open items) 
  • Alt+Esc (Cycle through items in the order in which they were opened) 
  • F6 key (Cycle through the screen elements in a window or on the desktop)
  • F4 key (Display the Address bar list in My Computer or in Windows Explorer) 
  • Shift+F10 (Display the shortcut menu for the selected item)
  • Alt+Spacebar (Display the System menu for the active window) 
  • Ctrl+Esc (Display the Start menu) 
  • Alt+Underlined letter in a menu name (Display the corresponding menu)
  • Underlined letter in a command name on an open menu (Perform the corresponding command)
  • F10 key (Activate the menu bar in the active program)
  • Right Arrow  (Open the next menu to the right, or open a submenu)
  • Left Arrow  (Open the next menu to the left, or close a submenu)
  • F5 key (Update the active window)
  • Backspace (View the folder one level up in My Computer or Windows Explorer) 
  • Esc (Cancel the current task)
  • Shift when you insert a CD into the CD drive (Prevent the CD from automatically playing)
  • Ctrl+Shift+Esc (Open Task Manager) 

Dialog box keyboard shortcuts

  • Ctrl+Tab (Move forward through the tabs)
  • Ctrl+Shift+Tab (Move backward through the tabs)
  • Tab (Move forward through the options)
  • Shift+Tab (Move backward through the options)
  • Alt+Underlined letter (Perform the corresponding command, or select the corresponding option)
  • Enter (Perform the command for the active option or button)
  • Spacebar (Select or clear the check box if the active option is a check box)
  • Arrow keys (Select a button if the active option is a group of option buttons)
  • F1 key (Display Help)
  • F4 key (Display the items in the active list)
  • Backspace (Open a folder one level up if a folder is selected in the Save As or Open dialog box)

Microsoft natural keyboard shortcuts

  • Windows Logo (Display or hide the Start menu)
  • Windows Logo+Break (Display the System Properties dialog box)
  • Windows Logo+D (Display the desktop)
  • Windows Logo+M (Minimize all the windows)
  • Windows Logo+Shift+M (Restore the minimized windows)
  • Windows Logo+E (Open My Computer)
  • Windows Logo+F (Search for a file or a folder)
  • Ctrl+Windows Logo+F (Search for computers)
  • Windows Logo+F1 (Display Windows Help)
  • Windows Logo+ L (Lock the keyboard)
  • Windows Logo+R (Open the Run dialog box)
  • Windows Logo+U (Open Utility Manager)

Accessibility keyboard shortcuts

  • Right Shift for eight seconds (Switch FilterKeys on or off)
  • Left Alt+left Shift+Print Screen (Switch High Contrast on or off)
  • Left Alt+left Shift+Num Lock (Switch the MouseKeys on or off)
  • Shift five times (Switch the StickyKeys on or off)
  • Num Lock for five seconds (Switch the ToggleKeys on or off)
  • Windows Logo +U (Open Utility Manager)

Windows Explorer keyboard shortcuts


  • End (Display the bottom of the active window)
  • Home (Display the top of the active window)
  • Num Lock+Asterisk sign (*) (Display all the subfolders that are under the selected folder)
  • Num Lock+Plus sign (+) (Display the contents of the selected folder)
  • Num Lock+Minus sign (-) (Collapse the selected folder)
  • Left Arrow  (Collapse the current selection if it is expanded, or select the parent folder)
  • Right Arrow  (Display the current selection if it is collapsed, or select the first subfolder) 

Keyboard Shortcuts for Character Map


After you double-click a character on the grid of characters, you can move through the grid by using the keyboard shortcuts:

  • Right Arrow  (Move to the right or to the beginning of the next line)
  • Left Arrow  (Move to the left or to the end of the previous line) 
  • Up Arrow (Move up one row)
  • Down Arrow (Move down one row)
  • Page Up  (Move up one screen at a time)
  • Page Down (Move down one screen at a time)
  • Home (Move to the beginning of the line)
  • End (Move to the end of the line)
  • Ctrl+Home (Move to the first character)
  • Ctrl+End (Move to the last character)
  • Spacebar (Switch between Enlarged and Normal mode when a character is selected) 

Microsoft Management Console (MMC) main window keyboard shortcuts


  • Ctrl+O (Open a saved console)
  • Ctrl+N (Open a new console)
  • Ctrl+S (Save the open console)
  • Ctrl+M (Add or remove a console item)
  • Ctrl+W (Open a new window)
  • F5 key (Update the content of all console windows)
  • Alt+Spacebar (Display the MMC window menu)
  • Alt+F4 (Close the console)
  • Alt+A (Display the Action menu)
  • Alt+V (Display the View menu)
  • Alt+F (Display the File menu)
  • Alt+O (Display the Favorites menu) 

Microsoft Management Console (MMC) window keyboard shortcuts

  • Ctrl+P (Print the current page or active pane)
  • Alt+Minus sign (-) (Display the window menu for the active console window)
  • Shift+F10 (Display the Action shortcut menu for the selected item)
  • F1 key (Open the Help topic, if any, for the selected item)
  • F5 key (Update the content of all console windows)
  • Ctrl+F10 (Maximize the active console window)
  • Ctrl+F5 (Restore the active console window)
  • Alt+Enter (Display the Properties dialog box, if any, for the selected item)
  • F2 key (Rename the selected item)
  • Ctrl+F4 (Close the active console window. When a console has only one console window, this shortcut closes the console)

Remote desktop connection navigation


  • Ctrl+Alt+End (Open the Microsoft Windows NT Security dialog box)
  • Alt+Page Up (Switch between programs from left to right)
  • Alt+Page Down (Switch between programs from right to left)
  • Alt+Insert (Cycle through the programs in most recently used order)
  • Alt+Home (Display the Start menu)
  • Ctrl+Alt+Break (Switch the client computer between a window and a full-screen display)
  • Alt+Delete (Display the Windows menu)
  • Ctrl+Alt+Minus sign (-) (Put a snapshot of the complete client window area on the Terminal server clipboard and provide the same functionality as pressing Alt+Print Screen on a local computer)
  • Ctrl+Alt+Plus sign (+) (Put a snapshot of the active window in the client on the Terminal server clipboard and provide the same functionality as pressing Print Screen on a local computer.) 

Microsoft Internet Explorer navigation


  • Ctrl+B (Open the Organize Favorites dialog box)
  • Ctrl+E (Open the Search bar)
  • Ctrl+F (Start the Find utility)
  • Ctrl+H (Open the History bar)
  • Ctrl+I (Open the Favorites bar)
  • Ctrl+L (Open the Open dialog box)
  • CtrlL+N (Start another instance of the browser with the same web address)
  • Ctrl+O (Open the Open dialog box, the same as CTRL+L)
  • Ctrl+P (Open the Print dialog box)
  • Ctrl+R (Update the current webpage)
  • Ctrl+W (Close the current window) 

Complete list of Windows Keyboard Shorcuts is on Microsoft website

How to create ssh tunnels / ssh tunneling on Linux and FreeBSD with openssh

Saturday, November 26th, 2011

ssh-tunnels-port-forwarding-windows-linux-bypassing-firewall-diagram
SSH tunneling
allows to send and receive traffic using a dedicated port. Using an ssh traffic can have many reasons one most common usage reason is to protect the traffic from a host to a remote server or to access port numbers which are by other means blocked by firewall, e.g.: (get around firewall filtering)
SSH tunneling works only with TCP traffic. The way to make ssh tunnel is with cmds:

host:/root# ssh -L localhost:deshost:destport username@remote-server.net
host:/root# ssh -R restport:desthost:localport username@remote-server.net
host:/root# ssh -X username@remote-server.net

This command will make ssh to bind a port on localhost of the host host:/root# machine to the host desthost:destport (destination host : destinationport). Important to say deshost is the host destination visible from the remote-server.net therefore if the connection is originating from remote-server.net this means desthost will be localhost.
Mutiple ssh tunnels to multiple ports using the above example commands is possible. Here is one example of ssh tunneling
Let’s say its necessery to access an FTP port (21) and an http port (80), listening on remote-server.net In that case desthost will be localhost , we can use locally the port (8080) insetad of 80, so it will be no necessery to make the ssh tunnel with root (admin privileges). After the ssh session gets opened both services will be accessible on the local ports.

host:/home/user$ ssh -L 21:localhost:21 -L 8080:localhost:80 user@remote-server.net

That’s all enjoy 😉

Finally TeamViewer 7 release for GNU / Linux is available

Thursday, March 29th, 2012


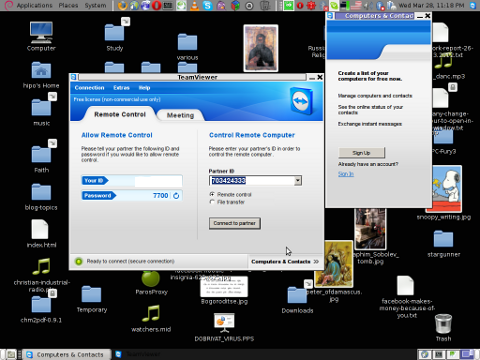
TeamViewer 7 Debian GNU / Linux released, my desktop screenshot

After a long time of inavailability, finally TeamViewer 7 for GNU / Linux is out!

Here is the short TeamViewer 7 Linux release note :

In our TeamViewer download area you will now find TeamViewer 7 for Linux.
The final version includes a selection of new features for Linux, e. g. an integrated screenshot feature and the possibility of saving individual connection settings per computer.
You can now establish cross platform connections with other computers running version 7 and hold online meetings and presentations with up to 25 participants.

We wish you best continued success with TeamViewer!

Well, guys it was about time, even later than that… Until now I've so many times experienced troubles with Windows machines which I had to administrate remotely and they only had a TeamViewer 7 installed (a real, real pain in the ass).

The issue comes cause TeamViewer 6 is incompatible with 7 and just until very recently only TV 6 for Linux was available, so trying to access a 7 install directly from Linux was impossible.
Hence to access TeamViewer 7 Windows install, I had to use either a fresh Windows copy with TeamViewer 7 installed or a Virtual Machine like (Qemu, VirtualBox) with Windows version installed in it.
Often back then, when I had to fix remotely a Windows machine behind a firewall, I had to instruct the machine owners to replace the TeamViewer 7 with TeamViewer 6 in order to be able to easily access the remote host from my Debian Linux.

I still remember, it was quite a stuggle to find a link to a Windows .exe install file for TeamViewer 6.

Now thanksfully, TeamViewer guys are starting to make it easier for the user who would for some reason want to stick to older TV version.
I've noticed on TeamViewer's website there is already a new TeamViewer download page offering for download all the old teamviewer version – 1.x, 2.x, 3.x, 4.x, 5.x, 6.x

One example, where old teamviewer release is useful is if you want to run teamviewer on older hardware or old OS (MS Windows 98 or old Linux distro).

I've made a mirror of teamviewer 6 for Debian / Ubuntu amd 32 and 64 bit versions along with all the OS available TeamViewer version 6 and 7, for the sake of preserving it if one day link to old versions of Teamviewer disappear from their website.

Here are the TeamViewer mirrored files:

Below you see a screenshot of teamviewer 7 running on my Debian Squeeze 🙂

TeamViewer 7 Debian GNU / Linux released, my desktop screenshot

It is great teamviewer produced a Linux working application, however if you run it you realize just like the previous releases TeamViewer is not natively supposed (compiled) to run on GNU / Linux OS but uses wine (windows emulator) to launch through…
Instead of porting the application to be natively for the Linux distros once again with this new release, teamviewer developers just "hacked" it to run on top of windows emulation. Though this is working its performance, is probably a bit degraded and it depends on having install on the Linux host a bunch of useless packages which wine depends on.
Besides that even if it "works" on Linux , TeamViewer has still non-free software essense. I still use it because unfortunately, I don't know of a better remote access program capable to connect to servers behind NAT / machines located behind a tight firewalled routers.
If only (I knew of?) a TeamViewer free software / open source equivalent
I will be glad to hear if someone know a (free software / open source) TeamViewer like program able to access remote hosts with no a real (public inet) IP address?P.S.: By similar TV program I don't mean VNC, UltraVNC and this kind of other VNC derivative programs but mean close TeamViewer alternative.

How to fix transmission unable to download and connect to torrent tracker on Ubuntu Maverick 10.10

Wednesday, April 27th, 2011

As you can read in my few previous posts I have just installed a new Ubuntu 10.10 on a Toshiba Satellite L40 notebook.

Most of the things which are necessery for a fully working Linux desktop are already installed and the machine works fine, however I just noticed there is an issue with the default torrent gnome client and transmission unable to download files from torrent trackers.

Few minutes of playing with the transmission’s settings has revealed what was causing my torrent download problems.

It seems on Ubuntu 10.10 (probably on other Ubuntus and Debians) by default the transmission bittorrent client is trying to use for torrent download connections an incoming port 53636 number.

As the computer is behind a firewall and does not have a real IP address seeders cannot properly connect to the notebook port 53636 and hence the transmission bittorrent client could not initialize any torrent downloads.

Fixing up the issue is rather easy to fix it I had to change the settings in transmission from the menus:

Edit -> Settings -> Network

You need to select the options:
 

  • Pick a random port on startup
  • Use UPnP or NAT-PMP to redirect connections

Next I had to restart transmission and my torrent downloads started 😉

The end of the work week :)

Friday, February 1st, 2008

One more week passed without serious server problems. Yesterday after upgrade to debian 4.0rc2 with

apt-get dist-upgrade and reboot the pc-freak box became unbootable.

I wasn’t able to fix it until today because the machine’s box seemed not to read cds well.The problem was consisted of this that after the boot process of the linux kernel has started the machine the boot up was interrupted with a message saying
/sbin/init is missing

and I was dropped to a busybox without being able to read nothing from my filesystem.Thankfully nomen came to Dobrich for the weekend and today he bring me his cdrom-drive I booted with the debian.

Using Debian’s linux rescue I mounted the partition to check what’s wrong. I suspected something is terribly wrong with the lilo’s conf.

Looking closely to it I saw it’s the lilo conf file it was setupped to load a initrd for the older kernel. changing the line to thenew initrd in /etc/lilo.conf and rereading the lilo; /sbin/lilo -C; /sbin/lilo;

fixed the mess and pc-freak booted succesfully! 🙂

Yesterday I had to do something kinky. It was requested from a client to have access to a mysql service of one of the company servers,the problem was that the client didn’t have static IP so I didn’t have a good way to put into the current firewall.

Everytime the adsl they use got restarted a new absolutely random IP from all the BTC IP ranges was assigned.

The solution was to make a port redirect to a non-standard mysql port (XXXXX) which pointed to the standard 3306 service. I had to tell the firewall not to check the coming IPs on the non-standard port (XXXXX) against the 3306 service fwall rules.

Thanks to the help of a guy inirc.freenode.net #iptables jengelh I figured out the solution.

To complete the requested task it was needed to mark all packagescoming into port (XXXXX) using the iptables mangle option and to add a rule to ACCEPT all marked packages.

The rules looked like this

/sbin/iptables -t mangle -A PREROUTING -p tcp –dport XXXXX -j MARK –set-mark 123456/sbin/iptables -t nat -A PREROUTING -d EXTERNAL_IP -i eth0 -p tcp –dport XXXXX -j DNAT –to-destination EXTERNAL_IP:3306

/sbin/iptables -t filter -A INPUT -p tcp –dport 3306 -m mark –mark 123456 -j ACCEPT .

Something I wondered a bit was should /proc/sys/net/ipv4/ip_forward in order for the above redirect to be working, in case you’re wondering too well it doesn’t 🙂 The working week was a sort of quiteful no serious problems with servers and work no serious problems at school (although I see me and my collegues become more and more unserious) at studying. My grand parentsdecided to make me a gift and give me money to buy a laptop and I’m pretty happy for this 🙂 All that is left is to choose a good machine with hardware supported both by FreeBSD and Linux.

END—–

How to block IP address with pf on FreeBSD, NetBSD and OpenBSD

Wednesday, July 27th, 2011

Pf Firewall BSD logo

I’ve noticed some IPs which had a kind of too agressive behaviour towards my Apache webserver and thus decided to filter them out with the Firewall.
As the server is running FreeBSD and my firewall choise is bsd’s pf I added the following lines to my /etc/pf.conf to filter up the abiser IP:

table persist file "/etc/pf.blocked.ip.conf"
EXT_NIC="ml0" # interface connected to internet
block drop in log (all) quick on $EXT_NIC from to any
echo '123.123.123.123' >> /etc/pf.blocked.ip.conf

As you see I’m adding the malicious IP to /etc/pf.blocked.ip.conf, if I later decide to filter some other IPs I can add them up there and they will be loaded and filtered by pf on next pf restart.

Next I restarted my pf firewall definitions to make the newly added rules in pf.conf to load up.

freebsd# pfctl -d
freebsd# pfctl -e -f /etc/pf.conf

To show all IPs which will be inside the blockips filtering tables, later on I used:

pfctl -t blockips -T show

I can also later use pf to add later on new IPs to be blocked without bothering to restart the firewall with cmd:

freebsd# pfctl -t blockedips -T add 111.222.333.444

Deleting an IP is analogous and can be achieved with:

freebsd# pfctl -t blockedips -T delete 111.222.333.444

There are also logs stored about pf IP blocking as well as the other configured firewall rules in /var/log/pflog file.
Hope this is helpful to somebody.