Posts Tagged ‘format’
Sunday, February 26th, 2012 In my last article, I've explained How to create PNG, JPG, GIF pictures from one single PDF document
Convertion of PDF to images is useful, however as PNG and JPEG graphic formats are raster graphics the image quality gets crappy if the picture is zoomed to lets say 300%.
This means convertion to PNG / GIF etc. is not a good practice especially if image quality is targetted.
I myself am not a quality freak but it was interesting to find out if it is possible to convert the PDF pages to SVG (Scalable Vector Graphics) graphics format.
Converting PDF to SVG is very easy as for GNU / Linux there is a command line tool called pdf2svg
pdf2svg's official page is here
The traditional source way compile and install is described on the homepage. For Debian users pdf2svg has already existing a deb package.
To install pdf2svg on Debian use:
debian:~# apt-get install --yes pdf2svg

...
Once installed usage of pdf2svg to convert PDF to multiple SVG files is analogous to imagemagick's convert .
To convert the 44 pages Projects.pdf to multiple SVG pages – (each PDF page to a separate SVG file) issue:
debian:~/project-pdf-to-images$ for i in $(seq 1 44); do \

pdf2svg Projects.pdf Projects-$i.SVG $i; \

done
This little loop tells each page number from the 44 PDF document to be stored in separate SVG vector graphics file:
debian:~/project-pdf-to-images$ ls -1 *.svg|wc -l

44
For BSD users and in particular FreeBSD ones png2svg has a bsd port in:
/usr/ports/graphics/pdf2svg
Installing on BSD is possible directly via the port and convertion of PDF to SVG on FreeBSD, should be working in the same manner. The only requirement is that bash shell is used for the above little bash loop, as by default FreeBSD runs the csh.
On FreeBSD launch /usr/local/bin/bash, before following the Linux instructions if you're not already in bash.
Now the output SVG files are perfect for editting with Inkscape or Scribus and the picture quality is way superior to old rasterized (JPEG, PNG) images
Tags: Auto, bash shell, bsd users, command line tool, Convert, Converting, convertion, crappy, deb, deb package, debian project, debian users, document, documentConvertion, Draft, editting, format, freak, GIF, gnu linux, graphic formats, Graphics, graphics format, graphics graphics, homepage, Image, image quality, ImageMagick, inkscape, issue, JPG, jpg gif, line, Linux, nbsp, number, package, page, pdf document, picture, png, png images, Projects, raster graphics, rasterized, Scalable, scalable vector graphics, Scribus, Shell, svg file, svg files, tool, traditional source, use, vector, way
Posted in Linux, Linux and FreeBSD Desktop, System Administration | No Comments »
Tuesday, September 14th, 2010 I’ve recently received a number of images in JPEG format as a feedback on a project plan that was constructed by a team I’m participating at the university where I study.
Somebody from my project group has scanned or taken snapshots of each of the hard copy paper feedback and has sent it to my mail.
I’ve received 13 images so I had to open them one by one to get each of the Project Plan to read the feedback on the page this was really unhandy, so I decided to give it a try on how to generate a common PDF file from all my picture files.
Thanksfully it happened to be very easy and trivial using the good old Image Magick
In order to complete the task of generating one PDF from a number of pictures all I did was.1. Switch to the directory where I have saved all my jpeg images
debian:~# cd /home/hipo/Desktop/my_images_directory/
2. Use the convert binary part of imagemagick package to generate the actual PDF file from the group of images
debian:~# convert *.jpg outputpdffile.pdf
If the images are numbered and contain many scanned pages of course you can always pass by all the images to the /usr/bin/convert binary, like for instance:
debian:~# convert 1.jpg 2.jpg 3.jpg 4.jpg 5.jpg outputpdffile.pdf
Even though in my case I had to convert to PDF from multiple JPEG (JPG) pictures, convertion with convert is not restricted to convert only from JPEG, but you can also convert to PDF by using other graphical file formats.
For instance to convert multiple PNG pictures to a single PDF file the command will be absolutely the same except you change the file extension of the graphic files e.g.:
debian:~# convert 1.PNG 2.PNG 3.PNG 4.PNG 5.PNG OUTPUT-PDF-FILE.PDF
I was quite happy eventually to know Linux is so flexible and such a trivial things are able to be completed in such an easy way.
Tags: cd home, convertion, copy, course, Create PDF file from (jpg) pictures in Linux, Desktop, feedback, file, file extension, file formats, format, gif images, graphic files, hipo, home, Image, image magick, ImageMagick, images directory, instance, JPEG, jpeg images, jpg gif, Linux, Magick, mail, number, order, OUTPUT-PDF-FILE, outputpdffile, package, page, Paper, picture, png, project, project group, snapshots, somebody, switch, team, Thanksfully, trivial things, unhandy, usr, usr bin, way
Posted in Linux, Linux and FreeBSD Desktop, Various | 5 Comments »
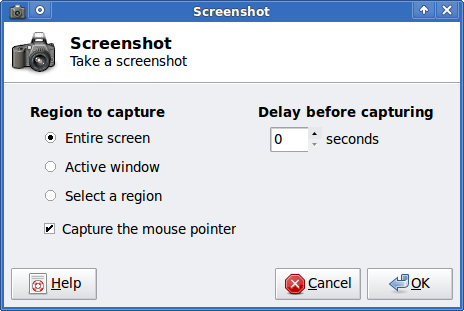
Thursday, February 23rd, 2012 1. Install the slackware binary package xfce4-screenshooter.
For the latest Slackware Linux release which as of time of writting is 13.37 xfce4-screenshooter-1.7.9-i486-3sl.txz can be download from here
Install of xfce4-screenshooter-1.7.9-i486-3sl.txz is done with slackware's usual installpkg package manager command:
bash-4.1# /sbin/installpkg xfce4-screenshooter-1.7.9-i486-3sl.txz
By the way, I haven't used slackware for a long time so in the mean time since Slackware 13, the default slackware packages format .tgz is now substituted with the newer .txz (better compressed .txz). The old .tgz was simply a tar archive with DEFLATE gzip. The newer .txz packages bundled with newer slackware releases are using the LZMA2 (XZ) chain algorithm for compression. LZMA implies higher compression than even bzip2 and this is the reason why Patrick Volkerding – the one man army man behind Slackware decided to use it.
The reason Vollerding choose using .txz is slackware network distribution will load up less the networks and will take less time for downloading extra slackware packages via the internet. The .txz also reduces slackware main CD size so more packages can be contained in the same 700MB sized slack install CD.
Anyways now back to the installation of xfce-screenshooter.
Once installed to runit use the Xfce menus:
Xfce Menu -> Accesories -> Screenshot
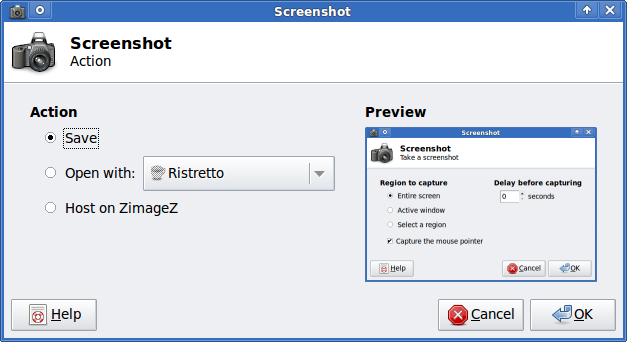
Next you will see the xfce-screenshooter program to pop-up:
To take a snapshot of the screen use:
Entire Screen -> Save
Tags: algorithm, army man, Auto, binary package, compression, distribution, download, Draft, format, graphical environment, gzip, Install, installation, Linux, long time, LZMA, man army, manager, mean time, menu, menus, nbsp, network distribution, package, reason, screen, size, slack, slackware packages, snapshot, tar archive, tgz, time, txzBy, Vollerding, writting, XFCE, xfce4
Posted in Linux, Linux and FreeBSD Desktop, System Administration | 2 Comments »
Monday, October 3rd, 2011 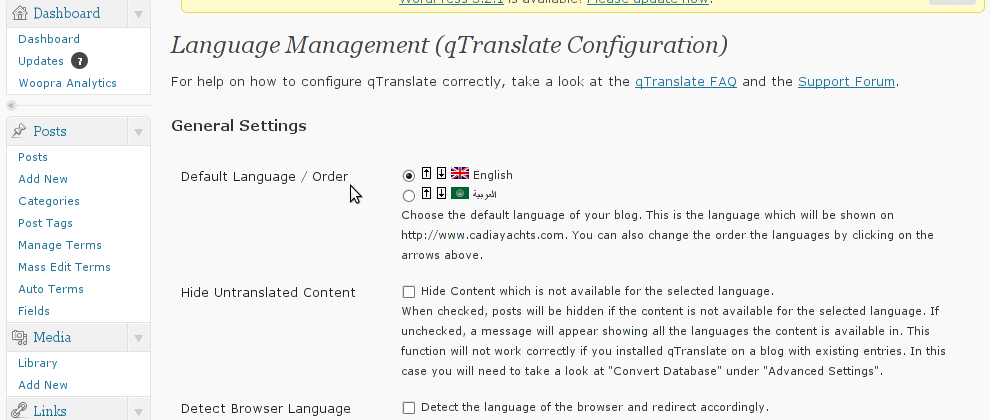
Lately, I have to deal with some wordpress based installs in big part of my working time. One of the wordpress sites needed to have added a multi language support.
My first research in Google pointed me to WPML Multilingual CMS The WordPress Multilingual Plugin
WPML Multilingual CMS looks nice and easy to use but unfortunately its paid, the company couldn’t afford to pay for the plugin so I looked forward online for a free alternative and stumbled upon QTranslate
QTranslate is free and very easy to install. Its installed the wordpress classic way and the installation went smoothly, e.g.:
1. Download and unzip QTranslate
# cd /var/www/blog/wp-content/plugins

/var/www/blog/wp-content/plugins# wget http://downloads.wordpress.org/plugin/qtranslate.2.5.24.zip

...

/var/www/blog/wp-content/plugins# unzip qtranslate.2.5.24.zip

...
Just for fun and in case the plugin disappears in future, a mirror of Qtranslate 2.5.24 is found here
2. Enable QTranslate from wordpress admin
Plugins -> Inactive -> qTranslate (Activate)
After activating the plugin, there is a Settings button from which qTranslate‘s various plugin parameteres can be tuned.
In my case my site had to support both English and Arabic, so from the settings I added support for Arabic translation to the wordpress install.
Adding Arabic is done in the following way:
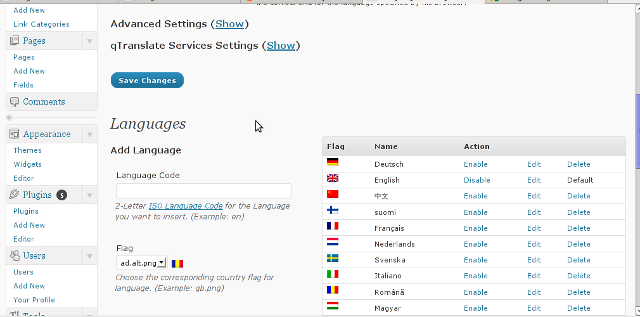
a. From the Language Management (qTranslate Configuration) from the Languages menu and the Languages (Add Languages) I had to choose a language code (in my case a language code of ar – for Arabic). Next I had to choose the Arabic flag from the follow up flag list.
In next text box Name , again I had to fill Arabic, for Locale en_US.UTF-8
The following Date Format and Time Format text boxes are optional so I left them blank.
To complete the process of adding the Arabic as a new language wordpress should support I pressed the Add Language button and the Arabic got added as a second language.
Afterwards the Arabic was added as second language, on the bottom of the left wordpress menu pane a button allowing a switch between English, Arabic appeared (see below screenshot):

Finally to make Arabic appear as a second language of choice on the website I added it as a Widget in the Widgets menu from the AWidgets menu:
Appearance -> Widgets
In widgets I added qTranslate Language Chooser to the Sidebar without putting any kind of Title for qtranslate widget .
I found it most helpful to choose the Text and Image as an option on how to display the Language switching in the wp.
Tags: Activate, alternative, arabi, Arabic, arabic translation, Button, cms, code, company, Date, downloads, flag, flag list, format, fun, google, Inactive, installation, language button, language code, language management, language support, languages, menu, mirror, multilingual, new language, plugin, Plugins, screenshot, second language, settings button, support, text, text boxes, time, time format, time one, unzip, UTF, utf 8, wget, Wordpress, working time
Posted in Various, Web and CMS, Wordpress | 2 Comments »
Monday, January 9th, 2012 I've recently had to set up a backup system to synchronize backup archive files between two remote servers and as I do usually with this situation I just set up a crontab job to periodically execute rsync to copy data from source server to the destination server . Copying SRC to DEST is the default behaviour rsync uses, however in this case I had to copy from the destination server to the source server host (in other words sync files the reversely.
The usual way to copy with rsync via SSH (from SRC to DEST) is using a cmd line like:
debian:~$ /usr/bin/rsync -avz -e ssh backup-user@xxx.xxx.xxx.xxx:/home/backup-user/my-directory .
Where the xxx.xxx.xxx.xxx is my remote server IP with which files are synched.
According to rsync manual, the proposed docs SYNOPSIS is in the format;
Local: rsync [OPTION…] SRC… [DEST
Obviusly the default way to use rsync is to copy source to destination which I used until now, but in this case I had to the other way around and copy files from a destination host to the source server. It was logical that swapping the SRC and DEST would complete my required task. Anyways I consulted with some rsync gurus in irc.freenode.net , just to make sure it is proper to just swap the SRC, DEST arguments.
I was told this is possible, so I swapped args;
debian:~$ /usr/bin/rsync -avz -e ssh . backup-user@xxx.xxx.xxx.xxx:/home/backup-user/my-directory

...
Surprisingly this worked 😉 Anyways I was adviced by by a good guy nick named scheel , that putting -e ssh to command line is generally unnecessery except if there is no some uncommon used SSH port over which the data is transferred. An example case in which -e 'ssh is necessery would be if transferring via lets say SSH port 1234;
rsync -avz -e 'ssh -p1234' /source user@host:/dest
In all other cases omitting '-e ssh' is better as '-e ssh' is rsync default. Therefore my final swapped line I put in cron to copy from a destinatio to source host with rsync looked like so:
05 03 2 * * /usr/bin/ionice -c 3 /usr/bin/rsync -avz my-directory backup-user@xxx.xxx.xxx.xxx:/home/backup-user/ >/dev/null 2>&1
Tags: archive files, Auto, avz, backup system, case, cmd, cmd line, copy, copying, cron, default, default behaviour, destIn, destinatio, destination, destination host, destination server, docs, Draft, example, example case, few words, format, gurus, host, job, nbsp, necessery, nick, option, port 1234, remote server, rsync, scheel, server host, server ip, source host, source server, ssh port, sync files, system, usr bin
Posted in FreeBSD, Linux, System Administration | No Comments »
Wednesday, December 7th, 2011 
I’ve playing trying to learn InkScape – The Open Source vector graphic editor .By so far I’m quite impressed on how easy this program is learned and how easy graphical manipulation with this nifty program can be done.
The default format in which InkScape saves its files is SVG (Scalable Vectors Graphics). For all those unfamiliar with SVG – SVG is an open (free format) format developed in 1999 which insetad of containing binary data like PNG or JPEG does contain plain XML content. SVG being consisted of plain XML has multiple advantageous, the most important one makes it easy for text and visual data to be displayed among different program svg readers in absolutely identical way. Besides that the format if read with plain text editor like vim or emacs can be altered directly via the source.
Being multi system interoperable makes SVG as a great format for text and visual data storage in HTML5, actually SVG is already a part of the HTML5 html coding standard. And most probably its adoption rate will raise up drastically as soon as HTML5 starts substitute HTML4 and lower web standards.
Anyways I’m slipping away from the aim of this post so I’ll stop blabbering on how great SVG is and let people check it out for themselves (if not already).
Going back to the aim of my article to show How to convert SVG to PNG graphical extension on GNU / Linux and FreeBSD
After producing a bunch of files with InkScape I realized the default format in which Inkscape stores its files is SVG , this was okay with me but since I wanted to have my experimental produced content in PNG I needed a way to convert SVG to
My first logical guess was that The Gimp will be able to handle the situation and after opening my SVG file with GIMP and used the gimp File -> Save As option and give the SVGfile an extension of PNG , Gimp succesfully converted the file to PNG.
However I wanted to dig further and check out what is the standard accepted way to convert SVG files using a plain command. This will possibly be handy to me if I had to do something online (let’s say a website) which will accept SVG and will require the SVG files to be converted and also stored in PNG or other Graphic file formats.
After checking online, I’ve found a post which pointed me to librsvg2 which contains RSVG – (Turn SVG files into raster images.)
librsvg is available as a package in most mainstream Linux distributions nowdays, Fedora, Debian etc., as well as contains a port inside the FreeBSD ports system. Since I’m using Debian on my notebook where I installed and tested the command line SVG to PNG convertion the way I did it is:
noah:/home/hipo/Desktop# apt-get --yes install librsvg2-bin

Reading package lists... Done

Building dependency tree

Reading state information... Done

The following NEW packages will be installed:

librsvg2-bin

0 upgraded, 1 newly installed, 0 to remove and 16 not upgraded.

Need to get 72.5 kB of archives.

After this operation, 180 kB of additional disk space will be used.

Get:1 http://ftp.nl.debian.org/debian/ squeeze/main librsvg2-bin amd64 2.26.3-1 [72.5 kB]

Fetched 72.5 kB in 0s (184 kB/s)

Selecting previously deselected package librsvg2-bin.

(Reading database ... 376046 files and directories currently installed.)

Unpacking librsvg2-bin (from .../librsvg2-bin_2.26.3-1_amd64.deb) ...

Processing triggers for man-db ...

Setting up librsvg2-bin (2.26.3-1) ...
Afterwards the exact convertion of my Inscape SVG file drawing.svg to drawing.png using rsvg I’ve done like so:
hipo@noah:~/Desktop$ rsvg drawing.svg drawing.png
The convertion results for me was 100% uniqueness between the file converted and the output PNG. Some people might wonder why I didn’t used Inkscape’s Export to Bitmap function and then use convert command part of ImageMagick in order to convert the produced Inkscape bitmap to PNG.
One other thing worthy to mention is on Debian, librsvg2-bin contains 2 more executable besides rsvg. One is the rsvg-view command which allows one to view SVG files using command line or Graphic enviroment, the other one is rsvg-convert which supports again SVG convertion to PDF and to PNG
Before proceeding with the other described ways to convert SVG to PNG earlier in this article, I give a try to Inkscape’s Export to Bitmap embedded function but the produced bitmap did not resembled the original SVG file so I decided to completely abandon this method
Maybe there is some particular reason of the chaotic way I’ve tested Inkscape to place random images sometimes going out of the field of a paper etc. which influenced the improper generation of Bitmap using Inkscape, despite that it seems InkScape needs some more development until the bugs in Bitmap producing get fixed and it can be freely used to produce Bitmaps.
Maybe there is some particular reason for the failure of Inkscape to produce a good BMP file, like for example the chaotic way I’ve tested Inkscape to place random images sometimes going out of the field of a paper borders etc.This should have influenced the improper generation of Bitmap using Inkscape, anyhow it seems InkScape needs some more development until the bugs in Bitmap creation get fixed.
By the way if you’re wondering how to convert PNG to bitmap BMP after, once having converted SVG to PNG this is easily doable with convert command, like so:
hipo@noah:~/Desktop$ convert drawing.png drawing.bmp
Maybe in future releases it will be a good idea if InkScape developers integrate a convertion to other formats this will make it handy and make surely these nice program more popular among users. Hope this is helpful. Cheers and as RMS likes to say Happy Hacking 😉
Tags: adoption rate, binary data, bitmap, convertion, data storage, default format, Desktop, emacs, export, file, format, function, GIMP, gnu linux, graphic editor, graphic formats, graphical extension, graphical manipulation, Graphics, hipo, HTML, inkscape, interoperable, librsvg, nbsp, nifty program, noah, Open, package, png, Scalable, source vector, substitute, svg file, text, Vectors, vim, xml content
Posted in FreeBSD, Linux, Linux and FreeBSD Desktop, Linux Audio & Video, Various | 2 Comments »
Thursday, November 17th, 2011 
I was looking for a way to convert some Video and Sound files, downloaded from Youtube (mostly things dedicated to free software) and as far as I looked online unfortunately these pieces of nice music and tutorials are not available for download anywhere else or at least not available for download in some of the Open / Free Format (OGG Vorbis or OGV (OGG / Theora Video).
When it comes to convertion between different formats, always the first things that I think of is ffmpeg or mencoder , however I was not sure if some of this tools are doing the trick so I did a quick research online if there is some specialised console or GUI program that can do the convertions between MP4, FLV etc. to OGV.
In less than 10 minutes I found a threat mentioning about ffmpeg2theora – A Simple Convertor to create Ogg Theora files
As I’m running Debian GNU / Linux, I installed ffmpeg2theora straight via apt, according to some reports online ffmpeg2theora cmd convertion tool is also available straight from repositories on Ubuntu as well.
On FreeBSD there is a port /usr/ports/multimedia/ffmpeg2theora available for install. Of course FFmpeg2Theora can be installed from source on other Linux distributions that might be missing a pre-built binary.
Using ffmpeg2theora to convert some kind of non-free video format is very simple, though the tool provides quite a numerous options for all those who want to have some customization for the video to be converted.
To convert the flash file “The Gnu Song.flv” for example to The Gnu Song.flv , I invoked ffmpeg2theora like this:
debian:~# ffmpeg2theora "The Gnu Song.flv"

...
The conversion took few minutes of time, as my machine is not ultra powerful and apparently the conversion to OGV format is not too quick but the good news is it works.
After the conversion was completed I used ogginfo to check the information about the recent converted file The Gnu Song.flv , below you see the file info ogginfo returns
debian:~# ogginfo The Gnu Song.ogv

Processing file "The Gnu Song.ogv"...
New logical stream (#1, serial: 5d65413f): type skeleton
New logical stream (#2, serial: 0570412d): type theora
New logical stream (#3, serial: 7e679651): type vorbis
Theora headers parsed for stream 2, information follows…
Version: 3.2.1
Vendor: Xiph.Org libtheora 1.1 20090822 (Thusnelda)
Width: 320
Height: 240
Total image: 320 by 240, crop offset (0, 0)
Framerate 25/1 (25.00 fps)
Aspect ratio undefined
Colourspace: Rec. ITU-R BT.470-6 Systems B and G (PAL)
Pixel format 4:2:0
Target bitrate: 0 kbps
Nominal quality setting (0-63): 32
User comments section follows…
ENCODER=ffmpeg2theora-0.24
Vorbis headers parsed for stream 3, information follows…
Version: 0
Vendor: Xiph.Org libVorbis I 20101101 (Schaufenugget)
Channels: 1
Rate: 22050
Nominal bitrate: 30.444000 kb/s
Upper bitrate not set
Lower bitrate not set
User comments section follows…
ENCODER=ffmpeg2theora-0.24
Logical stream 1 ended
Theora stream 2:
Total data length: 1525324 bytes
Playback length: 2m:41.360s
Average bitrate: 75.623401 kb/s
Logical stream 2 ended
Vorbis stream 3:
Total data length: 646729 bytes
Playback length: 2m:41.384s
Average bitrate: 32.059041 kb/s
ogginfo is a part of a package installed under the name vorbis-tools, vorbis tools also contains a few other helpful tools, whether operations with OGV or OGG file formats are at hand, the complete binaries vorbis-tools contains on Debian as of time of writting this post is:
/usr/bin/ogg123

/usr/bin/oggenc

/usr/bin/oggdec

/usr/bin/ogginfo

/usr/bin/vcut

/usr/bin/vorbiscomment

/usr/bin/vorbistagedit
ogg123 is a player for ogg files, however as far as I’ve tested it it doesn’t work too well. And just to compare ogg audio files were played just nice using the play command.
oggenc is used to encode ogg audio file, based on a stream haneded to it from other audio encoded stream (let’s say mp3). Hence oggenc can be used to convert mp3 files to ogg audio files , like so:
debian:~# mpg321 input.mp3 -w - | oggenc -o output.ogg -
oggdec is used to convert to wav files or raw PCM audio, whether;
vcut is used to cut ogg video file on parts.
vorbiscomment and vorbistagedit is used to edit information on already existing ogg audio files
There is also a GUI programmer for people who doesn’t want to bother with writting on the command line called oggconvert . OggConvert is written for GNOME and uses GTK gnome library, here is how the program looks like:
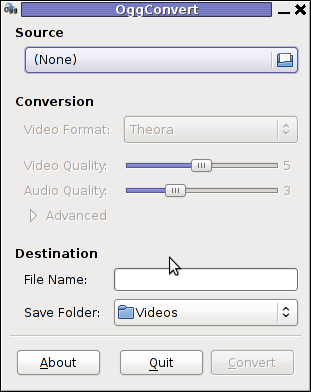
Tags: Auto, conversion, convertion, convertions, convertor, course, customization, debian gnu, doesn, download, Draft, few minutes, file, flash file, flv, format, Free, freebsd, gnu linux, gnu song, information, linux distributions, mp4, nice music, ogv, Open, ports, quot, repositories, software, Song, Sound, sound files, Theora, threat, time, tool, trick, type, Ubuntu, User, version, video, youtube
Posted in FreeBSD, Linux, Linux Audio & Video, Various | No Comments »
Thursday, September 29th, 2011 ffmpeg is the de-facto standard for Video conversion on Linux and BSD platforms. I was more than happy to find out that ffmpeg is capable of converting an .ogv file format to .flv (Flash compressed Video).
Ogg Vorbis Video to Flash’s conversion on Linux is a real piece of cake with ffmpeg .
Here is how to convert .ogv to .flv:
debian:~# ffmpeg -i ogg_vorbis_video_to_convert_.ogv converted_ogg_vorbis_video_to_flash_video.flv

...
Conversion of a 14MB ogg vorbis video to flv took 28 seconds, the newly produced converted_ogg_vorbis_video_to_flash_video.flv has been reduced to a size of 9MB. This is on a system with 2 GB of memory and dual core 1.8 Ghz intel CPU.
Tags: BSD, bsd platforms, cake, conversion, core, CPU, de facto standard, Debian, dual core, ffmpeg, file, file format, Flash, flv, format, freebsd, ghz intel, intel, intel cpu, Linux, memory, Ogg, ogv, piece of cake, platform, size, standard, system, video conversion, Vorbis
Posted in FreeBSD, Games Linux, Linux Audio & Video | No Comments »
Friday, April 15th, 2011 In my quest to know Linux better and use it capabilities to fulfill a multimedia tasks I came across the question:
How can I extract audio sound and music from Flash Videos .flv file format?
After a bit of investigation online I’ve found out in order to achieve this task the quickest way is via the handy ffmpeg conversion tool .
It’s rather easy actually, all necessery to do the conversion is to have the ffmpeg installed.
FFMpeg is part of Debian and Ubuntu repositories, so if you haven’t installed it yet, go straigh and install it with:
debian:~# apt-get install ffmpeg

...
Many modern day Linux distributions already have the ffmpeg pre-installed by default, ffmpeg even have a Windows version so this little tutorial should be directly applied on a Windows host with installed ffmpeg.
Convertion of a .flv file to .mp3 file for example is a real piece of cake to so do issue the command:
debian:~# ffmpeg -i input_file.flv -ab 128 -ar 44100 output_file.mp3
The few mmpeg options meaning is as follows:
-i (specifies input file)
-ab (Set the audio bitrate in bit/s 64k by default)
-ar (Set the audio sampling frequency (default = 44100 Hz).)
For more options checkout the ffmpeg help.
I found ffmpeg to be a bit slower than I expected. A 17 minutes .flv video file is converted to .mp3 for 38 seconds time.
Here is the textual output I got on my Debian Linux while extracting the flash video’s sound and converting it to mp3:
debian:~# time ffmpeg -i g7tvI6JCXD0.flv -ab 128 -ar 44100 output.mp3
FFmpeg version SVN-r25838, Copyright (c) 2000-2010 the FFmpeg developers
built on Jan 21 2011 08:21:58 with gcc 4.4.5
configuration: –enable-libdc1394 –prefix=/usr –extra-cflags=’-Wall -g ‘ –cc=’ccache cc’ –enable-shared –enable-libmp3lame –enable-gpl –enable-libvorbis –enable-pthreads –enable-libfaac –enable-libxvid –enable-postproc –enable-x11grab –enable-libgsm –enable-libtheora –enable-libopencore-amrnb –enable-libopencore-amrwb –enable-libx264 –enable-libspeex –enable-nonfree –disable-stripping –enable-avfilter –enable-libdirac –disable-decoder=libdirac –enable-libschroedinger –disable-encoder=libschroedinger –enable-version3 –enable-libopenjpeg –enable-libvpx –enable-librtmp –extra-libs=-lgcrypt –disable-altivec –disable-armv5te –disable-armv6 –disable-vis
libavutil 50.33. 0 / 50.39. 0
libavcore 0.14. 0 / 0.14. 0
libavcodec 52.97. 2 / 52.97. 2
libavformat 52.87. 1 / 52.87. 1
libavdevice 52. 2. 2 / 52. 2. 2
libavfilter 1.65. 0 / 1.65. 0
libswscale 0.12. 0 / 0.12. 0
libpostproc 51. 2. 0 / 51. 2. 0
[flv @ 0x1336760] Estimating duration from bitrate, this may be inaccurate
Seems stream 0 codec frame rate differs from container frame rate: 2000.00 (2000/1) -> 29.92 (359/12)
Input #0, flv, from ‘g7tvI6JCXD0.flv’:
Metadata:
duration : 1060
starttime : 0
totalduration : 1060
width : 480
height : 360
videodatarate : 76
audiodatarate : 94
totaldatarate : 179
framerate : 30
bytelength : 23723246
canseekontime : true
sourcedata : B5F9E82C6HH1302704673918653
purl :
pmsg :
Duration: 00:17:40.35, start: 0.000000, bitrate: 174 kb/s
Stream #0.0: Video: h264, yuv420p, 480×360 [PAR 1:1 DAR 4:3], 77 kb/s, 29.92 tbr, 1k tbn, 2k tbc
Stream #0.1: Audio: aac, 44100 Hz, stereo, s16, 96 kb/s
WARNING: The bitrate parameter is set too low. It takes bits/s as argument, not kbits/s
Output #0, mp3, to ‘output.mp3’:
Metadata:
duration : 1060
starttime : 0
totalduration : 1060
width : 480
height : 360
videodatarate : 76
audiodatarate : 94
totaldatarate : 179
framerate : 30
bytelength : 23723246
canseekontime : true
sourcedata : B5F9E82C6HH1302704673918653
purl :
pmsg :
TSSE : Lavf52.87.1
Stream #0.0: Audio: libmp3lame, 44100 Hz, stereo, s16, 0 kb/s
Stream mapping:
Stream #0.1 -> #0.0
Press [q] to stop encoding
size= 16576kB time=1060.81 bitrate= 128.0kbits/s
video:0kB audio:16575kB global headers:0kB muxing overhead 0.002404%
real 0m38.489s
user 0m37.126s
sys 0m0.764s
When talking about conversions, another very useful application of ffmpeg is in case if you want to:
Extract Audio from online streams
Let’s say you have a favourite radio, you often listen and there are a podcast you want to capture for later listening, or just catch a few nice songs, using ffmpeg it’s a piece of cake by using the command like:
debian:~# ffmpeg -i http:///xxx.xxx.xxx.xxx/some -ab 128 -ar 44100 captured-radio-sound.mp3
The possible ways of use of ffmpeg is truly versatily, you can use it for instance if you have to convert some kind of audio or video format to another one I have given a very simple example of converting a .flv file to .avi and vice versa in my previous post
Tags: audio bitrate, audio sampling, BSD, cake, ccache, cflags, conversion tool, convertion, debian linux, ffmpeg, file, format, gcc, height, input file, investigation, jan 21, JCXD, Linux, multimedia tasks, music, necessery, piece, piece of cake, sampling frequency, Set, Sound, sound and music, starttime, textual output, time, tool, Ubuntu, ubuntu repositories, video, video file, Videos, width, windows version
Posted in Linux, Linux and FreeBSD Desktop, Linux Audio & Video | 1 Comment »
Thursday, April 7th, 2011 The previous semester in Arnhem Business School, I’ve followed a module called Strategic Human Resources Management
as a part of the so called G-cluster (Grand Cluster) (the 3rd year second semester).
The Stragic HR subject (module) is a completely meaningless one and the best short way to describe it is with the word (an insanity!).
In reality there is no aim of this module, and it’s content is vague and irrelevant.
If you’re a student in Arnhem Business School (ABS) and you have as oligitory to follow this course you’re seriously in trouble.
The whole subject is a lot of bla, bla, the teachers attitude towards you is like they’re invincible and you’re a victim and you have to always obey the teacher or you’re out (fear based)
Anyways I would skip to describe how the Strategic HRM went through as it was a complete nightmare ..
As a part of the Strategic HRM course It was necessery to write the so called Strategic Paper, the paper was required as a proof to the teachers that the student has realized what Strategic HRM is.
I believe my paper became quite good and thus I decided to share it here on my blog in hope that some other students might benefit from my Strategic Human Resources and Management research paper.
Here is the strategic paper assignment document and the paper itself:
1. Assignment Strategic Paper for semester 2010-2011
2. Strategic Human Resources Research Paper in DOC format
3. Strategic Human Resources Research Paper in PDF format
As I passed the Strategic HRM and it was one of the weighting factors for the subject end mark, it appears my research paper was found to be a good one by the teachers and therefore I assume other students from HAN might like to read it as a sample if they have to write something similar.
Tags: aim, Arnhem, assignment document, attitude, bla bla, blog, Business, business school, Cluster, content, course, DOC, doc format, format, HAN, HRM, hrm course, human resources management, human resources research, insanity, irrelevantIf, management research, mark, necessery, nightmare, Paper, paper assignment, proof, reality, Research, research paper, School, second semester, SHR, something, strategic hrm, strategic human resources, student, subject module, victim, year
Posted in Business Management | No Comments »


