Posts Tagged ‘fresh’

How to fresh Upgrade mistakenly installed 32-bit Windows 10 Professional to 64-bit Windows / A failure to Disk Clone old SSD 120GB to 512GB HDD due to failed Solid State Drive

Wednesday, November 17th, 2021

upgrade-windows-10-32-bit-to-64-bit-howto-picture

I've been Setting up a new PC with Windows OS that is a bit old a 11 years old Lenovo ThinkCentre model M90P with 8 GB of Memory, Intel(R) Core(TM) i5 CPU         650  @ 3.20GHz   3.19 GHz, Intel Q57 Express Chipset. The machine came to me with Windows 7 preinstalled and the intial goal was to migrate Windows as it is with its data from the old 120GB SSD to new 512 SSD and then to keep the machine at least a bit more up to date to upgrade the old Windows 7 to Windows 10.

This as usual seemed like a very trivial task for a System Administrator, and even if you haven't touched much of Windows as me it makes it look a piece of cake, however as always with computers, once you think you'll be done in 2 hours usually it takes 20+ . Some call it Murphy's law "If something could go wrong then it will go wrong". But putting this situation that I thought all well that's easy lets do it is a kind of a proud Thought for man and the to save us from this Passion of Proudness which according to Church fathers is the worst passion one can have and humiliate us a bit.

God allows some unforseen stuff to happen   🙂 The case with this machine whose original idea I had is to OK I Simply Duplicate the Old Hard Drive to the New one and Place the new one on the ThinkCentre is not a big deal turned to a small adventure 🙂

For this machine hardware I have to say, the old English saying "Old but Gold" is pretty true, especially after I've attached the Samsung 512GB NVME SSD Drive, which my dear friend and brother in Christ "Uncle Emilian" had received as a gift from another friend called Angel. To put even more rant, here name Emilian stems from the Greek Emilianos which translated to English means Adversary.. But anyways The old Intel SSD 120 GB drive which besides being already completely Full of Data,  turned to have Memory DATA Chips (that perhaps burn out / wasted),  so parts of the Drive were Unreadable.
I've realized the fauly SSD fact after, 
trying to first clone the drives with my Hardware Disk Clone device Orico Dual Bay 2.5 6629US3-C device and then using a simple bit to bit copy with dd command.

orico-6629us3-c2-bay-usb3-type-b2.5-type3-5.inch-sata


At first for some weird reason the Cloning of 120GB SSD HDD towards -> 512 GB newer one was unsuccessful – one of the 2 lamp indicators on Source and Destination Drives was continuiously blinking orange as it seemed data could not be read, even though I tried few times and wait for about 1 hour of time for the cloning to complete, so I first suspected that might be an issue with my  last year bought Disk Clone hardware device. So I've attached the 2 Hard Drives towards my Debian GNU / Linux 10 as USB attached drives using the "Toaster" device  and tried a classical copy   from terminal with Disk Druid e.g.


# dd if=/dev/sdb2 of=/dev/sdbc2 bs=180M status=progress conv=noerror, sync

 
dd: error reading '/dev/sdb2': Input/output error
1074889+17746 records in
1092635+0 records out
559429120 bytes (559 MB, 534 MiB) copied, 502933 s, 1.1 kB/s
dd: writing to '/dev/dc2': Input/output error
1074889+17747 records in
1092635+0 records out
559429120 bytes (559 MB, 534 MiB) copied, 502933 s, 1.1 kB/s

Finally I did a manual copy of files from /dev/sdb2 /dev/sdc2 with rsync and part of the files managed to be succesfully copied, about 55Gigabytes out of 110 managed to copy.  Luckily the data on the broken Intel 320 Series 120GB was not top secret stuff so wasting some bits wasn't the end of the world 🙂

Next, I've removed the broken 120Gb SSD which perhaps was about at least 9+ years old and attached to the Lenovo ThinkCentre, the new drive and as my dear friend wanted to have Windows again (his computer has Microsoft "Certificate of Authenticity"), e.g. that OEM Registration Serial Key for Windows 7.
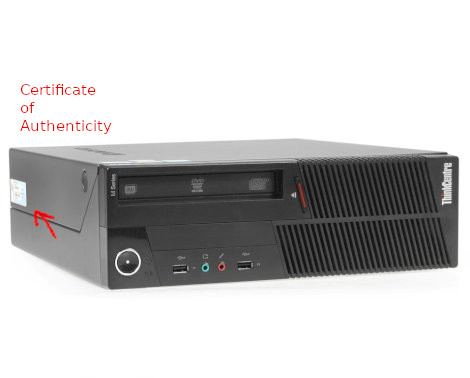
Lenovo-ThinkCentre-M90p-certificate-of-authenticity

I've jumped in and used some old Flash USB Stick Drive to place again Windows 7 (in order to use the same active license) and from there on, I've used another old Windows 10 Installation Bootable stick of mine to upgrade the Windows 7 to Windows 10 (by using this Win 7 to Win 10 upgrade trick it is possible to still continue use your old Windows 7 License Key on Windows 10). So far so good, now I've had Windows 10 Professional Edition installed on the machine, but faced another issue the Memory of the Machine which is 8GB did not get fully detected the machine had detected only 3.22 GB of Memory, for some weird reason.
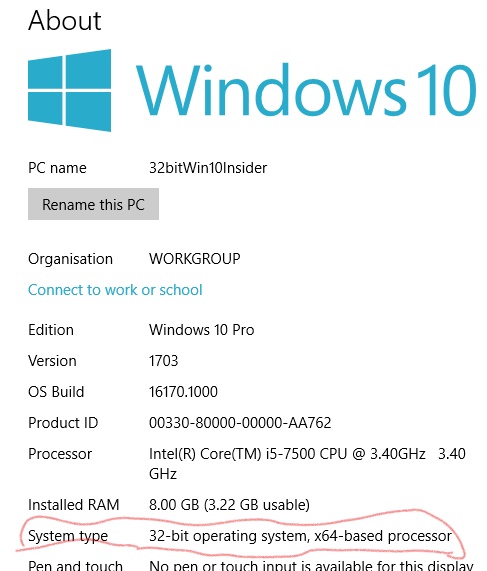
only-2-80-gb-usable-windows-10-problem-32-bit-cpu-cause-screenshot

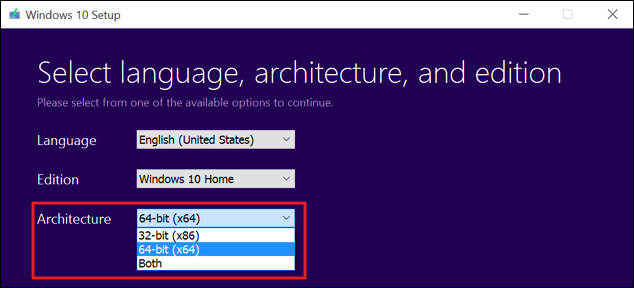
After few minutes of investigation online, I've realized, I've installed by mistake a 32 Bit version of Windows 10 Pro…So the next step was of course to upgrade to 64 bit to work around the unrecognized 5.2GB memory… To make sure my Windows 10 Installation is up-to-date I've downloaded the latest one from the Media Creation Installation Tool from Microsoft's website used the tool to burn the Downloaded Image to an Empty USB Stick (mine is 16GB but minimum required would be 4Gb) and proceeded to reboot the Lenovo Desktop machine and boot from the Windows 10 Install Flash Drive. From there on I've had to select I need to install a 64 Bit version of Windows and Skip the Licensing Key fill in Prompt Twice (act as I have no license) as Windows already could recognize the older OEM installed 32 bit install Windows key and automatically fetches the key from there.

Before proceeding to install the 64 Bit Windows, of course double check  that the Machine you have at hand has already the License Key recognized by Microsoft  is 64 Bit capable:

To check 32 bit version of Windows before attempted upgrade is Properly Licensed :

Settings > Update & security > Activation
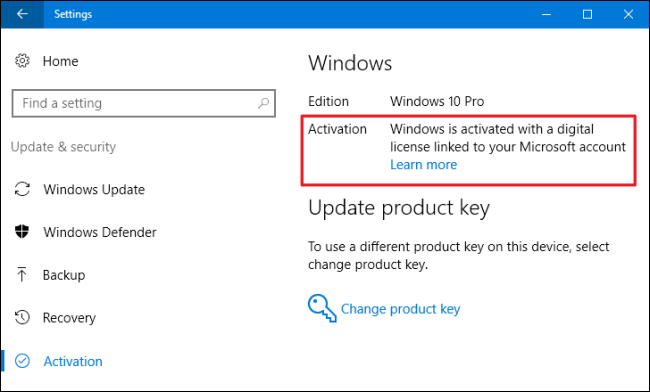
check-if-windows-is-already-activated-settings-update-and-security-Activation-menus


To check whether Hardware is 64 Capable:

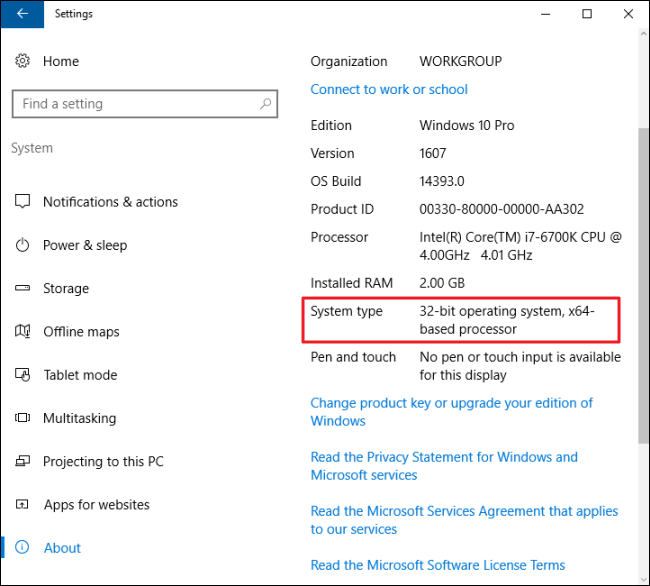
Settings -> System -> About
 

is-hardware-processor-64-bit-capable-windows-screenshot

32 bit Windows on x64based processor (Machine supports 64 bit OS)
 

windows10-OS-Installation-media-install-tool

Media Creation Tool Windows 10 MS Installer tool (make sure you select 64-bit (x86) instead of the default

From the Installer, I've installed Windows just like I install a brand new fersh Win OS and after asking the few trivial Installation Program questions landed to the new working OS and proceeded to install the usual software which are a must have on a freshly installed Windows for some of them check my previous article Essential Must have software to install on Fresh  new Windows installation host.

Adding multiple VirtualHosts hosting on fresh installed Debian GNU / Linux

Monday, September 10th, 2012

Nowdays most of my new (fresh) Linux server configurations are installed with Debian Linux.

Through the years I worked with most major GNU / Linux distributions. Though intalling Apache for multiple domain VirtualHost-ing is almost equally easier to set up on all distros I tried, (Slackware, Redhat, Fedora) etc., I found Debian to be most convenient in terms of freqeuent easy updates and general security.

Every time I configure a new host which is supposed to host a dozen of websites with Apache webserver and a DB backend, it is of course necessery to enable the server to have support multiple domain VirtualHosts.

I thought there are people out who look to configure Multiple domains on fresh installed Apache webserver and this how this short post get born.

I will explain hereby in short how I configure VirtualHosts on new Debian Linux servers with fresh installed Apache.

All required to have a working many domains hosted VirtualHosts on Debian is:

1. Have installed Apache serve package

# apt-get --yes install apache2

This would install all packages necessery for VirtualHost-ing.
After apache2 installed the system should have at least this packages present.

# dpkg -l |grep -i apache2
ii apache2-mpm-prefork 2.2.16-6+squeeze7 Apache HTTPServer - traditional non-threaded model
ii apache2-utils 2.2.16-6+squeeze7 utility programs for webservers
ii apache2.2-bin 2.2.16-6+squeeze7 Apache HTTPServer common binary files
ii apache2.2-common 2.2.16-6+squeeze7 Apache HTTPServer common files
ii libapache2-mod-php5 5.3.3-7+squeeze14 server-side, HTML-embedded scripting language (Apache 2 module)

Nowadays, having enabled mod_rewrite is necessery in almost any website, so the next thing I usually do is enable mod_rewrite webserver module.

# ln -sf /etc/apache2/mods-available/rewrite.load /etc/apache2/mods-enabled/rewrite.load
# apache2ctl -k restart

By default there is an index.html page containing the annoying phrase It Works!

I really dislike this default page and many times I start configuring a server, I wonder how to remove it; if you’re like me before doing anything other I advice you edit /var/www/index.html to change it to Coming Soon or just substitute the file with some nice looking Coming Soon page (custom page) …

Once this is done, I proceed adding as many Virtualhosts as I need with the respective Virtualhost names. To Do so on Debian, just create new Vhost config files in files /etc/apache2/sites-available/yoursite.com, /etc/apache2/sites-available/yoursite1.com etc.br />
Before creating any other VHosts, I usually edit the main webserver VirtualHost which is located in /etc/apache2/sites-available/000-default, there in the VirtualHost section normally need to add proper:

ServerName and ServerAlias variables as well as change DocumentRoot to whatever the default server host Virtualhost directory will be.

An example of 000-default Vhost config I do looks like so:

<VirtualHost *>ServerName server-main-host-name.com
ServerAlias www.server-main-host-name.com server-main-host-name.com
DocumentRoot /var/www
....
</Virtualhost>

Onwards add the same ServerName server-main-host-name.com as a new line in /etc/apache2/apache2.conf config

Now for those not too unfamiliar with VirtualHost types, it is useful to say there are two ways of VirtualHosts:

  • IP Based VirtualHost
  • and

  • Host Based VirtualHosts

IP Based VirtualHosts are added by using Apache directive syntax:

<VirtualHost 192.168.0.2:80>
ServerName ....
ServerAlias ....
</VirtualHost>

whether Host Based VirutalHosts are added by using in config file, the IP address on which the respective Vhost will reside:

<VirtualHost *>
ServerName ....
ServerAlias ....
</VirtualHost>

Host Based VirtualHosts directive syntax can be either in form:

a)Virtualhost *
or
b) Virtualhost port_number (Virtualhost 80, VirtualHost 90) etc.

If a host is configured with directive <VirtualHost *>, this means it will listen for incoming connections on any port Apache is configured to listen on, whether if used with a concrete port number it will only enable VirtualHosts for whole Apache server on the concrete port.

Based on the configuration, VirtualHost 80 or Virtualhost *, the variable which will enable globally on the Apache server multiple VirtualHosts has to be modified e.g.:
Whether VirtualHost with port number is configured <VirtualHost 80>, NameVirtualHost 80 should be used or otherwise NameVirtualHost *

Once you choose the type of Virtualhost-ing, just continue on adding the VirtualHosts …
In the first created VirtualHost config file, let’s say /etc/apache2/sites-available/first-virtualhost.com

NameVirtualHost * has to be added as first line in file; in other words the file content should look similar to:

NameVirtualHost *
<VirtualHost*>
ServerAdmin hipo_aT_www.pc-freak.net AddDefaultCharset UTF-8 DocumentRoot /var/www/ ServerName www.pc-freak.net ServerAlias www.pc-freak.net....
</VirtualHost>

The same steps has to go for all domain names in separate files except the variable NameVirtualHost * should not be added in the rest of new created Vhosts.

Many of the new configured Debian + Apache servers does not require support for SSL, therefore where SSL support is not necessery I prefer disabling it.
To do so it is necessery to comment out everything dealing with Secure Socket Layer in /etc/apache2/ports.conf, as of time of writting lines to comment are:

<IfModule mod_ssl.c>
# If you add NameVirtualHost *:443 here, you will also have to change
# the VirtualHost statement in /etc/apache2/sites-available/default-ssl
# to <VirtualHost *:443>
# Server Name Indication for SSL named virtual hosts is currently not
# supported by MSIE on Windows XP.
Listen 443
</IfModule>
<IfModule mod_gnutls.c>
Listen 443
</IfModule>