Posts Tagged ‘gz’

Fun with Apache / Nginx Webserver log – Visualize webserver access log in real time

Friday, July 18th, 2014

visualize-graphically-web-server-access-log-logstalgia-nginx-apache-log-visualize-in-gnu-linux-and-windows
If you're working in a hosting company and looking for a graphical way to Visualize access to your Linux webservers – (Apache, Nginx, Lighttpd) you will be happy to learn about Logstalgia's existence. Logstalgia is very useful if you need to convince your Boss / company clients that the webservers are exceeding the CPU / Memory hardware limits physically servers can handle. Even if you don't have to convince anyone of anything logstalgia is cool to run if you want to impress a friend and show off your 1337 4Dm!N Sk!11Z 🙂 Nostalgia is much more pleasent way to keep an eye on your Webserver log files in real time better than (tail -f)

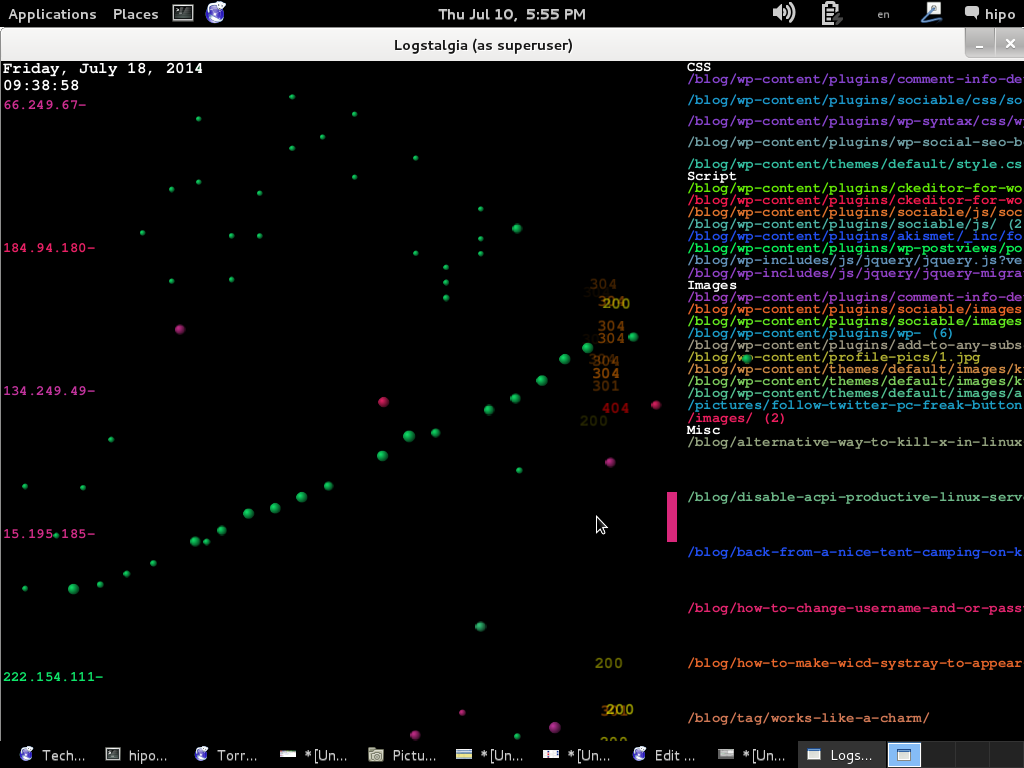
The graphical output of nostalgia is a pong-like battle game between webserver and never ending chain of web requests.

This is the official website description of Logstalgia:
 

Logstalgia is a website traffic visualization that replays web-server access logs as a pong-like battle between the web server and an never ending torrent of requests. Requests appear as colored balls (the same color as the host) which travel across the screen to arrive at the requested location. Successful requests are hit by the paddle while unsuccessful ones (eg 404 – File Not Found) are missed and pass through. The paths of requests are summarized within the available space by identifying common path prefixes. Related paths are grouped together under headings. For instance, by default paths ending in png, gif or jpg are grouped under the heading Images. Paths that don’t match any of the specified groups are lumped together under a Miscellaneous section.


To install Logstalgia on Debian / Ubuntu Linux there is a native package, so to install it run the usual:

apt-get --yes install logstalgia

Reading package lists... Done
Building dependency tree
Reading state information... Done
The following NEW packages will be installed:
logstalgia
0 upgraded, 1 newly installed, 0 to remove and 4 not upgraded.
Need to get 161 kB of archives.
After this operation, 1,102 kB of additional disk space will be used.
Get:1 http://mirrors.kernel.org/debian/ stable/main logstalgia amd64 1.0.0-1+b1 [161 kB]
Fetched 161 kB in 2s (73.9 kB/s)
Selecting previously deselected package logstalgia.
(Reading database ... 338532 files and directories currently installed.)
Unpacking logstalgia (from .../logstalgia_1.0.0-1+b1_amd64.deb) ...
Processing triggers for man-db ...
Setting up logstalgia (1.0.0-1+b1) ...


Logstalgia is easily installable from source code on non-Debian Linux distributions too, to install it on any non-debian Linux distrubution do:

cd /usr/local/src/ wget https://logstalgia.googlecode.com/files/logstalgia-1.0.5.tar.gz
 

–2014-07-18 13:53:23–  https://logstalgia.googlecode.com/files/logstalgia-1.0.3.tar.gz
Resolving logstalgia.googlecode.com… 74.125.206.82, 2a00:1450:400c:c04::52
Connecting to logstalgia.googlecode.com|74.125.206.82|:443… connected.
HTTP request sent, awaiting response… 200 OK
Length: 841822 (822K) [application/x-gzip]
Saving to: `logstalgia-1.0.3.tar.gz'

100%[=================================>] 841,822     1.25M/s   in 0.6s

2014-07-18 13:53:24 (1.25 MB/s) – `logstalgia-1.0.3.tar.gz' saved [841822/841822]

Untar the archive with:
 

tar -zxvf logstalgia-1.0.5.tar.gz

Compile and install it:

cd logstalgia
./configure
make
make install


How to use LogStalgia?

Syntax is pretty straight forward just pass the Nginx / Apache

Process Debian Linux Apache logs:

logstalgia /var/log/apache2/access.log


Process CentoS, Redhat etc. RPM based logs:

logstalgia /var/log/httpd/access.log
To process webserver log in real time with logstalgia:

tail -f /var/log/httpd/access_log | logstalgia -

To make logstalgia visualize log output you will need to have access to server physical console screen. As physical access is not possible on most dedicated servers – already colocated in some Datacenter. You can also use a local Linux PC / notebook installed with nostalgia to process webserver access logs remotely like so:

logstalgia-visualize-your-apache-nginx-lighttpd-logs-graphically-in-x-and-console-locally-and-remotely

ssh hipo@www.pc-freak.net tail -f /var/log/apache2/access.log | logstalgia --sync

Note! If you get an empty output from logstalgia, this is because of permission issues, in this example my user hipo is added in www-data Apache group – if you want to add your user to have access like me, issue on remote ssh server):
 

addgroup hipo www-data


Alterantively you can login with ssh with root, e.g. ssh root@www.pc-freak.net

If you're having a GNOME / KDE X environment on the Linux machine from which you're ssh-ing Logstalgia will visualize Webserver access.log requests inside a new X Window otherwise if you're on a Linux with just a console with no Xserver graphics it will visualize graphically web log statistics using console svgalib .


If you're planning to save output from nostalgia visualization screen for later use – lets say you have to present to your CEO statistics about all your servers  Webservers logs you can save nostalgia produced video in .ppm (netpbm) format.

Whether you have physical console access to the server:

logstalgia -1280x720 --output-ppm-stream output.ppm /var/log/httpd/access.log

Or if you just a have a PC with Linux and you want to save visualized content of access.log remotely:

ssh hipo@www.pc-freak.net tail -f /var/log/nginx/pc-freak-access.log | logstalgia -1280x720 --output-ppm-stream --sync output.ppm


ssh user@server1.cyberciti.biz tail -f /var/log/nginx/www.cyberciti.biz_access.log | logstalgia -1280x720 --output-ppm-stream --sync output.ppm

To make produced .ppm later usable you can use ffmpeg to convert to .mp4:

ffmpeg -y -r 60 -f image2pipe -vcodec ppm -i output.ppm -vcodec libx264 -preset ultrafast -pix_fmt yuv420p -crf 1 -threads 0 -bf 0 nginx.server.log.mp4

Then to play the videos use any video player, I usually use vlc and mplayer.

For complete info on Nostalgia – website access log visualizercheck home page on googlecode

If you're lazy to install Logstalgia, here is Youtube video made from its output:

Enjoy 🙂

Fix “tar: Error exit delayed from previous errors” and its cause and solution

Monday, August 18th, 2014

fix-solve-tar-error-delayed-exit-from-previous-errors-tarball-error

tar: Error exit delayed from previous errors

error is a very common error encountered when creating archives (or backing up server configurations / websites / sql binary data). The error is quite unexplanatory and whenever creating files verbose in order to see the files added to archve in "real time" with lets say:

tar -czvf /tmp/filename_backup_date-of-backup.tar.gz /home/websites /home/sql


its pretty hard to track on exactly which file is the backup producing the Error exit delayed from previous errors, this is especially the case whenever adding to archive directories containing millions of tiny few kilobyte sized files. Many novice on uncautious Linux admins , might simply ignore the warning if they're in a hurry / are having excessive work to be done as there will be .tar.gz backup produced and whenever uncompressed most of the files are there and the backup error would seem not of a big issue.

However as backuping files is vital stuff, especially when moving the files from a server to be decomissioned you have to be extra careful and make the backup properly, e.g. figure out the cause of the error, to do so log the full output of tar operations with tee command, like so:

tar -czvf /tmp/filename_backup_date-of-backup.tar.gz /home/websites/ /home/sql | tee /tmp/backup_tar_full_output.log

Then you will have to review the file and lookup for errors with less search string – / (slash) – look for "error" and "permission den" keywords and this should point you to what is causing the error. In cases when millions of files are to be archived, the log might grow really big and hard to process, therefore a much quicker way to understand what's happening is to only log and show in shell standard output last file error with > (shell redirect):
 

tar -czvf /tmp/filename_backup_date-of-backup.tar.gz /home/websites /home/sql > /tmp/backup_failure-cause.log


tar: www.ur-website.com-http/2.0.63/conf/tnsnames.ora.20080918: Cannot open: Permission denied
tar: Removing leading `/' from member names

The error indicates clearly the cause of error is lack of Permissions to read the file tnsnames.ora.20080918 so solution is to either grant permissions to non-root user with (chmod / chown) cmds, in my case grant perms to user hipo with which tar is ran, or run again the website backup with superuser, I usually just run with root user to prevent tampering with original permissions, e.g. to solve the error, either:

$ su root
# tar -czvf /tmp/filename_backup_date-of-backup.tar.gz /home/websites /home/sql

Or even better if sudo is installed and user is added to /etc/sudoers file

$ sudo tar -czvf /tmp/filename_backup_date-of-backup.tar.gz /home/websites /home/sql


Though permission errors is the most often reason for:

tar: Error exit delayed from previous errors, you should keep in mind that in some cases the error might be caused due to failing RAID membered disk drive or single hdd failure on systems that are not in some RAID array


Fixing Shellshock new critical remote bash shell exploitable vulnerability on Debian / Ubuntu / CentOS / RHEL / Fedora / OpenSuSE and Slackware

Friday, October 10th, 2014

Bash-ShellShock-remote-exploitable-Vulnerability-affecting-Linux-Mac-OSX-and-BSD-fixing-shellshock-bash-vulnerability-debian-redhat-fedora-centos-ubuntu-slackware-and-opensuse
If you still haven’t heard about the ShellShock Bash (Bourne Again) shell remote exploit vulnerability and you admin some Linux server, you will definitely have to read seriously about it. ShellShock Bash Vulnerabily has become public on Sept 24 and is described in details here.

The vulnerability allows remote malicious attacker to execute arbitrary code under certain conditions, by passing strings of code following environment variable assignments. Affected are most of bash versions starting with bash 1.14 to bash 4.3.
Even if you have patched there are some reports, there are other bash shell flaws in the way bash handles shell variables, so probably in the coming month there will be even more patches to follow.

Affected bash flaw OS-es are Linux, Mac OS and BSDs;

• Some DHCP clients

• OpenSSL servers that use ForceCommand capability in (Webserver config)

• Apache Webservers that use CGi Scripts through mod_cgi and mod_cgid as well as cgis written in bash or launching bash subshells

• Network exposed services that use bash somehow

Even though there is patch there are futher reports claiming patch ineffective from both Google developers and RedHat devs, they say there are other flaws in how batch handles variables which lead to same remote code execution.

There are a couple of online testing tools already to test whether your website or certain script from a website is vulnerable to bash remote code executions, one of the few online remote bash vulnerability scanner is here and here. Also a good usable resource to test whether your webserver is vulnerable to ShellShock remote attack is found on ShellShocker.Net.

As there are plenty of non-standard custom written scripts probably online and there is not too much publicity about the problem and most admins are lazy the vulnerability will stay unpatched for a really long time and we’re about to see more and more exploit tools circulating in the script kiddies irc botnets.

Fixing bash Shellcode remote vulnerability on Debian 5.0 Lenny.

Follow the article suggesting how to fix the remote exploitable bash following few steps on older unsupported Debian 4.0 / 3.0 (Potato) etc. – here.

Fixing the bash shellcode vulnerability on Debian 6.0 Squeeze. For those who never heard since April 2014, there is a A Debian LTS (Long Term Support) repository. To fix in Debian 6.0 use the LTS package repository, like described in following article.

If you have issues patching your Debian Wheezy 6.0 Linux bash, it might be because you already have a newer installed version of bash and apt-get is refusing to overwrite it with an older version which is provided by Debian LTS repos. The quickest and surest way to fix it is to do literally the following:


vim /etc/apt/sources.list

Paste inside to use the following LTS repositories:

deb http://http.debian.net/debian/ squeeze main contrib non-free
deb-src http://http.debian.net/debian/ squeeze main contrib non-free
deb http://security.debian.org/ squeeze/updates main contrib non-free
deb-src http://security.debian.org/ squeeze/updates main contrib non-free
deb http://http.debian.net/debian squeeze-lts main contrib non-free
deb-src http://http.debian.net/debian squeeze-lts main contrib non-free

Further on to check the available installable deb package versions with apt-get, issue:


apt-cache showpkg bash
...
...
Provides:
4.1-3+deb6u2 -
4.1-3 -
Reverse Provides:

As you see there are two installable versions of bash one from default Debian 6.0 repos 4.1-3 and the second one 4.1-3+deb6u2, another way to check the possible alternative installable versions when more than one version of a package is available is with:


apt-cache policy bash
...
*** 4.1-3+deb6u2 0
500 http://http.debian.net/debian/ squeeze-lts/main amd64 Packages
100 /var/lib/dpkg/status
4.1-3 0
500 http://http.debian.net/debian/ squeeze/main amd64 Packages

Then to install the LTS bash version on Debian 6.0 run:


apt-get install bash=4.1-3+deb6u2

Patching Ubuntu Linux supported version against shellcode bash vulnerability:
A security notice addressing Bash vulnerability in Ubuntus is in Ubuntu Security Notice (USN) here
USNs are a way Ubuntu discloses packages affected by a security issues, thus Ubuntu users should try to keep frequently an eye on Ubuntu Security Notices

apt-get update
apt-get install bash

Patching Bash Shellcode vulnerability on EOL (End of Life) versions of Ubuntu:

mkdir -p /usr/local/src/dist && cd /usr/local/src/dist
wget http://ftpmirror.gnu.org/bash/bash-4.3.tar.gz.sig
wget http://ftpmirror.gnu.org/bash/bash-4.3.tar.gz
wget http://tiswww.case.edu/php/chet/gpgkey.asc
gpg --import gpgkey.asc
gpg --verify bash-4.3.tar.gz.sig
cd ..
tar xzvf dist/bash-4.3.tar.gz
cd bash-4.3
mkdir patches && cd patches
wget -r --no-parent --accept "bash43-*" -nH -nd
ftp.heanet.ie/mirrors/gnu/bash/bash-4.3-patches/ # Use a local mirror
echo *sig | xargs -n 1 gpg --verify --quiet # see note 2

cd ..
echo patches/bash43-0?? | xargs -n 1 patch -p0 -i # see note 3 below

./configure --prefix=/usr --bindir=/bin
--docdir=/usr/share/doc/bash-4.3
--without-bash-malloc
--with-installed-readline

make
make test && make install

To solve bash vuln in recent Slackware Linux:

slackpkg update
slackpkg upgrade bash

For old Slacks, either download a patched version of bash or download the source for current installed package and apply the respective patch for the shellcode vulnerability.
There is also a GitHub project “ShellShock” Proof of Concept code demonstrating – https://github.com/mubix/shellshocker-pocs
There are also non-confirmed speculations for bash vulnerability bug to impact also:

Speculations:(Non-confirmed possibly vulnerable common server services):

• XMPP(ejabberd)

• Mailman

• MySQL

• NFS

• Bind9

• Procmail

• Exim

• Juniper Google Search

• Cisco Gear

• CUPS

• Postfix

• Qmail

Fixing ShellShock bash vulnerability on supported versions of CentOS, Redhat, Fedora

In supported versions of CentOS where EOL has not reached:

yum –y install bash

In Redhat, Fedoras recent releases to patch:

yum update bash

To upgrade the bash vulnerability in OpenSUSE:

zipper patch –cve=CVE-2014-7187

Shellcode is worser vulnerability than recent SSL severe vulnerability Hearbleed. According to Redhat and other sources this new bash vulnerability is already actively exploited in the wild and probably even worms are crawling the net stealing passwords, data and building IRC botnets for remote control and UDP flooding.

Windows equivalent of Linux which, whereis command – Windows WHERE command

Friday, June 6th, 2014

windows-find-commands-full-location-where-which-linux-commands-equivalent-in-windows-where-screenshot
In Linux there are the which and whereis commands showing you location of binaries included in $PATH # which lsof /usr/bin/lsof

# whereis lsof
lsof: /usr/bin/lsof /usr/share/man/man8/lsof.8.gz

so question arises what is which / whereis command Linux commands Windows equivalent?

In older Windows Home / Server editions – e.g. – Windows XP, 2000, 2003 – there is no standard installed tool to show you location of windows %PATH% defined executables. However it is possible to add the WHERE command binary by installing Resource Kit tools for administrative tasks.

windows-resource-kit-tools-install-where-linux-command-equivalent-in-windows


In Windows Vista / 7 / 8 (and presumably in future Windows releases), WHERE command is (will be) available by default

C:\Users\Georgi>WHERE SQLPLUS
D:\webdienste\application\oracle\11.2.0\client_1\BIN\sqlplus.exe

Cheers! 🙂

Convert png files to ico on Linux – Create “icon” files from pictures

Tuesday, November 2nd, 2010

You will need png2ico

First you will have to download the png2ico source

Now you will have to download compile and install the program by issuing:

debian:~# wget http://www.winterdrache.de/freeware/png2ico/data/png2ico-src-2002-12-08.tar.gz
debian:~# tar -zxvf png2ico-src-2002-12-08.tar.gz...
debian:~# cd png2ico/
debian:/root/png2ico# make
debian:/root/png2ico# cp -rpf png2ico /usr/local/bin/

Convertion is pretty easy and it comes to executing simply:

debian:/home/hipo$ png2ico favicon.ico png_picture_to_convert.png

Note that your png_picture_to_convert.png has to be in a graphic dimensions of 16×16
That’s all now you should have your favicon.ico on your Linux created.

How to build website sitemap (sitemap.xml) in Joomla

Monday, December 20th, 2010

A joomla installation I’m managing needed to have created a sitemap.xml

From a SEO perspective sitemap.xml and sitemap.xml.gz are absolutely necessary for a website to bewell indexed in google.

After some investigation I’ve found out a perfect program that makes generation of sitemap.xml in joomla a piece of cake.

All necessary to be done for the sitemap.xml to be created comes to download and install of JCrawler

What makes JCrawler even better is that it’s open source program.

To install Jcrawler go in the joomla administrator panel:

Extensiosn -> Install/Uninstall

You will see the Install from URL on the bottom, there place the link to the com_jcrawler.zip installation archive, for instance you can place the link of the downloaded copy of com_jcrawler.zip I’ve mirrored on www.pc-freak.net ,by placing it on https://www.pc-freak.net/files/com_jcrawler.zip

The installation will be done in a few seconds and you will hopefully be greated with a Installation Success message.

Last thing to do in order to have the sitemap.xml in your joomla based website generated is to navigate to:

Components -> JCrawler

There a screen will appear where you can customize certain things related to the sitemap.xml generation, I myself used the default options and continued straight to the Start button.

Further on a screen will appear asking you to Submit the newly generated sitemap to; Google, MSN, Ask.com, Moreover and Yahoo , so press the Submit button.
That’s all now your joomla website will be equipped with sitemap.xml, enjoy!