Posts Tagged ‘hackers’

How to Harden a Linux Server in 2025 – Practical Steps for Sysadmins to protect against hackers and bots

Thursday, December 11th, 2025

linux_server-hardening-practical-steps-for-sysadmins-protecting-machine-vs-hackers-and-bots-good-practices

Securing a Linux server has never been more importan than ever these days..
With automated attacks, AI-driven exploits, and increasingly complex infrastructure, even a small misconfiguration can lead to a serious breach.
But wait, you don't have to wait to get bumped by a random script kiddie. Good news is you can mitigate a bit attacks with just a few practical and pretty much standard steps, that can can drastically increase your server’s security.

Below is a straightforward, battle-tested hardening guide suitable for Debian, Ubuntu, CentOS, AlmaLinux, and most modern distributions.

1. Keep the System Updated (But Safely)

Outdated packages remain the #1 cause of server compromises.
On Debian/Ubuntu:

# apt update && apt upgrade -y

# apt install unattended-upgrades

On RHEL-based systems:
 

# dnf update -y

# dnf install dnf-automatic

Enable security-only auto-updates where possible. Full auto-updates may break production apps, so use them carefully.

2. Create a Non-Root User and Disable Direct Root Login
 

Attackers constantly brute-force “root”. Avoid letting them.
 

# adduser sysadmin

# usermod -aG sudo sysadmin

Then edit SSH:

# vim /etc/ssh/sshd_config

Set:

PermitRootLogin no

PasswordAuthentication no

And restart:

# systemctl restart sshd


Use SSH keys only.

3. Install a Firewall and Block Everything by Default

UFW (Debian/Ubuntu):

# ufw default deny incoming

# ufw default allow outgoing

#ufw allow ssh

# ufw enable

Firewalld (RHEL/AlmaLinux):

# systemctl enable firewalld –now

# firewall-cmd –permanent –add-service=ssh

# firewall-cmd –reload

Turn off any unneeded ports immediately.

4. Protect SSH with Fail2Ban

Fail2Ban watches log files for suspicious authentication attempts and blocks offenders.

# apt install fail2ban -y

or

# dnf install fail2ban -y

Enable:

# systemctl enable –now fail2ban

To harden SSH jail:

[sshd]

enabled = true

maxretry = 5

bantime = 1h

findtime = 10m

5. Enable Kernel Hardening

Install sysctl rules that protect against common attacks:

Create /etc/sysctl.d/99-hardening.conf:

kernel.kptr_restrict = 2

kernel.sysrq = 0

net.ipv4.conf.all.rp_filter = 1

net.ipv4.tcp_synack_retries = 2

net.ipv4.conf.all.accept_redirects = 0

net.ipv4.conf.all.send_redirects = 0

net.ipv4.conf.all.log_martians = 1

Apply:

# sysctl –system

6. Install and Configure AppArmor or SELinux

Mandatory Access Control significantly limits damage if a service gets compromised.

  • Ubuntu / Debian uses AppArmor by default — ensure it's enabled.
  • RHEL, AlmaLinux, Rocky use SELinux — keep it in enforcing mode unless absolutely necessary.

Check SELinux:

# getenforce

You want:

Enforcing but hopefully you will have to configure all your machine services to venerate and work correctly with selinux enabled.

7. Scan the System with Lynis

Lynis is the best open-source Linux security auditing tool.

# apt install lynis

# lynis audit system

It provides a security score and actionable suggestions.

8. Use 2FA for SSH (Optional but Highly Recommended)

Use Two Factor Authentication:

a. Freely with Oath toolkityou can read how in my previous article how to set up 2fa free software authentication on Linux

or

b. Install Google Authenticator:

# apt install libpam-google-authenticator

# google-authenticator

Enable in /etc/pam.d/sshd:

auth required pam_google_authenticator.so

And in SSH config:

ChallengeResponseAuthentication yes

Restart SSH.

9. Separate Services Using Containers or Systemd Isolation

Even simple servers can benefit from isolation.

Systemd sandbox options:

ProtectSystem=full

ProtectHome=true

ProtectKernelTunables=true

PrivateTmp=true

Add these inside a service file under:

/etc/systemd/system/yourservice.service

It prevents processes from touching parts of the system they shouldn’t.

10. Regular Backups Are Part of Security

A secure server with no backups is a disaster waiting to happen.

Use:

  • rsync
  • borgbackup
  • restic
  • Cloud object storage with versioning

Always encrypt backups and test restore procedures.

Conclusion

Hardening a Linux server in 2025 requires vigilance, good practices, and layered security. No single tool will protect your system — but when you combine SSH security, firewalls, Fail2Ban, kernel hardening, and backups, you eliminate the majority of attack vectors.


Enabling talkd (Console Chat) between logged in users on FreeBSD and other BSDs

Sunday, June 10th, 2012

Talk between two useres on FreeBSD 7.2 screenshot, console peer to peer interactive talk program UNIX, Linux, BSD

Those who are in familiar with older UNIXes, UNIX BSD derivatives and GNU Linux should certainly remember the times, when we hackers used to talk to each other using talk service.

Those who don't know what talk command is it is a simple console / ssh utility to talk to another logged in users.

Talk is very similar to write and mesg one liner messasing utilities available for *nixes, the difference is it is intendted to provide interactive chat between the two logged in users. People who came to know UNIX or free software in older times most likely don't know talk, however I still remember how precious this tool was for communication back in the day.

I believe still it can be useful so I dediced to install ot on one FreeBSD host.

In order to have the talk service running on BSD it is necessery to have /usr/libexec/ntalkd installed on the system this however is installed by default with standard BSD OS installs, so no need for any external ports install to run it.

talk doesn't have it's own init script to start is not written to run as it own service but in order to run it is is necessery to enable it via inetd

Enabling it is done by;;;

1 — Editting /etc/inetd.conf

Inside the conf the line::

#ntalk dgram udp wait tty:tty /usr/libexec/ntalkd ntalkd

should be uncommented e.g, become ;;;

ntalk dgram udp wait tty:tty /usr/libexec/ntalkd ntalkd

2 — Restart inetd

freebsd# /etc/rc.d/inetd restart
Stopping inetd.
Starting inetd.

talk is planned to be used for peer to peer conversations over SSH so in a way it is the GRANDFATHER 🙂 of IRC, ICQ and Skype;;;

Here is an example on how talk is used ,, Let's say there are three logged in users

pcfreak# w
12:39PM up 3 days, 16:25, 3 users, load averages: 1.12, 0.91, 0.71
USER TTY FROM LOGIN@ IDLE WHAT
testuser p0 192.168.0.7 10:50AM - bash
hipo p3 192.168.0.8 12:23PM - w
root p4 :ttyp2:S.0 12:24PM - vim /usr/local/www/dat

I'm logged in with my username hipo and I would like to talk to testuser ;;;;

pcfreak% tty
/dev/ttyp3

You see I'm logged in on /dev/ttyp3 (this is the specific naming on BSDs) on Linux equivalent is /dev/tty3So to talk the other user testuser;;;;;-

$ talk testuser ttyp0
[No connection yet]
[Waiting for your party to respond]

The testuser logged in via SSH will then get a message ||;

Message from Talk_Daemon@pcfreak at 12:44 on 2012/06/10 ...
talk: connection requested by hipo@localhost
talk: respond with: talk hipo@localhost

To enter a talk session then the logged in testuser has to type:

$ talk hipo@localhost


How to check the IP address of Skype (user / Contacts) on GNU / Linux with netstat and whois

Thursday, May 3rd, 2012

netstat check skype contact IP info with netstat Linux xterm Debian Linux

Before I explain how netstat and whois commands can be used to check information about a remote skype user – e.g. (skype msg is send or receved) in Skype. I will say in a a few words ( abstract level ), how skype P2P protocol is designed.
Many hard core hackers, certainly know how skype operates, so if this is the case just skip the boring few lines of explanation on how skype proto works.

In short skype transfers its message data as most people know in Peer-to-Peer "mode" (P2P)  – p2p is unique with this that it doesn't require a a server to transfer data from one peer to another. Most classical use of p2p networks in the free software realm are the bittorrents.

Skype way of connecting to peer client to other peer client is done via a so called "transport points". To make a P-to-P connection skype wents through a number of middle point destinations. This transport points (peers) are actually other users logged in Skype and the data between point A and point B is transferred via this other logged users in encrypted form. If a skype messages has to be transferred  from Peer A (point A) to Peer B (Point B) or (the other way around), the data flows in a way similar to:

 A -> D -> F -> B

or

B -> F -> D -> A

(where D and F are simply other people running skype on their PCs).
The communication from a person A to person B chat in Skype hence, always passes by at least few other IP addresses which are owned by some skype users who happen to be located in the middle geographically between the real geographic location of A (the skype peer sender) and B (The skype peer receiver)..

The exact way skypes communicate is way more complex, this basics however should be enough to grasp the basic skype proto concept for most ppl …

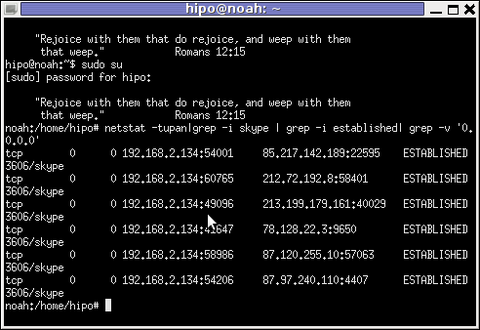
In order to find the IP address to a certain skype contact – one needs to check all ESTABLISHED connections of type skype protocol with netsat within the kernel network stack (connection) queue.

netstat displays few IPs, when skype proto established connections are grepped:

noah:~# netstat -tupan|grep -i skype | grep -i established| grep -v '0.0.0.0'
tcp 0 0 192.168.2.134:59677 212.72.192.8:58401 ESTABLISHED 3606/skype
tcp 0 0 192.168.2.134:49096 213.199.179.161:40029 ESTABLISHED 3606/skype
tcp 0 0 192.168.2.134:57896 87.120.255.10:57063 ESTABLISHED 3606/skype

Now, as few IPs are displayed, one needs to find out which exactly from the list of the ESTABLISHED IPs is the the Skype Contact from whom are received or to whom are sent the messages in question.

The blue colored IP address:port is the local IP address of my host running the Skype client. The red one is the IP address of the remote skype host (Skype Name) to which messages are transferred (in the the exact time the netstat command was ran.

The easiest way to find exactly which, from all the listed IP is the IP address of the remote person is to send multiple messages in a low time interval (let's say 10 secs / 10 messages to the remote Skype contact).

It is a hard task to write 10 msgs for 10 seconds and run 10 times a netstat in separate terminal (simultaneously). Therefore it is a good practice instead of trying your reflex, to run a tiny loop to delay 1 sec its execution and run the prior netstat cmd.

To do so open a new terminal window and type:

noah:~# for i in $(seq 1 10); do \
sleep 1; echo '-------'; \
netstat -tupan|grep -i skype | grep -i established| grep -v '0.0.0.0'; \
done

-------
tcp 0 0 192.168.2.134:55119 87.126.71.94:26309 ESTABLISHED 3606/skype
-------
tcp 0 0 192.168.2.134:49096 213.199.179.161:40029 ESTABLISHED 3606/skype
tcp 0 0 192.168.2.134:55119 87.126.71.94:26309 ESTABLISHED 3606/skype
-------
tcp 0 0 192.168.2.134:49096 213.199.179.161:40029 ESTABLISHED 3606/skype
tcp 0 0 192.168.2.134:55119 87.126.71.94:26309 ESTABLISHED 3606/skype
...

You see on the first netstat (sequence) exec, there is only 1 IP address to which a skype connection is established, once I sent some new messages to my remote skype friend, another IP immediatelly appeared. This other IP is actually the IP of the person to whom, I'm sending the "probe" skype messages.
Hence, its most likely the skype chat at hand is with a person who has an IP address of the newly appeared 213.199.179.161

Later to get exact information on who owns 213.199.179.161 and administrative contact info as well as address of the ISP or person owning the IP, do a RIPE  whois

noah:~# whois 213.199.179.161
% This is the RIPE Database query service.
% The objects are in RPSL format.
%
% The RIPE Database is subject to Terms and Conditions.
% See http://www.ripe.net/db/support/db-terms-conditions.pdf

% Note: this output has been filtered.
% To receive output for a database update, use the "-B" flag.
% Information related to '87.126.0.0 - 87.126.127.255'
inetnum: 87.126.0.0 - 87.126.127.255
netname: BTC-BROADBAND-NET-2
descr: BTC Broadband Service
country: BG
admin-c: LG700-RIPE
tech-c: LG700-RIPE
tech-c: SS4127-RIPE
status: ASSIGNED PA
mnt-by: BT95-ADM
mnt-domains: BT95-ADM
mnt-lower: BT95-ADM
source: RIPE # Filteredperson: Lyubomir Georgiev
.....

Note that this method of finding out the remote Skype Name IP to whom a skype chat is running is not always precise.

If for instance you tend to chat to many people simultaneously in skype, finding the exact IPs of each of the multiple Skype contacts will be a very hard not to say impossible task.
Often also by using netstat to capture a Skype Name you're in chat with, there might be plenty of "false positive" IPs..
For instance, Skype might show a remote Skype contact IP correct but still this might not be the IP from which the remote skype user is chatting, as the remote skype side might not have a unique assigned internet IP address but might use his NET connection over a NAT or DMZ.

The remote skype user might be hard or impossible to track also if skype client is run over skype tor proxy for the sake of anonymity
Though it can't be taken as granted that the IP address obtained would be 100% correct with the netstat + whois method, in most cases it is enough to give (at least approximate) info on a Country and City origin of the person you're skyping with.