Posts Tagged ‘host name’

Windows: command to show CPU info, PC Motherboard serial number and BIOS details

Wednesday, March 2nd, 2016

windows-command-to-show-motherboard-bios-and-cpu-serials-and-specific-info-with-wmic

Getting CPU information, RAM info and other various hardware specifics on Windows from the GUI interface is pretty trivial from Computer -> Properties
even more specifics could be obtained using third party Windows software such as CPU-Z

Perhaps there are plenty of many other ones to get and log info about hardware on PC or notebook system, but for Windwos sysadmins especially ones who are too much in love with command prompt way of behaving and ones who needs to automatizate server deployment processes with BATCH (.BAT)  scripts getting quickly info about hardware on freshly installed remote host Win server with no any additional hardware info tools, you'll be happy to know there are command line tools you can use to get extra hardware information on Windows PC / server:

The most popular tool available to present you with some basic hardware info is of course systeminfo


C:\> systeminfo

Host Name:                 REMHOST
OS Name:                   Microsoft Windows Server 2012 R2 Standard
OS Version:                6.3.9600 N/A Build 9600
OS Manufacturer:           Microsoft Corporation
OS Configuration:          Member Server
OS Build Type:             Multiprocessor Free
Registered Owner:          Registrar
Registered Organization:   Registrar
Product ID:                00XXX-X0000-00000-XX235
Original Install Date:     17/02/2016, 11:38:39
System Boot Time:          18/02/2016, 14:16:48
System Manufacturer:       VMware, Inc.
System Model:              VMware Virtual Platform
System Type:               x64-based PC
Processor(s):              1 Processor(s) Installed.
                           [01]: Intel64 Family 6 Model 45 Stepping 7 GenuineInt
el ~2600 Mhz
BIOS Version:              Phoenix Technologies LTD 6.00, 11/06/2014
Windows Directory:         C:\Windows
System Directory:          C:\Windows\system32
Boot Device:               \Device\HarddiskVolume1
System Locale:             de;German (Germany)
Input Locale:              de;German (Germany)
Time Zone:                 (UTC+01:00) Amsterdam, Berlin, Bern, Rome, Stockholm,
 Vienna
Total Physical Memory:     4,095 MB
Available Physical Memory: 2,395 MB
Virtual Memory: Max Size:  10,239 MB
Virtual Memory: Available: 8,681 MB
Virtual Memory: In Use:    1,558 MB
Page File Location(s):     C:\pagefile.sys
Domain:                    dom1.domain.com
Logon Server:              \\DOM
Hotfix(s):                 148 Hotfix(s) Installed.
                           [01]: KB2894852
                           [02]: KB2894856
                           [03]: KB2918614
                           [04]: KB2919355
…..


Now though systeminfo's hardware details and installed Windows KBXXXXX OS Hotfix patches are getting lists the command does not provide you with info about  system’s BIOS, thus to get this info you'll have to use also wmic (Windows Management Instrumentation Command).


So What Is WMIC?

WMIC extends WMI for operation from several command-line interfaces and through batch scripts. Before WMIC, you used WMI-based applications (such as SMS), the WMI Scripting API, or tools such as CIM Studio to manage WMI-enabled computers. Without a firm grasp on a programming language such as C++ or a scripting language such as VBScript and a basic understanding of the WMI namespace, do-it-yourself systems management with WMI was difficult. WMIC changes this situation by giving you a powerful, user-friendly interface to the WMI namespace.

WMIC is more intuitive than WMI, in large part because of aliases. Aliases take simple commands that you enter at the command line, then act upon the WMI namespace in a predefined way, such as constructing a complex WMI Query Language (WQL) command from a simple WMIC alias Get command. Thus, aliases act as friendly syntax intermediaries between you and the namespace. For example, when you run a simple WMIC command such as

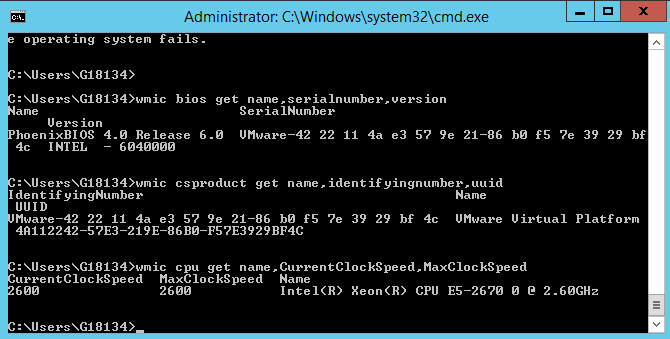
Here is how to wmic to get PC Motherboard serial numbers, CPU and BIOS details:


C:\> wmic bios get name,serialnumber,version


Above will print  name if your BIOS, current version and it’s serial number if there is any.

If you need to get more info about the specific Motherboard installed on host:


C:\> wmic csproduct get name,identifyingnumber,uuid


This command will show motherboard modification and it’s UUID

If you want to quickly get what is Windows running hardware CPU clock speed
 

C:\> wmic cpu get name,CurrentClockSpeed,MaxClockSpeed


Also if you have turbo boost CPUs above command will help you find what’s the Max Clock Speed your system is capable of for the current hardware configuration.

If you do have dynamic clock speed running, then add this line, will refresh and monitor the Clock speed every 1 second.
 

C:\> wmic cpu get name,CurrentClockSpeed,MaxClockSpeed /every:1

Actually wmic is a great tool

‘host-name’ is blocked because of many connection errors; unblock with ‘mysqladmin flush-hosts’

Sunday, May 20th, 2012

mysql-logo-host-name-blocked-because-of-many-connection-errors
My home run machine MySQL server was suddenly down as I tried to check my blog and other sites today, the error I saw while trying to open, this blog as well as other hosted sites using the MySQL was:

Error establishing a database connection

The topology, where this error occured is simple, I have two hosts:

1. Apache version 2.0.64 compiled support externally PHP scripts interpretation via libphp – the host runs on (FreeBSD)

2. A Debian GNU / Linux squeeze running MySQL server version 5.1.61

The Apache host is assigned a local IP address 192.168.0.1 and the SQL server is running on a host with IP 192.168.0.2

To diagnose the error I've logged in to 192.168.0.2 and weirdly the mysql-server was appearing to run just fine:
 

debian:~# ps ax |grep -i mysql
31781 pts/0 S 0:00 /bin/sh /usr/bin/mysqld_safe
31940 pts/0 Sl 12:08 /usr/sbin/mysqld –basedir=/usr –datadir=/var/lib/mysql –user=mysql –pid-file=/var/run/mysqld/mysqld.pid –socket=/var/run/mysqld/mysqld.sock –port=3306
31941 pts/0 S 0:00 logger -t mysqld -p daemon.error
32292 pts/0 S+ 0:00 grep -i mysql

Moreover I could connect to the localhost SQL server with mysql -u root -p and it seemed to run fine. The error Error establishing a database connection meant that either something is messed up with the database or 192.168.0.2 Mysql port 3306 is not properly accessible.

My first guess was something is wrong due to some firewall rules, so I tried to connect from 192.168.0.1 to 192.168.0.2 with telnet:
 

freebsd# telnet 192.168.0.2 3306
Trying 192.168.0.2…
Connected to jericho.
Escape character is '^]'.
Host 'webserver' is blocked because of many connection errors; unblock with 'mysqladmin flush-hosts'
Connection closed by foreign host.

Right after the telnet was initiated as I show in the above output the connection was immediately closed with the error:

Host 'webserver' is blocked because of many connection errors; unblock with 'mysqladmin flush-hosts'Connection closed by foreign host.

In the error 'webserver' is my Apache machine set hostname. The error clearly states the problems with the 'webserver' apache host unable to connect to the SQL database are due to 'many connection errors' and a fix i suggested with mysqladmin flush-hosts

To temporary solve the error and restore my normal connectivity between the Apache and the SQL servers I logged I had to issue on the SQL host:

mysqladmin -u root -p flush-hostsEnter password:

Thogh this temporar fix restored accessibility to the databases and hence the websites errors were resolved, this doesn't guarantee that in the future I wouldn't end up in the same situation and therefore I looked for a permanent fix to the issues once and for all.

The permanent fix consists in changing the default value set for max_connect_error in /etc/mysql/my.cnf, which by default is not too high. Therefore to raise up the variable value, added in my.cnf in conf section [mysqld]:

debian:~# vim /etc/mysql/my.cnf
...
max_connect_errors=4294967295

and afterwards restarted MYSQL:

debian:~# /etc/init.d/mysql restart
Stopping MySQL database server: mysqld.
Starting MySQL database server: mysqld.
Checking for corrupt, not cleanly closed and upgrade needing tables..

To make sure the assigned max_connect_errors=4294967295 is never reached due to Apache to SQL connection errors, I've also added as a cronjob.

debian:~# crontab -u root -e
00 03 * * * mysqladmin flush-hosts

In the cron I have omitted the mysqladmin -u root -p (user/pass) input options because for convenience I have already stored the mysql root password in /root/.my.cnf

Here is how /root/.my.cnf looks like:

debian:~# cat /root/.my.cnf
[client]
user=root
password=a_secret_sql_password

Now hopefully, this would permanently solve SQL's 'failure to accept connections' due to too many connection errors for future.

Fix FTP client error 425 Unable to build data connection: No route to host (Cause and Solution)

Monday, July 8th, 2013

ftp fix client 425 unable to-build data connection no route to host Linux
I just configured new dedicated server. One of requirement was dedicated server to support connections via FTP transfer protocol and few users to have access via it.
I added users with required permissions to directory structure and went on to test it with Linux ftp command, i.e.:


hipo@pcfreak:~$ ftp remote-host-name

Connected to remote-host-name.com
220 ProFTPD 1.3.3a Server (Matusala) [xx.xxx.xxx.xxx.xx]
Name (Matusala:hipo): testing-user
331 Password required for testing-user
Password:
230 User testing-user logged in

Remote system type is UNIX.
Using binary mode to transfer files.


ftp> ls


200 PORT command successful
425 Unable to build data connection: No route to host

ftp> exit


221 Goodbye.


As you see from above FTP paste even simple commands like "ls" failed to work with error:

425 Unable to build data connection: No route to host

I thought somehow I have configured on server some paranoid firewall, so tested same connection with iptables rules flushed, e.g.: matusala:~# iptables -F
matusala:~# iptables -t nat -F

Even after flushing firewall message persisted, so I googled around to see the what causes the error. The same error was hit by many users, and as I read, understand what causes is FTP server host is located behind some DMZ or firewall (as it was not my firewall I suppose, the dedicated provider has some firewall rules which are blocking FTP traffic on standard FTP TCP / UDP ports, port 20 and 21 ).
Fix is to enable in Linux kernel ip_nat_ftp or in newer Linux kernels module nf_nat_ftp:

matusala:~# modprobe ip_nat_ftp
matusala:~# modprobe nf_nat_ftp

or
To make ip_nat_ftp load permanently on Debian and Ubuntu servers:

matusala:~# echo 'ip_nat_ftp' >> /etc/modules
matusala:~# echo 'nf_nat_ftp' >> /etc/modules

One important note to make here is if you're testing the connection between two Linux servers it is possible the server from which you're running the client to have missing nf_nat_ftp loaded, so if error persist and you're testing remote FTP server from local ftp client on linux load same modules on localhost and you're done 🙂

How to configure Exim to relay mail to remote SMTP server on Debian and Ubuntu

Wednesday, August 24th, 2011

I’m required to do some mail relaying on a Debian Linux host which should use a remote mail server to relay its mails.
Until so far I’ve had not much experience with exim as I prefer using qmail, whever a mail server is needed. However since now only a relaying was necessery and exim is the default installed MTA on Debian, I’ve decided to use exim to take care of the SMTP mail relaying.
After a bit of reading it happened configuring exim to relay via remote SMTP server is more than easy!

All I had to do is run the command:

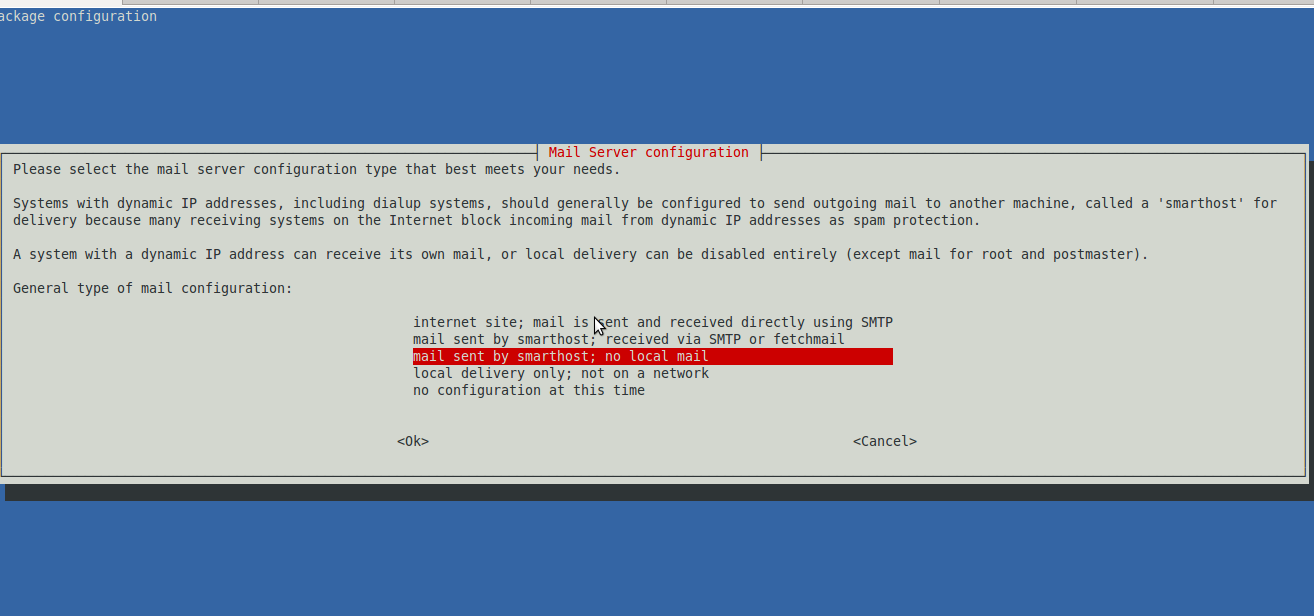
debian-relay:~# dpkg-reconfigure exim4-config

Next in the Ncruses interface to appear:

Debian Exim relay smtp config screenshot

I had to choose the option:

mail sent by smarthost; no local mail

Next a dialog appears asking for:
System mail name:
Therein it’s necessery to type in the hostname of the remote SMTP to be used for mail relay.
Next dialog asks for:
IP-addresses to listen on for incoming SMTP connections:
and I left it with 127.0.0.1 however if exim is supposed to be visible from external network one might decide to put in real IP address there.

Pressing OK leads to the next dialog:
 Other destinations for which mail is accepted: 
I decided to leave this blank as I don’t want to accept mail for any destinations.
Next pane reads:
Visible domain name for local users:
I’ve typed inside my smtp relay server e.g.:
smtp.myrelaymail.com

Further comes:
IP address or host name of the outgoing smarthost:
There once again I typed my mail relay host smtp.relaymail.com

The next config screen is:
Keep number of DNS-queries minimal (Dial-on-Demand)?
On any modern Linux host the default answer of No is fine.
Following prompt asked if I want to:
Split configuration into small files?
I’ve decided not to tamper with it and choosed No
Afterwards mail relaying works like a charm thx God 😉