Posts Tagged ‘httpd’

Apache disable requests to not log to access.log Logfile through SetEnvIf and dontlog httpd variables

Monday, October 11th, 2021

apache-disable-certain-strings-from-logging-to-access-log-logo

Logging to Apache access.log is mostly useful as this is a great way to keep log on who visited your website and generate periodic statistics with tools such as Webalizer or Astats to keep track on your visitors and generate various statistics as well as see the number of new visitors as well most visited web pages (the pages which mostly are attracting your web visitors), once the log analysis tool generates its statistics, it can help you understand better which Web spiders visit your website the most (as spiders has a predefined) IP addresses, which can give you insight on various web spider site indexation statistics on Google, Yahoo, Bing etc. . Sometimes however either due to bugs in web spiders algorithms or inconsistencies in your website structure, some of the web pages gets double visited records inside the logs, this could happen for example if your website uses to include iframes.

Having web pages accessed once but logged to be accessed twice hence is erroneous and unwanted, and though that usually have to be fixed by the website programmers, if such approach is not easily doable in the moment and the website is running on critical production system, the double logging of request can be omitted thanks to a small Apache log hack with SetEnvIf Apache config directive. Even if there is no double logging inside Apache log happening it could be that some cron job or automated monitoring scripts or tool such as monit is making periodic requests to Apache and this is garbling your Log Statistics results.

In this short article hence I'll explain how to do remove certain strings to not get logged inside /var/log/httpd/access.log.

1. Check SetEnvIf is Loaded on the Webserver
 

On CentOS / RHEL Linux:

# /sbin/apachectl -M |grep -i setenvif
AH00558: httpd: Could not reliably determine the server's fully qualified domain name, using localhost.localdomain. Set the 'ServerName' directive globally to suppress this message
 setenvif_module (shared)


On Debian / Ubuntu Linux:

/usr/sbin/apache2ctl -M |grep -i setenvif
AH00548: NameVirtualHost has no effect and will be removed in the next release /etc/apache2/sites-enabled/000-default.conf:1
 setenvif_module (shared)


2. Using SetEnvIf to omit certain string to get logged inside apache access.log


SetEnvIf could be used either in some certain domain VirtualHost configuration (if website is configured so), or it can be set as a global Apache rule from the /etc/httpd/conf/httpd.conf 

To use SetEnvIf  you have to place it inside a <Directory …></Directory> configuration block, if it has to be enabled only for a Certain Apache configured directory, otherwise you have to place it in the global apache config section.

To be able to use SetEnvIf, only in a certain directories and subdirectories via .htaccess, you will have defined in <Directory>

AllowOverride FileInfo


The general syntax to omit a certain Apache repeating string from keep logging with SetEnvIf is as follows:
 

SetEnvIf Request_URI "^/WebSiteStructureDirectory/ACCESS_LOG_STRING_TO_REMOVE$" dontlog


General syntax for SetEnvIf is as follows:

SetEnvIf attribute regex env-variable

SetEnvIf attribute regex [!]env-variable[=value] [[!]env-variable[=value]] …

Below is the overall possible attributes to pass as described in mod_setenvif official documentation.
 

  • Host
  • User-Agent
  • Referer
  • Accept-Language
  • Remote_Host: the hostname (if available) of the client making the request.
  • Remote_Addr: the IP address of the client making the request.
  • Server_Addr: the IP address of the server on which the request was received (only with versions later than 2.0.43).
  • Request_Method: the name of the method being used (GET, POST, etc.).
  • Request_Protocol: the name and version of the protocol with which the request was made (e.g., "HTTP/0.9", "HTTP/1.1", etc.).
  • Request_URI: the resource requested on the HTTP request line – generally the portion of the URL following the scheme and host portion without the query string.

Next locate inside the configuration the line:

CustomLog /var/log/apache2/access.log combined


To enable filtering of included strings, you'll have to append env=!dontlog to the end of line.


CustomLog /var/log/apache2/access.log combined env=!dontlog


You might be using something as cronolog for log rotation to prevent your WebServer logs to become too big in size and hard to manage, you can append env=!dontlog to it in same way.

If you haven't used cronolog is it is perhaps best to show you the package description.

server:~# apt-cache show cronolog|grep -i description -A10 -B5
Version: 1.6.2+rpk-2
Installed-Size: 63
Maintainer: Debian QA Group <packages@qa.debian.org>
Architecture: amd64
Depends: perl:any, libc6 (>= 2.4)
Description-en: Logfile rotator for web servers
 A simple program that reads log messages from its input and writes
 them to a set of output files, the names of which are constructed
 using template and the current date and time.  The template uses the
 same format specifiers as the Unix date command (which are the same
 as the standard C strftime library function).
 .
 It intended to be used in conjunction with a Web server, such as
 Apache, to split the access log into daily or monthly logs:
 .
   TransferLog "|/usr/bin/cronolog /var/log/apache/%Y/access.%Y.%m.%d.log"
 .
 A cronosplit script is also included, to convert existing
 traditionally-rotated logs into this rotation format.

Description-md5: 4d5734e5e38bc768dcbffccd2547922f
Homepage: http://www.cronolog.org/
Tag: admin::logging, devel::lang:perl, devel::library, implemented-in::c,
 implemented-in::perl, interface::commandline, role::devel-lib,
 role::program, scope::utility, suite::apache, use::organizing,
 works-with::logfile
Section: web
Priority: optional
Filename: pool/main/c/cronolog/cronolog_1.6.2+rpk-2_amd64.deb
Size: 27912
MD5sum: 215a86766cc8d4434cd52432fd4f8fe7

If you're using cronolog to daily rotate the access.log and you need to filter out the strings out of the logs, you might use something like in httpd.conf:


CustomLog "|/usr/bin/cronolog –symlink=/var/log/httpd/access.log /var/log/httpd/access.log_%Y_%m_%d" combined env=!dontlog


3. Disable Apache logging access.log from certain USERAGENT browser
 

You can do much more with SetEnvIf for example you might want to omit logging requests from a UserAgent (browser) to end up in /dev/null (nowhere), e.g. prevent any Website requests originating from Internet Explorer (MSIE) to not be logged.

SetEnvIf User_Agent "(MSIE)" dontlog

CustomLog /var/log/apache2/access.log combined env=!dontlog


4. Disable Apache logging from requests coming from certain FQDN (Fully Qualified Domain Name) localhost 127.0.0.1 or concrete IP / IPv6 address

SetEnvIf Remote_Host "dns.server.com$" dontlog

CustomLog /var/log/apache2/access.log combined env=!dontlog


Of course for this to work, your website should have a functioning DNS servers and Apache should be configured to be able to resolve remote IPs to back resolve to their respective DNS defined Hostnames.

SetEnvIf recognized also perl PCRE Regular Expressions, if you want to filter out of Apache access log requests incoming from multiple subdomains starting with a certain domain hostname.


SetEnvIf Remote_Host "^example" dontlog

– To not log anything coming from localhost.localdomain address ( 127.0.0.1 ) as well as from some concrete IP address :

SetEnvIf Remote_Addr "127\.0\.0\.1" dontlog

SetEnvIf Remote_Addr "192\.168\.1\.180" dontlog

– To disable IPv6 requests that be coming at the log even though you don't happen to use IPv6 at all

SetEnvIf Request_Addr "::1" dontlog

CustomLog /var/log/apache2/access.log combined env=!dontlog


– Note here it is obligatory to escape the dots '.'


5. Disable robots.txt Web Crawlers requests from being logged in access.log

SetEnvIf Request_URI "^/robots\.txt$" dontlog

CustomLog /var/log/apache2/access.log combined env=!dontlog

Using SetEnvIfNoCase to read incoming useragent / Host / file requests case insensitve

The SetEnvIfNoCase is to be used if you want to threat incoming originators strings as case insensitive, this is useful to omit extraordinary regular expression SetEnvIf rules for lower upper case symbols.

SetEnvIFNoCase User-Agent "Slurp/cat" dontlog
SetEnvIFNoCase User-Agent "Ask Jeeves/Teoma" dontlog
SetEnvIFNoCase User-Agent "Googlebot" dontlog
SetEnvIFNoCase User-Agent "bingbot" dontlog
SetEnvIFNoCase Remote_Host "fastsearch.net$" dontlog

Omit from access.log logging some standard web files .css , .js .ico, .gif , .png and Referrals from own domain

Sometimes your own site scripts do refer to stuff on your own domain that just generates junks in the access.log to keep it off.

SetEnvIfNoCase Request_URI "\.(gif)|(jpg)|(png)|(css)|(js)|(ico)|(eot)$" dontlog


SetEnvIfNoCase Referer "www\.myowndomain\.com" dontlog

CustomLog /var/log/apache2/access.log combined env=!dontlog


6. Disable Apache requests in access.log and error.log completely


Sometimes at rare cases the produced Apache logs and error log is really big and you already have the requests logged in another F5 Load Balancer or Haproxy in front of Apache WebServer or alternatively the logging is not interesting at all as the Web Application served written in ( Perl / Python / Ruby ) does handle the logging itself. 
I've earlier described how this is done in a good amount of details in previous article Disable Apache access.log and error.log logging on Debian Linux and FreeBSD

To disable it you will have to comment out CustomLog or set it to together with ErrorLog to /dev/null in apache2.conf / httpd.conf (depending on the distro)
 

CustomLog /dev/null
ErrorLog /dev/null


7. Restart Apache WebServer to load settings
 

An important to mention is in case you have Webserver with multiple complex configurations and there is a specific log patterns to omit from logs it might be a very good idea to:

a. Create /etc/httpd/conf/dontlog.conf / etc/apache2/dontlog.conf
add inside all your custom dontlog configurations
b. Include dontlog.conf from /etc/httpd/conf/httpd.conf / /etc/apache2/apache2.conf

Finally to make the changes take affect, of course you will need to restart Apache webserver depending on the distro and if it is with systemd or System V:

For systemd RPM based distro:

systemctl restart httpd

or for Deb based Debian etc.

systemctl apache2 restart

On old System V scripts systems:

On RedHat / CentOS etc. restart Apache with:
 

/etc/init.d/httpd restart


On Deb based SystemV:
 

/etc/init.d/apache2 restart


What we learned ?
 

We have learned about SetEnvIf how it can be used to prevent certain requests strings getting logged into access.log through dontlog, how to completely stop certain browser based on a useragent from logging to the access.log as well as how to omit from logging certain requests incoming from certain IP addresses / IPv6 or FQDNs and how to stop robots.txt from being logged to httpd log.


Finally we have learned how to completely disable Apache logging if logging is handled by other external application.
 

Ansible Quick Start Cheatsheet for Linux admins and DevOps engineers

Wednesday, October 24th, 2018

ansible-quick-start-cheetsheet-ansible-logo

Ansible is widely used (Configuration management, deployment, and task execution system) nowadays for mass service depoyments on multiple servers and Clustered environments like, Kubernetes clusters (with multiple pods replicas) virtual swarms running XEN / IPKVM virtualization hosting multiple nodes etc. .

Ansible can be used to configure or deploy GNU / Linux tools and services such as Apache / Squid / Nginx / MySQL / PostgreSQL. etc. It is pretty much like Puppet (server / services lifecycle management) tool , except its less-complecated to start with makes it often a choose as a tool for mass deployment (devops) automation.

Ansible is used for multi-node deployments and remote-task execution on group of servers, the big pro of it it does all its stuff over simple SSH on the remote nodes (servers) and does not require extra services or listening daemons like with Puppet. It combined with Docker containerization is used very much for later deploying later on inside Cloud environments such as Amazon AWS / Google Cloud Platform / SAP HANA / OpenStack etc.

Ansible-Architechture-What-Is-Ansible-Edureka

0. Instaling ansible on Debian / Ubuntu Linux


Ansible is a python script and because of that depends heavily on python so to make it running, you will need to have a working python installed on local and remote servers.

Ansible is as easy to install as running the apt cmd:


# apt-get install –yes ansible
 

The following additional packages will be installed:
  ieee-data python-jinja2 python-kerberos python-markupsafe python-netaddr python-paramiko python-selinux python-xmltodict python-yaml
Suggested packages:
  sshpass python-jinja2-doc ipython python-netaddr-docs python-gssapi
Recommended packages:
  python-winrm
The following NEW packages will be installed:
  ansible ieee-data python-jinja2 python-kerberos python-markupsafe python-netaddr python-paramiko python-selinux python-xmltodict python-yaml
0 upgraded, 10 newly installed, 0 to remove and 1 not upgraded.
Need to get 3,413 kB of archives.
After this operation, 22.8 MB of additional disk space will be used.

apt-get install –yes sshpass


Installing Ansible on Fedora Linux is done with:


# dnf install ansible –yes sshpass


On CentOS to install:
 

# yum install ansible –yes sshpass

sshpass needs to be installed only if you plan to use ssh password prompt authentication with ansible.

Ansible is also installable via python-pip tool, if you need to install a specific version of ansible you have to use it instead, the package is available as an installable package on most linux distros.

Ansible has a lot of pros and cons and there are multiple articles already written on people for and against it in favour of Chef or Puppet As I recently started learning Ansible. The most important thing to know about Ansible is though many of the things can be done directly using a simple command line, the tool is planned for remote installing of server services using a specially prepared .yaml format configuration files. The power of Ansible comes of the use of Ansible Playbooks which are yaml scripts that tells ansible how to do its activities step by step on remote server. In this article, I'm giving a quick cheat sheet to start quickly with it.
 

1. Remote commands execution with Ansible
 

First thing to do to start with it is to add the desired hostnames ansible will operate with it can be done either globally (if you have a number of remote nodes) to deploy stuff periodically by using /etc/ansible/hosts or use a custom host script for each and every ansible custom scripts developed.

a. Ansible main config files

A common ansible /etc/ansible/hosts definition looks something like that:


# cat /etc/ansible/hosts
[mysqldb]
10.69.2.185
10.69.2.186
[master]
10.69.2.181
[slave]
10.69.2.187
[db-servers]
10.69.2.181
10.69.2.187
[squid]
10.69.2.184

Host to execute on can be also provided via a shell variable $ANSIBLE_HOSTS
b) is remote hosts reachable / execute commands on all remote host

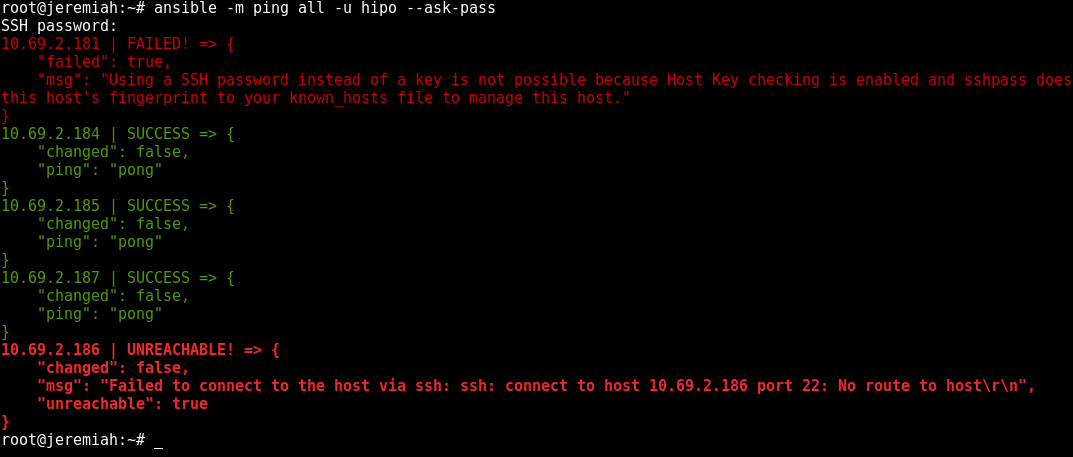
To test whether hour hosts are properly configure from /etc/ansible/hosts you can ping all defined hosts with:


ansible all -m ping


ansible-check-hosts-ping-command-screenshot

This makes ansible try to remote to remote hosts (if you have properly configured SSH public key authorization) the command should return success statuses on every host.


ansible all -a "ifconfig -a"


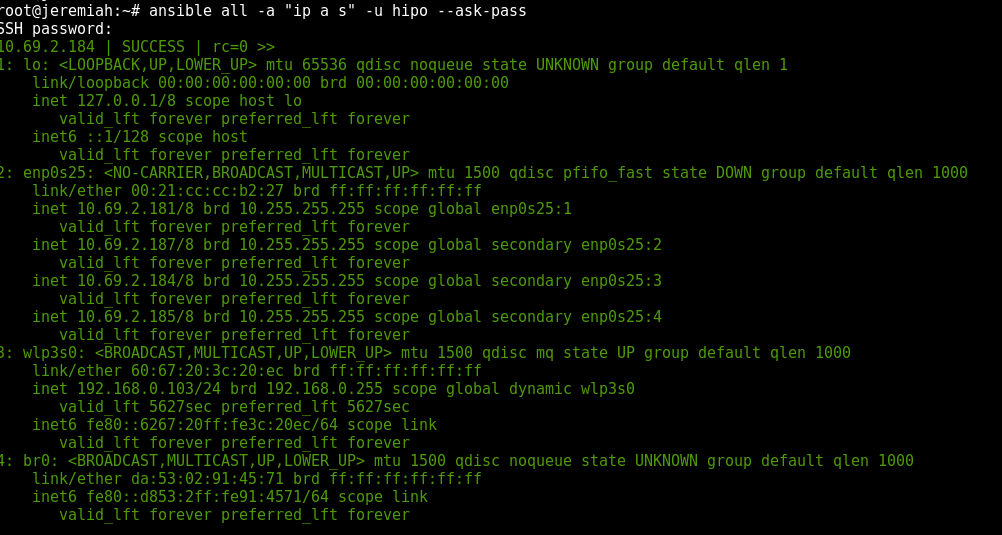
If you don't have SSH keys configured you can also authenticate with an argument (assuming) all hosts are configured with same password with:


ansible all –ask-pass -a "ip all show" -u hipo –ask-pass


ansible-show-ips-ip-a-command-screenshot-linux

If you have configured group of hosts via hosts file you can also run certain commands on just a certain host group, like so:


ansible <host-group> -a <command>

It is a good idea to always check /etc/ansible/ansible.cfg which is the system global (main red ansible config file).

c) List defined host groups
 

ansible localhost -m debug -a 'var=groups.keys()'
ansible localhost -m debug -a 'var=groups'

d) Searching remote server variables


# Search remote server variables
ansible localhost -m setup -a 'filter=*ipv4*'


ansible localhost -m setup -a 'filter=ansible_domain'


ansible all -m setup -a 'filter=ansible_domain'


# uninstall package on RPM based distros
ansible centos -s -m yum -a "name=telnet state=absent"
# uninstall package on APT distro
ansible localhost -s -m apt -a "name=telnet state=absent"


2. Debugging – Listing information about remote hosts (facts) and state of a host


# All facts for one host
ansible -m setup
  # Only ansible fact for one host
ansible
-m setup -a 'filter=ansible_eth*'
# Only facter facts but for all hosts
ansible all -m setup -a 'filter=facter_*'


To Save outputted information per-host in separate files in lets say ~/ansible/host_facts


ansible all -m setup –tree ~/ansible/host_facts


3. Playing with Playbooks deployment scripts


a) Syntax Check of a playbook yaml


ansible-playbook –syntax-check


b) Run General Infos about a playbook such as get what a playbook would do on remote hosts (tasks to run) and list-hosts defined for a playbook (like above pinging).


ansible-playbook –list-hosts
ansible-playbook
–list-tasks


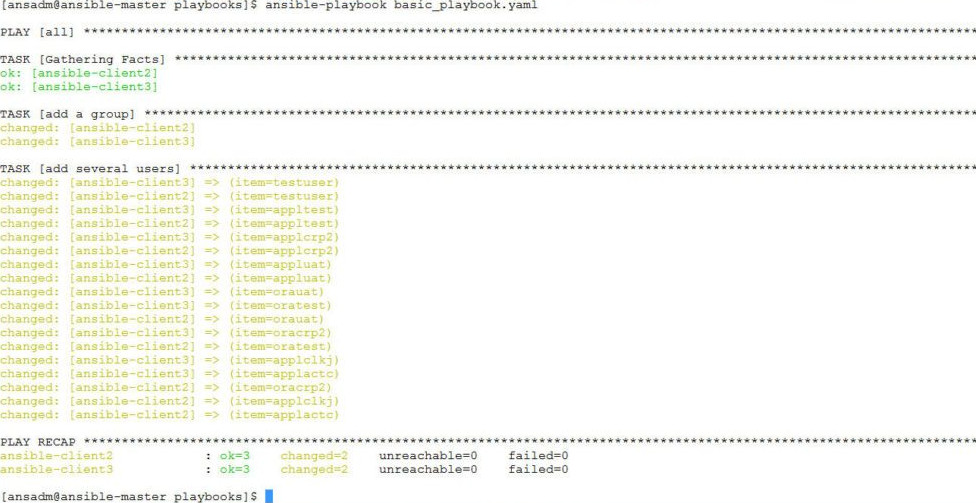
To get the idea about what an yaml playbook looks like, here is example from official ansible docs, that deploys on remote defined hosts a simple Apache webserver.


– hosts: webservers
  vars:
    http_port: 80
    max_clients: 200
  remote_user: root
  tasks:
  – name: ensure apache is at the latest version
    yum:
      name: httpd
      state: latest
  – name: write the apache config file
    template:
      src: /srv/httpd.j2
      dest: /etc/httpd.conf
    notify:
    – restart apache
  – name: ensure apache is running
    service:
      name: httpd
      state: started
  handlers:
    – name: restart apache
      service:
        name: httpd
        state: restarted

To give it a quick try save the file as webserver.yml and give it a run via ansible-playbook command
 

ansible-playbook -s playbooks/webserver.yml


The -s option instructs ansible to run play on remote server with super user (root) privileges.

The power of ansible is its modules, which are constantly growing over time a complete set of Ansible supported modules is in its official documenation.

Ansible-running-playbook-Commands-Task-script-Successful-output-1024x536

There is a lot of things to say about playbooks, just to give the brief they have there own language like a  templates, tasks, handlers, a playbook could have one or multiple plays inside (for instance instructions for deployment of one or more services).

The downsides of playbooks are they're so hard to write from scratch and edit, because yaml syntaxing is much more stricter than a normal oldschool sysadmin configuration file.
I've stucked with problems with modifying and writting .yaml files and I should say the community in #ansible in irc.freenode.net was very helpful to help me debug the obscure errors.

yamllint (The YAML Linter tool) comes handy at times, when facing yaml syntax errors, to use it install via apt:
 

# apt-get install –yes yamllint


a) Running ansible in "dry mode" just show what ansible might do but not change anything
 

ansible-playbook playbooks/PLAYBOOK_NAME.yml –check


b) Running playbook with different users and separate SSH keys


ansible-playbook playbooks/your_playbook.yml –user ansible-user
 
ansible -m ping hosts –private-key=~/.ssh/keys/custom_id_rsa -u centos


c) Running ansible playbook only for certain hostnames part of a bigger host group


ansible-playbook playbooks/PLAYBOOK_NAME.yml –limit "host1,host2,host3"


d) Run Ansible on remote hosts in parallel

To run in raw of 10 hosts in parallel
 

# Run 10 hosts parallel
ansible-playbook <File.yaml> -f 10            


e) Passing variables to .yaml scripts using commandline

Ansible has ability to pre-define variables from .yml playbooks. This variables later can be passed from shell cli, here is an example:

# Example of variable substitution pass from command line the var in varsubsts.yaml if present is defined / replaced ansible-playbook playbooks/varsubst.yaml –extra-vars "myhosts=localhost gather=yes pkg=telnet"


4. Ansible Galaxy (A Docker Hub) like large repository with playbook (script) files


Ansible Galaxy has about 10000 active users which are contributing ansible automation playbooks in fields such as Development / Networking / Cloud / Monitoring / Database / Web / Security etc.

To install from ansible galaxy use ansible-galaxy

# install from galaxy the geerlingguy mysql playbook
ansible-galaxy install geerlingguy.mysql


The available packages you can use as a template for your purpose are not so much as with Puppet as Ansible is younger and not corporate supported like Puppet, anyhow they are a lot and does cover most basic sysadmin needs for mass deployments, besides there are plenty of other unofficial yaml ansible scripts in various github repos.

How to set the preferred cipher suite on Apache 2.2.x and Apache 2.4.x Reverse Proxy

Thursday, May 4th, 2017

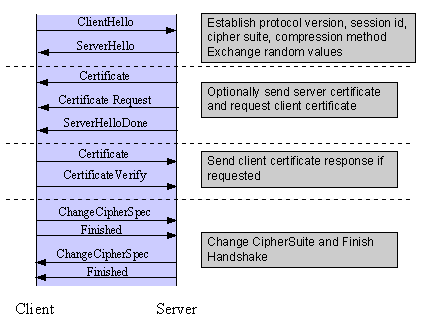
how-to-set-the-preferred-default-delivered-ssl-cipher-suite-apache-2.2-apache-2.4-how-ssl-handshake-works

1. Change default Apache (Reverse Proxy) SSL client cipher suite to end customer for Android Mobile applications to work

If you're a sys admin like me and you need  to support client environments with multiple Reverse Proxy Apache servers include old ones Apache version 2.2.x (with mod_ssl compiled in Apache or enabled as external module)
and for that reason a certain specific Apache Reverse Proxy certificate SSL encoding cipher default served suite change to be TLS_DHE_RSA_WITH_AES_128_CBC_SHA in order for the application to properly communicate with the server backend application then this article might help you.

There is an end user client application which is Live on a production servers some of which running on  backend WebSphere Application Servers (WAS) / SAP /  Tomcat servers and for security and logging purposes the traffic is being forwarded from the Apache Reverse Proxies (whose traffic is incoming from a roundup Load Balancers).

Here is a short background history of why cipher suite change is necessery?

The application worked fine and was used by a desktop PCs, however since recently there is an existent Android and Apple Store (iOS) mobile phone application and the Android Applications are unable to properly handle the default served Apache Reverse Proxy cipher suite and which forced the client to ask for change in the default SSL cipher suite to:

TLS_DHE_RSA_WITH_AES_128_CBC_SHA

By default, the way the client lists the cipher suites within its Client Hello will influence on Apache the selection of the cipher suite used between the client and server.

The current httpd.conf in Apache is configured so the ciphers for RP client cipher suite Hello transferred between Reverse Proxy -> Client are being provided in the following order:


1.    TLS_RSA_WITH_RC4_128_MD5
2.    TLS_RSA_WITH_RC4_128_SHA
3.    TLS_RSA_WITH_RC4_128_CBC_SHA
4.    TLS_DHE_RSA_WITH_AES_128_CBC_SHA


This has to be inverted so:

4. TLS_DHE_RSA_WITH_AES_128_CBC_SHA
becomes on the place of
1. TLS_RSA_WITH_RC4_128_MD5


A very good reading that helped me achieve the task as usual was Apache's official documentation about mod_ssl see here


So to fix the SSL/TLS cipher suite default served order use SSLCipherSuite and SSLHonorCipherOrder directives.


SSLCipherSuite directive is used to specify the cipher suites enabled on the server.
To dictate also  preferred cipher suite order directive and that's why you need SSLHonorCipherOrder directive (note that this is not available for older  Apache 2.x branch), the original bug for this directive can be seen within
 

For Example:


SSLHonorCipherOrder On
SSLCipherSuite RC4-SHA:AES128-SHA:AES256-SHA:DHE-RSA-AES128-SHA:DHE-RSA-AES256-SHA:DES-CBC3-SHA


So here is my fix for changing the Ciphersuite SSL Crypt order (notice the TLS_DHE_RSA_WITH_AES_128_CBC_SHA being given as first argument):


SSLHonorCipherOrder On
SSLCipherSuite TLS_DHE_RSA_WITH_AES_128_CBC_SHA:RC4-SHA:AES128-SHA:AES256-SHA:DHE-RSA-AES128-SHA:DHE-RSA-AES256-SHA:DES-CBC3-SHA

if you want also to enable TLSv1.2 certificate cipher support you can use also:
 

SSLProtocol -all +TLSv1.2

SSLHonorCipherOrder on


# Old Commented configuration from my httpd.conf – no RC4, 3DES allowed
#SSLCipherSuite "EECDH+ECDSA+AESGCM EECDH+aRSA+AESGCM EECDH+ECDSA+SHA384 EECDH+ECDSA+SHA256 EECDH+aRSA+SHA384 EECDH+aRSA+SHA256 EECDH+aRSA+RC4 EECDH EDH+aRSA 3DES-EDE-CBC-SHA RC4 !aNULL !eNULL !LOW !MD5 !EXP !PSK !SRP !DSS !RC4"


Because there was also requirement for a multiple of SSL cipher encryption (to support large range of both mobile and desktop computers and operating systems the final) cipher suite configuration in httpd.conf that worked for the client looked like so:
 

SSLCipherSuite ECDHE-RSA-AES128-GCM-SHA256:ECDHE-ECDSA-AES128-GCM-SHA256:ECDHE-RSA-AES256-GCM-SHA384:ECDHE-ECDSA-AES256-GCM-SHA384:DHE-DSS-AES128-GCM-SHA256:kEDH+AESGCM:ECDHE-RSA-AES128-SHA256:ECDHE-ECDSA-AES128-SHA256:ECDHE-RSA-AES128-SHA:ECDHE-ECDSA-AES128-SHA:ECDHE-RSA-AES256-SHA384:ECDHE-ECDSA-AES256-SHA384:ECDHE-RSA-AES256-SHA:ECDHE-ECDSA-AES256-SHA:DHE-DSS-AES128-SHA256:DHE-DSS-AES256-SHA:AES128-GCM-SHA256:AES256-GCM-SHA384:AES128-SHA:AES256-SHA:AES:CAMELLIA:DES-CBC3-SHA:!aNULL:!eNULL:!EXPORT:!DES:!RC4:!MD5:!PSK:!aECDH:!EDH-DSS-DES-CBC3-SHA:!EDH-RSA-DES-CBC3-SHA:!KRB5-DES-CBC3-SHA:!DHE-RSA-AES128-GCM-SHA256:!DHE-RSA-AES256-GCM-SHA384:!DHE-RSA-AES128-SHA256:!DHE-RSA-AES256-SHA:!DHE-RSA-AES128-SHA:!DHE-RSA-AES256-SHA256:!DHE-RSA-CAMELLIA128-SHA:!DHE-RSA-CAMELLIA256-SHA


Once this was done the customer requested HTTP cookie restriction to be added to the same virtual host.
There initial request was to:

2. Set HTTP cookie secure flag and HttpOnly on every cookie that is not being accessed from Internal website JavaScript code

To make Apache Reverse Proxy to behave that way here is the httpd.conf config added to httpd.conf
 

# vim httpd.conf


   #Header edit Set-Cookie ^(.*)$ $1;HttpOnly;Secure
   Header always edit Set-Cookie ^(.*)$ $1;HttpOnly;Secure

Finally an Apache restart was necessery

Improve Apache Load Balancing with mod_cluster – Apaches to Tomcats Application servers Get Better Load Balancing

Thursday, March 31st, 2016

improve-apache-load-balancing-with-mod_cluster-apaches-to-tomcats-application-servers-get-better-load-balancing-mod_cluster-logo


Earlier I've blogged on How to set up Apache to to serve as a Load Balancer for 2, 3, 4  etc. Tomcat / other backend application servers with mod_proxy and mod_proxy_balancer, however though default Apache provided mod_proxy_balancer works fine most of the time, If you want a more precise and sophisticated balancing with better load distribuion you will probably want to install and use mod_cluster instead.


So what is Mod_Cluster and why use it instead of Apache proxy_balancer ?
 

Mod_cluster is an innovative Apache module for HTTP load balancing and proxying. It implements a communication channel between the load balancer and back-end nodes to make better load-balancing decisions and redistribute loads more evenly.

Why use mod_cluster instead of a traditional load balancer such as Apache's mod_balancer and mod_proxy or even a high-performance hardware balancer?

Thanks to its unique back-end communication channel, mod_cluster takes into account back-end servers' loads, and thus provides better and more precise load balancing tailored for JBoss and Tomcat servers. Mod_cluster also knows when an application is undeployed, and does not forward requests for its context (URL path) until its redeployment. And mod_cluster is easy to implement, use, and configure, requiring minimal configuration on the front-end Apache server and on the back-end servers.


So what is the advantage of mod_cluster vs mod proxy_balancer ?

Well here is few things that turns the scales  in favour for mod_cluster:


  •     advertises its presence via multicast so as workers can join without any configuration
     
  •     workers will report their available contexts
     
  •     mod_cluster will create proxies for these contexts automatically
     
  •     if you want to, you can still fine-tune this behaviour, e.g. so as .gif images are served from httpd and not from workers…
     
  •     most importantly: unlike pure mod_proxy or mod_jk, mod_cluster knows exactly how much load there is on each node because nodes are reporting their load back to the balancer via special messages
     
  •     default communication goes over AJP, you can use HTTP and HTTPS


1. How to install mod_cluster on Linux ?


You can use mod_cluster either with JBoss or Tomcat back-end servers. We'll install and configure mod_cluster with Tomcat under CentOS; using it with JBoss or on other Linux distributions is a similar process. I'll assume you already have at least one front-end Apache server and a few back-end Tomcat servers installed.

To install mod_cluster, first download the latest mod_cluster httpd binaries. Make sure to select the correct package for your hardware architecture – 32- or 64-bit.
Unpack the archive to create four new Apache module files: mod_advertise.so, mod_manager.so, mod_proxy_cluster.so, and mod_slotmem.so. We won't need mod_advertise.so; it advertises the location of the load balancer through multicast packets, but we will use a static address on each back-end server.

Copy the other three .so files to the default Apache modules directory (/etc/httpd/modules/ for CentOS).
Before loading the new modules in Apache you have to remove the default proxy balancer module (mod_proxy_balancer.so) because it is not compatible with mod_cluster.

Edit the Apache configuration file (/etc/httpd/conf/httpd.conf) and remove the line


LoadModule proxy_balancer_module modules/mod_proxy_balancer.so


Create a new configuration file and give it a name such as /etc/httpd/conf.d/mod_cluster.conf. Use it to load mod_cluster's modules:


LoadModule slotmem_module modules/mod_slotmem.so
LoadModule manager_module modules/mod_manager.so
LoadModule proxy_cluster_module modules/mod_proxy_cluster.so

In the same file add the rest of the settings you'll need for mod_cluster something like:

And for permissions and Virtualhost section

Listen 192.168.180.150:9999
<virtualhost  192.168.180.150:9999="">
<directory>
Order deny,allow
Allow from all 192.168
</directory>
ManagerBalancerName mymodcluster
EnableMCPMReceive
</virtualhost>

ProxyPass / balancer://mymodcluster/


The above directives create a new virtual host listening on port 9999 on the Apache server you want to use for load balancing, on which the load balancer will receive information from the back-end application servers. In this example, the virtual host is listening on IP address 192.168.204.203, and for security reasons it allows connections only from the 192.168.0.0/16 network.
The directive ManagerBalancerName defines the name of the cluster – mymodcluster in this example. The directive EnableMCPMReceive allows the back-end servers to send updates to the load balancer. The standard ProxyPass and ProxyPassReverse directives instruct Apache to proxy all requests to the mymodcluster balancer.
That's all you need for a minimal configuration of mod_cluster on the Apache load balancer. At next server restart Apache will automatically load the file mod_cluster.conf from the /etc/httpd/conf.d directory. To learn about more options that might be useful in specific scenarios, check mod_cluster's documentation.

While you're changing Apache configuration, you should probably set the log level in Apache to debug when you're getting started with mod_cluster, so that you can trace the communication between the front- and the back-end servers and troubleshoot problems more easily. To do so, edit Apache's configuration file and add the line LogLevel debug , then restart Apache.
 

2. How to set up Tomcat appserver for mod_cluster ?
 

Mod_cluster works with Tomcat version 6, 7 and 8, to set up the Tomcat back ends you have to deploy a few JAR files and make a change in Tomcat's server.xml configuration file.
The necessary JAR files extend Tomcat's default functionality so that it can communicate with the proxy load balancer. You can download the JAR file archive by clicking on "Java bundles" on the mod_cluster download page. It will be saved under the name mod_cluster-parent-1.2.6.Final-bin.tar.gz.

Create a new directory such as /root/java_bundles and extract the files from mod_cluster-parent-1.2.6.Final-bin.tar.gz there. Inside the directory /root/java_bundlesJBossWeb-Tomcat/lib/*.jar you will find all the necessary JAR files for Tomcat, including two Tomcat version-specific JAR files – mod_cluster-container-tomcat6-1.2.6.Final.jar for Tomcat 6 and mod_cluster-container-tomcat7-1.2.6.Final.jar for Tomcat 7. Delete the one that does not correspond to your Tomcat version.

Copy all the files from /root/java_bundlesJBossWeb-Tomcat/lib/ to your Tomcat lib directory – thus if you have installed Tomcat in

/srv/tomcat

run the command:


cp -rpf /root/java_bundles/JBossWeb-Tomcat/lib/* /srv/tomcat/lib/ .


Then edit your Tomcat's server.xml file

/srv/tomcat/conf/server.xml.


After the default listeners add the following line:


<listener classname="org.jboss.modcluster.container.catalina.standalone.ModClusterListener" proxylist="192.168.204.203:9999"> </listener>


This instructs Tomcat to send its mod_cluster-related information to IP 192.168.180.150 on TCP port 9999, which is what we set up as Apache's dedicated vhost for mod_cluster.
While that's enough for a basic mod_cluster setup, you should also configure a unique, intuitive JVM route value on each Tomcat instance so that you can easily differentiate the nodes later. To do so, edit the server.xml file and extend the Engine property to contain a jvmRoute, like this:
 

.


<engine defaulthost="localhost" jvmroute="node2" name="Catalina"></engine>


Assign a different value, such as node2, to each Tomcat instance. Then restart Tomcat so that these settings take effect.

To confirm that everything is working as expected and that the Tomcat instance connects to the load balancer, grep Tomcat's log for the string "modcluster" (case-insensitive). You should see output similar to:

Mar 29, 2016 10:05:00 AM org.jboss.modcluster.ModClusterService init
INFO: MODCLUSTER000001: Initializing mod_cluster ${project.version}
Mar 29, 2016 10:05:17 AM org.jboss.modcluster.ModClusterService connectionEstablished
INFO: MODCLUSTER000012: Catalina connector will use /192.168.180.150


This shows that mod_cluster has been successfully initialized and that it will use the connector for 192.168.204.204, the configured IP address for the main listener.
Also check Apache's error log. You should see confirmation about the properly working back-end server:

[Tue Mar 29 10:05:00 2013] [debug] proxy_util.c(2026): proxy: ajp: has acquired connection for (192.168.204.204)
[Tue Mar 29 10:05:00 2013] [debug] proxy_util.c(2082): proxy: connecting ajp://192.168.180.150:8009/ to  192.168.180.150:8009
[Tue Mar 29 10:05:00 2013] [debug] proxy_util.c(2209): proxy: connected / to  192.168.180.150:8009
[Tue Mar 29 10:05:00 2013] [debug] mod_proxy_cluster.c(1366): proxy_cluster_try_pingpong: connected to backend
[Tue Mar 29 10:05:00 2013] [debug] mod_proxy_cluster.c(1089): ajp_cping_cpong: Done
[Tue Mar 29 10:05:00 2013] [debug] proxy_util.c(2044): proxy: ajp: has released connection for (192.168.180.150)


This Apache error log shows that an AJP connection with 192.168.204.204 was successfully established and confirms the working state of the node, then shows that the load balancer closed the connection after the successful attempt.

You can start testing by opening in a browser the example servlet SessionExample, which is available in a default installation of Tomcat.
Access this servlet through a browser at the URL http://balancer_address/examples/servlets/servlet/SessionExample. In your browser you should see first a session ID that contains the name of the back-end node that is serving your request – for instance, Session ID: 5D90CB3C0AA05CB5FE13121E4B23E670.node2.

Next, through the servlet's web form, create different session attributes. If you have a properly working load balancer with sticky sessions you should always (that is, until your current browser session expires) access the same node, with the previously created session attributes still available.

To test further to confirm load balancing is in place, at the same time open the same servlet from another browser. You should be redirected to another back-end server where you can conduct a similar session test.
As you can see, mod_cluster is easy to use and configure. Give it a try to address sporadic single-back-end overloads that cause overall application slowdowns.

Apache Webserver disable file extension – Forbid / Deny access in Apache config to certain file extensions for a Virtualhost

Monday, March 30th, 2015


If you're a Webhosting company sysadmin like me and you already have configured directory listing for certain websites / Vhosts and those files are mirrored from other  development webserver location but some of the uploaded developer files extensions which are allowed to be interptered such as php include files .inc / .htaccess mod_rewrite rules / .phps / .html / .txt need to be working on the dev / test server but needs to be disabled (excluded) from delivery or interpretting for some directory on the prod server.

Open Separate host VirtualHost file or Apache config (httpd.conf / apache2.conf)  if all Vhosts  for which you want to disable certain file extensions and add inside:

<Directory "/var/www/sploits">
        AllowOverride All

</Directory>


Extension Deny Rules such as:

For disabling .inc files from inclusion from other PHP sources:
 

<Files  ~ "\.inc$">
  Order allow,deny
  Deny from all
</Files>


To Disable access to .htaccess single file only


<Files ~ "^\.htaccess">
  Order allow,deny
  Deny from all
</Files>


To Disable .txt from being served by Apache and delivered to requestor browser:


<Files  ~ "\.txt$">
  Order allow,deny
  Deny from all
</Files>


To Disable any left intact .html from being delivered to client:


<Files  ~ "\.html$">
  Order allow,deny
  Deny from all
</Files>


Do it for as many extensions as you need.
Finally to make changes affect restart Apache as usual:

If on Deb based Linux issue:

/etc/init.d/apach2 restart


On CentOS / RHEL and other Redhats / RedHacks 🙂

/etc/init.d/httpd restart

Fix “Approaching the limit on PV entries, consider increasing either the vm.pmap.shpgperproc or the vm.pmap.pv_entry_max tunable.” in FreeBSD

Monday, May 21st, 2012

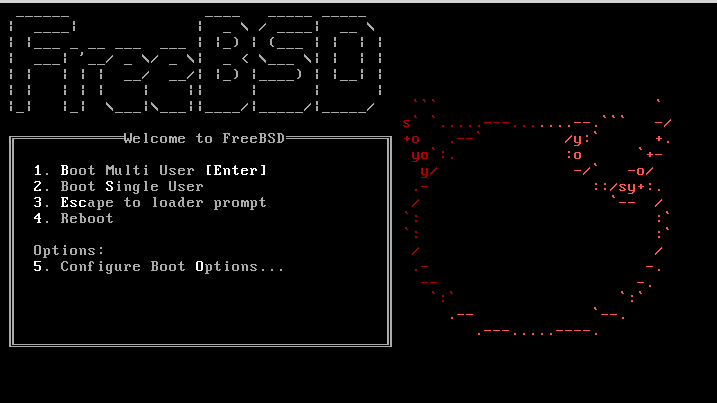
bsdinstall-newboot-loader-menu-pv_entries_consider_increasing_vm_pmap_shpgrepproc

I'm running FreeBSD with Apache and PHP on it and I got in dmesg (kernel log), following error:

freebsd# dmesg|grep -i vm.pmap.shpgperproc
Approaching the limit on PV entries, consider increasing either the vm.pmap.shpgperproc or the vm.pmap.pv_entry_max tunable.

The exact FreeBSD, Apache and php versions I have installed are:
 

freebsd# uname -a ; httpd -V ; php –version
FreeBSD pcfreak 7.2-RELEASE-p4 FreeBSD 7.2-RELEASE-p4 #0: Fri Oct 2 12:21:39 UTC 2009 root@i386-builder.daemonology.net:/usr/obj/usr/src/sys/GENERIC i386
Server version: Apache/2.0.64
Server built: Mar 13 2011 23:36:25Server's Module Magic Number: 20050127:14
Server loaded: APR 0.9.19, APR-UTIL 0.9.19
Compiled using: APR 0.9.19, APR-UTIL 0.9.19
Architecture: 32-bit
Server compiled with….
-D APACHE_MPM_DIR="server/mpm/prefork"
-D APR_HAS_SENDFILE
-D APR_HAS_MMAP
-D APR_HAVE_IPV6 (IPv4-mapped addresses enabled)
-D APR_USE_FLOCK_SERIALIZE
-D APR_USE_PTHREAD_SERIALIZE
-D SINGLE_LISTEN_UNSERIALIZED_ACCEPT
-D APR_HAS_OTHER_CHILD
-D AP_HAVE_RELIABLE_PIPED_LOGS
-D HTTPD_ROOT="/usr/local"
-D SUEXEC_BIN="/usr/local/bin/suexec"
-D DEFAULT_PIDLOG="/var/run/httpd.pid"
-D DEFAULT_SCOREBOARD="logs/apache_runtime_status"
-D DEFAULT_LOCKFILE="/var/run/accept.lock"
-D DEFAULT_ERRORLOG="logs/error_log"
-D AP_TYPES_CONFIG_FILE="etc/apache2/mime.types"
-D SERVER_CONFIG_FILE="etc/apache2/httpd.conf"
PHP 5.3.5 with Suhosin-Patch (cli) (built: Mar 14 2011 00:29:17)
Copyright (c) 1997-2009 The PHP Group
Zend Engine v2.3.0, Copyright (c) 1998-2010 Zend Technologies
with eAccelerator v0.9.6.1, Copyright (c) 2004-2010 eAccelerator, by eAccelerator

After a bunch of research a FreeBSD forums thread , I've found the fix suggested by a guy.

The solution suggested in the forum is to raise up vm.pmap.pv_entry_ma to vm.pmap.pv_entry_max=1743504, however I've noticed this value is read only and cannot be changed on the BSD running kernel;

freebsd# sysctl vm.pmap.pv_entry_max=1743504
sysctl: oid 'vm.pmap.pv_entry_max' is read only

Instead to solve the;

Approaching the limit on PV entries, consider increasing either the vm.pmap.shpgperproc or the vm.pmap.pv_entry_max tunable.
, I had to add in /boot/loader.conf

vm.pmap.pde.mappings=68
vm.pmap.shpgperproc=500
vm.pmap.pv_entry_max=1743504

Adding this values through /boot/loader.conf set them on kernel boot time. I've seen also in the threads the consider increasing either the vm.pmap.shpgperproc is also encountered on FreeBSD hosts running Squid, Dansguardion and other web proxy softwares on busy hosts.

This problems are not likely to happen for people who are running latest FreeBSD releases (>8.3, 9.x), I've read in same above post in newer BSD kernels the vm.pmap is no longer existing in newer kernels.

Speeding up Apache through apache2-mpm-worker and php5-cgi on Debian / How to improve Apache performance and decrease server memory consumption

Friday, March 18th, 2011

speeding up apache through apache2-mpm-worker and php5-cgi on Debian Linux / how to improve apache performance and decrease server responce time
By default most Apache running Linux servers on the Internet are configured to use with the mpm prefork apache module
Historically prefork apache module is the predecessor of the worker module therefore it's believed to be a way more tested and reliable, if you need a critical reliable webserver configuration.

However from my experience by so far with the Apache MPM Worker I can boldly say that many of the rumors concerning the unreliabity of apache2-mpm-worker are just myths.

The old way Apache handles connections e.g. the mod prefork is the well known way that high amount of the daemons on Linux and BSD are still realying on.
When prefork is a used by Apache, every new TCP/IP connection arriving at your Linux server on the Apache configured port let's say on port 80 is being served by Apache in a way that the Apache process (mother process) parent does fork a new Apache parent copy in order to serve the new request.
Thus by using the prefork Apache needs to fork new process (if it doesn't have already an empty forked one waiting for connections) and serve the HTTP request of the new client, after the request of the client is completed the newly forked Apache usually dies (even though it again depends on the way the Apache server is configured via the Apache configuration – apache2.conf / httpd.conf etc.).

Now you can imagine how slow and memory consuming it is that all the time the parent Apache process spawns new processes, kills old ones etc. in order to fulfill the client requests.

Now just to compare the Apace mpm prefork does not use the old forking way, but relies on a few Apache processes which handles all the requests without constantly being destroyed and recreated like with the prefork module.
This saves operations and system resources, threaded programming has already been proven to be more efficient way to handle tasks and is heavily adopted in GUI programming for instance in Microsoft Windows, Mac OS X, Linux Gnome, KDE etc.

There is plenty of information and statistical data which compares Apache running with prefork and respectively worker modules online.
As the goal of this article is not to went in depths with this kind of information I would not say more on it but let you explore online a bit more about them in case if you're interested.

The purpose of this article is to explain in short how to substitute the Apache2-MPM-Prefork and how your server performance could benefit out of the use of Apache2-MPM-Worker.
On Debian the default Apache process serving module in Apache 1.3x,Apache 2.0x and 2.2x is prefork thus the installation of apache2-mpm-worker is not "a standard way" to install Apache

Deciding to swith from the default Debian apache-mpm-prefork to apache-mpm-worker is quite a serious and responsible decision and in some cases might cause troubles, if you have decided to follow my article be sure to consider all the possible negative consequences of switching to the apache worker !

Now after having said a bunch of info which might be not necessary with the experienced system admin I'll continue on with the steps to install the apache2-mpm-worker.

1. Install the apache2-mpm-worker

debian:~# apt-get install apache2-mpm-worker php5-cgi
Reading state information... Done
The following packages were automatically installed and are no longer required:
The following packages will be REMOVED apache2-mpm-prefork libapache2-mod-php5
The following NEW packages will be installed apache2-mpm-worker
0 upgraded, 1 newly installed, 2 to remove and 46 not upgraded.
Need to get 0B/259kB of archives.After this operation, 6193kB disk space will be freed.

As you can notice in below's text confirmation which will appear you will have to remove the apache2-mpm-prefork and the apache2-mpm-worker modules before you can proceed to install the apache2-mpm-prefork.

You might ask yourself if I remove my installed libphp how would I be able to use my Apache with my PHP based websites? And why does the apt package manager requires the libapache2-mod-php5 to get removed.
The explanation is simple apache2-mpm-worker is not thread safe, in other words scripts which does use the php fork(); function would not work correctly with the Apache worker module and will probably be leading to PHP and Apache crashes.
Therefore in order to install the apache mod worker it's necessary that no libapache2-mod-php5 is existent on the system.
In order to have a PHP installed on the server again you will have to use the php5-cgi deb package, this is the reason in the above apt-get command I'm also requesting apt to install the php5-cgi package next to apache2-mpm-worker.

2. Enable the cgi and cgid apache modules

debian:~# a2enmod cgi
debian:~# a2enmod cgid

3. Activate the mod_actions apache modules

debian:~# cd /etc/apache2/mods-enabled
debian:~# ln -sf ../mods-available/actions.load
debian:~# ln -sf ../mods-available/actions.conf

4. Add configuration options in order to enable mod worker to use the newly installed php5-cgi

Edit /etc/apache2/mods-available/actions.conf vim, mcedit or nano (e.g. your editor of choice and add inside:

&ltIfModule mod_actions.c>
Action application/x-httpd-php /cgi-bin/php5
</IfModule>

After completing all the above instructions, you might also need to edit your /etc/apache2/apache2.conf to tune up, how your Apache mpm worker will serve client requests.
Configuring the <IfModule mpm_worker_module> in apache2.conf is necessary to optimize your newly installed mpm_worker module for performance.

5. Configure the mod_worker_module in apache2.conf One example configuration for the mod worker is:

<IfModule mpm_worker_module>
StartServers 2
MaxClients 150
MinSpareThreads 25
MaxSpareThreads 75
ThreadsPerChild 25
MaxRequestsPerChild 0
</IfModule>

Consider the fact that this configuration is just a sample and it's in no means configured for serving Apache requests for high load Apache servers and you need to further play with the values to have a good results on your server.

6. Check that all is fine with your Apache configurations and no syntax errors are encountered

debian:~# /usr/sbin/apache2ctl -t
Syntax OK

If you get something different from Syntax OK track the error and fix it before you're ready to restart the Apache server.

7. Now restart the Apache server

debian:~# /etc/init.d/apache2 restart

All should run fine and hopefully your PHP scripts should be interpreted just fine through the php5-cgi instead of the libapache2-mod-php5.
Using the /usr/bin/php5-cgi will increase with some percentage your server CPU load but on other hand will drasticly decrease the Webserver memory consumption.
That's quite logical because the libapache2-mod-hp5 is loaded once during apache server whether a new instance of /usr/bin/php5-cgi is invoked during each of Apache requests via the mod worker.

There is one serious security flow coming with php5-cgi, DoS against a server processing scripts through php5-cgi is much easier to be achieved.
An example for a denial attack which could affect a website running with mod worker and php5-cgi, could be simulated from a simple user with a web browser which holds up the f5 or ctrl + r browser page refresh buttons.
In that case whenever php5-cgi is used the CPU load would rise drastic, one possible solution to this denial of service issues is by installing and using libapache2-mod-evasive like so:

8. Install libapache2-mod-evasive

debian:~# apt-get install libapache2-mod-evasive
The Apache mod evasive module is a nice apache module to minimize HTTP DoS and brute force attacks.
Now with mod worker through the php5-cgi, your apache should start serving requests more efficiently than before.
For some performance reasons some might even want to try out the fastcgi with the worker to boost the Apache performance but as I have never tried that I can't say how reliable a a mod worker with a fastcgi would be.

N.B. ! If you have some specific php configurations within /etc/php5/apache2/php.ini you will have to set them also in /etc/php5/cgi/php.ini before you proceed with the above instructions to install Apache otherwise your PHP scripts might not work as expected.

Mod worker is also capable to work with the standard mod php5 Apache module, but if you decide to go this route you will have to recompile your PHP lib manually from source as in Debian this option is not possible with the default php library.
This installation worked fine on Debian Lenny but suppose the same installation should work fine on Debian Squeeze as well as Debian testing/unstable.
Feedback on the afore-described mod worker installation is very welcome!

Linux / BSD: Check if Apache web server is listening on port 80 and 443

Tuesday, June 3rd, 2014

apache_check_if_web_server_running_port-80-and-port-443-logo-linux-and-bsd-check-apache-running
If you're configuring a new Webserver or adding a new VirtualHost to an existing Apache configuration you will need to restart Apache with or without graceful option once Apache is restarted to assure Apache is continuously running on server (depending on Linux distribution) issue:

1. On Debian Linux / Ubuntu servers

# ps axuwf|grep -i apache|grep -v grep

root 23280 0.0 0.2 388744 16812 ? Ss May29 0:13 /usr/sbin/apache2 -k start
www-data 10815 0.0 0.0 559560 3616 ? S May30 2:25 _ /usr/sbin/apache2 -k start
www-data 10829 0.0 0.0 561340 3600 ? S May30 2:31 _ /usr/sbin/apache2 -k start
www-data 10906 0.0 0.0 554256 3580 ? S May30 0:20 _ /usr/sbin/apache2 -k start
www-data 10913 0.0 0.0 562488 3612 ? S May30 2:32 _ /usr/sbin/apache2 -k start
www-data 10915 0.0 0.0 555524 3588 ? S May30 0:19 _ /usr/sbin/apache2 -k start
www-data 10935 0.0 0.0 553760 3588 ? S May30 0:29 _ /usr/sbin/apache2 -k start


2. On CentOS, Fedora, RHEL and SuSE Linux and FreeBSD

ps ax | grep httpd | grep -v grep


7661 ? Ss 0:00 /usr/sbin/httpd
7664 ? S 0:00 /usr/sbin/httpd
7665 ? S 0:00 /usr/sbin/httpd
7666 ? S 0:00 /usr/sbin/httpd
7667 ? S 0:00 /usr/sbin/httpd
7668 ? S 0:00 /usr/sbin/httpd
7669 ? S 0:00 /usr/sbin/httpd
7670 ? S 0:00 /usr/sbin/httpd
7671 ? S 0:00 /usr/sbin/httpd


Whether a new Apache IP Based VirtualHosts are added to already existing Apache and you have added new

Listen 1.1.1.1:80
Listen 1.1.1.1:443

directives, after Apache is restarted to check whether Apache is listening on port :80 and :443
 

netstat -ln | grep -E ':80|443'

tcp        0      0 0.0.0.0:80              0.0.0.0:*               LISTEN
tcp        0      0 0.0.0.0:443            0.0.0.0:*               LISTEN


Meaning of 0.0.0.0 is that Apache is configured to Listen on Any Virtualhost IPs and interfaces. This output is usually returned whether in Apache config httpd.conf / apache2.conf webserver is configured with directive.

Listen *:80
 

If in netstat output there is some IP poping up for example  "192.168.1.1:http", this means that only connections to the "192.168.1.1" IP address will be accepted by Apache.

Another way to look for Apache in netstat (in case Apache is configured to listen on some non-standard port number) is with:

netstat -l |grep -E 'http|www'

tcp        0      0 *:www                   *:*                     LISTEN


As sometimes it might be possible that Apache is listening but its processes are in in defunct (Zommbie) state it is always a good idea, also to check if pages server by Apache are opening in browser (check it with elinks, lynx or curl)

To get more thorough information on Apache listened ports, protocol, user with which Apache is running nomatter of Linux distribution use lsof command:
 

/usr/bin/lsof -i|grep -E 'httpd|http|www'

httpd     6982 nobody    3u  IPv4  29388359      0t0  TCP www.pc-freak.net:https (LISTEN)
httpd    18071 nobody    3u  IPv4 702790659      0t0  TCP www.pc-freak.net:http (LISTEN)
httpd    18071 nobody    4u  IPv4 702790661      0t0  TCP www.pc-freak.net.net:https (LISTEN)


If Apache is not showing up even though restarted check what is going wrong in the error logs:

– on Debian standard error log is /var/log/apache2/error.log
– On RHEL, CentOS, SuSE std. error log is in /var/log/httpd/error.log
– on FeeBSD /var/log/httpd-error.log


Make Apache webserver fix spelling mistyped URL errors and serve files case insensitive with mod_speling

Wednesday, July 16th, 2014

make_apache_fix_mistyped_spelling_urls_errors_and_serve_files_case_insensitive_mod_speling_logo
On most if not all modern GNU / Linux distributions, Apache webserver comes preinstalled with mod_speling.

What mod_speling does is it tries to find and serve files and directories for non-existing  (404 return code) urls with a similar name to passed URL. Other thing mod_speling does is it serves files case-insensitive, even though the UNIX / Linux filesystems are built to understand files case-sensitive.

mod_speling is a very useful module especially when files are being pushed (synchronized) to Apache visible from web document folder from operating systems like Windows whose filesystem doesn't store files case sensitive.

Let me give you a small example on M$ Windows a create file NewFile.html, NEWFILE.HTML, NeWfIlE.Html etc. are one and the same file newfile.html and not 3 different files like it is usually on UNIX / Linux filesystems.

If you happen to migrate old static Websites from Microsoft Internet Information Services (IIS) to UNIX / Linux based hosting. Often Html coders which create websites on Windows platform doesn't respect in website hyperlinks case-sensitive, because anyways Windows FS is case-insetive, thus moving the website to Linux host with Apache the website/s will end up with many 404 error pages, whose fixing for big static websites will be a real pain in the ass.

Also there might be need for mod_speling module enabled, for PHP / Python / Perl websites developed on MS Windows platform and tested on Windows host and then officially to be deployed on Linux.

Note that mod_speling name as a funny thing as actually the module is also converting mis-pelled / mis-typed Apache URLs:

If for example, someone tried to link to your website from a forum mistyping the URL address with mod_speling the mistyped URL could still be handled to open the real existing URL:

Lets say you have URL:
 

http://your-domain.com/files/what-Ever-fle.php


and the actual URL is:

http://your-domain.com/files/what-Ever-file.php


mod_speling will make Apache scan in /files/ for any files with similar name to what-Ever-fle.php and will open any similar matched file name, preventing you from the normal 404 error and therefore often serving exactly what it has to. Of course such a behavior could be unwanted in same cases for CMSes, which depend on 404 error code for proper operating, so be very sure when configuring mod_speling that this is exactly what you need.

mod_speling can be also useful sometimes for Search Engine Optimization – SEO, as it will show less 404 pages to Crawler search engine bots.

1. Enable mod_speling module on Debian GNU / Linux and Ubuntu

Enabling mod_speling in Apache in Debian / Ubuntu etc. debian based Linuxes is done with either creating symlink from /etc/apache2/mods-available/speling.load to /etc/apache2/mods-enabled/speling.load :
 

ln -sf /etc/apache2/mods-available/speling.load /etc/apache2/mods-enabled/speling.load

Or by using a2enmodDebian apache module enabling script:
 

a2ensite sitename


To enable mod_speling mis-speling resolve feature config directive is:


CheckSpelling on


To disable case sensitivity – as I said earlier helpful for migrations from Microsoft Windows hosts to Linux, use directive:

CheckCaseOnly on


To enable both use:

<IfModule mod_speling.c>
    CheckCaseOnly on
    CheckSpelling on
</IfModule>

Enabling mod_speling case-insensitivity and fixing mistypes in URL could be done from .htaccess, for any <Directory> (vhost) with enabled .htaccess with

AllowOverride All

To enable it for default set host in new Apache install place it in /etc/apache2/apache2.conf and /etc/apache2/sites-enabled/000-default

Then as usual to make the configuration changes take affect, restart Apache:
 

/etc/init.d/apache2 restart


2. Enablig mod_speling on CentOS, RHEL and Fedora Linux


Most of RPM based Linux distributions have already mod_speling by default in Apache, so there will be no need to explicitly enable the module within HTTPD.

To check whether mod_speling is already enabled in httpd issue:
 

/usr/sbin/httpd -M |grep -i mod_speling


If you don't get no output from command this means the module is not enabled. This is the case with CentOS Linux 6.5 for example …

To enable mod_speling on Apache level add in /etc/httpd/conf/httpd.conf

LoadModule speling_module modules/mod_speling.so

and restart webserver
 

/etc/init.d/httpd restart


If you get instead
 

/usr/sbin/httpd -M |grep -i mod_speling
speling_module (shared)


Then it is already loaded in HTTPD to enable the module for default domain add to /etc/httpd/conf/httpd.conf – within (<Directory "/var/www/html">),

<IfModule mod_speling.c>
    CheckCaseOnly on
    CheckSpelling on
</IfModule>

Or if you want to make it active for specific directories within /var/www/html/whatever-dir use either new <Directory ..> directive within Apache config, or enable .htaccess processing with AllowOverride All and place them in .htaccess . For complete mod_speling reference check on Apache's official website

Fun with Apache / Nginx Webserver log – Visualize webserver access log in real time

Friday, July 18th, 2014

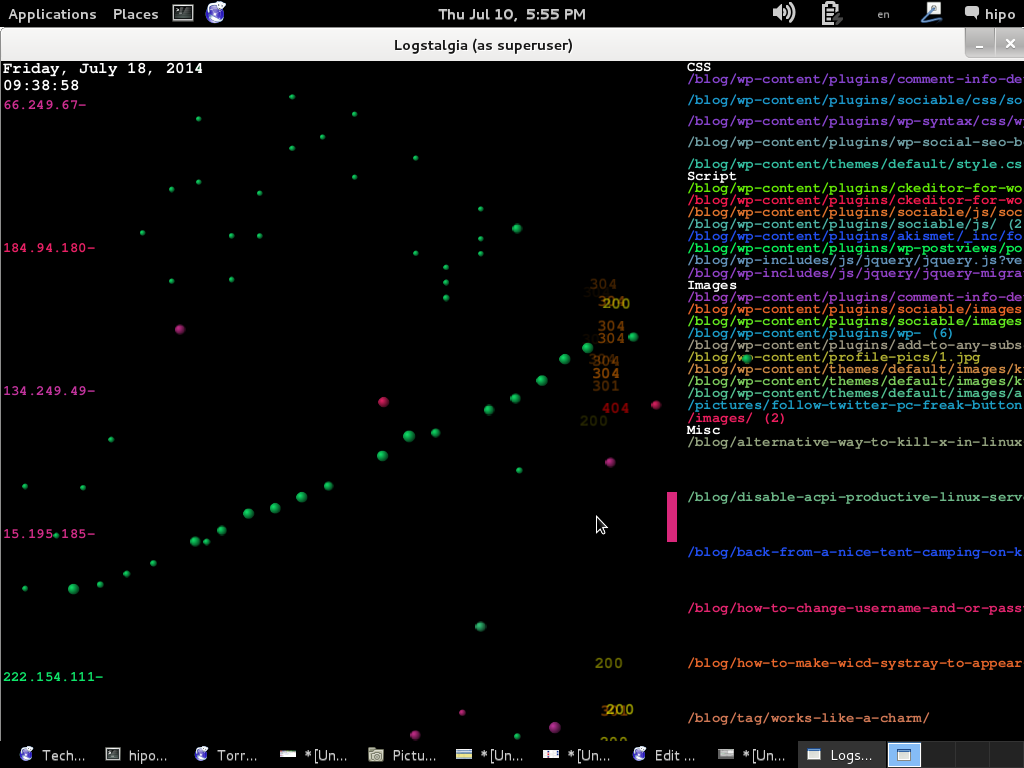
visualize-graphically-web-server-access-log-logstalgia-nginx-apache-log-visualize-in-gnu-linux-and-windows
If you're working in a hosting company and looking for a graphical way to Visualize access to your Linux webservers – (Apache, Nginx, Lighttpd) you will be happy to learn about Logstalgia's existence. Logstalgia is very useful if you need to convince your Boss / company clients that the webservers are exceeding the CPU / Memory hardware limits physically servers can handle. Even if you don't have to convince anyone of anything logstalgia is cool to run if you want to impress a friend and show off your 1337 4Dm!N Sk!11Z 🙂 Nostalgia is much more pleasent way to keep an eye on your Webserver log files in real time better than (tail -f)

The graphical output of nostalgia is a pong-like battle game between webserver and never ending chain of web requests.

This is the official website description of Logstalgia:
 

Logstalgia is a website traffic visualization that replays web-server access logs as a pong-like battle between the web server and an never ending torrent of requests. Requests appear as colored balls (the same color as the host) which travel across the screen to arrive at the requested location. Successful requests are hit by the paddle while unsuccessful ones (eg 404 – File Not Found) are missed and pass through. The paths of requests are summarized within the available space by identifying common path prefixes. Related paths are grouped together under headings. For instance, by default paths ending in png, gif or jpg are grouped under the heading Images. Paths that don’t match any of the specified groups are lumped together under a Miscellaneous section.


To install Logstalgia on Debian / Ubuntu Linux there is a native package, so to install it run the usual:

apt-get --yes install logstalgia

Reading package lists... Done
Building dependency tree
Reading state information... Done
The following NEW packages will be installed:
logstalgia
0 upgraded, 1 newly installed, 0 to remove and 4 not upgraded.
Need to get 161 kB of archives.
After this operation, 1,102 kB of additional disk space will be used.
Get:1 http://mirrors.kernel.org/debian/ stable/main logstalgia amd64 1.0.0-1+b1 [161 kB]
Fetched 161 kB in 2s (73.9 kB/s)
Selecting previously deselected package logstalgia.
(Reading database ... 338532 files and directories currently installed.)
Unpacking logstalgia (from .../logstalgia_1.0.0-1+b1_amd64.deb) ...
Processing triggers for man-db ...
Setting up logstalgia (1.0.0-1+b1) ...


Logstalgia is easily installable from source code on non-Debian Linux distributions too, to install it on any non-debian Linux distrubution do:

cd /usr/local/src/ wget https://logstalgia.googlecode.com/files/logstalgia-1.0.5.tar.gz
 

–2014-07-18 13:53:23–  https://logstalgia.googlecode.com/files/logstalgia-1.0.3.tar.gz
Resolving logstalgia.googlecode.com… 74.125.206.82, 2a00:1450:400c:c04::52
Connecting to logstalgia.googlecode.com|74.125.206.82|:443… connected.
HTTP request sent, awaiting response… 200 OK
Length: 841822 (822K) [application/x-gzip]
Saving to: `logstalgia-1.0.3.tar.gz'

100%[=================================>] 841,822     1.25M/s   in 0.6s

2014-07-18 13:53:24 (1.25 MB/s) – `logstalgia-1.0.3.tar.gz' saved [841822/841822]

Untar the archive with:
 

tar -zxvf logstalgia-1.0.5.tar.gz

Compile and install it:

cd logstalgia
./configure
make
make install


How to use LogStalgia?

Syntax is pretty straight forward just pass the Nginx / Apache

Process Debian Linux Apache logs:

logstalgia /var/log/apache2/access.log


Process CentoS, Redhat etc. RPM based logs:

logstalgia /var/log/httpd/access.log
To process webserver log in real time with logstalgia:

tail -f /var/log/httpd/access_log | logstalgia -

To make logstalgia visualize log output you will need to have access to server physical console screen. As physical access is not possible on most dedicated servers – already colocated in some Datacenter. You can also use a local Linux PC / notebook installed with nostalgia to process webserver access logs remotely like so:

logstalgia-visualize-your-apache-nginx-lighttpd-logs-graphically-in-x-and-console-locally-and-remotely

ssh hipo@www.pc-freak.net tail -f /var/log/apache2/access.log | logstalgia --sync

Note! If you get an empty output from logstalgia, this is because of permission issues, in this example my user hipo is added in www-data Apache group – if you want to add your user to have access like me, issue on remote ssh server):
 

addgroup hipo www-data


Alterantively you can login with ssh with root, e.g. ssh root@www.pc-freak.net

If you're having a GNOME / KDE X environment on the Linux machine from which you're ssh-ing Logstalgia will visualize Webserver access.log requests inside a new X Window otherwise if you're on a Linux with just a console with no Xserver graphics it will visualize graphically web log statistics using console svgalib .


If you're planning to save output from nostalgia visualization screen for later use – lets say you have to present to your CEO statistics about all your servers  Webservers logs you can save nostalgia produced video in .ppm (netpbm) format.

Whether you have physical console access to the server:

logstalgia -1280x720 --output-ppm-stream output.ppm /var/log/httpd/access.log

Or if you just a have a PC with Linux and you want to save visualized content of access.log remotely:

ssh hipo@www.pc-freak.net tail -f /var/log/nginx/pc-freak-access.log | logstalgia -1280x720 --output-ppm-stream --sync output.ppm


ssh user@server1.cyberciti.biz tail -f /var/log/nginx/www.cyberciti.biz_access.log | logstalgia -1280x720 --output-ppm-stream --sync output.ppm

To make produced .ppm later usable you can use ffmpeg to convert to .mp4:

ffmpeg -y -r 60 -f image2pipe -vcodec ppm -i output.ppm -vcodec libx264 -preset ultrafast -pix_fmt yuv420p -crf 1 -threads 0 -bf 0 nginx.server.log.mp4

Then to play the videos use any video player, I usually use vlc and mplayer.

For complete info on Nostalgia – website access log visualizercheck home page on googlecode

If you're lazy to install Logstalgia, here is Youtube video made from its output:

Enjoy 🙂