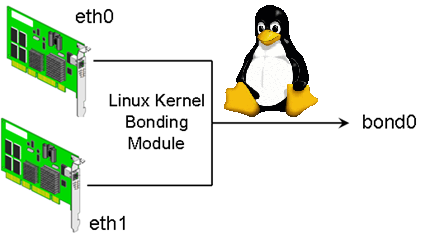
Bonding Network Traffic (link aggregation) or NIC teaming is used to increase connection thoroughput and as a way to provide redundancy for a services / applications in case of some of the network connection (eth interfaces) fail. Networking Bonding is mostly used in large computer network providers (ISPs), infrastructures, university labs or big computer network accessible infrastructures or even by enthusiatst to run home-server assuring its >= ~99% connectivity to the internet by bonding few Internet Providers links into single Bonded Network interface. One of most common use of Link Aggreegation nowadays is of course in Cloud environments.
Boding Network Traffic is a must know and (daily use) skill for the sys-admin of both Small Company Office network environment up to the large Professional Distributed Computing networks, as novice GNU / Linux sys-admins would probably have never heard it and sooner or later they will have to, I've created this article as a quick and dirty guide on configuring Linux bonding across most common used Linux distributions.
It is assumed that the server where you need network boding to be configured has at least 2 or more PCI Gigabyte NICs with hardware driver for Linux supporting Jumbo Frames and some relatively fresh up2date Debian Linux >=6.0.*, Ubuntu 10+ distro, CentOS 6.4, RHEL 5.1, SuSE etc.
1. Bond Network ethernet interfaces on Debian / Ubutnu and Deb based distributions
To make network bonding possible on Debian and derivatives you need to install support for it through ifenslave package (command).
apt-cache show ifenslave-2.6|grep -i descript -A 8
Description: Attach and detach slave interfaces to a bonding device
This is a tool to attach and detach slave network interfaces to a bonding
device. A bonding device will act like a normal Ethernet network device to
the kernel, but will send out the packets via the slave devices using a simple
round-robin scheduler. This allows for simple load-balancing, identical to
"channel bonding" or "trunking" techniques used in switches.
.
The kernel must have support for bonding devices for ifenslave to be useful.
This package supports 2.6.x kernels and the most recent 2.4.x kernels.
apt-get –yes install ifenslave-2.6
Bonding interface works by creating a "Virtual" network interface on a Linux kernel level, it sends and receives packages via special
slave devices using simple round-robin scheduler. This makes possible a very simple network load balancing also known as "channel bonding" and "trunking"
supported by all Intelligent network switches
Below is a text diagram showing tiny Linux office network router configured to bond ISPs interfaces for increased thoroughput:
Internet

 |                  204.58.3.10 (eth0)

ISP Router/Firewall 10.10.10.254 (eth1)


                              | -----+------ Server 1 (Debian FTP file server w/ eth0 & eth1) 10.10.10.1

      +------------------+ --- |

      | Gigabit Ethernet       |------+------ Server 2 (MySQL) 10.10.10.2

      | with Jumbo Frame       |

      +------------------+     |------+------ Server 3 (Apache Webserver) 10.10.10.3

                               |

                               |------+-----  Server 4 (Squid Proxy / Qmail SMTP / DHCP) 10.10.10.4

                               |

                               |------+-----  Server 5 (Nginx CDN static content Webserver) 10.10.10.5

                               |

                               |------+-----  WINDOWS Desktop PCs / Printers & Scanners, Other network devices
Next to configure just installed ifenslave Bonding
vim /etc/modprobe.d/bonding.conf
alias bond0 bonding
options bonding mode=0 arp_interval=100 arp_ip_target=10.10.10.254, 10.10.10.2, 10.10.10.3, 10.10.10.4, 10.10.10.5
Where:
- mode=0 : Set the bonding policies to balance-rr (round robin). This is default mode, provides load balancing and fault tolerance.
- arp_interval=100 : Set the ARP link monitoring frequency to 100 milliseconds. Without option you will get various warning when start bond0 via /etc/network/interfaces
- arp_ip_target=10.10.10.254, 10.10.10.2, … : Use the 10.10.10.254 (router ip) and 10.10.10.2-5 IP addresses to use as ARP monitoring peers when arp_interval is > 0. This is used determine the health of the link to the targets. Multiple IP addresses must be separated by a comma. At least one IP address must be given (usually I set it to router IP) for ARP monitoring to function. The maximum number of targets that can be specified is 16.
Next to make bonding work its necessery to load the bonding kernel module:
modprobe -v bonding mode=0 arp_interval=100 arp_ip_target=10.10.10.254, 10.10.10.2, 10.10.10.3, 10.10.10.4, 10.10.10.5
Loading the bonding module should spit some good output in /var/log/messages (check it out with tail -f /var/log/messages)
Now to make bonding active it is necessery to reload networking (this is extremely risky if you don't have some way of Console Web Java / VPN Access such as IPKVM / ILO / IDRAC), so reloading the network be absolutely sure to either do it through a cronjob which will automatically do the network restart with new settings and revert back to old configuration whether network is inaccessible or assure physical access to the server console if the server is at your disposal.
Whatever the case make sure you backup:
cp /etc/network/interfaces /etc/network/interfaces.bak
vim /etc/network/interfaces
############ WARNING ####################
# You do not need an "iface eth0" nor an "iface eth1" stanza.
# Setup IP address / netmask / gateway as per your requirements.
#######################################
auto lo

iface lo inet loopback
# The primary network interface
auto bond0
iface bond0 inet static
address 10.10.10.1
netmask 255.255.255.0
network 192.168.1.0
gateway 10.10.10.254
slaves eth0 eth1
# jumbo frame support
mtu 9000
# Load balancing and fault tolerance
bond-mode balance-rr
bond-miimon 100
bond-downdelay 200
bond-updelay 200
dns-nameservers 10.10.10.254
dns-search nixcraft.net.in
As you can see from config there are some bond specific configuration variables that can be tuned, they can have positive / negative impact in some cases on network thoroughput. As you can see bonding interfaces has slaves (this are all other ethXX) interfaces. Bonded traffic will be available via one single interface, such configuration is great for webhosting providers with multiple hosted sites as usually hosting thousand websites on the same server or one single big news site requires a lot of bandwidth and of course requires a redundancy of data (guarantee it is up if possible 7/24h.
Here is what of configs stand for
- mtu 9000 : Set MTU size to 9000. This is related to Jumbo Frames.
- bond-mode balance-rr : Set bounding mode profiles to "Load balancing and fault tolerance". See below for more information.
- bond-miimon 100 : Set the MII link monitoring frequency to 100 milliseconds. This determines how often the link state of each slave is inspected for link failures.
- bond-downdelay 200 : Set the time, t0 200 milliseconds, to wait before disabling a slave after a link failure has been detected. This option is only valid for the bond-miimon.
- bond-updelay 200 : Set the time, to 200 milliseconds, to wait before enabling a slave after a link recovery has been detected. This option is only valid for the bond-miimon.
- dns-nameservers 192.168.1.254 : Use 192.168.1.254 as dns server.
- dns-search nixcraft.net.in : Use nixcraft.net.in as default host-name lookup (optional).
To get the best network thorougput you might want to play with different bounding policies. To learn more and get the list of all bounding policies check out Linux ethernet Bounding driver howto
To make the new bounding active restart network:
/etc/init.d/networking stop
sleep 5;
/etc/init.d/networking start
2. Fedora / CentOS RHEL Linux network Bond
Configuring eth0, eth1, eth2 into single bond0 NIC network virtual device is with few easy steps:
a) Create following bond0 configuration file:
vim /etc/sysconfig/network-scripts/ifcfg-bond0
DEVICE=bond0
IPADDR=10.10.10.20
NETWORK=10.10.10.0
NETMASK=255.255.255.0
GATEWAY=10.10.10.1
USERCTL=no
BOOTPROTO=none
ONBOOT=yes
b) Modify ifcfg-eth0 and ifcfg-eth0 files /etc/sysconfig/network-scripts/
– Edit ifcfg-eth0
vim /etc/sysconfig/network-scripts/ifcfg-eth0
DEVICE=eth0
USERCTL=no
ONBOOT=yes
MASTER=bond0
SLAVE=yes
BOOTPROTO=none
– Edit ifcfg-eth1
vim /etc/sysconfig/network-scripts/ifcfg-eth1
DEVICE=eth0
USERCTL=no
ONBOOT=yes
MASTER=bond0
SLAVE=yes
BOOTPROTO=none
c) Load bond driver through modprobe.conf
vim /etc/modprobe.conf
alias bond0 bonding
options bond0 mode=balance-alb miimon=100
Manually load the bonding kernel driver to make it affective without server reboot:
modprobe bonding
d) Restart networking to load just configured bonding
service network restart
3. Testing Bond Success / Fail status
Periodically if you have to administrate a bonded interface Linux server it is useful to check Bonds Link Status:
cat /proc/net/bonding/bond0
Ethernet Channel Bonding Driver: v3.5.0 (November 4, 2008)
Bonding Mode: fault-tolerance (active-backup)
Primary Slave: None
Currently Active Slave: eth0
MII Status: up
MII Polling Interval (ms): 100
Up Delay (ms): 0
Down Delay (ms): 0Slave Interface: eth0
MII Status: up
Link Failure Count: 0
Permanent HW addr: 00:1e:0b:d6:6c:8fSlave Interface: eth1
MII Status: up
Link Failure Count: 0
Permanent HW addr: 00:1e:0b:d6:6c:8c
To check out which interfaces are bonded you can either use (on older Linux kernels)
/sbin/ifconfig -a
If ifconfig is not returning IP addresses / interfaces of teamed up eths, to check NICs / IPs:
/bin/ip a show
1: lo: <LOOPBACK,UP,LOWER_UP> mtu 16436 qdisc noqueue state UNKNOWN
link/loopback 00:00:00:00:00:00 brd 00:00:00:00:00:00
inet 127.0.0.1/8 brd 127.255.255.255 scope host lo
inet 127.0.0.2/8 brd 127.255.255.255 scope host secondary lo
inet6 ::1/128 scope host
valid_lft forever preferred_lft forever
2: eth0: <BROADCAST,MULTICAST,SLAVE,UP,LOWER_UP> mtu 1500 qdisc mq master bond0 state UP qlen 1000
link/ether 00:1e:0b:d6:6c:8c brd ff:ff:ff:ff:ff:ff
3: eth1: <BROADCAST,MULTICAST,SLAVE,UP,LOWER_UP> mtu 1500 qdisc mq master bond0 state UP qlen 1000
link/ether 00:1e:0b:d6:6c:8c brd ff:ff:ff:ff:ff:ff
7: bond0: <BROADCAST,MULTICAST,MASTER,UP,LOWER_UP> mtu 1500 qdisc noqueue state UP
link/ether 00:1e:0b:d6:6c:8c brd ff:ff:ff:ff:ff:ff
inet 10.239.15.173/27 brd 10.239.15.191 scope global bond0
inet 10.239.15.181/27 brd 10.239.15.191 scope global secondary bond0:7156web
inet6 fe80::21e:bff:fed6:6c8c/64 scope link
valid_lft forever preferred_lft forever
In case of Bonding interface failure you will get output like:
Ethernet Channel Bonding Driver: v3.5.0 (November 4, 2008)
Bonding Mode: load balancing (round-robin)
MII Status: up
MII Polling Interval (ms): 100
Up Delay (ms): 200
Down Delay (ms): 200
Slave Interface: eth0
MII Status: up
Link Failure Count: 0
Permanent HW addr: 00:xx:yy:zz:tt:31
Slave Interface: eth1
MII Status: down
Link Failure Count: 1
Permanent HW addr: 00:xx:yy:zz:tt:30
Failure to start / stop bonding is also logged in /var/log/messages so its a good idea to check there too once launched:
tail -f /var/log/messages
Dec 15 07:18:15 nas01 kernel: [ 6271.468218] e1000e: eth1 NIC Link is Down
Dec 15 07:18:15 nas01 kernel: [ 6271.548027] bonding: bond0: link status down for interface eth1, disabling it in 200 ms.
Dec 15 07:18:15 nas01 kernel: [ 6271.748018] bonding: bond0: link status definitely down for interface eth1, disabling it
On bond failure you will get smthing like:
Dec 15 04:19:15 micah01 kernel: [ 6271.468218] e1000e: eth1 NIC Link is Down
Dec 15 04:19:15 micah01 kernel: [ 6271.548027] bonding: bond0: link status down for interface eth1, disabling it in 200 ms.
Dec 15 04:19:15 micah01 kernel: [ 6271.748018] bonding: bond0: link status definitely down for interface eth1, disabling it
4. Adding removing interfaces to the bond interactively
You can set the mode through sysfs virtual filesystem with:
echo active-backup > /sys/class/net/bond0/bonding/mode
If you want to try adding an ethernet interface to the bond, type:
echo +ethN > /sys/class/net/bond0/bonding/slaves
To remove an interface type:
echo -ethN > /sys/class/net/bond0/bonding/slaves
In case if you're wondering how many bonding devices you can have, well the "sky is the limit" you can have, it is only limited by the number of NIC cards Linux kernel / distro support and ofcourse how many physical NIC slots are on your server.
To monitor (in real time) adding / removal of new ifaces to the bond use:
watch -n 1 ‘cat /proc/net.bonding/bond0′
 In Office home network, there is a Windows XP computer which is spending all his official work time in facebook.


