Posts Tagged ‘kind’

Fix “There Has Been a Critical Error on Your Website” wordpress error

Friday, December 2nd, 2022

there-has-been-a-critical-error-on-your-website-wordpress-critical-error-fix

Say you have a shiny working WordPress based website withtout any monitoring set for years but suddenly, you open the site and you get the terrifying error:
 

There Has Been a Critical Error on Your Website

That is quite of a stress for sure. As in the first few minutes you don't understand how this has happened since, you did not touched the perfeclty working site for a very, very long time.
Then you start to debug into the apache / nginx access.log, error.log and mysql mysql.err etc. franticly trying to figure it out the normal ideas pop-up immediately into mind, whether you have a recent backup for the website's database. If you have pair of high availability webservers service or backup databases that serve the traffic via a separate standby instance of the service, you might try to switch off the official service and see whether the standby Webserver / SQL server instance would serve the website fine.
However, if this is not an option and you have no standby backup service as a recovery Plan B option already set. Your only option is to continue to debug what is wrong.
Then the next thing to do is to check whether you don't have a Web Caching or Proxy in front of your webservers that are preventing you to see a recent version of the website and give you some old cache or you don't have an ISP proxy that is giving you some unreal results. That is easily seenable from the Webserver logs. If this is neither the case the next thing is to:
 

Enable WordPress (wp-config.php) Debug mode

By default for Security reasons the WordPress PHP execution debug mode is switched off inside wp-config.php.
When there are odd pages with the WordPress based blog or site however this can easily be changed by modifying the WP_DEBUG true|false value.

To do so edit with a text editor such as vim / nano / mcedit  wp-config.php or if no SSH access to the remote machine, use SFTP / FTP transfer protocol copy the file to your desktop and inspect it and make sure the WP_DEBUG / WP_DEBUG_DISPLAY / WP_DEBUG_LOG has following values:

define( 'WP_DEBUG', true );

define( 'WP_DEBUG_DISPLAY', false );

define( 'WP_DEBUG_LOG', true );

Reloading the Browser window tab with There is a critical error on Your website, you should get some Errors or Warnings like:
 

Warning: Illegal string offset 'parent_slug' in /var/www/websitecom/wp-content/plugins/photo-gallery/booster/main.php on line 180

Warning: Illegal string offset 'slug' in /var/www/websitecom/wp-content/plugins/photo-gallery/booster/main.php on line 180


Then you can temporary disable the problematic problem in that case for example the photo-gallery and recheck the website, and then restore from backup snapshot the respective plugin files version from a moment, when the website was working.

If this doesn't solve it and more plugins are crashing and you can't find an easy way to work-around it you miss a backup, you might try to


Disable all WordPress active plugins

Disable your plugins from the dashboard, visit Plugins > Installed Plugins and tick the checkbox at the top of the list to select them all.
Then click Bulk Actions -> Deactivate, which should be enough to disable any conflicts and restore your site.

You can do essentially the same thing through SSH / FTP session.

Step 1: Log in to your site with SSH / FTP.
Step 2: Open the wp-content folder to find your plugins.
Step 3: Rename the plugins folder to plugins_old and verify that your site is working again via SSH run commands:

# cd  path_to/plugins; mv plugins plugins_old

or rename via FTP client
Step 4: Rename the folder back to “plugins”. The plugins should be disabled still, so you should be able to log in to your dashboard and activate them one by one. If
the plugins reactivate automatically, rename individual plugin folders with _old until your site is restored.

Raise the PHP Memory Limit

Sometimes, a low PHP limitation causes critical errors on WP based blogs and sites, if necessery raise up the memory limitation via:

define( 'WP_MEMORY_LIMIT', '128M' );

Change Max Upload File Size and Text Processing function limits

To increase the max upload file size, add this code to wp-config.php:

ini_set('upload_max_size' , '256M' );

ini_set('post_max_size','256M');

And to fix the breaking of large pages on your site, add this code:

ini_set('pcre.recursion_limit',20000000);
ini_set('pcre.backtrack_limit',10000000);

Clear up any caches

If you use some session caching of the website on the machine such as memcached / ncache / redis / varnish or an haproxy or any proxy in front of the webserver to do some kind of High availability could produce strange  unexpected Critical errors on Your Website, thus restarting such services or cleaning up any cache would be advisable if you have such.
 

What Causes "There Has Been a Critical Error on Your Website" error?


The reason could be practically anything as WP is a kind of multi-comonent free and a bit of bloatware. The general ones could be  from a missing database table / table fields to a messed up plugin after update a disappeared critical plugin or essential wordpress PHP file, but in my specific case the reason was simple the Plugins Auto-update, which I have had the stupidity to enable.

The WordPress Automatic Updates, though saving you effort and Protecting your website in most cases against recent bugs and Exploits and increasing the WP security level, often causes issues and from my personal experience it is not recommended so better avoid it. Again next time you implement any automation to your server make sure you put some kind of monitoring.

Even if you decide to enable it make sure you do it the right way and not like me, by enabling some Monitoring to the WordPress site via Zabbix / Nagios / Cacti / monit  etc to be sure you get notified immediately if the WordPress based site is down.

Howto Pass SSH traffic through a Secured Corporate Proxy server with corkscrew, using sshd as a standalone proxy service with no proxy installed on remote Linux server or VPS

Tuesday, November 19th, 2019

howto pass ssh traffic through proxy to remote server use remote machine as a proxy for connecting to the Internet

Working in the big bad corporate world (being employed in  any of the Fortune 500) companies, especially in an IT delivery company is a nasty thing in terms of User Personal Data Privacy because usually when employeed in any of a corporation, the company ships you with a personal Computer with some kind of pre-installed OS (most often this is Windows) and the computer is not a standalone one but joined in Active Directory (AD) belonging to Windows Domain and centrally administered by whoever.

As part of the default deplyed configuration in this pre-installed OS and software is that part or all your network traffic and files is being monitored in some kind of manner as your pre-installed Windows or Linux notebook given by the Corporation is having a set of standard software running in the background, and even though you have Windows Administrator there are many things you have zero control or even if you have changed it once the Domain Policy is triggered your custom made changes / Installed Programs that happen to be against the company policy are being automatically deleted, any registry changes made are being rewinded etc. Sometimes even by trying to manually clean up your PC from the corporate crapware,  you might breaks access to the corporate DMZ firewalled network. A common way to secure their employee PC data large companies have a Network seperation, your PC when not connected to the Corporate VPN is having a certain IP configuration and once connected to the Demilitarized Zone VPN those configuration changes and the PC have access to internal company infrastructure servers / router / switches / firewalls / SANs etc. Access to corporate Infrastructure is handled via crypted VPN clinet such as Cisco AnyConnect Secure Mobility Client which is perhaps one of the most used ones out there.

Part of the common software installed to Monitor your PC for threats / viruses / trojans among which is MCafee / EMET (Enhandced Mitigation Experience Toolkit) the PC is often prebundled with some kind of anti-malware (crapware) :). But the tip of the iceberg on user surveillance where most of surveillance happens is the default installed proxy on the PC which usually does keep track of all your remote accessed HTTP Website URLs accessed in plain text – traffic flowing on Port 80 and crypted one on standard (SSL) Port 443. This Web Traffic is handled by the Central Corporate proxy that is being deployed via some kind of Domain policy, every time the Computer joins the Windows domain. 

This of course is a terrible thing for your Browsing security and together with the good security practice to run your browser in Incognito mode, which makes all your browsing activity such as access URLs History or Saved Cookies data to be cleared up on a Browser close it is important to make sure you run your own personal traffic via a separate browser which you will use only for your own concern browsing such as Accessing your Bank Money Accounts to check your Monthly Sallary / Purchase things online via Amazon.com / Ebay.com, whether all of the rest traffic company related is trafficed via the default set corporate central proxy.
This is relatively easy sometimes in companies, where security is not of a top concern but in corporations with tightened security accessing remote proxy, or accessing even common daily news and Public Email websites or social media sites  Gmail.com / Twitter / Youtube will be filtered so the only way to reach them will be via some kind of Proxy and often this proxy is the only way out to the Free world from the corporate jail.

Here is where the good old SSH comes as a saving grace as it turns out SSH traffic could be trafficed over a proxy. In below article I will give you a short insight on how Proxy through SSH could be achieved to Secure your dailty web traffic and use SSH to reach your own server on the Internet as well as how you can copy securely data via SSH through corporate Proxy. 
 

1. How to view your corporate used (default) proxy / Check Proxy.pac file definitions


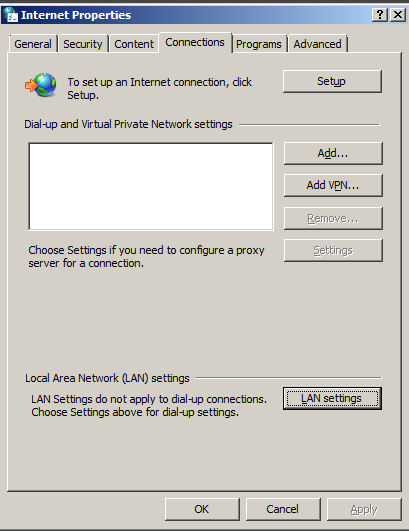
To get an idea what is the used proxy on your Corporate PC (as most corporate employee given notebooks are running some kind of M$ Windows)  you can go to:

Windows Control Panel -> Internet Options -> Connections -> Lan Settings


internet-properties-microsoft-windows-screenshot

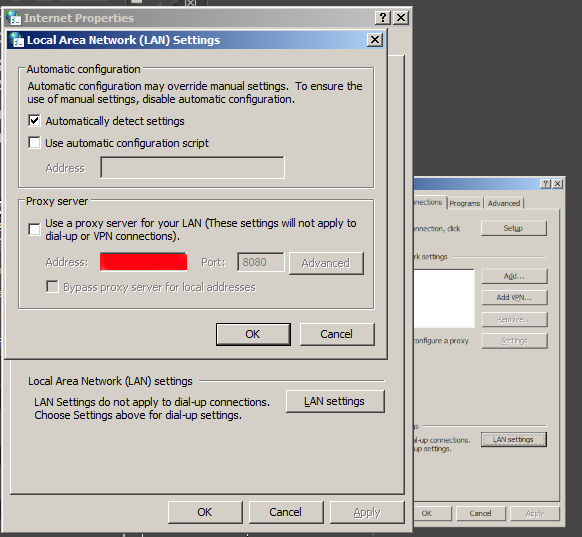
Under the field Proxy server (check out the Proxy configured Address and Port number )

local-area-network-lan-settings-screenshot-windows-1
 

Having that as browsers venerate the so-called Proxy.pac file, to be rawly aware on some general Company Proxy configured definitions you can access in a browser the proxy itself fething the proxy.pac file for example.


http://your-corporate-firewall-rpoxy-url:8080/proxy.pac


This is helpful as some companies Proxies have some proxy rules that reveal some things about its Internet architecture and even some have some badly configured proxy.pac files which could be used to fool the proxy under some circumstances 🙂
 

2. Few of the reasons corporations proxy all their employee's work PC web traffic


The corporate proxying of traffic has a number of goals, some of which are good hearted and others are for mostly spying on the users.


1. Protect Corporate Employees from malicious Viruses / Trojans Horses / Malware / Badware / Whatever ware – EXCELLENT
2. Prevent users from acessing a set of sources that due to the corporate policy are considered harmful (e.g. certain addresses 
of information or disinformation of competitors, any Internet source that might preach against the corporation, hacking ralated websites etc.) – NOT GOOD (for the employee / user) and GOOD for the company
3.Spy on the users activity and be able to have evidence against the employee in case he decided to do anything harmful to the company evidences from proxy could even later be used in court if some kind of corpoate infringment occurs due to misbehave of the employee. – PERFECT FOR COMPANY and Complete breach of User privacy and IMHO totally against European Union privacy legislation such as GDRP
4. In companies that are into the field of Aritificial Intelligence / Users behavior could even be used to advance Self-learning bots and mechanisms – NASTY ! YAECKES


3. Run SSH Socks proxy to remote SSHd server running on common SSL 443 port


Luckily sysadmins who were ordered the big bosses to sniff on your Web behaviour and preferences could be outsmarted with some hacks.

To protect your Browsing behaviours and Secure your privacy perhaps the best option is to use the Old but gold practice o Securing your Networkf traffic using SSH Over Proxy and SSH Dynamic tunnel as a Proxy as explained in my previous article here.

how-to-use-sshd-server-as-a-proxy-without-a-real-proxy-ssh-socks5_proxy_linux
 

In short the quest way to have your free of charge SOCKS  Remote proxy to your Home based Linux installed OS server / VPN with a Public Internet address is to use ssh as so:


ssh -D 3128 UserName@IP-of-Remote-SSHD-Host -p 443


This will start the SOCKS Proxy tunnel from Corporate Work PC to your Own Home brew server.

For some convenience it is useful to set up an .alias (for cygwin) / linux users in .bashrc file:


alias proxy='ssh -D 3128 UserName@IP-of-Remote-SSHD-Host -p 443';


To start using the Proxy from browser, I use a plugin called FoxyProxy in Chrome and Firefox browsers
set-up to connect to localhost – 127.0.0.1:3128 for All Protocols as a SOCKs v5 Proxy.

The sshd Socks proxy can be used for multiple others for example, using it you can also pass on traffic from Mail client such as Thunderbird to your Email server if you're behind a firewall prohibiting access to the common POP3 port 110 or IMAP port TCP 143. 

4. How to access SSH through Proxy using jumphost SSH hop


If you're like me and you have on your Home Linux machine only one Internet address and you have already setupped an SSL enabled service (lets say Webmail) to listen to that Public Internet IP and you don't have the possibility to run another instance of /usr/bin/sshd on port 443 via configuration or manually one time by issuing:


/usr/sbin/sshd -p 443


Then you can use another ssh another Linux server as a jump host to your own home Linux sshd server. This can be done even by purchasing a cheap VPS server for lets say 3 dollars month etc. or even better if you have a friend with another Linux home server, you can ask him to run you sshd on TCP port 443 and add you an ssh account.
Once you have the second Linux machine as JumpHost to reach out to your own machine use:


ssh -J Your-User@Your-jump-host.com:443 hipo@your-home-server.com -v


To easify this a bit long line it is handy to use some kind of alias like:


alias sshhome='ssh -J Your-User@Your-jump-host.com:443 hipo@your-home-server.com -v'


The advantage here is just by issuing this sshd tunnel and keeping it open in a terminal or setting it up as Plink Putty tunnel you have all your Web Traffic Secured
between your Work Corporate PC and your Home Brew Server, keeping the curious eyes of your Company Security Officers from your own Web traffic, hence
separating the corporate privacy from your own personal privacy. Using the just established own SSH Proxy Tunnel to home for your non-work stuff browsing habits
from the corporate systems which are accessed by switching with a button click in FoxyProxy to default proxy settings.
 

5. How to get around paranoid corporate setup where only remote access to Corporate proxy on TCP Port 80 and TCP 443 is available in Browser only


Using straight ssh and to create Proxy will work in most of the cases but it requires SSH access to your remote SSH running server / VPS on TCP Port 22, however under some Fort-Nox like financial involved institutions and companies for the sake of tightened security, it is common that all Outbound TCP Ports are prohibited except TCP Port 80 and SSL 443 as prior said, so what can you do then to get around this badful firewall and access the Internet via your own server Proxy? 
The hack to run SSH server either on tcp port 80 or tcp port 443 on remote Host and use 443 / 80 to acess SSHD should work, but then even for the most paranoid corporations the ones who are PCI Compliant – PCI stands for (Payment Card Industry), e.g. works with Debit and Credit Card data etc, accessing even 80 or 443  ports with something like telnet client or netcat will be impossible. 
Once connected to the corporate VPN,  this 2 two ports firewall exceptions will be only accessible via the Corporate Proxy server defined in a Web Browser (Firefox / IE / Chrome etc.) as prior explained in article.

The remedy here is to use a 3rd party tools such as httptunnel or corkscrew that  are able to TUNNEL SSH TRAFFIC VIA CORPORATE PROXY SERVER and access your own resource out of the DMZ.

Both httptunnel and corkscrew are installable both on most Linux distros or for Windows users via CygWin for those who use MobaXterm.

Just to give you better idea on what corkscrew and (hts) httptunnel does, here is Debian packages descriptions.

# apt-cache show​ corkscrew
" corkscrew is a simple tool to tunnel TCP connections through an HTTP
 proxy supporting the CONNECT method. It reads stdin and writes to
 stdout during the connection, just like netcat.
 .
 It can be used for instance to connect to an SSH server running on
 a remote 443 port through a strict HTTPS proxy.
"


# apt-cache show httptunnel|grep -i description -A 7
Description-en: Tunnels a data stream in HTTP requests
 Creates a bidirectional virtual data stream tunnelled in
 HTTP requests. The requests can be sent via a HTTP proxy
 if so desired.
 .
 This can be useful for users behind restrictive firewalls. If WWW
 access is allowed through a HTTP proxy, it's possible to use
 httptunnel and, say, telnet or PPP to connect to a computer

Description-md5: ed96b7d53407ae311a6c5ef2eb229c3f
Homepage: http://www.nocrew.org/software/httptunnel.html
Tag: implemented-in::c, interface::commandline, interface::daemon,
 network::client, network::server, network::vpn, protocol::http,
 role::program, suite::gnu, use::routing
Section: net
Priority: optional
Filename: pool/main/h/httptunnel/httptunnel_3.3+dfsg-4_amd64.deb

Windows cygwin users can install the tools with:
 

apt-cyg install –yes corkscrew httptunnel


Linux users respectively with:

apt-get install –yes corkscrew httptunnel

or 

yum install -y corkscrew httptunnel


You will then need to have the following configuration in your user home directory $HOME/.ssh/config file
 

Host host-addrs-of-remote-home-ssh-server.com
ProxyCommand /usr/bin/corkscrew your-corporate-firewall-rpoxy-url 8080 %h %p


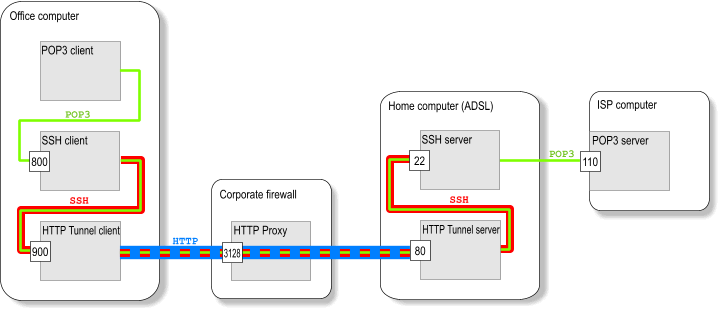
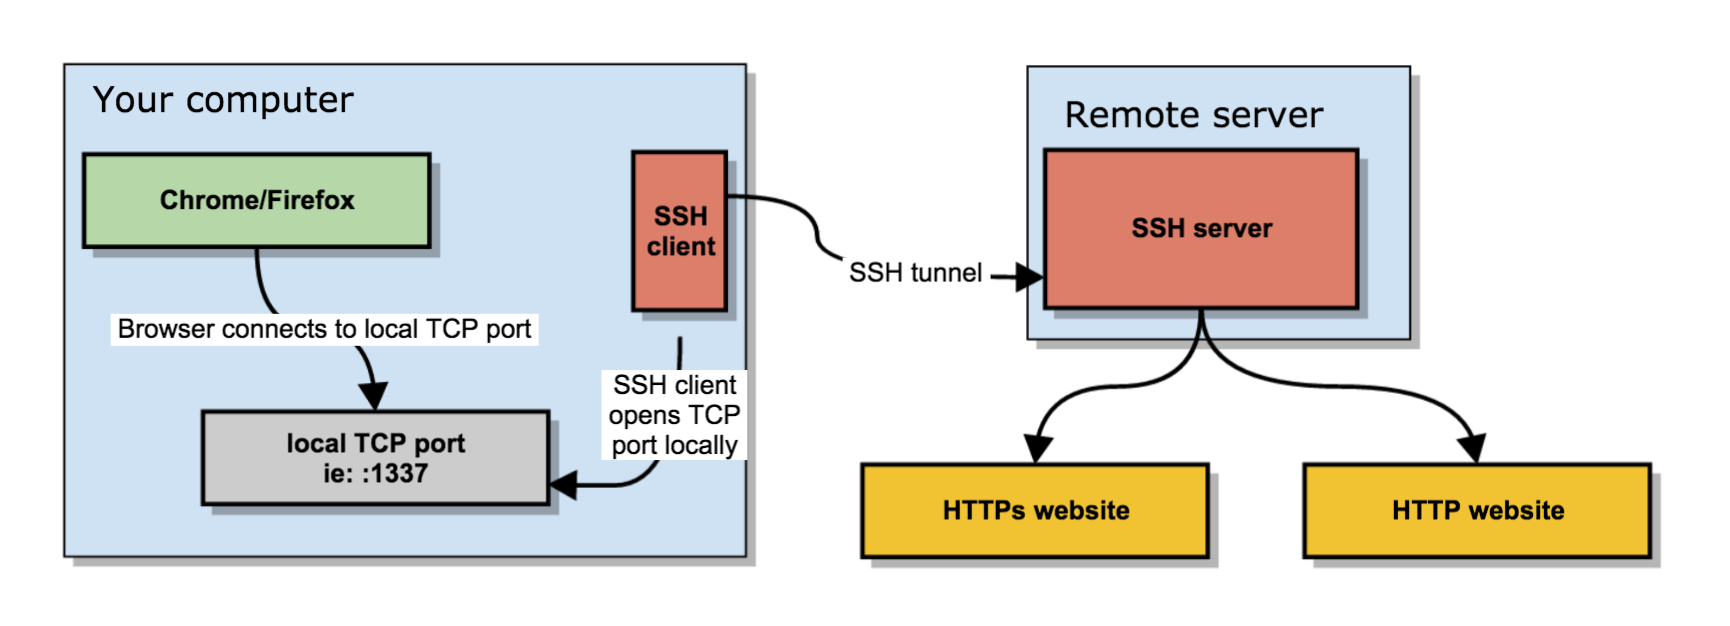
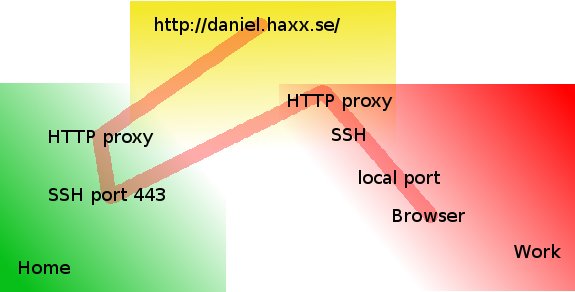
howto-transfer-ssh-traffic-over-proxy

Picture Copyright by Daniel Haxx

The best picture on how ssh traffic is proxied is the one found on Daniel Haxx's website which is a great quick tutorial which originally helped to get the idea of how corkscrew works in proxying traffic I warmly recommend you take a quick look at his SSH Through or over Proxy article.

Host-addrs-of-remote-home-ssh-server.com could be also and IP if you don't have your own domain name in case if using via some cheap VPN Linux server with SSH, or alternatively
if you don't want to spend money on buying domain for SSH server (assuming you don't have such yet) you can use Dyn DNS or NoIP.

Another thing is to setup the proper http_proxy / https_proxy / ftp_proxy variable exports in $HOME/.bashrc in my setup I have the following:
 

export ftp_proxy="http://your-corporate-firewall-rpoxy-url:8080"
export https_proxy="https://your-corporate-firewall-rpoxy-url:8080"
export http_proxy="http://your-corporate-firewall-rpoxy-url:8080"
export HTTP_PROXY="http://your-corporate-firewall-rpoxy-url:8080"
export HTTPS_PROXY="http://your-corporate-firewall-rpoxy-url:8080"


6. How to Transfer Files / Data via SSH Protocol through  Proxy with SCP and SFTP


Next logical question is how to Transfer your own personal encrypted files (that contains no corporate sensitive information) between your Work laptop and home brew Linux ssh server or cheap VPN.

It took me quite a lot of try-outs until finally I got it how Secure Copy (scp) command can be used toto transfer files between my Work Computer and my Home brew server using JumpHost, here is how:
 

scp -o 'ProxyJump Username@Jumpt-Host-or-IP.com:443' ~/file-or-files-to-copy* Username@home-ssh-server.com:/path/where/to/copy/files


I love using sftp (Secure FTP) command Linux client to copy files and rarely use scp so I have a lot of try-outs to connect interacitvely via the Corporate Proxy server over a Jump-Host:443 to my Destination home machine, 


I've tried using netcat as it was pointed in many articles online, like so to traffic my sftp traffic via my localhost binded SSH Socks proxy on :3128 together with netcat as shown in article prior example, using following line:
 

sftp -oProxyCommand='/bin/nc -X connect -x 127.0.0.1:3128 %h %p' Username@home-ssh-server.com 22


Also tried proxy connect like this:


sftp -o ProxyCommand="proxy-connect -h localhost -p 3128 %h %p" Username@home-ssh-server.com


Moreover, tried to use the ssh  command (-s) argument capability to invoke SSH protocol subsystem feature which is used to facilitiate use of SSH secure transport for other application
 

ssh -v -J hipo@Jump-Host:443 -s sftp root@home-ssh-server.com -v

open failed: administratively prohibited: open failed


Finally decided to give a try to the same options arguments as in scp and thanks God it worked and I can even access via the Corporate Proxy through the Jump Host SSH interactively via Secure FTP 🙂

!! THE FINAL WORKING SFTP THROUGH PROXY VIA SSH JUMPHOST !!
 

sftp -o 'ProxyJump Username@Jumpt-Host-or-IP.com:443' Username@home-ssh-server.com


To save time from typing this long line every time, I've setup the following alias to ~/.bashrc
 

alias sftphome='sftp -o 'ProxyJump Username@Jumpt-Host-or-IP.com:443' Username@home-ssh-server.com'


Conclusion

Of course using own Proxy via your Home brew SSH Machine as well as transferring your data securely from your Work PC (notebook) to Home does not completely make you Surveillance free, as the Corporate Windows installed OS image is perhaps prebundled with its own integrated Keylogger as well as the Windows Domain administrators have certainly access to connect to your PC and run various commands, so this kind of Security is just an attempt to make company has less control and know less on your browsing habits and the best solution where possible to secure your privacy and separate your Personal Space form Work space by using a second computer (if having the ability to work from home) with a KVM Switch device and switch over your Work PC and Home PC via it or in some cases (where companies) allows it, setup something like VNC server (TightVNC / RealVNC) on work PC and leave it all time running in office and connect remotely with vncviewer from your own controlled secured computer.

In article I've explained shortly common scenario found in corporate Work computers proxy setup, designed to Surveil all your move, mentioned few common softwares running by default to protect from Viruses and aimed to Protect user from malicious hacking tools, explained how to view your work notebook configured Proxy, shortly mentioned on Proxy.pac and hinted how to view proxy.pac config as well as gave few of the reasons why all web traffic is being routed over central proxy.

That's all folks, Enjoy the Freedom to be less surveilled !

Apache Webserver: No space left on device: Couldn’t create accept lock /var/lock/apache2/accept.lock – Fix

Wednesday, April 8th, 2015

Apache-http-server-no-space-left-on-device-semaphores-quotes-hard-disk-space-resolve-fix-howto
If out of a sudden your Apache webserver crashes and is refusing to start up by manually trying to restart it through its init script on Debian Linux servers – /etc/init.d/apache2 and RPM based ones: /etc/init.d/httpd

Checking in php_error.log there was no shown errors related to loading PHP modules, however apache's error.log show following errors:

[Wed Apr 08 14:20:14 2015] [error] [client 180.76.5.149] client denied by server configuration: /var/www/sploits/info/trojans_info/tr_data/y3190.html
[Wed Apr 08 14:20:39 2015] [warn] pid file /var/run/apache2.pid overwritten — Unclean shutdown of previous Apache run?
[Wed Apr 08 14:20:39 2015] [emerg] (28)No space left on device: Couldn't create accept lock (/var/lock/apache2/accept.lock.15974) (5)
[Wed Apr 08 14:25:39 2015] [warn] pid file /var/run/apache2.pid overwritten — Unclean shutdown of previous Apache run?
[Wed Apr 08 14:25:39 2015] [emerg] (28)No space left on device: Couldn't create accept lock (/var/lock/apache2/accept.lock.16790) (5)
[Wed Apr 08 14:27:03 2015] [warn] pid file /var/run/apache2.pid overwritten — Unclean shutdown of previous Apache run?
[Wed Apr 08 14:27:03 2015] [emerg] (28)No space left on device: Couldn't create accept lock (/var/lock/apache2/accept.lock.16826) (5)
[Wed Apr 08 14:27:53 2015] [warn] pid file /var/run/apache2.pid overwritten — Unclean shutdown of previous Apache run?
[Wed Apr 08 14:27:53 2015] [emerg] (28)No space left on device: Couldn't create accept lock (/var/lock/apache2/accept.lock.16852) (5)
[Wed Apr 08 14:30:48 2015] [warn] pid file /var/run/apache2.pid overwritten — Unclean shutdown of previous Apache run?
[Wed Apr 08 14:30:48 2015] [emerg] (28)No space left on device: Couldn't create accept lock (/var/lock/apache2/accept.lock.17710) (5)
[Wed Apr 08 14:31:21 2015] [warn] pid file /var/run/apache2.pid overwritten — Unclean shutdown of previous Apache run?
[Wed Apr 08 14:31:21 2015] [emerg] (28)No space left on device: Couldn't create accept lock (/var/lock/apache2/accept.lock.17727) (5)
[Wed Apr 08 14:32:40 2015] [warn] pid file /var/run/apache2.pid overwritten — Unclean shutdown of previous Apache run?
[Wed Apr 08 14:32:40 2015] [emerg] (28)No space left on device: Couldn't create accept lock (/var/lock/apache2/accept.lock.17780) (5)
[Wed Apr 08 14:38:32 2015] [warn] pid file /var/run/apache2.pid overwritten — Unclean shutdown of previous Apache run?

As you can read the most likely reason behind above errors preventing for apache to start is /var/run/apache2.pid  unable to be properly written due to lack of disk space or due to disk quota set for users including for userID with which Apache is running.

First thing I did is of course to see how much free space is on the server:

df -h
Filesystem                     Size  Used Avail Use% Mounted on
/dev/mapper/vg00-rootvol       4.0G  1.7G  2.2G  44% /
udev                           7.8G  204K  7.8G   1% /dev
tmpfs                           24G     0   24G   0% /dev/shm
/dev/sda1                      486M   40M  422M   9% /boot
/dev/mapper/vg00-lv_crashdump 1008M   34M  924M   4% /crashdump
/dev/mapper/vg00-homevol       496M   26M  445M   6% /home
/dev/mapper/vg00-lv_opt         12G  1.4G  9.9G  13% /opt
/dev/mapper/vg00-tmpvol        2.0G   68M  1.9G   4% /tmp
/dev/mapper/vg00-varvol        7.9G  609M  6.9G   8% /var
/dev/mapper/vg00-crashvol      1.9G   35M  1.8G   2% /var/crash
/dev/mapper/vg00-auditvol      124M  5.6M  113M   5% /var/log/audit
/dev/mapper/vg00-webdienste     60G   12G   48G  19% /webservice


As visible from above df command output , there is enough disk on HDD, so this is definitely not the issue:

Then I Checked whether there is Quota enabled on the Linux server with repquota command shows there are no quotas enabled:

# repquota / var/
repquota: Mountpoint (or device) / not found or has no quota enabled.
repquota: Mountpoint (or device) /var not found or has no quota enabled.
repquota: Not all specified mountpoints are using quota.


So obviously the only few left possible reason for Apache failing to start after invoked via init script is  either due to left tainted semaphores or due to some server hardware  RAM problem / or a dying  hard disk with bad blocks.

So what are Semaphores? Generally speaking Semaphores are apparatus for conveying information by means of visual signals between applications (something like sockets).They're used for communicating between the active processes of a certain application. In the case of Apache, they’re used to communicate between the parent and child processes, hence if Apache can’t properly write and coordinate these things down, then it can’t communicate properly with all of the processes it starts and hence the Main HTTPD process can't spawn probably its childs preventing Webserver to enter "started mode" and write its PID file.

To check general information about system semaphore arrays there is the ipcs -s command, however my experience is that ipcs -a is more useful (because it lists generally all kind of semaphores) including Semaphore Shared Memory Signals which are the most likely to cause you the problem.

ipcs -a

—— Shared Memory Segments ——–
key        shmid      owner      perms      bytes      nattch     status

—— Semaphore Arrays ——–
key        semid      owner      perms      nsems
0x00000000 22970368   www-data   600        1

—— Message Queues ——–
key        msqid      owner      perms      used-bytes   messages

As you see in my case there is a Semaphore Arrays which had to be cleaned to make Apache2 be able to start again.
 

To clean all left semaphores (arrays) preventing Apache from start properly, use below for one liner bash loop:
 

for i in `ipcs -s | awk '/www-data/ {print $2}'`; do (ipcrm -s $i); done
ipcrm -m 0x63637069


Note that above for loop is specific to Debian on CentOS / Fedora / RHEL and other Linuxes the username with which stucked semaphores might stay will be apache or httpd

Depending on the user with which the Apache Webserver is running, run above loop like so:

For RPM based distros (CentOS / RHEL):


for i in `ipcs -s | awk '/apache/ {print $2}'`; do (ipcrm -s $i); done
ipcrm -m 0x63637069


For other distros such as Slackware or FreeBSD or any custom compiled Apache webserver:

for i in `ipcs -s | awk '/httpd/ {print $2}'`; do (ipcrm -s $i); done
ipcrm -m 0x63637069


If there is also Shared Memory Segments you can remove them with ipcrm i.e.:

ipcrm -m 0x63637069


An alternative way to get rid of left uncleaned semaphores is with xargs:
 

ipcs -s | grep nobody | awk ‘ { print $2 } ‘ | xargs ipcrm


Even though this fixes the issue I understood my problems were due to exceeding semaphores, to check default number of set semaphores on Linux Kernel level as well as few Semaphore related values run below sysctl:

sysctl -a | egrep kernel.sem\|kernel.msgmni
kernel.msgmni = 15904

kernel.sem = 250        32000   32      128


As you can see the number of maximum semaphores is quite large so in my case the failure because of left semaphores was most likely due to some kind of Cracker / Automated bot scanner attack or someone trying malicious against the webserver or simply because of some kind of Apache bug or enormous high load the server faced.

Extracting pages and page ranges, protect with password and remove password from PDF on GNU / Linux with QPDF – Linux Manipulating PDF files from command line

Friday, August 8th, 2014

qpdf-logo-extract-pages-page-ranges-protect-pdf-with-password-remove-password-from-pdf-linux-qpdf-manipulating-pdf-files-on-gnu-linux-and-bsd
If're a Linux user and you need to script certain page extraction from PDF files, crypt protect with password a PDF file or decrypt (remote password protection from PDF) or do some kind of structural transformation of existing PDF file you can use a QPDF command line utility. qpdf is in active development and very convenient tool for Website developers (PHP / Perl / Python), as often on websites its necessery to write code to cut / tailer / restructure PDFs.

1. Install QPDF from deb / rpm package

qpdf is instalalble by default in deb repositories on Debian / Ubuntu GNU / (deb derivative) Linux-es to install it apt-get it

apt-get install –yes qpdf

On RPM based distribution CentOS / SuSE / RHEL / Fedora Linux to install qpdf, fetch the respective distribution binary from rpmfind.net or to install latest version of qpdf build it from source code.

2. Install QPDF from source

To build latest qpdf from source

  • on RPM based distributions install with yum fullowing packages:

yum -y install zlib-devel pcre-devel gcc gcc-c++

  • on Deb based Linuces, you will need to install

apt-get install –yes build-essential gcc dpkg-dev g++ zlib1g-dev


Then to build gather latest qpdf source from here


cd /usr/local/src
wget -q https://www.pc-freak.net/files/qpdf-5.1.2.tar.gz
tar -zxvf qpdf-5.1.2.tar.gz
cd qpdf-5.1.2/
./configure
make
make install


Once it is installed, if you get error on qpdf runtime:
 

/usr/local/bin/qpdf: error while loading shared libraries: libqpdf.so.13: cannot open shared object file: No such file or directory

To solve the error find in your compile directory libqpdf.so.13 and copy it to /usr/lib or /usr/local/lib

 cp -rpf ./libqpdf/build/.libs/libqpdf.so.13 /usr/local/lib


3. Decrypt password encrypted (protected) PDF file

if you have time and you like reading be sure to check the extensive qpdf-manual.

To remove password from a PDF file protected with a password with qpdf

qpdf –password=SECRET-PASSWORD –decrypt input-file.pdf output-file.pdf

QPDF has a vast range of split and merge features. It can combine all the files in a folder (*.pdf), you can use it to try to recover damaged pdf files, extract individual pages from PDF, dump and reverse page range, make new created PDF with old PDF's reversed pages (pages 1,2,3,4 to become in order 4,3,2,1), apply some single pdf file metadata to multiple files.

4. Try to Recover damaged PDF file


To try to recover some damaged file with qpdf:
 

qpdf file-to-repair.pdf repaired-file.pdf

5. Extract certain pages or page range from PDF

It is recommended to use the version built from source to extract certain page range from PDF
 

/usr/local/bin/qpdf –empty –pages input-file.pdf 1-5 — outfile-file.pdf


If you wanted to take pages 1–5 from file1.pdf and pages 11–15 from file2.pdf in reverse, you would run
 

qpdf file1.pdf –pages file1.pdf 1-5 file2.pdf 15-11 — outfile.pdf


How to check Microsoft IIS webserver version

Monday, July 21st, 2014

If you have to tune some weirdly behaviour Microsoft IIS (Internet Information Services) webserver, the first thing to do is to collect information about the system you're dealing with – get version of installed Windows and check what kind of IIS version is running on the Windows server?

To get the version of installed Windows on the system you just logged in, the quickest way I use is:
 

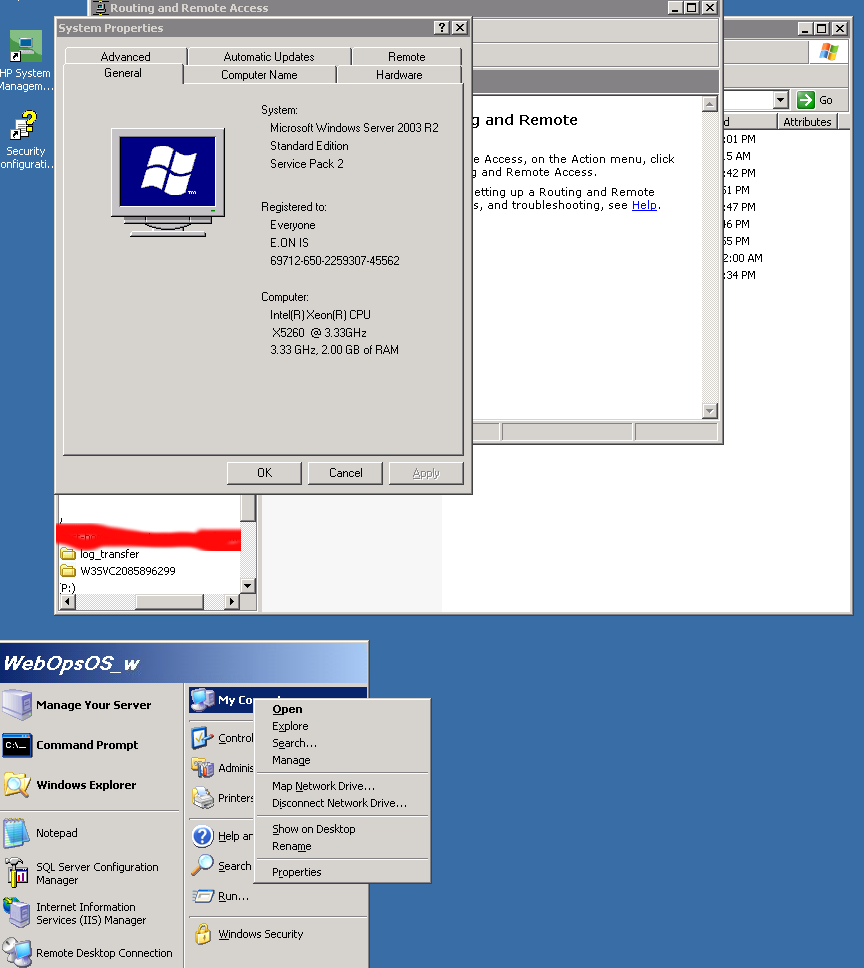
Start -> My Computer (right mouse button) Properties

check-windows-server-version-screenshot-windows-2003-r2

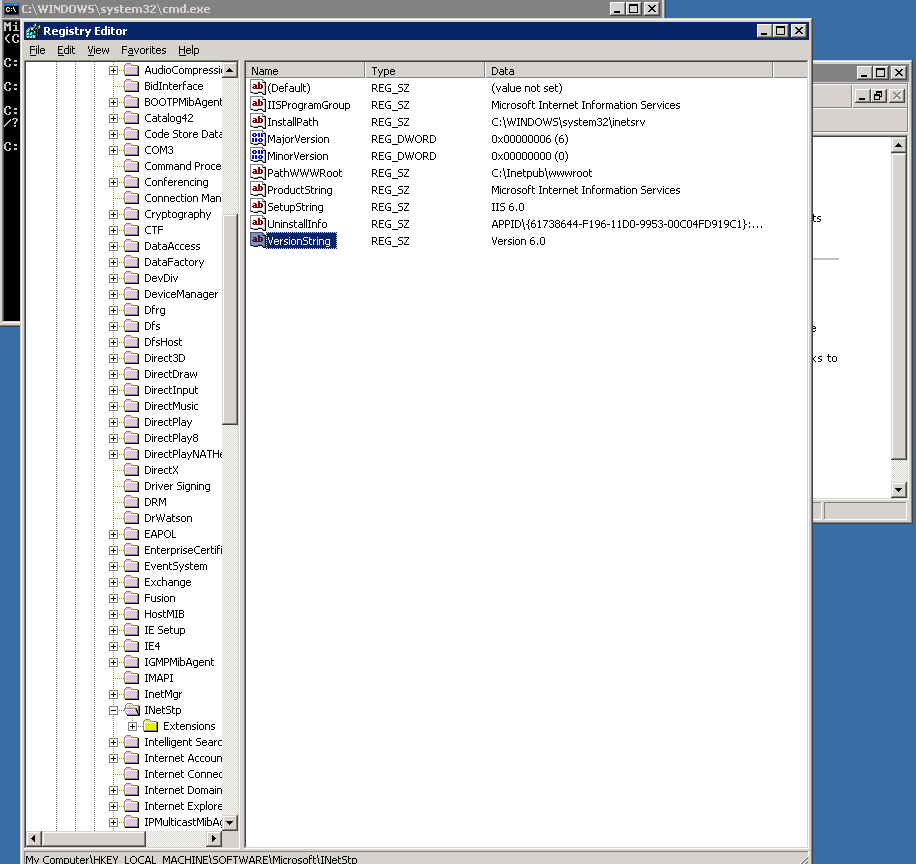
Run regedit from cmd.exe and go and check value of registry value:


HKEY_LOCAL_MACHINE\SOFTWARE\MicrosoftInetStp\VersionString


check-iis-webserver-version-with-windows-registry-screenshot

As you can see in screenshot in this particular case it is IIS version 6.0.

An alternative way to check the IIS version in some cases (if IIS version return is not disabled) is to telnet to webserver:

telnet your-webserver 80


Once connected Send:

HEAD / HTTP/1.0


Also on some Windows versions it is possible to check IIS webserver version from Internet Information Services Management Cosnole:

To check IIS version from IIS Manager:

Start (button) -> Control Panel -> Administrative Tools -> "Internet Information Services" IIS Manager

From IIS Manager go to:

Help -> About Microsoft Management Console


Here is a list with most common IIS version output you will get depending on the version of Windows server:


Windows NT 3.51 1.0
Windows NT 4 2.0-4.0
Windows Server 2000 5.0
Windows XP Professional 5.1
Windows Server 2003 6.0
Windows Vista 7.0
Windows Server 2008 7.0
Windows Server 2008 R2 7.5
Windows 7 7.5
Windows Server 2012 8.0
Windows 8 8.0
Windows Server 2012 R2 8.5
Windows 8.1 8.5

If you have only an upload FTP access to a Folder served by IIS Webserver – i.e. no access to the Win server running IIS, you can also grasp the IIS version with following .ASP code:
 

<%
response.write(Request.ServerVariables("SERVER_SOFTWARE"))
%>


Save the file as anyfile.asp somewhere in IIS docroot and invoke it in browser.

Linux: how to show all users crontab – List all cronjobs

Thursday, May 22nd, 2014

linux-unix-list-all-crontab-users-and-scripts
I'm doing another server services decomissioning and part of decomissioning plan is: Removing application and all related scripts from related machines (FTP, RSYNC, …). In project documentation I found a list with Cron enabled shell scripts:

#Cron tab excerpt:
1,11,21,31,41,51 * * * */webservices/tools/scripts/rsync_portal_sync.sh

that has to be deleted, however there was nowhere mentioned under what kind of credentials (with what kind of user) are the cron scripts running? Hence I had to look up all users that has cronjobs and find inside each user's cronjobs whether respective script is set to run. Herein I will explain shortly how I did that.

Cronjobs by default has few locations from where cronjobs are setupped depending on their run time schedule. First place I checked for the scripts is

/etc/crontabs # cat /etc/crontabs SHELL=/bin/sh
PATH=/usr/bin:/usr/sbin:/sbin:/bin:/usr/lib/news/bin
MAILTO=root
#
# check scripts in cron.hourly, cron.daily, cron.weekly, and cron.monthly
#
-*/15 * * * * root test -x /usr/lib/cron/run-crons && /usr/lib/cron/run-crons >/dev/null 2>&1
59 * * * * root rm -f /var/spool/cron/lastrun/cron.hourly
14 4 * * * root rm -f /var/spool/cron/lastrun/cron.daily
29 4 * * 6 root rm -f /var/spool/cron/lastrun/cron.weekly
44 4 1 * * root rm -f /var/spool/cron/lastrun/cron.monthly

I was not really user via what user is shell script run, therefore I looked first if someone doesn't set the script to run via crontab's standard locations for Daily, Hourly,Weekly and Monthly cronjobs:
 

a) Daily set cron jobs are in:

/etc/cron.daily/

b) Hourly set cron jobs:

/etc/cron.hourly

c) Weekly cron jobs are in:

/etc/cron.weekly/

d) Monthly cron jobs:

/etc/cron.monthly

There is also a location read by crontab for all Software (package distribution) specific cronjobs – all run under root user privileges.:

e) Software specific script cron jobs are in:

/etc/cron.d/  
As the system has about 327 users in /etc/passwd, checking each user's cronjob manually with:

# crontab -u UserName -l

was too much time consuming thus it is a good practice to list

/var/spool/cron/*

directory and to see which users has cron jobs defined


# ls -al /var/spool/cron/*
-rw——- 1 root root 11 2007-07-09 17:08 /var/spool/cron/deny

/var/spool/cron/lastrun:
total 0
drwxr-xr-x 2 root root 80 2014-05-22 11:15 .
drwx—— 4 root root 120 2008-02-25 15:45 ..
-rw-r–r– 1 root root 0 2014-05-22 04:15 cron.daily

/var/spool/cron/tabs:
total 8
drwx—— 2 root root 72 2014-04-03 03:43 .
drwx—— 4 root root 120 2008-02-25 15:45 ..
-rw——- 1 root root 4901 2014-04-03 03:43 root


/var/spool/cron – is crond (/usr/bin/cron/)'s spool directory.

# ls -al /var/spool/cron/tabs/ total 8
drwx------ 2 root root 72 2014-04-03 03:43 .
drwx------ 4 root root 120 2008-02-25 15:45 ..
-rw------- 1 root root 4901 2014-04-03 03:43 root

Above output shows only root superuser has defined crons.

Alternative way to check all user crontabs is via quick Linux one liner shell script show all user cron jobs

for i in $(cat /etc/passwd | sed -e "s#:# #g" | awk '{ print $1 }'); do
echo "user $i --- crontab ---";
crontab -u $i -l 2>&1 >/dev/null;
echo '----------';
done|less

Note that above short script has to run with root user. Enjoy 🙂

Minsk Monastery trip to saint Elizabeth’s Nun Convent – Spiritual realms of Belarus

Monday, April 7th, 2014

st_Elizabeth_Romanova-monastery-Church
If you happen to be in Belarus's capital Minsk and you're a Christian you would definitely will be interested to see the spiritual side of Belarus. I was in Minsk with my wife for a month and had the chance to go for a pilgrimage in st. Elisaberth's Orthodox Christian Convent.

In Belarus about 80% of population of population are Orthodox Christians with about 7% Catholics, some 4% protestants and 9% atheists. I'm Orthodox Christian myself so mostly I kept interest in exoeriencing Orthodox religion life there. The religious life in Belarus so deeply impressed me so I decided to even document it here.

I was in a couple of Orthodox Churches during the Great Lent first week attending afternoon (Great) Repentence services canon of St. Andrew of Crete. And was amazed how many people are religious in this God fearful country. All Churches where I was during the Great Canon or Holy Liturgy was so full of people that you cannot even enter the Church if you're late for the service. People attending were also very concentrated on the service and most of the people came to services bringing most of which holding a book with the Great Repentance Canon following the service and concentrated in praying and doing ground prostrations. One thing to note is Belarusian Orthodox Church is a sub-division of Russian Orthodox Church (ROC), Belarusian doesn't have their own patriarch but are under the patriarchy of Russian and all Moscow patriarch – Kiril I.

Few weeks ago for Sunday of All Orthodoxy (Triumph of All orthodoxy) for Holy Liturgy service me and Svetlana with a close friend of her Tatyiana went to St. Elisabeth's Monastery. 
Monastery is named in honour of St. Elizabeth Feodorovna Romanova – which is the last Russian Grand Princess of the Romanov family later executed with her husband and kids by Communists Bolsheviks, canonized by ROC in the 1990s.

Saint_Elizabeth_holy_orthodox_icon_monastery_Minskst_Elizabeth_Romanova-monastery-Church

The monastery as almost all Churches in Belarus is so full of people you cannot move (it seems in Russian Orthodox Church – there is an amazing spiritual awakening at the moment). I wanted to confess and even though I was in the Church building before beginning of the holy liturgy and there were two priests to confess the queue of people to confess was so long that confession lasted until the end of the Holy Liturgy. In order to able to confess I've waited on the "confession queue" for about 2 hours and a half. Even though Holy Liturgy completed confession continued and those who confessed after the Church service end was also offered the Holy Sacraments. Another stunning thing for me was the amount of young and obviously intelligent people who was in the Church – just to compare here in Bulgaria, seeing young people in most Churches and monasteries is a rare thing ..

Saint Elisabeth's Monastery is the only monastery situated in (very near 19 km away) from MINSK on Vigotskogo 6 str. We reached the monastery by taking bus from regular Minsktrans (state's bus company) city bus nr. 26, other bus and trolley riding there are – bus 18 and trolley 33, 38, 55.
Monastery was established in 1990 after dissolvement of USSR and is situatuated on a place where previously there was no church or a monastery. The SisterHood in monastery is enormous by size and consists nowadays of 7 Churches!!!

St_Elizabeth_Monastery_Monastery_Minsk-picture

The main Church of the Monastery has saint relics from all around the known Orthodox Walls, to venerate all the saint relics you will need at least 20 minutes!! The Holy Relics of the monastery are so much that they remind me very much of Monasteries I've seen on Holy Mounth Athos. The spiritual father of the monastery is father Andreya Lemoshonka.

father-Andreya-Lemeshonka-spiritual-father-of-st-Elizabeth-monastery-Minsk


From ruromrs the sisterhood in monastery consists of about 120 sisters (and even maybe more), some of them are Nuns and others are the so called "Sisters of Mercy" (something like the "White Sisters" moveing in the Roman Catholic Church) – woman who deliberately decided to help the monastery often walking the streets shops and metro stations collecting charity for poor, sick and people in need. Sisters of mercy are something exception and seeing a lady dressed in white robes on the street or metro with a prayer book at hand is something rare to see in today's crazy materialistic world. Some of this kind sisters of mercy are novice nuns in the monastery and others are just worldly woman with family whom the monastery employes on a small renumeration.

Minsk-sister-of-mercy-sestri-miloserdie-Belarus

The cloister is a unique place next to the majestic Church buildings, the monastery has a coffeteria where you can have a coffee / snacks or even a dinner after service, there is a Church shops full of icon and all kind of orthodox spiritual literature,a Christian games for kids (Orthodox Lotto, kids collapsible Churches from cardboards) as well as a food store with fasting and non-fasting food and even a shop for Christian clothing "Православная Одежда". 

orthodox-clothes-shop

Orthodox Clothes Shop near St. Elizabeth's monastery Minsk

st_Elizabeth-monastery_minsk-medovaja_lavka

A Honey Store – St. Elizabeth Monastery Belarus

st_elizabeth_monastery-food-store

Orthodox Foodstore near St. Elizabeth Monastery Misnk

In one of the Churches there is a 3 floor tiny shop first floor sell icons, books and faith related things, monastic souvenirs and on the second floor there is a herbal pharmacy  with healing herbs for almost all kind of physical and nervological disorders etc. Part of monastic life is the evening and morning service which occur everyday in the monastery. The spiritual father of a monastery Andreya Lemoshonka who is a married priest is also leading frequent lectures on faith and is often helping people coming to him for a spiritual advice, a problem or question related to faith. The Nuns are fasting each Monday, Wednesday and Friday – fasting also in Mondays even though this fasting day was only observed in ancient Church and in many Orthodox monasteries, Monday fastings (In veneration of Angels) is no longer observed – i.e. sisterhood life is very strict. Near the monastery is situated a Mental Hospital and one of the duties of nuns is to often visit the mentally sick there. The sisterhood helps orphanage homes and is bringing for Holy sacraments often a lot of sick children.

st_elizabeth-monastery-minsk1

Part of monastery service is sheltering the homeless, alcoholics and drug addicts offering them encouragement and work in the small monastic farm. The monastery has also workshops where people with disability work in making gloves, icons, decorations, souvenirs embroided by hand. Near the monastery there is a wooden shop where one can order all kind of custom crafted wooden wardrobes, chairs or anything wooden you like for your home.

What I saw there make my heart joyful. It seems Minsk Monastery achieved something which is rarely seen in Orthodox world a symbiosis between Faith, charity and a monetary funding model that works
The monastery very much reminded me to an Orthodox movie Forpost and to the Godly initiate in Bulgaria by father Ioan of Novi Khan who by his efforts, Gods help and the charity of hundreds of bulgarian takes care for about 150 homeless orphans in a monastery.


'Forpost' (Outpost) – What the Church Can Accomplish. 

As a closure word I want say Thanks and Glory be to the Holy Trinity The Father, The Son and the Holy Spirit! for blessing me to the pilgrimage journet to St. Elizabeth's monastery!

Web Application Load Balancer types and when to use what kind of Load Balancer

Monday, February 3rd, 2014

General load balancer types description / active / passive / static / dynamic and additional
In this small article I will try to clear it up the general types of Web Server Load Balancers available. Whether one choose a Load Balancer he has the option to use a software LB or a hardware LB one there are plenty of software load balancer scripts out there. In this pos t I will mention just what choice is available in hardware load balancer interface BigIP LTM F5 standard. Generally BigIP LTM Load Balancers can be grouped in Static, Dynamic and Additional. One or more Load Balancers can be configured in front of group or farm of appplication servers. When more than one load balancer is used in front of application Load Balancer could be Active Load Balancer and Passive Load Balancer.
Below information will hopefully be useful to Web and Middleware working sys admins and anybody involved in frequent and large web systems integration.

Static Load Balancing

LB_RoundRobin_ type of load balancing example picture


Round Robin
Load Balancing

This is the default load balancing method. Round Robin mode passes each new connection request to the next server in line, eventually distributing connections evenly across the array of machines being load balanced.
Round Robin mode works well in most configurations, especially if the equipment that you are load balancing is roughly equal in processing speed and memory.

ratio_member_load_balancer picture diagram

Ratio (member) / Ratio (node) Load Balancer

   
The Ratio (member) system distributes connections among pool members or nodes in a static rotation according to ratio weights that you define. In this case, the number of connections that each system receives over time is proportionate to the ratio weight you defined for each pool member or node. You set a ratio weight when you create each pool member or node.

These are static load balancing methods, basing distribution on user-specified ratio weights that are proportional to the capacity of the servers.

dynamic_ratio_member_load_balancer picture diagram

Dynamic Load Balancers


Dynamic Ratio (member) Dynamic Ratio (node) LB

The Dynamic Ratio load balancing select a server based on various aspects of real-time server performance analysis. These methods are similar to the Ratio methods, except that with Dynamic Ratio methods, the ratio weights are system-generated, and the values of the ratio weights are not static. These methods are based on continuous monitoring of the servers, and the ratio weights are therefore continually changing.
   
The Dynamic Ratio LBs are used specifically for load balancing traffic to RealNetworks® RealSystem® Server platforms, Windows® platforms equipped with Windows Management Instrumentation (WMI), or any server equipped with an SNMP agent such as the UC Davis SNMP agent or Windows 2000 Server SNMP agent.

dynamic_load_balancing load balancer diagram picture with circles

Fastest (node) /Fastest (application) LB

   
The Fastest methods select a server based on the least number of current sessions. The following rules apply to the Fastest load balancing methods:

These LB require that you assign both a Layer 7 and a TCP type of profile to the virtual server interface where LB IP is binded.
If a Layer 7 profile is not configured, the virtual server falls back to Least Connections load balancing mode.

Note: If the OneConnect feature is enabled, the Least Connections methods do not include idle connections in the calculations when selecting a pool member or node. The Least Connections balancing use only active connections in their calculations.
   
Fastest node load balancing is useful in environments where nodes are distributed across separate logical networks.


Least Connections (member) / Least Connections (node) LB    

The Least Connections method are relatively simple in that the system passes a new connection to the pool member or node that has the least number of active connections.

Note: If the OneConnect feature is enabled, the Least Connections methods do not include idle connections in the calculations when selecting a pool member or node. The Least Connections methods use only active connections in their calculations.
   
The Least Connections balancing function best in environments where the servers have similar capabilities. Otherwise, some amount of latency can occur.

For example, consider the case where a pool has two servers of differing capacities, A and B. Server A has 95 active connections with a connection limit of 100, while server B has 96 active connections with a much larger connection limit of 500. In this case, the Least Connections method selects server A, the server with the lowest number of active connections, even though the server is close to reaching capacity.

If you have servers with varying capacities, consider using the Weighted Least Connections load balancing instead.


Weighted Least Connections (member) / Weighted Least Connections (node)

Like  Least Connections, these load balancing methods select pool members or nodes based on the number of active connections. However, the Weighted Least Connections methods also base their selections on server capacity.

The Weighted Least Connections (member) method specifies that the system uses the value you specify in Connection Limit to establish a proportional algorithm for each pool member. The system bases the load balancing decision on that proportion and the number of current connections to that pool member. Example is member_a has 40 connections and its connection limit is 200, so it is at 20% of capacity. Similarly, member_b has 40 connections and its connection limit is 400, so it is at 10% of capacity. In this case, the system select selects member_b. This algorithm requires all pool members to have a non-zero connection limit specified.

The Weighted Least Connections (node) method specifies that the system uses the value you specify in the node's Connection Limit setting and the number of current connections to a node to establish a proportional algorithm. This algorithm requires all nodes used by pool members to have a non-zero connection limit specified.

If all servers have equal capacity, these load balancing  behave in the same way as the Least Connections methods.

Note: If the OneConnect feature is enabled, the Weighted Least Connections methods do not include idle connections in the calculations when selecting a pool member or node. The Weighted Least Connections  use only active connections in their calculations.
   

Weighted Least Connections methods work best in environments where the servers have differing capacities.
For example, if two servers have the same number of active connections but one server has more capacity than the other, the BIG-IP system calculates the percentage of capacity being used on each server and uses that percentage in its calculations.


Observed (member) / Observed (node)

With the Observed methods, nodes are ranked based on the number of connections. The Observed methods track the number of Layer 4 connections to each node over time and creates a ratio for load balancing.
   

The need for the Observered methods is rare, and they are not recommended for large pools.

Predictive (member) / Predictive (node)

The Predictive methods use the ranking methods used by the Observed methods, where servers are rated according to the number of current connections. However, with the Predictive methods, the BIG-IP system analyzes the trend of the ranking over time, determining whether a nodes performance is currently improving or declining. The servers with performance rankings that are currently improving, rather than declining, receive a higher proportion of the connections.
   

The need for the Predictive methods is rare, and they are not recommend for large pools.

Least Sessions LB type

The Least Sessions method selects the server that currently has the least number of entries in the persistence table. Use of this load balancing method requires that the virtual server reference a type of profile that tracks persistence connections, such as the Source Address Affinity or Universal profile type.

Note: The Least Sessions methods are incompatible with cookie persistence.
   
The Least Sessions method works best in environments where the servers or other equipment that you are load balancing have similar capabilities.


L3 Address

L3 Address is same LB type as Least Connections methods.
  

Web and Middleware JBoss Training at Hewlett Packard – Intro to JBoss JAVA application server

Thursday, November 21st, 2013

jboss application server logo- serve java servlet pages on Linux and Windows

I and my TEAM Web and Middleware Implementation Team @Hewlett Packard are assigned an online training to follow on topic of JBoss Application server.It is my first online training of this kind where a number of people are streamed a video from a trainer who explains in real time concepts of JBossA Community Drive open source middleware (Application Server), since some time JBoss is known under a new name (WildFly).

Wildfly new name of jboss application java servlet server

In short what is JBoss? – It is an application server similar to Apache Tomcat  -an open source software implementation of the Java Servlet and JavaServer Pages technologies.

Apache Tomcat java servlet application server logo

In case you wonder about what is Middleware it is a buzzword well established in Corporate world referring to all kind of servers in the middle between Servers on pure OS and hardware Level and end client. Middleware includes all kind of Web and Application servers like Apache, JBoss, Tomcat, Adobe's WebLogic Webserver, IBM WebSphere application server etc..

What this means is JBOSS is very similar to Tomcat but it is designed to run interpret through (Java Virtual Machine), higher scale of Java Applications and then return content to a a web browser. In other words if you need to have a Webserver with support for Java VM. JBoss is one of the open source technologies available which can be a substitute for Tomcat. In Fact Jboss itself started as a fork of Tomcat and n owadays, Jboss has an implementation of Tomcat embedded into itself. Jboss is mainly developed and supported by Redhat. It has 3 major releases used in IT Companies. Jboss 5, JBoss 6 and JBoss 7. In most production server systems running some kind of Java servlets currently still Jboss ver. 5 and Jboss v. 6 is used. Just like Tomcat, the server is messy in its structure. But if we have to compare Tomcat with Jboss then JBoss is at least 100 times more messy and hard to configure tune than Tomcat. Actually after getting to know JBoss 6 I would not advice anyone to use this Application server. Its too complex and all configuration and performance tuning is done through hundred of XML so it is like a hell for the usual System Administrator who likes clearness and simplicity. JBoss has a Web configuration interface which in version 7 is a bit advanced and easier to configure and get to know the server compared to previous versions. But same web interface for older releases is lousy and not nice. Just like Tomcat, JBoss supports clustering, here is full list of all features it supports:

  • Full clustering support for both traditional J2EE applications and EJB 3.0 POJO applications
  • Automatic discovery. Nodes in cluster find each other with no additional configuration.
  • Cluster-wide replicated JNDI context
  • Failover and load-balancing for JNDI, RMI and all EJB types
  • Stateful Session Bean state replication
  • HTTP Session replication
  • High Availability JMS
  • Farming. Distributed deployment of JBoss components. Deploying on one node deploys on all nodes.
     

Looks like JBoss is among the few Application Servers supporting deployment of Java JSP, WAR Archive files, SAR Archives, JMS (Java Message Service), JNDI (Java Naming and Directory Interface). Jboss supports load balancing between clustered nodes, supports SOAP, Java servlet faces and Java MQ (Messaging Queue). JBoss can be installed on GNU / Linux, FreeBSD and Windows. So far from what I've learned for JBOSS I prefer not to use it and don't recommend this Application server to anyone. Its too complex and doesn't worth the effort to learn. Proprietary products like WebLogic and Webspehere are in light years better.