Posts Tagged ‘linux host’

Mail send from command line on Linux and *BSD servers – useful for scripting

Monday, September 10th, 2018

mail-send-email-from-command-line-on-linux-and-freebsd-operating-systems-logo

Historically Email sending has been very different from what most people use it in the Office, there was no heavy Email clients such as Outlook Express no MX Exchange, no e-mail client capabilities for Calendar and Meetings schedule as it is in most of the modern corporate offices that depend on products such as Office 365 (I would call it a connectedHell 365 days a year !).

There was no free webmail and pop3 / imap providers such as Mail.Yahoo.com, Gmail.com, Hotmail.com, Yandex.com, RediffMail, Mail.com the innumerous lists goes and on.
Nope back in the day emails were doing what they were originally supposed to like the post services in real life simply send and receive messages.

For those who remember that charming times, people used to be using BBS-es (which were basicly a shared set-up home system as a server) or some of the few University Internal Email student accounts or by crazy sysadmins who received their notification and warnings logs about daemon (services) messages via local DMZ-ed network email servers and it was common to read the email directly with mail (mailx) text command or custom written scripts … It was not uncommon also that mailx was used heavily to send notification messages on triggered events from logs. Oh life was simple and clear back then, and even though today the email could be used in a similar fashion by hard-core old school sysadmins and Dev Ops / simple shell scriptings tasks or report cron jobs such usage is already in the deep history.

The number of ways one could send email in text format directly from the GNU / Linux / *BSD server to another remote mail MTA node (assuming it had properly configured Relay server be it Exim or Postifix) were plenty.

In this article I will try to rewind back some of the UNIX history by pinpointing a few of the most common ways, one used to send quick emails directly from a remote server connection terminal or lets say a cheap VPS few cents server, through something like (SSH or Telnet) etc.
 

1. Using the mail command client (part of bsd-mailx on Debian).
 

In my previous article Linux: "bash mail command not found" error fix
I ended the article with a short explanation on how this is done but I will repeat myself one more time here for the sake of clearness of this article.

root@linux:~# echo "Your Sample Message Body" | mail -s "Whatever … Message Subject" remote_receiver@remote-server-email-address.com


The mail command will connect to local server TCP PORT 25 on local configured MTA and send via it. If the local MTA is misconfigured or it doesn't have a proper MX / PTR DNS records etc. or not configure as a relay SMTP remote mail will not get delivered. Sent Email should be properly delivered at remote recipient address.

How to send HTML formatted emails using mailx command on Linux console / terminal shell using remote server through SSH ?

Connect to remote SSH server (VPS), dedicated server, home Linux router etc. and run:


root@linux:~# mailx -a 'Content-Type: text/html'
      -s "This is advanced mailx indeed!" < email_content.html
      "first_email_to_send_to@gmail.com, mail_recipient_2@yahoo.com"


email_content.html should be properly formatted (at best w3c standard compliant) HTML.

Here is an example email_content.html (skeleton file)


    To: your_customer@gmail.com
    Subject: This is an HTML message
    From: marketing@your_company.com
    Content-Type: text/html; charset="utf8"

    <html>
    <body>
    <div style="
        background-color:
        #abcdef; width: 300px;
        height: 300px;
        ">
    </div>
Whatever text mixed with valid email HTML tags here.
    </body>
    </html>


Above command sends to two email addresses however if you have a text formatted list of recipients you can easily use that file with a bash shell script for loop and send to multiple addresses red from lets say email_addresses_list.txt .

To further advance the one liner you can also want to provide an email attachment, lets say the file email_archive.rar by using the -A email_archive.rar argument.


root@linux:~# mailx -a 'Content-Type: text/html'
      -s "This is advanced mailx indeed!" -A ~/email_archive.rar < email_content.html
      "first_email_to_send_to@gmail.com, mail_recipient_2@yahoo.com"


For those familiar with Dan Bernstein's Qmail MTA (which even though a bit obsolete is still a Security and Stability Beast across email servers) – mailx command had to be substituted with a custom qmail one in order to be capable to send via qmail MTA daemon.
 

2. Using sendmail command to send email
 

Do you remember that heavy hard to configure MTA monster sendmail ? It was and until this very day is the default Mail Transport Agent for Slackware Linux.

Here is how we were supposed to send mail with it:


[root@sendmail-host ~]# vim email_content_to_be_delivered.txt


Content of file should be something like:

Subject: This Email is sent from UNIX Terminal Email

Hi this Email was typed in a file and send via sendmail console email client
(part of the sendmail mail server)

It is really fun to go back in the pre-history of Mail Content creation 🙂


[root@sendmail-host ~]# sendmail -v user_name@remote-mail-domain.com  < /tmp/email_content_to_be_delivered.txt


-v argument provided, will make the communication between the mail server and your mail transfer agent visible.
 

3. Using ssmtp command to send mail
 

ssmtp MTA and its included shell command was used historically as it was pretty straight forward you just launch it on the command line type on one line all your email and subject and ship it (by pressing the CTRL + D key combination).

To give it a try you can do:


root@linux:~# apt-get install ssmtp
Reading package lists… Done
Building dependency tree       
Reading state information… Done
The following additional packages will be installed:
  libgnutls-openssl27
The following packages will be REMOVED:
  exim4-base exim4-config exim4-daemon-heavy
The following NEW packages will be installed:
  libgnutls-openssl27 ssmtp
0 upgraded, 2 newly installed, 3 to remove and 1 not upgraded.
Need to get 239 kB of archives.
After this operation, 3,697 kB disk space will be freed.
Do you want to continue? [Y/n] Y
Get:1 http://ftp.us.debian.org/debian stretch/main amd64 ssmtp amd64 2.64-8+b2 [54.2 kB]
Get:2 http://ftp.us.debian.org/debian stretch/main amd64 libgnutls-openssl27 amd64 3.5.8-5+deb9u3 [184 kB]
Fetched 239 kB in 2s (88.5 kB/s)         
Preconfiguring packages …
dpkg: exim4-daemon-heavy: dependency problems, but removing anyway as you requested:
 mailutils depends on default-mta | mail-transport-agent; however:
  Package default-mta is not installed.
  Package mail-transport-agent is not installed.
  Package exim4-daemon-heavy which provides mail-transport-agent is to be removed.


(Reading database … 169307 files and directories currently installed.)
Removing exim4-daemon-heavy (4.89-2+deb9u3) …
dpkg: exim4-config: dependency problems, but removing anyway as you requested:
 exim4-base depends on exim4-config (>= 4.82) | exim4-config-2; however:
  Package exim4-config is to be removed.
  Package exim4-config-2 is not installed.
  Package exim4-config which provides exim4-config-2 is to be removed.
 exim4-base depends on exim4-config (>= 4.82) | exim4-config-2; however:
  Package exim4-config is to be removed.
  Package exim4-config-2 is not installed.
  Package exim4-config which provides exim4-config-2 is to be removed.

Removing exim4-config (4.89-2+deb9u3) …
Selecting previously unselected package ssmtp.
(Reading database … 169247 files and directories currently installed.)
Preparing to unpack …/ssmtp_2.64-8+b2_amd64.deb …
Unpacking ssmtp (2.64-8+b2) …
(Reading database … 169268 files and directories currently installed.)
Removing exim4-base (4.89-2+deb9u3) …
Selecting previously unselected package libgnutls-openssl27:amd64.
(Reading database … 169195 files and directories currently installed.)
Preparing to unpack …/libgnutls-openssl27_3.5.8-5+deb9u3_amd64.deb …
Unpacking libgnutls-openssl27:amd64 (3.5.8-5+deb9u3) …
Processing triggers for libc-bin (2.24-11+deb9u3) …
Setting up libgnutls-openssl27:amd64 (3.5.8-5+deb9u3) …
Setting up ssmtp (2.64-8+b2) …
Processing triggers for man-db (2.7.6.1-2) …
Processing triggers for libc-bin (2.24-11+deb9u3) …


As you see from above output local default Debian Linux Exim is removed …

Lets send a simple test email …


hipo@linux:~# ssmtp user@remote-mail-server.com
Subject: Simply Test SSMTP Email
This Email was send just as a test using SSMTP obscure client
via SMTP server.
^d


What is notable about ssmtp is that even though so obsolete today it supports of STARTTLS (email communication encryption) that is done via its config file


/etc/ssmtp/ssmtp.conf


4. Send Email from terminal using Mutt client
 

Mutt was and still is one of the swiff army of most used console text email clients along with Alpine and Fetchmail to know more about it read here

Mutt supports reading / sending mail from multiple mailboxes and capable of reading IMAP and POP3 mail fetch protocols and was a serious step forward over mailx. Its syntax pretty much resembles mailx cmds.


root@linux:~# mutt -s "Test Email" user@example.com < /dev/null


Send email including attachment a 15 megabytes MySQL backup of Squirrel Webmail


root@linux:~# mutt  -s "This is last backup small sized database" -a /home/backups/backup_db.sql user@remote-mail-server.com < /dev/null


5. Using simple telnet to test and send email (verify existence of email on remote SMTP)
 

As a Mail Server SysAdmin this is one of my best ways to test whether I had a server properly configured and even sometimes for the sake of fun I used it as a hack to send my mail 🙂
telnet is and will always be a great tool for doing SMTP issues troubleshooting.
 

It is very useful to test whether a remote SMTP TCP port 25 is opened or a local / remote server firewall prevents connections to MTA.

Below is an example connect and send example using telnet to my local SMTP on www.pc-freak.net (QMail powered (R) 🙂 )

sending-email-using-telnet-command-howto-screenshot


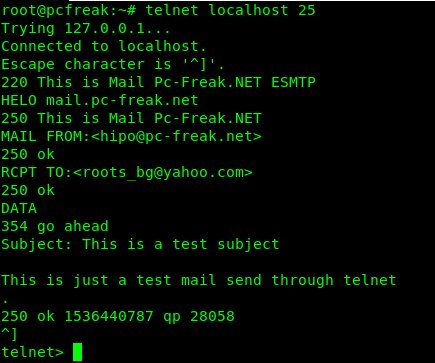
root@pcfreak:~# telnet localhost 25
Trying 127.0.0.1…
Connected to localhost.
Escape character is '^]'.
220 This is Mail Pc-Freak.NET ESMTP
HELO mail.www.pc-freak.net
250 This is Mail Pc-Freak.NET
MAIL FROM:<hipo@www.pc-freak.net>
250 ok
RCPT TO:<roots_bg@yahoo.com>
250 ok
DATA
354 go ahead
Subject: This is a test subject


This is just a test mail send through telnet
.
250 ok 1536440787 qp 28058
^]
telnet>


Note that the returned messages are native to qmail, a postfix would return a slightly different content, here is another test example to remote SMTP running sendmail or postfix.


root@pcfreak:~# telnet mail.servername.com 25
Trying 127.0.0.1…
Connected to localhost.localdomain (127.0.0.1).
Escape character is '^]'.
220 mail.servername.com ESMTP Sendmail 8.13.8/8.13.8; Tue, 22 Oct 2013 05:05:59 -0400
HELO yahoo.com
250 mail.servername.com Hello mail.servername.com [127.0.0.1], pleased to meet you
mail from: systemexec@gmail.com
250 2.1.0 hipo@www.pc-freak.net… Sender ok
rcpt to: hip0d@yandex.ru
250 2.1.5 hip0d@yandex.ru… Recipient ok
data
354 Enter mail, end with "." on a line by itself
Hey
This is test email only


Thanks
.
250 2.0.0 r9M95xgc014513 Message accepted for delivery
quit
221 2.0.0 mail.servername.com closing connection
Connection closed by foreign host.


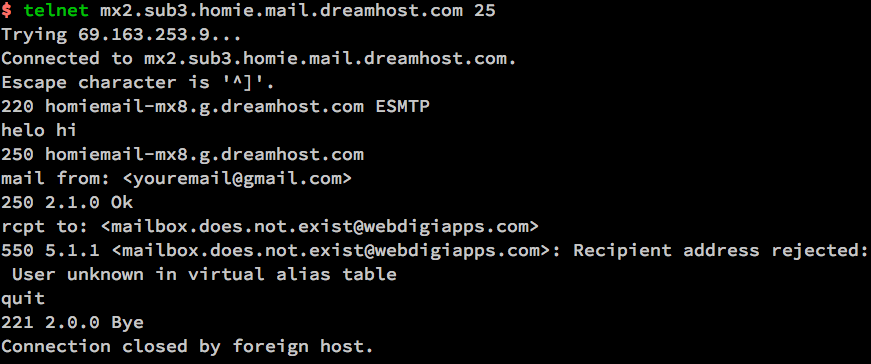
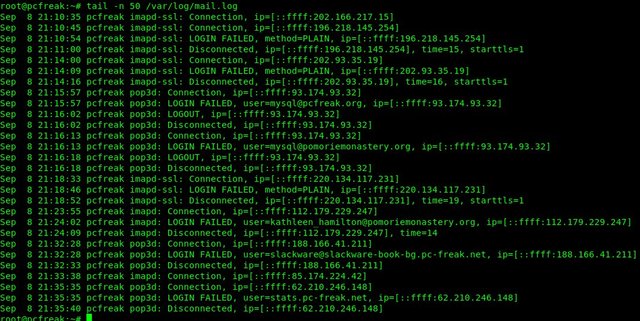
It is handy if you want to know whether remote MTA server has a certain Emailbox existing or not with telnet by simply trying to send to a certian email and checking the Email server returned output (note that the message returned depends on the remote MTA version and many qmails are configured to not give information on the initial SMTP handshake but returns instead a MAILER DAEMON failure error sent back to your sender address. Some MX servrers are still vulnerable to this attack yet, historically dreamhost.com. Below attack screenshot is made at the times before dreamhost.com fixed the brute force email issue.

Terminal-Verify-existing-Email-with-telnet

6. Using simple netcat TCP/IP Swiss Army Knife to test and send email in console

netcat-logo-a-swiff-army-knife-of-the-hacker-and-security-expert-logo
Other tool besides telnet of testing remote / local SMTP is netcat tool (for reading and writting data across TCP and UDP connections).

The way to do it is analogous but since netcat is not present on most Linux OSes by default you need to install it through the package manager first be it apt or yum etc.

# apt-get –yes install netcat


First lets create a new file test_email_content.txt using bash's echo cmd.


# echo 'EHLO hostname
MAIL FROM: hip0d@yandex.ru
RCPT TO:   solutions@www.pc-freak.net
DATA
From: A tester <hip0d@yandex.ru>
To:   <solutions@www.pc-freak.net>
Date: date
Subject: A test message from test hostname


Delete me, please
.
QUIT
' >>test_email_content.txt


# netcat -C localhost 25 < test_email_content.txt


220 This is Mail Pc-Freak.NET ESMTP
250-This is Mail Pc-Freak.NET
250-STARTTLS
250-SIZE 80000000
250-PIPELINING
250 8BITMIME
250 ok
250 ok
354 go ahead
451 See http://pobox.com/~djb/docs/smtplf.html.

Because of its simplicity and the fact it has a bit more capabilities in reading / writing data over network it was no surprise it was among the favorite tools not only of crackers and penetration testers but also a precious debug tool for the avarage sysadmin. netcat's advantage over telnet is you can push-pull over the remote SMTP port (25) a non-interactive input.


7. Using openssl to connect and send email via encrypted channel


root@linux:~# openssl s_client -connect smtp.gmail.com:465 -crlf -ign_eof

    ===
               Certificate negotiation output from openssl command goes here
        ===

        220 smtp.gmail.com ESMTP j92sm925556edd.81 – gsmtp
            EHLO localhost
        250-smtp.gmail.com at your service, [78.139.22.28]
        250-SIZE 35882577
        250-8BITMIME
        250-AUTH LOGIN PLAIN XOAUTH2 PLAIN-CLIENTTOKEN OAUTHBEARER XOAUTH
        250-ENHANCEDSTATUSCODES
        250-PIPELINING
        250-CHUNKING
        250 SMTPUTF8
            AUTH PLAIN *passwordhash*
        235 2.7.0 Accepted
            MAIL FROM: <hipo@pcfreak.org>
        250 2.1.0 OK j92sm925556edd.81 – gsmtp
            rcpt to: <systemexec@gmail.com>
        250 2.1.5 OK j92sm925556edd.81 – gsmtp
            DATA
        354  Go ahead j92sm925556edd.81 – gsmtp
            Subject: This is openssl mailing

            Hello nice user
            .
        250 2.0.0 OK 1339757532 m46sm11546481eeh.9
            quit
        221 2.0.0 closing connection m46sm11546481eeh.9
        read:errno=0


8. Using CURL (URL transfer) tool to send SSL / TLS secured crypted channel emails via Gmail / Yahoo servers and MailGun Mail send API service


Using curl webpage downloading advanced tool for managing email send might be  a shocking news to many as it is idea is to just transfer data from a server.
curl is mostly used in conjunction with PHP website scripts for the reason it has a Native PHP implementation and many PHP based websites widely use it for download / upload of user data.
Interestingly besides support for HTTP and FTP it has support for POP3 and SMTP email protocols as well
If you don't have it installed on your server and you want to give it a try, install it first with apt:
 

root@linux:~# apt-get install curl


To learn more about curl capabilities make sure you check cURL –manual arg.
 

root@linux:~# curl –manual


a) Sending Emails via Gmail and other Mail Public services

Curl is capable to send emails from terminal using Gmail and Yahoo Mail services, if you want to give that a try.

gmail-settings-google-allow-less-secure-apps-sign-in-to-google-screenshot

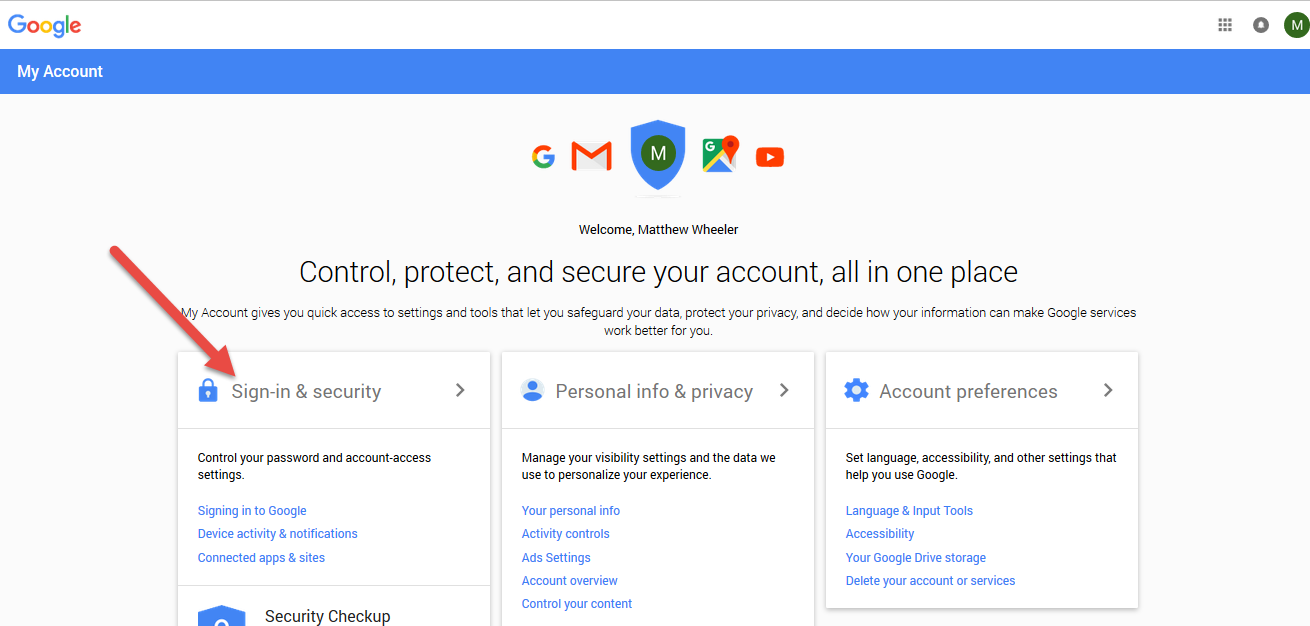
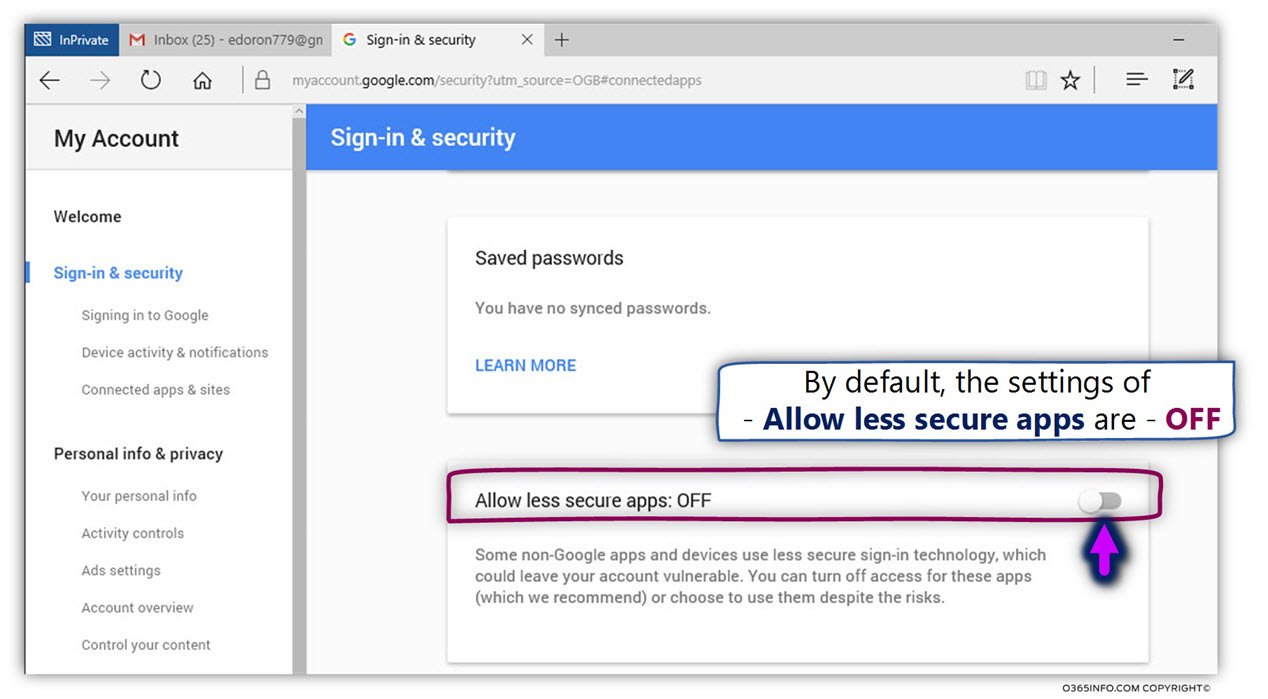
Go to myaccount.google.com URL and login from the web interface choose Sign in And Security choose Allow less Secure Apps to be -> ON and turn on access for less secure apps in Gmail. Though I have not tested it myself so far with Yahoo! Mail, I suppose it should have a similar security settings somewhere.

Here is how to use curl to send email via Gmail.

Gmail-password-Allow-less-secure-apps-ON-screenshot-howto-to-be-able-to-send-email-with-text-commands-with-encryption-and-outlook


root@linux:~# curl –url 'smtps://smtp.gmail.com:465' –ssl-reqd \
  –mail-from 'your_email@gmail.com' –mail-rcpt 'remote_recipient@mail.com' \
  –upload-file mail.txt –user 'your_email@gmail.com:your_accout_password'


b) Sending Emails using Mailgun.com (Transactional Email Service API for developers)

To use Mailgun to script sending automated emails go to Mailgun.com and create account and generate new API key.

Then use curl in a similar way like below example:


curl -sv –user 'api:key-7e55d003b…f79accd31a' \
    https://api.mailgun.net/v3/sandbox21a78f824…3eb160ebc79.mailgun.org/messages \
    -F from='Excited User <developer@yourcompany.com>' \
    -F to=sandbox21a78f824…3eb160ebc79.mailgun.org \
    -F to=user_acc@gmail.com \
    -F subject='Hello' \
    -F text='Testing Mailgun service!' \
   –form-string html='<h1>EDMdesigner Blog</h1><br /><cite>This tutorial helps me understand email sending from Linux console</cite>' \
    -F attachment=@logo_picture.jpg


The -F option that is heavy present in above command lets curl (Emulate a form filled in button in which user has pressed the submit button).
For more info of the options check out man curl.


9. Using swaks command to send emails from


root@linux:~# apt-cache show swaks|grep "Description" -B 10
Package: swaks
Version: 20170101.0-1
Installed-Size: 221
Maintainer: Andreas Metzler <ametzler@debian.org>
Architecture: all
Depends: perl
Recommends: libnet-dns-perl, libnet-ssleay-perl
Suggests: perl-doc, libauthen-sasl-perl, libauthen-ntlm-perl
Description-en: SMTP command-line test tool
 swaks (Swiss Army Knife SMTP) is a command-line tool written in Perl
 for testing SMTP setups; it supports STARTTLS and SMTP AUTH (PLAIN,
 LOGIN, CRAM-MD5, SPA, and DIGEST-MD5). swaks allows one to stop the
 SMTP dialog at any stage, e.g to check RCPT TO: without actually
 sending a mail.
 .
 If you are spending too much time iterating "telnet foo.example 25"
 swaks is for you.
Description-md5: f44c6c864f0f0cb3896aa932ce2bdaa8


root@linux:~# apt-get instal –yes swaks

root@linux:~# swaks –to mailbox@example.com -s smtp.gmail.com:587
      -tls -au <user-account> -ap <account-password>


The -tls argument (in order to use gmail encrypted TLS channel on port 587)

If you want to hide the password not to provide the password from command line so (in order not to log it to user history) add the -a options.

10. Using qmail-inject on Qmail mail servers to send simple emails

Create new file with content like:
 

root@qmail:~# vim email_file_content.text
To: user@mail-example.com
Subject: Test


This is a test message.
 

root@qmail:~# cat email_file_content.text | /var/qmail/bin/qmail-inject


qmail-inject is part of ordinary qmail installation so it is very simple it even doesn't return error codes it just ships what ever given as content to remote MTA.
If the linux host where you invoke it has a properly configured qmail installation the email will get immediately delivered. The advantage of qmail-inject over the other ones is it is really lightweight and will deliver the simple message more quickly than the the prior heavy tools but again it is more a Mail Delivery Agent (MDA) for quick debugging, if MTA is not working, than for daily email writting.

It is very useful to simply test whether email send works properly without sending any email content by (I used qmail-inject to test local email delivery works like so).
 

root@linux:~# echo 'To: mailbox_acc@mail-server.com' | /var/qmail/bin/qmail-inject


11. Debugging why Email send with text tool is not being send properly to remote recipient

If you use some of the above described methods and email is not delivered to remote recipient email addresses check /var/log/mail.log (for a general email log and postfix MTAs – the log is present on many of the Linux distributions) and /var/log/messages or /var/log/qmal (on Qmail installations) /var/log/exim4 (on servers running Exim as MTA).

https://www.pc-freak.net/images/linux-email-log-debug-var-log-mail-output

 Closure

The ways to send email via Linux terminal are properly innumerous as there are plenty of scripted tools in various programming languages, I am sure in this article,  also missing a lot of pre-bundled installable distro packages. If you know other interesting ways / tools to send via terminal I would like to hear it.

Hope you enjoyed, happy mailing !

How to configure Exim to relay mail to remote SMTP server on Debian and Ubuntu

Wednesday, August 24th, 2011

I’m required to do some mail relaying on a Debian Linux host which should use a remote mail server to relay its mails.
Until so far I’ve had not much experience with exim as I prefer using qmail, whever a mail server is needed. However since now only a relaying was necessery and exim is the default installed MTA on Debian, I’ve decided to use exim to take care of the SMTP mail relaying.
After a bit of reading it happened configuring exim to relay via remote SMTP server is more than easy!

All I had to do is run the command:

debian-relay:~# dpkg-reconfigure exim4-config

Next in the Ncruses interface to appear:

Debian Exim relay smtp config screenshot

I had to choose the option:

mail sent by smarthost; no local mail

Next a dialog appears asking for:
System mail name:
Therein it’s necessery to type in the hostname of the remote SMTP to be used for mail relay.
Next dialog asks for:
IP-addresses to listen on for incoming SMTP connections:
and I left it with 127.0.0.1 however if exim is supposed to be visible from external network one might decide to put in real IP address there.

Pressing OK leads to the next dialog:
 Other destinations for which mail is accepted: 
I decided to leave this blank as I don’t want to accept mail for any destinations.
Next pane reads:
Visible domain name for local users:
I’ve typed inside my smtp relay server e.g.:
smtp.myrelaymail.com

Further comes:
IP address or host name of the outgoing smarthost:
There once again I typed my mail relay host smtp.relaymail.com

The next config screen is:
Keep number of DNS-queries minimal (Dial-on-Demand)?
On any modern Linux host the default answer of No is fine.
Following prompt asked if I want to:
Split configuration into small files?
I’ve decided not to tamper with it and choosed No
Afterwards mail relaying works like a charm thx God 😉

Adding Teamviewer to auto start on Linux GNOME login

Friday, February 1st, 2013

Administrating Linux via graphical interface is not common, however sometimes it is necessery. There are plenty of ways to remotely administrate with GUI Linux. You can connect to remote Xserver and launch X session via xinit, connect via (Gnome Display Manager) GDM, use nomachine NX server / client (if you're on slow connection line) or use the good old Teamviewer.

As Teamviewer works pretty well on both Windows and Linux in last times I like using teamviewer as a standard. It is freeware and it often disconnects with the annoying Trial message, but in general for managing something quick on remote desktop it is nice.

To use teamviewer, you need to have it installed on the Linux host via deb or rpm:

Whether on Debian / Ubuntu use:


# wget http://www.teamviewer.com/download/version_8x/teamviewer_linux_x64.deb
.....
# dpkg -i teamviewer_linux_x64.deb
...
....


On Fedora, CentOS, RHEL run:

# wget -q http://www.teamviewer.com/download/teamviewer_linux.rpm
# rpm -Uvh teamviewer_linux.rpm
.....

Once package is installed teamviewer is installed in /opt/teamviewer/* there is a tiny wrapper run script in /usr/bin/teamviewer – evoking TeamViewer to be run via wine emulation.

Hence to make TeamViewer start on certain user GNOME login the script has to run on GNOME user login session.
In both GNOME 2 and GNOME 3 what is run on user login is managed through gnome-session-properties thus /usr/bin/teamviewer has to be set to run through gnome-session-properties (to run it press ALT+F2 or type it directly in gnome-terminal)

user@linux:~$ gnome-session-properties

A window like in below screenshot pops up and from there Add TeamViewer.

Adding Teamviewer to auto start on Linux Debian Fedora CentOS GNOME non privileged user

To be able to later connect via a Remote host with another TeamViewer peer launch TeamViewer and configure permanent password through menus:

Extras -> Options -> Security

teamviewer extras options security configuring teamviewier permanent password for ID

All left is to write down your Teamviewer Remote Connect ID and permanent set password

Teamviewer remote connect ID screnshot Linux

After next succesful GNOME login teamviewer will just pop-up. Enjoy

How to make wicd systray to appear in GNOME on Ubuntu 11.10 / How to fix missing wicd network manager systray on Ubuntu

Monday, November 7th, 2011

After upgrading my sis’s notebook from Ubuntu 11.04 to Ubuntu 11.10 on her Acer Aspire 5736Z the default gnome wireless network manager started behaving oddly.
The Network Manager did not show any networks, even though the network drivers showed that are loaded properly on the Linux host and using the normal commands like iwlist or iwconfig I could list and see the networks and even connect to a network.

As my sister is not a console geek like me it was necessery of course to have an easy way to connect herself to the Internet with nice GUI application. I personally love WICD Network Manager and as the default gnome manager was misbehaving I immediately installed her wicd.
With wicd , the wireless networks were properly listed and there was no connection issues to the wireless networks, however the wicd system tray was missing and hence everytime she wanted to connect to a wireless network, she had to keep wicd-client running active in the Dock or run it manually every time on connect, when she had to change her physical location and connect to another wireless network.
This of course is quite unhandy and gives her a bad image of Linux and I definitely want to make her love free software and GNU / Linux. Thus I want to give her a GNU / Linux she will be easy to use.

To make her more satisfied with her Ubuntu I googled around to see what causes the wicd systray to be missing after some research online I found out, its probably due to either wicd bug or some kind of interface changes in unity newer versions of Ubuntu. Some people online suggested a fix via changing values in gconf-editor but this work around by changing the values in gconf-editor:

'desktop' -> 'unity' -> 'panel'

I tried this suggested fix which was reported to work on Ubuntu 11.04 but the gconf registry suggested pathway was missing at all so this solution did not worked.

I further read some other suggested solution using wicd-client by invoking it with two args like so:

stanimira@ubuntu:~$ wicd-client -n &
...stanimira@ubuntu:~$ wicd-client -a &

This proposed solution did not worked either, then I found in one of the Ubuntu bugs reports, a little shell script (add-wicd-to-whitelist.sh) that changes some values in gconf so I proceeded downloaded and give it a try:

stanimira@ubuntu:~$ wget https://www.pc-freak.net/files/add-wicd-to-whitelist.sh
...
stanimira@ubuntu:~$ sh add-wicd-to-whitelist.sh
...

For my surprise running the script doesn’t immediately changed nothing and wicd wireless connectivity indicator was still missing from the tray.
I thought it might need to reload gnome so I give it a restart and HOORAY! after the restart the WICD connected wireless strength show up, like you can see in the screenshot below 😉

Wicd indicator running in systray on GNOME in Ubuntu 11.10

Now hope this fix will, help out there experiencing the same issues to work around his wireless network connectivity issues 😉 Cheers.

How to change mail sent from in Nagios on Debian GNU/Linux 6

Wednesday, August 24th, 2011

I’ve been playing with configuring a new nagios running on a Linux host which’s aim is to monitor few Windows servers.
The Linux host’s exim is configured to act as relay host to another SMTP server, so all email ending up in the Linux localhost on port 25 is forwarded to the remote SMTP.

The remote smtp only allows the Linux to send email only in case if a real existing username@theserverhostname.com is passed it, otherwise it rejects mail and does not sent properly the email.
As the newly configured Nagios installatio is supposed to do e-mail notification, I was looking for a way to change the default user with which Nagios sends mails, which is inherited directly after the username with which /usr/sbin/nagios3 and /usr/sbin/nrpe are running (on Debian this is nagios@theserverhostname.com).

Thanksfully, there is a work around, I’ve red some forum threads explaning that the username with whch nagios sends mail can be easily changed from /etc/nagios3/commands.cfg by passing the -a “From: custom_user@myserverhostname.com” to all occurance of /usr/bin/mail -s , its preferrable that the -a custom_user@myserverhostname.com is inserted before the -s “” subject option. Hence the occurance of mail command should be changed from:

| /usr/bin/mail -s "** $NOTIFICATIONTYPE$

To:

| /usr/bin/mail -a "From: custom_user@theserverhostname.com" -s "** $NOTIFICATIONTYPE$

Now to read it’s new configurations nagios requirs restart:

debian:~# /etc/init.d/nagios3 restart
...

Now in case of failed services or Hosts Down nagios will send it’s mail from the custom user custom_user@theserverhostname.com and nagios can can send mail properly via the remote relay SMTP host 😉

How to solve qmail /usr/local/bin/tcpserver: libc.so.6: failed to map segment from shared object: Cannot allocate memory

Saturday, April 30th, 2011

If you’re building (compiling) a new qmail server on some Linux host and after properly installing the qmail binaries and daemontools, suddenly you notice in readproctitle service errors: or somewhere in in qmail logs for instance in/var/log/qmail/current the error:

/usr/local/bin/tcpserver: error while loading shared libraries:
libc.so.6: failed to map segment from shared object: Cannot allocate memory

then you have hit a bug caused by insufficient memory assigned for tcpserver in your /var/qmail/supervise/qmail-smtpd/run daemontools qmail-smtpd initialize script:

This kind of issue is quite common especially on hardware architectures that are 64 bit and on Linux installations that are amd65 (x86_64) e.g. run 64 bit version of Linux.

It relates to the 64 bit architecture different memory distribution and thus as I said to solve requires increase in memory softlimit specified in the run script an example good qmail-smtpd run script configuration which fixed the libc.so.6: failed to map segment from shared object: Cannot allocate memory I use currently is as follows:

#!/bin/shQMAILDUID=`id -u vpopmail`NOFILESGID=`id -g vpopmail`MAXSMTPD=`cat /var/qmail/control/concurrencyincoming`# softlimit changed from 8000000exec /usr/local/bin/softlimit -m 32000000 /usr/local/bin/tcpserver -v -H -R -l 0 -x /home/vpopmail/etc/tcp.smtp.cdb -c "$MAXSMTPD"
-u "$QMAILDUID" -g "$NOFILESGID" 0 smtp
/var/qmail/bin/qmail-smtpd
/home/vpopmail/bin/vchkpw /bin/true 2>&1

The default value which was for softlimit was:

exec /usr/local/bin/softlimit -m 8000000

A good softlimit raise up values which in most cases were solving the issue for me are:

exec /usr/local/bin/softlimit -m 3000000

or exec /usr/local/bin/softlimit -m 4000000

The above example run configuration fixed the issue on a amd64 debian 5.0 lenny install, the server hardware was:

CPU: Intel(R) Core(TM)2 Duo CPU @ 2.93GHz
System Memory: 4GB
HDD Disk space: 240GB

The softlimit configuration which I had to setup on another server with system parameters:

Intel(R) Core(TM) i7 CPU (8 CPUS) @ 2.80GHz
System Memory: 8GB
HDD Disk Space: 1.4Terabytes

is as follows:

#!/bin/sh
QMAILDUID=`id -u vpopmail`
NOFILESGID=`id -g vpopmail`
MAXSMTPD=`cat /var/qmail/control/concurrencyincoming`
exec /usr/bin/softlimit -m 64000000
/usr/local/bin/tcpserver -v -H -R -l 0
-x /home/vpopmail/etc/tcp.smtp.cdb -c "$MAXSMTPD"
-u "$QMAILDUID" -g "$NOFILESGID" 0 smtp
/var/qmail/bin/qmail-smtpd
/home/vpopmail/bin/vchkpw /bin/true 2>&1

If none of the two configurations pointed out in the post works, for you just try to manually set up the exec /usr/bin/softlimit -m to some high value.

To assure that the newly set value is not producing the same error you will have to, reload completely the daemontools proc monitor system.
To do so open /etc/inittab comment out the line:

SV:123456:respawn:/command/svscanboot
to
#SV:123456:respawn:/command/svscanboot

Save again /etc/inittab and issue te cmd:

linux:~# init q

Now again open /etc/inittab and uncomment the commented line:

#SV:123456:respawn:/command/svscanboot to
SV:123456:respawn:/command/svscanboot

Lastly reload the inittab script once again with command:

linux:~# init q

To check if the error has disappeared check the readproctitle process, like so:

linux:~# ps ax|grep -i readproctitle

The command output should produce something like:

3070 ? S 0:00 readproctitle service errors: .......................................

Hope that helps.

Universal way to configure a static IP address on ethernet lan (eth0) interface in Linux

Friday, April 29th, 2011

One of the most precious commands I ever learned to use in Linux is ifconfig and route .

They have saved my life in configuring the static IP based internet of numerous Desktop Linux computers & notebooks.

Though the usage is very much known by most of the people who are into Linux, I believe it’s likely that the newer people who entered the world of Linux or some Unix system administrators are still lacking the knowledge on how to manually configure their eth0 lan card, thus I thought it might be handy for someone to share it, I know that for most unix users & admins especially the advanced ones this post might be funny, so if you’re an advanced administrator just skip the post and don’t laught at it 😉

Now the universal commands (works on each and every Linux host) to configure manually static IP internet connection on Linux are:

linux:~# /sbin/ifconfig eth0 192.168.0.3 netmask 255.255.255.0
linux:~# /sbin/route add default gw 192.168.0.1
linux:~# echo 'nameserver 192.168.0.1' >> /etc/resolv.conf

I’ve used this simple commands on thousands ot Linux hosts and it’s still handy 🙂

In above example 192.168.0.3 is the static IP address provided by the ISP, netmask is the netmask and the second /sbin/route add default gw would set the default gateway to the example ip 192.168.0.1

The third final line would add up a resolver nameserver the Linux host would use.

Cheers 😉

How to disable or remove completely Adobe (Macromedia) Flash Cookies on Linux

Monday, April 11th, 2011

As I’ve mentioned in my previous post, one of the greatest “evils” which prevents a good internet anonymization whether you surf online is Adobe Flash Player

There are two approaches you might partake to disable the privacy issues which might be related to Adobe Flash cookies saving data about flash banners or websites which stores their cookies to your computer.

To find out if flash websites has already saved their nasty flash cookies on your Linux, issue the commands:

hipo@debian:~$ cd .macromedia
hipo@debian:/home/hipo/.macromedia$ find -iname '*.sol'
./Flash_Player/macromedia.com/support/flashplayer/sys/#s.ytimg.com/settings.sol
./Flash_Player/macromedia.com/support/flashplayer/sys/settings.sol
./Flash_Player/macromedia.com/support/flashplayer/sys/#ip-check.info/settings.sol

The returned output of the above find command clearly reveals the shitty flash has stored already 3 flash cookies on my Linux, 3 cookies which later can be easily requested by other flash banners.
The 3 flash cookies are:
1. Saved by Adobe’s Flash Configuration Manager
2. Saved by the website ip-check.info
3. Saved by s.ytimg.com’s website

Now to deal with the situation and get rid of flash cookies, there are possibly two ways of approach that one can take:

1. One is to use some kind of script like the one clear_flash_cookies.tsch the other one is to completely disable flash cookies.
Using the clear_flash_cookies.tcsh does get rid of flash cookie problems just temporary as it might be set to be executed either once the browser is starting up, or directly via some kind of cron job entry like:

01 11,19 * * * /home/hipo/scripts/clear_flash_cookies.tcsh

eHowever clearing up (removing) the flash cookies, still doesn’t completely proihibit saving up of flash cookies and in the time intervals between the clear ups of the flash cookies, still some websites might save information related to their use on your Linux host and expose this information for other external flash websites to read and retrieve information about your previous websites visits.

Therefore it might be a better solution in terms of browser security to;

2. completely disable the use of adobe flash cookies on your Linux powered desktop.

Disabling adobe flash cookies is possible by either using the online flash Global Storage Settings (Flash Settings Manager) by navigating to the URL:

http://www.macromedia.com/support/documentation/
en/flashplayer/help/settings_manager03.html

Adobe Flash Player online settings manager unticked option

And by removing the tick which is present to the option:

Allow third party Flash content to store data on your computer

Or by linking the local directory ~/.macromedia -> /dev/null

hipo@debian:~$ mv .macromedia .macromedia-bak
hipo@debian:~$ ln -s /dev/null .macromedia
hipo@debian:~$ ls -ald .macromedia
lrwxrwxrwx 1 hipo hipo 9 2009-03-30 09:56 .macromedia -> /dev/null

That’s all, Farewell nasty Flash cookies!

Few websites to check how anonymous you are on the Internet

Monday, April 11th, 2011

A friend of mine has recommended, few websites which are quite useful in checking what kind of information a remote website could possibly retrieve about your system. I’ve found quite useful as they expose the high level of browser security there is nowdays even on a Linux based systems.
I’ve been stunned that so many information about my Linux desktop could be mined even when I use my browser through a tor network.

Here are the websites you might also like to check and possibly afterwards improve your Browser security:

http://anon.inf.tu-dresden.de/help/jap_help/en/help/security_test.html
http://www.proxy-list.org/en/show-my-ip.php
http://leader.ru/secure/who.html

I was rather shocked that some information that could be retrieved on my Linux host could even reveal fundamental details about my Linux Desktop like a version of my currently running Linux kernel!

In the past I’ve blogged an article which is quite related to the topic of Internet Anonimity and Browser security

You might consider checking my old article How to improve your web browser security and better secure your personal identity privacy on the internet here
I will take some steps further to look on how to further decrease the amount of OS sensitive data revealed by my browser and will further blog when I find ways for better ways to anonimize my surging.