Posts Tagged ‘linux users’

Howto Pass SSH traffic through a Secured Corporate Proxy server with corkscrew, using sshd as a standalone proxy service with no proxy installed on remote Linux server or VPS

Tuesday, November 19th, 2019

howto pass ssh traffic through proxy to remote server use remote machine as a proxy for connecting to the Internet

Working in the big bad corporate world (being employed in  any of the Fortune 500) companies, especially in an IT delivery company is a nasty thing in terms of User Personal Data Privacy because usually when employeed in any of a corporation, the company ships you with a personal Computer with some kind of pre-installed OS (most often this is Windows) and the computer is not a standalone one but joined in Active Directory (AD) belonging to Windows Domain and centrally administered by whoever.

As part of the default deplyed configuration in this pre-installed OS and software is that part or all your network traffic and files is being monitored in some kind of manner as your pre-installed Windows or Linux notebook given by the Corporation is having a set of standard software running in the background, and even though you have Windows Administrator there are many things you have zero control or even if you have changed it once the Domain Policy is triggered your custom made changes / Installed Programs that happen to be against the company policy are being automatically deleted, any registry changes made are being rewinded etc. Sometimes even by trying to manually clean up your PC from the corporate crapware,  you might breaks access to the corporate DMZ firewalled network. A common way to secure their employee PC data large companies have a Network seperation, your PC when not connected to the Corporate VPN is having a certain IP configuration and once connected to the Demilitarized Zone VPN those configuration changes and the PC have access to internal company infrastructure servers / router / switches / firewalls / SANs etc. Access to corporate Infrastructure is handled via crypted VPN clinet such as Cisco AnyConnect Secure Mobility Client which is perhaps one of the most used ones out there.

Part of the common software installed to Monitor your PC for threats / viruses / trojans among which is MCafee / EMET (Enhandced Mitigation Experience Toolkit) the PC is often prebundled with some kind of anti-malware (crapware) :). But the tip of the iceberg on user surveillance where most of surveillance happens is the default installed proxy on the PC which usually does keep track of all your remote accessed HTTP Website URLs accessed in plain text – traffic flowing on Port 80 and crypted one on standard (SSL) Port 443. This Web Traffic is handled by the Central Corporate proxy that is being deployed via some kind of Domain policy, every time the Computer joins the Windows domain. 

This of course is a terrible thing for your Browsing security and together with the good security practice to run your browser in Incognito mode, which makes all your browsing activity such as access URLs History or Saved Cookies data to be cleared up on a Browser close it is important to make sure you run your own personal traffic via a separate browser which you will use only for your own concern browsing such as Accessing your Bank Money Accounts to check your Monthly Sallary / Purchase things online via Amazon.com / Ebay.com, whether all of the rest traffic company related is trafficed via the default set corporate central proxy.
This is relatively easy sometimes in companies, where security is not of a top concern but in corporations with tightened security accessing remote proxy, or accessing even common daily news and Public Email websites or social media sites  Gmail.com / Twitter / Youtube will be filtered so the only way to reach them will be via some kind of Proxy and often this proxy is the only way out to the Free world from the corporate jail.

Here is where the good old SSH comes as a saving grace as it turns out SSH traffic could be trafficed over a proxy. In below article I will give you a short insight on how Proxy through SSH could be achieved to Secure your dailty web traffic and use SSH to reach your own server on the Internet as well as how you can copy securely data via SSH through corporate Proxy. 
 

1. How to view your corporate used (default) proxy / Check Proxy.pac file definitions


To get an idea what is the used proxy on your Corporate PC (as most corporate employee given notebooks are running some kind of M$ Windows)  you can go to:

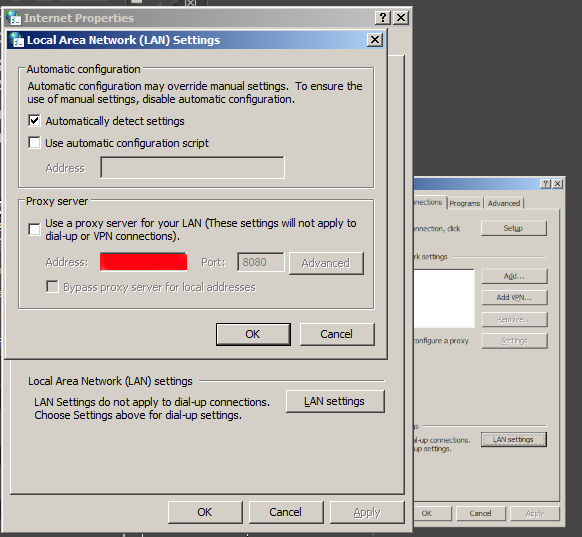
Windows Control Panel -> Internet Options -> Connections -> Lan Settings
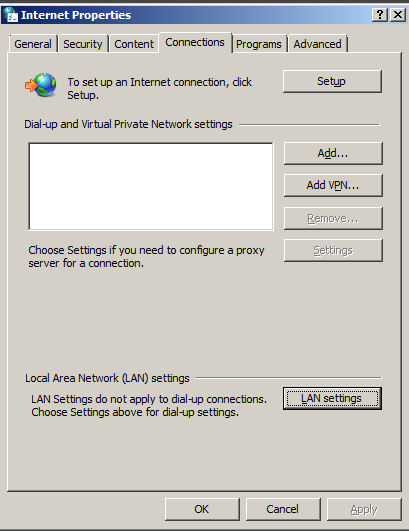

internet-properties-microsoft-windows-screenshot

Under the field Proxy server (check out the Proxy configured Address and Port number )
local-area-network-lan-settings-screenshot-windows-1
 

Having that as browsers venerate the so-called Proxy.pac file, to be rawly aware on some general Company Proxy configured definitions you can access in a browser the proxy itself fething the proxy.pac file for example.


http://your-corporate-firewall-rpoxy-url:8080/proxy.pac


This is helpful as some companies Proxies have some proxy rules that reveal some things about its Internet architecture and even some have some badly configured proxy.pac files which could be used to fool the proxy under some circumstances 🙂
 

2. Few of the reasons corporations proxy all their employee's work PC web traffic


The corporate proxying of traffic has a number of goals, some of which are good hearted and others are for mostly spying on the users.


1. Protect Corporate Employees from malicious Viruses / Trojans Horses / Malware / Badware / Whatever ware – EXCELLENT
2. Prevent users from acessing a set of sources that due to the corporate policy are considered harmful (e.g. certain addresses 
of information or disinformation of competitors, any Internet source that might preach against the corporation, hacking ralated websites etc.) – NOT GOOD (for the employee / user) and GOOD for the company
3.Spy on the users activity and be able to have evidence against the employee in case he decided to do anything harmful to the company evidences from proxy could even later be used in court if some kind of corpoate infringment occurs due to misbehave of the employee. – PERFECT FOR COMPANY and Complete breach of User privacy and IMHO totally against European Union privacy legislation such as GDRP
4. In companies that are into the field of Aritificial Intelligence / Users behavior could even be used to advance Self-learning bots and mechanisms – NASTY ! YAECKES


3. Run SSH Socks proxy to remote SSHd server running on common SSL 443 port


Luckily sysadmins who were ordered the big bosses to sniff on your Web behaviour and preferences could be outsmarted with some hacks.

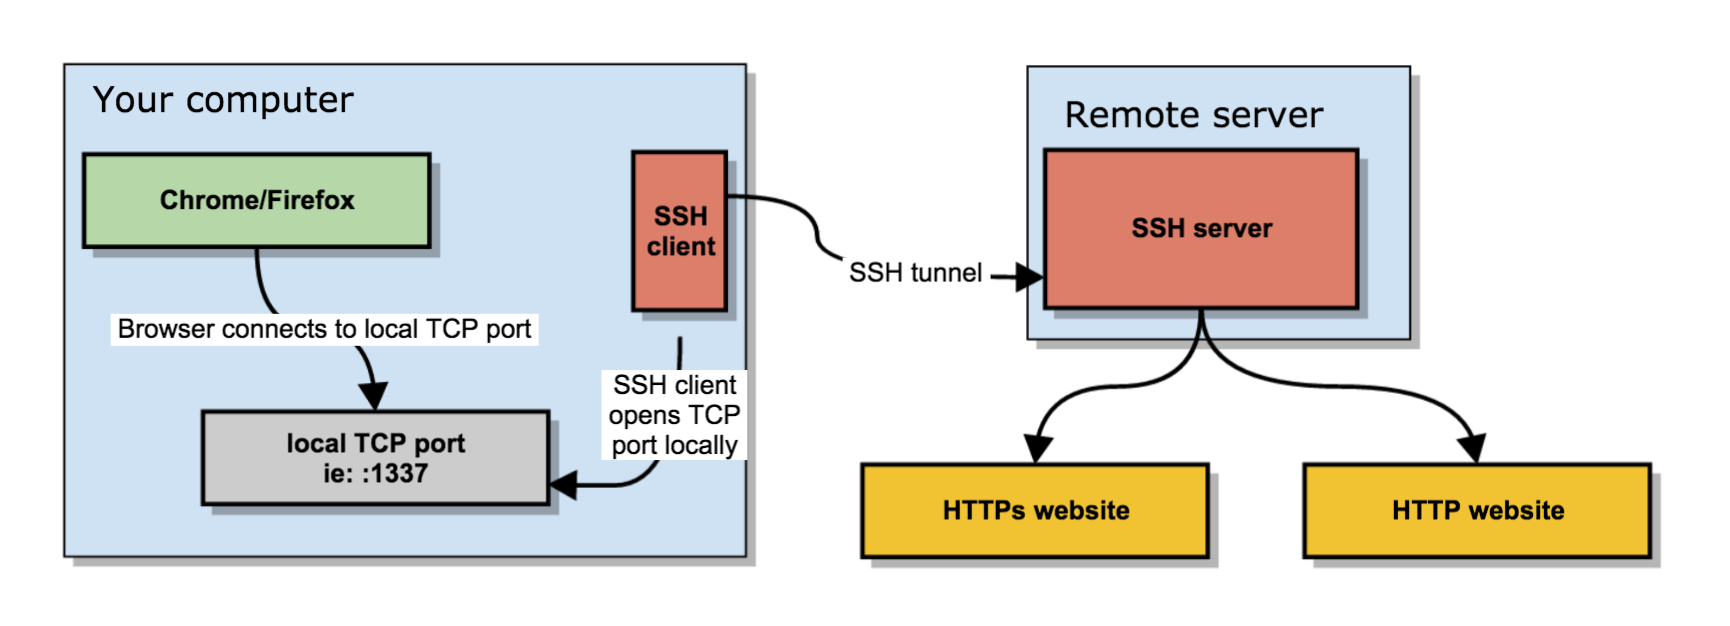
To protect your Browsing behaviours and Secure your privacy perhaps the best option is to use the Old but gold practice o Securing your Networkf traffic using SSH Over Proxy and SSH Dynamic tunnel as a Proxy as explained in my previous article here.
how-to-use-sshd-server-as-a-proxy-without-a-real-proxy-ssh-socks5_proxy_linux
 

In short the quest way to have your free of charge SOCKS  Remote proxy to your Home based Linux installed OS server / VPN with a Public Internet address is to use ssh as so:


ssh -D 3128 UserName@IP-of-Remote-SSHD-Host -p 443


This will start the SOCKS Proxy tunnel from Corporate Work PC to your Own Home brew server.

For some convenience it is useful to set up an .alias (for cygwin) / linux users in .bashrc file:


alias proxy='ssh -D 3128 UserName@IP-of-Remote-SSHD-Host -p 443';


To start using the Proxy from browser, I use a plugin called FoxyProxy in Chrome and Firefox browsers
set-up to connect to localhost – 127.0.0.1:3128 for All Protocols as a SOCKs v5 Proxy.

The sshd Socks proxy can be used for multiple others for example, using it you can also pass on traffic from Mail client such as Thunderbird to your Email server if you're behind a firewall prohibiting access to the common POP3 port 110 or IMAP port TCP 143. 

4. How to access SSH through Proxy using jumphost SSH hop


If you're like me and you have on your Home Linux machine only one Internet address and you have already setupped an SSL enabled service (lets say Webmail) to listen to that Public Internet IP and you don't have the possibility to run another instance of /usr/bin/sshd on port 443 via configuration or manually one time by issuing:


/usr/sbin/sshd -p 443


Then you can use another ssh another Linux server as a jump host to your own home Linux sshd server. This can be done even by purchasing a cheap VPS server for lets say 3 dollars month etc. or even better if you have a friend with another Linux home server, you can ask him to run you sshd on TCP port 443 and add you an ssh account.
Once you have the second Linux machine as JumpHost to reach out to your own machine use:


ssh -J Your-User@Your-jump-host.com:443 hipo@your-home-server.com -v


To easify this a bit long line it is handy to use some kind of alias like:


alias sshhome='ssh -J Your-User@Your-jump-host.com:443 hipo@your-home-server.com -v'


The advantage here is just by issuing this sshd tunnel and keeping it open in a terminal or setting it up as Plink Putty tunnel you have all your Web Traffic Secured
between your Work Corporate PC and your Home Brew Server, keeping the curious eyes of your Company Security Officers from your own Web traffic, hence
separating the corporate privacy from your own personal privacy. Using the just established own SSH Proxy Tunnel to home for your non-work stuff browsing habits
from the corporate systems which are accessed by switching with a button click in FoxyProxy to default proxy settings.
 

5. How to get around paranoid corporate setup where only remote access to Corporate proxy on TCP Port 80 and TCP 443 is available in Browser only


Using straight ssh and to create Proxy will work in most of the cases but it requires SSH access to your remote SSH running server / VPS on TCP Port 22, however under some Fort-Nox like financial involved institutions and companies for the sake of tightened security, it is common that all Outbound TCP Ports are prohibited except TCP Port 80 and SSL 443 as prior said, so what can you do then to get around this badful firewall and access the Internet via your own server Proxy? 
The hack to run SSH server either on tcp port 80 or tcp port 443 on remote Host and use 443 / 80 to acess SSHD should work, but then even for the most paranoid corporations the ones who are PCI Compliant – PCI stands for (Payment Card Industry), e.g. works with Debit and Credit Card data etc, accessing even 80 or 443  ports with something like telnet client or netcat will be impossible. 
Once connected to the corporate VPN,  this 2 two ports firewall exceptions will be only accessible via the Corporate Proxy server defined in a Web Browser (Firefox / IE / Chrome etc.) as prior explained in article.

The remedy here is to use a 3rd party tools such as httptunnel or corkscrew that  are able to TUNNEL SSH TRAFFIC VIA CORPORATE PROXY SERVER and access your own resource out of the DMZ.

Both httptunnel and corkscrew are installable both on most Linux distros or for Windows users via CygWin for those who use MobaXterm.

Just to give you better idea on what corkscrew and (hts) httptunnel does, here is Debian packages descriptions.

# apt-cache show​ corkscrew
" corkscrew is a simple tool to tunnel TCP connections through an HTTP
 proxy supporting the CONNECT method. It reads stdin and writes to
 stdout during the connection, just like netcat.
 .
 It can be used for instance to connect to an SSH server running on
 a remote 443 port through a strict HTTPS proxy.
"


# apt-cache show httptunnel|grep -i description -A 7
Description-en: Tunnels a data stream in HTTP requests
 Creates a bidirectional virtual data stream tunnelled in
 HTTP requests. The requests can be sent via a HTTP proxy
 if so desired.
 .
 This can be useful for users behind restrictive firewalls. If WWW
 access is allowed through a HTTP proxy, it's possible to use
 httptunnel and, say, telnet or PPP to connect to a computer

Description-md5: ed96b7d53407ae311a6c5ef2eb229c3f
Homepage: http://www.nocrew.org/software/httptunnel.html
Tag: implemented-in::c, interface::commandline, interface::daemon,
 network::client, network::server, network::vpn, protocol::http,
 role::program, suite::gnu, use::routing
Section: net
Priority: optional
Filename: pool/main/h/httptunnel/httptunnel_3.3+dfsg-4_amd64.deb

Windows cygwin users can install the tools with:
 

apt-cyg install –yes corkscrew httptunnel


Linux users respectively with:

apt-get install –yes corkscrew httptunnel

or 

yum install -y corkscrew httptunnel


You will then need to have the following configuration in your user home directory $HOME/.ssh/config file
 

Host host-addrs-of-remote-home-ssh-server.com
ProxyCommand /usr/bin/corkscrew your-corporate-firewall-rpoxy-url 8080 %h %p
 

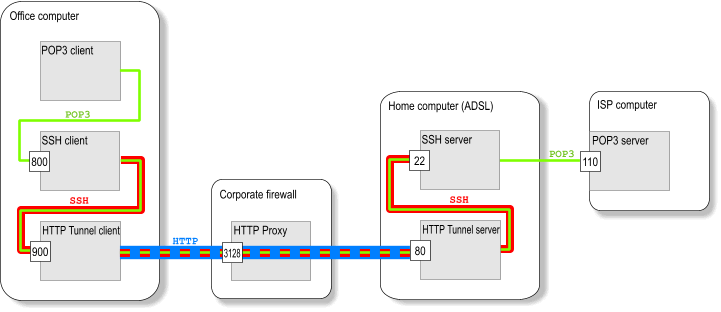
howto-transfer-ssh-traffic-over-proxy

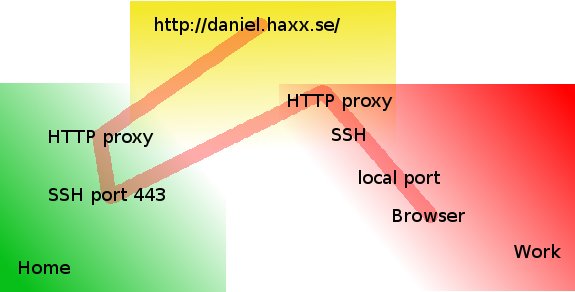
Picture Copyright by Daniel Haxx

The best picture on how ssh traffic is proxied is the one found on Daniel Haxx's website which is a great quick tutorial which originally helped to get the idea of how corkscrew works in proxying traffic I warmly recommend you take a quick look at his SSH Through or over Proxy article.

Host-addrs-of-remote-home-ssh-server.com could be also and IP if you don't have your own domain name in case if using via some cheap VPN Linux server with SSH, or alternatively
if you don't want to spend money on buying domain for SSH server (assuming you don't have such yet) you can use Dyn DNS or NoIP.

Another thing is to setup the proper http_proxy / https_proxy / ftp_proxy variable exports in $HOME/.bashrc in my setup I have the following:
 

export ftp_proxy="http://your-corporate-firewall-rpoxy-url:8080"
export https_proxy="https://your-corporate-firewall-rpoxy-url:8080"
export http_proxy="http://your-corporate-firewall-rpoxy-url:8080"
export HTTP_PROXY="http://your-corporate-firewall-rpoxy-url:8080"
export HTTPS_PROXY="http://your-corporate-firewall-rpoxy-url:8080"


6. How to Transfer Files / Data via SSH Protocol through  Proxy with SCP and SFTP


Next logical question is how to Transfer your own personal encrypted files (that contains no corporate sensitive information) between your Work laptop and home brew Linux ssh server or cheap VPN.

It took me quite a lot of try-outs until finally I got it how Secure Copy (scp) command can be used toto transfer files between my Work Computer and my Home brew server using JumpHost, here is how:
 

scp -o 'ProxyJump Username@Jumpt-Host-or-IP.com:443' ~/file-or-files-to-copy* Username@home-ssh-server.com:/path/where/to/copy/files


I love using sftp (Secure FTP) command Linux client to copy files and rarely use scp so I have a lot of try-outs to connect interacitvely via the Corporate Proxy server over a Jump-Host:443 to my Destination home machine, 


I've tried using netcat as it was pointed in many articles online, like so to traffic my sftp traffic via my localhost binded SSH Socks proxy on :3128 together with netcat as shown in article prior example, using following line:
 

sftp -oProxyCommand='/bin/nc -X connect -x 127.0.0.1:3128 %h %p' Username@home-ssh-server.com 22


Also tried proxy connect like this:


sftp -o ProxyCommand="proxy-connect -h localhost -p 3128 %h %p" Username@home-ssh-server.com


Moreover, tried to use the ssh  command (-s) argument capability to invoke SSH protocol subsystem feature which is used to facilitiate use of SSH secure transport for other application
 

ssh -v -J hipo@Jump-Host:443 -s sftp root@home-ssh-server.com -v

open failed: administratively prohibited: open failed


Finally decided to give a try to the same options arguments as in scp and thanks God it worked and I can even access via the Corporate Proxy through the Jump Host SSH interactively via Secure FTP 🙂

!! THE FINAL WORKING SFTP THROUGH PROXY VIA SSH JUMPHOST !!
 

sftp -o 'ProxyJump Username@Jumpt-Host-or-IP.com:443' Username@home-ssh-server.com


To save time from typing this long line every time, I've setup the following alias to ~/.bashrc
 

alias sftphome='sftp -o 'ProxyJump Username@Jumpt-Host-or-IP.com:443' Username@home-ssh-server.com'


Conclusion

Of course using own Proxy via your Home brew SSH Machine as well as transferring your data securely from your Work PC (notebook) to Home does not completely make you Surveillance free, as the Corporate Windows installed OS image is perhaps prebundled with its own integrated Keylogger as well as the Windows Domain administrators have certainly access to connect to your PC and run various commands, so this kind of Security is just an attempt to make company has less control and know less on your browsing habits and the best solution where possible to secure your privacy and separate your Personal Space form Work space by using a second computer (if having the ability to work from home) with a KVM Switch device and switch over your Work PC and Home PC via it or in some cases (where companies) allows it, setup something like VNC server (TightVNC / RealVNC) on work PC and leave it all time running in office and connect remotely with vncviewer from your own controlled secured computer.

In article I've explained shortly common scenario found in corporate Work computers proxy setup, designed to Surveil all your move, mentioned few common softwares running by default to protect from Viruses and aimed to Protect user from malicious hacking tools, explained how to view your work notebook configured Proxy, shortly mentioned on Proxy.pac and hinted how to view proxy.pac config as well as gave few of the reasons why all web traffic is being routed over central proxy.

That's all folks, Enjoy the Freedom to be less surveilled !

Get Hardware System info on Debian Linux / How to detecting hardware and servers model on GNU / Linux

Wednesday, December 12th, 2012

hardware-info-getting-on-linux-howto

Users who are novice to Linux should be probably interested on how to get a decent Hardware System Information. Getting system info on Windows is quite straight forward, however on Linux and especially on Linux servers it is a bit confusing at first and even for people who spend years administrating Linux servers, or even have a Linux desktop it is very likely after a period of time to forget how exactly last time got the hardware system information. I'm administrating Linux servers and running a linux desktop for already almost 11 years and often it happened I'm away from configuring a new server for a year, or even when configuring a new server I don't need to get exact system information from command line, as I know it already from the server hardware manual. However whether managing a bunch of dedicated servers or purchasing new systems which are physically away and someone pre-configured the server with some basis Linux install, often a very raw info is provided by the Dedicated Provider on exact server metrics. Other situation, where it is good idea to have a precise system hardware vendor information on a server, is if you just joined a company with a bunch of existing dedicated servers, whose exact hardware configuration is no documented anywhere and suddenly some RAID or piece of hardware located on 1 of the 100 dedicated servers starts misbehaving causing hour down-times and client important data loss.

In any of those cases it always takes me few times of research to find out what exact methodology I used to get the hardware info last time. To make my life for future times easier and not loose the few minutes of research and reading on how to get Linux server system information I decided to write this short article, which might hopefully be useful to others out there who face similar periodic questioning on what was the command to get hardware system info.

Of course the general commands to get some general overview on a Linux server as anyone knows are:

a. dmesg
b. cat /proc/cpuinfo
c. lspci
d. lsusb
c. free -m

A note to make here is that in order to have lsusb and lspci commands present you will have to have installed the deb packs lsusb and pciutils.

However as I prior said, this tools output is not enough or the output is not enough systematic and hard to read and understand especially for lazy or short memory admins like me. Thus it is worthy to mention few others which can be installed as a separate packages and gives more structured and very precised information on what kind of machine hardware you're accessing through ssh.

Here is the list of all of profiled hardware detection progs and scripts:

1. dmidecode

2. lshw

3. x86info

4. hwinfo

5. hardinfo

6. biosdecode


To install all of them in a raw with apt-get do:

debian:~# apt-get install --yes dmidecode lshw x86info hwinfo hardinfo superiotool
Reading package lists... Done
Building dependency tree      
Reading state information... Done
dmidecode is already the newest version.
hardinfo is already the newest version.
lshw is already the newest version.
The following extra packages will be installed:
  libhd16
The following NEW packages will be installed:
  hwinfo libhd16 superiotool x86info
0 upgraded, 4 newly installed, 0 to remove and 9 not upgraded.
Need to get 827 kB of archives.
After this operation, 4,506 kB of additional disk space will be used.
Get:1 http://ftp.uk.debian.org/debian/ squeeze/main libhd16 amd64 16.0-2 [696 kB]
Get:2 http://ftp.uk.debian.org/debian/ squeeze/main hwinfo amd64 16.0-2 [46.6 kB]
Get:3 http://ftp.uk.debian.org/debian/ squeeze/main superiotool amd64 0.0+r5050-1 [43.0 kB]
Get:4 http://ftp.uk.debian.org/debian/ squeeze/main x86info amd64 1.25-1 [40.9 kB]
Fetched 827 kB in 2s (378 kB/s)  
Selecting previously deselected package libhd16.
(Reading database ... 85783 files and directories currently installed.)
Unpacking libhd16 (from .../libhd16_16.0-2_amd64.deb) ...
Selecting previously deselected package hwinfo.
Unpacking hwinfo (from .../hwinfo_16.0-2_amd64.deb) ...
Selecting previously deselected package superiotool.
Unpacking superiotool (from .../superiotool_0.0+r5050-1_amd64.deb) ...
Selecting previously deselected package x86info.
Unpacking x86info (from .../x86info_1.25-1_amd64.deb) ...
Processing triggers for man-db ...
Setting up libhd16 (16.0-2) ...
Setting up hwinfo (16.0-2) ...
Setting up superiotool (0.0+r5050-1) ...
Setting up x86info (1.25-1) ...

Next just try to launch the tools one by one and check the content of the output, in my view  the most useful one and maybe also the most popular is dmidecode, the rest however might be useful to get specific hardware debug info.

1.  hwinfo

debian:~# hwinfo |tee -a server-hardware-info.txt
....

hwinfo will provide you a very long list of very thoroughful information on hardware. A lot of the info it shows however is not so useful for regular admins, but will be of high value to people who need to develop a new Linux driver for respective hardware.

2. lswh

debian:~# lshw > linux-hw-info.txt

lshw provides long list of debug information and if the output is not redirected to a file the screen gets flooded, if not piped to less. For that reason I will not paste output here.

3. x86info

debian:~# x86info

x86info v1.25.  Dave Jones 2001-2009
Feedback to <davej@redhat.com>.

Found 2 CPUs
————————————————————————–
CPU #1

EFamily: 0 EModel: 2 Family: 6 Model: 42 Stepping: 7
CPU Model: Unknown model.
Processor name string: Intel(R) Pentium(R) CPU G630 @ 2.70GHz
Type: 0 (Original OEM)    Brand: 0 (Unsupported)
Number of cores per physical package=8
Number of logical processors per socket=16
Number of logical processors per core=2
APIC ID: 0x0    Package: 0  Core: 0   SMT ID 0
————————————————————————–
CPU #2
EFamily: 0 EModel: 2 Family: 6 Model: 42 Stepping: 7
CPU Model: Unknown model.
Processor name string: Intel(R) Pentium(R) CPU G630 @ 2.70GHz
Type: 0 (Original OEM)    Brand: 0 (Unsupported)
Number of cores per physical package=8
Number of logical processors per socket=16
Number of logical processors per core=2
APIC ID: 0x2    Package: 0  Core: 0   SMT ID 2
————————————————————————–
WARNING: Detected SMP, but unable to access cpuid driver.
Used Uniprocessor CPU routines. Results inaccurate.

As you see x86info, mainly provides information on CPU Cache, exact model, family AND APIC (don't mix it with ACPI – advanced power management interface)
APIC is a chip that remaps IOs and IRQs of your computer to the CPU(s), thus in most cases it is more of not so needed debug information.

4. biosdecode

debian:~#  biosdecode
# biosdecode 2.9
ACPI 2.0 present.
    OEM Identifier: LENOVO
    RSD Table 32-bit Address: 0xBCD9C028
    XSD Table 64-bit Address: 0x00000000BCD9C068
SMBIOS 2.6 present.
    Structure Table Length: 2233 bytes
    Structure Table Address: 0x000EBB70
    Number Of Structures: 59
    Maximum Structure Size: 184 bytes
PNP BIOS 1.0 present.
    Event Notification: Not Supported
    Real Mode 16-bit Code Address: F000:BC66
    Real Mode 16-bit Data Address: F000:0000
    16-bit Protected Mode Code Address: 0x000FBC8E
    16-bit Protected Mode Data Address: 0x000F0000
PCI Interrupt Routing 1.0 present.
    Router ID: 00:1f.0
    Exclusive IRQs: None
    Compatible Router: 8086:27b8
    Slot Entry 1: ID 00:1f, on-board
    Slot Entry 2: ID 00:1b, on-board
    Slot Entry 3: ID 00:16, on-board
    Slot Entry 4: ID 00:1c, on-board
    Slot Entry 5: ID 02:00, slot number 21
    Slot Entry 6: ID 00:01, on-board
    Slot Entry 7: ID 00:06, on-board
    Slot Entry 8: ID 00:1d, on-board
    Slot Entry 9: ID 00:1a, on-board
    Slot Entry 10: ID 03:00, on-board
    Slot Entry 11: ID 00:02, on-board
    Slot Entry 12: ID 00:00, on-board

As you see biosdecode, also provides a lot of hex addresses, also reports on the exact CPU architecture on the system.

The line   XSD Table 64-bit Address: 0x00000000BCD9C068, indicated the host is running a 64 bit CPU, most of the rest info like Slot entries IDs etc. is not so useful.

The most useful info that biosdecode provides is the exact type of BIOS (Basic Input Output System) bundled with the system in my case the BIOS is running on a Lenovo host and is vendored by Lenovo, thus it shows in the cmd output:

OEM Identifier: LENOVO

5. hardinfo

debian:~# hardinfo | tee -a hardware-info.txt


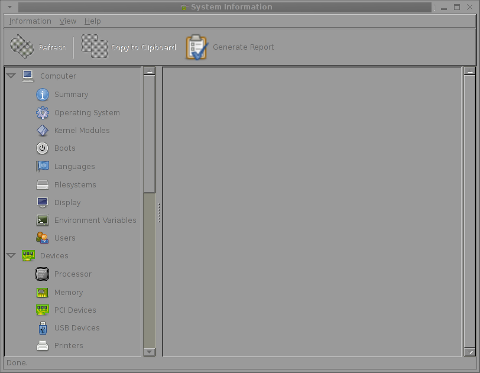
hardinfo gnome screenshot debian gnu / linux

HardInfo is the GNOME GTK+ program which displays robust and thouroughful info in same was as Windows System Info does on  GNOME Desktop. If however you run it under console or via ssh it does display what it detects as: 

Computer hardware, operating system, kernel modules, supported system languages, existing filesystems, Display, set environment variables, Existing system users, Processor type, Memory, PCI and USB devices, Printers (if attached), Battery type (if run on laptop), Storage, Other Input devices

hardinfo, does a few benchmarking tests using CPU stress test algorithms to do Blowfish encryption, CryptoHash, Fibonacci, N-Queens, FPU FFT and FPU raytracing. This benchmark values, if run on a couple of hosts can be used to compare different hardware performances.

6. dmidecode

debian: # dmidecode > system-hware-info.txt

The output from dmidecode is very very detailed and verbose. Though along with the useful info there is plenty of debug information, the debug information it provides is much user friendly / user comprehensible than the rest of tools, thus I guess dmidecode is nowadays preferred by me and probably most of the Linux sys admins.

debian:~# dmidecode |head -n 34
# dmidecode 2.9
SMBIOS 2.6 present.
59 structures occupying 2233 bytes.
Table at 0x000EBB70.

Handle 0x0000, DMI type 0, 24 bytes
BIOS Information
    Vendor: LENOVO
    Version: 9QKT37AUS
    Release Date: 02/14/2012
    Address: 0xF0000
    Runtime Size: 64 kB
    ROM Size: 2560 kB
    Characteristics:
        PCI is supported
        BIOS is upgradeable
        BIOS shadowing is allowed
        Boot from CD is supported
        Selectable boot is supported
        BIOS ROM is socketed
        EDD is supported
        5.25"/1.2 MB floppy services are supported (int 13h)
        3.5"/720 KB floppy services are supported (int 13h)
        3.5"/2.88 MB floppy services are supported (int 13h)
        Print screen service is supported (int 5h)
        8042 keyboard services are supported (int 9h)
        Serial services are supported (int 14h)
        Printer services are supported (int 17h)
        ACPI is supported
        USB legacy is supported
        BIOS boot specification is supported
        Targeted content distribution is supported
    BIOS Revision: 0.37
 

Though it is the most useful tool on some hardware configurations it might not display any data because the BIOS is lacking a DMI implementation.

In almost all cases dmidecode is enough to check what kind of hardware you have ssh-ed to. dmidecode is available also not only on Debian but on Fedora and almost all (if not all Linux distros), through default repositories.

How to make a mirror of website on GNU / Linux with wget / Few tips on wget site mirroring

Wednesday, February 22nd, 2012

how-to-make-mirror-of-website-on-linux-wget

Everyone who used Linux is probably familiar with wget or has used this handy download console tools at least thousand of times. Not so many Desktop GNU / Linux users like Ubuntu and Fedora Linux users had tried using wget to do something more than single files download.
Actually wget is not so popular as it used to be in earlier linux days. I've noticed the tendency for newer Linux users to prefer using curl (I don't know why).

With all said I'm sure there is plenty of Linux users curious on how a website mirror can be made through wget.
This article will briefly suggest few ways to do website mirroring on linux / bsd as wget is both available on those two free operating systems.

1. Most Simple exact mirror copy of website

The most basic use of wget's mirror capabilities is by using wget's -mirror argument:

# wget -m http://website-to-mirror.com/sub-directory/

Creating a mirror like this is not a very good practice, as the links of the mirrored pages will still link to external URLs. In other words link URL will not pointing to your local copy and therefore if you're not connected to the internet and try to browse random links of the webpage you will end up with many links which are not opening because you don't have internet connection.

2. Mirroring with rewritting links to point to localhost and in between download page delay

Making mirror with wget can put an heavy load on the remote server as it fetches the files as quick as the bandwidth allows it. On heavy servers rapid downloads with wget can significantly reduce the download server responce time. Even on a some high-loaded servers it can cause the server to hang completely.
Hence mirroring pages with wget without explicity setting delay in between each page download, could be considered by remote server as a kind of DoS – (denial of service) attack. Even some site administrators have already set firewall rules or web server modules configured like Apache mod_security which filter requests to IPs which are doing too frequent HTTP GET /POST requests to the web server.
To make wget delay with a 10 seconds download between mirrored pages use:

# wget -mk -w 10 -np --random-wait http://website-to-mirror.com/sub-directory/

The -mk stands for -m/-mirror and -k / shortcut argument for –convert-links (make links point locally), –random-wait tells wget to make random waits between o and 10 seconds between each page download request.

3. Mirror / retrieve website sub directory ignoring robots.txt "mirror restrictions"

Some websites has a robots.txt which restricts content download with clients like wget, curl or even prohibits, crawlers to download their website pages completely.

/robots.txt restrictions are not a problem as wget has an option to disable robots.txt checking when downloading.
Getting around the robots.txt restrictions with wget is possible through -e robots=off option.
For instance if you want to make a local mirror copy of the whole sub-directory with all links and do it with a delay of 10 seconds between each consequential page request without reading at all the robots.txt allow/forbid rules:

# wget -mk -w 10 -np -e robots=off --random-wait http://website-to-mirror.com/sub-directory/

4. Mirror website which is prohibiting Download managers like flashget, getright, go!zilla etc.

Sometimes when try to use wget to make a mirror copy of an entire site domain subdirectory or the root site domain, you get an error similar to:

Sorry, but the download manager you are using to view this site is not supported.
We do not support use of such download managers as flashget, go!zilla, or getright

This message is produced by the site dynamic generation language PHP / ASP / JSP etc. used, as the website code is written to check on the browser UserAgent sent.
wget's default sent UserAgent to the remote webserver is:
Wget/1.11.4

As this is not a common desktop browser useragent many webmasters configure their websites to only accept well known established desktop browser useragents sent by client browsers.
Here are few typical user agents which identify a desktop browser:
 

  • Mozilla/5.0 (Windows NT 6.1; rv:6.0) Gecko/20110814 Firefox/6.0
  • Mozilla/5.0 (X11; Linux i686; rv:6.0) Gecko/20100101 Firefox/6.0
  • Mozilla/6.0 (Macintosh; I; Intel Mac OS X 11_7_9; de-LI; rv:1.9b4) Gecko/2012010317 Firefox/10.0a4
  • Mozilla/5.0 (Windows NT 6.1; Win64; x64; rv:2.2a1pre) Gecko/20110324 Firefox/4.2a1pre

etc. etc.

If you're trying to mirror a website which has implied some kind of useragent restriction based on some "valid" useragent, wget has the -U option enabling you to fake the useragent.

If you get the Sorry but the download manager you are using to view this site is not supported , fake / change wget's UserAgent with cmd:

# wget -mk -w 10 -np -e robots=off \
--random-wait
--referer="http://www.google.com" \--user-agent="Mozilla/5.0 (Windows; U; Windows NT 5.1; en-US; rv:1.8.1.6) Gecko/20070725 Firefox/2.0.0.6" \--header="Accept:text/xml,application/xml,application/xhtml+xml,text/html;q=0.9,text/plain;q=0.8,image/png,*/*;q=0.5" \--header="Accept-Language: en-us,en;q=0.5" \--header="Accept-Encoding: gzip,deflate" \--header="Accept-Charset: ISO-8859-1,utf-8;q=0.7,*;q=0.7" \--header="Keep-Alive: 300"

For the sake of some wget anonimity – to make wget permanently hide its user agent and pretend like a Mozilla Firefox running on MS Windows XP use .wgetrc like this in home directory.

5. Make a complete mirror of a website under a domain name

To retrieve complete working copy of a site with wget a good way is like so:

# wget -rkpNl5 -w 10 --random-wait www.website-to-mirror.com

Where the arguments meaning is:
-r – Retrieve recursively
-k – Convert the links in documents to make them suitable for local viewing
-p – Download everything (inline images, sounds and referenced stylesheets etc.)
-N – Turn on time-stamping
-l5 – Specify recursion maximum depth level of 5

6. Make a dynamic pages static site mirror, by converting CGI, ASP, PHP etc. to HTML for offline browsing

It is often websites pages are ending in a .php / .asp / .cgi … extensions. An example of what I mean is for instance the URL http://php.net/manual/en/tutorial.php. You see the url page is tutorial.php once mirrored with wget the local copy will also end up in .php and therefore will not be suitable for local browsing as .php extension is not understood how to interpret by the local browser.
Therefore to copy website with a non-html extension and make it offline browsable in HTML there is the –html-extension option e.g.:

# wget -mk -w 10 -np -e robots=off \
--random-wait \
--convert-links http://www.website-to-mirror.com

A good practice in mirror making is to set a download limit rate. Setting such rate is both good for UP and DOWN side (the local host where downloading and remote server). download-limit is also useful when mirroring websites consisting of many enormous files (documental movies, some music etc.).
To set a download limit to add –limit-rate= option. Passing by to wget –limit-rate=200K would limit download speed to 200KB.

Other useful thing to assure wget has made an accurate mirror is wget logging. To use it pass -o ./my_mirror.log to wget.
 

PortQRY Native Windows command line Nmap like port scanner – Check status of remote host ports on Windows

Monday, June 30th, 2014

Windows_command_line_and_gui_port-scanner-portqry-like-nmap-check-status-of-remote-host-service-windows-xp-7-2000-2003-2008-server
Linux users know pretty well Nmap (network mapper) tool which is precious in making a quick server host security evaluation.
Nmap binary port is available for Windows too, however as nmap is port for its normal operation you have to install WinPcap (Packet Capture Library).
And more importantly it is good to mention if you need to do some remote port scanning from Windows host, there is Microsoft produced native tool called PortQry (Port Query).

PortQRY is a must have tool for the Windows Admin as it can help you troubleshoot multiple network issues.

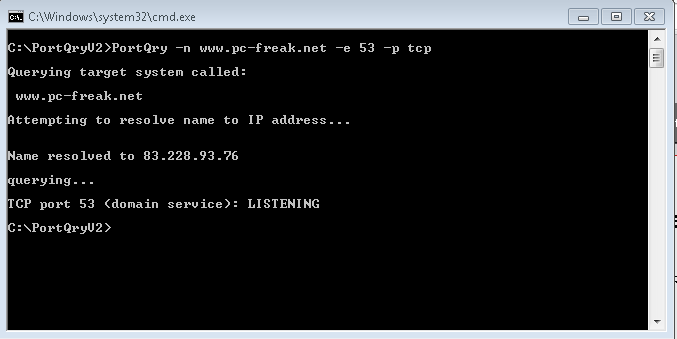
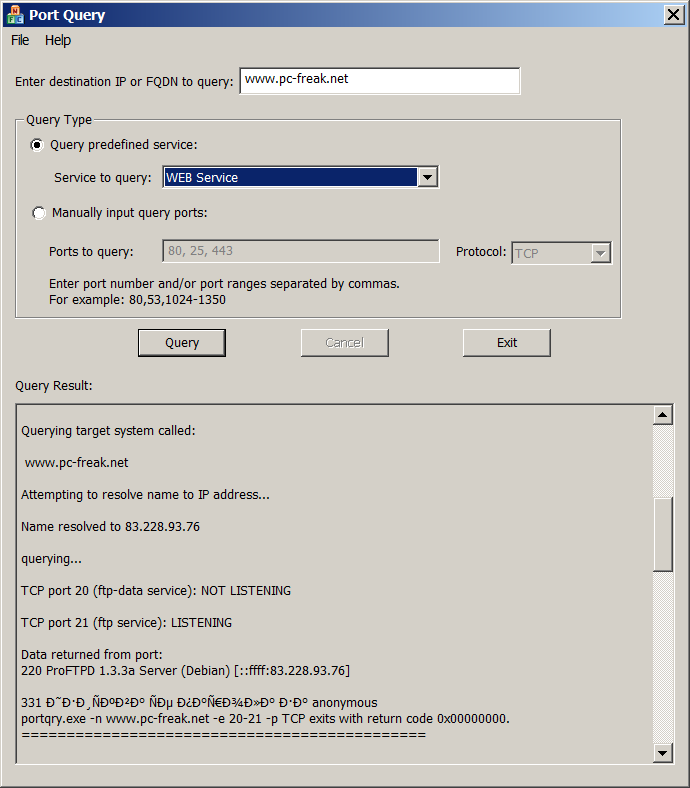
windows-nmap-native-alternative-portqry-gui-ui-web-service-port-scan-screenshot
As of time of writting this post PortQRY is at version 2, PortQRY tool has also a GUI (UI) Version for those lazy to type in command line.

Port Query UI tool (portqueryui.exe) is a tool to query open ports on a machine. This tool makes use of command line version port query tool (portqry.exe). The UI provides the following functionalities:

   1. Following "Enter destination IP or FQDN to query:”, an edit box needs the user to specify the IP address or FDQN name of the destination to query port status.

   2. The end user is able to choose Query type:

        – Predefined services type. It groups ports into service, so that you can query multiple ports for a service by a single click. Service includes "Domains and Trusts", "DNS Queries", "NetBIOS     communication", "IPSEC", "Networking", "SQL Service", "WEB Service", "Exchange Server",          "Netmeeting", and other services.

You can check detail port and protocol info for each service category by opening Help -> Predefined Services…

PORTQRY is part of Windows Server 2003 Support Tools and can be added to any NT based Windows (XP, 2003, Vista, 7, 8)
 You can download portqry command line tool here or my mirrored portqry version command line port scanner here and PortQRY UI here.

PortQRY comes in PortQryV2.exe package which when run extracts 3 files: PortQry.exe program, EULA and readme file. Quickest way to make portqry globally accessible from win command prompt is to copy it to %SystemRoot% (The environment variable holding default location for Windows Installation directory).
It is good idea to add PortQRY to default PATH folder to make it accessible from command line globally.

PorQry has 3 modes of operation:

Command Line Mode, Interactive Mode and Local Mode

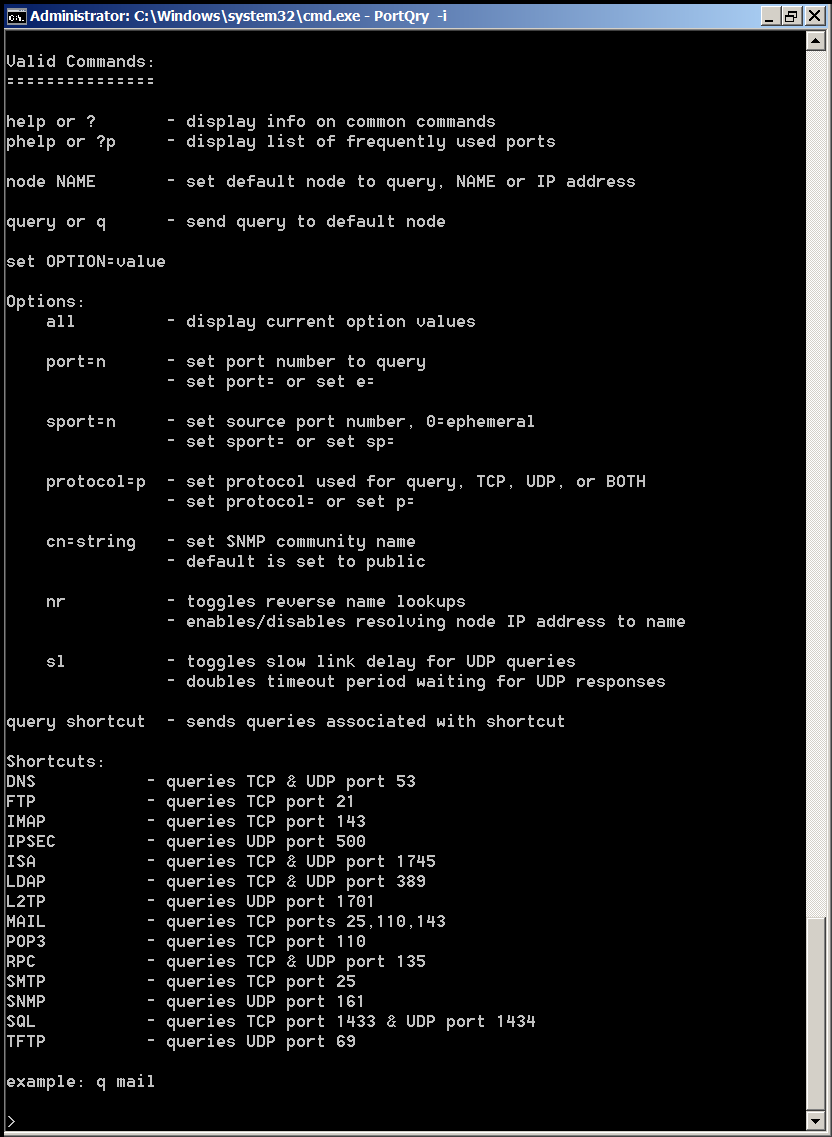
portqry-windows-native-security-port-network-scanner-nmap-equivalent-help-screenshot
 

Command Line Mode – is when it is invoked with parameters.

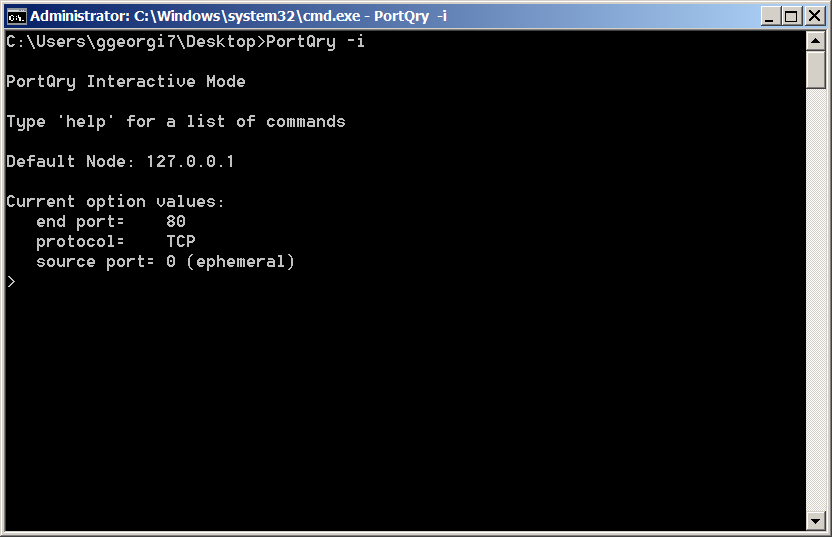
Interactive Mode is when it runs in interactive CLI console

portqry-windows-native-security-port-network-scanner-nmap-equivalent-interactive-mode-screenshot

portqry-windows-native-security-port-network-scanner-nmap-equivalent-interactive-mode-help-screenshot
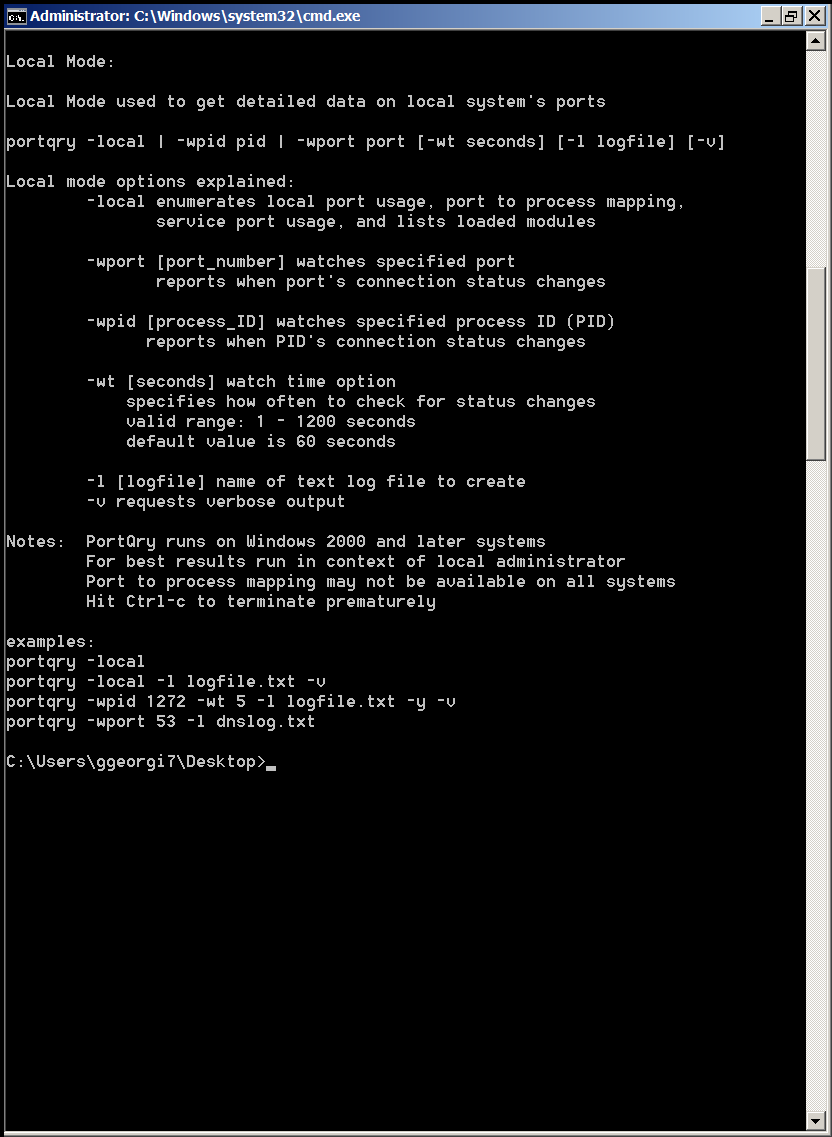
and Local Mode is used whether information on local system ports is required.

portqry-windows-native-security-port-network-scanner-nmap-equivalent-local-mode-screenshot


Here are some examples on basic usage of portqry:
 

1. Check if remote server is running webserver is listening on (HTTPS protocol) TCP port 80

portqry -n servername -e 80
 

Querying target system called:

 www.pc-freak.net

Attempting to resolve name to IP address…


Name resolved to 83.228.93.76

querying…

TCP port 80 (http service): FILTERED

2. Check whether some common Samba sharing and DNS UDP ports are listening

portqry -n servername -p UDP -o 37,53,88,135
 

Querying target system called:

servername

Attempting to resolve name to IP address…


Name resolved to 74.125.21.100

querying…

UDP port 37 (time service): NOT LISTENING

UDP port 53 (domain service): NOT LISTENING

UDP port 88 (kerberos service): NOT LISTENING

UDP port 135 (epmap service): NOT LISTENING

3. Scan open ports in a port range – Check common services port range (port 1-1024)

portqry -n 192.168.1.20 -r 1:1024 | find ": LISTENING"

4. Logging network scan output to file

Portqry –n localhost –e 135 -l port135.txt
 

Querying target system called:

 localhost

Attempting to resolve name to IP address…


Name resolved to 127.0.0.1

querying…

TCP port 135 (epmap service): LISTENING

Using ephemeral source port
Querying Endpoint Mapper Database…
Server's response:

UUID: d95afe70-a6d5-4259-822e-2c84da1ddb0d
ncacn_ip_tcp:localhost[49152]

UUID: 2f5f6521-cb55-1059-b446-00df0bce31db Unimodem LRPC Endpoint
ncacn_np:localhost[PIPEwkssvc]

Total endpoints found: 38


5. Scanning UDP and TCP protocols port

PortQry -n www.pc-freak.net -e 25 -p both


Querying target system called:

 www.pc-freak.net

Attempting to resolve name to IP address…


Name resolved to 83.228.93.76

querying…

TCP port 53 (domain service): LISTENING

UDP port 53 (domain service): LISTENING or FILTERED

Sending DNS query to UDP port 53…


6. Checking remote server whether LDAP ports are listening

Portqry -remotehost.com -p tcp -e 389
Portqry -n remotehost.com -p tcp -e 636
Portqry -n remotehost.com -p both -e 3268
Portqry -n remotehost.com -p tcp -e 3269


7. Making SNMP community name requests

portqry -n host2 -cn !my community name! -e 161 -p udp


8. Initiating scan from pre-selected source port

A network socket request initiation is useful from certain port because, some remote services expect connection from certain ports, lets say you're connecting to mail server, you might want to set as a source port – port 25, to make remote server another SMTP is connecting.

portqry -n www.pc-freak.net -e 25 -sp 25


9. Scanning whether server ports required by Active Directories are opened

Common ports used in Windows hosts to communicate between each other to sustain Active Directory are:

88 (Kerberos)
135 (RPC)
389 (LDAP)
445 (CIFS)
3268 (Global Catalog)

portqry -n remote-host.com -o 88,135,389,445,3268 -p both

portqry has also a silent mode with the "-q" switch if you want to get only whether a port is LISTENING (opened).

On port scan it returns three major return codes (very useful for scripting purposes);

  • returncode 0 – if port / service is listening
  • returncode 1 – if service is not listening
  • returncode 2 – if service is listening or filtered

PortQry is very simple port scanner for win sysadms and is precious tool for basic network debugging (services)  on Windows farms, however it doesn't have the powerful cracker functionality, application / OS versioning etc. like Nmap.


Linux: 8 Console Music players / Listening mp3 music in text mode

Monday, June 17th, 2013

As most of computer geeks, music is very important to make up my day and bring me up from bad mood or boredom. I like doing things from console, so even though nowadays Linux Desktop is so convenient, I still often prefer playing my mp3s from command line. In that spirit its worthy share with newer Linux users about existence of few mp3 players I used over the years to play my MODs / XM / Wavs / Mp3 etc.in pure console:

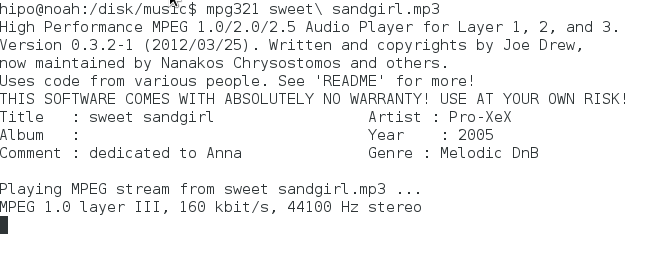
1. First and maybe most used over the years is mpg123 and its clone mpg321

mpg321 debian gnu linux playing mp3 in console screenshot
mpg123 is first mp3 player I ever used in Linux with no graphical environment and even to this day I install it on every Linux Desktop I have to configure. Its small its handy and it plays well most of mp3 music. Historically there was some issues with licensing of mpg321 making it not 100% (GPL-ed free software). Therefore a clone of it was made mpg321.
mpg321 is also a good mp3 player, but in some encoded mp3s my experience shows mpg123 plays music better (with less glitches).

 Install both mpg321 and mpg123 on Debian and Ubuntu and rest of deb based Linuces is with trivial:

debian:~# apt-get install --yes mpg321 mpg123
...

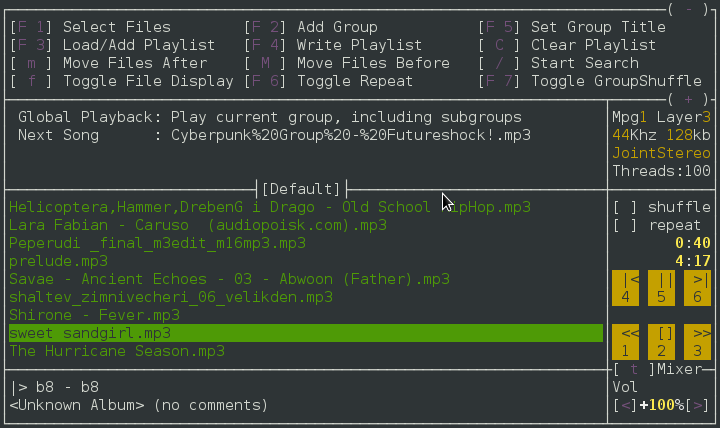
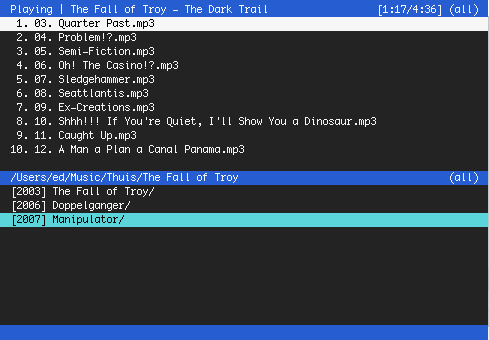
2. MP3Blaster (More interactiveNcurses mp3 and ogg vorbis player)

mp3blaster console music mp3 player Debian linux wheezy gnome terminal screenshot

debian:~#  apt-cache show mp3blaster|grep -i -A 1 description

Description-en: Full-screen console mp3 and Ogg Vorbis player
 mp3blaster is an interactive text-based mp3 and Ogg Vorbis player with

Description-md5: 0f28b31112e54bf3e946048856a7b6ce
Tag: interface::text-mode, role::program, sound::mixer, sound::player,

root@noah:/home/hipo/Плот# apt-cache show mp3blaster|grep -i -A 1 description
Description-en: Full-screen console mp3 and Ogg Vorbis player
 mp3blaster is an interactive text-based mp3 and Ogg Vorbis player with

Description-md5: 0f28b31112e54bf3e946048856a7b6ce
Tag: interface::text-mode, role::program, sound::mixer, sound::player,

To install:


debian:~# apt-get install --yes mp3blaster
...

3. Open Cubic Player – Cubic Player rewrite for UNIX and Linux

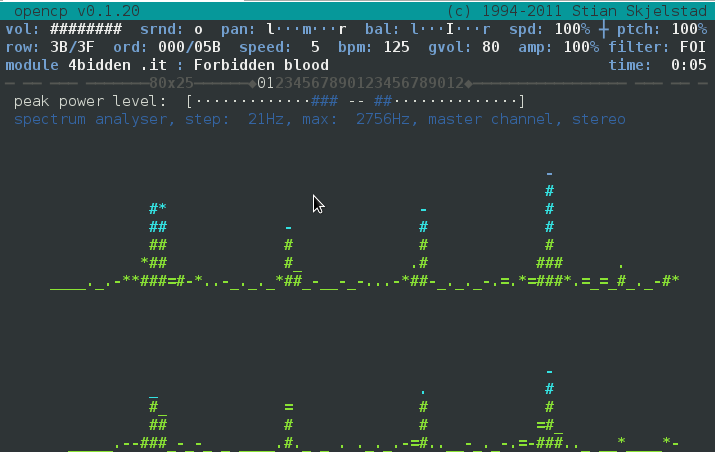
listening mp3 mod xm in console and terminal opencubicplayer ocp gnu linux debian

Those who remember how we used to listen music in DOS (Disk Operating System) days, should certainly remember Cubic Player – IMHO it used to be best MSDOS music player to play CDAudio, midi, MODs, WAVES etc. sound formats. I was more than delighted to find out some few years ago, some geeky developers started project aiming to rewrite from scratch Cubic Player for UNIX OS-es. Open Cubic Player is nowadays reality stable and kicks ass. I warmly recommend it to everyone who want to play music from console or terminal! It simply kicks ass!!! 🙂

Install it with;

debian:~# apt-get install --yes opencubicplayer
...

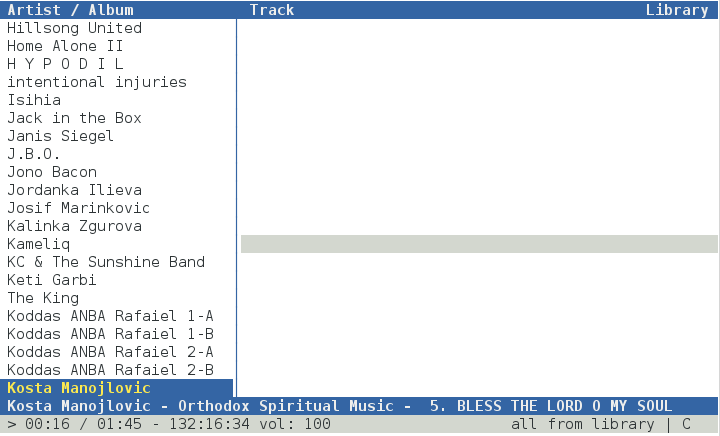
4. Cmus C Music Player (mp3 / wav / aac / flac / ogg vorbis) console player

Cmus tiny console terminal gnu linux mp3 music player screenshot
debian:~# apt-cache show cmus|grep -i description -A 2

Description-en: lightweight ncurses audio player
 C* Music Player is a modular and very configurable ncurses-based audio player.
 It has some interesting features like configurable colorscheme, mp3 and ogg

Install it with:

debian:~# apt-get install --yes cmus
...

Cmus tiny console terminal gnu linux mp3 music player screenshot
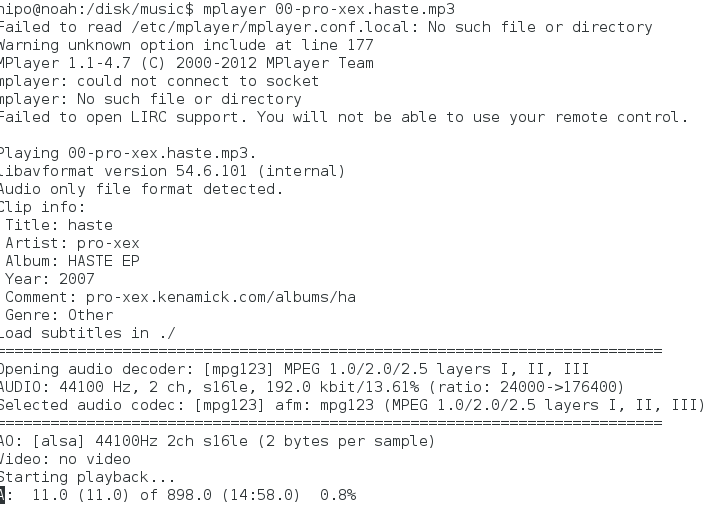
5.Good old but gold Mplayer

noah:~# apt-cache show mplayer|grep -i description -A 2

Description: Ultimate Movie Player For Linux.
 It plays most mpeg, avi and asf files, supported by many native and win32
 DLL codecs. You can watch VCD, DVD and even DivX movies too. The other

Description-en: movie player for Unix-like systems
 MPlayer plays most MPEG, VOB, AVI, Ogg/OGM, VIVO,
 ASF/WMA/WMV, QT/MOV/MP4, FLI, RM, NuppelVideo, yuv4mpeg, FILM, RoQ, PVA files,

noah:~# apt-get install --yes mplayer

playing music in console and terminal mplayer play mp3 ogg and videos in linux console


7. herrie – Minimalistic console music player

herrie linux console music player
Other newer player I just recently heard of is Herrie.
I red quite positive things about it, installed it but never got into habit of using it.

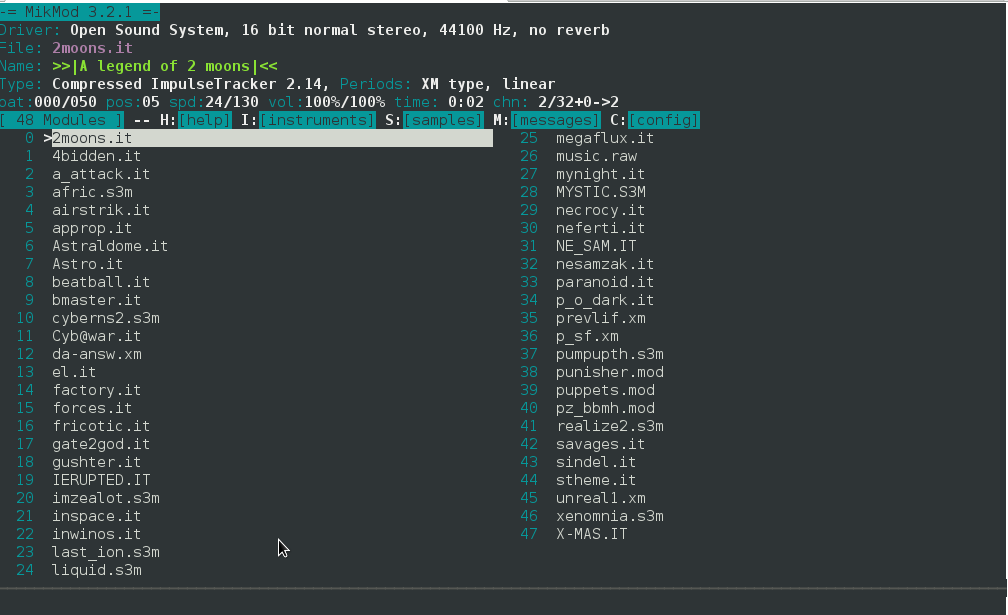
8. MikMod – Portable tracked music player

mikmod-console-mod-xm-it-old-school-music-format-player-for-gnu-linux-and-freebsd

Talking about geek music and old school stuff it is impossible not to mention MikMod. Even 12 years after i saw it for first time I still use it often to play cool music from modarchive.org. Its my personal believe MikMod is a player for hard core coders and hackers 🙂

noah:~# apt-cache show mikmod|grep -i description -A 2

Description-en: Portable tracked music player
 Mikmod is a very portable tracked music player which supports a wide
 variety of module formats including compressed sample Impulse Tracker

I'll be glad to hear from others what was your favourite console sound player

noah:~# apt-get install --yes mikmod
...

How to get full host and IP address of last month logged in users on GNU / Linux

Friday, December 21st, 2012

This post might be a bit trivial for the Linux gurus, but for novices Linux users hopefully helpful. I bet, all Linux users know and use the so common used last command.

last cmd provides information on last logged in users over the last 1 month time as well as shows if at present time of execution there are logged in users. It has plenty of options and is quite useful. The problem with it I have often, since I don't get into the habit to use it with arguments different from the so classical and often used:

last | less

back in time when learning Linux, is that whether run it like this I can't see full hostname of users who logged in or is currently logged in from remote hosts consisting of longer host names strings than 16 characters.

To show you what I mean, here is a chunk of  last | less output taken from my home router www.pc-freak.net.

# last|less
root     pts/1        ip156-108-174-82 Fri Dec 21 13:20   still logged in  
root     pts/0        ip156-108-174-82 Fri Dec 21 13:18   still logged in  
hipo     pts/0        ip156-108-174-82 Thu Dec 20 23:14 - 23:50  (00:36)   
root     pts/0        g45066.upc-g.che Thu Dec 20 22:31 - 22:42  (00:11)   
root     pts/0        g45066.upc-g.che Thu Dec 20 21:56 - 21:56  (00:00)   
play     pts/2        vexploit.net.s1. Thu Dec 20 17:30 - 17:31  (00:00)   
play     pts/2        vexploit.net.s1. Thu Dec 20 17:29 - 17:30  (00:00)   
play     pts/1        vexploit.net.s1. Thu Dec 20 17:27 - 17:29  (00:01)   
play     pts/1        vexploit.net.s1. Thu Dec 20 17:23 - 17:27  (00:03)   
play     pts/1        vexploit.net.s1. Thu Dec 20 17:21 - 17:23  (00:02)   

root     pts/0        ip156-108-174-82 Thu Dec 20 13:42 - 19:39  (05:56)   
reboot   system boot  2.6.32-5-amd64   Thu Dec 20 11:29 - 13:57 (1+02:27)  
root     pts/0        e59234.upc-e.che Wed Dec 19 20:53 - 23:24  (02:31)   

The hostname last cmd output as you can see is sliced, so one cannot see full hostname. This is quite inconvenient, especially, if you have on your system some users who logged in with suspicious hostnames like the user play which is a user, I've opened for people to be able to play my system installed Cool  Linux ASCII (text) Games. In normal means, I would skip worrying about the vexploit.net.s1…..  user, however as I've noticed one of the ascii games similar to nethack called hunt was kept hanging on the system putting a load of about 50% on the CPU   and was run with the play user and according to logs, the last logged in username with play was containing a hostname with "vexploit.net" as a hostname.

This looked to me very much like a script kiddie, attempt to root my system, so I killed hunt, huntd and HUNT hanging processes and decided investigate on the case.

I wanted to do whois on the host, but since the host was showing incomplete in last | less, I needed a way to get the full host. The first idea I got is to get the info from binary file /var/log/wtmp – storing the hostname records for all logged in users:

# strings /var/log/wtmp | grep -i vexploit | uniq
vexploit.net.s1.fti.net

To get in a bit raw format, all the hostnames and IPs (whether IP did not have a PTR record assigned):

strings /var/log/wtmp|grep -i 'ts/' -A 1|less

Another way to get the full host info is to check in /var/log/auth.log – this is the Debian Linux file storing ssh user login info; in Fedora and CentOS the file is /var/log/secure.

# grep -i vexploit auth.log
Dec 20 17:30:22 pcfreak sshd[13073]: pam_unix(sshd:auth): authentication failure; logname= uid=0 euid=0 tty=ssh ruser= rhost=vexploit.net.s1.fti.net  user=play

Finally, I decided to also check last man page and see if last is capable of showing full hostname or IPS of previously logged in hosts. It appears, last is having already an argument for that so my upper suggested methods, turned to be useless overcomplexity. To show full hostname of all hosts logged in on Linux over the last month:
 

# last -a |less

root     pts/2        Fri Dec 21 14:04   still logged in    ip156-108-174-82.adsl2.static.versatel.nl
root     pts/1        Fri Dec 21 13:20   still logged in    ip156-108-174-82.adsl2.static.versatel.nl
root     pts/0        Fri Dec 21 13:18   still logged in    ip156-108-174-82.adsl2.static.versatel.nl
hipo     pts/0        Thu Dec 20 23:14 - 23:50  (00:36)     ip156-108-174-82.adsl2.static.versatel.nl
root     pts/0        Thu Dec 20 22:31 - 22:42  (00:11)     g45066.upc-g.chello.nl
root     pts/0        Thu Dec 20 21:56 - 21:56  (00:00)     g45066.upc-g.chello.nl
play     pts/2        Thu Dec 20 17:30 - 17:31  (00:00)     vexploit.net.s1.fti.net
play     pts/2        Thu Dec 20 17:29 - 17:30  (00:00)     vexploit.net.s1.fti.net
play     pts/1        Thu Dec 20 17:27 - 17:29  (00:01)     vexploit.net.s1.fti.net
play     pts/1        Thu Dec 20 17:23 - 17:27  (00:03)     vexploit.net.s1.fti.net
play     pts/1        Thu Dec 20 17:21 - 17:23  (00:02)     vexploit.net.s1.fti.net
root     pts/0        Thu Dec 20 13:42 - 19:39  (05:56)     ip156-108-174-82.adsl2.static.versatel.nl
reboot   system boot  Thu Dec 20 11:29 - 14:58 (1+03:28)    2.6.32-5-amd64
root     pts/0        Wed Dec 19 20:53 - 23:24  (02:31)     e59234.upc-e.chello.nl

Listing all logged in users remote host IPs (only) is done with last's "-i" argument:

# last -i
root     pts/2        82.174.108.156   Fri Dec 21 14:04   still logged in  
root     pts/1        82.174.108.156   Fri Dec 21 13:20   still logged in  
root     pts/0        82.174.108.156   Fri Dec 21 13:18   still logged in  
hipo     pts/0        82.174.108.156   Thu Dec 20 23:14 - 23:50  (00:36)   
root     pts/0        80.57.45.66      Thu Dec 20 22:31 - 22:42  (00:11)   
root     pts/0        80.57.45.66      Thu Dec 20 21:56 - 21:56  (00:00)   
play     pts/2        193.252.149.203  Thu Dec 20 17:30 - 17:31  (00:00)   
play     pts/2        193.252.149.203  Thu Dec 20 17:29 - 17:30  (00:00)   
play     pts/1        193.252.149.203  Thu Dec 20 17:27 - 17:29  (00:01)   
play     pts/1        193.252.149.203  Thu Dec 20 17:23 - 17:27  (00:03)   
play     pts/1        193.252.149.203  Thu Dec 20 17:21 - 17:23  (00:02)   
root     pts/0        82.174.108.156   Thu Dec 20 13:42 - 19:39  (05:56)   
reboot   system boot  0.0.0.0          Thu Dec 20 11:29 - 15:01 (1+03:31)  

One note to make here is on every 1st number of month last command  clear ups the records storing for user logins in /var/log/wtmp and nullifies the file.

Though the other 2 suggested, methods are not necessary, as they are provided in last argument. They're surely a mus do routine, t when checking a system for which doubting it could have been intruded (hacked). Checking both /var/log/wtmp and /var/log/auth.log / and /var/log/auth.log.1 content and comparing if the records on user logins match is a good way to check if your login logs are not forged. It is not a 100% guarantee however, since sometimes attacker scripts wipe out their records from both files. Out of security interest some time, ago I've written a small script  to clean logged in user recordfrom /var/log/wtmp and /var/log/auth.log – log_cleaner.sh – the script has to be run as a super to have write access to /var/log/wtmp and /var/log/auth.log. It is good to mention for those who don't know, that last reads and displays its records from /var/log/wtmp file, thus altering records in this files will alter  last displayed login info.

Thanks God in my case after examing this files as well as super users in /etc/passwd,  there was no  "signs", of any succesful breach.


diskinfo Linux hdparm FreeBSD equivalent command for disk info and benchmarking

Thursday, March 8th, 2012

FreeBSD Linux hdparm equivalent is diskinfo artistic logo

On Linux there is the hdparm tool for various hard disk benchmarking and extraction of hard disk operations info.
As the Linux manual states hdparmget/set SATA/IDE device parameters

Most Linux users should already know it and might wonder if there is hdparm port or equivalent for FreeBSD, the aim of this short post is to shed some light on that.

The typical use of hdparm is like this:

linux:~# hdparm -t /dev/sda8

/dev/sda8:
Timing buffered disk reads: 76 MB in 3.03 seconds = 25.12 MB/sec
linux:~# hdparm -T /dev/sda8
/dev/sda8:
Timing cached reads: 1618 MB in 2.00 seconds = 809.49 MB/sec

The above output here is from my notebook Lenovo R61i.
If you're looking for alternative command to hdparm you should know in FreeBSD / OpenBSD / NetBSD, there is no exact hdparm equivalent command.
The somehow similar hdparm equivallent command for BSDs (FreeBSD etc.) is:
diskinfo

diskinfo is not so feature rich as linux's hdparm. It is just a simple command to show basic information for hard disk operations without no possibility to tune any hdd I/O and seek operations.
All diskinfo does is to show statistics for a hard drive seek times I/O overheads. The command takes only 3 arguments.

The most basic and classical use of the command is:

freebsd# diskinfo -t /dev/ad0s1a
/dev/ad0s1a
512 # sectorsize
20971520000 # mediasize in bytes (20G)
40960000 # mediasize in sectors
40634 # Cylinders according to firmware.
16 # Heads according to firmware.
63 # Sectors according to firmware.
ad:4JV48BXJs0s0 # Disk ident.

Seek times:
Full stroke: 250 iter in 3.272735 sec = 13.091 msec
Half stroke: 250 iter in 3.507849 sec = 14.031 msec
Quarter stroke: 500 iter in 9.705555 sec = 19.411 msec
Short forward: 400 iter in 2.605652 sec = 6.514 msec
Short backward: 400 iter in 4.333490 sec = 10.834 msec
Seq outer: 2048 iter in 1.150611 sec = 0.562 msec
Seq inner: 2048 iter in 0.215104 sec = 0.105 msec

Transfer rates:
outside: 102400 kbytes in 3.056943 sec = 33498 kbytes/sec
middle: 102400 kbytes in 2.696326 sec = 37978 kbytes/sec
inside: 102400 kbytes in 3.178711 sec = 32214 kbytes/sec

Another common use of diskinfo is to measure hdd I/O command overheads with -c argument:

freebsd# diskinfo -c /dev/ad0s1e
/dev/ad0s1e
512 # sectorsize
39112312320 # mediasize in bytes (36G)
76391235 # mediasize in sectors
75784 # Cylinders according to firmware.
16 # Heads according to firmware.
63 # Sectors according to firmware.
ad:4JV48BXJs0s4 # Disk ident.

I/O command overhead:
time to read 10MB block 1.828021 sec = 0.089 msec/sector
time to read 20480 sectors 4.435214 sec = 0.217 msec/sector
calculated command overhead = 0.127 msec/sector

Above diskinfo output is from my FreeBSD home router.

As you can see, the time to read 10MB block on my hard drive is 1.828021 (which is very high number),
this is a sign the hard disk experience too many read/writes and therefore needs to be shortly replaced with newer faster one.
diskinfo is part of the basis bsd install (bsd world). So it can be used without installing any bsd ports or binary packages.

For the purpose of stress testing hdd, or just some more detailed benchmarking on FreeBSD there are plenty of other tools as well.
Just to name a few:
 

  • rawio – obsolete in FreeBSD 7.x version branch (not available in BSD 7.2 and higher)
  • iozone, iozone21 – Tools to test the speed of sequential I/O to files
  • bonnie++ – benchmark tool capable of performing number of simple fs tests
  • bonnie – predecessor filesystem benchmark tool to bonnie++
  • raidtest – test performance of storage devices
  • mdtest – Software to test metadata performance on filsystems
  • filebench – tool for micro-benchmarking storage subsystems

Linux hdparm allows also changing / setting various hdd ATA and SATA settings. Similarly, to set and change ATA / SATA settings on FreeBSD there is the:

  • ataidle

tool.

As of time of writting ataidle is in port path /usr/ports/sysutils/ataidle/

To check it out install it as usual from the port location:

FreeBSD also has also the spindown port – a small program for handling automated spinning down ofSCSI harddrive
spindown is useful in setting values to SATA drives which has problems with properly controlling HDD power management.

To keep constant track on hard disk operations and preliminary warning in case of failing hard disks on FreeBSD there is also smartd service, just like in Linux.
smartd enables you to to control and monitor storage systems using the Self-Monitoring, Analysisand Reporting Technology System (S.M.A.R.T.) built into most modern ATA and SCSI hard disks.
smartd and smartctl are installable via the port /usr/ports/sysutils/smartmontools.

To install and use smartd, ataidle and spindown run:

freebsd# cd /usr/ports/sysutils/smartmontools
freebsd# make && make install clean
freebsd# cd /usr/ports/sysutils/ataidle/
freebsd# make && make install clean
freebsd# cd /usr/ports/sysutils/spindown/
freebsd# make && make install clean

Check each one's manual for more info.