Posts Tagged ‘machines’

Disable VNC on KVM Virtual Machine without VM restart / How to Change VNC listen address

Monday, February 28th, 2022

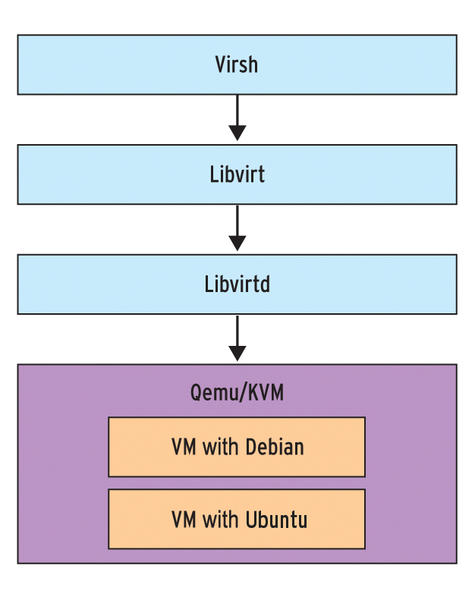
disable-vnc-port-listener-on-a-KVM-ran-virtual-machine-virsh-libvirt-libvirt-architecture-design

Say you have recently run a new KVM Virtual machine, have connected via VNC on lets say the default tcp port 5900 
installed a brand new Linux OS using a VNC client to connect, such as:
TightVNC / RealVNC if connecting from Windows Client machine or Vncviewer / Remmina if connecting from Linux / BSD  and now 
you want to turn off the VNC VM listener server either for security reasons to make sure some script kiddie random scanner did not manage to connect and take control over your VM or just because, you will be only further using the new configured VM only via SSH console sessions as they call it in modern times to make a buziness buzz out of it a headless UNIX server (server machines connected a network without a Physical monitor attached to it).


The question comes then how can be the KVM VNC listener on TCP port 5900 be completely disabled?

One way of course is to filter out with a firewall 5900 completely either on a Switch Level (lets say on a Cisco equipment catalist in front of the machine) or the worst solution to  locally filter directly on the server with firewalld or iptables chain rules.
 

1. Disable KVM VNC Port listener via VIRSH VM XML edit

The better way of course  is to completely disable the VNC using KVM, that is possible through the virsh command interface.
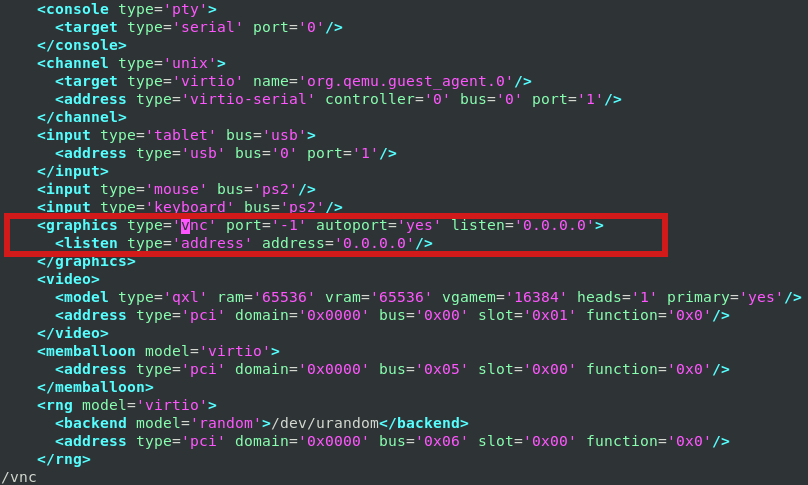
By editing the XML Virtual Machine configuration and finding the line about vnc confiuguration with:

root@server:/kvm/disk# virsh edit pcfreakweb
Domain pcfreakweb XML configuration not changed.

like:

<graphics type='vnc' port='5900' autoport='yes' listen='0.0.0.0'>
      <listen type='address' address='0.0.0.0'/>


and set value to undefined:

port='-1'


virsh-KVM-disable-VNC-port-listener-virsh-xml-edit-screenshot

Modifying the XML however will require you to reboot the Virtual Machine for which XML was editted. This might be not possible
if you have a running production server already configured with Apache / Proxy / PostgreSQL / Mail or any other Internet public service.

2. Disable VNC KVM TCP port 5900 to a dynamic running VM without a machine reboot


Thus if you want to remove the KVM VNC Port Listener on 5900 without a VM shutdown / reboot you can do it via KVM's virsh client interface.

root@server:/kvm/disk# virsh
Welcome to virsh, the virtualization interactive terminal.

Type:  'help' for help with commands
       'quit' to quit

virsh # qemu-monitor-command pcfreakweb –hmp change  vnc none


The virsh management user interface client, can do pretty much more of real time VM changes, it is really useful to use it if you have KVM Hypervisor hosts with 10+ Virtual machines and it if you have to deal with KVM machines on daily, do specific changes to the VMs on how VM networks are configured, information on HV hardware, configure / reconfigure storage volumes to VMs etc, take some time to play with it 🙂

How to filter dhcp traffic between two networks running separate DHCP servers to prevent IP assignment issues and MAC duplicate addresses

Tuesday, February 8th, 2022

how-to-filter-dhcp-traffic-2-networks-running-2-separate-dhcpd-servers-to-prevent-ip-assignment-conflicts-linux
Tracking the Problem of MAC duplicates on Linux routers
 

If you have two networks that see each other and they're not separated in VLANs but see each other sharing a common netmask lets say 255.255.254.0 or 255.255.252.0, it might happend that there are 2 dhcp servers for example (isc-dhcp-server running on 192.168.1.1 and dhcpd running on 192.168.0.1 can broadcast their services to both LANs 192.168.1.0.1/24 (netmask 255.255.255.0) and Local Net LAN 192.168.1.1/24. The result out of this is that some devices might pick up their IP address via DHCP from the wrong dhcp server.

Normally if you have a fully controlled little or middle class home or office network (10 – 15 electronic devices nodes) connecting to the LAN in a mixed moth some are connected via one of the Networks via connected Wifi to 192.168.1.0/22 others are LANned and using static IP adddresses and traffic is routed among two ISPs and each network can see the other network, there is always a possibility of things to go wrong. This is what happened to me so this is how this post was born.

The best practice from my experience so far is to define each and every computer / phone / laptop host joining the network and hence later easily monitor what is going on the network with something like iptraf-ng / nethogs  / iperf – described in prior  how to check internet spepeed from console and in check server internet connectivity speed with speedtest-cliiftop / nload or for more complex stuff wireshark or even a simple tcpdump. No matter the tools network monitoring is only part on solving network issues. A very must have thing in a controlled network infrastructure is defining every machine part of it to easily monitor later with the monitoring tools. Defining each and every host on the Hybrid computer networks makes administering the network much easier task and  tracking irregularities on time is much more likely. 

Since I have such a hybrid network here hosting a couple of XEN virtual machines with Linux, Windows 7 and Windows 10, together with Mac OS X laptops as well as MacBook Air notebooks, I have followed this route and tried to define each and every host based on its MAC address to pick it up from the correct DHCP1 server  192.168.1.1 (that is distributing IPs for Internet Provider 1 (ISP 1), that is mostly few computers attached UTP LAN cables via LiteWave LS105G Gigabit Switch as well from DHCP2 – used only to assigns IPs to servers and a a single Wi-Fi Access point configured to route incoming clients via 192.168.0.1 Linux NAT gateway server.

To filter out the unwanted IPs from the DHCPD not to propagate I've so far used a little trick to  Deny DHCP MAC Address for unwanted clients and not send IP offer for them.

To give you more understanding,  I have to clear it up I don't want to have automatic IP assignments from DHCP2 / LAN2 to DHCP1 / LAN1 because (i don't want machines on DHCP1 to end up with IP like 192.168.0.50 or DHCP2 (to have 192.168.1.80), as such a wrong IP delegation could potentially lead to MAC duplicates IP conflicts. MAC Duplicate IP wrong assignments for those older or who have been part of administrating large ISP network infrastructures  makes the network communication unstable for no apparent reason and nodes partially unreachable at times or full time …

However it seems in the 21-st century which is the century of strangeness / computer madness in the 2022, technology advanced so much that it has massively started to break up some good old well known sysadmin standards well documented in the RFCs I know of my youth, such as that every electronic equipment manufactured Vendor should have a Vendor Assigned Hardware MAC Address binded to it that will never change (after all that was the idea of MAC addresses wasn't it !). 
Many mobile devices nowadays however, in the developers attempts to make more sophisticated software and Increase Anonimity on the Net and Security, use a technique called  MAC Address randomization (mostly used by hackers / script kiddies of the early days of computers) for their Wi-Fi Net Adapter OS / driver controlled interfaces for the sake of increased security (the so called Private WiFi Addresses). If a sysadmin 10-15 years ago has seen that he might probably resign his profession and turn to farming or agriculture plant growing, but in the age of digitalization and "cloud computing", this break up of common developed network standards starts to become the 'new normal' standard.

I did not suspected there might be a MAC address oddities, since I spare very little time on administering the the network. This was so till recently when I accidently checked the arp table with:

Hypervisor:~# arp -an
192.168.1.99     5c:89:b5:f2:e8:d8      (Unknown)
192.168.1.99    00:15:3e:d3:8f:76       (Unknown)

..


and consequently did a network MAC Address ARP Scan with arp-scan (if you never used this little nifty hacker tool I warmly recommend it !!!)
If you don't have it installed it is available in debian based linuces from default repos to install

Hypervisor:~# apt-get install –yes arp-scan


It is also available on CentOS / Fedora / Redhat and other RPM distros via:

Hypervisor:~# yum install -y arp-scan


Hypervisor:~# arp-scan –interface=eth1 192.168.1.0/24

192.168.1.19    00:16:3e:0f:48:05       Xensource, Inc.
192.168.1.22    00:16:3e:04:11:1c       Xensource, Inc.
192.168.1.31    00:15:3e:bb:45:45       Xensource, Inc.
192.168.1.38    00:15:3e:59:96:8e       Xensource, Inc.
192.168.1.34    00:15:3e:d3:8f:77       Xensource, Inc.
192.168.1.60    8c:89:b5:f2:e8:d8       Micro-Star INT'L CO., LTD
192.168.1.99     5c:89:b5:f2:e8:d8      (Unknown)
192.168.1.99    00:15:3e:d3:8f:76       (Unknown)

192.168.x.91     02:a0:xx:xx:d6:64        (Unknown)
192.168.x.91     02:a0:xx:xx:d6:64        (Unknown)  (DUP: 2)

N.B. !. I found it helpful to check all available interfaces on my Linux NAT router host.

As you see the scan revealed, a whole bunch of MAC address mess duplicated MAC hanging around, destroying my network topology every now and then 
So far so good, the MAC duplicates and strangely hanging around MAC addresses issue, was solved relatively easily with enabling below set of systctl kernel variables.
 

1. Fixing Linux ARP common well known Problems through disabling arp_announce / arp_ignore / send_redirects kernel variables disablement


Linux answers ARP requests on wrong and unassociated interfaces per default. This leads to the following two problems:

ARP requests for the loopback alias address are answered on the HW interfaces (even if NOARP on lo0:1 is set). Since loopback aliases are required for DSR (Direct Server Return) setups this problem is very common (but easy to fix fortunately).

If the machine is connected twice to the same switch (e.g. with eth0 and eth1) eth2 may answer ARP requests for the address on eth1 and vice versa in a race condition manner (confusing almost everything).

This can be prevented by specific arp kernel settings. Take a look here for additional information about the nature of the problem (and other solutions): ARP flux.

To fix that generally (and reboot safe) we  include the following lines into


Hypervisor:~# cp -rpf /etc/sysctl.conf /etc/sysctl.conf_bak_07-feb-2022
Hypervisor:~# cat >> /etc/sysctl.conf

# LVS tuning
net.ipv4.conf.lo.arp_ignore=1
net.ipv4.conf.lo.arp_announce=2
net.ipv4.conf.all.arp_ignore=1
net.ipv4.conf.all.arp_announce=2

net.ipv4.conf.all.send_redirects=0
net.ipv4.conf.eth0.send_redirects=0
net.ipv4.conf.eth1.send_redirects=0
net.ipv4.conf.default.send_redirects=0

Press CTRL + D simultaneusly to Write out up-pasted vars.


To read more on Load Balancer using direct routing and on LVS and the arp problem here


2. Digging further the IP conflict / dulicate MAC Problems

Even after this arp tunings (because I do have my Hypervisor 2 LAN interfaces connected to 1 switch) did not resolved the issues and still my Wireless Connected devices via network 192.168.1.1/24 (ISP2) were randomly assigned the wrong range IPs 192.168.0.XXX/24 as well as the wrong gateway 192.168.0.1 (ISP1).
After thinking thoroughfully for hours and checking the network status with various tools and thanks to the fact that my wife has a MacBook Air that was always complaining that the IP it tried to assign from the DHCP was already taken, i"ve realized, something is wrong with DHCP assignment.
Since she owns a IPhone 10 with iOS and this two devices are from the same vendor e.g. Apple Inc. And Apple's products have been having strange DHCP assignment issues from my experience for quite some time, I've thought initially problems are caused by software on Apple's devices.
I turned to be partially right after expecting the logs of DHCP server on the Linux host (ISP1) finding that the phone of my wife takes IP in 192.168.0.XXX, insetad of IP from 192.168.1.1 (which has is a combined Nokia Router with 2.4Ghz and 5Ghz Wi-Fi and LAN router provided by ISP2 in that case Vivacom). That was really puzzling since for me it was completely logical thta the iDevices must check for DHCP address directly on the Network of the router to whom, they're connecting. Guess my suprise when I realized that instead of that the iDevices does listen to the network on a wide network range scan for any DHCPs reachable baesd on the advertised (i assume via broadcast) address traffic and try to connect and take the IP to the IP of the DHCP which responds faster !!!! Of course the Vivacom Chineese produced Nokia router responded DHCP requests and advertised much slower, than my Linux NAT gateway on ISP1 and because of that the Iphone and iOS and even freshest versions of Android devices do take the IP from the DHCP that responds faster, even if that router is not on a C class network (that's invasive isn't it??). What was even more puzzling was the automatic MAC Randomization of Wifi devices trying to connect to my ISP1 configured DHCPD and this of course trespassed any static MAC addresses filtering, I already had established there.

Anyways there was also a good think out of tthat intermixed exercise 🙂 While playing around with the Gigabit network router of vivacom I found a cozy feature SCHEDULEDING TURNING OFF and ON the WIFI ACCESS POINT  – a very useful feature to adopt, to stop wasting extra energy and lower a bit of radiation is to set a swtich off WIFI AP from 12:30 – 06:30 which are the common sleeping hours or something like that.
 

3. What is MAC Randomization and where and how it is configured across different main operating systems as of year 2022?

Depending on the operating system of your device, MAC randomization will be available either by default on most modern mobile OSes or with possibility to have it switched on:

  • Android Q: Enabled by default 
  • Android P: Available as a developer option, disabled by default
  • iOS 14: Available as a user option, disabled by default
  • Windows 10: Available as an option in two ways – random for all networks or random for a specific network

Lately I don't have much time to play around with mobile devices, and I do not my own a luxury mobile phone so, the fact this ne Androids have this MAC randomization was unknown to me just until I ended a small mess, based on my poor configured networks due to my tight time constrains nowadays.

Finding out about the new security feature of MAC Randomization, on all Android based phones (my mother's Nokia smartphone and my dad's phone, disabled the feature ASAP:


4. Disable MAC Wi-Fi Ethernet device Randomization on Android

MAC Randomization creates a random MAC address when joining a Wi-Fi network for the first time or after “forgetting” and rejoining a Wi-Fi network. It Generates a new random MAC address after 24 hours of last connection.

Disabling MAC Randomization on your devices. It is done on a per SSID basis so you can turn off the randomization, but allow it to function for hotspots outside of your home.

  1. Open the Settings app
  2. Select Network and Internet
  3. Select WiFi
  4. Connect to your home wireless network
  5. Tap the gear icon next to the current WiFi connection
  6. Select Advanced
  7. Select Privacy
  8. Select "Use device MAC"
     

5. Disabling MAC Randomization on MAC iOS, iPhone, iPad, iPod

To Disable MAC Randomization on iOS Devices:

Open the Settings on your iPhone, iPad, or iPod, then tap Wi-Fi or WLAN


  1. Tap the information button next to your network
  2. Turn off Private Address
  3. Re-join the network


Of course next I've collected their phone Wi-Fi adapters and made sure the included dhcp MAC deny rules in /etc/dhcp/dhcpd.conf are at place.

The effect of the MAC Randomization for my Network was terrible constant and strange issues with my routings and networks, which I always thought are caused by the openxen hypervisor Virtualization VM bugs etc.

That continued for some months now, and the weird thing was the issues always started when I tried to update my Operating system to the latest packetset, do a reboot to load up the new piece of software / libraries etc. and plus it happened very occasionally and their was no obvious reason for it.


6. How to completely filter dhcp traffic between two network router hosts
IP 192.168.0.1 / 192.168.1.1 to stop 2 or more configured DHCP servers
on separate networks see each other

To prevent IP mess at DHCP2 server side (which btw is ISC DHCP server, taking care for IP assignment only for the Servers on the network running on Debian 11 Linux), further on I had to filter out any DHCP UDP traffic with iptables completely.
To prevent incorrect route assignments assuming that you have 2 networks and 2 routers that are configurred to do Network Address Translation (NAT)-ing Router 1: 192.168.0.1, Router 2: 192.168.1.1.

You have to filter out UDP Protocol data on Port 67 and 68 from the respective source and destination addresses.

In firewall rules configuration files on your Linux you need to have some rules as:

# filter outgoing dhcp traffic from 192.168.1.1 to 192.168.0.1
-A INPUT -p udp -m udp –dport 67:68 -s 192.168.1.1 -d 192.168.0.1 -j DROP
-A OUTPUT -p udp -m udp –dport 67:68 -s 192.168.1.1 -d 192.168.0.1 -j DROP
-A FORWARD -p udp -m udp –dport 67:68 -s 192.168.1.1 -d 192.168.0.1 -j DROP

-A INPUT -p udp -m udp –dport 67:68 -s 192.168.0.1 -d 192.168.1.1 -j DROP
-A OUTPUT -p udp -m udp –dport 67:68 -s 192.168.0.1 -d 192.168.1.1 -j DROP
-A FORWARD -p udp -m udp –dport 67:68 -s 192.168.0.1 -d 192.168.1.1 -j DROP

-A INPUT -p udp -m udp –sport 67:68 -s 192.168.1.1 -d 192.168.0.1 -j DROP
-A OUTPUT -p udp -m udp –sport 67:68 -s 192.168.1.1 -d 192.168.0.1 -j DROP
-A FORWARD -p udp -m udp –sport 67:68 -s 192.168.1.1 -d 192.168.0.1 -j DROP


You can download also filter_dhcp_traffic.sh with above rules from here


Applying this rules, any traffic of DHCP between 2 routers is prohibited and devices from Net: 192.168.1.1-255 will no longer wrongly get assinged IP addresses from Network range: 192.168.0.1-255 as it happened to me.


7. Filter out DHCP traffic based on MAC completely on Linux with arptables

If even after disabling MAC randomization on all devices on the network, and you know physically all the connecting devices on the Network, if you still see some weird MAC addresses, originating from a wrongly configured ISP traffic router host or whatever, then it is time to just filter them out with arptables.

## drop traffic prevent mac duplicates due to vivacom and bergon placed in same network – 255.255.255.252
dchp1-server:~# arptables -A INPUT –source-mac 70:e2:83:12:44:11 -j DROP


To list arptables configured on Linux host

dchp1-server:~# arptables –list -n


If you want to be paranoid sysadmin you can implement a MAC address protection with arptables by only allowing a single set of MAC Addr / IPs and dropping the rest.

dchp1-server:~# arptables -A INPUT –source-mac 70:e2:84:13:45:11 -j ACCEPT
dchp1-server:~# arptables -A INPUT  –source-mac 70:e2:84:13:45:12 -j ACCEPT


dchp1-server:~# arptables -L –line-numbers
Chain INPUT (policy ACCEPT)
1 -j DROP –src-mac 70:e2:84:13:45:11
2 -j DROP –src-mac 70:e2:84:13:45:12

Once MACs you like are accepted you can set the INPUT chain policy to DROP as so:

dchp1-server:~# arptables -P INPUT DROP


If you later need to temporary, clean up the rules inside arptables on any filtered hosts flush all rules inside INPUT chain, like that
 

dchp1-server:~#  arptables -t INPUT -F
Linux script to periodically log enabled systemctl services, configured network IPs and routings, server established connections and iptables firewall rules

Tuesday, January 25th, 2022

bash-script-command-line-script-logo

For those who are running some kind of server be it virtual or physical, where multiple people or many systemins have access, sometimes it could be quite a mess as someone due to miscommunication or whatever could change something on the configured Network Ethernet interfaces, or configured routing tables, or simply issue an update which might change the set of automatically set to run systemctl services due to update. Such changes on a Linux server Operating system often can remain unnoticed and could cause quite a harm. Even when the change is noticed the logical question occurs what was the previous network route on the server or what kind of network was configured on Ethernet interface ethX etc. 
Problems like the described where, pretty common in many public Private Clouds or VMWare / XEN based Hypervisors that host multiple  Virtual machines, for that reason I've developed a small script which is pretty dumb on the first glimpse but mostly useful as it keeps historical records of such important information.
 

#!/bin/sh
# script to show configured services on system, configured IPs, netstat state and network routes
# Script to be used during CentOS and Redhat Enterprise Linux RPM package updates with yum

output_file=network_ip_routes_services_status;
ddate=$(date '+%Y-%m-%d_%H-%M-%S');
iptables=$(which iptables);
if [ ! -d /root/logs/ ]; then
mkdir /root/logs/;
fi

echo "STARTED: $(date '+%Y-%m-%d_%H-%M-%S'):" | tee -a /root/logs/$output_file-$(hostname)-$ddate.log
echo -e "# systemctl list-unit-files\n" | tee -a /root/logs/$output_file-$(hostname)-$ddate.log
systemctl list-unit-files –type=service | grep enabled | tee -a /root/logs/$output_file-$(hostname)-$ddate.log
echo -e '# systemctl | grep ".service" | grep "running"\n' | tee -a /root/logs/$output_file-$(hostname)-$ddate.log
systemctl | grep ".service" | grep "running" | tee -a /root/logs/$output_file-$(hostname)-$ddate.log
echo -e "# netstat -tulpn\n" | tee -a /root/logs/$output_file-$(hostname)-$ddate.log
netstat -tulpn | tee -a /root/logs/$output_file-$(hostname)-$ddate.log
echo -e "# netstat -r\n" | tee -a /root/logs/$output_file-$(hostname)-$ddate.log
netstat -r | tee -a /root/logs/$output_file-$(hostname)-$ddate.log
echo -e "# ip a s\n" | tee -a /root/logs/$output_file-$(hostname)-$ddate.log
ip a s | tee -a /root/logs/$output_file-$(hostname)-$ddate.log
echo -e "# /sbin/route -n\n" | tee -a /root/logs/$output_file-$(hostname)-$ddate.log
/sbin/route -n | tee -a /root/logs/$output_file-$(hostname)-$ddate.log
echo -e "# $iptables -L -n\n" | tee -a /root/logs/$output_file-$(hostname)-$ddate.log
echo -e "# $iptables -t nat -L" | tee -a /root/logs/$output_file-$(hostname)-$ddate.log
$iptables -L -n | tee -a /root/logs/$output_file-$(hostname)-$ddate.log
$iptables -t nat -L | tee -a /root/logs/$output_file-$(hostname)-$ddate.log
echo "ENDED $(date '+%Y-%m-%d_%H-%M-%S'):" | tee -a /root/logs/$output_file-$(hostname)-$ddate.log


Script produces its logs inside  /root/logs/network_ip_routes_services_status*hostname*currentdate*.log, put the script inside /root/ or wherever you like.

To keep an eye how network routing or ip configuration or firewall changed or there was a peak with the established connections towards daemons running on host (lets say requiring a machine upgrade), I've set the script to run as usually via cron job at the end of the predefined cron job tasks, like so:

# crontab -u root -e
# periodic dump and log network routing tables, netstat and systemctl list-unit-files
*/1 01 01,25 * * /root/show_running_services_netstat_ips_route1.sh 2>&1 >/dev/null

You can download a copy of show_running_services_netstat_ips_route1.sh script here.
The script is written without much of efficiency on mind, as you can see the with the multiple tee -a and for critical hosts it might be a good idea to rewrite it to use '>>' OPERAND instead, anyhows as most machines today are pretty powerful it doesn't really matter much.

Of course today such a script is quite archaic, as most big corporations are using much more complex monitoring software such as Zabbix, Prometheus or if some kind of Elastic Search is used Kibana etc. but for a basic needs and even for a double checking and comparing with other more advanced monitoring tools  (in case if monitoring tools  database gets damaged or temporary down until backupped), still I think such an oldschool simple monitoring script can be of use.

A good addition to that if you use a central logging server is to set another cron to periodically synchronize produced /root/logs/* to somewhere, here is how to do it with simple rsync (considering your host is configured to login with a user without password with ssh key authentication).

# HOSTNAME=$(hostname); rsync -axHv –ignore-existing -e 'ssh -p 22' /bashscripts/  -q -i –out-format="%t %f %b" –log-file=/var/log/rsync_sync_jobs.log –info=progress2 root@BACKUP_SERVER_HOST:/$(HOSTNAME)-logs/

Once something strange occurs with the machine, like the machine needs to be rebuild

I would be glad to hear if some of my readers uses some useful script which I can adopt myself. Cheers  🙂

Defining multiple short Server Hostname aliases via SSH config files and defining multiple ssh options for it, Use passwordless authentication via public keys

Thursday, September 16th, 2021

using-ssh-host-acronym-aliases-ssh-client-explained-openssh-logo

In case you have to access multiple servers from your terminal client such as gnome-terminal, kterminal (if on Linux) or something such as mobaxterm + cygwin (if on Windows) with an opens ssh client (ssh command). There is a nifty trick to save time and keyboard typing through creating shortcuts aliases by adding few definitions inside your $HOME/.ssh/config ( ~/.ssh/config ) for your local non root user or even make the configuration system wide (for all existing local /etc/passwd users) via /etc/ssh/ssh_config.
By adding a pseudonym alias for each server it makes sysadmin life much easier as you don't have to type in each time the FQDN (Fully Qualified Domain Name) hostname of remote accessed Linux / Unix / BSD / Mac OS or even Windows sshd ready hosts accessible via remote TCP/IP port 22.


1. Adding local user remote server pointer aliases via ~/.ssh/config


The file ~/.ssh/config is read by the ssh client part of the openssh-client (Linux OS package) on each invokement of the client, and besides defining a pseudonym for the hosts you like to save you time when accessing remote host and hence increase your productivity. Moreover you can also define various other nice options through it to define specifics of remote ssh session for each desired host such as remote host default SSH port (for example if your OpenSSHD is configured to run on non-standard SSH port as lets say 2022 instead of default port TCP 22 for some reason, e.g. security through obscurity etc.).


The general syntax of .ssh/config file si simplistic, it goes like this:
 

Host MACHNE_HOSTNAME

SSH_OPTION1 value1
SSH_OPTION1 value1 value2
SSH_OPTION2 value1 value2


Host MACHNE_HOSTNAME

SSH_OPTION value
SSH_OPTION1 value1 value2

  • Another understood syntax if you prefer to not have empty whitespaces is to use ( = )
    between the parameter name and values.

Host MACHINE_HOSTNAME
SSH_config=value
SSH_config1=value1 value2

  • All empty lines and lines starting with the hash shebang sign ( # ) would be ignored.
  • All values are case-sensitive, but parameter names are not.

If you have never so far used the $HOME/.ssh/config you would have to create the file and set the proper permissions to it like so:

mkdir -p $HOME/.ssh
chmod 0700 $HOME/.ssh


Below are examples taken from my .ssh/config configuration for all subdomains for my pcfreak.org domain


# Ask for password for every subdomain under pc-freak.net for security
Host *.pcfreak.org
user hipopo
passwordauthentication yes
StrictHostKeyChecking no

# ssh public Key authentication automatic login
Host www1.pc-freak.net
user hipopo
Port 22
passwordauthentication no
StrictHostKeyChecking no

UserKnownHostsFile /dev/null

Host haproxy2
    Hostname 213.91.190.233
    User root
    Port 2218
    PubkeyAuthentication yes
    IdentityFile ~/.ssh/haproxy2.pub    
    StrictHostKeyChecking no
    LogLevel INFO     

Host pcfrxenweb
    Hostname 83.228.93.76
    User root
    Port 2218

    PubkeyAuthentication yes
    IdentityFile ~/.ssh/pcfrxenweb.key    
    StrictHostKeyChecking no

Host pcfreak-sf
    Hostname 91.92.15.51
    User root
    Port 2209
    PreferredAuthentications password
    StrictHostKeyChecking no

    Compression yes


As you can see from above configuration the Hostname could be referring either to IP address or to Hostname.

Now to connect to defined IP 91.92.15.51 you can simply refer to its alias

$ ssh pcfreak-sf -v

and you end up into the machine ssh on port 2209 and you will be prompted for a password.

$ ssh pcfrxenweb -v


would lead to IP 83.228.93.76 SSH on Port 2218 and will use the defined public key for a passwordless login and will save you the password typing each time.

Above ssh command is a short alias you can further use instead of every time typing:

$ ssh -i ~/.ssh/pcfrxenweb.key -p 2218 root@83.228.93.76

There is another nifty trick worthy to mention, if you have a defined hostname such as the above config haproxy2 to use a certain variables, but you would like to override some option for example you don't want to connet by default with User root, but some other local account, lets say ssh as devuser@haproxy2 you can type:

$ ssh -o "User=dev" devuser

StrictHostKeyChecking no

– variable will instruct the ssh to not check if the finger print of remote host has changed. Usually this finger print check sum changes in case if for example for some reason the opensshd gets updated or the default /etc/ssh/ssh_host_dsa_key /etc/ssh/sshd_host_dsa_* files have changed due to some reason.
Of course you should use this option only if you tend to access your remote host via a secured VPN or local network, otherwise the Host Key change could be an indicator someone is trying to intercept your ssh session.


Compression yes


– variable  enables compression of connection saves few bits was useful in the old modem telephone lines but still could save you few bits
It is also possible to define a full range of IP addresses to be accessed with one single public rsa / dsa key

Below .ssh/config
 

Host 192.168.5.?
     Hostname 192.168.2.18
     User admin
     IdentityFile ~/.ssh/id_ed25519.pub


Would instruct each host attemted to be reached in the IP range of 192.168.2.1-254 to be automatically reachable by default with ssh client with admin user and the respective ed25519.pub key.
 

$ ssh 192.168.1.[1-254] -v


2. Adding ssh client options system wide for all existing local or remote LDAP login users


The way to add any Host block is absolutely the same as with a default user except you need to add the configuration to /etc/ssh/ssh_config. Here is a confiugaration from mine Latest Debian Linux

$ cat /etc/ssh/ssh_config

# This is the ssh client system-wide configuration file.  See
# ssh_config(5) for more information.  This file provides defaults for
# users, and the values can be changed in per-user configuration files
# or on the command line.

# Configuration data is parsed as follows:
#  1. command line options
#  2. user-specific file
#  3. system-wide file
# Any configuration value is only changed the first time it is set.
# Thus, host-specific definitions should be at the beginning of the
# configuration file, and defaults at the end.

# Site-wide defaults for some commonly used options.  For a comprehensive
# list of available options, their meanings and defaults, please see the
# ssh_config(5) man page.

Host *
#   ForwardAgent no
#   ForwardX11 no
#   ForwardX11Trusted yes
#   PasswordAuthentication yes
#   HostbasedAuthentication no
#   GSSAPIAuthentication no
#   GSSAPIDelegateCredentials no
#   GSSAPIKeyExchange no
#   GSSAPITrustDNS no
#   BatchMode no
#   CheckHostIP yes
#   AddressFamily any
#   ConnectTimeout 0
#   StrictHostKeyChecking ask
#   IdentityFile ~/.ssh/id_rsa
#   IdentityFile ~/.ssh/id_dsa
#   IdentityFile ~/.ssh/id_ecdsa
#   IdentityFile ~/.ssh/id_ed25519
#   Port 22
#   Protocol 2
#   Ciphers aes128-ctr,aes192-ctr,aes256-ctr,aes128-cbc,3des-cbc
#   MACs hmac-md5,hmac-sha1,umac-64@openssh.com
#   EscapeChar ~
#   Tunnel no
#   TunnelDevice any:any
#   PermitLocalCommand no
#   VisualHostKey no
#   ProxyCommand ssh -q -W %h:%p gateway.example.com
#   RekeyLimit 1G 1h
    SendEnv LANG LC_*
    HashKnownHosts yes
    GSSAPIAuthentication yes

As you can see pretty much can be enabled by default such as the forwarding of the Authentication agent option ( -A ) option, necessery for some Company server environments to be anbled. So if you have to connect to remote host with enabled Agent Forwarding instead of typing

ssh -A user@remotehostname


To enable Agent Forwarding instead of

ssh -X user@remotehostname


Simply uncomment and set to yes
 

ForwardX11 yes
ForwardX11Trusted yes


Just simply uncomment above's config ForwardAgent no

As you can see ssh could do pretty much, you can configure enable SSH Tunneling or run via a Proxy with the ProxyCommand (If it is the first time you hear about ProxyCommand I warmly recommend you check my previous article – How to pass SSH traffic through a secured Corporate Proxy Server with corkscrew).

Sometimes for a defines hostname, due to changes on remote server ssh configuration, SSH encryption type or a host key removal you might end up with issues connecting, therefore to override all the previously defined options inside .ssh/config by ignoring the configuration with -F /dev/null

$ ssh -F /dev/null user@freak -v


What we learned ?

To sum it up In this article, we have learned how to easify the stressed sysadmin life, by adding Aliases with certain port numbering and configurations for different remote SSH administrated Linux / Unix, hosts via local ~/.ssh/config or global wide /etc/ssh/ssh_config configuration options, as well as how already applied configuration from ~/.ssh/config affecting each user ssh command execution, could be overriden.

How to automate open xen Hypervisor Virtual Machines backups shell script

Tuesday, June 22nd, 2021

openxen-backup-logo As a sysadmin that have my own Open Xen Debian Hypervisor running on a Lenovo ThinkServer few months ago due to a human error I managed to mess up one of my virtual machines and rebuild the Operating System from scratch and restore files service and MySQl data from backup that really pissed me of and this brought the need for having a decent Virtual Machine OpenXen backup solution I can implement on the Debian ( Buster) 10.10 running the free community Open Xen version 4.11.4+107-gef32c7afa2-1. The Hypervisor is a relative small one holding just 7 VM s:

HypervisorHost:~#  xl list
Name                                        ID   Mem VCPUs      State   Time(s)
Domain-0                                     0 11102    24     r—–  214176.4
pcfrxenweb                                  11 12288     4     -b—-  247425.5
pcfrxen                                     12 16384    10     -b—-  1371621.4
windows7                                    20  4096     2     -b—-   97887.2
haproxy2                                    21  4096     2     -b—-   11806.9
jitsi-meet                                  22  2048     2     -b—-   12843.9
zabbix                                      23  2048     2     -b—-   20275.1
centos7                                     24  2040     2     -b—-   10898.2

HypervisorHost:~# xl list|grep -v 'Name ' |grep  -v 'Domain-0'  |wc -l
7


The backup strategy of the script is very simple to shutdown the running VM machine, make a copy with rsync to a backup location the image of each of the Virtual Machines in a bash shell loop for each virtual machine shown in output of xl command and backup to a preset local directory in my case this is /backups/ the backup of each virtual machine is produced within a separate backup directory with a respective timestamp. Backup VM .img files are produced in my case to mounted 2x external attached hard drives each of which is a 4 Terabyte Seagate Plus Backup (Storage). The original version of the script was made to be a slightly different by Zhiqiang Ma whose script I used for a template to come up with my xen VM backup solution. To prevent the Hypervisor's load the script is made to do it with a nice of (nice -n 10) this might be not required or you might want to modify it to better suit your needs. Below is the script itself you can fetch a copy of it /usr/sbin/xen_vm_backups.sh :

#!/bin/bash

# Author: Zhiqiang Ma (http://www.ericzma.com/)
# Modified to work with xl and OpenXen by Georgi Georgiev – https://pc-freak.net
# Original creation dateDec. 27, 2010
# Script takes all defined vms under xen_name_list and prepares backup of each
# after shutting down the machine prepares archive and copies archive in externally attached mounted /backup/disk1 HDD
# Latest update: 08.06.2021 G. Georgiev – hipo@pc-freak.net

mark_file=/backups/disk1/tmp/xen-bak-marker
log_file=/var/log/xen/backups/bak-$(date +%Y_%m_%d).log
err_log_file=/var/log/xen/backups/bak_err-$(date +%H_%M_%Y_%m_%d).log
xen_dir=/xen/domains
xen_vmconfig_dir=/etc/xen/
local_bak_dir=/backups/disk1/tmp
#bak_dir=xenbak@backup_host1:/lhome/xenbak
bak_dir=/backups/disk1/xen-backups/xen_images/$(date +%Y_%m_%d)/xen/domains
#xen_name_list="haproxy2 pcfrxenweb jitsi-meet zabbix windows7 centos7 pcfrxenweb pcfrxen"
xen_name_list="windows7 haproxy2 jitsi-meet zabbix centos7"

if [ ! -d /var/log/xen/backups ]; then
echo mkdir -p /var/log/xen/backups
 mkdir -p /var/log/xen/backups
fi

if [ ! -d $bak_dir ]; then
echo mkdir -p $bak_dir
 mkdir -p $bak_dir

fi


# check whether bak runned last week
if [ -e $mark_file ] ; then
        echo  rm -f $mark_file
 rm -f $mark_file
else
        echo  touch $mark_file
 touch $mark_file
  # exit 0
fi

# set std and stderr to log file
        echo mv $log_file $log_file.old
       mv $log_file $log_file.old
        echo mv $err_log_file $err_log_file.old
       mv $err_log_file $err_log_file.old
        echo "exec 2> $err_log_file"
       exec 2> $err_log_file
        echo "exec > $log_file"
       exec > $log_file


# check whether the VM is running
# We only backup running VMs

echo "*** Check alive VMs"

xen_name_list_tmp=""

for i in $xen_name_list
do
        echo "/usr/sbin/xl list > /tmp/tmp-xen-list"
        /usr/sbin/xl list > /tmp/tmp-xen-list
  grepinlist=`grep $i" " /tmp/tmp-xen-list`;
  if [[ “$grepinlist” == “” ]]
  then
    echo $i is not alive.
  else
    echo $i is alive.
    xen_name_list_tmp=$xen_name_list_tmp" "$i
  fi
done

xen_name_list=$xen_name_list_tmp

echo "Alive VM list:"

for i in $xen_name_list
do
   echo $i
done

echo "End alive VM list."

###############################
date
echo "*** Backup starts"

###############################
date
echo "*** Copy VMs to local disk"

for i in $xen_name_list
do
  date
  echo "Shutdown $i"
        echo  /usr/sbin/xl shutdown $i
        /usr/sbin/xl shutdown $i
        if [ $? != ‘0’ ]; then
                echo 'Not Xen Disk image destroying …';
                /usr/sbin/xl destroy $i
        fi
  sleep 30

  echo "Copy $i"
  echo "Copy to local_bak_dir: $local_bak_dir"
      echo /usr/bin/rsync -avhW –no-compress –progress $xen_dir/$i/{disk.img,swap.img} $local_bak_dir/$i/
     time /usr/bin/rsync -avhW –no-compress –progress $xen_dir/$i/{disk.img,swap.img} $local_bak_dir/$i/
      echo /usr/bin/rsync -avhW –no-compress –progress $xen_vmconfig_dir/$i.cfg $local_bak_dir/$i.cfg
     time /usr/bin/rsync -avhW –no-compress –progress $xen_vmconfig_dir/$i.cfg $local_bak_dir/$i.cfg
  date
  echo "Create $i"
  # with vmmem=1024"
  # /usr/sbin/xm create $xen_dir/vm.run vmid=$i vmmem=1024
          echo /usr/sbin/xl create $xen_vmconfig_dir/$i.cfg
          /usr/sbin/xl create $xen_vmconfig_dir/$i.cfg
## Uncomment if you need to copy with scp somewhere
###       echo scp $log_file $bak_dir/xen-bak-111.log
###      echo  /usr/bin/rsync -avhW –no-compress –progress $log_file $local_bak_dir/xen-bak-111.log
done

####################
date
echo "*** Compress local bak vmdisks"

for i in $xen_name_list
do
  date
  echo "Compress $i"
      echo tar -z -cfv $bak_dir/$i-$(date +%Y_%m_%d).tar.gz $local_bak_dir/$i-$(date +%Y_%m_%d) $local_bak_dir/$i.cfg
     time nice -n 10 tar -z -cvf $bak_dir/$i-$(date +%Y_%m_%d).tar.gz $local_bak_dir/$i/ $local_bak_dir/$i.cfg
    echo rm -vf $local_bak_dir/$i/ $local_bak_dir/$i.cfg
    rm -vrf $local_bak_dir/$i/{disk.img,swap.img}  $local_bak_dir/$i.cfg
done

####################
date
echo "*** Copy local bak vmdisks to remote machines"

copy_remote () {
for i in $xen_name_list
do
  date
  echo "Copy to remote: vm$i"
        echo  scp $local_bak_dir/vmdisk0-$i.tar.gz $bak_dir/vmdisk0-$i.tar.gz
done

#####################
date
echo "Backup finishes"
        echo scp $log_file $bak_dir/bak-111.log

}

date
echo "Backup finished"


Things to configure before start using using the script to prepare backups for you is the xen_name_list variable

#  directory skele where to store already prepared backups
bak_dir=/backups/disk1/xen-backups/xen_images/$(date +%Y_%m_%d)/xen/domains

# The configurations of the running Xen Virtual Machines
xen_vmconfig_dir=/etc/xen/
# a local directory that will be used for backup creation ( I prefer this directory to be on the backup storage location )
local_bak_dir=/backups/disk1/tmp
#bak_dir=xenbak@backup_host1:/lhome/xenbak
# the structure on the backup location where daily .img backups with be produced with rsync and tar archived with bzip2
bak_dir=/backups/disk1/xen-backups/xen_images/$(date +%Y_%m_%d)/xen/domains

# list here all the Virtual Machines you want the script to create backups of
xen_name_list="windows7 haproxy2 jitsi-meet zabbix centos7"

If you need the script to copy the backup of Virtual Machine images to external Backup server via Local Lan or to a remote Internet located encrypted connection with a passwordless ssh authentication (once you have prepared the Machines to automatically login without pass over ssh with specific user), you can uncomment the script commented section to adapt it to copy to remote host.

Once you have placed at place /usr/sbin/xen_vm_backups.sh use a cronjob to prepare backups on a regular basis, for example I use the following cron to produce a working copy of the Virtual Machine backups everyday.
 

# crontab -u root -l 

# create windows7 haproxy2 jitsi-meet centos7 zabbix VMs backup once a month
00 06 1,2,3,4,5,6,7,8,9,10,11,12 * * /usr/sbin/xen_vm_backups.sh 2>&1 >/dev/null


I do clean up virtual machines Images that are older than 95 days with another cron job

# crontab -u root -l

# Delete xen image files older than 95 days to clear up space from backup HDD
45 06 17 * * find /backups/disk1/xen-backups/xen_images* -type f -mtime +95 -exec rm {} \; 2>&1 >/dev/null

#### Delete xen config backups older than 1 year+3 days (368 days)
45 06 17 * * find /backups/disk1/xen-backups/xen_config* -type f -mtime +368 -exec rm {} \; 2>&1 >/dev/null