Recently I have installed Redshift Linux application in order to make this nifty small tool to be able to control the colors temperature according to the
sun to benefit once night sleep and reduce eye strain when working on Linux desktop.
Applications like the Linux redshift are already a standard on Windows OS-es, as well as on most modern iOS and Android based phones and many modern Phones has a native way to do the same as redshift, as well as there are multiple free and paid apps that auto-adjust the screen brightness and color temperature as this helps the eyes to get less eye strain and helps to protect ones eye health and prevent sleep cycle disturbances. The problem as most people might have heard is the emitting
of the screen of the extra blue light which makes a person keep awake for a longer periods of time and makes you sleepless once you spend time on the
Computer / phone screen late at night after 10 o'clock.
But enought bla-bla lets get into business.
Thus once installing redhisft with simple:
# apt install redshift -y
…
I wanted to make redshift to automatically load on my Linux desktop. Hence in this small article I'll explain how this can be done
easily from GUI on Mate Linux desktop as well as from command line.
The easies for any GUI user is to simply add it using Mate's Control panel gui for that run command run:
$ mate-control-center
Press the 'Add' button and select the application that you would like to have autostart in your Mate Linux GUI interface.
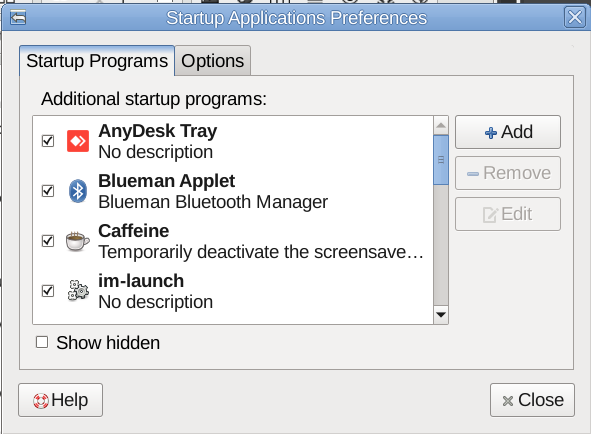
To remove an application use the 'Remove' button. Pretty simple huh?
Autostart programs using the terminal *.desktop application files
The Mate autostart GUI tool is a great way to manage automatic startup programs quickly, however, it’s not the only way. and often
If you’re a terminal fan, you can also create automatic startup entries in the command-line.
To make a new startup entry, launch a terminal window with Ctrl + Alt + T or Ctrl + Shift + T. Then, move the terminal session into the /usr/share/applications/ directory.
$ cd /usr/share/applications/
Run the ls command and view the program shortcuts in the folder, so that you may locate the name of the program you want to auto-start.
ls
Can’t find the app you need? Combine ls with the grep tool to more easily filter out a keyword.
$ ls | grep programname
Take the name of the program and plug it into the following cp command to create a new autostart entry. For example, to autostart Firefox on Mate through the terminal, you’d do either a symbolic link:
$ ln -sf redshift.desktop ~/.config/autostart/
or just copy the program config file:
$ cp -rpf redshift.desktop ~/.config/autostart/
Removing automatic program start in the terminal
To get rid of an automatic startup entry for the Mate desktop environment from the command-line, you’ll need CD into the ~/.config/autostart directory.
cd ~/.config/autostart
Can’t access the ~/.config/autostart directory on your Mate desktop (shouldn't be the cabe but anyways?)
If this is the case, you may not have an autostart folder. To create one, use the mkdir command.$
$ mkdir -p ~/.config/autostart
Inside of the autostart folder, run the ls command. Running this command will allow you to take a look inside the folder.
$ ls
Take note of the files revealed by the ls tool. Then, plug them into the following rm command to delete and disable the startup entries.
$ rm -f programname.desktop
Want to delete more than one startup entry at a time? Use the rm command, but instead of specifying the exact name of the startup entry file (such as firefox.desktop,) you can make use of the wildcard (*) function in Bash on Linux.
Using the wildcard (*) will allow you to automatically remove and delete all desktop shortcut files from the ~/.config/autostart directory (be sure that you really want to do that :).
$ rm *.desktop
That's all folks. Enjoy ! 🙂