Posts Tagged ‘mcedit’

Set mcedit as default text editor for mc (midnight commander) on Linux

Thursday, October 4th, 2018

set-default-text-editor-for-midnight-commander-to-mcedit-linux-howto

If you're a vim (VI Improved) fan and you set your Linux server / desktop to use VIM as a default text editor, for those who don't know this is done either locally for user (if you're not superuser on remote server) by adding:

export VISUAL=vim
export EDITOR="$VISUAL"

to ~/.bashrc or ~/.bash_profile, e.g.


echo 'export VISUAL=vim; export EDITOR="$VISUAL"' >> ~/.bashrc
echo 'export VISUAL=vim; export EDITOR="$VISUAL"' >> ~/.bash_profile


or if you're root on the system e.g. it is your Linux desktop / administered by you (debian / ubuntu) server to set VIM as default text editor for all applications with cmd:


 # update-alternatives –config editor


or if you haven't unset the EDITOR variable the default behavior on some Ubuntu (10.10) etc. versions mc editting would edit with nano text editor.

Just like me however you work also regularly with Midnight Commander (mc) the Linux equivalent of good old Norton Commander you might end up with Midnight Commander opening your files with F4 command with VIM text editor instead of the default.

So here is how to change this behavior in order to end up editting with mcedit any edited file via mc:

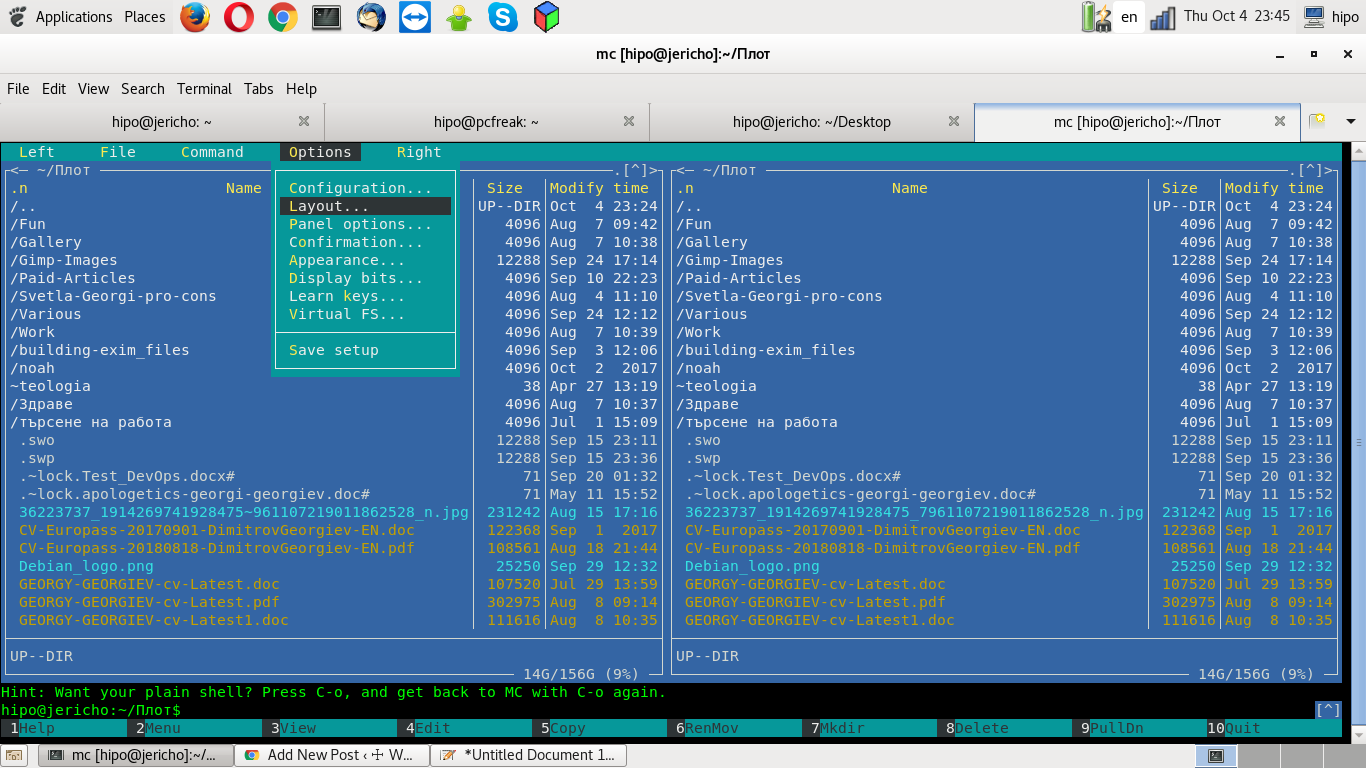
mc-menu-options-layout-screenshot

1. Press F9 to Activate the top menu.
2. Press o to Select the Option menu.
3. Press c to Open the configuration dialog.
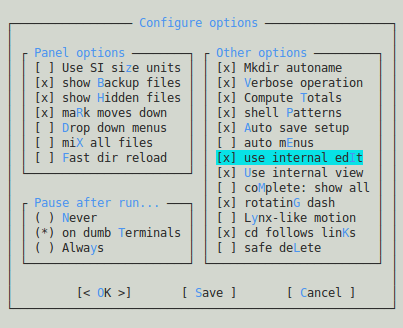
4. Press i to Toggle the use internal edit option.
5. Press s to Save your preferences.

midnight-commander-configure-options-use-internal-edit-screenshot
Hooray, you're done now mc will use mcedit again as default just like it was intended to be in old times on most GNU / Linux distributions.
Enjoy!
 

Virtualbox Shared folder set up on Linux between Host and Guest OS – Set up Virtualbox shared folder to Copy files from PC Host to Guest

Wednesday, September 12th, 2018

mount-shares-between-host-OS-and-guest-virtual-machine-howto-virtualbox-vbox-logo

How to set-up Virtualbox shared folder to Copy files from PC Host  and Guest Virtualized OS?

Running VirtualBox Host is an easy thing to set-up across all Operating Systems.  Once you have it sooner or later you will need to copy files from the VM Host OS (that in my case is GNU / Linux) to the virtualized Guest operating system (again in my case that's again another Linux ISO running indide the Virtual Machine).

Below are steps to follow To use Virtualbox Shared Folder functionality to copy files between VBox and your Desktop / server Linux install.

1. Install Virtualbox Guest Additions CD Image ISO

I've explained how to add the Guest Additions CD image thoroughfully in my previous article Howto enable Copy / Paste Virtualbox betwen Linux guest and Host OS
Anyways I'll repeat myself below for sake of clarity:

To do so use Oracle VBox menus (on the booted virtualized OS VBox window):


Devices -> Insert Guest additions CD Image


Mount the ISO inside the Linux Virtual Machine:

root@debian:~# mount /media/cdrom1/
 

If the mount fails and there are no files inside the mount point it might be because the virtualbox-dkms and virtualbox-guest-dkms packages might be missing on the Host OS.

To install them (on Debian GNU / Linux) assuming that you're using virtualbox default distro packages /etc/apt/sources.list :
 

apt-get install –yes -qq virtualbox-dkms virtualbox-guest-dkms


and run:


root@debian:/media/cdrom1# cd /media/cdrom1; sh VBoxLinuxAdditions.run


2. Create directory for Shared Folder that will be used to access Host / OS files from the Guest Virtualized OS
 

root@debian:~# mkdir /mnt/shared_folder


3. Map from VBox program interface Shared folder settings and Mount /mnt/shared_folder location
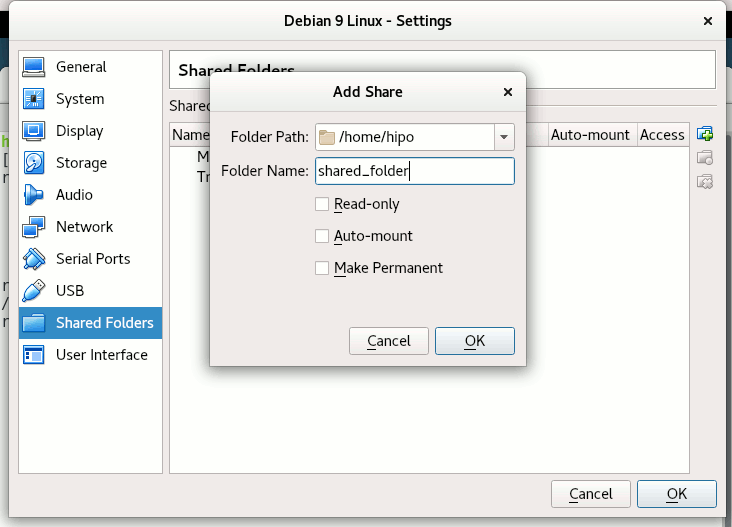
virtualbox-virtual-machine-devices-shared-folders-shared-folder-settings-linux-screenshot


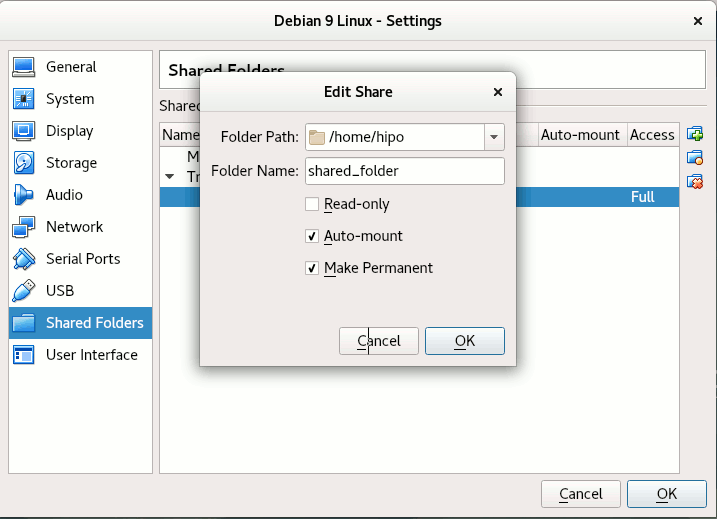
Devices -> Shared Folder -> Shared Folder settings -> Transient Folders (click blue folder add small button right)


From Transient Folders add whatever directory you want to be shared from your local notebook / PC to the VM.
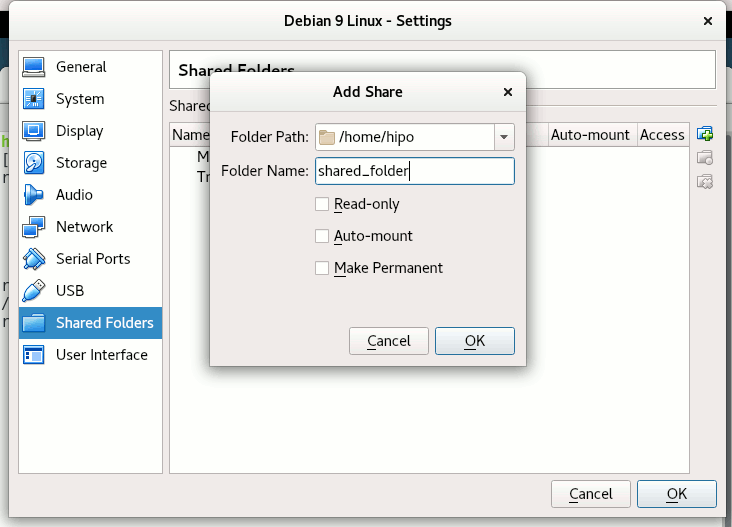
virtualbox-devices-Shared-Folder-Add-Shared-Folder-add-share-linux-screenshotDepending on whether you would like to mount the shared folder only for reading files (choose Read Only) to make it a permanent shared folder (and not just for the one session of current running Virtual Machine until its killed use Make Permanent) or check Auto-Mount tick if you want the shared_folder mapping to be mounted on every VM boot.

Once the shared_folder directory location is set-up from GUI menu click OK and in order for the settings to take effect, you'll need to restart the VM Guest with Linux (use halt command from terminal) or Power Off the Machine via the VBox menus.

To mount use command like:

mount -t vboxsf name_of_folder_linked_from_vbox  /mnt/name_folder_guest_os/
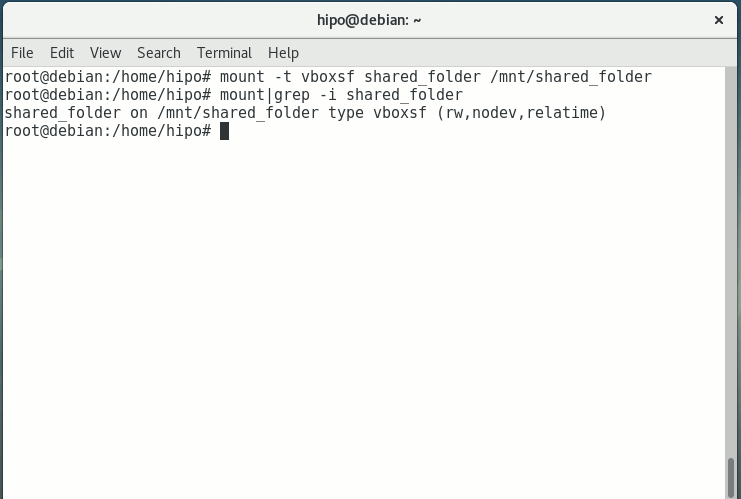

mount-vboxsf-shared-folder-mnt-shared-linux-guest-screenshot

In my case I wanted to share home folder /home so the command I used is:

root@debian:~# mount -t vboxsf  shared_folder /mnt/shared_folder


If everything is fine your Host OS file content from /home will be visible (for read and write if you Mapped it so) 
under /mnt/shared_folder …

And as Turtles Ninja used to heavily say Cowabunga !!! 🙂
You have it mounted and ready for file share between Desktop -> Virtualized OS.


Bear in mind that above mount command has to run as root (superuser) to succeed.

You now could copy files from your Host OS (running the Virtual Machine) and the Guest OS (Virtualized OS) using /mnt/shared_folder mount point without problems.

The example is if you want to share files between VirtualBox installed Linux and the Guest (Desktop / server) OS, however at many cases mounting your Host OS directory for root users might be not very practical but, instead you might prefer to do the mount for specific non admin user, for example I prefer to do the shared folder mount with my pointed non-root username hipo.

Here is how to do above VM shared_folder mount for non-root user:

First you need to know the exact UID / GID (User ID / Group ID) of user, you can get that with id command:


hipo@linux:~$  id
uid=1000(hipo) gid=1000(hipo) groups=1000(hipo),24(cdrom),25(floppy),29(audio),30(dip),44(video),46(plugdev),108(netdev),114(bluetooth),115(lpadmin),119(scanner)


As you see UID / GID in my case are 1000 / 1000

hipo@linux:~$ sudo mount -t vboxsf -o rw,uid=1000,gid=1000 shared_folder /mnt/shared_folder
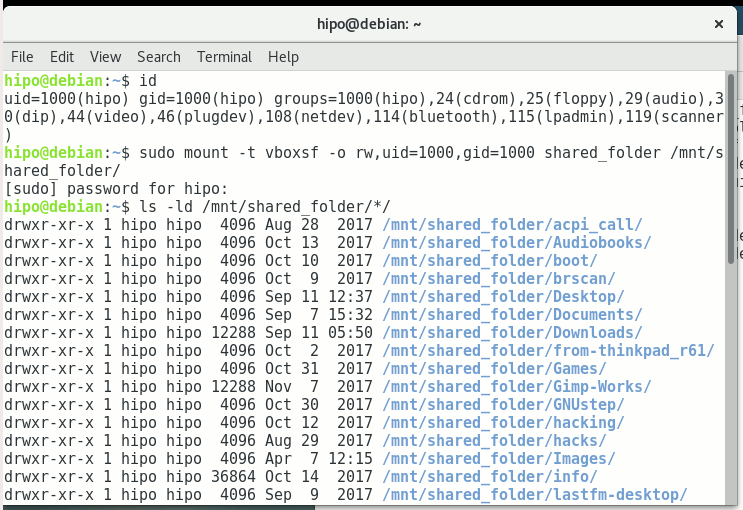
 

mount-virtual-box-shared_folder-with-non-administration-permissions-non-root-permissions-id-and-mount-command-screenshot-linux


4. Mounting configured shared_folder to automatically mount into the Guest OS Linux on every boot

a) Configuring shared_folder auto-mount using /etc/rc.local

If you need the shared_folder to automatically mount next-time you boot the virtual machine quickest way is to add the mount command to /etc/rc.local (on Debian 8 and Debian 9 and newer Ubuntu Linuxes rc.local is missing by default to enable it to work like it worked before read follow my previous article ).

b) Configuring auto-mount for shared_folder through /etc/fstab

The more professional way to auto-mount on emulated OS VM boot time,  you could add the vboxsf mount definitions to /etc/fstab with your favourite text-editor mcedit, nano, joe etc. … (for me that's vim).

Syntax of /etc/fstab is as follows:
 

<Device> <Mount Point> <Type> <Options> <Dump> <Pass>

root@linux:~# vim /etc/fstab


shared_folder /mnt/shared_folder                                vboxsf rw,uid=1000,gid=1000 0 0

Note that you will want to change 1000 / 1000, id / gid with the ones of the non-admin user you would like to add to mount it for.

A quick way to add it to /etc/fstab with a shell one-liner is with command
 

root@linux:~# echo 'shared_folder /mnt/shared_folder                                vboxsf rw,uid=1000,gid=1000 0  0' >> /etc/fstab

An alternative way to add a user to have permissions for vboxsf file system (without specifying the long -o uid=1000,gid=1000 options is to simply add the username in question to group vboxsf like so:

c) Adding non super user username to vboxsf group

root@linux:~# usermod -G vboxsf hipo
root@linux:~# grep -i vboxsf /etc/group
vboxsf:x:999:hipo


hipo@linux:~$ sudo mount -t vboxsf  shared_folder /mnt/shared_folder


without the extra arguments and the options to pass to /etc/fstab (for eventual requirement to auto mount the shared_folder) would be more simple e.g.:


echo 'shared_folder /mnt/shared_folder                                vboxsf ' >> /etc/fstab


One note to make here is if the uesr is added to vboxsf the line for /etc/fstab to auto mount to mount for root user and non-root will be identical.

Then you can get the /etc/fstab auto-mount configured tested by running:

c) Checking auto-mount is working

hipo@linux:~# mount -a
hipo@linux:~# mount |grep -i vboxsf
shared_folder on /mnt/shared_folder type vboxsf (rw,nodev,relatime)


5. What if you end up with mounting failed errors ? – What might be causing the mounting failed Protocol error (a few things to check to solve)


In case of troubles with the mount you might get an error like:

hipo@linux:~# mount -t vboxsf  share_folder /mnt/shared_folder

/sbin/mount.vboxsf: mounting failed with the error: Protocol error


This error might be caused because of Insert Guest Additions CD Image might be not properly enabled and installed using the ISO provided VBoxLinuxAdditions.sh shell script.
Other common reason you might get this error if you have mistyped the Folder name: given in Shared Folders -> Folder Path -> Add Share for example I have given shared_folder as a Map name but as you can see in above mount -t vboxsf, I've mistyped share_folder instead of the correct one shared_folder inserted.
In some VBox releases this error was caused by bugs in the Virtual Machine.
 

virtualbox-virtual-machine-shared-folder-transient-folder-add-folder-linux-VM-guest-linux

One useful tip is to be able to check whether a Virtualbox Virtual Machine has a configured shared_folder (if you're logging to manage the machine on remote server – nomatter whether you have logged in with VNC / Teamviewer / Citrix etc. or via SSH session.

To do so use VBoxControl as of time of writting usually located on most distributions under (/usr/bin/VBoxControl)


hipo@linux:~# VBoxControl sharedfolder list -automount
Oracle VM VirtualBox Guest Additions Command Line Management Interface Version 5.2.18
(C) 2008-2018 Oracle Corporation
All rights reserved.


Auto-mounted Shared Folder mappings (0):

No Shared Folders available.

You can use VBoxControl command to get set and list a number of settings on the VBox VM, here is an useful example with it where you get information about numerous VBox info values:


root@linux:~# VBoxControl guestproperty enumerate
Oracle VM VirtualBox Guest Additions Command Line Management Interface Version 5.2.18
(C) 2008-2018 Oracle Corporation
All rights reserved.


Name: /VirtualBox/GuestInfo/OS/Product, value: Linux, timestamp: 1536681633430852000, flags: <NULL>
Name: /VirtualBox/GuestInfo/Net/0/V4/IP, value: 10.0.2.15, timestamp: 1536681633438717000, flags: <NULL>
Name: /VirtualBox/HostInfo/GUI/LanguageID, value: en_US, timestamp: 1536697521395621000, flags: RDONLYGUEST
Name: /VirtualBox/GuestInfo/Net/0/MAC, value: 08002762FA1C, timestamp: 1536681633442120000, flags: <NULL>
Name: /VirtualBox/GuestInfo/OS/ServicePack, value: <NULL>, timestamp: 1536681633431259000, flags: <NULL>
Name: /VirtualBox/HostInfo/VBoxVerExt, value: 5.2.18, timestamp: 1536681619002646000, flags: TRANSIENT, RDONLYGUEST
Name: /VirtualBox/GuestInfo/Net/0/V4/Netmask, value: 255.255.255.0, timestamp: 1536681633440157000, flags: <NULL>
Name: /VirtualBox/GuestInfo/OS/Version, value: #1 SMP Debian 4.9.110-3+deb9u2 (2018-08-13), timestamp: 1536681633431125000, flags: <NULL>
Name: /VirtualBox/GuestAdd/VersionExt, value: 5.2.18, timestamp: 1536681633431582000, flags: <NULL>
Name: /VirtualBox/GuestAdd/Revision, value: 124319, timestamp: 1536681633432515000, flags: <NULL>
Name: /VirtualBox/HostGuest/SysprepExec, value: <NULL>, timestamp: 1536681619002355000, flags: TRANSIENT, RDONLYGUEST
Name: /VirtualBox/GuestInfo/OS/LoggedInUsers, value: 1, timestamp: 1536681673447293000, flags: TRANSIENT, TRANSRESET
Name: /VirtualBox/GuestInfo/Net/0/Status, value: Up, timestamp: 1536681633443911000, flags: <NULL>
Name: /VirtualBox/GuestInfo/Net/0/Name, value: enp0s3, timestamp: 1536681633445302000, flags: <NULL>
Name: /VirtualBox/HostGuest/SysprepArgs, value: <NULL>, timestamp: 1536681619002387000, flags: TRANSIENT, RDONLYGUEST
Name: /VirtualBox/GuestAdd/Version, value: 5.2.18, timestamp: 1536681633431419000, flags: <NULL>
Name: /VirtualBox/HostInfo/VBoxRev, value: 124319, timestamp: 1536681619002668000, flags: TRANSIENT, RDONLYGUEST
Name: /VirtualBox/GuestInfo/Net/0/V4/Broadcast, value: 10.0.2.255, timestamp: 1536681633439531000, flags: <NULL>
Name: /VirtualBox/HostInfo/VBoxVer, value: 5.2.18, timestamp: 1536681619002613000, flags: TRANSIENT, RDONLYGUEST
Name: /VirtualBox/GuestInfo/OS/LoggedInUsersList, value: hipo, timestamp: 1536681673446498000, flags: TRANSIENT, TRANSRESET
Name: /VirtualBox/GuestInfo/Net/Count, value: 1, timestamp: 1536698949773993000, flags: <NULL>
Name: /VirtualBox/GuestInfo/OS/Release, value: 4.9.0-7-amd64, timestamp: 1536681633431001000, flags: <NULL>
Name: /VirtualBox/GuestInfo/OS/NoLoggedInUsers, value: false, timestamp: 1536681673447965000, flags: TRANSIENT, TRANSRESET
Name: /VirtualBox/GuestAdd/HostVerLastChecked, value: 5.2.18, timestamp: 1536681702832389000, flags: <NULL>

Hope you enjoyed ! Have phun! 🙂
How to set up Qmail auto reply (Out of the Office), vacation message manually using .qmail message processing file

Tuesday, February 14th, 2012

Qmail Logo Auto reply message / how to setup qmail auto reply out of the office vacation message

I had to setup a QMAIL auto reply (Out of the Office) message on 5 email addresses and since I haven't done it for a long time it took me a couple 20 minutes to consult Qmail (Life With Qmail http://lifewithqmail.org (great website!) documentation and read a couple of online forum threads until I finally remembered, how I used to be setting up a vacation message manually via qmail's .qmail file.

Of course Setting qmail auto reply can always be done via QmailAdmin or VQadmin ..Qmail Vpopmail web frontends however on many Qmail mail servers Qmailadmin or/and VQadmin is absent due to some reason or even on a big mail servers the server doesn't run Apache at all. Hence it is good to know how to set qmail vacation message directly via plain SSH terminal connection and this is why how this article got born.

So here is how I enable qmail auto reply "manually", through .qmail for my email address info@my-email-domain.com:

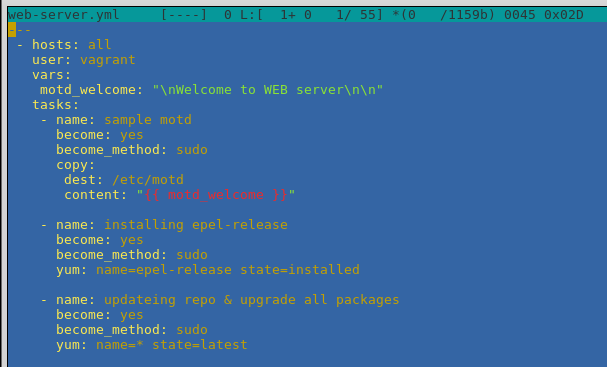
1. Set a /var/vpopmail/domains/my-email-domain.com/info/.qmail file with the following content:

| /usr/bin/autorespond 86400 3 /home/vpopmail/domains/my-email-domain.com/info/vacation/message /home/vpopmail/domains/my-email-domain.com/info/vacation

2. Create /home/vpopmail/domains/my-email-domain.com/info/vacation directory

linux:~# mkdir -p /home/vpopmail/domains/my-email-domain.com/info/vacation/

3. Create /home/vpopmail/domains/my-email-domain.com/info/vacation/message file with auto reply message

First create the message file with touch command:

linux:~# touch /home/vpopmail/domains/my-email-domain.com/info/vacation/message

Then put with vim or mcedit etc. an auto-reply vacation message similar to the sample below:

From: info@cadiainsurance.com
Subject: We have received your message. Thank you!

Dear Customer, we thank you for the interest in our services.
A member of our team will reply promptly to your enquiry shortly.

4. Set proper permissions for vacation/message and .qmail files

/home/vpopmail/domains/my-email-domain.com/info/vacation/message and /home/vpopmail/domains/my-email-domain.com/info/.qmail files has to be owned by user/group vpopmail:vchkpw, e.g.:

linux:~# chown -R vpopmail:vchkpw /home/vpopmail/domains/my-email-domain.com/info/vacation
linux:~# chown vpopmail:vchkpw /home/vpopmail/domains/my-email-domain.com/info/.qmail

If you are a qmail administration with the requirement to create auto reply message for employees going on a holiday often (in a middle sized company office), setting up the out of the office auto reply manually one by one is a time consuming, annoying task and "crazy" task. Therefore some time ago while still I was employed in a Bulgarian mid-sized company called Design.BG, I've written a tiny shell script which creates qmail email users vacation messages by passing few arguments.

Here is my create_vpopmail_vacation.sh shell script
Note that this script might have a lot of bugs and is not much tested, so read it carefully and test it before you put it for daily use 😉
Happy Hacking! 😉

How to Split files on Linux FreeBSD, NetBSD and OpenBSD

Sunday, July 31st, 2011

Split large files in pieces Scissors

Did you have the need to sometimes split an SQL extra large files to few pieces in order to be able to later upload it via phpmyadmin?
Did you needed an extra large video or data file to be cut in few pieces in order to transfer it in few pieces over an USB stick?
Or just to give you an another scenario where I sometimes need to have an enormous file let’s say 3G split in few pieces, in order to later read it in vim or mcedit .
I sometimes need to achieve this on FreeBSD and Linux hosts thus I thought it will be helpful to somebody to give a very quick tutorial on the way large files can be cut in pieces on Linux and BSD hosts.

GNU/Linux and FreeBSD are equipped with the split command. The purpose of this command is exactly the cutting of a file to a number of pieces.

On Linux the split command comes by default install to the system with the coreutils package on most Debian (deb) based and Redhat based (rpm) distributions, theerefore Linux’s version of split is GNU/split since it’s part of the GNU Coreutils package. An interesting fact about Linux split is that one of the two programmers who has coded it is Richard Stallman 😉

On BSD Unix split is the AT&T UNIX (BSD) split

In the past splitting files in pieces was much more needed than today, as people used floppy drives to transfer data, though today with the bloom of Internet and the improve of the data carriers transferring even an extra large files from one place to another is a way more trivial task still at many occasions splitting it in pieces is needed.

Even though today splitting file is very rarely required, still there are times when being able to split a file in X number of parts is very much needed.
Maybe the most common use of splitting a file today is necessery when a large SQL file dumps, like let’s say 200 MBytes of info database needs to be moved from ane hosting provider to another one.
Many hosting providers does disallow direct access with standard mySQL client programs to the database directly and only allow a user to connect only via phpMyAdmin or some other web interface like Cpanel to improve data into the SQL or PostgreSQL server.

In such times, having knowledge on the Unix split command is a priceless asset.

Even though on Linux and BSD the code for the split command is not identical and GNU/split and BSD/split has some basic differences, the use of split on both of these Unices is identical.
The way to split a file in few pieces using on both Linux and BSD OSes is being done with one and the same command, here is how:

1. Splitting file in size of 40 mb On Linux

linux:~# split -b 40m SQL-Backup-Data.sql SQL-Backup-Data_split

2. Splitting file in size of 40mb on BSD (FreeBSD, OpenBSD, NetBSD)

freebsd# split -b 40m SQL-Backup-Data.sql SQL-Backup-Data_split

The Second argument the split command takes is actually called a prefix, the prefix is used as a basis name for the creation of the newly generated files cut in pieces file based on SQL-Backup-Data.sql.

As I said identical command will split the SQL-Backup-Data.sql files in a couple of parts which of it will be sized 40 megas.

These command will generate few files output like:

freebsd# ls -1 SQL-Backup-Dat*SQL-Backup-Data.sql
SQL-Backup-Dataa
SQL-Backup-Dataab
SQL-Backup-Dataac
SQL-Backup-Dataad
SQL-Backup-Dataae

As you see the SQL-Backup-Data.sql with size 200MB is being split in four files each of which is sized 40mbytes.

After the files are transfered to another Linux or BSD host, they can easily be again united in the original file with the command:

linux:~# for i in $(ls -1 SQL-Backup-Data_split*); echo $i >> SQL-Backup-Data.sql

Alternatively in most Unices also using cat should be enough to collect back the pieces into the original file, like so:

freebsd# cat SQL-Backup-Data_split* >> SQL-Backup-Data.sql

Enjoy splitting

How to reboot remotely Linux server if reboot, shutdown and init commands are not working (/sbin/reboot: Input/output error) – Reboot Linux in emergency using MagicSysRQ kernel sysctl variable

Saturday, July 23rd, 2011

SysRQ an alternative way to restart unrestartable Linux server

I’ve been in a situation today, where one Linux server’s hard drive SCSI driver or the physical drive is starting to break off where in dmesg kernel log, I can see a lot of errors like:

[178071.998440] sd 0:0:0:0: [sda] Result: hostbyte=DID_BAD_TARGET driverbyte=DRIVER_OK,SUGGEST_OK
[178071.998440] end_request: I/O error, dev sda, sector 89615868

I tried a number of things to remount the hdd which was throwing out errors in read only mode, but almost all commands I typed on the server were either shown as missng or returning an error:
Input/output error

Just ot give you an idea what I mean, here is a paste from the shell:

linux-server:/# vim /etc/fstab
-bash: vim: command not found
linux-server:/# vi /etc/fstab
-bash: vi: command not found
linux-server:/# mcedit /etc/fstab
-bash: /usr/bin/mcedit: Input/output error
linux-server:/# fdisk -l
-bash: /sbin/fdisk: Input/output error

After I’ve tried all kind of things to try to diagnose the server and all seemed failing, I thought next a reboot might help as on server boot the filesystems will get checked with fsck and fsck might be able to fix (at least temporary) the mess.

I went on and tried to restart the system, and guess what? I got:

/sbin/reboot init Input/output error

I hoped that at least /sbin/shutdown or /sbin/init commands might work out and since I couldn’t use the reboot command I tried this two as well just to get once again:

linux-server:/# shutdown -r now
bash: /sbin/shutdown: Input/output error
linux-server:/# init 6
bash: /sbin/init: Input/output error

You see now the situation was not pinky, it seemed there was no way to reboot the system …
Moreover the server is located in remote Data Center and I the tech support there is conducting assigned task with the speed of a turtle.
The server had no remote reboot, web front end or anything and thefore I needed desperately a way to be able to restart the machine.

A bit of research on the issue has led me to other people who experienced the /sbin/reboot init Input/output error error mostly caused by servers with failing hard drives as well as due to HDD control driver bugs in the Linux kernel.

As I was looking for another alternative way to reboot my Linux machine in hope this would help. I came across a blog post Rebooting the Magic Wayhttp://www.linuxjournal.com/content/rebooting-magic-way

As it was suggested in Cory’s blog a nice alternative way to restart a Linux machine without using reboot, shutdown or init cmds is through a reboot with the Magic SysRQ key combination

The only condition for the Magic SysRQ key to work is to have enabled the SysRQ – CONFIG_MAGIC_SYSRQ in Kernel compile time.
As of today luckily SysRQ Magic key is compiled and enabled by default in almost all modern day Linux distributions in this numbers Debian, Fedora and their derivative distributions.

To use the sysrq kernel capabilities as a mean to restart the server, it’s necessery first to activate the sysrq through sysctl, like so:

linux-server:~# sysctl -w kernel.sysrq=1
kernel.sysrq = 1

I found enabling the kernel.sysrq = 1 permanently in the kernel is also quite a good idea, to achieve that I used:

echo 'kernel.sysrq = 1' >> /etc/sysctl.conf

Next it’s wise to use the sync command to sync any opened files on the server as well stopping as much of the server active running services (MySQL, Apache etc.).

linux-server:~# sync

Now to reboot the Linux server, I used the /proc Linux virtual filesystem by issuing:

linux-server:~# echo b > /proc/sysrq-trigger

Using the echo b > /proc/sysrq-trigger simulates a keyboard key press which does invoke the Magic SysRQ kernel capabilities and hence instructs the kernel to immediately reboot the system.
However one should be careful with using the sysrq-trigger because it’s not a complete substitute for /sbin/reboot or /sbin/shutdown -r commands.
One major difference between the standard way to reboot via /sbin/reboot is that reboot kills all the running processes on the Linux machine and attempts to unmount all filesystems, before it proceeds to sending the kernel reboot instruction.

Using echo b > /proc/sysrq-trigger, however neither tries to umount mounted filesystems nor tries to kill all processes and sync the filesystem, so on a heavy loaded (SQL data critical) server, its use might create enormous problems and lead to severe data loss!

SO BEWARE be sure you know what you’re doing before you proceed using /proc/sysrq-trigger as a way to reboot ;).

How to configure static IP address on Lan card eth0 on Ubuntu and Debian Linux

Wednesday, April 27th, 2011

Does your provider provides you with a connection to the internet via a static IP address? Are you an Ubuntu or Debian user like me? Are you looking for a way to configure your eth0 Linux network card with the static ISP provided IP address? That was the scenario with me and in this article I will explain, how you can configure your Home internet access with your Ubuntu/Debian based Linux.

Both Ubuntu and Debian does have a graphic tools, which also can be used to set a static IP address to your network interface, however I find it easier to do it straight from the command line.

To configure your internet static IP via a command line, what you will need to modify is the file:

/etc/network/interfaces

In order to configure a static IP address, your provider should have equipped you with few IP addresses like let’s say the example values below:

Host IP Address: 192.168.0.5
Netmask Address: 255.255.255.0
Gateway: 192.168.0.1
Primary DNS Server: 192.168.0.1
Secondary DNS Server: 192.168.0.2

Now edit with vim, nano or mcedit /etc/network/interfaces e.g.:

root@ubuntu:~# mcedit /etc/network/interfaces

A plain /etc/network/interfaces file should contain something similar to:

auto lo
iface lo inet loopback

In order to be able to set your static IP address, Netmask, Gateway and DNS servers you will have to append in the interfaces file, the settings:

iface eth0 inet static
address 192.168.0.1
netmask 255.255.255.0
network 192.168.0.0
gateway 192.168.0.1

The eth0 sets the lan card on which the values will be assigned, address variable is the IP address assigned by your ISP, netmask is logically the netmask, network should always be configured same as the value set for address but the last ip block should be always .0 , gateway as you already know is the gateway (the ISP router).

One more thing you need to do is to configure your DNS servers by including the DNS ip addresses to /etc/resolv.conf , just issue something like:

root@ubuntu:~# echo 'nameserver 192.168.0.1' >> /etc/resolv.conf
root@ubuntu:~# echo 'nameserver 192.168.0.2' >> /etc/resolv.conf

To test that your new Linux static ip configuration is correct exec:

root@ubuntu:~# /etc/init.d/networking restart

Next use ping or (if ping is disabled by ISP), use matt’s traceroute (mtr) or a browser to test if the Linux is connected to the net.

ubuntu:~# ping google.com
...
ubuntu:~# mtr google.com

If none of the two are not able to show either ping requests flowing around, or routes to google, then something is either wrong with your internet configuration or you forgot to pay your internet bill 😉

Change mc (midnight commander) editor to mcedit / How to make mcedit default editor for mc once again / Change Debian Default editor the correct way

Monday, March 22nd, 2010

I’m considering to use mc (midnight commander) to review some dozens of source files in php/css and Java. However currently on my Debian Lenny I have configured vim to be the default editor in the system. The way I’ve setupped my vim to be the default editor is not really canonical, I mean I did it through $EDITOR variable in my /root/.bashrc and my ~/.bashrc file. In other words I have:

export VISUAL='vim'
export EDITOR='vim'

in my .bashrc files.
Though the correct way to do that is actually either by:

hipo@noah:~# update-alternatives --config editor

or through by linking /etc/alternatives/editor to your vim for instance:

hipo@noah:~# rm -f /etc/alternatives/editor
hipo@noah:~# ln -sf /usr/bin/vim /etc/alternatives/editor

As a result of my non-canonical ways to do things on the Debian as whenever I tried opening files with midnight commander (mc), files ended opening with vim.
I have to note that really sux a lot and therefore I hurried up to change mc’s behaviour back to normal.
Here is how:

While in mc press F9 and go to the Options menu, then navigate to Configuration
Now tick on the text reading: use internal edIt
afterwards it might be also a good idea to select Save Setup from the Options in order to save changed settings for future use.