If you're admin using Mac OS X Desktop or casually on a place where you have no access to a Windows / Linux PC (only have access to your girlfriend of wife MAC OS notebook) and you need to administrate Windows hosts remotely out of office hours (from home), you will needsome remote desktop client for Mac OS X.
I was just recently in that situation as we were guests to a friend in Shabla village nearby Sea coast and the only near PC, I had was my wife's MacBook Air running Mac OS X.
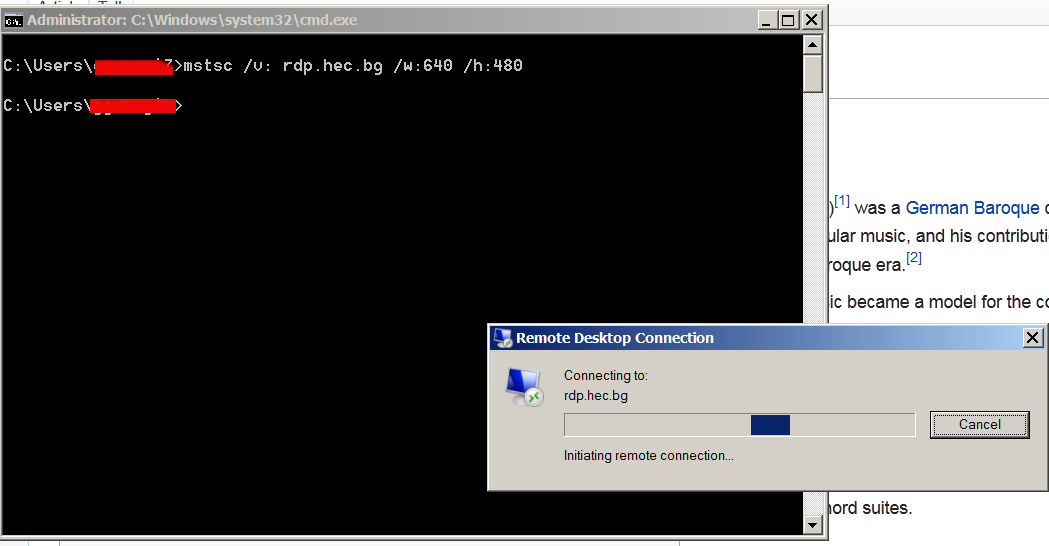
I looked in google to see if there is some default RDP (remote desktop protocol) client like MS Windows remote desktop command line client, i.e. (yes there is way to invoke remote desktop on Windows from command line 🙂 ):
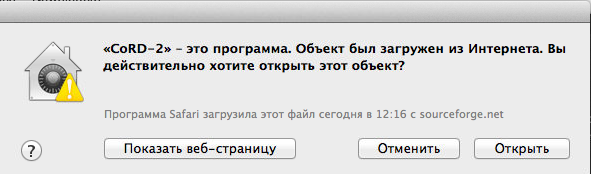
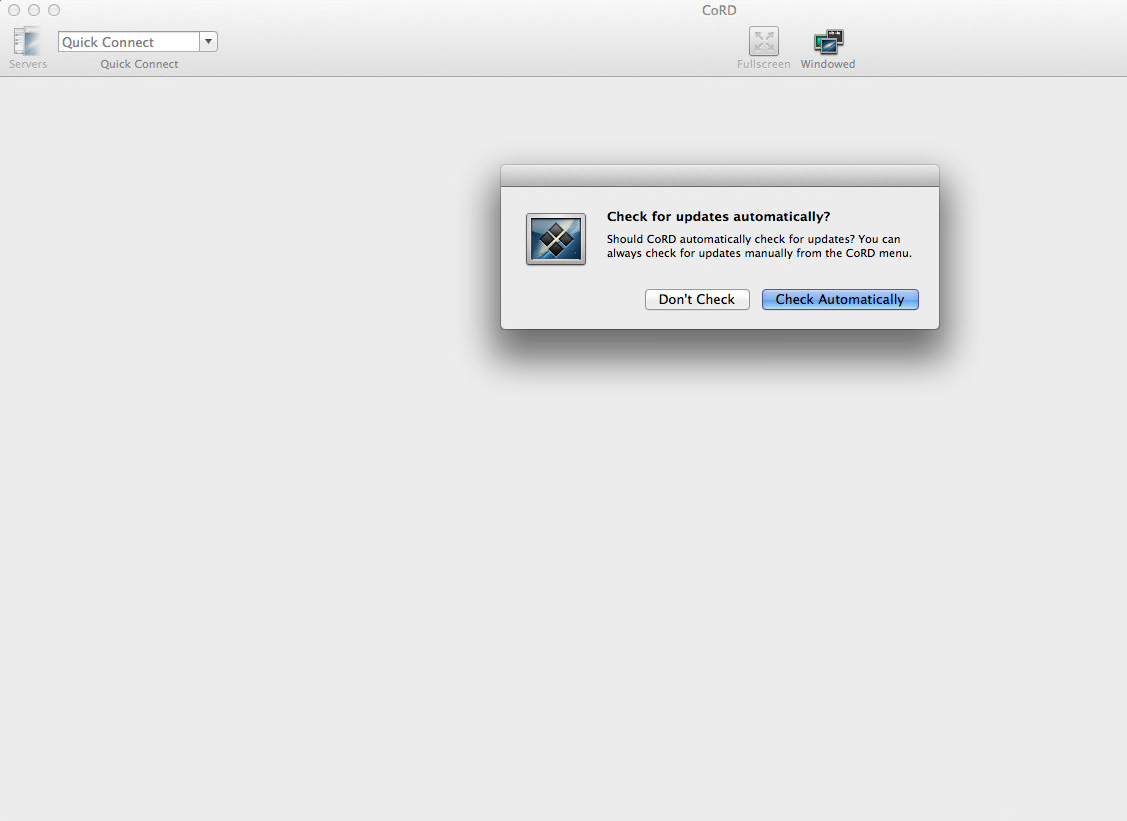
I tried installing the clicking it but it seemed my wife, didn't know her AppStore as it was her cousin which earlier configured her Mac OS PC on laptop initial install time. Contacting her cousin to ask for the password was a time eater as well as I was lazy to create new appstore account (plus I always prefer to use free software alternative when possible) … did a quick search in Google whether there is some Open Source / Free Software Remote Desktop Client for Mac OS X and I found CoRD – Mac OS X remote desktop client for Microsoft Windows computers using the RDP protocol. CoRD was originally ported from UNIX program rdesktop. To have CoRD working you will need as a minimum requirement Mac OS X version 10.5 or later.
Here is CoRD's description quoted from its SourceForge website:
CoRD: Simple RDP Remote Desktop
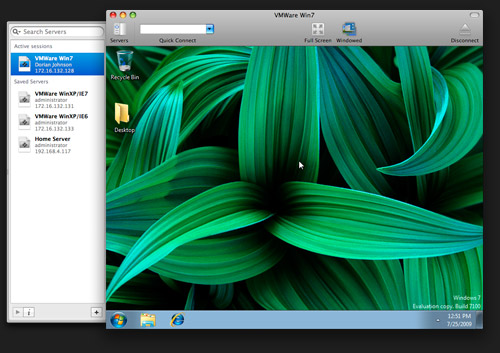
Macs interact well with Windows, and with CoRD the experience is a bit smoother. Great for working on the office terminal server, administrating servers or any other time you'd like your PC to be a bit closer without leaving your Mac. CoRD allows you to view each session in its own window, or save space with all sessions in one window. Scale session windows to whatever size fits you—the screen is resized automatically. Enter full screen mode and feel like you're actually at the computer. The clipboard is automatically synchronized between CoRD and the server. For system administrators, CoRD creates a simpler workflow by allowing you to save server information, then quickly connect to that server by using HotKeys or the server drawer. This makes quickly connecting to a specific server easy, even when managing many servers.
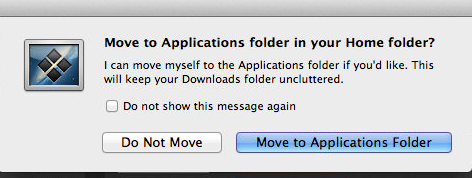
Installing CoRD is pretty, straight forward, just download unzip the archive and run it:
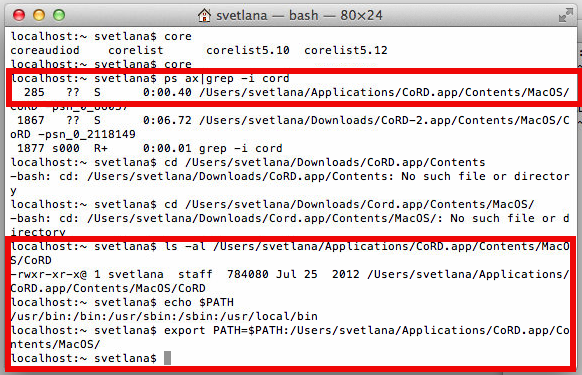
To later run Cord either look it up in Finder or if you prefer like me to access it from command line, you will need to export CoRD PATH in Mac Terminal $PATH variable:
As you see in above screenshot to find out which directory is CoRD located, I've grepped through the processes with
Remembering CoRD to type it each time is annoying, thus to make CorD be accessed like on Linux with rdesktop (easy to remember command), I've used alias:
alias rdesktop='CoRD'
To make the new PATH and alias permanent for the user, I've added it to (/Users/svetlana) – ~/.profile
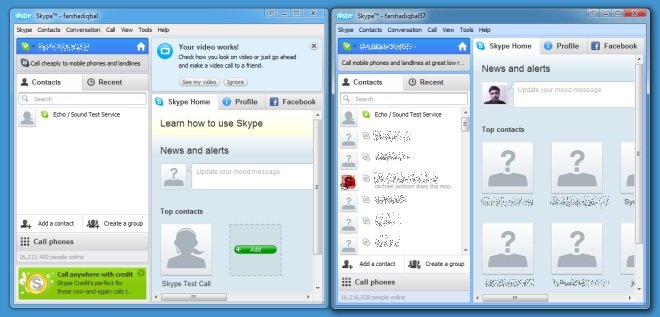
Whether you tried running simultaneously more than 1 Skype clients by clicking twice on Skype Desktop icon or invoking Skype via Windows Start menu; You already have figured out that Skype on Windows is set-up by defaykt to only support one logged in Skype user. In case you wonder why on earth someone might need to run in parallel few Skype accounts on one Windows PC, possible scenario is;;;
You work for a company and just for clarity you have to communicate with clients from one skype name and with another skype name to communicate to company management.
In Linux in Skype version this is not so and thus for people like me who come from Linux it is rather uneasy to not be able to login in second Skype instance, whether you go to a friend who already keeps logged in with his Skype user …
Thus this triggered me to research a bit if simulatenous user login is possible? Yes it is possible and very easy, to do so the user has to run manually Skype from command line like so:
On 32bit PC hardware with 32 bit of Microsoft Windows issue in win cmd.exe (command prompt) from:
To easily run few instances of Skype in parallel, you can make shortcuts on Desktop. pointing to any of both above commands.
That's all now you can login as many skype users as you like on 1 Win PC. All parallel logged in users can receive and write messages. However you should bear in mind that situation with answering Skype calls is a bit complicated as you cannot speak in parallel through different logged in skype users. Anyhow whether you have to react on Skype voice / video calls incoming in similar or same time from 2 skype accounts, you can use – Set Skype Call on Hold functionality and hence keep voice video in parallel with different skype accounts.
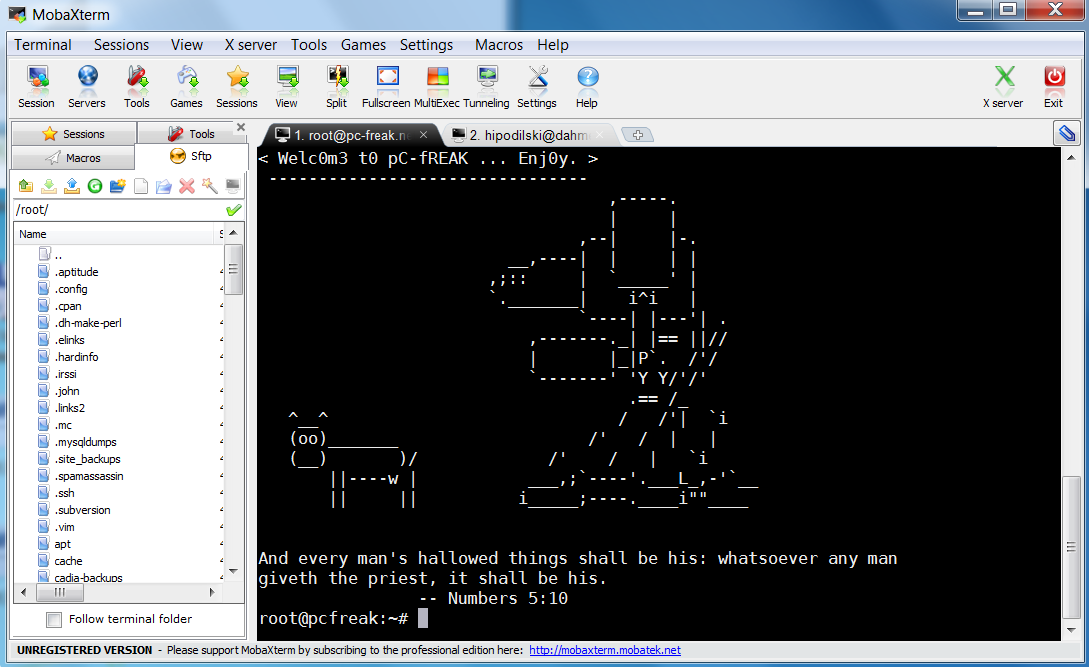
Last 10+ years I worked on GNU / Linux as Desktop. Last 7 years most of my SSH connections were managed from GNOME and I'm quite used to gnome-terminal ssh tabbing. In my new Employee Hewlett Packard. I'm forced to work on Microsoft Windows 7 and thus I used for a month or so Putty and Kitty fork from version 0.63 of PuTTY advertising itself as the best telnet / SSH client in the world. Both of the two lack tabbing and have interface which is pretty unfamiliar to me. As I'm so used to using native UNIX terminal. Fortunately a colleague of mine Ivelin was using an SSH client called MobaXTerm which very much did emulation similar to my favourite gnome-terminal. MobaXterm is not free software / open source app but this doesn't matter so much to me as anyways I'm running a non-free Win OS on my desktop. What makes MobaXterm so attractive is its rich functionality (cosmic years infront of Putty).
Here is website description of MobaXterm quoted from its website:
MobaXterm is an enhanced terminal for Windows with an X11 server, a tabbed SSH client and several other network tools for remote computing (VNC, RDP, telnet, rlogin). MobaXterm brings all the essential Unix commands to Windows desktop, in a single portable exe file which works out of the box.
embedded X11 server for easily exporting your Unix/Linux display
a session manager with several network utilities: SSH, RDP, VNC, Telnet, Rlogin, FTP, SFTP and XDMCP
passwords management for SSH, RDP, VNC, SFTP (on demand password saving)
easy graphical file transfer using drag and drop during SSH sessions
advanced SSH tunnels creation tool (graphical port forwarding builder)
tasks automation using scripts or macros
Mobaxterm is portable just like Putty so its useful to use on HOP stations to servers like used in big companies like HP. Featured embedded Unix commands (e.g., ls, cd, cat, sed, grep, awk, rsync, wget) gives a feeling like you're working on pure Linux console making people addicted to Linux / BSD quite confortable. Some other very useful terminal emulator functions are support for anti-aliasing session manager (save / remember passwords for ssh sessions in Crypted format so much missing in Putty) and it even supports basic macros. Basic UNIX commands embedded in MobaXterm are taken and ported from Cygwin project – Linux-like environment for Windows making it possible to port software running on POSIX systems (such as Linux, BSD, and Unix systems) to Windows. A very cool think is also MobaXterm gives you a Linux like feel of console navigation in between basic files installed from Cygwin. Some downside I found is program menus which look at first glimpse a bit confusing especially for people used to simplicity of gnome-terminal. Once logged in to remote host via ssh command the program offers you to log you in also via SFTP protocol listing in parallel small window with possibility to navigate / copy / move etc. between server files in SFTP session which at times is pretty useful as it saves you time to use some external SFTP connector tools like WinSCP.
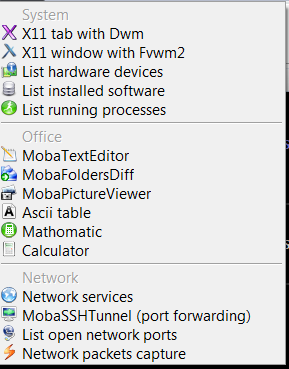
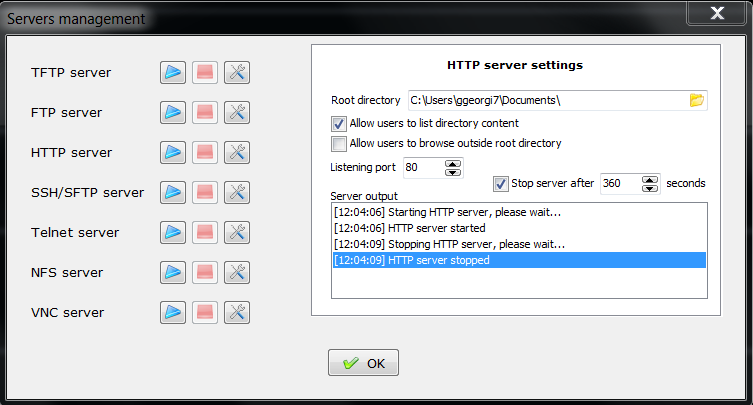
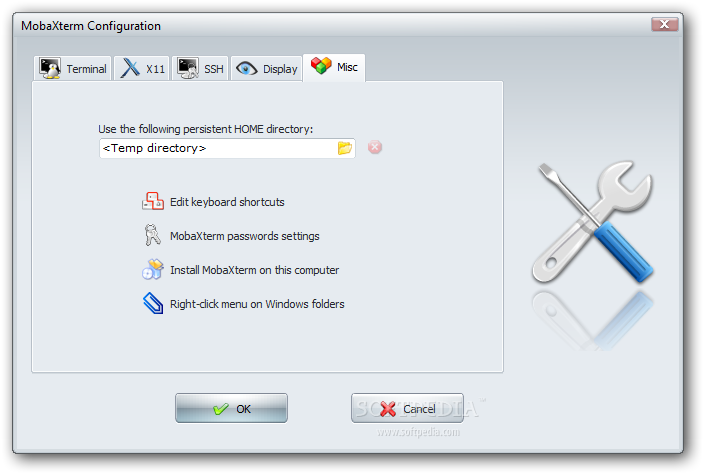
From Tools configuration menu, there are few precious tools as well; – embedded text editor MobaTextEditor – MobaFoldersDiff (Able to show diffeernces between directories) – AsciiTable (Complete List of Ascii table with respective codes and characters) – Embedded simple Calculator – List open network ports – GUI Tool to list all open ports on Windows localhost – Network packets capture – A Gui tool showing basic info like from UNIX's tcpdump! – Ability to start quickly on local machine (TFTP, FTP, SFTP / SSH server, Telnet server, NFS server, VNC Server and even simple implementation of HTTP server)
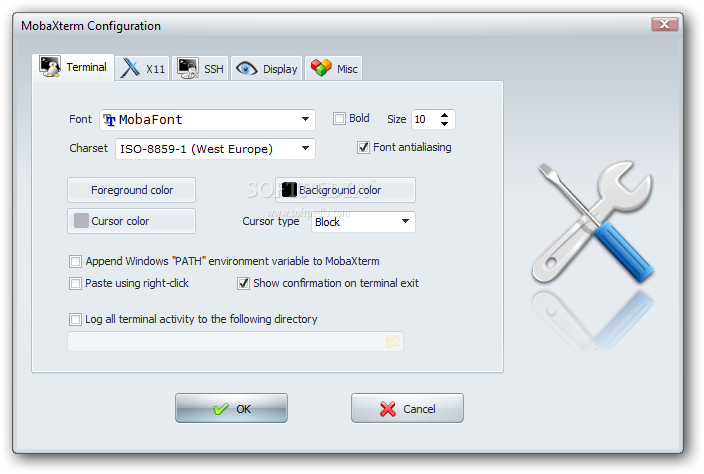
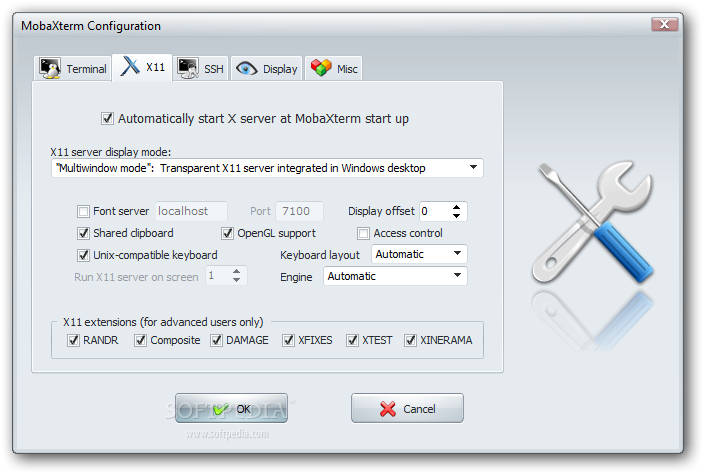
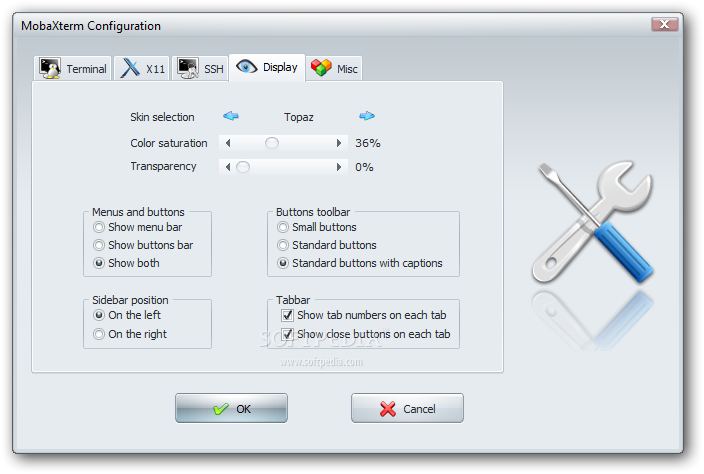
Below are few screenshots to get you also idea about what kind of configuration MobaXterm supports
To configure and use Telnet, RSH, RDP, VNC, FTP etc. Sessions use the Sessions tab on top menu.
One very handy thing is MobaXterm supports export of remote UNIX display with no requirement to install special Xserver like already a bit obsolete Xming – X server for Windows. The X Display Manager Control Protocol (XCMCP) is a key feature of the X11 architecture. Together with XDMCP, the X network protocol allows distributed operation of the X server and X display manager. The requesting X server runs on the client (usually as an X terminal), thus providing a login service, that why the X server ported to MobaXterm from Cygwin also supports XDMCP. If, for example, you want to start a VNC session with a remote VNC server, all you have to do is enter the remote VNC server’s IP address in the VNC area; the default VNC port is already registered.
Accessing the remote Windows server via RDP (Remote Desktop Protocol) is also a piece of cake. Once you establish a session to RDP or other Proto it is possible to save this session so later you just choose between session to access. The infamous (X11 Port Forwarding) or creation of SSH encrypted tunnels between hosts to transfer data securily or hide your hostname is also there.
MobaXterm is undoubtedly a very useful and versatile tool. Functionally, the software is well mannered, and Windows users who want to sniff a little Linux/Unix air can get a good idea of how Linux works. A closer look reveals that anything you can do with MobaXterm can be achieved directly with freely available tools (Cygwin) and Unix tools ported from Cygwin. However, although Cygwin provides a non-Posix environment for Windows, it doesn’t offer a decent terminal, which is one thing Moba-Xterm has going for it.
Admittedly, in pure vanilla Cygwin, you can start an X server automatically and then use xterm, but xterm lacks good-quality fonts, whereas MobaXterm conveniently lets you integrate a font server.
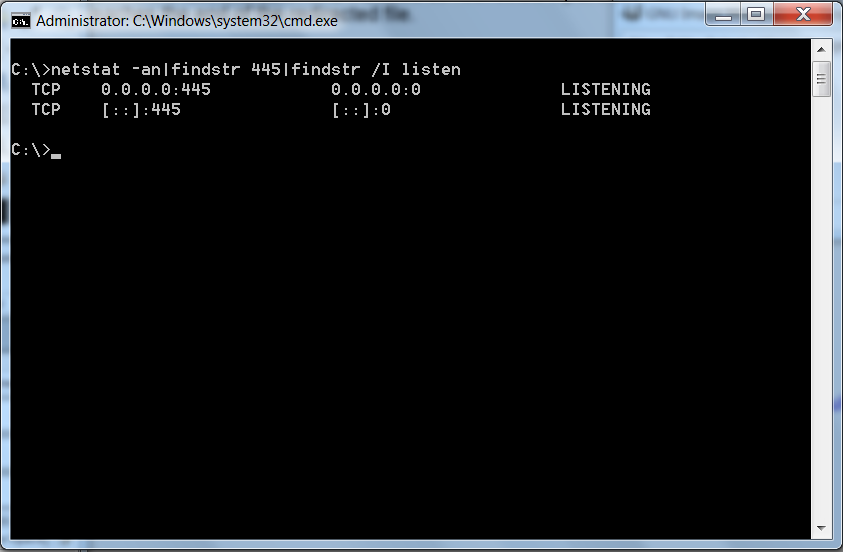
Most of my last 13 years are spend working on Linux. Now in my new job in Hewlett Packard. I'm forced to work again on Microsoft Windows … Therefore I'm trying to refresh my Windows knowledge. One thing I've forgotten with the years is what is Windows command equivalent to Linux grep. On Windows there is a command FINDSTR (find string).
Way to use it is almost identical as GREP on Linux. Lets say I would like to grep all opened listening ports on port 445 (used for samba – SMB shares connections) on Linux command will be:
/B Matches pattern if at the beginning of a line. /E Matches pattern if at the end of a line. /L Uses search strings literally. /R Uses search strings as regular expressions. /S Searches for matching files in the current directory and all subdirectories. /I Specifies that the search is not to be case-sensitive. /X Prints lines that match exactly. /V Prints only lines that do not contain a match. /N Prints the line number before each line that matches. /M Prints only the filename if a file contains a match. /O Prints character offset before each matching line. /P Skip files with non-printable characters. /OFF[LINE] Do not skip files with offline attribute set. /A:attr Specifies color attribute with two hex digits. See "color /?" /F:file Reads file list from the specified file(/ stands for console). /C:string Uses specified string as a literal search string. /G:file Gets search strings from the specified file(/ stands for console). /D:dir Search a semicolon delimited list of directories strings Text to be searched for. [drive:][path]filename Specifies a file or files to search.
Use spaces to separate multiple search strings unless the argument is prefixed with /C. For example, 'FINDSTR "hello there" x.y' searches for "hello" or "there" in file x.y. 'FINDSTR /C:"hello there" x.y' searches for "hello there" in file x.y.
Regular expression quick reference: . Wildcard: any character * Repeat: zero or more occurrences of previous character or class ^ Line position: beginning of line $ Line position: end of line [class] Character class: any one character in set [^class] Inverse class: any one character not in set [x-y] Range: any characters within the specified range \x Escape: literal use of metacharacter x \<xyz Word position: beginning of word xyz\> Word position: end of word
For full information on FINDSTR regular expressions refer to the online Command Reference.
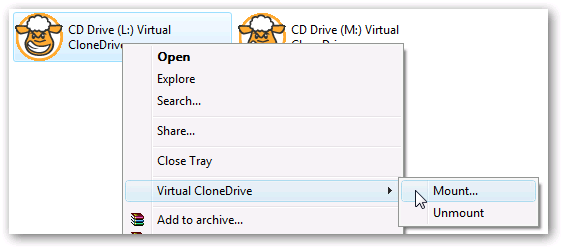
In Microsoft Windows 8, there is embedded way to mount ISO files. However in Windows 7 still there is no way to mount ISO image files. I just installed a new Windows 7 on my office work notebook given by Hewlett Packard and had to mount an ISO with Microsoft Visio. Normally all know the two standard programs to mount ISO images in Windows;
After consulting my colleague I was recommended to rather install Virtual Clone Drive, for the reason Daemontool's latest versions install Spyware on Computer. On the other hand MagicISO is nice one but a bit obsolete already. Launching installation prompts opens below install Window;
As you can see from installationVirtual Clone Drivesupports ISO / IMG / UDF / BIN and CCD images. Once installation complete to Mount an ISO into separate drive quickest way is to Double click on Image. Also it can be done from program by navigating to:
From my little experience so far with Virtual Clone Drive I would recommend Windows users to better install it instead of freeware alternatives. VCD feels more robust.
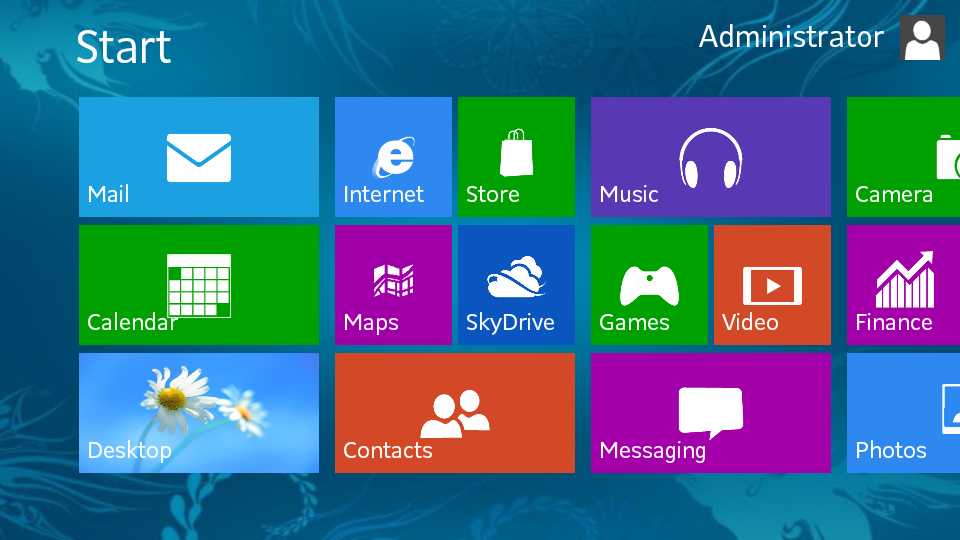
Whether you just installed to try Win 8 or received an office work notebook configured to work with Microsoft Windows 8, you certainly are already annoyed by changed Mobile phone like interface. First time I saw Windows 8 interface I was in shock what kind of mess this interface is. I understand Microsoft's desire to make Windows Mobile ready, but maybe it was wise idea to allow the user with option to revert back to old Windows XP / Vista /7 interface for the sake of some compitability and user friendliness. Even for young people who already worked with computers this "chopped" interface is surely horrible. I even can't imagine how hard it is for older people to get used to this weird interface.
Today in my work place, the husband of our Second Executive, brought to me a relatively new Sony VAIOnotebook bought with pre-installed Win 8. Just like any normal person, he was in shock with Windows 8 weird interface and he asked me to explain him the interface. Well I will immediately after someone explain me the interface 🙂 He so much didn't like Win 8 that he even asked to re-install computer with Windows 7. I'm a lazy person plus I like saving my time. So looked quickly online if it is possible to make Windows 8 interface with Start button similar to older Windows releases. Actually there are plenty of ways to do it via both, Free and paid Software. I'm a Free Software supporter, so I didn't even considered checking non-free or freeware ones. And I sticked directly to Open Source – Classic Shell.
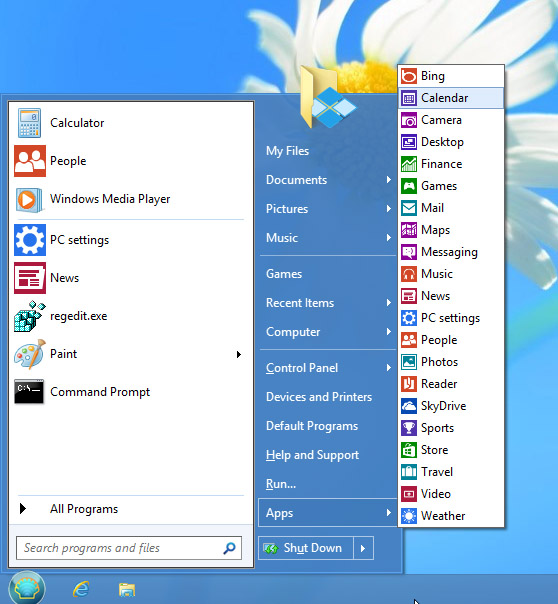
What Classic Shell does is it turns interface of Internet Explorer to look like IE 9, adds a Start Menu button With Programs etc. to left Win corner (of course it doesn't place Windows Start button as this one is patented and forbidden to use in Free Soft).
Unlike most Start menu replacements, Classic Shell has been around for 4 years already. Its first version came out in November 2009, long before Windows 8 was even close to public. At the time, it was meant to fix interface annoyances in Windows Vista. That was version 0.9 (the first publicly available version).
Here is main list of current Classic Shell features:
Highly customizable start menu with multiple styles and skins
Start button for Windows 7 and Windows 8
Toolbar and status bar for Windows Explorer
Caption and status bar for Internet Explorer
Program is in very active development (last beta released is from 2 days ago) meaning it is very popular among Windows users. As of time of writting its stable release is at ver. 3.6.8. It has even translations in in 18 languages including (my native Bulgarian)
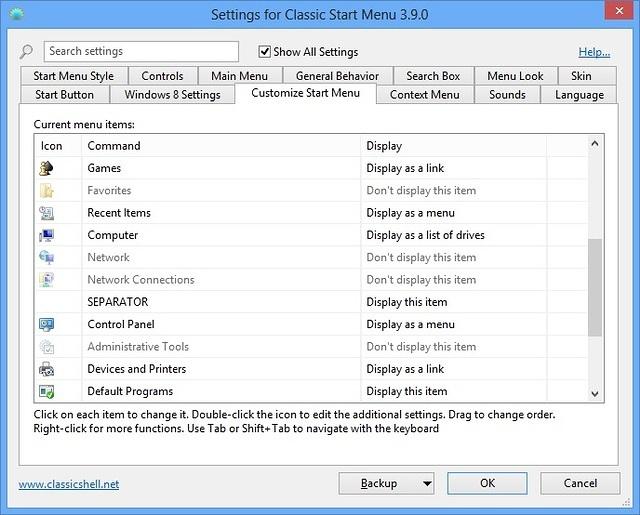
There are plenty of things to configure on how Classic Shell behaves;
I was a little bit scared it might break up Win 8 first time I installed it, but installation went quite smoothly and even there was no need for restart for new Win start menu to appear. Classic Shell, Search option works fine too and is quite fast (dunno if it is due to Windows indexing) or it use some custom acceleration. It has also a number of Skins to choose from to change appearance of Start Menu button.
To sum it up Classic Shell does well what it is meant for, I guess in any future Windows install it will be the first program to install and save myself those terrible Windows 8 UI!
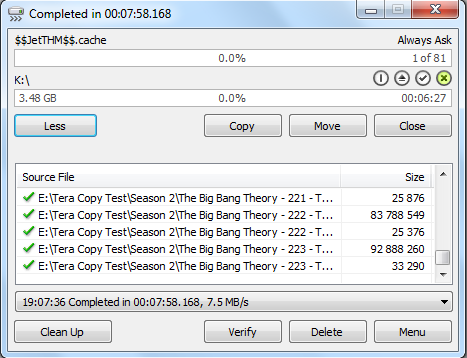
My sysadmin colleague mentioned today about TeraCopy. An application for Microsoft Windows designed to be used to Move or Copy files. So why would one want to use Teracopy instead of normal Windows Explorer copy integrated soft? Reason is Teracopy is faster than MS Windows Copy / Move and uses dynamically adjusted buffers to reduce seek times. This asynchronous copying speeds up file transfers between physical HDDs.
More precious feature of TeraCopy is whether you have to Save data from hard disks with Bad Sectors, it can skip faulty files (stored on bad sectors) without triggering Windows to hang up or halt with the Blue Screen of Death.TeraCopy even can be setup to replace Windows Explorer (i.e. Shell Integration copy and move functions). Beside that it works well with Unicode encoded file names (Cyrillic, Chineese) etc.
As of time of writting article, TeraCopy has support for all Windows NT (Windows XP / 2000) as well as for Windows 7 and 8. Whether a failure to copy file occurs it tries to recopy file several times in order to achieve copy success. After each file is copied a CRC check up value of file is calculated and matched. It also provides a way more verbose information on copied files than Windows default Copy. It is very useful in copying large files from system to system as file transfers complete time is significantly lower.
Once TeraCopy is installed it automatically does replace Explorer Copy and Move functions, hence after install every next Move or Copy operation is auto handled by it. In preferences the user could still revert back Copy / Move functions to Explorer original.
Unfortunately TeraCopy is not-free software but freeware and can only be used to non-commercial use, for commercial use you have to purchase TeraCopy Pro version.
Debian SqueezeLinux depending on RC release comes with a Version of WINE Windows emulator 0.9.8 or wine 1.0.1-3.1. This wine version is very out of date already and many of the new win software working well with newer wine releases doesn't work. We all know the down-side of Debian stable releases you always stay a bit outdated.
Thanksfully there is an easy way to upgrade to newer wine version and hence have more Windows software properly running on Squeeze. To do so you need to add custom following wine custom deb repository:
deb http://main.mepis-deb.org/mepiscr/repo/ mepis85cr main
 debian:~# apt-get update

....

debian:~# apt-get --yes install wine ....

The following NEW packages will be installed:

fonts-droid ttf-droid ttf-umefont ttf-unfonts-core wine-gecko

The following packages will be upgraded: wine

1 upgraded, 5 newly installed, 10 to remove and 86 not upgraded.

Need to get 135 MB of archives.
debian:~# dpkg -l |grep -i wine
rc libwine 1.0.1-3.1 Windows API implementation – library ii playonlinux 3.7.6-1 front-end for Wine ii wine 1.4-1mcr8.5+1 Windows Compatibility Layer (Binary Emulator and Library) rc wine-bin 1.0.1-3.1 Windows API implementation – binary loader ii wine-gecko 1.4.0-1mcr85+2 Microsoft Windows Compatibility Layer (Web Browser)
Many younger people probably haven't heard of Digital Equipment / DEC Corporation neither PDP 8, PDP 16 and all of this arcane computer hardware. I'm sure many people nowdays determining themselves as hackers or tech professionals don't know about VMS nowdays known under the name of OpenVMS either. OpenVMS used to be often said as to be one of the most secure operatings systems in the World What makes this OS unique is that it had a tremendous influence on modern computers as we know it. OpenVMS used to the first commercial operating system to be supporting a decent native clustering memory and hard disk sharing. I've played with OpenVMS on a test machine and it is really amazing. One of the main design engineers who planned VMS has later worked for Microsoft on the Windows NT technology. Therefore, many of the VMS ideas are nowdays embedded in most of Microsoft Windows products (Windows NT, XP, 2000, 2003, Windows '7 etc.). VMS was an absolute hit and many corporations used it until 1989, when the OS deployment slowly started to fall down, followed by a demise of DEC corporation as well. With its demise DEC was bought by Packard Bell which later was purchased by HP. VMS was renamed to OpenVMS as it was bought by Hewlett Packard in 1996. What is interesting of OpenVMS is that it requires a specific hardware 64 bit architecture Alpha Processors).Hence OpenVMS is not nowdays compatible with modern Personal Computers 32 / 64 bit hardware. There are some emulator softwares which can make a PC to run OpenVMS (if someone wants to take a look at this nowdays considered archaic OS). OpenVMS comes with a command language similar to Linux's bash called DCL (Digital Command Language). DCL scripts are rather funny to read and see, and I'm sure anyone who has a love for scripting will be interested to learn it as a learning curve. Below is a DEFCON Video talk on DEFCON. For all those who don't know DEFCON, this is one of the most popular hacker conferences in America. DEFCON is a codename from the army and means (Defence Readiness Condition). As hacking is quite related to military someone decided to name this hacking / cracking conference under this sound name 🙂 To check out what OpenVMS is like you can immediately, launch:
# ssh -l NEWUSER dahmer.vistech.net
Welcome to Gein.vistech.net [Alpha DS10L Under OpenVMS 7.3-1] …
Public Access DEC Alpha/OpenVMS 7.3-1
For more information about how to get a account here, Please check out http://deathrow.vistech
IRC Server: irc.2600.net / IRC Channel: #vms
The #vms channel password (if one is set) is shosys
Want an account? New users Login as -> "NEWUSER"/Password="NEWUSER" Forgotten password? Login as -> "NEWPASSWORD"/Password="NEWPASSWORD" For "Guest" access to DCL Login as -> "DEMO"/Password="USER" To play the online GAMES Login as -> "GAMES/Password="PRESSPLAY"
—————————————————————————-
This Node was graciously donated by http://www.islandco.com [Island Computers]
NEWUSER@dahmer.vistech.net's password:
To access it from Windows use Putty or any terminal emualator:
I hope below video will be of interest to you. It introduces OpenVMS shortly and also explains how it can be hacked. Enjoy 🙂
I've received a PDF file with a plan for development of a bundle of projects, My task was to evaluate this plan and give feeback on the 44 pages PDF document.
Since don't know of program to directly be able edit PDF files on GNU / Linux ?, my initial idea was to open and convert the PDF to ODT / DOC with OpenOffice (Libre Office) and then edit the ODT file. Unfortunately Open Officeoowrite program was unable to open / visualize the PDF file. My assumption is OO failure to open the PDF is because the PDF was generated on Microsoft Windows with Adobe illustrator or smth.
The idea that came to my mind as alternative, way to edit the PDF file was to convert it in pictures edit and then convert the pictures to PDF. In other words to follow these 3 steps: 1. Convert the PDF document to multiple images
2. Edit each of the images with GIMP or Inkscape
3. Convert back all images to a single PDF file
. This prior article was exactly describing how to complete Step 3.Therefore all left was to find a way to convert the PDF file to multiple JPEG / PNG / GIF images.
convert command to convert PDF document to multiple pictures which you can take from my earlier article is:
$ convert *.jpg outputpdffile.pdf
Actually in Step 1 I was aiming to do the opposite of what I've previously done.
Hence, in order to convert the singe Project.PDF file to multiple PNG images, I just switched convert IN / OUT arguments order.
I've done the PDF to pictures conversion on my notebook running Debian Squeeze (6.0.2) GNU / Linux.Convertion of the PDF file to 44 images, took 25 seconds on my dual core 1.8 Ghz / 2GB RAM Thinkpad r61. Afterwards, I've had at hand 44 PNG files generated, e.g.:
hipo@noah:~/project-pdf-to-images$ ls -al Project-*.png |wc -l

44
convert was also smart enough to produce correct file naming. The output file names were: Project-1.png Project-2.png etc.
Nicely each number (-1.png) was corresponding to the respective PDF page. For instance Project-10.png was corresponding to page 10 of the Projects.PDF file
Rather ironically, after convertion of the PDF to pictures, while opening the Project-1.png, I've noticed The GIMP – (The GNU Image Manipulation Program) is capable of directly reading PDF files. GIMP has both the option to open files in layers or separate images 😉 Anyways even if GIMP is used to modify the different PDF pages as layers, once completed GIMP doesn't have the ability to save the file as PDF and therefore once saved the file if merging of layers is done the resulting picture becomes ONE BIG MESS. Therefore it seems my the 3 steps way e.g.:
1. convertion PDF to pictures

2. picture edit with GIMP or Inkscape

3. convertion of pictures back to PDF
is still the only way to "modify PDF" in Linux or BSDs. I will be glad to hear if someone has come up with a better solution?