Posts Tagged ‘Missing’

How to Create the Latest Windows 10 / 11 Installation Media from Linux OS

Monday, April 20th, 2026

create-a-windows-installation-flash-drive-from-linux-logo-howto-create-windows-media-os-installer

Creating a Windows 10 installation USB from a Linux system is entirely possible and surprisingly straightforward once you know the few steps process and using few Linux tools. Whether you're preparing a dual-boot setup, fixing a broken Windows machine OS onplace, or re-installed Windows, installing fresh from scratch, is an useful skill every self-respecting sysadmin should be aware of.

Why Create Windows Installation Media from Linux ?

Even a hardcore Linux sysadmin / Desktop users need Windows for specific software, gaming, or troubleshooting, or for deployment of Windows installs for non-IT professionals, friends or company environments.
Having a Windows installable ISO by downloading and using Windows Media Creation Tool is an easy trivial task for those with Windows but is a problem especially for GNU / Linux users like me who don't own a computer with Microsoft Windows, but have Debian / Ubuntu / Fedora in place
Microsoft’s official media creation tool is made to only runs on Windows OS, fortunately there is a few ways to have an installable USB drive prepared even on Linux.

The main challenge lies in properly formatting the USB flash drive and handling large Windows image files, especially the install.wim, which can exceed FAT32 file size limits.

What You’ll Need

Before starting, make sure you have:

  • A USB drive (at least 8GB sized recommended)
  • A Linux system (Ubuntu, Fedora, Arch Linux etc.)
  • The latest Windows 10 ISO file (downloaded locally)

1. Download the Windows 10 ISO

Go to Microsoft’s official website and download the latest Windows 10 ISO. You can do this directly from Linux using your browser.

  1. Go to the Official Windows 10 Download Page.
  2. On Windows: Press F12 (Dev Tools), click the Device Toolbar icon (mobile/tablet icon), and refresh the page. This tricks Microsoft into thinking you are on a Mac or Linux machine.
  3. Select the edition and language, then click Confirm.
  4. Right-click the 64-bit Download button and select Copy link address.
  5. In your terminal, use wget. Note: You must wrap the URL in double quotes because it contains special characters:


Use wget with  a direct copy of download link like for example:

$ wget https://www.microsoft.com/software-download/windows10.iso -O windows10.iso

Make sure the ISO is fully and correctly downloaded before proceeding further.

2. Install Required Tools

On Debian / Ubuntu deb-based distros. You’ll need few utilities:

# apt update # apt install wimtools ntfs-3g p7zip-full

On Fedora:

# dnf install wimlib ntfs-3g p7zip

These tools help extract and handle Windows image files properly.

3. Prepare the USB Drive

Insert your USB drive and identify it:

# lsblk

Look for something like /dev/sdb (be careful, as this will erase all data on the drive).

Partition and Format

Use fdiskor parted:

# fdisk /dev/sdb

  • Create a new partition table (GPT or MBR)
  • Create one primary partition
  • Set type to NTFS or FAT32

Then format it:

# mkfs.ntfs -f /dev/sdb1


NTFS is recommended because it supports large files.

4. Mount ISO and USB

Create mount points:

mkdir ~/winiso mkdir ~/winusb

Mount the ISO:

# mount -o loop windows10.iso ~/winiso

Mount the USB:

# mount /dev/sdb1 ~/winusb

5. Copy Files of ISO to Flash drive

Copy all files from the ISO to the USB:

# rsync -avh –progress ~/winiso/ ~/winusb/

This may take several minutes.

6. Handle Large install.wim File (If Needed)

If you formatted your USB as FAT32 and encounter issues with large files:

Split the WIM file:

# wimlib-imagex split ~/winiso/sources/install.wim ~/winusb/sources/install.swm 4000

Then remove the original:

rm ~/winusb/sources/install.wim

This step ensures compatibility with FAT32 file size limits.

7. Safely Unmount

Once everything is copied, make sure to:

# umount ~/winiso # umount ~/winusb

Now your USB is ready.

! NB ! Ensure Boot Files Exist

Double-check this path exists (on the new created Flash stick):

/EFI/BOOT/bootx64.efi

If this file is missing, the USB will fail to boot Windows 11 OS Installer.

8. Boot from fresh created USB drive

Insert the USB flash drive into the target machine, reboot, and enter BIOS / UEFI (usually by pressing F2, F12, DEL, or ESC).

Select the USB drive as the boot device / Save settings, reboot and the Windows OS installer screen should appear.

9. Troubleshooting Tips and Common Pitfalls (Especially with Windows 11)

  • USB not booting ? – Ensure your system is set to boot in UEFI mode if your USB is GPT formatted.
  • Missing drivers ? – Try recreating the USB using NTFS instead of FAT32.
  • Secure Boot issues ? – You may need to disable Secure Boot in BIOS.

9.1. USB Not Booting

  • Try use FAT32 instead of NTFS
  • Ensure UEFI mode is enabled

9.2. “File Too Large” Error

  • Very likely you forgot to split install.wim (as prior described)

9.3. Installer Refuses to Continue

  • Windows 11 require:
    a.TPM 2.0
    b. Secure Boot

10. Alternative GUI Linux Tools to use WoeUSB-ng / Ventroy

If you prefer Linux GUI tools for preparation of Installation USB drive Media , consider downloading WoeUSB or Ventroy:

  • WoeUSB – specifically designed for creating Windows bootable USBs from Linux
  • Ventoy – allows you to copy multiple ISOs to a single USB and boot from a menu

10.1 Install WoeUSB-ng

Easiest and perhaps most straight forward way is to install it via git and pip python.

$ git clone https://github.com/WoeUSB/WoeUSB-ng.git

$ cd WoeUSB-ng

$ sudo pip3 install .

10.2. Install Ventroy and deploy Windows installer on USB Drive


a) Prepare the USB Drive in Linux

b) Add the Windows ISO 

c) Install Windows ISO

1. Download it : Get the ventoy-x.x.xx-linux.tar.gz file from the Ventoy website.

2. Extract : Open a terminal and extract: tar -xvf ventoy-*.tar.gz.

3. Locate USB: Run lsblk to identify your USB drive (e.g., /dev/sdb).

4. Install: Run the script (replace /dev/sdb with your drive):

# sudo ./Ventoy2Disk.sh -i /dev/sdb


Once installed, the USB will have a large partition named "Ventoy".


5. Copy, paste Windows ISO file: (Windows 10 or 11) onto this USB drive. 


6. Insert the USB,  into the target computer.

7. Reboot PC:  and enter the BIOS/boot menu (e.g., F2, F12) to boot from the USB.

Sum it up

Creating Windows 10 installation media from Linux might seem tricky at first, but with the right approach, it’s completely manageable, it is also a nice one if you need to create multiple flash drives, and you need to automate the process of Windows installable USB drive creation for multiple windows setups that needs to get reinstalled on place simultaneously.
Once you’ve done it once, it becomes a quick and reliable process you can reuse anytime.

Whether you're a Linux enthusiast or just working across systems, this method ensures you're never stuck without a Windows installer at hand, even without owing a Windows OS.

How to Install and Troubleshoot Grafana Server on Linux: Complete Step-by-Step Tutorial

Saturday, October 25th, 2025

install-grafana-on-linux-logo

If you’ve ever set up monitoring for your servers or applications, you’ve probably heard about Grafana.
It’s the de facto open-source visualization and dashboard tool for time-series data — capable of turning raw metrics into beautiful and insightful charts.

In this article, I’ll walk you through how to install Grafana on Linux, configure it properly, and deal with common problems that many sysadmins hit along the way.
This guide is written with real-world experience, blending tips from the official documentation and years of self-hosting tinkering.

1. Prerequisites

You’ll need:

  • A Linux machine — Ubuntu 22.04 LTS, Debian 11+, or CentOS 8 / Rocky Linux 9.
  • A superuser or user with sudo privileges.
  • At least 512 MB of RAM and 1 CPU core (Grafana is lightweight).
  • Internet access to fetch the repository and packages.

Optionally:

  • A domain name (for example: grafana.yourdomain.com)
  • Nginx/Apache if you want to enable HTTPS later.

2. Update Your System

Before any installation, ensure your system packages are up to date:

# Debian/Ubuntu
# apt update && sudo apt upgrade -y

# or

# dnf update -y # CentOS/RHEL/Rocky

3. Install Grafana (from the Official Repository)

Grafana provides an official APT and YUM repository. Always use it to get security and feature updates.

For Debian / Ubuntu:
 

# apt install -y software-properties-common apt-transport-https wget
# wget -q -O - https://packages.grafana.com/gpg.key | sudo apt-key add -
# echo "deb https://packages.grafana.com/oss/deb stable main" | \
# tee /etc/apt/sources.list.d/grafana.list
# apt update
# apt install grafana -y 


For CentOS / Rocky / RHEL:

# tee /etc/yum.repos.d/grafana.repo <<EOF
[grafana]
name=Grafana OSS
baseurl=https://packages.grafana.com/oss/rpm
repo_gpgcheck=1
enabled=1
gpgcheck=1
gpgkey=https://packages.grafana.com/gpg.key
EOF
# dnf install grafana -y


4. Start and Enable the Service

Once installation completes, start and enable Grafana to run on boot:
 

# systemctl daemon-reload
# systemctl enable grafana-server
# systemctl start grafana-server

Check status:

# systemctl status grafana-server


You should see Active: running.

5. Access the Grafana Web Interface

Grafana listens on port 3000 by default.

Open your browser and visit:

http://<your_server_ip>:3000

Login with the default credentials:

Username: admin
Password: admin

You’ll be asked to change the password — do it immediately for security.

6. Configure Grafana Basics

Configuration file location:

/etc/grafana/grafana.ini

Common settings to edit:

  • Port:

http_port = 8080

  • Root URL (for reverse proxy):

root_url = https://grafana.yourdomain.com/

  • Database: (change from SQLite to MySQL/PostgreSQL if desired)
[database]
type = mysql
host = 127.0.0.1:3306
name = grafana
user = grafana
password = supersecret_password582?255!#

Restart Grafana after making changes:

# systemctl restart grafana-server


7. Optional – Secure Grafana with HTTPS and Reverse Proxy

If Grafana is public-facing, always use HTTPS.

Install Nginx and Certbot:

# apt install nginx certbot python3-certbot-nginx -y
# certbot --nginx -d grafana.yourdomain.com

This automatically sets up SSL certificates and redirects traffic from HTTP → HTTPS.

8. Add a Data Source

Once logged in:

  1. Go to Connections → Data Sources → Add data source

  2. Choose Prometheus, InfluxDB, Loki, or your preferred backend

  3. Enter the connection URL (e.g., http://localhost:9090)

  4. Click “Save & Test”

If successful, you can start creating dashboards!

9. Troubleshooting Common Grafana Installation Issues

Even the smoothest installs sometimes go wrong.
Here are real-world fixes for typical problems sysadmins face:

Problem

Likely Cause

Fix

Service won’t start

Misconfigured grafana.ini or port in use

Run # journalctl -u grafana-server -xe to see logs. Correct syntax, change port, restart.

Port 3000 already in use

Another app (maybe NodeJS app or Jenkins)

sudo lsof -i :3000 → stop or reassign the conflicting service.

Blank login page / dashboard not loading

Browser cache or reverse proxy misconfig

Clear cache, check Nginx proxy settings (proxy_pass should point to http://localhost:3000).

APT key errors (Ubuntu 22.04+)

apt-key deprecated

Use signed-by=/usr/share/keyrings/grafana.gpg method as Grafana docs suggest.

“Bad Gateway” via proxy

Missing header forwarding

In Nginx config, ensure:

proxy_set_header Host $host;
proxy_set_header X-Real-IP $remote_addr;
proxy_set_header X-Forwarded-For $proxy_add_x_forwarded_for;
proxy_set_header X-Forwarded-Proto $scheme;


“` |
| **Can’t access Grafana from LAN**

Most common reason Firewall blocking port

# ufw allow 3000/tcp


 (or adjust firewalld). 


10. Maintenance and Backup Tips
 

– Backup your dashboard database frequently: 
– SQLite: `/var/lib/grafana/grafana.db`
– MySQL/PostgreSQL: use your normal DB backup methods

– Watch logs regularly, e.g.: 

# journalctl -u grafana-server -f

  • Upgrade grafana safely:

# apt update && apt install grafana -y

(Always back up before upgrading!)

Conclusion

Grafana is a powerful, elegant way to visualize your system metrics, application logs, and alerts.
Installing it on Linux is straightforward — but knowing where it can fail and how to fix it is what separates a beginner from a seasoned sysadmin.

By following this guide, you not only get Grafana up and running, but also understand the moving parts behind the scenes — a perfect fit for any DIY server admin or DevOps engineer who loves keeping full control.

Fix KDE Plasma fails to load: “All shell packages missing. This is an installation issue, please contact your distribution” in Kubuntu Linux

Friday, September 27th, 2019

Kubuntu_Linux-logo_and_wordmark-fix-plasma-graphical-environment

I've been called yesterday by a friend who has referred me to a friend of him Zvezdomir from Gabrovo who had installation of Kubuntu Desktop Linux by some other colleague but then suddenly the colleague decided to leave the country thus the Kubuntu become completely unmanaged.
In the spirit of Murphy's laws soon after it broke and as the HDD was filled with a lot of important pictures data I received the call with a beseech to help him fix his existing broken Kubuntu installation on the relatively old IBM thinkpad notebook. 
No problem,  I switched the role of a Linux Desktop user tech support  as it is part of daily job of every system admini to be on the hotline for computer medication and never say no to incoming requests 🙂

It seems the guy had messed up his Graphical Environment when as a Linux novice user decided to experiment with changing environments, he used to be using GNOME and then due to some issues with some of the Image Viewer eog – Eye of Gnome / Shotwell / Gpaint whose borders was not showing properly or something he decided to Switch to KDE Plasma. This was successful but as he continued to try out things on the Linux he broke it up badly so after the machine booted he was getting the error after boot of Xorg  Plasma was producing below error.
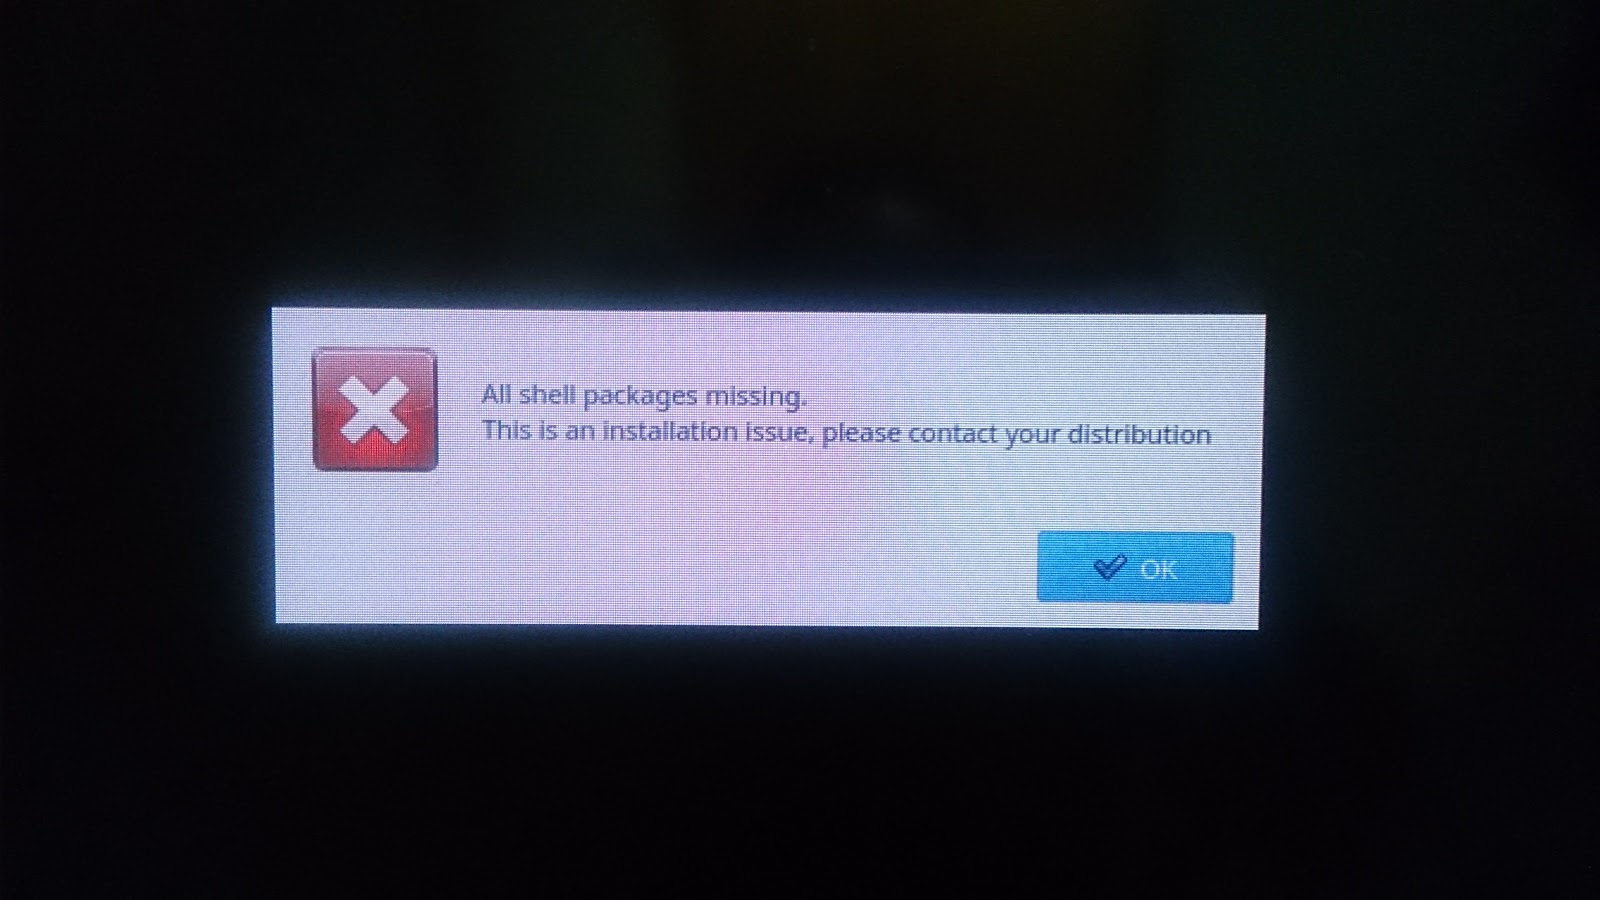
All-shell-packages-missing-This-is-an-installation-issue-please-contact-your-distribution

"All shell packages missing. This is an installation issue, please contact your distribution"


After spending about 30 minutes on the phone explaining him how to switch to Console as he had even no basic concepts about how to manage his Linux box, the problem was solved below are few steps taken to fix All shell packages missing issue

1. Press Ctrl + Alt + F2 Simultaneously

Usually historically switching to console on GNU / Linux was possible with CTRL + ALT + F1 but this was changed as often newer Linux distros do use TTY1 console to launch the X GUI environment.
Here we had some struggles to explain him where F1 as he thought he is supposed to press CTRL + ALT + S + 2 (perhaps misheard on the phone …) and was panicing how he is supposed to press 4 buttons simultaneously after a while it was cleared it is CTRL + ALT + F2 …
PS. In some of the other Ubuntus Lubuntu or older Ubuntus if CTRL + ALT + F2 doesn't work,

some of the other Virtual Text Consoles should be accessible with CTRL + ALT + F3CTRL + ALT + F4 etc.

2.  Login with your user login name

Once the login: field appears I had to explain him about 10 times how he should type his non-privileged user as it is always the case with computer novice. I had to stress here he should press Enter after the username / login is typed …

3. Become root (superuser) after standard login with:


sudo su


3. If the machine is not connected to internet (this might be the case if errors are produced on below 4. 5. steps)

Assuming you're already superuser (root) and you have no internet because the Network Manager is unable to connect due to failure of KDE Plasma to start, in order to connect to lets say already configured WI-Fi home wireless router,
restart networking with


service NetworkManager restart


Since internet connectivity will be required in order to be able to install the missing packages and update the package repositories, next test whether internet is reachable.


ping google.com
PING google.com (172.217.169.110) 56(84) bytes of data.
64 bytes from sof02s31-in-f14.1e100.net (172.217.169.110): icmp_seq=1 ttl=56 time=15.2 ms
64 bytes from sof02s31-in-f14.1e100.net (172.217.169.110): icmp_seq=2 ttl=56 time=11.5 ms
64 bytes from sof02s31-in-f14.1e100.net (172.217.169.110): icmp_seq=3 ttl=56 time=6.00 ms
^C
— google.com ping statistics —
3 packets transmitted, 3 received, 0% packet loss, time 5ms
rtt min/avg/max/mdev = 6.003/10.892/15.220/3.783 ms

N.B.! We had stumble blocks here too, as the Wi-Fi router seemed to be far away from the room where the PC was, after he moved to the other room where Signal was fine and re-issuing the service NetworkManager restart ping worked.

4. Next to get the latest list with available installable packages on the Ubuntu run the usual


apt-get update


5. Do install / reinstall kubuntu-desktop meta package


Finally to Fix the broken desktop GUI (that is not appearing instead of the Plasma login


apt-get install –yes kubuntu-desktop


Finally reboot the Laptop with reboot cmd:

reboot

On next boot Kubuntu's usual login screen should be as it used to be until you have broken your package system with tampering with the packages.

And Hooray ! It works again 🙂

By the way as I googled a bit to investigate futher, the problem seems to be common and the solution with a lot of fuzzling is given also pointed as an bug in Ubuntu's launchpad here
 

Fixing weird problems with missing File Explorer on Polaroid MPCS700 tablet with Andorid 2.2 (Linux kernel 2.6.32)

Wednesday, October 10th, 2012

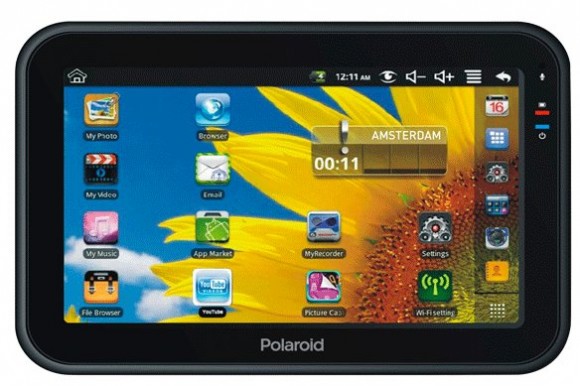
Polaroid MPCs700 Tablet Android version 2.2 with 2.6.32 linux kernel picture

I’ve been given Android Polaroid Tablet which had only 5 clickable icons on main (touchscreen) display:

  • Settings
  • Wi-Fi Settings
  • Youtube
  • Browser
  • App market

The shipped in standard applications for Listening Music, Watching Videos, Managing Photos and Browsing files / ( My Photo, My Video, My Music, File Browser) were missing.

Main problem was File Browser by default shipped with Anroid was missing, and if an USB Stick / Flash Drive is plugged in to the USB port, a message appears along with a sound indicating the USB Flash Drive is detected but there was no way to access the USB Flash drive data ….

The tablet is a second hand bought one and is not my own and it appeared like someone has messed up with it trying to change default Android Linux kernel with some “hacked” (custom compiled one?).

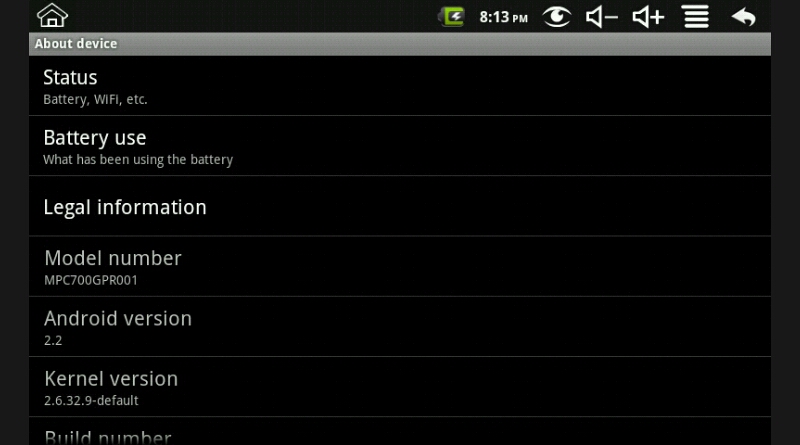
The exact Android version installed on it is 2.2, I checked navigating to:


Settings -> About Device

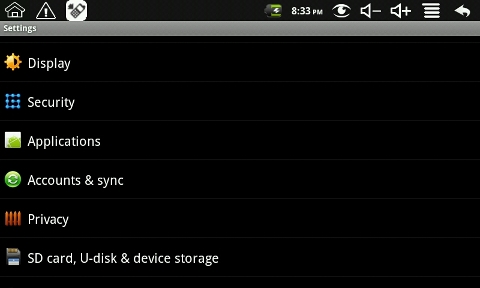
Android 2.2 Polaroid Settings About Device Screenshot pic

Onwards to fix the messed android I had to reset the device to its factory settings by navigating to:


Settings -> Privacy -> Factory data reset

Android 2.2 Polaroid Settings Privacy Reset to Factory Defaults Screenshot

This formats the device and all installed programs and restores the kernel to its original version, so after few minutes of waiting all worked like a charm 🙂

The normal programs for viewing pics, listening music, File Explorer all come at place. Even both VFAT (Fat 32) and NTFS formatted USB drives file systems worked normally with the device. Before that I was puzzled because I suspected the USB Drive is not detected because the kernel is not supporting NTFS and I need to install something. I was wrong just this Factory data reset and NTFS USB bundled by default works as usual 🙂

Just about to go crazy

Monday, July 30th, 2007

The weekend was disastrous. A lot of problems with Valueweb. Missing servers online, missing information about them hard times connecting with their technical support. Lack of information about what’s happening server outages. Using backups of sites changing DNS-es … this is a simple sample of what’s happening and continues to some degree with our servers. Valueweb are a really terrible choice for a Dedicated hosting. But we started with them before so much time it’s hard to change the provider easily. At least the mail server is working normally now. Thanks to God at least I’m provided with ernergy to work, think and fix things Intensively. As Usual PRAISE THE LORD ! :] Hope everything would be back to normal in a few days period. END—–