Posts Tagged ‘mkdir’

How to install / add new root certificates on Debian, Ubuntu, Mint Linux

Saturday, October 21st, 2017

add-install-new-root-ca-certificates-to-debian-ubuntu-linux-howto

How to add / Installing a root/CA Certificate on Debian, Ubuntu, Mint Linux


 Because of various auditing failures and other security issues, the CAcert root certificate set is slowly disappearing from the Ubuntu and Debian ‘ca-certificates’ package.

That's really tricky because if you're a system administrator or have a bunch of programmers whose needs is to install a new set of root certificates for their freshly develped Application or you have to make a corporate certificates added to debian rootca, then the good news is it is quite easy to install new certificates to deb based distributions.


Given a CA certificate file foo.crt, follow these steps to install it on Debian / Ubuntu:

    Create a directory for extra CA certificates in /usr/share/ca-certificates:


    debian:~# mkdir /usr/share/ca-certificates/extra-certificates


    Copy the CA .crt file to this directory:


    debian:~# cp foo.crt /usr/share/ca-certificates/extra-certificates/foo.crt


    Let Debian / Ubuntu add the .crt file's path relative to /usr/share/ca-certificates to /etc/ca-certificates.conf (the file lists certificates that you wish to use or to ignore to be installed in /etc/ssl/certs)


    debian:~# dpkg-reconfigure ca-certificates


In case you want to include a .pem file to the list of trustable certificates on Debian / Ubuntu, it must first be converted to a .crt file first, you can do that with:


    debian:~# openssl x509 -in foo.pem -inform PEM -out foo.crt


Lets say you want to add some custom Root certificate for exapmle cacert.org


   debian:~# mkdir /usr/local/share/ca-certificates/cacert.org
   debian:~# cd /usr/local/share/ca-certificates/cacert.org
   debian:~# mkdir /usr/local/share/ca-certificates/cacert.org
   debian:~# wget -P /usr/local/share/ca-certificates/cacert.org http://www.cacert.org/certs/root.crt http://www.cacert.org/certs/class3.crt


Then once again update the ca certificates bundle

   debian:~# update-ca-certificates


Recover/Restore unbootable GRUB boot loader on Debian Testing GNU/Linux using Linux LiveCD (Debian Install CD1)

Tuesday, July 6th, 2010

I’ve recently broke my grub untentianally while whiping out one of my disk partitions who was prepared to run a hackintosh.
Thus yesterday while switching on my notebook I was unpleasently surprised with an error Grub Error 17 and the boot process was hanging before it would even get to grub’s OS select menu.

That was nasty and gave me a big headache, since I wasn’t even sure if my partitions are still present.
What made things even worse that I haven’t created any backups preliminary to prepare for an emergency!
Thus restoring my system was absolutely compulsory at any cost.
In recovering the my grub boot manager I have used as a basis of my recovery an article called How to install Grub from a live Ubuntu cd
Though the article is quite comprehensive, it’s written a bit foolish, probably because it targets Ubuntu novice users 🙂
Another interesting article that gave me a hand during solving my issues was HOWTO: install grub with a chroot
Anyways, My first unsuccessful attempt was following a mix of the aforementioned articles and desperately trying to chroot to my mounted unbootable partition in order to be able to rewrite the grub loader in my MBR.
The error that slap me in my face during chroot was:

chroot: cannot execute /bin/sh : exec format error

Ghh Terrible … After reasoning on the shitty error I came to the conclusion that probably the livecd I’m trying to chroot to my debian linux partition is probably using a different incompatible version of glibc , if that kind of logic is true I concluded that it’s most likely that the glibc on my Linux system is newer (I came to that assumption because I was booting from livecds (Elive, Live CentOS as well Sabayon Linux, which were burnt about two years ago).

To proof my guesses I decided to try using Debian testing Squeeze/Sid install cd . That is the time to mention that I’m running Debian testing/unstable under the code name (Squeeze / Sid).
I downloaded the Debian testing amd64 last built image from here burnt it to a cd on another pc.
And booted it to my notebook, I wasn’t completely sure if the Install CD would have all the necessary recovery tools that I would need to rebuilt my grub but eventually it happened that the debian install cd1 has everything necessary for emergency situations like this one.

After I booted from the newly burned Debian install cd I followed the following recovery route to be able to recovery my system back to normal.It took me a while until I come with the steps described here, but I won’t get into details for brevity

1. Make new dir where you intend to mount your Linux partition and mount /proc, /dev, /dev/pts filesystems and the partition itself

noah:~# mkdir /mnt/root
noah:~# mount -t ext3 /dev/sda8 /mnt/root
noah:~# mount -o bind /dev /mnt/root/dev
noah:~# mount devpts /dev/pts -t devpts

Change /dev/sda8 in the above example commands with your partition name and number.
2. chroot to the mounted partition in order to be able to use your filesystem, exactly like you normally use it when you’re using your Linux partition

noah:~# chroot /mnt/root /bin/bash

Hopefully now you should be in locked in your filesystem and use your Linux non-bootable system as usual.

Being able to access your /boot/grub directory I suggest you first check that everything inside:

/boot/grub/menu.lst is well defined and there are no problems with the paths to the Linux partitions.

Next issue the following commands which will hopefully recover your broken grub boot loader.

noah:~# grub
noah:~# find /boot/grub/stage1

The second command find /boot/grub/stage1 should provide you with your partitions range e.g. it should return something like:

root (hd0,7)

Nevertheless in my case instead of the expected root (hd0,7) , I was returned

/boot/grub/stage1 not found

Useless to say this is uncool 🙂

As a normal reaction I tried experimenting in order to fix the mess. Logically enough I tried to reinstall grub using the

noah:~# grub-install --root-directory=/boot /dev/sda
noah:~# update-grub

To check if that would fix my grub issues I restarted my notebook. Well now grub menu appeared with some error generated by splashy
Trying to boot any of the setup Linux kernels was failing with some kind of error where the root file system was trying to be loaded from /root directory instead of the normal / because of that neither /proc /dev and /sys filesystems was unable to be mounted and the boot process was interrupting in some kind of rescue mode similar to busybox, though it was a was less flexible than a normal busybox shell.

To solve that shitty issue I once again booted with the Debian Testing (Sid / Squeeze ) Install CD1 and used the commands displayed above to mount my linux partition.

Next I reinstalled the following packages:

noah:~# apt-get update
noah:~# apt-get install --reinstall linux-image-amd64 uswsusp hibernate grub grub-common initramfs-tools

Here the grub reinstall actually required me to install the new grub generation 2 (version 2)
It was also necessary to remove the splashy

noah:~# apt-get remove splashy
As well as to grep through all my /etc/ and look for a /dev/sda6 and substitute it with my changed partition name /dev/sda8

One major thing where I substituted /dev/sda6 to my actual linux partition now with a name /dev/sda8 was in:

initramfs-tools/conf.d/resumeThe kernel reinstall and consequently (update) does offered me to substitute my normal /dev/sda* content in my /etc/fstab to some UUIDS like UUID=ba6058da-37f8-4065-854b-e3d0a874fb4e

Including this UUIDs and restarting now rendered my system completely unbootable … So I booted once again from the debian install cd .. arrgh 🙂 and removed the UUID new included lines in /etc/fstab and left the good old declarations.
After rebooting the system now my system booted once again! Hooray! All my data and everything is completely intact now Thanks God! 🙂

Install xmame from source on Debian Linux 7.0 (Wheezy) to play for better MAME (Arcade Games Emulation)

Thursday, May 30th, 2013

xmame logo install xmame on latest stable debian

Whether you're keen on playing old school arcade games. And you just updated or installed latest stable Debian 7 Wheezy. You will find out current installable Mame (Arcade Emulator) package cannot play many of the hot Games, even though game rom files are okay and you might have played those games in some previous versions of Debian with now obsolete but apparently better working emu  xmame.

As playing Captain Command, Xain'D Sleena, Cadillac & Dinosaurs and Punisher Classic Arcades is one of my great entertainments when I have some free time. I took the time to find out if xmame is still installable either by deb package or from source.

Unfortunately xmame for latest Debian releases is not available from unofficial repositories, so I proceeded with installing it from source. Thanksfully source install was successful. Hence, below is explained how to install xmame from source on Debian Wheezy and Debian testing/unstable.
First before compiling install a bunch of development packages necessary for proper compilation:

# apt-get install --yes zlib1g-dev
# apt-get install --yes libexpat1-dev
# apt-get install --yes libghc-x11-dev
# apt-get install --yes x11proto-video-dev
# apt-get install --yes libxv-dev

Download xmame 0.103 source archive (xmame-0.103.tar.bz2)

Tar archive doesn't have configure script so to compile it just run make ;

# cd /usr/local/src
# tar -jxvvf xmame-0.103.tar.bz2
# su hipo
cd xmame-0.103
$ make
...
....
$ exit
# make install
.....


In case some header .h file is still missing and compile fails, as it happened to me on few occasions. You can install and use apt-file;

One important note is xmame's build will take very long on my machine with 2Gb of Memory and Dual Core 1.8 Ghz it took about 1,.30 or 2 hours. 

# apt-get –yes install apt-file
# apt-file update

To find from which package the the missing .h file can be installed

# apt-file search Header-Name.h

Then just install package which will provide needed header.

Next step is to create xmame config file:
# mkdir /usr/local/share/xmame/
xmame-0.103$ cp -rpf ./src/unix/doc/xmamerc.dist /usr/local/share/xmame/xmamerc

In xmamerc set proper location for Mame ROM files:

# vim /usr/local/share/xmame/xmamerc
Find line;

rompath                 /usr/local/share/xmame/roms

and change it to whether Rom files are located. In my case they're in /disk/Games/Mames/roms, so change rompath to;
 

rompath                 /disk/Games/Mames/roms

There are some other configurations which you might want to tune. A well configured xmamerc that works fine for me is here

Finally link xmame.x11 to /usr/bin/xmame

# ln -sf /usr/local/bin/xmame.x11 /usr/bin/xmame

After having properly configured XMamE'S roms Directory to launch a game, for example punisher.zip or captcomm.zip:

$ xmame punisher
....
 $ xmame captcom
....

captain_commando_arcade-game-logo running on xmame Linux

I've build xmame from source on Debian but I suppose same guide should be working okay on Ubuntu, Mint and rest of Debian distributions. I'll be happy to get feedback if someone succeeded running xmame on other distro. If you do please drop me a comment with distro name and specifics or problems faced.

Filter messages in Qmail with unwanted words, get rid of the Viagra annoying spam with Qtrap

Sunday, September 4th, 2011

Drop qmail received mail containing banned / unwanted words to get rid of Viagra and Sex related spam

Recently the annoying Viagra spam has emerged again. Therefore I decided to clean up some of the mails received to one of the qmail servers to protect users emailbox from this viagra peril.

To do so I’ve remember about an old script which used to be part of qmailrocks.org qmail install, the script is called qtrap and is able to filter emails based on list of specific mail contained words.
Since qmailrocks.org is gone (down) for some time and its still available only on few mirrored locations which by the way are not too easy to find I decided to write a little post on how qtrap.sh could be integrated quick & easy with any Qmail + Vpopmail install out there.

Hereby I include the description for qtrap.sh given by the script author:

“qtrap.sh script is applied on a per domain basis and serves as a “bad word” scanner to catch any spam that Spamassassin may have missed. This filter serves as the last defense against SPAM before it arrived in your inbox. I like this filter because it helps to get rid of any SPAM that happens to make it by Spamassassin. Without any protection at all, my mailbox gets a shit ton of SPAM every day. Within the first 3 months I enacted the Qtrap filter, Qtrap logged over 9,000 deleted SPAM messages, none of which were legitimate e-mails. My keyboard’s delete key was very appreciated the extra rest.

Any emails that are scanned and contain a banned word will be automatically deleted and logged by the qtrap script. A whitelist feature now exists so that individual addresses or domains can be exempt from the qtrap scan.”

Now as one might have general idea on what the script does. Here is the step by step qtrap.sh integration;

1. Create necessery qtrap directory and logs and set proper permissions

If the vpopmail is installed in /home/vpopmail , issue the following commands.

debian:~# cd /home/vpopmail
debian:~# mkdir -p qtrap/logs
debian:/home/vpopmail/qtrap# cd qtrap
debian:/home/vpopmail/qtrap# wget https://www.pc-freak.net/files/qtrap.sh
...
debian:/home/vpopmail/qtrap# cd ~
debian:~# touch /home/vpopmail/qtrap/logs/qtrap.logdebian:~# chown -R vpopmail:vchkpw /home/vpopmail/qtrapdebian:~# chmod -R 755 /home/vpopmail/qtrap

On older qmail installations it could be vpopmail is installed in /var/vpopmail if that’s the case, link /var/vpopmail to /home/vpopmail and go back to step 1. To link:

debian:~# ln -sf /var/vpopmail/ /home/vpopmail

2. Edit qtrap.sh to whitelist email addresses and build a ban words list

a) Include the email addresses mail arriving from which would not be checked by qtrap.sh

Inside qtrap.sh in line 63, there is a shell function whitelist_check(), the function looks like so:

whitelist_check () {
case $WHITELIST in
address@somewhere.com|address@somewhereelse.com)
echo $SENDER found in whitelist on `date "+%D %H:%M:%S"` >> /home/vpopmail/qtrap/logs/qtrap.log
exit 0;;
*)
;;
esac
}

By default the script has just two sample mails which gets whitelisted this is the line reading:

address@somewhere.com|address@somewhereelse.com

The whitelisted emails should be separated with a pipe, thus to add two more sample emails to get whitelisted by script the line should be changed like:

address@somewhere.com|address@somewhereelse.com|hipod@mymailserver.com|hipo@gmail.com

In order to whitelist an entire domain let’s say yahoo.com add a line to the above code like:

address@somewhere.com|address@somewhereelse.com|hipod@mymailserver.com|hipo@gmail.com|*yahoo.com

b) Defining the bad words ban list, mails containing them should not be delivery by qmail

The function that does check for the ban word list inside the script is checkall();, below is a paste from the script function:

checkall () {
case $BANNED_WORDS in
porn|PORN|Sex|SEX)
printout $BANNED_WORDS
echo MESSAGE DROPPED from $SENDER because of $BANNED_WORDS on `date "+%D %H:%M:%S"` >> /home/vpopmail/qtrap/logs/qtrap.log
exit 99;;
*)
;;
esac
}

checkall(); is located on line 74 in qtrap.sh, the exact list of banned words which the script should look for is located on line 76, the default qtrap.sh filters only mails containing just 4 words, e.g.:

porn|PORN|Sex|SEX)

To add the Viagra and VIAGRA common spam words to the list, modify it and expand like so:

porn|PORN|Sex|SEX|viagra|Viagra)

The delimiter is again | , so proceed further and add any unwanted spam words that are not common for any legit mails.

3. Install qtrap.sh to process all emails delivered to vpopmail

If its necessery to install the dropping of mails based on word filtering only to a single vpopmail virtualdomain do it with cmd:

debian:~# cd /home/vpopmail/domains/yourdomain.com
debian:/home/vpopmail/domains/yourdomain.com# touch .qmail-default.new
debian:/home/vpopmail/domains/yourdomain.com# echo '| /home/vpopmail/qtrap/qtrap.sh' >> .qmail-default.new
debian:/home/vpopmail/domains/yourdomain.com# echo "| /home/vpopmail/bin/vdelivermail '' bounce-no-mailbox" >> .qmail-default.new
debian:/home/vpopmail/domains/yourdomain.com# chown vpopmail:vchkpw .qmail-default.new
debian:/home/vpopmail/domains/yourdomain.com# cp -rpf .qmail-default .qmail-default.bak; mv .qmail-default.new .qmail-default
If however qtrap.sh needs to get installed for all existing vpopmail virtualdomains on the qmail server, issue a one liner bash script:

debian:~# cd /home/vpopmail/domains
debian:/var/vpopmail/domains# for i in *; do cd $i; echo "| /home/vpopmail/qtrap/qtrap.sh" >> $i/.qmail-default.new;
echo "| /home/vpopmail/bin/vdelivermail '' bounce-no-mailbox" >> $i/.qmail-default.new;
chown vpopmail:vchkpw .qmail-default.new; mv .qmail-default .qmail-default.old; mv .qmail-default.new .qmail-default; cd ..; done

This for loop will add ‘| /home/vpopmail/qtrap/qtrap.sh’ to all .qmail-default for all vpopmail domains.

Afterwards the .qmail-default file should contain the following two lines:

| /home/vpopmail/qtrap/qtrap.sh
| /home/vpopmail/bin/vdelivermail '' delete

A very important thing here you should consider that adding some common words, as let’s say hello or mail etc. could easily drop almost all the emails the qmail hands in to vpopmail.

Caution!! Never ever implement common words in the list of words !!
Always make sure the banned words added to qtrap.sh are words that are never enter an everyday legit email.

Another thing to keep in mind is that qtrap.sh doesn’t make a copy of the received message ,though it can easily be modified to complete this task.
Any mail that matches the banned words list will be dropped and lost forever.

4. Check if qtrap.sh is working

To check, if qtrap is working send mail to some mailbox located on the qmail server containing inside subject or mail message body the unwanted word defined inside qtrap.sh.

The mail should not be received in the mailbox to which its sent, if qtrap is working moreover qtrap.sh should log it inside it’s log file:

debian:~# cat /home/vpopmail/qtrap/logs/qtrap.log
MESSAGE DROPPED from hipo@mytestmail.com because of viagra on 09/03/11 11:34:19
MESSAGE DROPPED from support@mymailserver.com because of Viagra on 09/03/11 11:39:29

If the qtrap.log contains records similar to the one above, and the mail matching the banned word is not delivered, qtrap.sh is properly configured. If any issues check in qmail logs, they should have a good pointer on what went wrong with qtrap.sh invokation.

Note that I’ve integrated qtrap.sh to custom qmail install running on Debian Lenny 5.0 GNU/Linux.
If I have time I’ll soon test if its working fine on the latest stable Debian Squeeze and will report here in comments.
If however someone is willing to test if the script works on Debian Squeeze 6.0 or have tested it already please drop a comment to report if it works fine.
qtrap.sh, is a bit oldish and is not written to work too optimal therefore on some heavy loaded mail servers it can create some extra load and a bit delay the mail delivery. Thus when implementang one needs to consider the downsides of putting it in.

Also I was thinking tt might be nice if the script is rewritten to read the ban words and whitelist mails from files instead of as it is now as the words are hard coded in the script.
If I have some free time, I’ll probably do this, though I’m not sure if this is a too good idea as this might have a negative performance impact on the script execution time, as each instance of the script invoked should do one more operation of reading a file storing the ban words.

Well that’s pretty much it, enjoy 😉
How to install Microsoft Windows XP SP3 on Debian GNU / Linux Squeeze

Thursday, December 1st, 2011

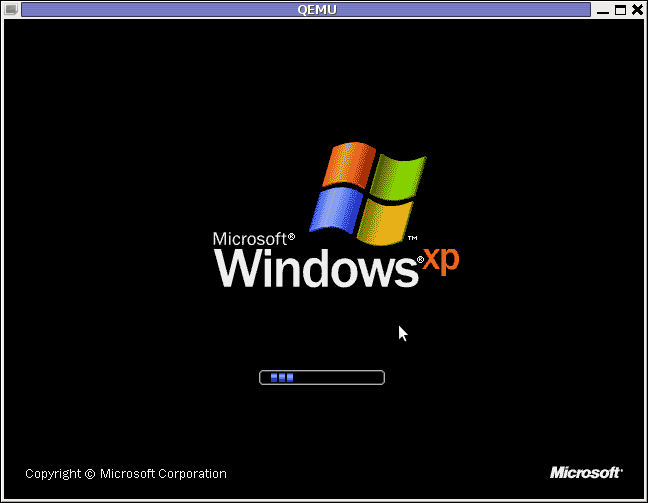
Windows XP Service Pack 3 QEMU Debian Squeeze

I have never did a proper install of Windows XP on Debian before hand. Even though I experimented once long time ago. I had zero success with installing Windows XP Service Pack 2 . The only Windows I can make correctly working before hand on these early days on my Debian powered notebook with qemu virtual machine emulator was Windows 2000 .

I decided to give it another go today as I hoped the qemu has advanced and I’ve seen many reports online of people who were able to correctly make Windows XP SP2 work out.

As I’ve seen many blog posts online of people who succesfully run with qemu Windows XP SP2, in order to escape from repeating the other guys experience and conduct a fresh experiment, I decided to give qemu a try with Microsoft.Windows.XP.Professional.SP3.Integrated.June.2011.Corporate

Before I proceed with using latest qemu I,

1. Installed qemu using the usual:

debian:~# apt-get install --yes qemu qemu-keymaps qemu-system qemu-user qemu-utils uml-utilities
...

Afterwards,

2. Created a new directory where the qemu Windows image will be stored:

debian:~# su hipo
hipo@noah:~$ mkdir windows
hipo@noah:~$ cd windows
hipo@noah:/home/hipo/windows$

As a following step I loaded the tun kernel module which is necessery for Qemu to properly handle the Windows LAN networking.

3. Load and set proper permissions for tun kernel module

In case if /dev/net is not existing first step is to create the proper device, however in most cases /dev/net should be there:

debian:~# mkdir -p /dev/net
debian:~# mknod /dev/net/tun c 10 200

As a next step its necessery to load tun kernel module and set the proper permissions:

debian:~# modprobe tun
debian:~# echo 'tun' >> /etc/modules
debian:~# chgrp users /dev/net/tun
debian:~# chmod g+w /dev/net/tun

Next step is to create an image file with dd or with qemu-img which will be holding the Virtual Machine Windows installation.

4. Create image file for Windows using dd

I decided to create a the image file to be with a size of 5 Gigabytes, this is of course custom so other people might prefer having it less or more the absolute minimum for a proper Windows XP SP3 install is 2000 Megabytes.

debian:~# su hipo -; cd windows;
debian:/home/hipo/windows$ dd of=hd.img bs=1024 seek=5000000 count=0
0+0 records in
0+0 records out
0 bytes (0 B) copied, 1.5505e-05 s, 0.0 kB/s

Notice here that the file dd will create will appear like 0 kb file until the Windows install from a BootCD is run with qemu.

5. Download an image of Microsoft.Windows.XP.Professional.SP3.Integrated.June.2011.Corporate from thepiratebay.org

Microsoft.Windows.XP.Professional.SP3.Integrated.June.2011.Corporate is currently available for download from the thepiratebay.org if in the times to come it is not available it will most likely be available from torrentz.net, isohunt.com etc. so I’ll skip more explanations with this step and let you use your favourite torrent program of choice to download the MS Windows iso. Just to make a note here I used transmission as this is my favourite torrent client. After downloading the iso I used K3B to burn the Image file as Bootable ISO. I’m naturally a GNOME user so to burn it as Image I just open it with K3B by using the GNOME menu and selecting Open with K3B

Next I instructed qemu to boot from the just burnt CD.

6. Boot windows Installation with Qemu from the Boot CD

debian:/home/hipo/windows$ qemu -boot d -cdrom /dev/cdrom -hda hd.img

Notice here that I’m running the qemu virtual machine emulator with a non-privileged reasons. This is important as qemu might have holes in the emulation of Windows Networking stack which if executed as root superuser. Can allow some malicious attacker to remotely compromise your GNU / Linux PC …

Qemu window will pop-up where one installs the Windows as it will install it using an ordinary PC. To switch qemu to fullscreen mode to have the complete feeling like installing Windows on an non-emulated PC ctrl + alt + f can be pressed.

The Windows installation took like 1 hour 20 minutes on my dual core 1.8 Ghz notebook with 2 GB of RAM. But I should say while installing I had multiple applications running; xmms, transmission, epiphany, icedove, evince etc. probably if I just run the Virtual Machine with no other applications to extra load my PC, probably the Windows install would have been done in max 50 minutes time.

After the installation is complete. To

7. Further run the installed Windows debian:/home/hipo/windows$ qemu -hda hd.img -boot c
...

As a next step its necessery to;

8. Bring up the tap0 interface and configure it for the user

I’m running my qemu emulator with my user hipo , so I run cmds:

debian:/home/hipo/windows$ su - root
debian:~# tunctl -u hipo
Set 'tap0' persistent and owned by uid 1000

9. Enable ip_forwarding and arp proxy and for wlan0 and tap0

debian:~# echo 1 > /proc/sys/net/ipv4/conf/wlan0/proxy_arp
debian:~# echo 1 > /proc/sys/net/ipv4/conf/tap0/proxy_arp

10. Install the proper Network Drivers inside Windows

That’s just in case, if they’re not supported by the Windows default existing drivers.
To do so, I downloaded my LAN drivers from the Vendor and put it on USB and sticked the USB drive to my laptop. In order to make the Kingston USB drive I used to transfer my LAN and Video drivers. I had to restart qemu with the parameter -usb -usbdevice host:0951:1625 , where I used lsusb to check and get the correct USB ID 0951:1625, like shown in the command below:

debian:~# lsusb |grep -i kingston
Bus 001 Device 006: ID 0951:1625 Kingston Technology DataTraveler 101 II

After on I booted again the Windows XP with the following command line in order to make qemu detect the USB Drive:

debian:/home/hipo/windows# sudo qemu -boot c -hda hd.img -usb -usbdevice host:0951:1625

One oddity here is that in order for qemu to detect the USB stick, I had to run it via sudo with super user privileges.Don’t ask me why this is the only way it worked …
Next on used the Windows device manager from Control Panel -> System -> Device Manager to point my undetected hardware to the correct Win drivers.

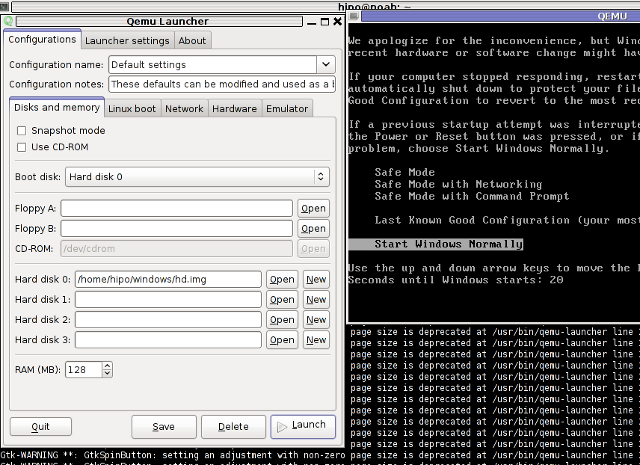
For the GUI preferring user qemu has a nice GNOME GUI interface called qemu-launcher, if you like to use qemu via it instead of scripting the qemu launcher commands, you can install and use via:

debian:~# apt-get install --yes qemu-launcher qemuctl
...
debian:/home/hipo/windows$ qemu-launcher

QEMU-Launcher Debian Squeeze Screenshot

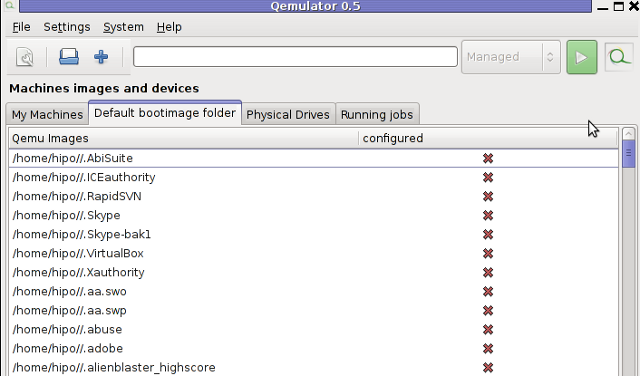
Another GUI alternative to qemu-launcher, which easifys the work with qemu is qemulator; here is a screenshot:

Qemulator 0.5 - Qemu GUI Screenshot Debian Squeeze

How to mount /proc and /dev and in chroot on Linux

Wednesday, April 20th, 2011

I’m using a backtrack Linux to recover a broken Ubuntu Linux, to fix this disastrous situation I’m using the Ubuntu Linux through chroot after mounting my /dev/sda1, where my Linux resides with:

linux-recovery:~# mkdir /mnt/test1
linux-recovery:~# mount /dev/sda1 /mnt/test1
linux-recovery:~# chroot /mnt/test1
ubuntu:~#

I consequently needed to mount up the /proc and /dev partition inside the chroot environment.

Here is how I did it:

ubuntu:~# mount /proc
ubuntu:~# mount -a

Next I switched on on a different virtual console in the backtrack and to mount /dev issued the commands:

linux-recovery:~# mount --bind /dev /mnt/test1/dev

Now once again, I can use theapt-get inside the chroot to fix up the whole mess …