Posts Tagged ‘number’

Howto to Unlock Mtel locked Mobile Phone ZTE Blade 3 IMEI 866643012872768 to connect to Telenor and Vivacom mobile networks in Bulgaria

Friday, January 20th, 2017

howto-unlock-zte-from-mtel-encoded-to-work-with-telenor-mobile-imei-866643012872768

How to unlock Unlock Mtel locked Mobile Phone ZTE Blade 3 IMEI 866643012872768


Thanks to this little forum after a very thoroughful research on the topic howto unlock my ZTE Blade 3
in Russian Google.ru / United Stated Google.US and UK Google.Co.Uk I've figured out a number of ways recommended

I've lost some time watching also few videos illustrating howto unlock the phone for other non MTEL mobile operators with

some third party cracker software  which seemed like a good way to infect your PC with spyware for example
videos:
Direct Unlock ZTE BLADE 3 & ZTE RACER 3 – YouTube
Unlock ZTE Blade 3, Blade V & Blade Q Mini – YouTube

there are a number of ways and paid software that could do various non-conventional things like unlock the phone for example:
GB Key

gbstream-gbkey-fast-unlocker-zte-blackberry-huawei-apple-motorola-alcatel-lg-unlock

Here is description of GB Key

You can Call it UNLIMITED – Direct Unlocker, Code Calculator, Code Reader, is fast, easy to use, encrypted, more than 200 models supported and most of it is it's UNLIMITED use. Updates come on regular basis with addition to new models and features.

Supported Models

More than 500 supported models from mobile phones to modems and growing.

Currently supports around 260 MEPs & more than 9500 PRDs (and growing..) .

FREE & UNLIMITED: Huawei, Huawei Modem, BlackBerry, Alcatel MTK, Alcatel U7, Alcatel Modem, LG, Samsung Swift, Samsung 3G, ZTE Qcom-Android, ZTE MTK, and many many more..

There is also a number of services online that offer remote paid services to Unlock any smart phone remotely by paying with a card and providing the IMEI.
I guess this services either use Android Emulator with manually setting the respective IMEI of the phone and then uses some software (box) as they call it to generate the code using the respective algorithm. etc.


However as I didn't wanted to spend money on something on such non-sense I digged a little bit more and I found out that according to Bulgarian Legislation encoding a sold mobile phone by the mobile operator is already illegal and all mobile operators in Bulgaria (that used some kind of encoding software to prevent a bought phone from them to be used with another mobile operator should provide openly the mobile phone codes freely).

As MTEL had to fit the new wall they made a small online generator Database with Unlock codes for all prior sold mobiles encoded.

I've used the URL (using my website access previosuly freely registered on website in order to track and send free SMS-es in MTEL and check out my mobile phone money balance spent in inbound and inbound calls etc.)

https://www.mtel.bg/unlock-phone

and found out my mobile ZTE according to the imey:

5803701350365278 ZTE Blade III Поставете карта на друг оператор в телефона и директно ще Ви бъде изискан отключващият код.

Just switched on my ZTE Blade 3 phone and inserted the code and got a message it is wrong but immediately I phone able to connect to Telenor (the ex Globul Mobile operator ) Mobile network Voila! 🙂 Hope this helps small article helps someone else too. Enjoy !

I

Increase tomcat MaxThreads values to resolve Tomcat timeout issues and sort

Friday, December 11th, 2015

Increase_Tomcat_MaxThreads_values_to_resolve_Tomcat_timeout-issues-and-sort

Thanks God, we have just completed (6 months) Migration few Tomcat and TomEE application servers for PG / PP and Scorpion instances from old environment to a new one for a customer.

Though the separate instances of the old environment are being migrated, the overall design of the Current Mode of Operations (CMO) as they use to call it in corporate World and the Future Mode of Operations (FMO) has differences.

The each of applications on old environment is configured to run in Tomcat failover cluster (2 tomcats on 2 separate machines with unique IP addresses are running) and Apache Reverse Proxy is being used with BalanceMember apache directive in order to drop requests to Tomcat cluster to Tomcat node1 and node2. On the new environment however by design the Tomcat cluster is removed and the application request has to be served by single Tomcat instance.

The migration completed fine and in the beginning in the first day (day 1) and day 2 since the environment went in Production and went through the so-called "GoLive", as called in Corporate World- which is a meathor for launching the application to be used as a production environment for customer, the customer reported TimeOut issues.

Some of the requests according to their report would took up to 4 minutes to serve, after a bit of investigation we found out, that though the environment was moved to one Tomcat the (number) amount of connections to application of end clients did not change, thus the timeouts were caused by default MaxThreads being reached and, we needed to to obviously raise that number. Here is the old Apache RP config where we had the 2 Tomcats between which the RP was load balancing:
 

BalancerMember ajp://10.10.10.5:11010 route=node1 connectiontimeout=10 ttl=60 retry=60
BalancerMember ajp://10.10.10.5:11010 route=node2 connectiontimeout=10 ttl=60 retry=60

ProxyPass / balancer://pool/ stickysession=JSESSIONID
ProxyPassReverse / balancer://pool/


As we needed a work around, we come to conclusion that we just need to increase Timeout on RP first so on Apache Reverse Proxy we placed following httpd.conf Virtualhost ProxyPass (directive) configs :


ProxyPass / ajp://10.10.10.5:11010/ keepalive=On timeout=30 connectiontimeout=30 retry=20
ProxyPassReverse / ajp://10.10.10.5:11010/

ProxyPass / ajp://10.10.10.5:11010/ keepalive=On timeout=30 connectiontimeout=30 retry=20
ProxyPassReverse / ajp://10.10.10.5:11010/


and following Apache Timeout directives options:


Timeout 300
KeepAlive On
MaxKeepAliveRequests 100
KeepAliveTimeout 15


Even though the developer tried to insist that the problem was in Reverse Proxy timeout config, they were wrong as I checked the RP logs and there was no "maximum connections reached" errors..

As you could guess what left to check was only Tomcat, after quick evaluation of server.xml, it turned out that the MaxThreads directive on old clustered Tomcats was omitted at all, meaning the default MaxThreads Tomcat value of 200 maximum connections were used, however this was not enough as the client was quering the application with about 350 connections / sec.

The solution was of course to raise the Maxthreads to 400 we were pretty lucky that we already had a good dedicated Linux machine where the application was hosted (16GB Ram, 2 CPUs x 2.67 Ghz), thus raising MaxThreads to 400 was not such a big deal.

Here is the final config we used to fix tomcat timeouts:
 

<Connector port="11010" address="10.10.10.80" protocol="AJP/1.3" redirectPort="8443" MaxThreads="400" connectionTimeout="300000" keepAliveTimeout="300000" debug="9" />


One note to make here is the debug="9" options to Connector directive was used to increase debug loglevel of Tomcat, and address="" is the local network IP on which Tomcat instance runs. As you see, we choose to use very high connectionTimeouts (because it is crucial, not to cut requests to applications due to timeouts) in case of application slowness.

We also suspected that there are some Oracle (ORA) database queries slowly served on the SQL backend, that might in future cause more app slowness, but this has to be checked seperately further in time as presently we were checking we did not have our Db person present.


Fix “Approaching the limit on PV entries, consider increasing either the vm.pmap.shpgperproc or the vm.pmap.pv_entry_max tunable.” in FreeBSD

Monday, May 21st, 2012

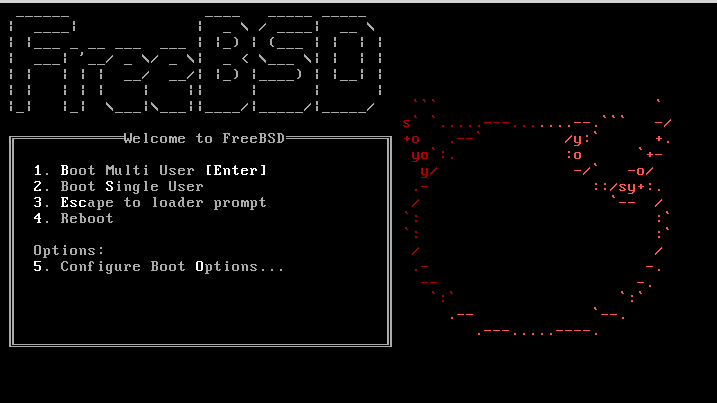
bsdinstall-newboot-loader-menu-pv_entries_consider_increasing_vm_pmap_shpgrepproc

I'm running FreeBSD with Apache and PHP on it and I got in dmesg (kernel log), following error:

freebsd# dmesg|grep -i vm.pmap.shpgperproc
Approaching the limit on PV entries, consider increasing either the vm.pmap.shpgperproc or the vm.pmap.pv_entry_max tunable.

The exact FreeBSD, Apache and php versions I have installed are:
 

freebsd# uname -a ; httpd -V ; php –version
FreeBSD pcfreak 7.2-RELEASE-p4 FreeBSD 7.2-RELEASE-p4 #0: Fri Oct 2 12:21:39 UTC 2009 root@i386-builder.daemonology.net:/usr/obj/usr/src/sys/GENERIC i386
Server version: Apache/2.0.64
Server built: Mar 13 2011 23:36:25Server's Module Magic Number: 20050127:14
Server loaded: APR 0.9.19, APR-UTIL 0.9.19
Compiled using: APR 0.9.19, APR-UTIL 0.9.19
Architecture: 32-bit
Server compiled with….
-D APACHE_MPM_DIR="server/mpm/prefork"
-D APR_HAS_SENDFILE
-D APR_HAS_MMAP
-D APR_HAVE_IPV6 (IPv4-mapped addresses enabled)
-D APR_USE_FLOCK_SERIALIZE
-D APR_USE_PTHREAD_SERIALIZE
-D SINGLE_LISTEN_UNSERIALIZED_ACCEPT
-D APR_HAS_OTHER_CHILD
-D AP_HAVE_RELIABLE_PIPED_LOGS
-D HTTPD_ROOT="/usr/local"
-D SUEXEC_BIN="/usr/local/bin/suexec"
-D DEFAULT_PIDLOG="/var/run/httpd.pid"
-D DEFAULT_SCOREBOARD="logs/apache_runtime_status"
-D DEFAULT_LOCKFILE="/var/run/accept.lock"
-D DEFAULT_ERRORLOG="logs/error_log"
-D AP_TYPES_CONFIG_FILE="etc/apache2/mime.types"
-D SERVER_CONFIG_FILE="etc/apache2/httpd.conf"
PHP 5.3.5 with Suhosin-Patch (cli) (built: Mar 14 2011 00:29:17)
Copyright (c) 1997-2009 The PHP Group
Zend Engine v2.3.0, Copyright (c) 1998-2010 Zend Technologies
with eAccelerator v0.9.6.1, Copyright (c) 2004-2010 eAccelerator, by eAccelerator

After a bunch of research a FreeBSD forums thread , I've found the fix suggested by a guy.

The solution suggested in the forum is to raise up vm.pmap.pv_entry_ma to vm.pmap.pv_entry_max=1743504, however I've noticed this value is read only and cannot be changed on the BSD running kernel;

freebsd# sysctl vm.pmap.pv_entry_max=1743504
sysctl: oid 'vm.pmap.pv_entry_max' is read only

Instead to solve the;

Approaching the limit on PV entries, consider increasing either the vm.pmap.shpgperproc or the vm.pmap.pv_entry_max tunable.
, I had to add in /boot/loader.conf

vm.pmap.pde.mappings=68
vm.pmap.shpgperproc=500
vm.pmap.pv_entry_max=1743504

Adding this values through /boot/loader.conf set them on kernel boot time. I've seen also in the threads the consider increasing either the vm.pmap.shpgperproc is also encountered on FreeBSD hosts running Squid, Dansguardion and other web proxy softwares on busy hosts.

This problems are not likely to happen for people who are running latest FreeBSD releases (>8.3, 9.x), I've read in same above post in newer BSD kernels the vm.pmap is no longer existing in newer kernels.

How to get rid of Debian and Ubuntu GNU / Linux obsolete configuration files and system directories

Wednesday, October 19th, 2011

debian_ubuntu-linux-get-rid-of-obsolete-files
I've been using Debian GNU / Linux on my Thinkpad laptop for almost 3 years and half. Initially the Debian version which I had installed was a stable Debian Lenny. As I was mostly dissatisfied of the old versions of the programs, I migrated to testing / unstable
Testing / unstables shipped program versions were a bit better but still back in the day I wanted to get advantage of the latest program versions so for a while I switched to unstable .
Later I regretted for this bad idea, after the migration to Unstable, it was too buggy to run on a notebook one uses for everyday work.
Then to revert back to a bit stable I downgraded to testing unstable again.
When Debian launched Debian Squeeze I set in my /etc/apt/sources.list file software repositories to be the one for the stable Debian Squeeze.

As you can see, I've done quite a lot of "experiments" and "excersises". Many packages were installed, then removed, some became obsolete with time others I just temporary installed out of curiosity. Anyways as a result I ended up with many packages uninstalled / removed , which still kept some of their directory structres and configurations on the machine.

Today, I decided to check how many of these obsolete packages are still present in dpkg database and I was shocked to find out 412 debs were still in my package database! To check the number I used cmd:

root@noah:~# dpkg -l | grep -i '^rcs.*$'|wc -l

Considering the tremendous number of packs waiting to be purged, I decided to get rid of this old and already unnecessery files for the sake of clarity, besides that removing the old already uninstalled packages removes old configuration files, readmes, directories and frees some little space and therefore frees some inodes 😉

Before proceeding to remove them, I carefully reviewed and all the package names which I was about to completely purge in order to make sure there is no package with a configuration files I might need in future:

root@noah:~# dpkg -l |grep -i '^rcs.*$'
...
After reviewing all the deb packages possessing the rc – (remove candidate) flag, I used the following bash one liners to remove the obsolete deb packages:

root@noah:~# for i in $(dpkg -l |grep -i '^rcs.*$'|awk '{ print $2 }'); do echo dpkg --purge $i done...
root@noah:~# for i in $(dpkg -l |grep -i '^rcs.*$'|awk '{ print $2 }'); do dpkg --purge $i done

First line will just print out what will be purged with dpkg , so after I checked it out I used the second one to purge all the RC packs.

ASCII PacMan (Pac-Man) for Linux and FreeBSD / Play online ASCII Pacman

Wednesday, May 26th, 2010

ASCII Pacman image

Since just few days ago it was the birthday of Pac-Man game (The abolute classic game among ’80s arcardes).
I decided to try to look if there is an ASCII Pacman available somewhere.
Luckily there are number of ASCII versions of the classic arcade PacMan for both Linux and FreeBSD, I thought,it doesn’t worth the time to check if ASCII Pacman is also available for Windows OS.
For all the ASCII game fans out there I’ve installed ASCII PacMan FreeBSD version on the Play Cool FreeBSD ASCII games free page From there you can play a number of cool ascii art games online via telnet, the reasons I took the time to add the ASCII Pacman to the list of possible games to play is that it’s a shame that the list misses one of the most notable games if not the most notable ever made.

For Linux I’ve found three version of ASCII Pacman:

1. The best looking one is probably ASCII Pacman Linux clone game available on sourceforge.net
You can download ASCII Pac-Man 0.9.1 from here

I’ve included 2 files with instructions on installation and usage of the game. I saw that as a completely necessery since,the game controls of the elsely nice looking game are hard to get. To play the game you will need to use the game controls:
z,x – to move right and left and m,k for up and down .

2. A bit more ugly and less interactive is another version of ASCII PacMan called:
Pac-Man for Console or simply Console Pacman

This two compiled without any troubles on my Debian GNU/Linux squeeze/sid Linux .
Unfortunately the up-mentioned ascii version of pacman won’t work on FreeBSD

3. The ASCII Pacman that is running and compatible with FreeBSD is called Pacman ASCII and herein is it’s home page

PacMan ascii is a way less sophisticated, so don’t expect too much of it. Originally Pacman ASCII was a project by some French guy in with the main task to learn C++.
Anyways he did a good job, since his little ascii pacman game is compatible with FreeBSD as well.
You can download ASCII Pacman for FreeBSD here

I did some minor modifications to few of the ASCII Pacman .cpp files in order to change the default help and game language from French to English, since French would be cryptic to most of the non-french users.

Putty Connection Manager A Handy tip to make your PuTTY multi tab enabled

Wednesday, September 30th, 2009

Some time ago, I asked myself if there is a SSH/Telnet supporting Terminal program
for Windows which enables you to have a tabs with the opened connections to a number
of servers. Well after some time spent looking, I’ve came across the solution
which concludes to a nice PuTTy wrapper program called Putty Connection Manager .
Putty Connection Manager requires you to have PuTTY installed all it does it runs a multiple putty instances
each one opening in a nice multi tab windows, like the good old linux gnome-terminal.
Cheers!END—–

19th of August Ilindensko Preobrajenski Revolt – Bulgarian land liberation war Uprising on feast of Transfiguration

Monday, August 20th, 2012

Ilinden freedom or death flag Svoboda ili Smyrt slogan

On 19-th of August 1903 happened the Indensko Preobrajensko Vyzstanie – (Ilinden Transfiguration liberation revolt). This revolt is important moment for Bulgarian restoration modern history. At this time South Eastern part of Bulgaria was still under Ottoman Turkish Empire rule and there was huge internal tension between local population striving to liberate and unite with rest of bulgarian lands.

The revolt was planned to raise some publicity in western world and show that the lands of Strandzha mountain are belonging to the newly established Russian liberated restored Bulgaria. Ilindensko Preobrazhenski Uprising was preceded by another revolt which happened in nowdays Macedonian lands near the city of Ohrid. The revolt is named under Ilindensko Preobrajensko Vyzstanie name because actually, the 2 revolts were perceived as one common effort to liberate and unite ex-Bulgarian empire territories with mainly Bulgarian and Serbian population to the newly re-establed Bulgarian land. Ilinden is important day for Bulgarian culture in english it means (Saint Elijah’s day) as the people of the early 20th century had strong faith the 2 revolts received a common name after the two Church feasts Ilinden (st. Elijah’s day) and Preobrazhenie (The day of Christ transfiguration). The revolt was organized and planned by the even to this day existing Bulgarian organizatoin VMROVytreshno Makedonska Revolicionna Organizatia – (Internal Macedonian Revolutionary Organization).
VMRO asks on a few times the then Bulgarian army to join them in the uprising efforts, but the then Bulgarian king refuses foreseeing that this could cause another war between the newly re-established 5 centuries unexistent Bulgaria with the still large and powerful Ottoman empire.
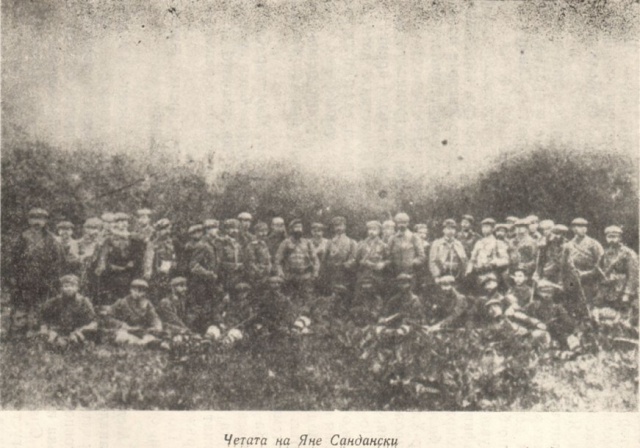
Chetata na Yane Sandanski Ilindensko preobrazhensko revolt

Though uprising was quickly brutally extinguished by Turkish as planned the revolt was able to raise a huge dispute about the so called “Bulgarian problem” and in 1913 part of Strandzha mountain was united with Bulgarian country. The Bulgarian population of the parts of Strandja mountain which remained in territory of Turish empire was forcefully chased to central Bulgaria.

Chetata na Yane Sandanski Ilindensko Preobrazhensko revolt uprising

The total number of “guerillas” who participated in two revolts was 26 000. This 26 000 bravehearts faced enormous 350 000 people Turkish army! Of course the outcomes of this uniqeual powers were clear. Still some members of the uprising held hopes thta maybe Russia or some of the western countries would help them with provisions and people “reinforcements”. 994 “guerillas” died in the uprising.

Zname ohrid flag ohrid cheta Peter Chaulev

The turkish army demolished 201 peaceful people villages (12 440 houses!) and killed brutally 4 694 (peaceful inhabitants in this number kids and woman) by slaughtering and burning them alive. 30 000 of people from the ravaged villages escaped from their homelands and become refugees in Bulgaria. As one can guess whole Civillized Europe was in shock that in 20th century such a blood bath could happen in Europe ….

12 must have Joomla extension plugins / Essential modules for new Joomla CMS install

Thursday, June 16th, 2011

Joomla bundle of must have extensions picture

These days very often I have to install, plain new Joomla based websites. I’ve realized that since there is no structured guide to follow describing the most essential plugins that every new fresh new joomla installation is required to have.
Thus I took the time and wrote this post, as it will be useful to myself in my future new joomla based websites establishment, I also believe these guide will be useful to other Joomla enthusiasts or administrators in their daily work.

Below I will describe in short the installation, configuration and oddities I’ve faced during installment of the above described bundle of plugins on a plan Joomla 1.5 install.These article will walk through 12 joomla essential plugins that I believe every fresh Joomla installation should be equipped with.
Hope this guide will be helpful to you. Now let’s start it up:

1. JoomlaXplorer – A sophisticated web file explorer for Joomla

One of the basic modules, beneficial with a new joomla CMS install is Joomla Xptplorer . This module enables the joomla admin to browse files in a web file explorer, on the server where the joomla CMS is installed. Below you see how handy the joomla web explorer provided by the plugin is:
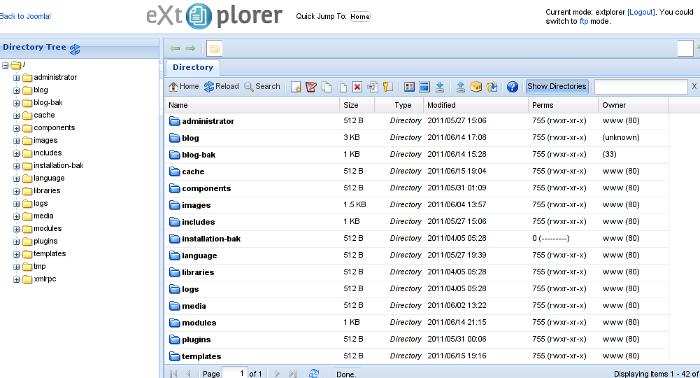
Joomla file explorer extplorer module

Installing and using the plugin is a piece of cake. To install the plugin:

a. download Joomla file Xplorer from here or from the official plugin website.

b. Install the plugin through the admin joomla menu:

Extensions -> Install/Uninstall

c. Start using the newly installed plugin by following to menus:

Components -> eXtplorer

2. JCrawler Generate easily sitemap.xml to aim the overall Joomla website SEO optimization

JCrawler logo plugin joomla

I have previously written a very through tutorial on how to install configure and generate website sitemap with Jcrawler module, You can read my article titled: How to build website sitemap.xml in Joomla here

3. sh404SEF – Make your Joomla links and content more user friendly

sh404sef Joomla Search Engine Optimization plugin

sh404SEF is a great Joomla plugin, which will seriously improve SEO and could contribute well for a website to be better indexed with major search engines.

I have previously written an article describing thoroughfully the install and use procedures for the module.
You can read the article Making your Joomla URLS Google friendly with sh404sef plugin / Simple Joomla link SEO here

4. Akeeba Backup Joomla solution

Akeeba backup Joomla Module

Installing a joomla backup solution is very essential if you does take care about your data, it often happens that server hard disk got crashes or a RAID massives got corrupted or some kind of other unexpected disaster hits the server. In these terrible times, having a website backup will save you nerves and data recovery funds, not to mention that in many cases data recovery is impossible.

Joomla has a very easy to use software for creating full website backup called Akeeba Backup

To start using the software one must:

a. Download Akeeba Backup and install it via:

Extensions -> Install/Uninstall

After the Akeeba Backup installation is over, to create your first backup, one needs to navigate to:

Components -> Akeeba Backup -> Backup Now

Each Akeeba backup (a version of the website’s files data and sql info) will be created in an archive file with the extension .jpa
The backup files are created under joomla’s website (main) root directory in directory location administrator/components/com_akeeba/backup

The Akeeba plugin also has capabilities to recover a (.jpa) backup restore point easily.
To recover a backup with the Akeeba plugin one needs to do it once again, via the plugin joomla web interface.
5. Google Analytics (place easy tracking code) in Joomla

Google Analytics Tracking Module for Joomla

a. Download the Google Analytics Tracking Module
The module is available from Joomla Extensions on joomla.org

At the current time of writting you need to download the analytics_tracking15,zip file

b. Install the Google Analytics Tracking Module;
Login as joomla admin and navigate to;

Extensions -> Install

Place the analytics_tracking15.zip url to the Install URL: field.
Again as of time of writting you need to place https://www.pc-freak.net/files/analytics_tracking15.zip;

c. Open the Module Manager

Extensions -> Module Manager

d. Click over Google Analytics Tracking Module
On the right pane you will notice in the Module Parameters the Analytics_uacct_code field. In the uacct_code field you need to paste your UA obtained from your created google-analytics account.
This code is usually something like UA-2101595-10
Now place your code their and press the save green button located near the right top of the screen. You should see the text in blue Item Saved which would indicate your UA code is stored already in the Google Analytics Tracking Module, now press the Cancel button located again on the right top.
As a last step before the Google analytics is set-up on the Joomla you need to enable the plugin to do you need to press over the tick left sided from the text reading Google Analytics Tracking Module in the Module Manager
e. Click over the Enabled button in Module Manager;
Google Analytics Tracking Module -> Enabled

6. Itprism (Facebook, Twitter etc.) Social Network share buttons Joomla plugin

ITPShare Large Social Buttons Joomla

a. to add the itpsocialbuttons to joomla Download the Itpsocialbuttons latest module files from http://itprism.com/free-joomla-extensions/social-buttons-plugin or use my mirrored module files below:

Download mod_itpsocialbuttons .zip file
Download plg_itpsocialbuttons .zip

After having the two files necessery to be installed to make the ITPSocialButtons appear on website, installation is done like with any other installation:

Extensions -> Install/Uninstall -> Upload Package File (Choose File)

Next its necessery to configure the plugin to do so, follow to menus:

Extensions -> Module Manager -> Share

You will notice the Share dialog in the list of Module Name column in Module Manager

Here is a screenshot on how the settings options for ITpsocialbuttons will look like:
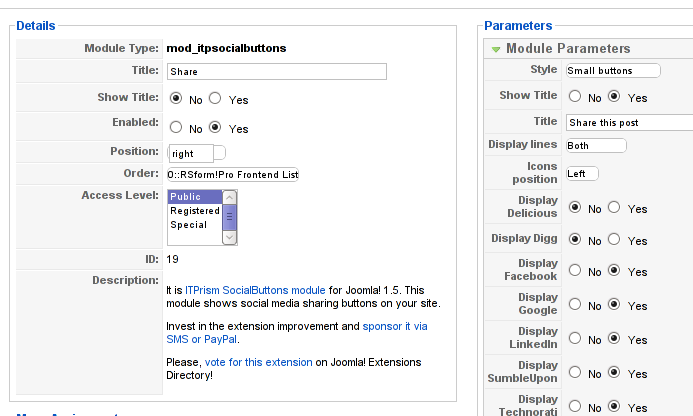
Mod ITpSocialButtons settings screen

The options which I personally changed was:

Show Title – I set this one to No as I wanted to omit the plugin title text to appear on my website.
Further on I’ve set the Enabled option to Yes to enable the plugin and choose the buttons Style option to be of a Small buttons type.
I’ve also found that the most suitable position for the Social Share buttons were to be of a right – Position .

Here is how the social network itprism share buttons looks like:

ITprism Joomla Social Share Plugin various button types

The plugin supports sharing of joomla pages to the following list of social networks:
 

  • Delicios.com
  • Digg.com
  • Facebook
  • Google Bookmarks
  • StumbleUpon
  • Technorati
  • Twitter
  • LinkedIn

The module configuration, also allows the user to configure the type of social network buttons, one wants to display on the website.

7. Joomla JCE Content Editor

This content editor is really awesome compared to the default editor TinyMCE. If you want to have an options rich content editor for Joomla, then this is the one for you 🙂
download JCE Content Editor here

After installing the JCE Joomla content editor in order to enable it as a default editor you need to go to the following location:

Site -> Global Configuration -> Default WYSIWYG Editor

There place on Editor TinyMCE and change it with Editor – JCE

Now go to edit some article, and you will see the difference in the editor 🙂

8. Add gallery Joomla capabilities with sigplus (Image Gallery Plus) and Very Simple Image Gallery

Image Gallery Plus sigplus Joomla Screenshot

Image Gallery Plus plugin (sigplus) gallery review screenshot

sigplus Image Gallery Plus is a straightforward way to add image or photo galleries to a Joomla article with a simple syntax. It takes a matter of minutes to set up a gallery but those who are looking for a powerful gallery solution will not be disappointed either: sigplus is suitable for both beginner and advanced users.

Download Sigplus Joomla Image Gallery plugin here
Using sigllus is quite easy all one has to do is use Joomla Media Manager from links:

Site -> Media Manager

Create new folder in the stories folder, let’s say New Pictures and further on use Media Manager to upload all desired pictures to be later displayed.

Being done with uploading the images you want to display, go to Article Manager :

Content -> Article Manager

From there choose your article where new uploaded pictures you want to display and type in the article:

{gallery}New Pictures{/gallery}.

Note that New Pictures is the directory just recently created as stated below, it’s important that there is no spacing between {gallery}and New Pictures, if one tries {gallery} New Pictures {/gallery} instead of {gallery}New Pictures{/gallery} an error will occur instead of the pictures being displayed in a scrolled gallery.

Sigplus Image Gallery has also a number of configuration options, which might make it look a bit more decent.
I have to say in my view the default way sigplus displays pictures is awful!

Another alternative if you don’t like Sigplus ‘s way of creating new galleries is to use Very Simple Image Gallery
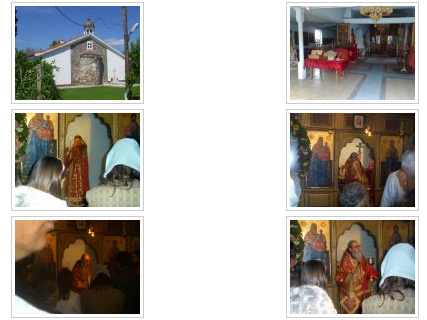
Very Simple Image Gallery joomla screenshot

Here is a screenshot on a sample gallery created with Very Simple Image Gallery Joomla Plugin

You can download Very simple image gallery here

After installing the plugin. It’s use is analogous to the Sigplus . To use it likewise sigplus create new directory through Media Manager and in stories and upload your files in let’s say New Pictures1 . Later on in your article place, the code

{vsig}New Pictures1{/vsig}

Gallery will be generated automatically by the plugin. I think Simple Image Gallery is a bit more advanced and gives a better outlook to Galleries, though it’s configuration settings are much less than with SigPlus image gallery.

To add pictures comments e.g. img link alt=” and title=” tib you need to place a code within the Article manager similar to:

{vsig_c}0|Picture_1.JPG|Some sample text|Some other text{/vsig_c}
{vsig_c}0|Picture_2.JPG|Some example text|Some text{/vsig_c}
etc. ..

Note that the 0 in above example specifies the gallery number if you for instance are using a couple of galleries with Simple Image Gallery , the first one you used would be call 0 . The text specified as comments to the picture will also appear after you preview the gallery right below the picture when clicked on as a picture description in a really nice way.
9. Install Google maps plugin for Joomla
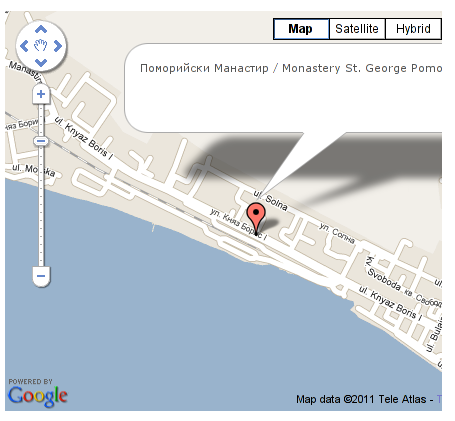
Google Maps plugin for Joomla screenshot

It’s a wise idea that every website has a location map on it’s website, for that reason Google maps is just great.
To install Google maps capability to joomla one can use a plugin called Google Maps .

You can straighly download Joomla’s Googlemap plugin from here

Afterwards use Extension Manager to install the plugin e.g. follow:

Extensions -&gr; Install/Uninstall (Choose File)

and click on Upload File & Install button.

To further enable and configure the Joomla Googlemap plugin you will have to go to the location:

Extensions -> Plugin Manager

Therein you will have to find and enable the Google Maps plugin which is to be found in the column named Plugin Manager
On my Joomla installation the plugin was located in the second page with modules, so if you don’t find the module on the listing with modules on the first page, make sure you scroll to the bottom of the page and click on Next button.

Therein in the list you will most likely notice Google Maps use the Enable button to enable it.

Next step is to configure the plugin, to do so press on the plugin name Google Maps
All configuration necessery here is to place Googlemaps API Key in the respective field (you will see it among config options).

Issuing a new Google Maps api key takes just few seconds, if you already have a gmail account just go to http://code.google.com/apis/maps/signup.html and take few seconds to issue the key.

You will get the key right on your gmail account after being issued (to repeat myself issuing takes few seconds so no worrier here).

One moreOnce having the key place it in the Googlemaps API Key field and configuring Address (which is one of the list of many options the plugin provides) you will be done with configuration.

To display a google map the location you just configured go to the Article Manager , select the article where you want the google maps location picture of your address to appear and type in the Article:

{mosmap|text='Exact street address location'|zoom='15'|zoomType='Large'|zoomNew='0'}

After you save the article a very nice Google map showing you the location’s streets will appear.
You can further conifgure a number of things related to the google map to appear, one thing you might want to play with is the zoom option which as you see in below’s code is equal to 15, e.g. zoom=’15’
Set it to another one if you want to regulate your googlemaps zoom level. For more thoroughful options take a look at the extensive plugin documentation.

10. Joomla Xmap (generating static HTML sitemap) Download Xmap from here , install it the usual plugin way.

Right after installation on the plugin succesful install screen you will notice the link component menu .
Clicking on the component menu you will be leaded to a page showing you few links Sitemap’s URL :
 

  • XML Sitemap:
  • HTML Sitemap:
  • News Sitemap:
  • Images Sitemap:

11. Add Joomla donate Paypal capabilities with Joomla PAYPAL DONATION MODULE

Paypal Donation Module Joomla Screenshot

Just recently I’ve written a a post on how to add a paypal donation capabilities to joomla, you can read my previous post here

12. Install Joomla RSForms Module (Advanced Joomla Forms Support)
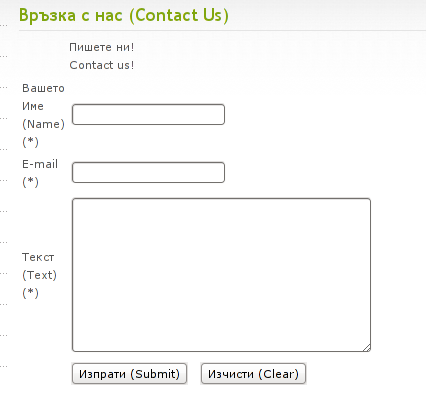
Simple Joomla RsForm contact form

If you’re planning to add a complicated form support for Joomla, there are plenty of plugins, however one that was suggested by a friend of mine which is deep in Joomla world and moreover works good on my joomla installations is RSForms

Joomla – RSForms! is free to download and has great and easy interface to create new joomla forms.

At the time of writting I use these three RSForms components on new Joomla installations:

RSform Pro 1.1.0 com
Mod RsForm for Joomla 1.5
Mod Rsform list for Joomla

For latest release of RSForms! use the link http://www.rsjoomla.com/joomla-components/rsform.html

Installation is like any other module and is done through Extensions -> Install/Uninstall menu.

After installation, setting up a new form is available from the Joomla Menus:

Components -> RSform!Pro -> Manage Forms

I would not enter in details on how to edit the default RSForms or create a new RSForm. Just take some time and learn it by trying 😉

After the rsform is ready, to enable the new form, navigate to Joomla menus:

Menus -> Main Menu

Press the New button located in the buttons bar nearby the page header in the list of options in Select Menu item Type you will notice the RSForm!Pro as an option, press on it to establish the new form in the menus.

A follow up window will appear where one can set a Title: and Alias: for the new form as well as few other options.
After finalizing the settings press on Apply button to save the settings and the new form should appear in Joomla.

Probably there are many more handy plugins, which I’m missing here thus I’ll be glad if readers suggest some more helpful essential (must have plugins) for Joomla.
Feedback on this tutorial is very welcome!
Looking forward to hear for your opinions if my article was helpful to you 😉

Microsoft Windows most secure OS for 2014 ? – Short OS and Application Security report for 2014

Tuesday, February 24th, 2015

windows-more-secure-OS-for-2014-than-Linux-and-Mac-OSX-and-iOS-operating-systems-short-security-report-2014

It is shocking news for me and probably to many that according to security specialists at National Vulnerability Database, at present moment for year 2014 Windows looks like more secure than both Apple's (iOS and Mac OS X) as well as to Linux.

Windows has been  bullied for its bad OS design and easier to breach Security compared to Linux, there was a constant hype also of Mac OS users claiming the invulnerability of their BSD based OS, but it seems security breach statistics given by  National Vulnerability Database security breach evaluation reports tell us security issues for 2014 Windows OSes while compared to other OS vulnerabilities in different operating systems such as Linux.

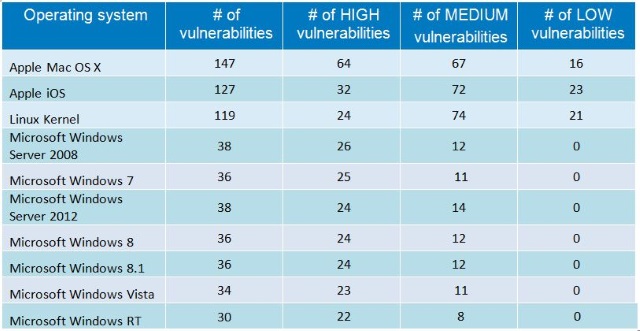
statistics-of-Operating-System-security-issues-vulnerabilities-for-2014-windows-most-secure-OS-2014-source-national-vulnerability-database
I will have to disappoint Apple Mac fans but in 2014 Mac OS X was found to be riddled with the greatest number of security problems147 in total, including 64 rated as high severity, and 67 as medium.

iOS's security was also ranked poor with 127 vulnerabilities including 32 high and 72 with a medium rating.

For comparison the latest Windows 8.1 had only 36 vulnerabilities, and its predecessors — Windows 8 and 7 — both had same number.
In Enterprise World (users) Windows Server 2007 and 2008 both have 38 vulnerabilities. Reported vulnerabilities were mainly of middle and high severity.

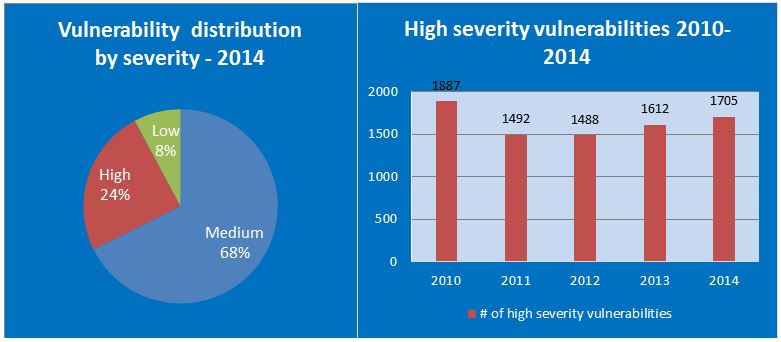
high-severity-vulnerabilities-graph-of-operating-systems-year-2014

Overall statistics also show there has been a huge increase in the number security vulnerabilities in the NVD security reports database.
In 2013 the number of all logged vulnerabilities were 4,794 while this jumped to 7,038 in y. 2014. The good news is lower percentage of all logged in security issues were rated of critical security importance.
It is mostly third party software not part of OS which contain security issues, 83% of all reported vulnerabilities were laying in 3rd party applications, only 13% percantage were OS specific and 4% hardware related.
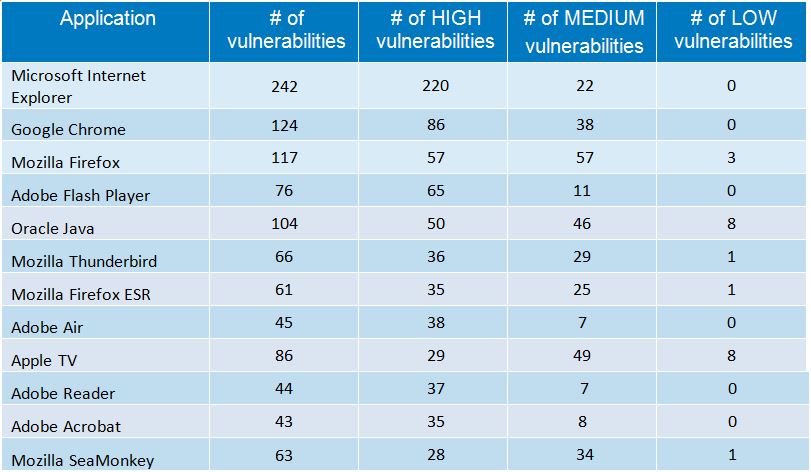
Though overall statistics shows Microsoft products more secure than Apple Inc. Products and (Open Source) Linux, though still M$ Internet Explorer is the most insecure web browser, for 2014,  Internet Explorer had  242 vulnerabilities while Google Chrome had 124 security issues and the most secure browser rated for 2014 is (surprising for me) Mozilla Firefox.
It is important to say such statistics are not completely relevant because, for example you can rarely see a Linux desktop user infected with Malware but almost everyone around using Windows OS is malware infected, same goes for Mac OS users, there are plenty of vulnerabilities for Mac but overall security of Mac OS is better as I haven't still met Mac OS users with Viruses and Spyware but I fixed about (30!!) of Microsoft PCs and notebooks infected with various Viruses and badware throughout 2014. Also it should be considered that many securitty bugs are kept secret and actively exploited for a long time by blackhats like it happened recently with Heartbleed and ShellShock vulnerabilities
For those interested, below is a list of top vulnerable applications for 2014

security-issues-vulnerability-report-2012-2013-2014_graph_windows-most-secure-operating-system-for-2014

Saint Cyprian the Bulgarian – Metropolitan of Moscow and All Russians

Thursday, March 13th, 2014

Saint Cyprian the Bulgarian Metropolitan of Moscow and All Russians

Probably few Bulgarians and even less Russians have heard about Saint Cyprian the Bulgariana great saint who played a ey role in esblishment of nowadays Russian Orthodox Church.. I have learned about the living of the saint just recently. Cyprian (The Bulgarian) (c. 1336 – 16 September 1406) was Metropolitan of Kiev and All Rus' with the Metropolitan's residence in Moscow. (The official title was Metropolitan of Kiev and All Rus' until 1448, even though the metropolitans were in Vladimir-on-Kliazma and later Moscow since 1299.)

Saint Cyprian was a Clergyman of Bulgarian nationality, he lived for some time at Mount Athos. In 1373, the Patriarch of Constantinople Philotheus Kokkinos picked him for his devout lifestyle and excellent education and sent him to Lithuania and Muscovy on a mission to reconcile the princes of Lithuania and Tver with Metropolitan Alexius. In 1375, after the hostilities between Moscow and Lithuania had started all over again, the Lithuanian princes asked to appoint Cyprian their Metropolitan. Philotheus Kokkinos made Cyprian Metropolitan of Kiev, all Russia and Lithuania, so that he could unite both ecclesiastical provinces after the death of Alexius. In 1376 he was ordained as a bishop in Constantinople at the behest of the Lithuanian grand duke Algirdas and become Mitropolitan of Kiev. Because this ordination was not recognized by Moscow, he was driven out from Moscow on his first arival there and had to wait in Constantinople until he was officially recognized as Metropolitan. He became officially regognized metropolitan of "all Rus" by the Moscow Duke later in 1389.

His residence from there on was Moscow, although he visited Kiev and other Ukrainian eparchies regularly. In 1378, Metropolitan Alexius died. As a result of the ensuing skirmishes and intrigues, Cyprian became Metropolitan of Moscow in 1381. One year later, however, he fled from Moscow due to the approaching armies of Tokhtamysh. Subsequently, he was removed from Russia and replaced with Metropolitan Pimen (1382–1384). The latter was succeeded by Metropolitan Dionysius (1384–1385). In 1390, Cyprian was returned to Moscow by Vasili II, who he had always supported, and appointed Metropolitan of Moscow and All Russia. Cyprian is remembered as a wise and experienced church administrator who fought for the unity of the Russian church.

In fact, he is mainly responsible for uniting the Church in Russia and the Grand Duchy of Lithuania. He faced serious opposition during his metropolitanate; Dmitry Donskoy and his advisors were excommunicated for opposing Cyprian's efforts to take up his place in Moscow, and Novgorod the Great – especially Archbishops Aleksei and Ioann II – also opposed his efforts to adjudicate ecclesiastical cases there, which would have allowed him to gain the court fees from Novgorod during the time he sat in judgement there. St. Cyprian was an erudite person and oversaw the copying and creation of a number of important works, including the Troitskaia Chronicle (or Troitskaya letopis') and, probably, the Metropolitan Justice (also known as the Pravosudiye metropolich’ye or Правосудие митрополичье). He also rewrote the Life of Metropolitan Peter, originally written around 1327.

Under st. Cyprian's governance, a church "reform"  was made on how the iconostasis is build the called "high few raws of icons" on the Church Alter wall iconostasis so common nowadays in Russian Church is actually his invention.
He also corrected biblical books and translated a number of ecclesiastic works from Greek into Old Church Slavic.
A little known fact is Andrei Rublev was under St. Cyprian's spiritual guidance when he painted the most famous Russian icon (and the only canonical icon depicing) "The Holy Trinity".

Andrey_Rublev_The_old-testament-Holy_Trinity_icon made under spiritual guidance of Saint Cyprian the Bulgarian

St. Cyprian is buried in the Assumption Cathedral in the Moscow Kremlin. He was canonized by the Russian Orthodox Church in the 15th century. One curious fact is St. Kiprian Peak on Greenwich Island in the South Shetland Islands, Antarctica is named for Cyprian.

Here is a movie Saint Cyprian the Bulgarian (unfortunatelyin Bulgarian language)

:

Film about Saint Cyprian the Bulgarian – Metropolitan of Moscow and All Russians