
Creating a simple home based backup solution with some shell scripting and rsync is a common use. However as a sysadmin in a middle sized or large corporations most companies use some professional backup service such as IBM Tivoli Storage Manager TSM – recently IBM changed the name of the product to IBM Spectrum.
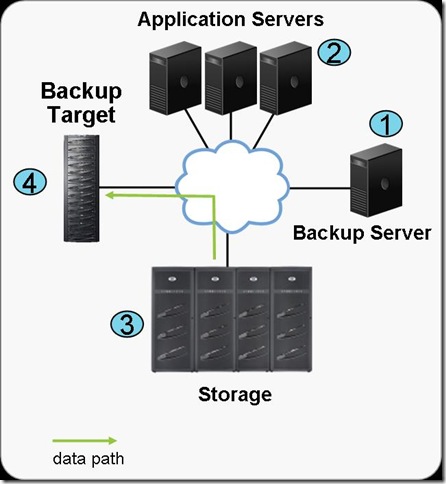
IBM TSM is a data protection platform that gives enterprises a single point of control and administration for backup and recovery that is used for Privare Clouds backup and other high end solutions where data criticality is top.
Usually in large companies TSM backup handling is managed by a separate team or teams as managing a large TSM infrastructure is quite a complex task, however my experience as a sysadmin show me that even if you don't have too much of indepth into tsm it is very useful to know how to manage at least basic Incremental backup operations such as view what is set to be backupped, set-up a new directory structure for backup, check the backup schedule configured, check what files are included and which excluded from the backup store etc.
TSM has multi OS support ans you can use it on most streamline Operating systems Windows / Mac OS X and Linux in this specific article I'll be talking concretely about backing up data with tsm on Linux, tivoli can be theoretically brought up even on FreeBSD machines via the Linuxemu BSD module and the 64-Bit Tivoli Storage Manager RPMs.
Therefore in this small article I'll try to give few useful operations for the novice admin that stumbles on tsm backupped server that needs some small maintenance.
1. Starting up the dsmc command line client
Nomatter the operating system on which you run it to run the client run:
# dsmc
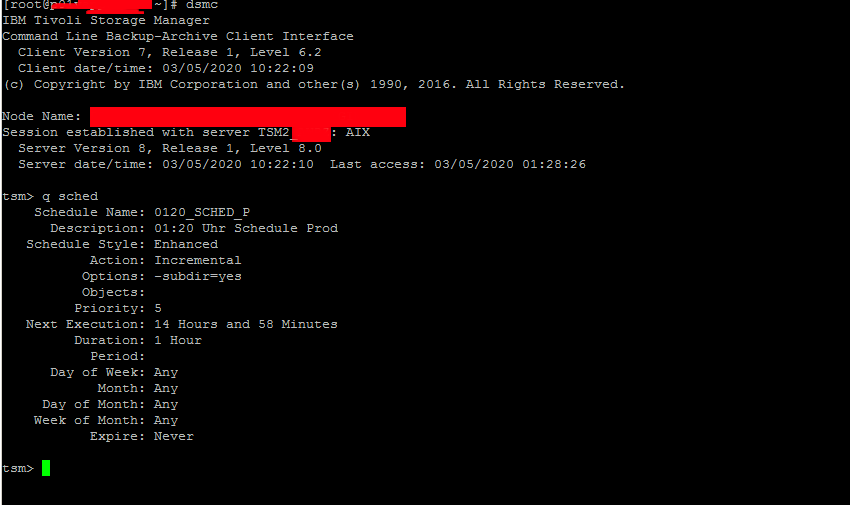
Note that usually dsmc should run as superuser so if you try to run it via a normal non-root user you will get an error message like:
[ user@linux ~]$ dsmc
ANS1398E Initialization functions cannot open one of the Tivoli Storage Manager logs or a related file: /var/tsm/dsmerror.log. errno = 13, Permission denied
Tivoli SM has an extensive help so to get the use basics, type help
tsm> help
1.0 New for IBM Tivoli Storage Manager Version 6.4
2.0 Using commands
2.1 Start and end a client command session
2.1.1 Process commands in batch mode
2.1.2 Process commands in interactive mode
2.2 Enter client command names, options, and parameters
2.2.1 Command name
2.2.2 Options
2.2.3 Parameters
2.2.4 File specification syntax
2.3 Wildcard characters
2.4 Client commands reference
2.5 Archive
2.6 Archive FastBack
Enter 'q' to exit help, 't' to display the table of contents,
press enter or 'd' to scroll down, 'u' to scroll up or
enter a help topic section number, message number, option name,
command name, or command and subcommand:
2. Listing files listed for backups
A note to make here is as in most corporate products tsm supports command aliases so any command supported described in the help like query, could be
abbreviated with its first letters only, e.g. query filespace tsm cmd can be abbreviated as
tsm> q fi
Commands can be run non-interactive mode also so if you want the output of q fi you can straight use:
tsm> dsmc q fi

This shows the directories and files that are set for backup creation with Tivoli.
3. Getting included and excluded backup set files
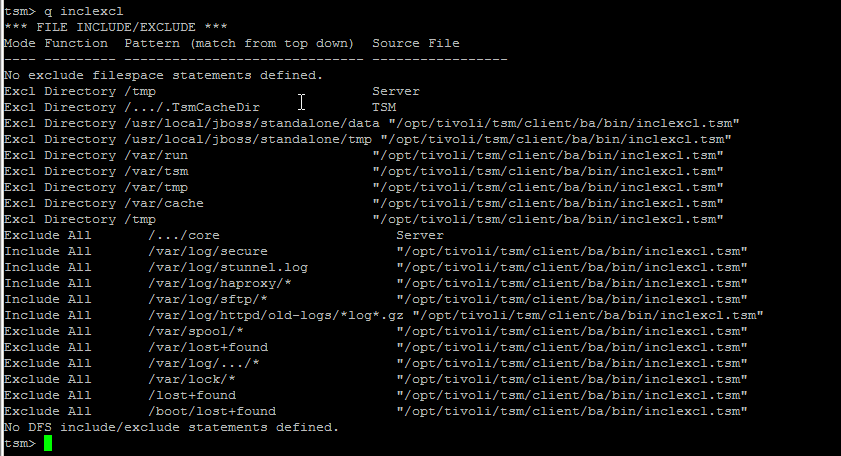
It is useful to know what are the exact excluded files from tsm set backup this is done with query inclexcl
4. Querying for backup schedule time
Tivoli as every other backup solution is creating its set to backup files in a certain time slot periods.
To find out what is the time slot for backup creation use;
tsm> q sched
Schedule Name: WEEKLY_ITSERV
Description: ITSERV weekly incremental backup
Schedule Style: Classic
Action: Incremental
Options:
Objects:
Priority: 5
Next Execution: 180 Hours and 35 Minutes
Duration: 15 Minutes
Period: 1 Week
Day of Week: Wednesday
Month:
Day of Month:
Week of Month:
Expire: Never

5. Check which files have been backed up
If you want to make sure backups are really created it is a good to check, which files from the selected backup files have already
a working backup copy.
This is done with query backup like so:
tsm> q ba /home/*
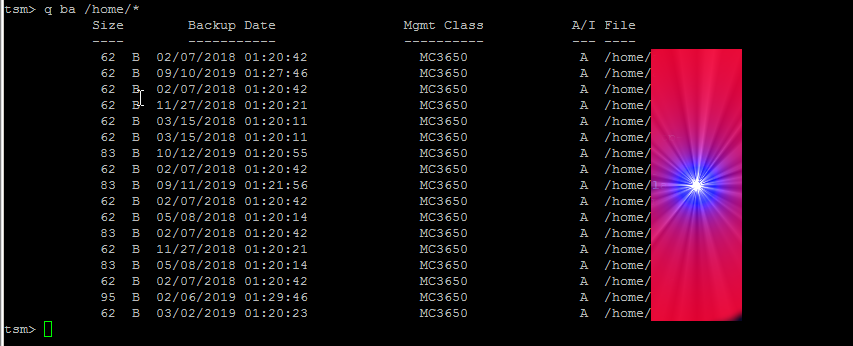
If you want to query all the current files and directories backed up under a directory and all its subdirectories you need to add the -subdir=yes option as below:
tsm> q ba /home/hipo/projects/* -subdir=yes
Size Backup Date Mgmt Class A/I File
—- ———– ———- — —-
512 12-09-2011 19:57:09 STANDARD A /home/hipo/projects/hfs0106
1,024 08-12-2011 02:46:53 STANDARD A /home/hipo/projects/hsm41perf
512 12-09-2011 19:57:09 STANDARD A /home/hipo/projects/hsm41test
512 24-04-2012 00:22:56 STANDARD A /home/hipo/projects/hsm42upg
1,024 12-09-2011 19:57:09 STANDARD A /home/hipo/projects/hfs0106/test
1,024 12-09-2011 19:57:09 STANDARD A /home/hipo/projects/hfs0106/test/test2
12,048 04-12-2011 02:01:29 STANDARD A /home/hipo/projects/hsm41perf/tables
50,326 30-04-2012 01:35:26 STANDARD A /home/hipo/projects/hsm42upg/PMR70023
50,326 27-04-2012 00:28:15 STANDARD A /home/hipo/projects/hsm42upg/PMR70099
11,013 24-04-2012 00:22:56 STANDARD A /home/hipo/projects/hsm42upg/md5check
- To make tsm, backup some directories on Linux / AIX other unices:
tsm> incr / /usr /usr/local /home /lib
- For tsm to backup some standard netware drives, use:
tsm> incr NDS: USR: SYS: APPS:
- To backup C:\ D:\ E:\ F:\ if TSM is running on Windows
tsm> incr C: D: E: F: -incrbydate
- To back up entire disk volumes irrespective of whether files have changed since the last backup, use the selective command with a wildcard and -subdir=yes as below:
tsm> sel /* /usr/* /home/* -su=yes ** Unix/Linux
7. Backup selected files from a backup location
It is intuitive to think you can just add some wildcard characters to select what you want
to backup from a selected location but this is not so, if you try something like below
you will get an err.
tsm> incr /home/hipo/projects/*/* -su=yes
ANS1071E Invalid domain name entered: '/home/hipo/projects/*/*'
The proper way to select a certain folder / file for backup is with:
tsm> sel /home/hipo/projects/*/* -su=yes
8. Restoring tsm data from backup
To restore the config httpd.conf to custom directory use:
tsm> rest /etc/httpd/conf/httpd.conf /home/hipo/restore/
N!B! that in order for above to work you need to have the '/' trailing slash at the end.
If you want to restore a file under a different name:
tsm> rest /etc/ntpd.conf /home/hipo/restore/
9. Restoring a whole backupped partition
tsm> rest /home/* /tmp/restore/ -su=yes
This is using the Tivoli 'Restoring multiple files and directories', and the files to restore '*'
are kept till the one that was recovered (saying this in case if you accidently cancel the restore)
10. Restoring files with back date
By default the restore function will restore the latest available backupped file, if you need
to recover a specific file, you need the '-inactive' '-pick' options.
The 'pick' interface is interactive so once listed you can select the exact file from the date
you want to restore.
General restore command syntax is:
tsm> restore [source-file] [destination-file]
tsm> rest /home/hipo/projects/* /tmp/restore/ -su=yes -inactive -pickTSM Scrollable PICK Window – Restore
# Backup Date/Time File Size A/I File
————————————————————————————————–
170. | 12-09-2011 19:57:09 650 B A /home/hipo/projects/hsm41test/inclexcl.test
171. | 12-09-2011 19:57:09 2.74 KB A /home/hipo/projects/hsm41test/inittab.ORIG
172. | 12-09-2011 19:57:09 2.74 KB A /home/hipo/projects/hsm41test/inittab.TEST
173. | 12-09-2011 19:57:09 1.13 KB A /home/hipo/projects/hsm41test/md5.out
174. | 30-04-2012 01:35:26 512 B A /home/hipo/projects/hsm42125upg/PMR70023
175. | 26-04-2012 01:02:08 512 B I /home/hipo/projects/hsm42125upg/PMR70023
176. | 27-04-2012 00:28:15 512 B A /home/hipo/projects/hsm42125upg/PMR70099
177. | 24-04-2012 19:17:34 512 B I /home/hipo/projects/hsm42125upg/PMR70099
178. | 24-04-2012 00:22:56 1.35 KB A /home/hipo/projects/hsm42125upg/dsm.opt
179. | 24-04-2012 00:22:56 4.17 KB A /home/hipo/projects/hsm42125upg/dsm.sys
180. | 24-04-2012 00:22:56 1.13 KB A /home/hipo/projects/hsm42125upg/dsmmigfstab
181. | 24-04-2012 00:22:56 7.30 KB A /home/hipo/projects/hsm42125upg/filesystems
182. | 24-04-2012 00:22:56 1.25 KB A /home/hipo/projects/hsm42125upg/inclexcl
183. | 24-04-2012 00:22:56 198 B A /home/hipo/projects/hsm42125upg/inclexcl.dce
184. | 24-04-2012 00:22:56 291 B A /home/hipo/projects/hsm42125upg/inclexcl.ox_sys
185. | 24-04-2012 00:22:56 650 B A /home/hipo/projects/hsm42125upg/inclexcl.test
186. | 24-04-2012 00:22:56 670 B A /home/hipo/projects/hsm42125upg/inetd.conf
187. | 24-04-2012 00:22:56 2.71 KB A /home/hipo/projects/hsm42125upg/inittab
188. | 24-04-2012 00:22:56 1.00 KB A /home/hipo/projects/hsm42125upg/md5check
189. | 24-04-2012 00:22:56 79.23 KB A /home/hipo/projects/hsm42125upg/mkreport.020423.out
190. | 24-04-2012 00:22:56 4.27 KB A /home/hipo/projects/hsm42125upg/ssamap.020423.out
191. | 26-04-2012 01:02:08 12.78 MB A /home/hipo/projects/hsm42125upg/PMR70023/70023.tar
192. | 25-04-2012 16:33:36 12.78 MB I /home/hipo/projects/hsm42125upg/PMR70023/70023.tar
0———10——–20——–30——–40——–50——–60——–70——–80——–90–
<U>=Up <D>=Down <T>=Top <B>=Bottom <R#>=Right <L#>=Left
<G#>=Goto Line # <#>=Toggle Entry <+>=Select All <->=Deselect All
<#:#+>=Select A Range <#:#->=Deselect A Range <O>=Ok <C>=Cancel
pick>
To navigate in pick interface you can select individual files to restore via the number seen leftside.
To scroll up / down use 'U' and 'D' as described in the legenda.
11. Restoring your data to another machine
In certain circumstances, it may be necessary to restore some, or all, of your data onto a machine other than the original from which it was backed up.
In ideal case the machine platform should be identical to that of the original machine. Where this is not possible or practical please note that restores are only possible for partition types that the operating system supports. Thus a restore of an NTFS partition to a Windows 9x machine with just FAT support may succeed but the file permissions will be lost.
TSM does not work fine with cross-platform backup / restore, so better do not try cross-platform restores.
Trying to restore files onto a Windows machine that have previously been backed up with a non-Windows one. TSM created backups on Windows sent by other OS platforms can cause backups to become inaccessible from the host system.
To restore your data to another machine you will need the TSM software installed on the target machine. Entries in Tivoli configuration files dsm.sys and/or dsm.opt need to be edited if the node that you are restoring from does not reside on the same server. Please see our help page section on TSM configuration files for their locations for your operating system.
To access files from another machine you should then start the TSM client as below:
# dsmc -virtualnodename=RESTORE.MACHINE
You will then be prompted for the TSM password for this machine.
You will probably want to restore to a different destination to the original files to prevent overwriting files on the local machine, as below:
- Restore of D:\ Drive to D:\Restore ** Windows
tsm> rest D:\* D:\RESTORE\ -su=yes
- Restore user /home/* to /scratch on ** Mac, Unix/Linux
tsm> rest /home/* /scratch/ -su=yes
- Restoring Tivoli data on old netware
tsm> rest SOURCE-SERVER\USR:* USR:restore/ -su=yes ** Netware
12. Adding more directories for incremental backup / Check whether TSM backup was done correctly?
The easiest way is to check the produced dschmed.log if everything is okay there should be records in the log that Tivoli backup was scheduled in a some hours time
succesfully.
A normally produced backup scheduled in log should look something like:
14-03-2020 23:03:04 — SCHEDULEREC STATUS BEGIN
14-03-2020 23:03:04 Total number of objects inspected: 91,497
14-03-2020 23:03:04 Total number of objects backed up: 113
14-03-2020 23:03:04 Total number of objects updated: 0
14-03-2020 23:03:04 Total number of objects rebound: 0
14-03-2020 23:03:04 Total number of objects deleted: 0
14-03-2020 23:03:04 Total number of objects expired: 53
14-03-2020 23:03:04 Total number of objects failed: 6
14-03-2020 23:03:04 Total number of bytes transferred: 19.38 MB
14-03-2020 23:03:04 Data transfer time: 1.54 sec
14-03-2020 23:03:04 Network data transfer rate: 12,821.52 KB/sec
14-03-2020 23:03:04 Aggregate data transfer rate: 114.39 KB/sec
14-03-2020 23:03:04 Objects compressed by: 0%
14-03-2020 23:03:04 Elapsed processing time: 00:02:53
14-03-2020 23:03:04 — SCHEDULEREC STATUS END
14-03-2020 23:03:04 — SCHEDULEREC OBJECT END WEEKLY_23_00 14-12-2010 23:00:00
14-03-2020 23:03:04 Scheduled event 'WEEKLY_23_00' completed successfully.
14-03-2020 23:03:04 Sending results for scheduled event 'WEEKLY_23_00'.
14-03-2020 23:03:04 Results sent to server for scheduled event 'WEEKLY_23_00'.
in case of errors you should check dsmerror.log
Conclusion
In this article I've briefly evaluated some basics of IBM Commercial Tivoli Storage Manager (TSM) to be able to list backups, check backup schedules and how to the files set to be
excluded from a backup location and most importantly how to check that data backed up data is in a good shape and accessible.
It was explained how backups can be restored on a local and remote machine as well as how to append new files to be set for backup on next incremental scheduled backup.
It was shown how the pick interactive cli interface could be used to restore files at a certain data back in time as well as how full partitions can be restored and how some
certain file could be retrieved from the TSM data copy.






How to show country flag, web browser type and Operating System in WordPress Comments
Wednesday, February 15th, 2012!!! IMPORTANT UPDATE COMMENT INFO DETECTOR IS NO LONGER SUPPORTED (IS OBSOLETE) AND THE COUNTRY FLAGS AND OPERATING SYSTEM WILL BE NOT SHOWING INSTEAD,
!!!! TO MAKE THE COUNTRY FLAGS AND OS WP FUNCTIONALITY WORK AGAIN YOU WILL NEED TO INSTALL WP-USERAGENT !!!
I've come across a nice WordPress plugin that displays country flag, operating system and web browser used in each of posted comments blog comments.
Its really nice plugin, since it adds some transperancy and colorfulness to each of blog comments 😉
here is a screenshot of my blog with Comments Info Detector "in action":
Comments Info Detector as of time of writting is at stable ver 1.0.5.
The plugin installation and configuration is very easy as with most other WP plugins. To install the plugin;
1. Download and unzip Comments Info Detector
linux:/var/www/blog:# cd wp-content/pluginslinux:/var/www/blog/wp-content/plugins:# wget http://downloads.wordpress.org/plugin/comment-info-detector.zip
...
linux:/var/www/blog/wp-content/plugins:# unzip comment-info-detector.zip
...
Just for the sake of preservation of history, I've made a mirror of comments-info-detector 1.0.5 wp plugin for download here
2. Activate Comment-Info-Detector
To enable the plugin Navigate to;
Plugins -> Inactive -> Comment Info Detector (Activate)After having enabled the plugin as a last 3rd step it has to be configured.
3. Configure comment-info-detector wp plugin
By default the plugin is disabled. To change it to enabled (configure it) by navigating to:
Settings -> Comments Info DetectorNext a a page will appear with variout fields and web forms, where stuff can be changed. Here almost all of it should be left as it is the only change should be in the drop down menus near the end of the page:
Display Country Flags Automatically (Change No to Yes)Display Web Browsers and OS Automatically (Change No to Yes
After the two menus are set to "Yes" and pressing on Save Changes the plugin is enabled it will immediately start showing information inside each comment the GeoIP country location flag of the person who commented as well as OS type and Web Browser 🙂
Tags: action, Auto, blog, Browsers, change, Comment, Comments, configured, country flag, country location, Detector, Display, downloads, Draft, drop, drop down menus, flag web, How to, Inactive, information, installation, Linux, location, mirror, operating system, os type, page, person, plugin, plugin installation, quot, sake, Save Changes, screenshot, show, Stable, time, transperancy, type, unzip, web browser type, web browsers, web forms, wget, Wordpress, Wordpress Comments, writting, www, zip linux
Posted in Web and CMS, Wordpress | 1 Comment »