Posts Tagged ‘package’
Wednesday, October 19th, 2011 
I've been using Debian GNU / Linux on my Thinkpad laptop for almost 3 years and half. Initially the Debian version which I had installed was a stable Debian Lenny. As I was mostly dissatisfied of the old versions of the programs, I migrated to testing / unstable
Testing / unstables shipped program versions were a bit better but still back in the day I wanted to get advantage of the latest program versions so for a while I switched to unstable .
Later I regretted for this bad idea, after the migration to Unstable, it was too buggy to run on a notebook one uses for everyday work.
Then to revert back to a bit stable I downgraded to testing unstable again.
When Debian launched Debian Squeeze I set in my /etc/apt/sources.list file software repositories to be the one for the stable Debian Squeeze.
As you can see, I've done quite a lot of "experiments" and "excersises". Many packages were installed, then removed, some became obsolete with time others I just temporary installed out of curiosity. Anyways as a result I ended up with many packages uninstalled / removed , which still kept some of their directory structres and configurations on the machine.
Today, I decided to check how many of these obsolete packages are still present in dpkg database and I was shocked to find out 412 debs were still in my package database! To check the number I used cmd:
root@noah:~# dpkg -l | grep -i '^rcs.*$'|wc -l
Considering the tremendous number of packs waiting to be purged, I decided to get rid of this old and already unnecessery files for the sake of clarity, besides that removing the old already uninstalled packages removes old configuration files, readmes, directories and frees some little space and therefore frees some inodes 😉
Before proceeding to remove them, I carefully reviewed and all the package names which I was about to completely purge in order to make sure there is no package with a configuration files I might need in future:
root@noah:~# dpkg -l |grep -i '^rcs.*$'

...
After reviewing all the deb packages possessing the rc – (remove candidate) flag, I used the following bash one liners to remove the obsolete deb packages:
root@noah:~# for i in $(dpkg -l |grep -i '^rcs.*$'|awk '{ print $2 }'); do echo dpkg --purge $i done...

root@noah:~# for i in $(dpkg -l |grep -i '^rcs.*$'|awk '{ print $2 }'); do dpkg --purge $i done
First line will just print out what will be purged with dpkg , so after I checked it out I used the second one to purge all the RC packs.
Tags: bad idea, bit, buggy, candidate, clarity, cmd, configuration files, curiosity, deb packages, debian version, debs, dpkg, everyday work, file, half, How to, inodes, laptop, Linux, little space, machine, need, noah, number, old versions, package, package database, package names, program versions, purge, quot, root, software, software repositories, squeeze, system, system directories, testing, time, Ubuntu, work
Posted in Linux, Linux and FreeBSD Desktop, Linux Audio & Video, System Administration, Various | 3 Comments »
Monday, January 23rd, 2012 
1. Add Medibuntu package repository
root@ubuntu:~# wget --output-document=/etc/apt/sources.list.d/medibuntu.list \

http://www.medibuntu.org/sources.list.d/$(lsb_release -cs).list \

&& apt-get --quiet update \

&& apt-get --yes --quiet --allow-unauthenticated install medibuntu-keyring \

&& apt-get --quiet update
2. Enable Ubuntu to play Restricted DVD
root@ubuntu:~# apt-get install --yes libdvdread4

...

root@ubuntu:~# /usr/share/doc/libdvdread4/install-css.sh
After that VLC will be ready to play DVDs for some programs which was compiled without DVD, source rebuilt is required.
If DVDs hang you might need to set a Region Code with regionset:
# regionset
3. Install non-free codecs
root@ubuntu:~# apt-get install non-free-codecs
4. Install Chromium ffmpeg nonfree codecs
root@ubuntu:~# apt-get install chromium

root@ubuntu:~# apt-get install chromium-codecs-ffmpeg-nonfree
5. Install w32codecs / w64codecs
Depending on the Ubuntu Linux installation architecture 32/64 bit install w32codecs or w64codecs
For 32 bit (x86) Ubuntu install w32codecs:
root@ubuntu:~# apt-get install w32codecs
For 64 bit arch Ubuntu:
root@ubuntu:~# apt-get install w64codecs
6. Install ubuntu-restricted-extras meta package
root@ubuntu:~# apt-get install ubuntu-restricted-extras
7. Install cheese for webcam picture/video snapshotting
root@ubuntu:~# apt-get install cheese
8. Install GIMP, Inkscape, xsane,sane, shotwell etc.
root@ubuntu:~# apt-get --yes install sane xsane gimp inkscape gimp-data-extras gimp-plugin-registry \

blender gcolor2 showtwell bluefish kompozer
9. Install multimedia Sound & Video utilities
Install Subtitle editor, video editiking , sound editing, mp3 player, iso mounters, DVD/CD Burners
root@ubuntu:~# apt-get install rhythmbox banshee smplayer mplayer \

realplayer audacity brasero jokosher istanbuk gtk-recordMyDesktop \acetoneisohexedit furiusisomount winff fala audacious dvdstyler lives hydrogen

subtitleeditor gnome-subtitles electricsheep k3b
10. Install CD / DVD RIP tools
root@ubuntu:~# apt-get install acidrip sound-juicer ogmrip thoggen
11. Install chat messanger programs, Browsers, mail pop3 clients, torrent, emulators, ftp clients etc.
apt-get install seamonkey thunderbird transmission transmission-gtk gbgoffice kbedic \

pidgin openoffice.org gxine mozilla-plugin-vlc wine dosbox samba filezilla amsn ntp \epiphany-browser ntpdate desktop-webmail alltray chmsee gftp xchat-gnome ghex \gnome-genius bleachbit arista
12. Install Non-Free Flash Player
Unfortunately Gnash is not yet production ready and crashes in many websites …
root@ubuntu:~# apt-get install flashplugin-nonfree flashplugin-nonfree-extrasound swfdec-gnome
13. Install Archive / Unarchive management programs
root@ubuntu:~# apt-get install unace unrar zip unzip p7zip-full p7zip-rar sharutils rar uudeview \

mpack lha arj cabextract file-roller
15. Install VirtualBox and QEmu
root@ubuntu:~# apt-get install qemu-launcher qemu-kvm-extras virtualbox virtualbox-ose \

virtualbox-ose-guest-dkms virtualbox-ose-guest-dkms
This should be enough to use Ubuntu normally for multimedia Desktop just as MS Windows for most of the daily activities.
Am I missing some important program?
Tags: amp, architecture, audacity, Auto, banshee, bit, blender, bluefish, cd burners, Chromium, Draft, editing, editing mp3, ffmpeg, free codecs, gcolor, inkscape, Install, installation, ISO, libdvdread, Linux, linux multimedia, list, lsb, Medibuntu, meta package, org, output document, package, player, plugin registry, regionset, repository, root, sane, shafter, shotwell, showtwell, smplayer, Sound, sound editing, Sound Video, subtitle editor, sudo, Ubuntu, ubuntu linux, Ubuntu Linux Multimedia, video, video utilities, VirtualBox, VLC, wget, WinFF, x86
Posted in Linux, Linux and FreeBSD Desktop, Linux Audio & Video, System Administration | 4 Comments »
Monday, June 11th, 2012 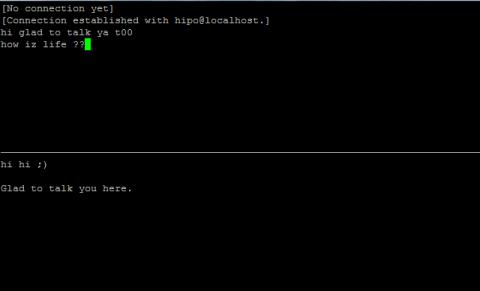
After writting in previous article on how talk be used to handle interactive chat console sessions on FreeBSD, I thought of dropping a few lines on how same is done on Debian, so here is how:
1.; Install talk and talkd
noah:/home/hipo# apt-get --yes install talk talkd

Reading package lists... Done

Building dependency tree

Reading state information... Done

The following NEW packages will be installed:

talk talkd

0 upgraded, 2 newly installed, 0 to remove and 93 not upgraded.

Need to get 19.0 kB/42.3 kB of archives.

After this operation, 201 kB of additional disk space will be used.

Get:1 http://ftp.nl.debian.org/debian/ stable/main talkd amd64 0.17-14 [19.0 kB]

Fetched 19.0 kB in 0s (67.1 kB/s)

Selecting previously deselected package talk.

(Reading database ... 90%

Unpacking talk (from .../talk_0.17-14_amd64.deb) ...

Selecting previously deselected package talkd.

Unpacking talkd (from .../talkd_0.17-14_amd64.deb) ...

Processing triggers for man-db ...

Setting up talk (0.17-14) ...

update-alternatives: using /usr/bin/netkit-ntalk to provide /usr/bin/talk (talk) in auto mode.

Setting up talkd (0.17-14) ...
2.;; Check and make sure talk and ntalkd lines are present in /etc/inetd.conf
noah:/home/hipo# grep -i talk /etc/inetd.conf

#:BSD: Shell, login, exec and talk are BSD protocols.

talk dgram udp wait nobody.tty /usr/sbin/in.talkd in.talkd

ntalk dgram udp wait nobody.tty /usr/sbin/in.ntalkd in.ntalkd
Now you probably wonder why are there two lines in /etc/inetd.conf for ))
in.talkd and in.ntald
in.talkd daemon's aim is to deliver talk sessions between logged in users on one Linux host with few logged in users willing to talk to each other locally;;
Wheter in.ntalkd is designed to serve interactive user talks between the host where in.ntalkd is installed and remote systems ruwhich have the talk client program installed. Of course in order for remote talks to work properly the firewall (if such has to be modified to allow in.ntalkd chats. I've never used in.ntalkd and on most machines having in.ntald hanging around from inetd, could be a potential security hole so, for people not planning to initiate remote TALKs between Unix / Linux / BSD hosts on a network it is a good practice the ntalkd line seen above in inetd.conf to be commented out ::;
noah:/home/hipo# grep -i talk /etc/inetd.conf

#:BSD: Shell, login, exec and talk are BSD protocols.

talk dgram udp wait nobody.tty /usr/sbin/in.talkd in.talkd

#ntalk dgram udp wait nobody.tty /usr/sbin/in.ntalkd in.ntalkd
3.;;; Restart openbsd-inetd init script and talk is ready to use
noah:~# /etc/init.d/openbsd-inetd restart

* Restarting internet superserver inetd
Onwards to use talk between two users the syntax is same like on other BSD, as a matter of fact TALK – console / terminal interactive chat originally was developed for the 4.2BSD UNIX release ;; the Linux code is a port of this BSD talk and not rewrite from scratch.
Using talk between two logged in users on pts/1 (lets say user test) and tty1 (user logged as root) is done with:
noah:~$ tty

noah:~$ talk root@localhost tty1

/dev/pts/1
On tty1 the user has to have enabled Talk sessions request, by default this behaviour in Debian and probably other Debian based Linuxes (Ubuntu) for instance is configured to have talks disabled, i,e ,,,
root@noah:~# mesg

is n
Enabling it on root console is done with:
root@noah:~# mesg y
Once enabled the root will be able to see the TALK service requests on tty1 otherwise, the user gets nothing. With enabled messaging the root user will get on his tty:
Message from TalkDaemon@his_machine...

talk: connection requested by your_name@your_machine.

talk: respond with: talk your_name@your_machine
So on the root console to reply back to talk chat request:
noah:~$ talk hipo@localhost
Tags: aim, Auto, auto mode, building, configured, confnoah, daemon, deb, debian gnu, dependency, dependency tree, dgram, Disk, disk space, DoneBuilding, Draft, exec, Fetched, freebsd, gnu linux, inetd, information, Install, Installing, interactive user, localhost, login, mesg, network, noah, nobody, ntalk, ntalkd, operation, package, protocols, reading database, reading package, request, root, root user, sbin, sessions, Shell, shell login, state information, tree, tty, wait, work, writting
Posted in Curious Facts, Everyday Life, Linux, Various | No Comments »
Monday, August 1st, 2011 
It seems DjbDNS on Debian Squeeze has been not included as a Debian package. There is still possibility to install djbdns from an older deb package or install it from source. I however decided to install it from source as finding the old Debian package for Lenny and Etch takes time, plus I'm running an amd64 version of Debian and this might even more complicate the situation.
Installing it from source is not really a Debian way but at least it works.
In this article I assume that daemontools and ucspi-tcp are preliminary installed, if not one needs to install them with:
debian:~# apt-get install ucspi-tcp daemontools daemontools-run

...
The above two ones are required as DJBDNS is originally made to run through djb's daemontools.
Here is the exact step I took to have it installed as local caching DNS server on a Debian Squeeze server:
1. Download and untar DjbDNS
debian:~# wget -q http://cr.yp.to/djbdns/djbdns-1.05.tar.gz
debian:~# tar -zxvvf djbdns-1.05.tar.gz

...
2. Add DjbDNS users to /etc/passwd
Creating the below two users is not arbitrary but it's recommendable.
echo 'dnscache:*:54321:54321:dnscache:/dev/null:/dev/null' >> /etc/passwd

echo 'dnslog:*:54322:54322:dnslog:/dev/null:/dev/null' >> /etc/passwd
3. Compile DJBDNS nameserver
First it's necessery to use the below echo command to work around a common Linux bug:
debian:~# cd djbdns-1.05

debian:/root/djbdns-1.05# echo gcc -O2 -include /usr/include/errno.h > conf-cc
Next let's make it:
debian:/root/djbdns-1.05# make
4. Install the compiled djbdns binaries
debian:/root/djbdns-1.05# make setup check

# here comes some long install related output
If no errors are produced by make setup check this means that the djbdns should have installed itself fine.
As installation is compileted it's a good idea to report about the newly installed DjbDNS server if running a mail server. This info is used by Dan Bernstein to gather statistical data about the number of installations of djbdns servers throughout the world.
5. Do some general configurations to the newly installed DJBDNS
Now let's copy the list of the IP addresses of the global DNS root servers in /etc/.
debian:/root/djbdns-1.05# cp -rpf dnsroots.global /etc/
debian:/root/djbdns-1.05# ./dnscache-conf dnscache dnslog /etc/dnscache 0.0.0.0
dnscache-conf will generate some default configuration files for djbdns in /etc/dnscache
Next allow the networks which should be able to use the just installed djbdns server as a caching server:
debian:/root/djbdns-1.05# cd /etc/dnscache/root/ip

debian:/etc/dnscache/root# touch 192.168.1

debian:/root/djbdns-1.05# touch 123.123
First command will allow all ips in range 192.168.1.* to be able to access the DNS server and the second command will allow all ips from 123.123.1-255.1-255 to be able to query the server.
Some further fine tunning can be done from the files:
/etc/dnscache/env/CACHESIZE and /etc/dnscache/env/DATALIMIT
As a last step, before it's running, we have to link the /etc/dnscache to daemontools like so:
debian:/root/djbdns-1.05# ln -sf /etc/dnscache /etc/service/dnscache
If the daemontools is not linked to be accessible via /etc/service it's also a good to link it there:
debian:~# ln -sf /etc/service /
Now the DJBDNS should be running fine, to test if it's running without errors through daemontools I used:
debian:~# ps ax|grep -i readproc

5358 pts/18 R+ 0:00 grep -i readproc

11824 ? S 0:00 readproctitle service errors: ...........
If no errors are displayed it's configured and running to also test if it's capable of resolving I used the host command:
debian:~# host www.pc-freak.net localhost

Using domain server:

Name: localhost

Address: 127.0.0.1#53

Aliases:
www.pc-freak.net has address 83.228.93.76
www.pc-freak.net mail is handled by 0 mail.www.pc-freak.net.
Now the DJBDNS is properly installed and if you test it for a while with time host somehost.com localhost , you will see how quick it is in resolving.
The advantage of running DJBDNS is it does not require almost no maintance, its rock solid and great just like all other Dan Bernstein's written software.
Enjoy 😉
Tags: binaries, Cachening, Cachening Localhost Proxy, Compile, configure, configured, cr, daemontools, dan bern, dan bernstein, deb package, debian cd, debian package, djb, djbdns, DNS, dns server, echo command, efficiency, errno, etc passwd, etch, host, How to, Install, installation, Linux, linux bug, mail server, necessery, package, passwdecho, possibility, root, running, squeeze, statistical data, tar gz, tcp, time, Touch, untar, wget, yp, zxvvf
Posted in Linux, Performance Tuning, System Administration, Web and CMS | 4 Comments »
Tuesday, October 4th, 2011 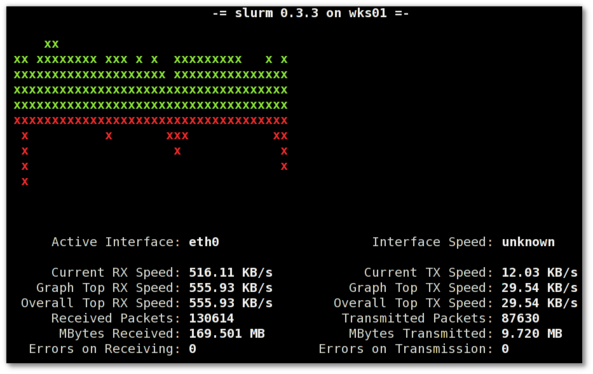
saidar is a text based ncurses program to display live statistics about general system health.
It displays in one refreshable screen (similar to top) statistics about server state of:
CPU, Load, Memory, Swap, Network, I/O disk operations
Besides that saidar supports a ncurses console colors, which makes it more funny to look at.
Saidar extracts the statistics for system state based on libgstrap cross platform statistics library about pc system health.
On Debian, Ubuntu, Fedora, CentOS Linuxes saider is available for install straight from distribution repositories.
On Debian and Ubuntu saidar is installed with cmd:
debian:~# apt-get install saidar

...
On CentOS and Fedora saidar is bundled as a part of statgrab-tools rpm package.
Installing it on 64 bit CentOS with yum is with command:
[root@centos ~]# yum install statgrab-tools.x86_64
Saidar is also available on FreeBSD as a part of the /usr/ports/devel/libgstrab, hence to use on my FreeBSD I had to install the libgstrab port:
freebsd# cd /usr/ports/devel/libstatgrab

freebsd# make install clean
Here is saidar running on my Desktop Debian on Thinkpad in color output:
debian:~# saidar -c
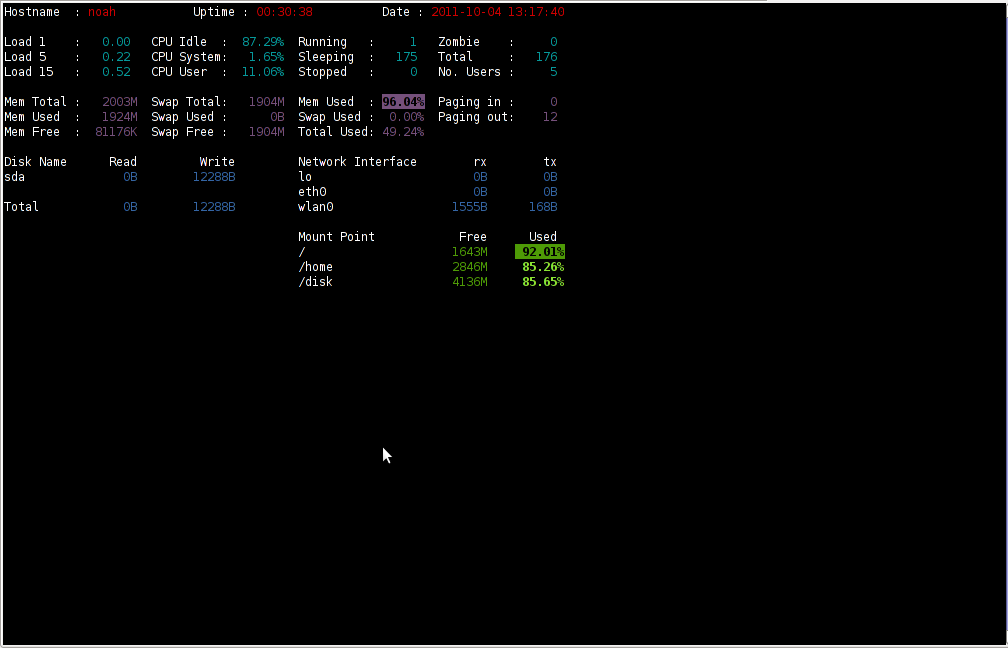
I've seen many people, who use various shell scripts to output system monitoring information, this scripts however are often written to just run without efficiency in mind and they put some let's say 1% extra load on the system CPU. This is not the case with saidar which is written in C and hence the program is optimized well for what it does.
Update: Next to saidar I recommend you check out Slurm (Real Time Network Interface Monitor) it can visualizes network interface traffic using ascii graph such as on top of the article. On Debian and Ubuntu Slurm is available and easily installable via simple:
apt-get install –yes slurm
Tags: CentOS, cleanHere, cpu load, cross platform, Desktop, desktop system, Disk, disk operations, distribution, extracts, fedora, freebsd, health, information, libgstrab, libgstrap, Linux, Load, load memory, memory, Monitor General Server Desktop, package, platform, ports, repositories, root, rpm, saidar, saider, screen, server desktop, server state, Shell, shell scripts, Slurm Real Time Network Interface Monitor, statistics library, system cpu, system health, text, thinkpad, Ubuntu, use, yum
Posted in FreeBSD, Linux, Monitoring, Networking, System Administration | 1 Comment »
Friday, March 18th, 2011 
By default most Apache running Linux servers on the Internet are configured to use with the mpm prefork apache module
Historically prefork apache module is the predecessor of the worker module therefore it's believed to be a way more tested and reliable, if you need a critical reliable webserver configuration.
However from my experience by so far with the Apache MPM Worker I can boldly say that many of the rumors concerning the unreliabity of apache2-mpm-worker are just myths.
The old way Apache handles connections e.g. the mod prefork is the well known way that high amount of the daemons on Linux and BSD are still realying on.
When prefork is a used by Apache, every new TCP/IP connection arriving at your Linux server on the Apache configured port let's say on port 80 is being served by Apache in a way that the Apache process (mother process) parent does fork a new Apache parent copy in order to serve the new request.
Thus by using the prefork Apache needs to fork new process (if it doesn't have already an empty forked one waiting for connections) and serve the HTTP request of the new client, after the request of the client is completed the newly forked Apache usually dies (even though it again depends on the way the Apache server is configured via the Apache configuration – apache2.conf / httpd.conf etc.).
Now you can imagine how slow and memory consuming it is that all the time the parent Apache process spawns new processes, kills old ones etc. in order to fulfill the client requests.
Now just to compare the Apace mpm prefork does not use the old forking way, but relies on a few Apache processes which handles all the requests without constantly being destroyed and recreated like with the prefork module.
This saves operations and system resources, threaded programming has already been proven to be more efficient way to handle tasks and is heavily adopted in GUI programming for instance in Microsoft Windows, Mac OS X, Linux Gnome, KDE etc.
There is plenty of information and statistical data which compares Apache running with prefork and respectively worker modules online.
As the goal of this article is not to went in depths with this kind of information I would not say more on it but let you explore online a bit more about them in case if you're interested.
The purpose of this article is to explain in short how to substitute the Apache2-MPM-Prefork and how your server performance could benefit out of the use of Apache2-MPM-Worker.
On Debian the default Apache process serving module in Apache 1.3x,Apache 2.0x and 2.2x is prefork thus the installation of apache2-mpm-worker is not "a standard way" to install Apache
Deciding to swith from the default Debian apache-mpm-prefork to apache-mpm-worker is quite a serious and responsible decision and in some cases might cause troubles, if you have decided to follow my article be sure to consider all the possible negative consequences of switching to the apache worker !
Now after having said a bunch of info which might be not necessary with the experienced system admin I'll continue on with the steps to install the apache2-mpm-worker.
1. Install the apache2-mpm-worker
debian:~# apt-get install apache2-mpm-worker php5-cgi

Reading state information... Done

The following packages were automatically installed and are no longer required:

The following packages will be REMOVED apache2-mpm-prefork libapache2-mod-php5

The following NEW packages will be installed apache2-mpm-worker

0 upgraded, 1 newly installed, 2 to remove and 46 not upgraded.

Need to get 0B/259kB of archives.After this operation, 6193kB disk space will be freed.
As you can notice in below's text confirmation which will appear you will have to remove the apache2-mpm-prefork and the apache2-mpm-worker modules before you can proceed to install the apache2-mpm-prefork.
You might ask yourself if I remove my installed libphp how would I be able to use my Apache with my PHP based websites? And why does the apt package manager requires the libapache2-mod-php5 to get removed.
The explanation is simple apache2-mpm-worker is not thread safe, in other words scripts which does use the php fork(); function would not work correctly with the Apache worker module and will probably be leading to PHP and Apache crashes.
Therefore in order to install the apache mod worker it's necessary that no libapache2-mod-php5 is existent on the system.
In order to have a PHP installed on the server again you will have to use the php5-cgi deb package, this is the reason in the above apt-get command I'm also requesting apt to install the php5-cgi package next to apache2-mpm-worker.
2. Enable the cgi and cgid apache modules
debian:~# a2enmod cgi

debian:~# a2enmod cgid
3. Activate the mod_actions apache modules
debian:~# cd /etc/apache2/mods-enabled

debian:~# ln -sf ../mods-available/actions.load

debian:~# ln -sf ../mods-available/actions.conf
4. Add configuration options in order to enable mod worker to use the newly installed php5-cgi
Edit /etc/apache2/mods-available/actions.conf vim, mcedit or nano (e.g. your editor of choice and add inside:
<IfModule mod_actions.c>
Action application/x-httpd-php /cgi-bin/php5
</IfModule>
After completing all the above instructions, you might also need to edit your /etc/apache2/apache2.conf to tune up, how your Apache mpm worker will serve client requests.
Configuring the <IfModule mpm_worker_module> in apache2.conf is necessary to optimize your newly installed mpm_worker module for performance.
5. Configure the mod_worker_module in apache2.conf One example configuration for the mod worker is:
<IfModule mpm_worker_module>

StartServers 2

MaxClients 150

MinSpareThreads 25

MaxSpareThreads 75

ThreadsPerChild 25

MaxRequestsPerChild 0

</IfModule>
Consider the fact that this configuration is just a sample and it's in no means configured for serving Apache requests for high load Apache servers and you need to further play with the values to have a good results on your server.
6. Check that all is fine with your Apache configurations and no syntax errors are encountered
debian:~# /usr/sbin/apache2ctl -t

Syntax OK
If you get something different from Syntax OK track the error and fix it before you're ready to restart the Apache server.
7. Now restart the Apache server
debian:~# /etc/init.d/apache2 restart
All should run fine and hopefully your PHP scripts should be interpreted just fine through the php5-cgi instead of the libapache2-mod-php5.
Using the /usr/bin/php5-cgi will increase with some percentage your server CPU load but on other hand will drasticly decrease the Webserver memory consumption.
That's quite logical because the libapache2-mod-hp5 is loaded once during apache server whether a new instance of /usr/bin/php5-cgi is invoked during each of Apache requests via the mod worker.
There is one serious security flow coming with php5-cgi, DoS against a server processing scripts through php5-cgi is much easier to be achieved.
An example for a denial attack which could affect a website running with mod worker and php5-cgi, could be simulated from a simple user with a web browser which holds up the f5 or ctrl + r browser page refresh buttons.
In that case whenever php5-cgi is used the CPU load would rise drastic, one possible solution to this denial of service issues is by installing and using libapache2-mod-evasive like so:
8. Install libapache2-mod-evasive
debian:~# apt-get install libapache2-mod-evasive
The Apache mod evasive module is a nice apache module to minimize HTTP DoS and brute force attacks.
Now with mod worker through the php5-cgi, your apache should start serving requests more efficiently than before.
For some performance reasons some might even want to try out the fastcgi with the worker to boost the Apache performance but as I have never tried that I can't say how reliable a a mod worker with a fastcgi would be.
N.B. ! If you have some specific php configurations within /etc/php5/apache2/php.ini you will have to set them also in /etc/php5/cgi/php.ini before you proceed with the above instructions to install Apache otherwise your PHP scripts might not work as expected.
Mod worker is also capable to work with the standard mod php5 Apache module, but if you decide to go this route you will have to recompile your PHP lib manually from source as in Debian this option is not possible with the default php library.
This installation worked fine on Debian Lenny but suppose the same installation should work fine on Debian Squeeze as well as Debian testing/unstable.
Feedback on the afore-described mod worker installation is very welcome!
Tags: Activate, amount, apache configuration, apache mod worker speed up, apache module, apache performance, apache processes, apache server, apache2, boost apache performance, BSD, cause, cgi, cgid, client, client requests, configured, configured port, connection, consuming, consumption, copy, daemons, fine, Gnome, historically, HTTP, httpd, information, installation, instance, libapache, linux server, linux servers, memory consumption, mpm, myths, new processes, package, php, php5, predecessor, request, server memory, speed up apache, speed up apache debian, Speeding up Apache through apache2-mpm-worker and php5-cgi on Debian / How to improve Apache performance and decrease server memory consumption, system resources, tcp ip connection, time, unreliabity
Posted in Linux, System Administration, Various, Web and CMS | 12 Comments »
Friday, February 27th, 2015 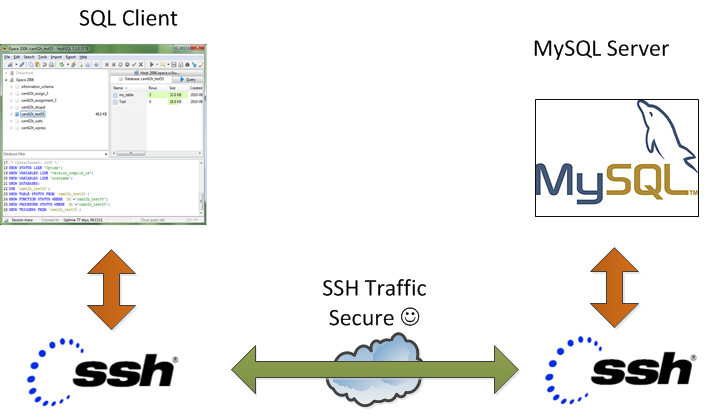
On our Debian / CentOS / Ubuntu Linux and Windows servers we're running multiple MySQL servers and our customers sometimes need to access this servers.
This is usually problem because MySQL Db servers are running in a DMZ Zone with a strong firewall and besides that for security reasons SQLs are configured to only listen for connections coming from localhost, I mean in config files across our Debian Linux servers and CentOS / RHEL Linux machines the /etc/mysql/my.cnf and /etc/my.cnf the setting for bind-address is 127.0.0.1:
[root@centos ~]# grep -i bind-address /etc/my.cnf
bind-address = 127.0.0.1
##bind-address = 0.0.0.0
For source code developers which are accessing development SQL servers only through a VPN secured DMZ Network there are few MySQL servers witha allowed access remotely from all hosts, e.g. on those I have configured:
[root@ubuntu-dev ~]# grep -i bind-address /etc/my.cnf
bind-address = 0.0.0.0
However though clients insisted to have remote access to their MySQL Databases but since this is pretty unsecure, we decided not to configure MySQLs to listen to all available IP addresses / network interfaces.
MySQl acess is allowed only through PhpMyAdmin accessible via Cleint's Web interface which on some servers is CPanel and on other Kloxo (This is open source CPanel like very nice webhosting platform).
For some stubborn clients which wanted to have a mysql CLI and MySQL Desktop clients access to be able to easily analyze their databases with Desktop clients such as MySQL WorkBench there is a "hackers" like work around to create and use a MySQL Tunnel to SQL server from their local Windows PCs using standard OpenSSH Linux Client from Cygwin, MobaXterm which already comes with the SSH client pre-installed and has easy GUI interface to create SSH tunnels or eventually use Putty's Plink (Command Line Interface) to create the tunnel
Anyways the preferred and recommended (easiest) way to achieve a tunnel between MySQL and local PC (nomatter whether Windows or Linux client system) is to use standard ssh client and below command:
ssh -o ServerAliveInterval=10 -M -T -M -N -L 3308:localhost:3306 your-server.your-domain.com
By default SSH tunnel will keep opened for 3 minutes and if not used it will automatically close to get around this issue, you might want to raise it to (lets say 15 minutes). To do so in home directory user has to add in:
~/.ssh/config
ServerAliveInterval 15
ServerAliveCountMax 4
Note that sometimes it is possible ven though ssh tunnel timeout value is raised to not take affect if there is some NAT (Network Adress Translation) with low timeout setting on a firewall level. If you face constant SSH Tunnel timeouts you can use below bash few lines code to auto-respawn SSH tunnel connection (for Windows users use MobaXterm or install in advance bash shell cygwin package):
while true
do
ssh -o ServerAliveInterval=10 -M -T -M -N -L 3308:localhost:3306 your-server.your-domain.com
sleep 15
done
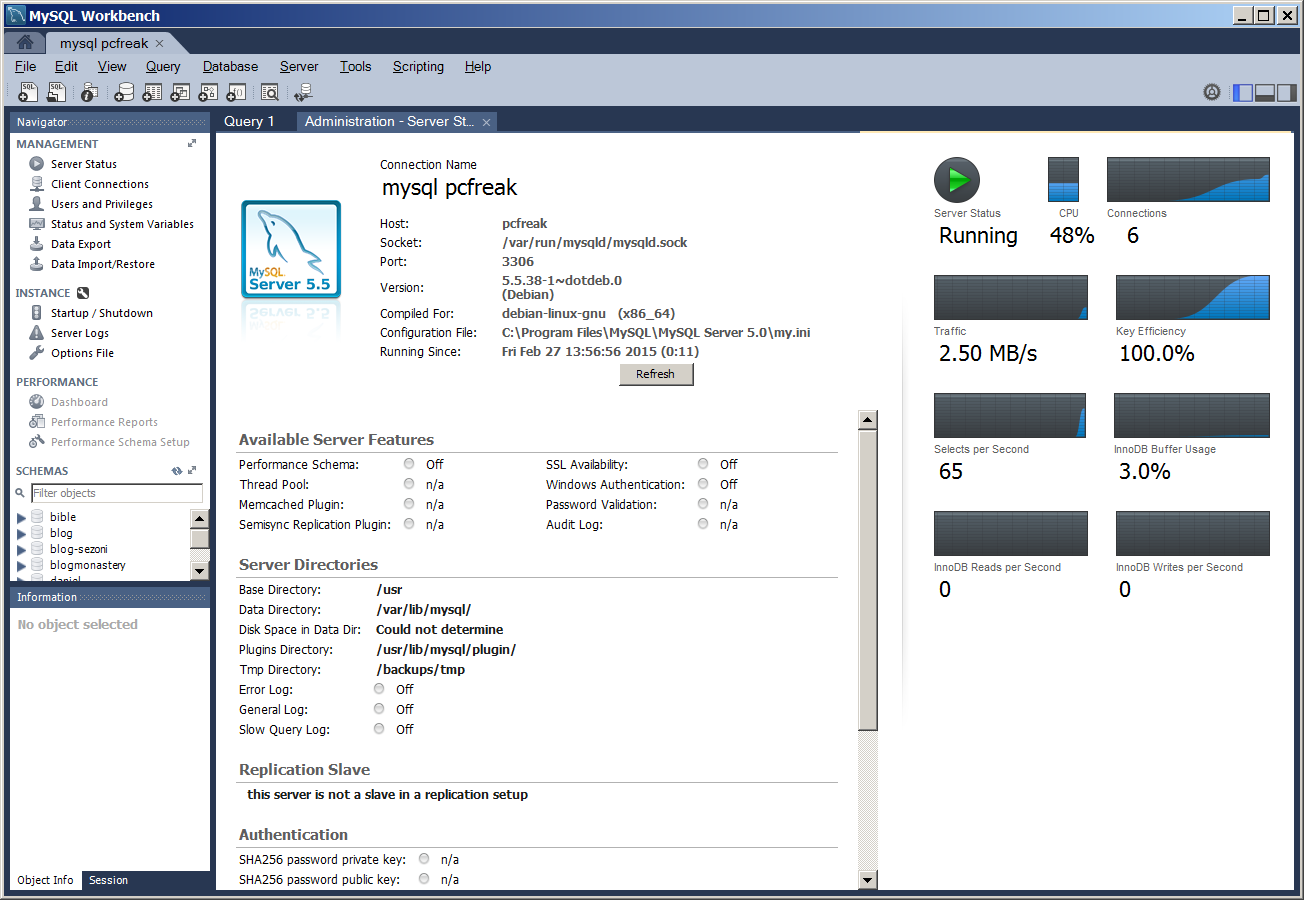
Below is MySQLBench screenshot connected through server where this blog is located after establishing ssh tunnel to remote mysql server on port 3308 on localhost
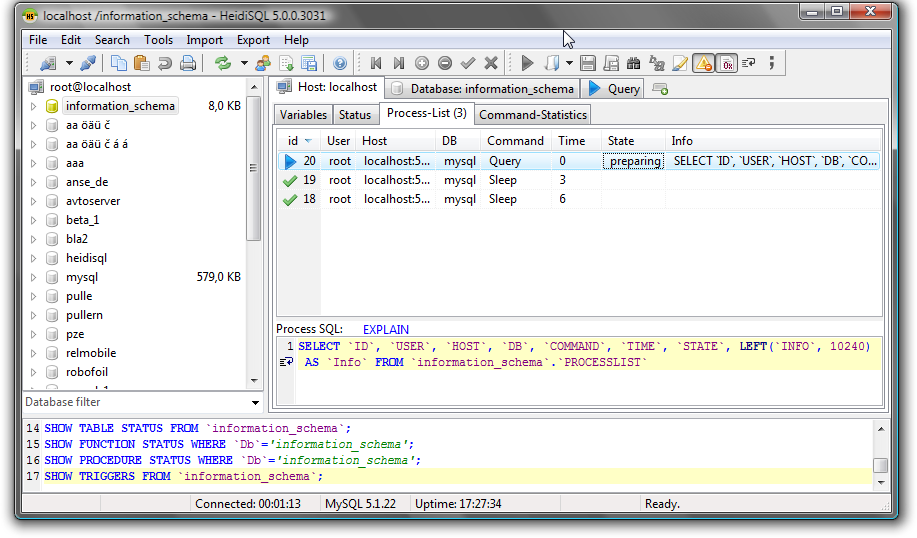
There is also another alternative way to access remote firewall filtered mysql servers without running complex commands to Run a tunnel which we recommend for clients (sql developers / sql designers) by using HeidiSQL (which is a useful tool for webdevelopers who has to deal with MySQL and MSSQL hosted Dbs).
To connect to remote MySQL server through a Tunnel using Heidi:
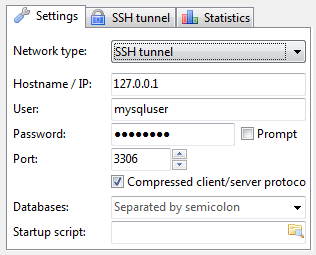
In the ‘Settings’ tab
1. In the dropdown list of ‘Network type’, please select SSH tunnel
2. Hostname/IP: localhost (even you are connecting remotely)
3. Username & Password: your mysql user and password
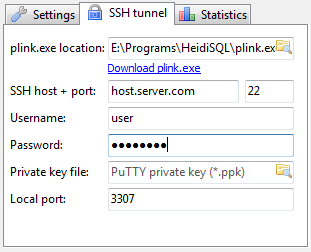
Next, in the tab SSH Tunnel:
1. specify plink.exe or you need to download it and specify where it’s located
2. Host + port: the remote IP of your SSH server(should be MySQL server as well), port 22 if you don’t change anything
3. Username & password: SSH username (not MySQL user)
Tags: cnf, configured, debian linux, developers, firewall, ip, linux windows, localhost, localhost port, mysql servers, network interfaces, package, platform, Plink Command Line Interface, root admin, running, security, source code, ssh client, Username Password, Windows
Posted in Everyday Life, MySQL, System Administration, Various, Web and CMS | No Comments »
Tuesday, May 18th, 2010 Every now and then I have to build a binary rpm from a source rpm (src.rpm) file.
Last time I had to rebuild clamav-toaster-0.96.0-1.3.35.src.rpm because a the clamav toaster installationon one of the CentOS servers I maintin has reached an end of the supported maintance period for the previous clamav 0.94.
Of course I first had to download clamav-toaster-0.96.0-1.3.35.src.rpm .
[root@centos-server:~ ]# wget http://mirrors.qmailtoaster.net/clamav-toaster-0.96.0-1.3.35.src.rpm
Consequently I used the following command to rebuild the source rpm file into rpm binary
[root@centos-server:~ ]# rpmbuild --rebuild clamav-toaster-0.96.0-1.3.35.src.rpm
The aforementioned command will take a while it took like 5 minutes on my server.
As soon as the rpm build is completed your binary rpm installation file for clamav-toaster will be located in:
/usr/src/redhat/RPMS/x86_64/clamav-toaster-0.96.0-1.3.35.x86_64.rpm
To install or update the recently built clamav-toaster rpm binary issue:
[root@centos-server:~ ]# rpm -Uvh /usr/src/redhat/RPMS/x86_64/clamav-toaster-0.96.0-1.3.35.x86_64.rpm
That’s all now your outdated clamav-toaster installation should be once more up to date.
If you want to further list the content of the newly installed/updated rpm binary you will have to issue the command in your terminal:
[root@centos-server:~ ]# rpm -ql clamav-toaster
Tags: command, end, file, issue, manager, package, period, Rebuilding source rpm (redhat package manager) files to binary rpms / Update clamav toaster installation on CentOS 5, RPMS, src, usr
Posted in System Administration | 1 Comment »
Friday, December 16th, 2011 
1. Frogatto & Friends – Is an Indian Free Software (Open Source) game in the spirit of old-school jump’en runs like Commander Keen, Prehistoric, Jazz Jack Rabbit
The game is really entertaining, the graphics looks approximately nice, the music is awesome, the gamelplay is good even though after some point in the game the moment with “where should I go now, I can’t find exit” comes through and it gets boring.
Generally if you compare with all the existing jump and run arcade games free software games available for Linux and FreeBSD the game will definetely arrange itself in the list of TOP 10 free software Arcade Games
and therefore its my own believe that Frogatto is a game that every GNU / Linux and FreeBSD desktop should have in Application -> Games GNOME menu.
Frogatto is rich of levels, enemies obstacles objects, places to visit (which puts it ahead of many of the linux arcade games which often miss enough game levels, has a too short game plots, or simply miss overall game diversity).

The game’s general look & feel is like a professional game and not just some tiny free software arcade, made by its authors for the sake to learn some programming, graphics or music creation.


Besides that Frogatto & Friends is multi-platform supporting all the major operating systems.
Game supports:
- Windows
- Mac
- iPhone
- Debian GNU / Linux
- FreeBSD
The game source code is also available on Frogatto.com – The Game’s Official website
The game is available as a deb package in Debian and Ubuntu GNU / Linuxes so to install on those deb based distributions, simply use apt:
debian:~# apt-get install frogatto

...
The above command will install two packages frogatto (containing the game’s main executable binary) and frogatto-data containinng all the game textures, levels, graphics, music etc.
BTW the package saparation on a gamename and gamename-data in Debian (for all those who have not still noticed), can be seen on most of the games with a game data that takes more disk space.
After the game is installed the only way to start the game is to run it manually through pressing ALT+F2 in GNOME or running the progrtam through gnome-terminal with cmd:
debian:~$ frogatto
Here are few more Frogatto gameplay screenshots:


I’ve noticed Frogatto is also available as an RPM package for Fedora Linux, as well as has a FreeBSD port in the /usr/ports/games/frogatto and this makes it easy to install on most free software OSes in the wild.
While checking frogatto.com , I found an interesting link to a website offering free graphics (pictures), textures and sounds for free and open source games for all those who hold interest into the development of Free Software & Open Source Games make sure you check OpenGameArt.org
OpenGameArt.org looks like a great initiative and will definitely be highly beneficial to the development of more and better FSOS Games so I wish them God speed with this noble initiative.
Frogatto is very suitable for growing kids since it doesn’t contain no violence and every now and then the main game actor the Frogatto Frog leads few lines English dialogues with some of the characters found in the quest.
For none speaking English countries, the game can help the kids to learn some basic english words and thus can help develop kids intellect and knowledge
And oh yeah one more criticism towards the game is the Enlish structure, it seems people who wrote the plot can work this out in the time to come. Many of the English sentences during dialogues the frog leads with the cranks he met does not sound like a common and sometimes even correct english / phrases.
Besides those little game “defect”, the game is pretty awesome and worthy to kill some time and relax from a long stressy day.
Tags: arcade games, code, com, deb package, Debian, debian gnu, Desktop, Disk, English, exit, fedora linux, Free, free software games, freebsd, game levels, game source code, game textures, Gnome, gnu linux, Indian, IPhone, jack rabbit, jack rabbitthe, Jazz, jazz jack rabbit, jump, jump and run, knowledge, linux freebsd, look feel, menu, music creation, nbsp, official, Open, open source game, open source games, operating systems, package, Prehistoric, professional game, programming graphics, quot, saparation, school jump, short game, software, software arcade, software open source, Source, time, Ubuntu
Posted in Everyday Life, FreeBSD, Games Linux, Linux, Linux and FreeBSD Desktop | No Comments »
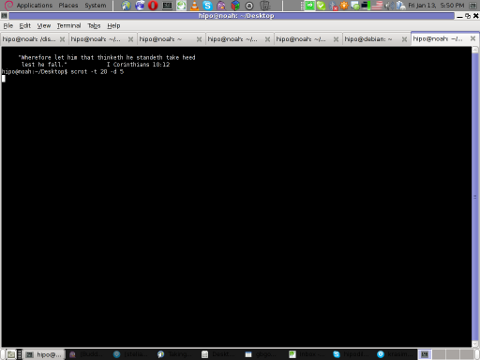
Friday, January 13th, 2012 scrot and import are two commands, which can be used to take screenshot in terminal on Linux and FreeBSD:
To use scrot cmd to take screenshots on Ubuntu and Debian the scrot package has to be installed:
noah:~# apt-get install scrot

...
scrot should also be available on most other Linux distributions in the main repositories, I'll be glad to hear if someone has used it on Fedora, SUSE etc.
On FreeBSD, there is a port called scrot , to install on FreeBSD:
freebsd# cd /usr/ports/graphics/scrot

freebsd# make install clean

...
Scrot has plenty of nice arguments one can use to make a screenshot. Maybe the most handy one in my view is after a preliminary set delay before screenshot is taken.
To take screenshot with it after lets say 5 seconds delay before the screenshot:
hipo@noah:~/Desktop$ scrot -t 20 -d 5
To put an year, month and day and year followed by screen resolution with scrot :
hipo@noah:~$ scrot '%Y-%m-%d_$wx$h.png'
Another way to take a screenshot of screen with command is by using ImageMagick's – import image manipulation package.
To take screenshot of the current screen via terminal using import , type in xterm, gnome-termina or Gnome's Run Application (ALT+F2)
hipo@noah:~$ import -window root ScreenShot.png
To make import command to save the taken screenshot in a format (minute:hour:day:month:year)i :
hipo@noah:~$ import -window root $screenshot_dir/screenshot-$(date +%M_%k_%d_%m_%Y|sed -e 's/^ *//').png
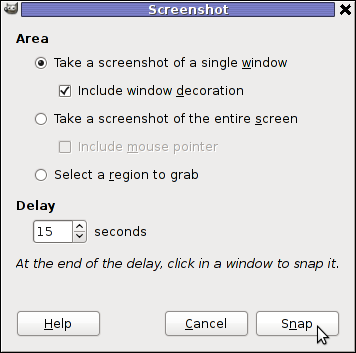
Taking a delayed screenshot is also possible via The GIMP via menus File -> Create -> Screenshot
Now here is an interesting question, what if I would like to take periodic screenshots of what I do on my Desktop to take random movie scenes from a movie I watch with totem or vlc??
This task is quite easily achiavable with a little bash shell script, I wrote:
screenshot_dir='Screenshots';

seconds='60';

if [ ! -d "$screenshot_dir" ]; then

mkdir $screenshot_dir;

fi

while [ 1 ]; do

sleep $seconds;

(import -window root $screenshot_dir/screenshot-$(date +%M_%k_%d_%m_%Y|sed -e 's/^ *//').png) &

done
This script will take screenshot automatically to Screenshots/ directory every (1 min – 60 seconds)
You can also my downloads take_screenshot_every_60_secs_import.sh here
To use take_screenshot_every_60_secs_import.sh just issue the script inside xterm or gnome-terminal, after that simply use your computer as you normally would.
The script will take snapshots every minute and store all taken screenshots in Screenshots dir.
If you prefer to use scrot to take automatically the screenshots every lets say 5 minutes, you can use a script like:
screenshot_dir='Screenshots';

# 300 secs (5 mins)seconds='300';

if [ ! -d "$screenshot_dir" ]; then

mkdir $screenshot_dir;

fi

while [ 1 ]; do

sleep $seconds;

(scrot $screenshot_dir/'%Y-%m-%d_$wx$h.png') &

done
You can fetch take_screenshot_every_60_secs_scrot.sh here
The script using scrot is better in terms of efficiency, the system load scrot will put on your machine will be less.
Using some of this scripts will be handy if you need screenshots to Movies, Programs and favourite Free Software games.
Hope this is educative to someone 😉
Tags: Alt, Auto, bash shell script, Desktop, Draft, fedora, freebsd, GIMP, Gnome, gnu linux, handy one, hipo, How to, image manipulation, ImageMagick, import, import command, import image, import window, linux distributions, manipulation package, multiple, noah, package, png, quot, repositories, root, screen, screenshot, Screenshots, scrot, Shell, someone, SUSE, terminal, totem, type, Ubuntu, wx, xterm, year
Posted in FreeBSD, Linux, Linux and FreeBSD Desktop, System Administration, Various | No Comments »


