Posts Tagged ‘pain in the ass’
Wednesday, February 8th, 2023 
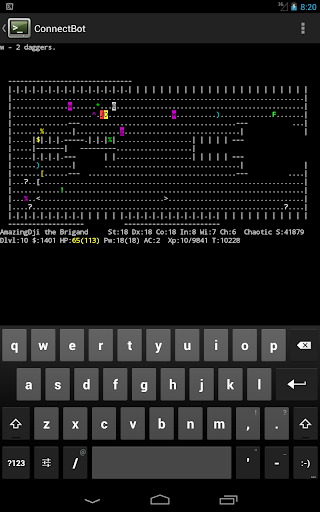
Since few months I've switched my old BLU r1 HD Phone (a great old low budget phone for its price) to a friend's iPhone 10 ( X ) who gifted it for me. Coming from Android world, everyone who has experience with it is a pain in the ass as some of the Apps, which are into Google's play store does not have the same equivalent into Apple's install Package manager tool AppStore. Some of the crucial tools which I was interested as a freshly new migrated user from Android to iPhone was to have a decent SSH / Telnet client and Terminal, with which I can easily connect to my Linux servers both home and work.
As Android Phone user, to connect and manage my SSH sessions I used most often some of the most popular Connectbot / SSHDroid / JuiceSSH.
On Android I've usually installed all of these tools but most frequently used Connectbot, which quickly become my favourite SSH client for Android over time.
The reasons why I really loved Connectbot and used it on Android OS in short:
- It is Completely free
- Ad-free
- Open-source (too bad not Free software but still step better)
- Copy and paste text between Applications
- Customizable interface (i.e. font size, keyboard layout, SSH auth agent, etc.)
I've seen some people used and preferred Termius but never myself really liked this client, as it was including some Advertisements or for don't remember why reason.
Switching to iOS mobile operating system, of course was quite a shock especially the moment I found out the standard loved SSH Remote Client programs are used are not available or have only a paid version. Thus it took me quite a while of a research and googling until I found some decent stuff.
Tried for a time with Termius as well but again, its Ads and lack of some functionality pissed me off, so I've moved on to Shelly.
Shelly is really not a bad tool but has limitation over the SSH sessions you can add and other limitations, which can only be unlocked with an "Upgrade", to its paid version, thus I decided after few weeks of attempts to make it my remote server management mobile tool for iPhone, I've dropped it off as well.
Then I found the Blink Shell App – Blink Shell is a professional, desktop grade terminal for iOS. As overall the tool is really great and is easy to use but again to have it used in its full power you need the paid version and until you pay for it every now and then you got interruption of your shell for some really annoying ads.
Thus even though I used it for a times this few tools with whom basicly you can do basic remote ssh / telnet session operations eventually, started looking for a better SSH Client Free alternative for iPhone Users.
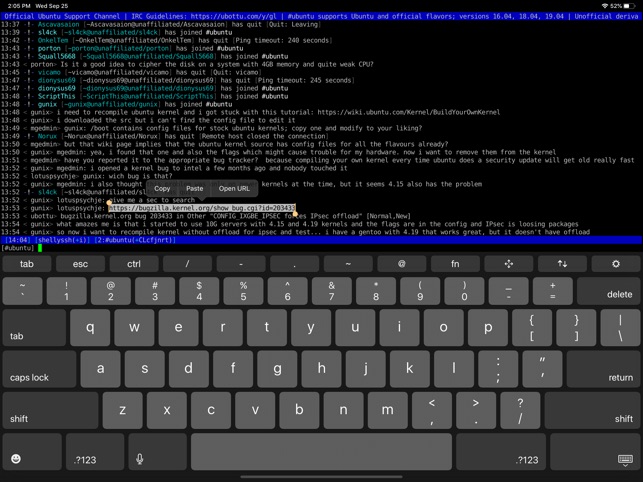
Then came a friend at home for a dinner my dear friend Milen (Static) and he show me iOS.
The moment I saw this tool I totally loved it, for its simplicity and its resemblance to a classical TTY Physical old Linux console I used back in the days and its ability to resemble easily any improved functionaltiy through simple screen (multiple session management) command tool or tmux.
Wait, what's iSH ? And why it is the Best SSH / Telnet client to manage your servers remotely on iOS Mobiles (iPhone and IPads) ?
iSH is a project to get a Linux shell environment running locally on your iOS device, using a usermode x86 emulator.
In other wors iSH is Linux emulator with busybox and a package ports for many of the standard Linux tools you get by simple apt-get / yum or if I have to compare you get via the MobaXterm's advanced apt-cyg (Cygwin packages) tool capabilities.
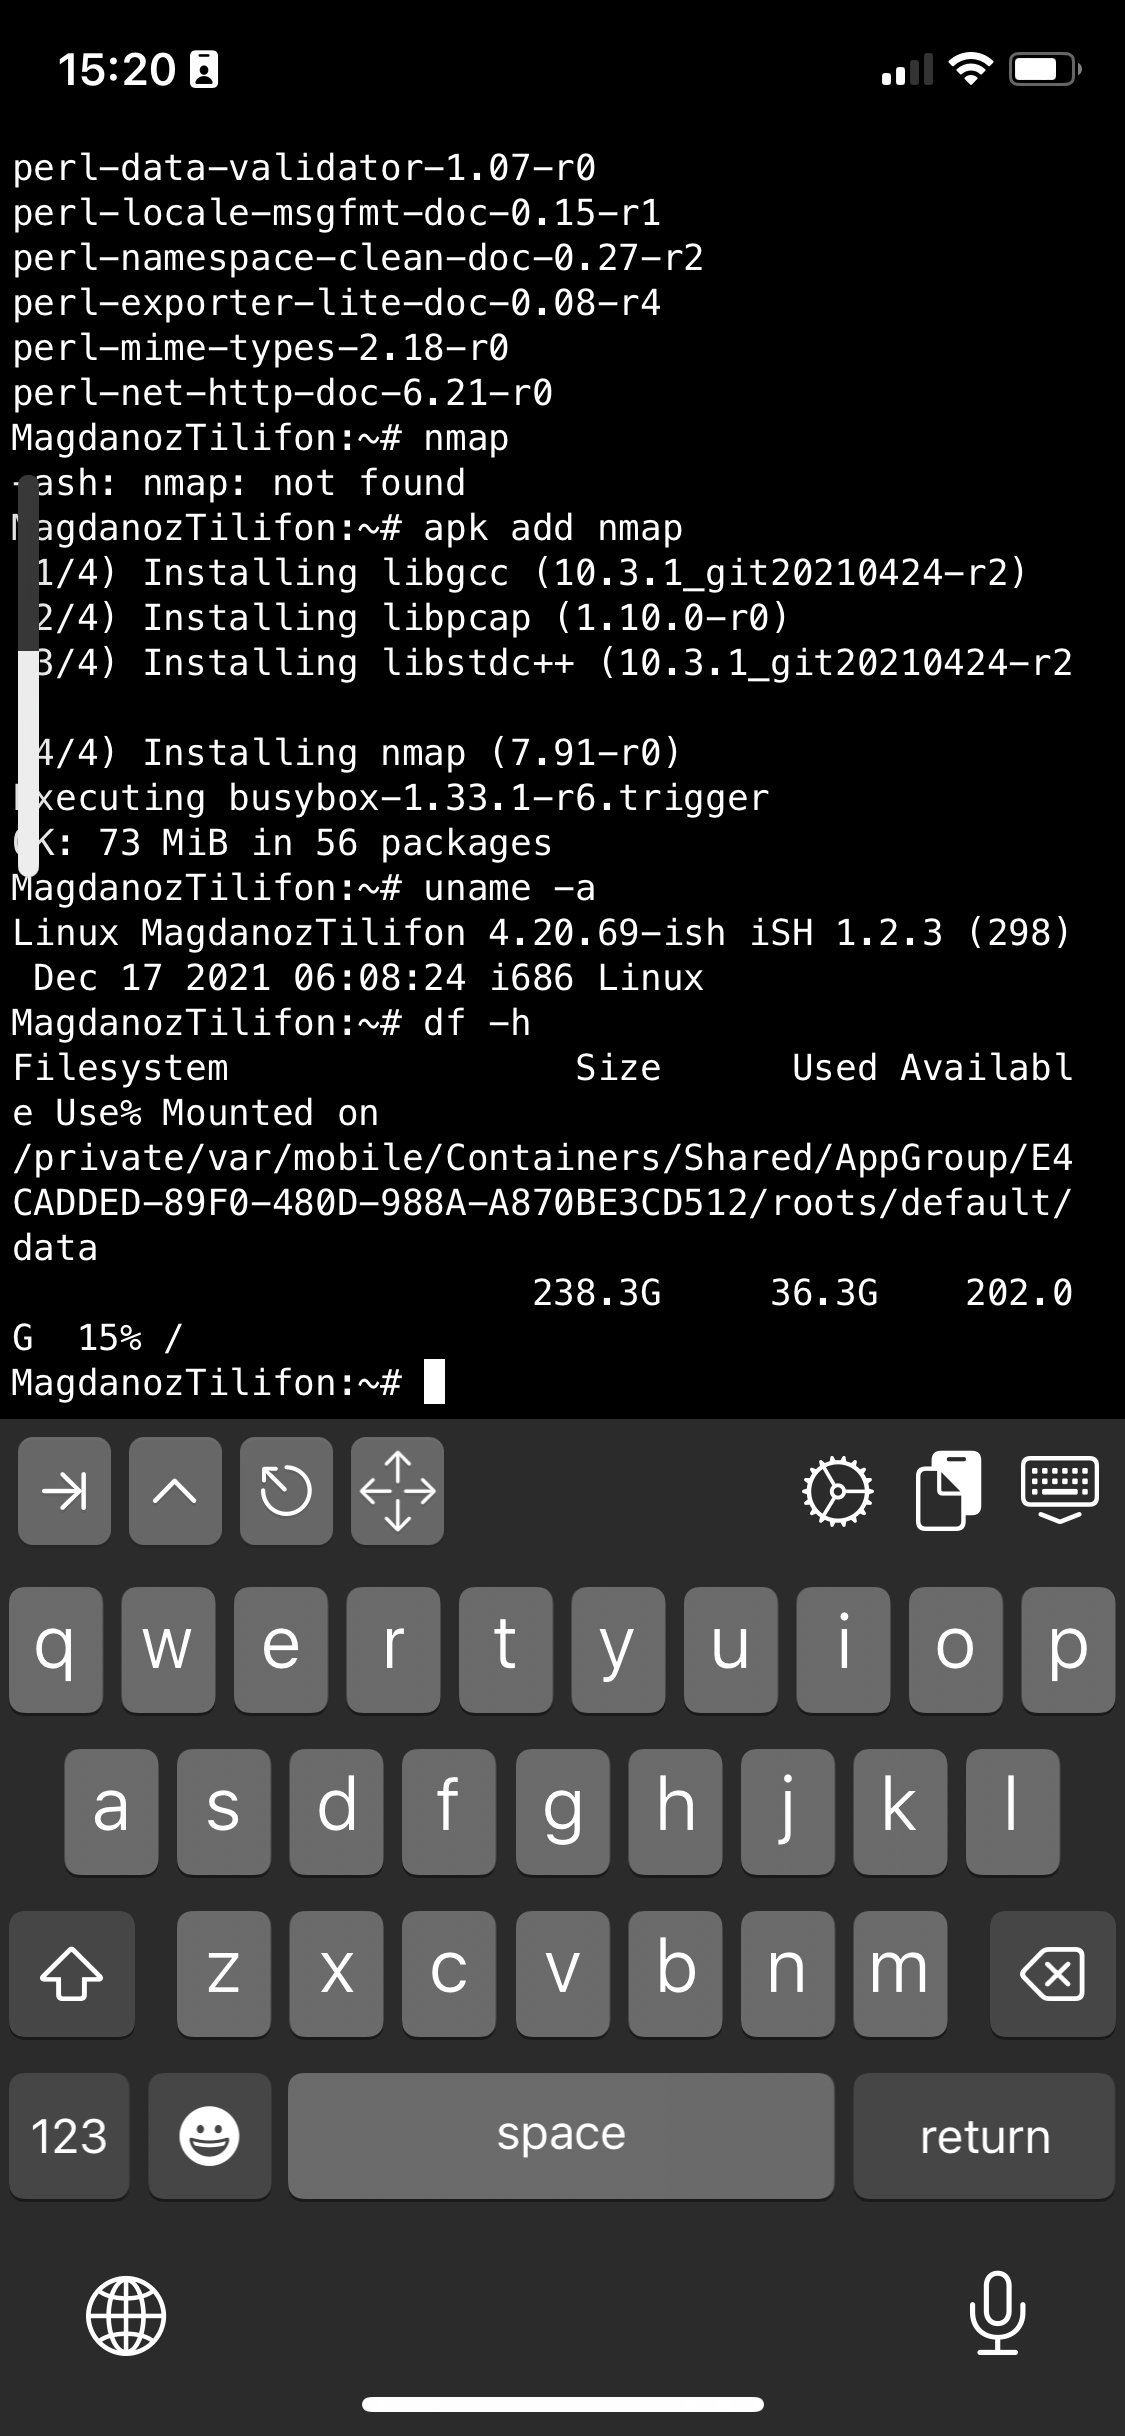
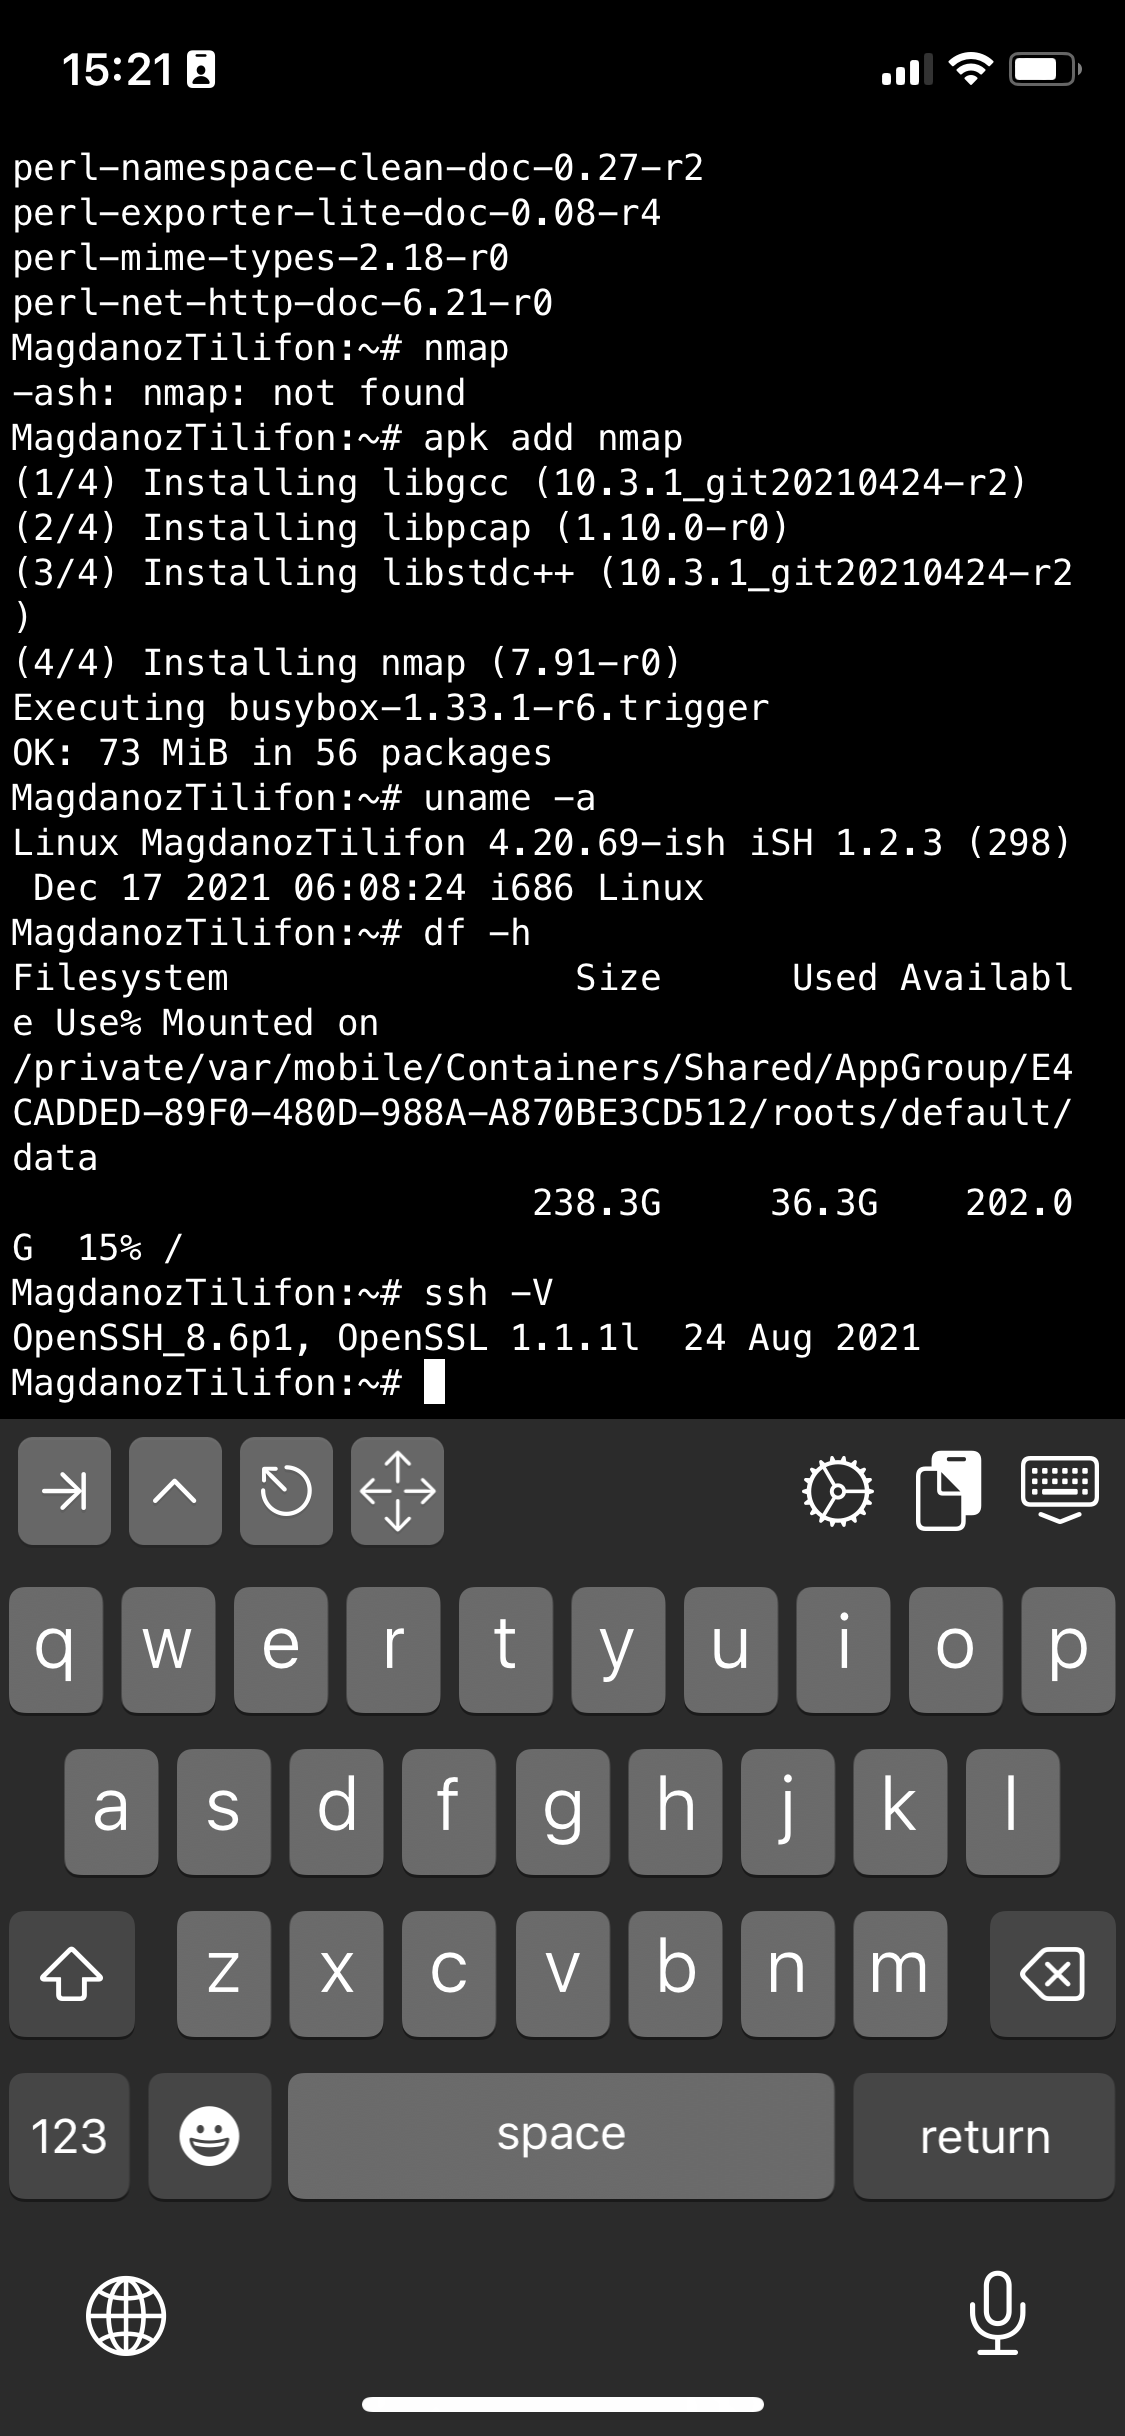
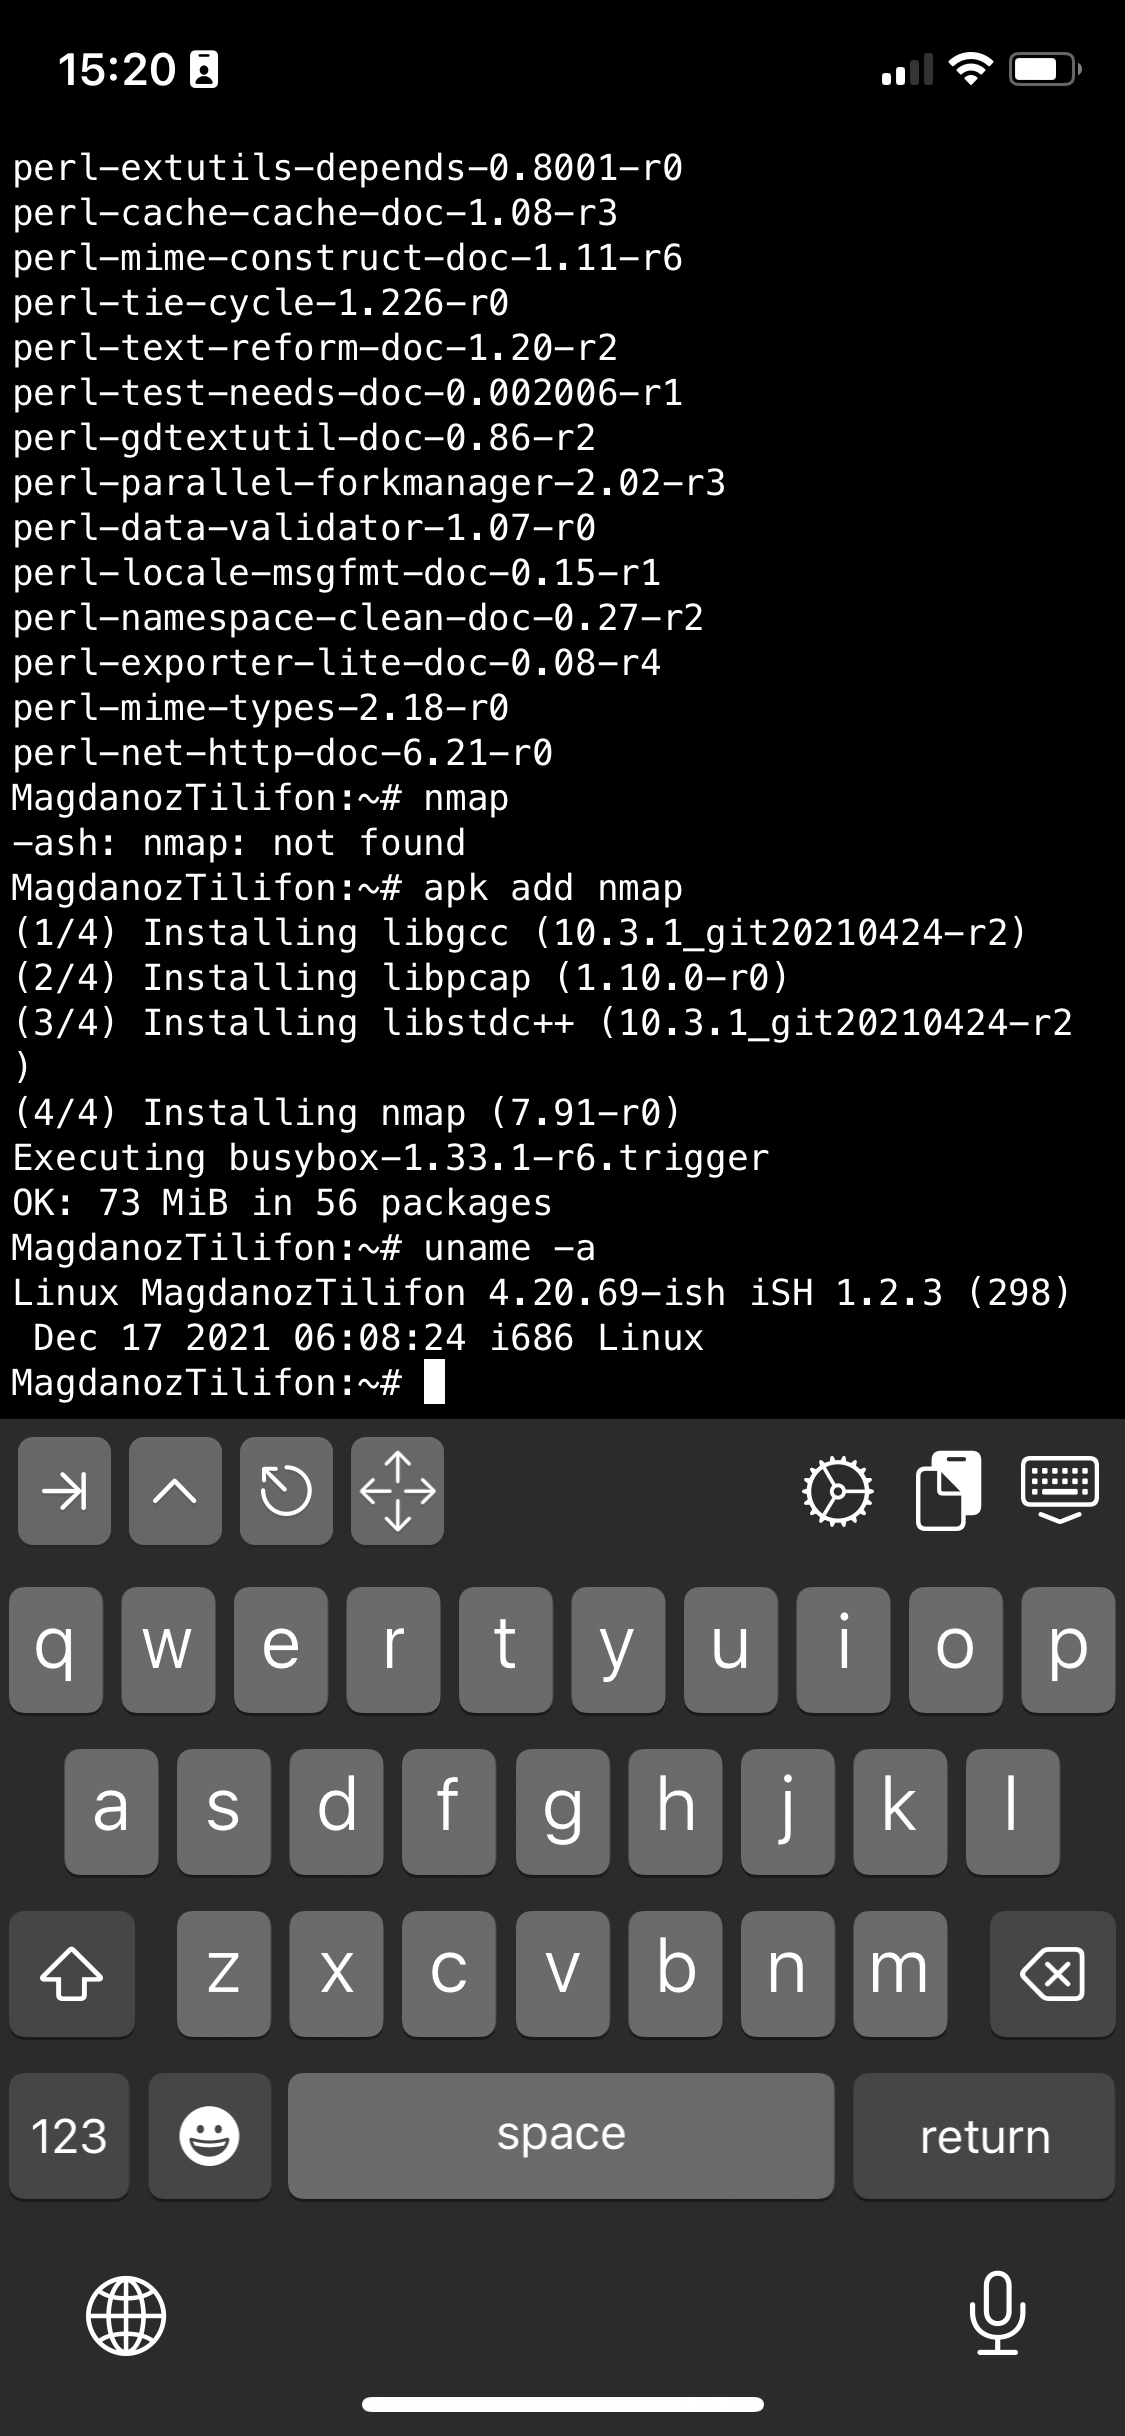
Once iSH is installed it comes with pre-installed apk command line package management tool, with which you can install stuff like openssh-client / screen / tmux / mc (midnight commander) etc. apk, is an apt like command like tool which uses as a basis for installing its packages Alpine Linux repositories.
Alpine Linux is perhaps little known as it is not one of these main stream disributions, such as Fedora or Ubuntu, but for those more concerned about security Alpine Linux is well known as it is a security-oriented, lightweight Linux distribution based on musl libc and busybox. What makes the Linux even more attractive and perhaps the reason why the iSH developers decided to use it as a basis for their iSH emulator is it being actively developed and its tightened security makes it a good compliment to the quite closed and security focused mobile platform iOS.
iSH is available straight from AppStore , so to use it install it and run it (it is really a great news that iOS does not require iphone to be jailbreak – ed, and it is an ordinary installable software straight from AppStore):
iSH, already comes with some of the standard programs you would expect in a Linux environment such as Vi, wget, zip / unzip, and tar.
However to fit it better for my use over ssh and improve its capabilities, as well as support and use multiple Virtual windows ssh, just like you do on a Linux xterm
run from ish shell:
# apk add openssh-client
# apk add screen
# apk add vim
# apk add mc
I also like to have a Midnight Commander and VIM Text editor installed out of the box to be able to move around in Ncurses interface through my iPhone.
Note that, just like most GNU / Linux distributions, iOS shell will run a normal bash shell.
From there on to use iSH as my default SSH client and enable my just installed GNU screen some Windowing beauty for readability whence I use the screen with multiple ssh logins to different servers as well make the screen Virtual consoles to have ability for scroll back and scroll up of console text to work, I do set up the following .screenrc inside my /home/iPhoneuser
The .screenrc to setup on the iSH to easify your work with screen is as follows:
# An alternative hardstatus to display a bar at the bottom listing the
# windownames and highlighting the current windowname in blue. (This is only
# enabled if there is no hardstatus setting for your terminal)
hardstatus on
hardstatus alwayslastline
hardstatus string "%{.bW}%-w%{.rW}%n %t%{-}%+w %=%{..G} %H %{..Y} %m/%d %C%a "
# Enable scrolling fix the annoying screen scrolling problem
termcapinfo xterm* ti@:te@
# Scroll up
bindkey -d "^[[5S" eval copy "stuff 5\025"
bindkey -m "^[[5S" stuff 5\025
# Scroll down
bindkey -d "^[[5T" eval copy "stuff 5\004"
bindkey -m "^[[5T" stuff 5\004
# Scroll up more
bindkey -d "^[[25S" eval copy "stuff \025"
bindkey -m "^[[25S" stuff \025
# Scroll down more
bindkey -d "^[[25T" eval copy "stuff \004"
bindkey -m "^[[25T" stuff \004
You can download the same .screenrc file from here straight with wget from the console:
# wget https://www.pc-freak.net/files/.screenrc
Run GNU screen manager
# screen
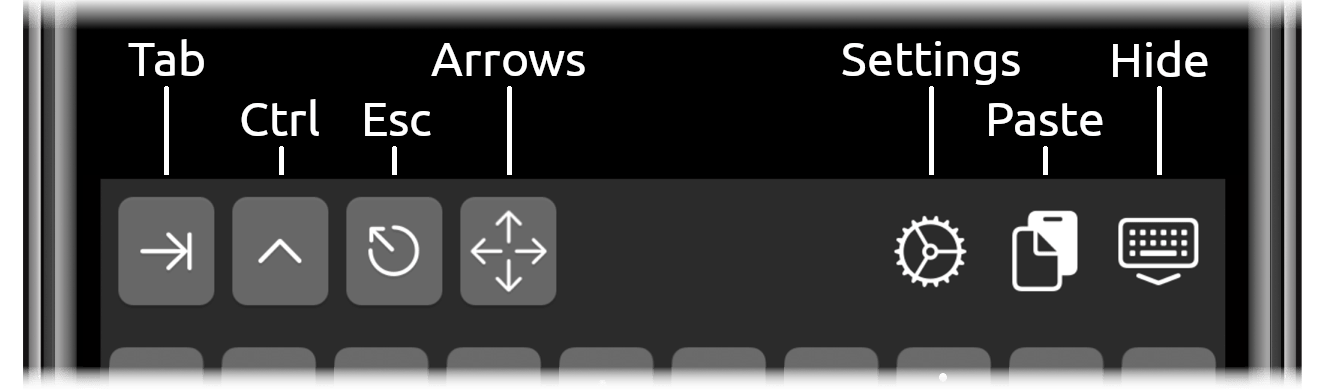
You will end up with a screen session, to open a new session for Virtual Terminal use virtual keyboard from ISH and Press
CTRL + A + C
To open other Virtual Windows inside screen just press CTRL + A + C as many times as you need it, each session will appear ina small window on the down corner as you can see in screenshot

To move across the Screen unnamed 3 Virtual Windows 0 ash 1 ash and 2 ash use the Virtual keyboard
for next WIndow use key combination:
CTRL + A + N (where + is just to indicate you have to press them once after another and not actually press the + 🙂 )
For Previous Window use:
CTRL + A + P
Or use CTRL + A and type
:number 3 (where number is the number of window)
The available iSH commands without adding any further packages which are part of the busybox install are as follows:
Available /bin/ directory commands:
arch ash base64 bbconfig busybox cat chgrp chmod chown conspy cp date dd df dmesg dnsdomainname dumpkmap echo ed egrep false fatattr fdflush fgrep fsync getopt grep gunzip gzip hostname ionice iostat ipcalc kbd_mode kill link linux32 linux64 ln login ls lzop makemime mkdir mknod mktemp more mount mountpoint mpstat mv netstat nice pidof ping ping6 pipe_progress printenv ps pwd reformime rev rm rmdir run-parts sed setpriv setserial sh sleep stty su sync tar touch true umount uname usleep watch zcat
Available /usr/bin/ commands:
awk basename beep blkdiscard bunzip2 bzcat bzip2 cal chvt cksum clear cmp comm cpio crontab cryptpw cut dc deallocvt diff dirname dos2unix du dumpleases eject env expand expr factor fallocate find flock fold free fuser getconf getent groups hd head hexdump hostid iconv id install ipcrm ipcs killall ldd less logger lsof lsusb lzcat lzma lzopcat md5sum mesg microcom mkfifo mkpasswd nc nl nmeter nohup nproc nsenter nslookup od passwd paste patch pgrep pkill pmap printf pscan pstree pwdx readlink realpath renice reset resize scanelf seq setkeycodes setsid sha1sum sha256sum sha3sum sha512sum showkey shred shuf smemcap sort split ssl_client strings sum tac tail tee test time timeout top tr traceroute traceroute6 truncate tty ttysize udhcpc6 unexpand uniq unix2dos unlink unlzma unlzop unshare unxz unzip uptime uudecode uuencode vi vlock volname wc wget which whoami whois xargs xxd xzcat yes
If you're a maniac developer you can even use iSH, to do some programs development with vim with Python / Perl or PHP as these are available from the Alpine repositories and installable via a simple apk add packagename for security experts nmap and some security tools are also available but unfortunately not everything is still working as this project is in active development and iOS has some security limitations if OS is not ROOTED 🙂
Hence some of the packages you can install via apk manager will be failing actually.
There is a list of What works and what doesn't still on iSH on the project github wiki check it out here.
There is much more funny stuff you can do with it, and actually my quick research on how people use iSH on their phones lead me to some Videos talking about iOS and Ethical hacking etc, but I'll stop here as I dont have the time to dig deeper to it.
If you know or have some good use of iSH or some other goody you are using as a hack please share in comments.
Enjoy ! 🙂
Tags: Alpine Linux, available, BLU, busybox, combination, coming, command tool, copy, everyone, friend, home, network, package management, pain in the ass, phone, price, screen, screen session, screenshot, security, ssh, stuff, times, tool, use, wget, work, working, www
Posted in Mobile Phone Apps & Games, System Administration | No Comments »
Wednesday, February 3rd, 2010 I realized today, that because my varnish serves incoming connections to my
apache port a really annoying problem appears.
I mean in my httpd-access.log everytime I get some visit from the Net, the
incoming IP address logged in the Apache log is originating from 127.0.0.0
e.g. (localhost). That’s a real pain in the ass, cause it prevents me from
adequately tracking visitors countries and their networks.
Therefore to fix that and configure varnish to always log my original visitors
IPs to the apache log I had to follow instructions described in.
How can I log the client IP address on the backend? in the Varnish Cache FAQ
Here I will include step by step explanation how I practically implemented
the solution as explained in the FAQ on my FreeBSD.
First I had edit:
/usr/local/etc/varnish/default.vcl
The following is currently my default.vlc file content:
backend default {.host = "127.0.0.1";.port = "8080";}sub vcl_recv {# Add a unique header containing the client addressremove req.http.X-Forwarded-For;set req.http.X-Forwarded-For = client.ip;# [...]}
Next I had to add:
varnishd_config="/usr/local/etc/varnish/default.vcl"
to my /etc/rc.conf
And then modify my:
/usr/local/etc/apache2/httpd.conf
and include:
LogFormat "%{X-Forwarded-For}i %l %u %t "%r" %>s %b "%{Referer}i" "%{User-Agent}i"" varnishcombined
as well as:
CustomLog /var/log/httpd-access.log varnishcombined
to all my VirtualHosts.
Finally it’s required to restart both varnishd and apache
pcfreak# /usr/local/etc/rc.d/varnishd restartpcfreak# /usr/local/etc/rc.d/apache2 restart
That’s all folks!
Tags: apache2, Configuring, CustomLog, default, ip, pain in the ass, port 8080, req, usr, VirtualHosts
Posted in System Administration | No Comments »
Thursday, March 25th, 2010 I faced the task of generating official Validated SSL Certificates by in mydaily duties as a System Administrator at cadiaholding.com . Though generating self-signedSSL certificate is comparatively easy task. It was a pain in the ass setting Apache version 2.2.9-10+lenny6to correctly serve pages through https:// protocol over openssl version 0.9.8g-15+lenny6.I’ll try to go through the whole process of Generating the certificate in order to help some other Debianusers out there to face less setbacks in such a simple task as installing a Trusted SSL Certificate issued(bought) by RapidSSL. Even though this article will mostly deal with SSL certificate issued by RapidSSL,it should be not a problem to apply this methodogy with Verisign or some of the other Geotrust issuedSecure Socket Layer certificates.
In generating the Validated certficate I used enom which is a domain name,ssl certificates, email and hosting company whole-saler.
Fron emon’s website after logging in and using the web interface, there are two major things required to fill inin order to issue your Trusted SSL certificate.
1. Fill in in a form a CSR file, this is usually generated on the Linux server using the openssl.
To issue the CSR file required by Enom use the following commands:
a. First we generate an DES3 RSA encrypted key which we will use next to generate the opeensl CSR file required by ENOM.
debian:~# /usr/bin/openssl genrsa -des3 -out www.domain.com.key 2048

Enter pass phrase for www.domain.com.key:
You’ll be required to fill in a pass-phrase that will be later be required to fill in before Apache servers starts or restarts,so make sure you fill something you either remember or you keep the password stored in a file.
You have to change also the www.domain.com.key in accordance with your domain name.
Now as we already have a proper generated DES3 RSA key afterwards it’s necessery to generate the CSR file with the openssl command line frontend.
So here is how:
debian:~# /usr/bin/openssl req -new -key /home/hipo/www.domain.com.key -out /home/hipo/www.domain.com.csr
Again in the above example change all the paths and file names as you wish.
It’s necessery that the end user fill in a number of questions related to the Certificate Signing Request.
Herein I’ll list what kind of prompts will emerge after executing the above command:
Enter pass phrase for /home/hipo/www.domain.com.key:

You are about to be asked to enter information that will be incorporated

into your certificate request.

What you are about to enter is what is called a Distinguished Name or a DN.

There are quite a few fields but you can leave some blank

For some fields there will be a default value,

If you enter '.', the field will be left blank.

-----

Country Name (2 letter code) [AU]:

State or Province Name (full name) [Some-State]:

Locality Name (eg, city) []:

Organization Name (eg, company) [Internet Widgits Pty Ltd]:

Organizational Unit Name (eg, section) []:

Common Name (eg, YOUR name) []:

Email Address []:

Please enter the following 'extra' attributes

to be sent with your certificate request

A challenge password []:

An optional company name []:
Note that you’ll hav eto fill in the pass phrase previously entered during the generation of the www.domain.com.key file.
In case if you’d like to read more thoroughly on the subject of howto create a Certificate Signing Request or (CSR) as we called it on multiple times, you can read About Certificate Signing Request (CSR) Generation Instructions – Apache SSL more in depth here
2. Hopefully following the above instructions you’ll now have a file named www.domain.csrJust open the www.domain.scr and copy paste it’s content to the ENOM website CSR * webform.
3. Further on select your Webserver type on Enom’s website:In our case we have to select Apache + ApacheSSL
4. What follows next is filling in your company contact information This is also required for proper certificate generation, you have to think twice before you fill in this data, take a note this can’t be changed later on without issuing a brand SSL new certificate.
Apart from the 3 major above requirements to fill in Enom there are some few more radio buttons to use to make some selections according to your personal preferences, however I won’t take time to dig in that and I’ll leave this to you.
After all the above is fulfilled you’ll have to submit your certificate details and choose an email address to which you will receive in a minute a RapidSSL Certificate Request Confirmation
Following a link from the email, will show you some basic information about the certificate about to be generated. That’s your final chance to cancel the issued Trusted Certificated.
If you’re absolutely sure the information about to enter the certificate is correct then you’ll have to follow a link and approve the certificate.
You’ll be informed that you’ll receive your certificate either through Certifier website (e.g. Enom’s website) or via another email.
I thought it’s more probable I receive it via email but anyways I was wrong. More thank 4 hours has passed since the certificate was issued and is available via Enom’s interface but I haven’t received nothing on my mail.
Therefore my friendly advice is to check about your brand new shiny Trusted Certificate on Emom’s website. I had mine ready in about 10 minutes after the CSR was issued.
Assuming that you’ve succesfully obtained the SSL Trusted certificate from RapidSSL what follows is setting up the certificate.
Initially I tried using documentation from RapidSSL website called Installing your SSL Certificate / Web Server Certificate / Secure Server Certificate from RapidSSL.com
I tried to configure one of my Virtualhost as shown in their example inserting in my /etc/apache/sites-available/www.domain.com file, few directives within the VirtualHost something like the shown below
SSLEngine on

# domain.com.crt cointains the Trusted SSL certificate generated and obtained by you from RapidSSL

SSLCertificateFile /etc/apache2/ssl/www.domain.com.crt

# www.domain.com.key contains the file used to generate the CSR file as described earlier in this post

SSLCertificateKeyFile /etc/apache2/ssl/www.domain.com.key
It is also possible insetad of using the SSLCertificateFile and SSLCertificateKeyFile directvies directives in Apache config to use:
Another alternative is to use
SSLCertificateFile /etc/ssl/certs/your-domain-name.crt
SSLCertificateKeyFile /etc/ssl/certs/your-domain-name.key
SSLCACertificateFile /etc/ssl/certs/gd_bundle.crt
The key file is the one generated earlier on the server and handed to the SSL regisrar, the files:
your-domain-name.crt and gd_bundle.crt files are provided by RapidSSL or from whatever SSL registrater the SSL was purchased.
After trying the above configuration and restarting apache with:
/etc/init.d/apache2 restart
Apache failed to start, it might be helpful to somebody out there the error I had in my apache error.log:
The error.log red the following:
[warn] RSA server certificate is a CA certificate (BasicConstraints: CA == TRUE !?)
After some 30 minutes or an hour of Googling on the error I came to the conclusion that the error is caused, becauseApache is supposed to work with .PEM files instead of the classical .CRT and .KEY files asnormally approached in most of the other Unix operating systems.
It took me a bit more of reading on the internet to find out that actually the .pem files so widely adopted in Debian simply contain both the www.domain.com.key file and the www.domain.com.crt key simply pasted one after another, this I also observed from the default Apache self-signed certificate that I believe comes with debian /etc/apache2/ssl/apache.pem .
So I copied both the content of my www.domain.com.key and www.domain.com.crt and store it in one file:
/etc/apache2/ssl/www.domain.com.pem
Also the following configuration:
SSLEngine on

SSLCertificateFile /etc/apache2/ssl/www.domain.com.pem
had to go in your
/etc/apache2/sites-enabled/www.domain.com
Last thing that’s left is to restart your Apache;
/etc/init.d/apache2 restart
Apache will prompt you for your certificate password entered by you during the www.domain.com.key generation. Type your password and with a bit of luck and hopefully with God’s help you’ll be having a Trusted Certificate on your webserver.
Last step is to check if the certificate is okay accessing your domain https://www.domain.com.
Well this is the end of the article, hope you enjoy.If you do please leave your comments, any corrections are also welcomed 🙂
Tags: administrator, apache servers, apache version, apache2, certficate, certificate, Certificates, com, company, contact, csr, DES, des3, domain, domain name, email, emon, enom, file, generation, geotrust, hipo, Hopefully, hosting company, howto, information, key, key file, lenny, linux server, methodogy, multiple times, necessery, official, openssl, pain in the ass, password, phrase, rapidssl, RSA, setbacks, socket layer, ssl certificate, system administrator, usr bin, verisign, web interface, whole saler, www
Posted in Computer Security, System Administration, Web and CMS | 30 Comments »
Wednesday, July 16th, 2014 
On most if not all modern GNU / Linux distributions, Apache webserver comes preinstalled with mod_speling.
What mod_speling does is it tries to find and serve files and directories for non-existing (404 return code) urls with a similar name to passed URL. Other thing mod_speling does is it serves files case-insensitive, even though the UNIX / Linux filesystems are built to understand files case-sensitive.
mod_speling is a very useful module especially when files are being pushed (synchronized) to Apache visible from web document folder from operating systems like Windows whose filesystem doesn't store files case sensitive.
Let me give you a small example on M$ Windows a create file NewFile.html, NEWFILE.HTML, NeWfIlE.Html etc. are one and the same file newfile.html and not 3 different files like it is usually on UNIX / Linux filesystems.
If you happen to migrate old static Websites from Microsoft Internet Information Services (IIS) to UNIX / Linux based hosting. Often Html coders which create websites on Windows platform doesn't respect in website hyperlinks case-sensitive, because anyways Windows FS is case-insetive, thus moving the website to Linux host with Apache the website/s will end up with many 404 error pages, whose fixing for big static websites will be a real pain in the ass.
Also there might be need for mod_speling module enabled, for PHP / Python / Perl websites developed on MS Windows platform and tested on Windows host and then officially to be deployed on Linux.
Note that mod_speling name as a funny thing as actually the module is also converting mis-pelled / mis-typed Apache URLs:
If for example, someone tried to link to your website from a forum mistyping the URL address with mod_speling the mistyped URL could still be handled to open the real existing URL:
Lets say you have URL:
http://your-domain.com/files/what-Ever-fle.php
and the actual URL is:
http://your-domain.com/files/what-Ever-file.php
mod_speling will make Apache scan in /files/ for any files with similar name to what-Ever-fle.php and will open any similar matched file name, preventing you from the normal 404 error and therefore often serving exactly what it has to. Of course such a behavior could be unwanted in same cases for CMSes, which depend on 404 error code for proper operating, so be very sure when configuring mod_speling that this is exactly what you need.
mod_speling can be also useful sometimes for Search Engine Optimization – SEO, as it will show less 404 pages to Crawler search engine bots.
1. Enable mod_speling module on Debian GNU / Linux and Ubuntu
Enabling mod_speling in Apache in Debian / Ubuntu etc. debian based Linuxes is done with either creating symlink from /etc/apache2/mods-available/speling.load to /etc/apache2/mods-enabled/speling.load :
ln -sf /etc/apache2/mods-available/speling.load /etc/apache2/mods-enabled/speling.load
Or by using a2enmod – Debian apache module enabling script:
a2ensite sitename
To enable mod_speling mis-speling resolve feature config directive is:
CheckSpelling on
To disable case sensitivity – as I said earlier helpful for migrations from Microsoft Windows hosts to Linux, use directive:
CheckCaseOnly on
To enable both use:
<IfModule mod_speling.c>
CheckCaseOnly on
CheckSpelling on
</IfModule>
Enabling mod_speling case-insensitivity and fixing mistypes in URL could be done from .htaccess, for any <Directory> (vhost) with enabled .htaccess with
AllowOverride All
To enable it for default set host in new Apache install place it in /etc/apache2/apache2.conf and /etc/apache2/sites-enabled/000-default
Then as usual to make the configuration changes take affect, restart Apache:
/etc/init.d/apache2 restart
2. Enablig mod_speling on CentOS, RHEL and Fedora Linux
Most of RPM based Linux distributions have already mod_speling by default in Apache, so there will be no need to explicitly enable the module within HTTPD.
To check whether mod_speling is already enabled in httpd issue:
/usr/sbin/httpd -M |grep -i mod_speling
If you don't get no output from command this means the module is not enabled. This is the case with CentOS Linux 6.5 for example …
To enable mod_speling on Apache level add in /etc/httpd/conf/httpd.conf
LoadModule speling_module modules/mod_speling.so
and restart webserver
/etc/init.d/httpd restart
If you get instead
/usr/sbin/httpd -M |grep -i mod_speling
speling_module (shared)
Then it is already loaded in HTTPD to enable the module for default domain add to /etc/httpd/conf/httpd.conf – within (<Directory "/var/www/html">),
<IfModule mod_speling.c>
CheckCaseOnly on
CheckSpelling on
</IfModule>
Or if you want to make it active for specific directories within /var/www/html/whatever-dir use either new <Directory ..> directive within Apache config, or enable .htaccess processing with AllowOverride All and place them in .htaccess . For complete mod_speling reference check on Apache's official website
Tags: apache2, config, Debian Ubuntu, doesn, filesystem, fix, httpd, Make Apache, NEWFILE, Often Html, operating systems, pain in the ass, php, script, url, website, Windows
Posted in PHP, Web and CMS | No Comments »
Friday, July 26th, 2013  In Office home network, there is a Windows XP computer which is spending all his official work time in facebook.
Hanging in facebook makes this social network freak work quite inefficient so something had to be done immediately … and guess who had to do it …
Usually I do facebook filtering via iptables rules directly from Linux NAT router, but filtering facebook https (port 443 traffic) is real pain in the ass and moreover facebook has a bunch of hosts so filtering from Linux i-net router is not always best solution. In this specific case the Linux router deliving internet to the Win host was also having complete routing so filtering with iptables wasn't so easy.
To save myself from loosing few hours trying to discover why I can't manage to filter facebook from Linux router, checked online if it possible to filter facebook using standard Windows method.
It turns out on Windows computer it is possible filter facebook by simply mapping all Facebook main hosts to localhost (127.0.0.1) using hosts map file. In my case Win computer was running Windows XP, however on All Windows XP / Vista / 7 and 8, default location of hosts file is in:
C:\WINDOWS\system32\drivers\etc\hosts
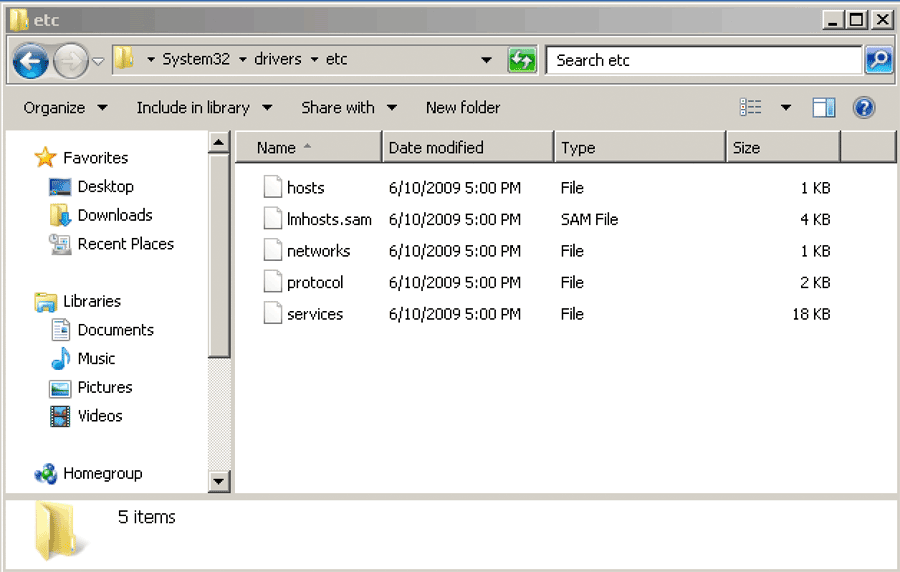
Therefore I used Windows Explorer, navigated to C:\WINDOWS\system32\drivers\etc\ copied hosts file to Desktop, edited with Notepad and placed at the end of it following lines:
  # Block Facebook

127.0.0.1 api.facebook.com

127.0.0.1 connect.facebook.net

127.0.0.1 facebook.com

127.0.0.1 www.facebook.com

127.0.0.1 graph.facebook.com

127.0.0.1 profile-b.xx.fbcdn.net

127.0.0.1 s-static.ak.facebook.com

127.0.0.1 static.ak.connect.facebook.com

127.0.0.1 static.ak.facebook.com

127.0.0.1 static.ak.fbcdn.net

127.0.0.1 www.fbcdn.com

127.0.0.1 static.facebook.com

127.0.0.1 www.static.ak.connect.facebook.com

127.0.0.1 www.login.facebook.com

127.0.0.1 login.facebook.com
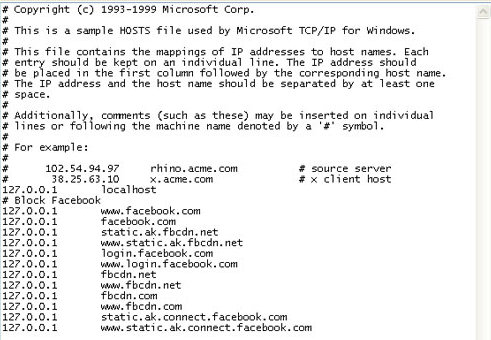
Then copied the new modified hosts files from Desktop back to C:\WINDOWS\system32\drivers\etc
Following same logic, its possible to disable access to any host on the Internet. There are even some software like SpyBot which does by default change Windows default hosts file with pre-mapped well known spammer / spyware / malware hosts to prevent viruses and spyware to download more of themselves.
Finally to make Windows re-read new hosts file I had to restart the PC, and Voila! Facebook access was cut 🙂
Tags: default location, facebook, freak, inet, linux router, local network, nat router, network ip, notepad, organization network, pain in the ass, windows explorer, windows features, windows hosts file, work time
Posted in Everyday Life, System Administration, Various, Windows | No Comments »
Tuesday, July 24th, 2012 
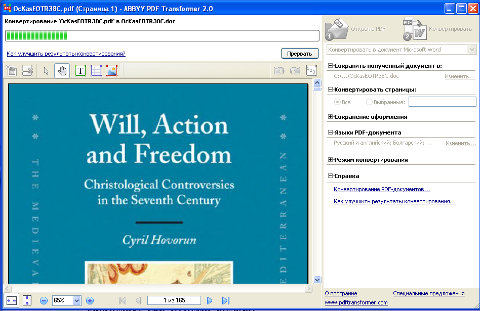
I had to convert Adobe PDF file to Microsoft Word ( .doc) file on Microsoft Windows OS for a friend. There is plenty of software available to convert PDF to DOC on Windows, as well as few web-site services claiming to convert correcly PDF to DOC. Converting PDF to DOC is easy and can be done with Open Office, however the reverse process is a real pain in the ass. I tried a dozen of free web serviecs to convert an ancient Latin writting PDF to DOC but none of them couldn’t properly convert it. Failing with the web services as a tool to convert, I’ve turned to seeking a tool that will do the trick. After trying few PDF to DOC converters which failed to produce a properly structed edittable DOC from the PDF file, I’ve come across ABBYY PDF Transformer 2.0. Abbyy PDF Transformer finally did it …
I’ve tried hard to look for a free software good PDF to DOC converter alternative for Windows but it seems as of time of writing this post there is no GPLed free software that does properly convert PDFs to MS WORD DOC ….
Using Abbyy PDF Transformer 2.0 is a piece of cake all I had to do is select the PDF file (pressing Open PDF) and then click on Convert (in right bottom corner). Below is a shot of Abby PDF transformer in action.
Tags: action, Adobe, Auto, bottom corner, Click, Convert, converter, converters, Converting, converting pdf to doc, DOC, Draft, file, free software, GPLed, microsoft windows os, microsoft word doc, ms windows 2000, ms word doc, Open, open office, open pdf, pain, pain in the ass, pdf to doc, pdf to doc converter, pdf transformer, PDFs, piece of cake, plenty, shot, software, time, tool, transformer, transformer 2, Vista, web site services, windows 2000, Word
Posted in Everyday Life, Various, Windows | No Comments »
Thursday, April 5th, 2012 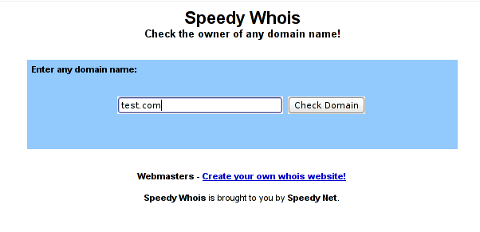
I've been planning to run my own domain WHOIS service, for quite sime time and I always postpone or forgot to do it.
If you wonder, why would I need a (personal) web whois service, well it is way easier to use and remember for future use reference if you run it on your own URL, than wasting time in search for a whois service in google and then using some other's service to get just a simple DOMAIN WHOIS info.
So back to my post topic, I postpopned and postponed to run my own web whois, just until yesterday, whether I have remembered about my idea to have my own whois up and running and proceeded wtih it.
To achieve my goal I checked if there is free software or (open source) software that easily does this.
I know I can write one for me from scratch, but since it would have cost me some at least a week of programming and testing and I didn't wanted to go this way.
To check if someone had already made an easy to install web whois service, I looked through in the "ultimate source for free software" sourceforge.net
Looking for the "whois web service" keywords, displayed few projects on top. But unfortunately many of the projects sources was not available anymore from http://sf.net and the project developers pages..
Thanksfully in a while, I found a project called SpeedyWhois, which PHP source was available for download.
With all prior said about project missing sources, Just in case if SpeedyWhois source disappears in the future (like it probably) happened with, some of the other WHOIS web service projects, I've made SpeedyWhois mirror for download here
Contrary to my idea that installing the web whois service might be a "pain in the ass", (like is the case with so many free software php scripts and apps) – the installation went quite smoothly.
To install it I took the following 4 steps:
1. Download the source (zip archive) with wget
# cd /var/www/whois-service;
/var/www/whois-service# wget -q https://www.pc-freak.net/files/speedywhois-0.1.4.zip
2. Unarchive it with unzip command
/var/www/whois-service# unzip speedywhois-0.1.4.zip
…
3. Set the proper DNS records My NS are using Godaddy, so I set my desired subdomain record from their domain name manager.
4. Edit Apache httpd.conf to create VirtualHost
This step is not mandatory, but I thought it is nice if I put the whois service under a subdomain, so add a VirtualHost to my httpd.conf
The Virtualhost Apache directives, I used are:
<VirtualHost *:80>
ServerAdmin hipo_aT_www.pc-freak.net
DocumentRoot /var/www/whois-service
ServerName whois.www.pc-freak.net
<Directory /var/www/whois-service
AllowOverride All
Order Allow,Deny
Allow from All
</Directory>
</VirtualHost>
Onwards to take effect of new Webserver configs, I did Apache restart
# /usr/local/etc/rc.d/apache2 restart
Whenever I have some free time, maybe I will work on the code, to try to add support for logging of previous whois requests and posting links pointing to the previous whois done via the web WHOIS service on the main whois page.
One thing that I disliked about how SpeedyWHOIS is written is, if there is no WHOIS information returned for a domain request (e.g.) a:
# whois domainname.com
returns an empty information, the script doesn't warn with a message there is no WHOIS data available for this domain or something.
This is not so important as this kind of behaviour of 'error' handling can easily be changed with minimum changes in the php code.
If you wonder, why do I need the web whois service, the answer is it is way easier to use.
I don't have more time to research a bit further on the alternative open source web whois services, so I would be glad to hear from anyone who tested other web whois service that is free comes under a FOSS license.
In the mean time, I'm sure people with a small internet websites like mine who are looking to run their OWN (personal) whois service SpeedyWHOIS does a great job.
Tags: Auto, code, contrary, domain, domain web, domain whois, download, Draft, free software, goal, google, idea, info, information, installation, minute, mirror, nbsp, open source software, pain in the ass, personal domain, personal web, programming, project, project developers, quot, scratch, scripts, Search, service projects, sime, software, software php, someone, SpeedyWHOIS, Thanksfully, time, top, topic, Virtualhost, wasting, wasting time, way, web service, web whois, wget, while, whois, whois web, yesterday
Posted in Everyday Life, System Administration, Web and CMS | 5 Comments »
Thursday, March 29th, 2012

After a long time of inavailability, finally TeamViewer 7 for GNU / Linux is out!
Here is the short TeamViewer 7 Linux release note :
In our TeamViewer download area you will now find TeamViewer 7 for Linux.
The final version includes a selection of new features for Linux, e. g. an integrated screenshot feature and the possibility of saving individual connection settings per computer.
You can now establish cross platform connections with other computers running version 7 and hold online meetings and presentations with up to 25 participants.
We wish you best continued success with TeamViewer!
Well, guys it was about time, even later than that… Until now I've so many times experienced troubles with Windows machines which I had to administrate remotely and they only had a TeamViewer 7 installed (a real, real pain in the ass).
The issue comes cause TeamViewer 6 is incompatible with 7 and just until very recently only TV 6 for Linux was available, so trying to access a 7 install directly from Linux was impossible.
Hence to access TeamViewer 7 Windows install, I had to use either a fresh Windows copy with TeamViewer 7 installed or a Virtual Machine like (Qemu, VirtualBox) with Windows version installed in it.
Often back then, when I had to fix remotely a Windows machine behind a firewall, I had to instruct the machine owners to replace the TeamViewer 7 with TeamViewer 6 in order to be able to easily access the remote host from my Debian Linux.
I still remember, it was quite a stuggle to find a link to a Windows .exe install file for TeamViewer 6.
Now thanksfully, TeamViewer guys are starting to make it easier for the user who would for some reason want to stick to older TV version.
I've noticed on TeamViewer's website there is already a new TeamViewer download page offering for download all the old teamviewer version – 1.x, 2.x, 3.x, 4.x, 5.x, 6.x
One example, where old teamviewer release is useful is if you want to run teamviewer on older hardware or old OS (MS Windows 98 or old Linux distro).
I've made a mirror of teamviewer 6 for Debian / Ubuntu amd 32 and 64 bit versions along with all the OS available TeamViewer version 6 and 7, for the sake of preserving it if one day link to old versions of Teamviewer disappear from their website.
Here are the TeamViewer mirrored files:
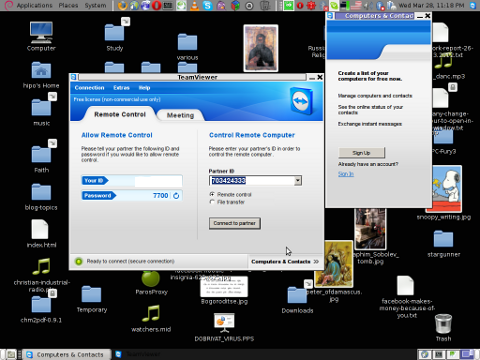
Below you see a screenshot of teamviewer 7 running on my Debian Squeeze 🙂
It is great teamviewer produced a Linux working application, however if you run it you realize just like the previous releases TeamViewer is not natively supposed (compiled) to run on GNU / Linux OS but uses wine (windows emulator) to launch through…
Instead of porting the application to be natively for the Linux distros once again with this new release, teamviewer developers just "hacked" it to run on top of windows emulation. Though this is working its performance, is probably a bit degraded and it depends on having install on the Linux host a bunch of useless packages which wine depends on.
Besides that even if it "works" on Linux , TeamViewer has still non-free software essense. I still use it because unfortunately, I don't know of a better remote access program capable to connect to servers behind NAT / machines located behind a tight firewalled routers.
If only (I knew of?) a TeamViewer free software / open source equivalent …
I will be glad to hear if someone know a (free software / open source) TeamViewer like program able to access remote hosts with no a real (public inet) IP address?P.S.: By similar TV program I don't mean VNC, UltraVNC and this kind of other VNC derivative programs but mean close TeamViewer alternative.
Tags: Auto, connection, connection settings, copy, cross platform, debian linux, download, download area, Draft, exa, feature, firewall, gnu linux, host, inavailability, new features, online meetings, page, pain in the ass, platform, possibility, qemu, reason, screenshot, software, stuggle, TeamViewer, time, tv 6, tv version, Ubuntu, Virtual, virtual machine, VirtualBox, windows copy, windows machine, windows machines, windows version, wine, xOne
Posted in Linux and FreeBSD Desktop, News, System Administration | No Comments »
Wednesday, January 17th, 2007 Aloha. Still here. Two days ago I ran Heroes 3 under my FreeBSD box successfully, there was a terrible bug in fullscreen mode which needed fix I’ve used the loki’s site patch to patch the heroes 3 start binary with xdelta. The loki installer was a terrible pain in the ass I used my l337test sk!llZ :} to be able to patch the binary by hand. About the last post yes I was desperate still not good still living. Today I was on exam again a failure probably, nothing new.
As I often used to say in the fast if something starts bad then it overs bad too. See my life show this very well. I’m suffering terrible and still waiting for something to set me free to happen. What would be the turning point? Will there be turning point at all? No idea. If God is such good and powerful as he said in the bible and his promises are true then he will deliver me and set me free on a good ground. Still hoping … Prodigy — Speedway, else the earth is probably his favourite experiment.
Tags: bible, earth, experiment, failure, favourite, freebsd, fullscreen, god, ground, hand, heroes, idea, life, llZ, loki, Mode, pain, pain in the ass, post, Prodigy, promises, show, site, something, speedway, test, turning, turning point, xdelta
Posted in Everyday Life | No Comments »
Thursday, April 5th, 2007 It was a day full of waiting. The Admin/tech support personel in sofia is a real pain in the ass. I waited half a day for a simple debian base install. The guy installed debian over already installed freebsd on a server we sent destined for colocation in evolink. The machine is great dual 3ghz Xeon with 3 x 70 gb SCSI discs. In 4:00 o’clock I received a mail with username and password of the server, but the system was unaccessible for 1 more hour. I got really nervous I received tons of calls from the boss, our project Manager, Vladi the PHP programmer. I logged to the server in 5:00 and configured apache with mysql upto 10:00 o’clock then did a little walk with nomen in the central park and drinked one beer per capita. I had to meet Static and Amri in 6:00 o’clock but I was busy configuring the new rack so I missed a great oportunity to have fun with old friends. ORDER has to come back to Bulgaria, today or even he maybe is already in Varna. I’m quite impatient to see him! In the afternoon I went to some spiritual downfalls but now Thanks to God I’m alive and well. The pozvanete site already points to the new rack so I hope the machine would be able to serve it’s goal perfect. This will be made clear in the morning. Soon I’m going to bed. Glory be to God for fulfilling me with his love and sustaining my life and keeping me from evil! END—–
Tags: admin, apache, bed, Beer, capita, central park, clock, colocation, configured, end, freebsd, fun, gb scsi, glory be to god, half a day, love, machine, mail, nomen, old friends, oportunity, order, pain in the ass, password, personel, php programmer, programmer, rack, sofia, spiritual, Static, support, support personel, upto, username, x 70, Xeon
Posted in Everyday Life | No Comments »


