Posts Tagged ‘ports’

Install TorrentFlux Bit Torrent Web management interface on Debian / Ubuntu Linux

Tuesday, July 15th, 2014

torrent flux logo
Torrentflux
is web based, feature-rich BitTorrent download manager.
Torrentflux is a must have installed server software for anyone who does regular torrent downloads and want to access the downloads from anywhere on the internet.

TorrentFlux is a PHP based BitTorrent controller that runs on a web
 server. It can manage all of your BitTorrent downloads from anywhere
 through a convenient and easy-to-use web interface.
 .
 TorrentFlux uses a MySQL database to manage the downloads.

 TorrentFlux enables you to run BitTorrent downloads unattended on a monitor-less or remote server 24 hours a day, while still maintaining complete control from any web browser. Now you can control your  downloading on your firewall, or keep up with downloads while on  vacation. It uses the BitTornado client to download files, and also  requires a web server with PHP.
 
 Some of the Torrentflux features:

   * Upload Torrents via URL or File Upload
   * Start, Stop, and Delete Torrents with ease
   * Advanced Torrent start options (ports, speeds, etc.)
   * Multi-user interface
   * RSS Feeds, download Torrents files with a click
   * Run several torrents at once
   * View Download Progress of all torrents at a glance
   * View drive space at a glance
   * View Torrent file meta information
   * Built-in User management and Security
   * Private Messaging
   * Themes (selectable per user)
   * Upload History


Before installing Bittorrent you will need to have a running version of Debian, Ubuntu or any other debian derivative (though it can easily be run on any Linux distro). To install AMP (Apache MySQL Server, PHP) you can follow first part of my previous article Installing Usual PHP Apache MySQL for new Debian GNU / Linux installs.

So what for is TorrentFlux Useful?
Torrenflux is precious and must have if you have to access filtered torrent from outside of your homecountry and you have a running server already in your home country in that I was using TorrentFlux to access Bulgarian Zamunda.Net Torrent Tracker from Holland and was downloading first movies from the Bulgarian Torrent Tracker to my Fluxbox installed on my Dobrich home router and then used FTP to transfer movies to the Netherlands. Talking about many people choose to also install VSFTP and use it together with Torrentflux …

1. Install TorrentFlux and its dependencies (BitTornado, Bittorrent, Zip, Unzip, Bzip etc.) the "Debian Way"


On my Debian 7 Wheezy home machine  I run

apt-get install –yes bzip2 php5-gd php5-cli unrar-free grep python net-tools mawk wget unzip cksfv vlc-nox uudeview python-crypto libxml-simple-perl libxml-dom-perl libdbd-mysql-perl bittorrent bittornado


a) Install TorrentFlux the Debian Way

apt-get install –yes torrentflux


You will be prompted with a coule of screens, to set a new MySQL database user and password and SQL database, as well as offered to restart Apache to make Torrentflux accessible like as on below screenshots.
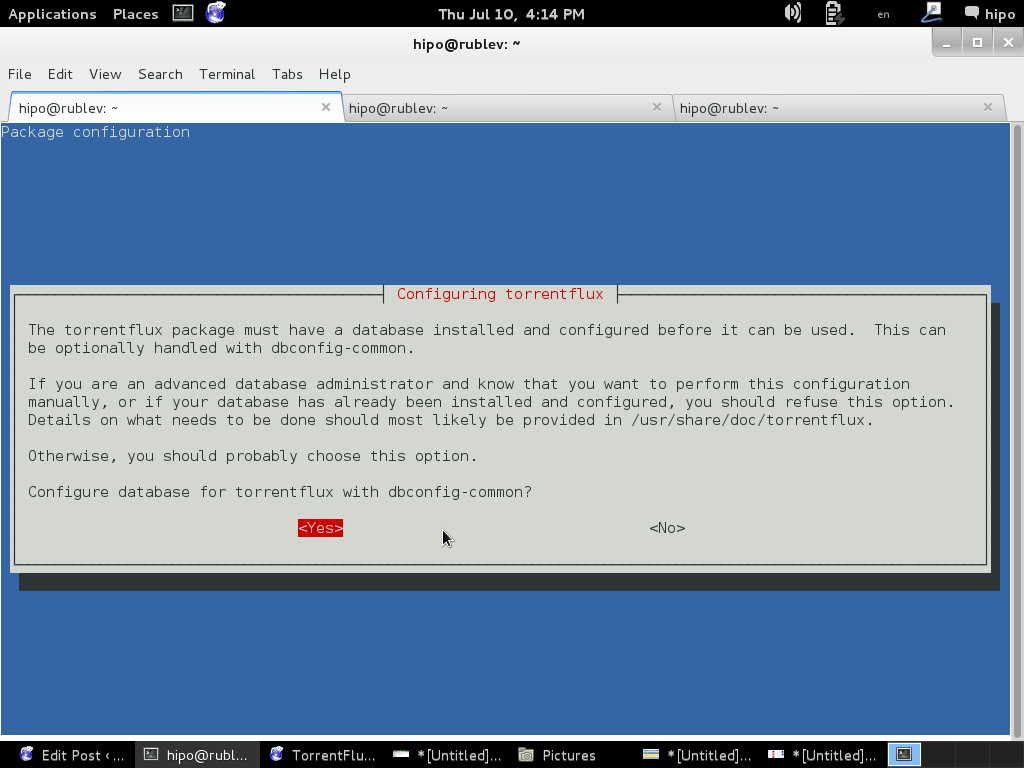
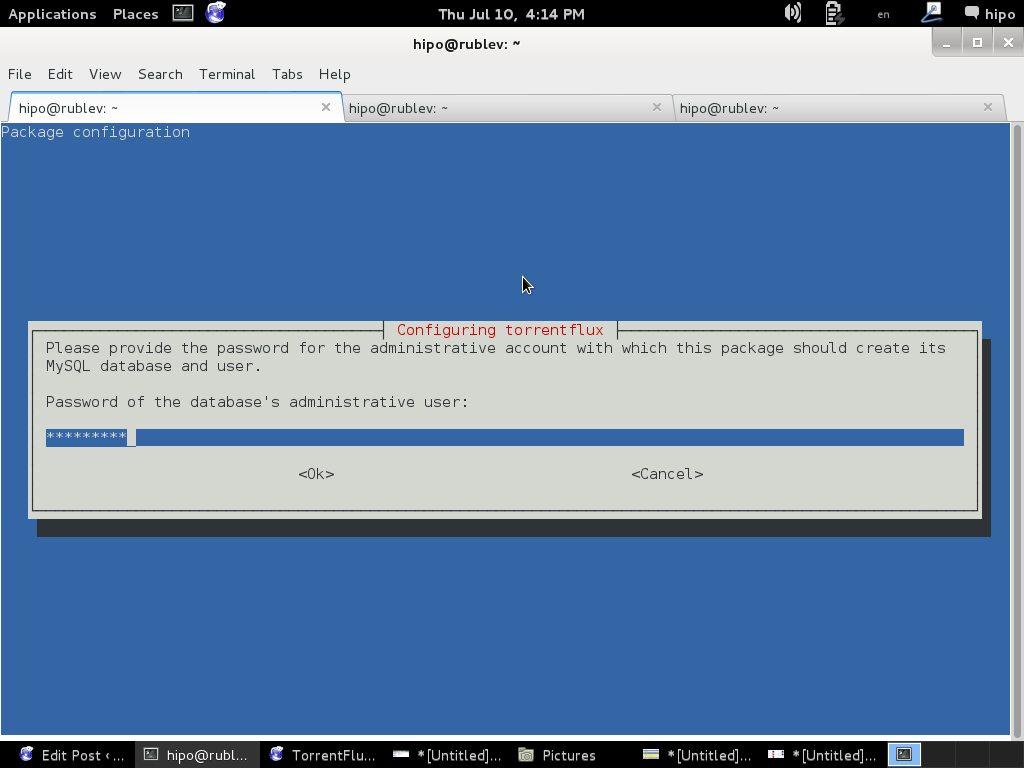
configuring-torrentflux-debian-linux-screenshot-2


configuring-torrentflux-debian-linux-screenshot 3

configuring-torrentflux-debian-linux-screenshot-4

To make new installed torrentflux accessible from web you will either have to configure it via some new Apache VirtualHost or make a symbolic link to /usr/share/torrentflux/www :
 

cd /var/www/
ln -sf /usr/share/torrentflux/www/ torrentflux


That's all you're all done to access torrentflux either access it via your default configured webserver domain name or via localhost if you're logged in to same pc where installing.

http://www.your-domain.com/torrentflux

or

http://127.0.0.1/torrentflux
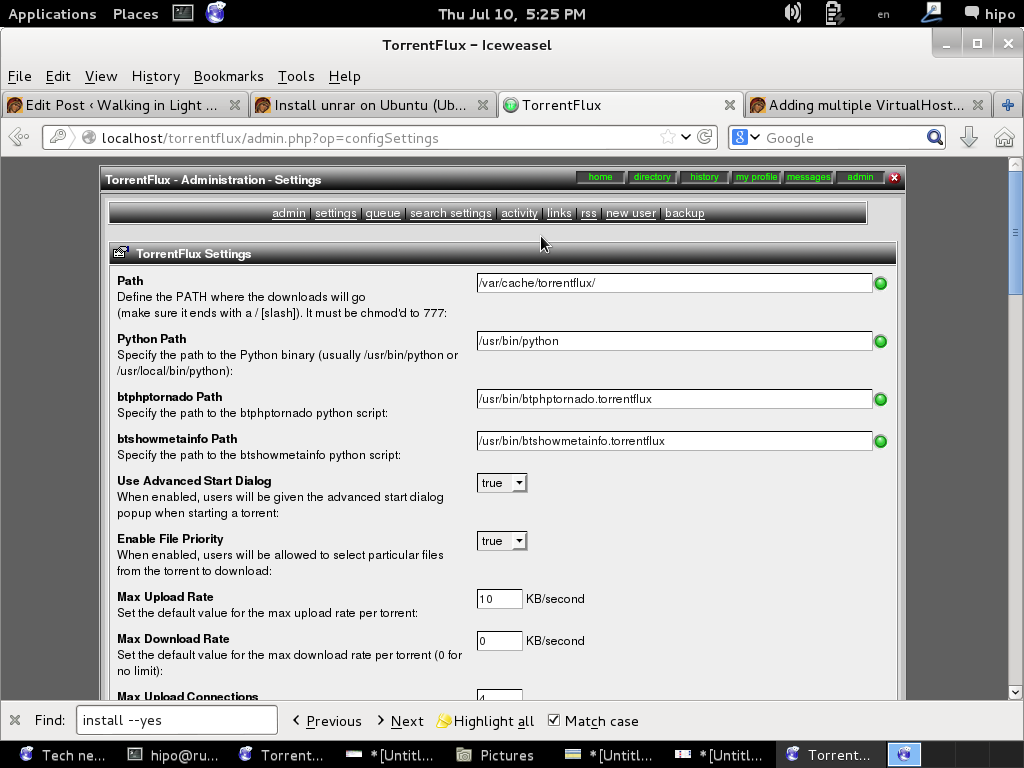
configuring-torrentflux-after-first-login-in-web-debian-linux

2. Install latest Torrentflux version from source

Alternatively if you want to have the latest version (because the Debian version is part of the stable distribution is a little bit outdated you will have to fetch Torrentflux-b4rt and unarchive it:

cd /tmp/
wget http://download.berlios.de/tf-b4rt/torrentflux-b4rt_1.0-beta2.tar.bz2

tar -xjf torrentflux-b4rt_1.0-beta2.tar.bz2

mv torrentflux-b4rt_1.0-beta2 /opt/torrentflux

Then to make torrentflux visible from web server I had to create a symbolic link to installation directory:
 

ln -sf /opt/torrentflux/html /var/www/torrentflux

For further initial configuration its necessery to make Torrentflux config writtable by www-data (the user with which Apache is running on Debian).


chown -R www-data:www-data /var/www/torrentflux/inc/config/


Next it its required to create somewhere download folder where TorrentFlux will keep downloaded Torrents

mkdir /var/lib/torrentflux


Apache HTTP server will have to have write ther:

chown -R www-data:www-data /var/lib/torrentflux


If you already haven't restarted Apache earlier in installing TorrentFlux pre-requirements, you will have to do it now:


/etc/init.d/apache2 restart


As TorrentFlux depends on its MySQL backend, we need to also create manually TorrentFlux database username and a password
 

export SQL_DB='torrentflux';
TFLUXSQL_USERNAME='torrentflux';
TFLUX_SQL_PWD='any-secret-password';

echo "CREATE DATABASE IF NOT EXISTS $SQL_DB DEFAULT CHARACTER SET utf8 DEFAULT COLLATE utf8_unicode_ci"
| mysql –user=root –password

echo "GRANT ALL PRIVILEGES ON $SQL_DB.*
TO $TFLUXSQL_USERNAME@localhost
IDENTIFIED BY $TFLUX_SQL_PWD;" | mysql –user=root –password


Substitute with your Database, Username and Password above shell variables – $SQL_DB, $TFLUX_USERNAME, $TFLUX_SQL_PWD

To configure TorrentFlux access it in browser:

http://your-domain.com/torrentflux
 

By accessing it for a first time, you will redirected to setup.php, in case something goes wrong and yuo're not redirected (probably some mod_rewrite issues add setup.php to url – e.g., acess –

http://your-domain.com/torrentflux/setup.php

I will not enter details, about Web config, because everything there is pretty clear.

Just in short – you will have to now choose:

Choose Database
Choose Database Information of database (put in the exact name of TorrentFlux databse previously created)
Uncheck the box for "Create new database"
Choose as a download location upper created directory – /var/lib/torrentflux

If you get an error on software dependencies screen for missing unrar – just install it
VLC may show an error as well, that's not a problem because VLC is probably not to be used.
Finally after completion of all, you will get an error that setup.php cannot be deleted.
 

To prevent, someone to re-configure it through http://your-domain/torrentflux/setup.php URL remove setup.php


rm /var/www/torrentflux/setup.php

To prevent someone rewrite anything in config file from web we have to revert back config/ folder not to be writable by Apache


chown -R root:root /var/www/torrentflux/inc/config/

Now in browser to access torrentflux type:


http://ipofyourbox/torrentflux

/torrentflux should redirect you to login.php if for some reason it doesn't type it manually in URL.

First account you will login is the super user account, you can allow multiple users to use it by adding multiple accounts.
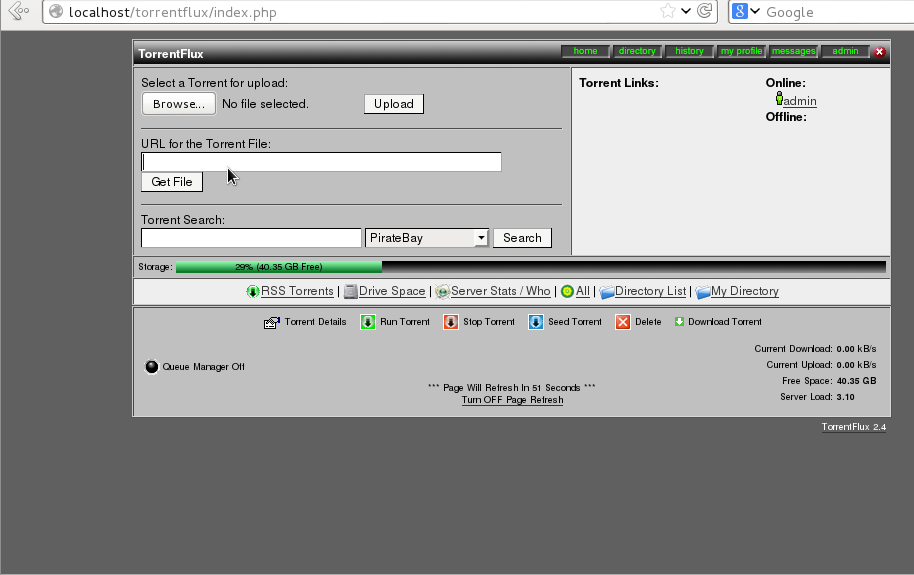
torrentflux-install-on-debian-ubuntu-gnu-linux-web-management-torrent-interface

As you will see there is plety of configuration options to play with.

You will definitely want to look in Server Page, some very important page to look is the Transfer Page – from there you can adjust the bandwidth of your connection on 100Mbit network this would be 12500 – to use the maximum possible connection provided by your ISP set the max bandwidth to 0. You have the option to also set a default bittorrent client, by default this will be bittornado.


If you have troubles downloading from TorrentTrackers make sure your router is configured to forward port 49160 to 49300

Now if you have a lot of storage create accounts also for your friends and enjoy torrentflux 🙂


How to create ssh tunnels / ssh tunneling on Linux and FreeBSD with openssh

Saturday, November 26th, 2011

ssh-tunnels-port-forwarding-windows-linux-bypassing-firewall-diagram
SSH tunneling
allows to send and receive traffic using a dedicated port. Using an ssh traffic can have many reasons one most common usage reason is to protect the traffic from a host to a remote server or to access port numbers which are by other means blocked by firewall, e.g.: (get around firewall filtering)
SSH tunneling works only with TCP traffic. The way to make ssh tunnel is with cmds:

host:/root# ssh -L localhost:deshost:destport username@remote-server.net
host:/root# ssh -R restport:desthost:localport username@remote-server.net
host:/root# ssh -X username@remote-server.net

This command will make ssh to bind a port on localhost of the host host:/root# machine to the host desthost:destport (destination host : destinationport). Important to say deshost is the host destination visible from the remote-server.net therefore if the connection is originating from remote-server.net this means desthost will be localhost.
Mutiple ssh tunnels to multiple ports using the above example commands is possible. Here is one example of ssh tunneling
Let’s say its necessery to access an FTP port (21) and an http port (80), listening on remote-server.net In that case desthost will be localhost , we can use locally the port (8080) insetad of 80, so it will be no necessery to make the ssh tunnel with root (admin privileges). After the ssh session gets opened both services will be accessible on the local ports.

host:/home/user$ ssh -L 21:localhost:21 -L 8080:localhost:80 user@remote-server.net

That’s all enjoy 😉

swap_pager_getswapspace: failed, MySQL troubles on FreeBSD 7.2 cause and solution

Tuesday, May 3rd, 2011

Every now and then my FreeBSD router dmesg ( /var/log/dmesg.today ) logs, gets filled with error messages like:

pid 86369 (httpd), uid 80, was killed: out of swap space
swap_pager_getswapspace(14): failed
swap_pager_getswapspace(16): failed
swap_pager_getswapspace(11): failed
swap_pager_getswapspace(12): failed
swap_pager_getswapspace(16): failed
swap_pager_getswapspace(14): failed
swap_pager_getswapspace(16): failed
swap_pager_getswapspace(8): failed

Using swapinfo during the swap_pager_getswapspace(16): failed messages were logged in, I figured out that definitely the swap memory over-use is the bottleneck for the troubles, to find this I used the command:

freebsd# swapinfo
Device 1K-blocks Used Avail Capacity Type
/dev/ad0s1b 49712 45920 3792 92% Interleaved

After some investigation, I’ve figured out that the MySQL server is causing the kernel exceeded swap troubles.

My current MySQL server version is installed from the ports tree, whether I’m using the bsd port /usr/ports/databases/mysql51-server/ and it appears to work just fine.

However I have noticed that the mysql-server is missing a my.cnf file!, which means the mysql server is running under a mode with some kind of default configurations.

Strangely in the system process list it appeared it is using a default my.cnf file located in /var/db/mysql/my.cnf

Below you see the paste from the ps command:

ps axuww freebsd# ps axuww | grep -i my.cnf | grep -v grep
mysql 7557 0.0 0.1 3464 1268 p1 I 12:03PM 0:00.01 /bin/sh /usr/local/bin/mysqld_safe --defaults-extra-file=/var/db/mysql/my.cnf --user=mysql --datadir=/var/db/mysql --pid-file=/var/db/mysql/pcfreak.pidmysql 7589 0.0 5.1 93284 52852 p1 I 12:03PM 0:59.01 /usr/local/libexec/mysqld --defaults-extra-file=/var/db/mysql/my.cnf --basedir=/usr/local --datadir=/var/db/mysql --user=mysql --pid-file=/var/db/mysql/pcfreak.pid --port=3306 --socket=/tmp/mysql.sock

Nevertheless it appeared the sql server is running the file /var/db/mysql/my.cnf conf was not existing! This was really weird for me as I’m used to have the default my.cnf from my previous experience with Linux servers!

Thus the next logical thing I did was to create my.cnf conf file in order to be able to have a proper limiting configuration for the sql server.

The FreeBSD my.cnf skele files are found in /usr/local/share/mysql/, here are the 4 files one can use as a starting basis for further configuration of the mysql-server.

freebsd# ls -al /usr/local/share/mysql/my-*.cnf
-r--r--r-- 1 root wheel 4948 Aug 12 2009 /usr/local/share/mysql/my-huge.cnf
-r--r--r-- 1 root wheel 20949 Aug 12 2009 /usr/local/share/mysql/my-innodb-heavy-4G.cnf
-r--r--r-- 1 root wheel 4924 Aug 12 2009 /usr/local/share/mysql/my-large.cnf
-r--r--r-- 1 root wheel 4931 Aug 12 2009 /usr/local/share/mysql/my-medium.cnf
-r--r--r-- 1 root wheel 2502 Aug 12 2009 /usr/local/share/mysql/my-small.cnf

I have chosen to use the my-medium.cnf as a skele to tune up, as my server is not high iron one e.g. the host I run the mysql is a (simple dual core 1.2Ghz system).

Further on I copied the /usr/local/share/mysql/my-medium.cnf to /var/db/mysql/my.cnf e.g.:

freebsd# cp -rpf /usr/local/share/mysql/my-medium.cnf /var/db/mysql/my.cnf

As a next step to properly tune up the default values of the newly copied my.cnf to my specific server I used the Tuning-Primer MySQL tuning script

Using tuning-primer.sh is really easy as all I did is download, launch it and follow the script suggestions to correct some of the values already in my.cnf

I have finally ended up with the following my.cnf after using tuning-primer.sh to optimize mysql server to work with my bsd host

Now I really hope the shitty swap_pager_getswapspace: failed errors would not haunt me once again by crashing my server and causing mem overheads.

Still I wonder why the port developer Alex Dupre – ale@FreeBSD.org choose not to provide the default mysql51-server conf with some kind of my.cnf file? I hope he had a good reason.

End of Management Games / Lectures

Wednesday, April 16th, 2008

Today was the last day of the lectures with Joop Vinke. Here is how my day passed. I woke up at 9:00, washed my teeth dressed combed my hair and went to the police station to look for our quarter police officer. I need to renew my personal ID card because it has been expired already for 4 years already. Thanks God everything went smoothly in the police station. After that I went to school we had lectures with Joop Vinke. After the school I went home and played around with my FreeBSD system. I succesfully upgraded gnome 2.20 to 2.22.

Using the binary packages from

http://www.marcuscom.com/tb/packages/7-STABLE-FreeBSD/gnome/. I’m trying to upgrade gnome from source for already almost 3 weeks with portmanager. After all of the required ports rebuilded still gnome wasn’t functioning, so in order to make it working I downloaded packages from http://www.marcuscom.com/tb/packages/7-STABLE-FreeBSD/gnome/ and ran a little loop with

for i in *; do pkg_add -vf $i; done


to make all the .tbz files install I did that yesterday night today at the afternoon everything was installed and gnome ran just fine I only had to link few libraries because they were searched on a different places. All works just fine now I only have to rebuild few of my games because they’re now linked to an old libraries. In the evening we went out with Javor for a coffee. As very often we went to the fountain we had a nice talk and then we went to his apartment to watch a film. He recommended a film called 1984 and we watched that. My impression is that this film is totally psychodelic and freaky, but still interesting to see. After I went home I went to see my grandma and now I’m home tired on a few steps of my bed 🙂 I should also mention that today I upgraded clamav on 3 of the servers I maintain. It seems there are few configuration options which changed in the new clamav release (0.93). It was an easy day as a whole if we don’t count my physical infirmity.

END—–

How to fix “The function split() is deprecated in PHP 5.3” on FreeBSD

Saturday, May 28th, 2011

If you’re installing some PHP based CMS/blog like (Joomla or WordPress) or some kind of template and suddenly you stumble on a error:

Deprecated: Function split() is deprecated in /usr/local/www/websitedomain/templates/youbizz/html/modules.php on line 78

In order to fix that the file which spits the error message, in my case modules.php needs to be modified and the split php function has to be substituted with explode on every occuring place.

I experienced this error on FreeBSD 7_2 with php version 5.3.5 installed from ports.
This simple fix works fine.

How to fix php “Fatal error: Class ‘SimpleXMLElement’ not found” and “Fatal error: Class ‘JLoader’ not found” on FreeBSD

Tuesday, June 21st, 2011

One of the contact forms running on a FreeBSD server configured to work on top of Apache+MySQL suddenly stopped working.

The errors that appeared on the webpage during a page request to the form url was:

Fatal error: Class 'SimpleXMLElement' not found in /var/www/joomla/plugins/system/plugin_googlemap2_helper.php on line 2176 Fatal error: Class 'JLoader' not found in /var/www/joomla/plugins/libraries/loader.php on line 161

As you see in the output the website which was causing the issues was running a Joomla version 1.5.23 Stable configured with RSForm!ver 1.5.x (as a contact form solution) and Google Maps version 2.13b plugins.

The Google Map from Google Maps plugin and the RSform were configured to appear on one physical configured article in Joomla and seemed to work just until now. However yesterday suddenly the error messages:
Fatal error: Class ‘SimpleXMLElement’ not found
Fatal error: Class ‘JLoader’ not found

came out of nothing, it’s really strange as I don’t remember doing any changes to either Joomla or the PHP installation on this server.
There is one more guy who has access to the Joomla installation which I suspect might have changed something in the Joomla, but this scenario is not very likely.

Anyways as the problem was there I had to fix it up. Obviously as the error message Fatal error: Class ‘SimpleXMLElement’ not found reported the server php simplexml was missing!

Just to assure myself the php simplexml extension is not present on the server I used the classical method of setting up a php file with phpinfo(); in it to check all the installed php extensions on the server.

Finally to solve the issue I had to install the module from ports php5-simplexml , e.g.:

freebsd# cd /usr/ports/textproc/php5-simplexml
freebsd# make install clean

Afterwards to make the new settings take place I did restart of my Apache server:

freebsd# /usr/local/etc/rc.d/apache2 restart
Syntax OK
Stopping apache2.
Waiting for PIDS: 63883.
Performing sanity check on apache2 configuration:
Syntax OK
Starting apache2.

Now my Joomla contact form is back to normal 😉

If someone has any idea why this error occured without any php or server modifications, and how comes that all worked fine beforehand even though I did not have the simplexml module instlaled on the server o_O, I would be enormously greatful.

How to fix “Fatal error: Call to undefined function: curl_init()” on FreeBSD and Debian

Saturday, June 18th, 2011

After installing the Tweet Old Post wordpress plugin and giving it, I’ve been returned an error of my PHP code interpreter:

Call to undefined function: curl_init()

As I’ve consulted with uncle Google’s indexed forums 😉 discussing the issues, I’ve found out the whole issues are caused by a missing php curl module

My current PHP installation is installed from the port tree on FreeBSD 7.2. Thus in order to include support for php curl it was necessery to install the port /usr/ports/ftp/php5-curl :

freebsd# cd /usr/ports/ftp/php5-curl
freebsd# make install clean

(note that I’m using the php5 port and it’s surrounding modules).

Fixing the Call to undefined function: curl_init() on Linux hosts I suppose should follow the same logic, e.g. one will have to install php5-curl to resolve the issue.
Fixing the missing curl_init() function support on Debian for example will be as easy as using apt to install the php5-curl package, like so:

debian:~# apt-get install php5-curl
...

Now my tweet-old-post curl requirement is matched and the error is gone, hooray 😉

How to install OpenNTPD NTP server to synchronize system clock on FreeBSD for better security

Sunday, February 12th, 2012

FreeBSD, OpenBSD, NetBSD and Linux ntpd alternative server to synchronize server system time

Lately I've been researching on ntpd and wrote a two articles on how to install ntpd on CentOS, Fedora and how to install ntpd on FreeBSD and during my research on ntpd, I've come across OpenNTPD and decided to give it a go on my FreeBSD home router.
OpenBSD project is well known for it is high security standards and historically has passed the test of time for being a extraordinary secure UNIX like free operating system.
OpenBSD is developed in parallel with FreeBSD, however the development model of the two free operating systems are way different.

As a part of the OpenBSD to be independant in its basis of software from other free operating systems like GNU / Linux and FreeBSD. They develop the all around free software realm known OpenSSH. Along with OpenSSH, one interesting project developed for the main purpose of OpenBSD is OpenNTPD.

Here is how openntpd.org describes OpenNTPD:

"a FREE, easy to use implementation of the Network Time Protocol. It provides the ability to sync the local clock to remote NTP servers and can act as NTP server itself, redistributing the local clock."

OpenNTPD's accent just like OpenBSD's accent is security and hence for FreeBSD installs which targets security openntpd might be a good choice. Besides that the so popular classical ntpd has been well known for being historically "insecure", remote exploits for it has been released already at numerous times.

Another reason for someone to choose run openntpd instead of ntpd is its great simplicity. openntpd configuration is super simple.

Here are the steps I followed to have openntpd time server synchronize clock on my system using other public accessible openntpd servers on the internet.

1. Install openntpd through pkg_add -vr openntpd or via ports tree

a) For binar install with pkg_add issue:

freebsd# pkg_add -vr openntpd
...

b) if you prefer to compile it from source

freebsd# cd /usr/ports/net/openntpd
freebsd# make install clean
...

2. Enable OpenNTPD to start on system boot:

freebsd# echo 'openntpd_enable="YES"' >> /etc/rc.conf

3. Create openntpd ntpd.conf configuration file

There is a default sample ntpd.conf configuration which can be straight use as a conf basis:

freebsd# cp -rpf /usr/local/share/examples/openntpd/ntpd.conf /usr/local/etc/ntpd.conf

Default ntpd.conf works just fine without any modifications, if however there is a requirement the openntpd server to listen and accept time synchronization requests from only certain hosts add to conf something like:

listen on 192.168.1.2
listen on 192.168.1.3
listen on 2607:f0d0:3001:0009:0000:0000:0000:0001
listen on 127.0.0.1

This configuration will enable only 192.168.1.2 and 192.168.1.3 IPv4 addresses as well as the IPv6 2607:f0d0:3001:0009:0000:0000:0000:0001 IP to communicate with openntpd.

4. Start OpenNTPD service

freebsd# /usr/local/etc/rc.d/openntpd

5. Verify if openntpd is up and running

freebsd# ps axuww|grep -i ntp
root 31695 0.0 0.1 3188 1060 ?? Ss 11:26PM 0:00.00 ntpd: [priv] (ntpd)
_ntp 31696 0.0 0.1 3188 1140 ?? S 11:26PM 0:00.00 ntpd: ntp engine (ntpd)
_ntp 31697 0.0 0.1 3188 1088 ?? S 11:26PM 0:00.00 ntpd: dns engine (ntpd)
root 31700 0.0 0.1 3336 1192 p2 S+ 11:26PM 0:00.00 grep -i ntp

Its also good idea to check if openntpd has succesfully established connection with its peer remote openntpd time servers. This is necessery to make sure pf / ipfw firewall rules are not preventing connection to remote 123 UDP port:

freebsd# sockstat -4 -p 123
USER COMMAND PID FD PROTO LOCAL ADDRESS FOREIGN ADDRESS
_ntp ntpd 31696 4 udp4 83.228.93.76:54555 212.70.148.15:123
_ntp ntpd 31696 6 udp4 83.228.93.76:56666 195.69.120.36:123
_ntp ntpd 31696 8 udp4 83.228.93.76:49976 217.75.140.188:123

By default openntpd is also listening to IPv6 if IPv6 support is enabled in freebsd kernel.

6. Resolve openntpd firewall filtering issues

If there is a pf firewall blocking UDP requests to in/out port 123 within /etc/pf.conf rule like:

block in log on $EXT_NIC proto udp all

Before the blocking rule you will have to add pf rules:

# Ipv4 Open outgoing port TCP 123 (NTP)
pass out on $EXT_NIC proto tcp to any port ntp
# Ipv6 Open outgoing port TCP 123 (NTP)
pass out on $EXT_NIC inet6 proto tcp to any port ntp
# Ipv4 Open outgoing port UDP 123 (NTP)
pass out on $EXT_NIC proto udp to any port ntp
# Ipv6 Open outgoing port UDP 123 (NTP)
pass out on $EXT_NIC inet6 proto udp to any port ntp

where $EXT_NIC is defined to be equal to the external lan NIC interface, for example:
EXT_NIC="ml0"

Afterwards to load the new pf.conf rules firewall has to be flushed and reloaded:

freebsd# /sbin/pfctl -f /etc/pf.conf -d
...
freebsd# /sbin/pfctl -f /etc/pf.conf -e
...

In conclusion openntpd should be more secure than regular ntpd and in many cases is probably a better choice.
Anyhow bear in mind on FreeBSD openntpd is not part of the freebsd world and therefore security updates will not be issued directly by the freebsd dev team, but you will have to regularly update with the latest version provided from the bsd ports to make sure openntpd is 100% secure.

For anyone looking for more precise system clock synchronization and not so focused on security ntpd might be still a better choice. The OpenNTPD's official page states it is designed to reach reasonable time accuracy, but is not after the last microseconds.
 

How to play Audio music CDs in GNU/Linux and Free/Net/Open BSDs

Sunday, January 22nd, 2012

If you still have some old dusty CDs left on the CD shelf, its quite cool to give it a ride in a rainy morning.

As I enjoy working in console so much, I thought it might be interesting to share how music audio CDs can be listened in plain text mode console.

For all console / terminal geeks Linux and BSDs can be equipped with a number of text/console audio cd console players.

There are plenty of free software console cd audio players on the net, however I found cdplay , cdcd and dcd to be the most popular ones.

On Debian and Ubuntu G*/Linuces cdplay and cdcd are installable via apt. To install cdtool:

root@xubuntu-desktop:~# apt-get install cdtool
...

cdtool package, contains a number of commands enabling you to listen/stop/shuffle/eject/get info about cd audio volumes. cdtool provides the following binaries:

cdeject
cdclose
cdir
cdinfo
cdpause
cdplay
cdstop
cdvolume
cdshuffle

Install cdcd on Debian and alike by typing:

root@xubuntu-desktop:~# apt-get install cdcd
...

cdcd has shell like interface the most basic use of it is with:

root@xubuntu-desktop:~# cdcd
cdcd> play

To play audiocds in console on FreeBSD , a command tool dcd is available and installable through ports.
To install it issue:

root@freebsd# cd /usr/ports/audio/dcd
root@freebsd# make install clean
...

dcd is also available for Linux but on most GNU/Linuxes it has to be built from source.

Lets say you'd like to Play the 5th song from audio CD:

freebsd# dcd 5

dcd has plenty of great arguments, to get some fun with it check the man page.

Another program that can be used to play audio CDs on both Linux and BSDs is the "classical" mplayer .

To play AUDIO CD with mplayer the command line to use is:

root@debian:~# mplayer -cdrom-device /dev/sr0 cdda:// -cache 5000
...

The argument -cache 5000 has to be passed to to work around choppy sound (if for example audio playback interruptions every few milliseconds).

For people who are keen on ncurses (Midnight Commander) like command line interfaces you might enjoy Herrie a minimalistic music player that supports plenty of sound formats, including audiocds.

Herrie is available for Debian and most deb based modern distros via apt, e.g.:

root@xubuntu-desktop:~# apt-get install herrie
...

Herrie Minimalistic Music player for Linux and BSD


Ports are also available for FreeBSD, NetBSD and OpenBSD.
To install on FreeBSD:

root@freebsd# cd /usr/ports/audio/herrie
root@freebsd# make install clean

I'll be happy to hear feedback and recommendations on any other console audio cd players I might forgot to mention.
Which is your favourite console text based cd audio player?

How to install and configure Jabber Server (Ejabberd) on Debian Lenny GNU / Linux

Wednesday, December 28th, 2011

Ejabberd server erlang logo hedgehog

I've recently installed a jabber server on one Debian Lenny server and hence decided to describe my installations steps hoping this would help ppl who would like to run their own jabber server on Debian . After some research of the jabber server softwares available, I decided to install Ejabberd

The reasons I choose Ejabberd is has rich documentation, good community around the project and the project in general looks like one of the best free software jabber servers available presently. Besides that ejabberd doesn't need Apache or MySQL and only depends on erlang programming language.

Here is the exact steps I followed to have installed and configured a running XMPP jabber server.

1. Install Ejabberd with apt

The installation of Ejabberd is standard, e.g.:

debian:~# apt-get --yes install ejabberd

Now as ejabberd is installed, some minor configuration is necessery before the server can be launched:

2. Edit /etc/ejabberd/ejabberd.cfg

Inside I changed the default settings for:

a) Uncomment%%override_acls.. Changed:

%%%% Remove the Access Control Lists before new ones are added.%%%%override_acls.

to

%%
%% Remove the Access Control Lists before new ones are added.
%%
override_acls.

b) Admin User from:

%% Admin user
{acl, admin, {user, "", "example.com"}}.

to

%% Admin user
{acl, admin, {user, "admin", "jabber.myserver-host.com"}}.

c) default %% Hostname of example.com to my real hostname:

%% Hostname
{hosts, ["jabber.myserver-host.com"]}.

The rest of the configurations in /etc/ejabberd/ejabberd.cfg can stay like it is, though it is interesting to read it carefully before continuing as, there are some config timings which might prevent the XMPP server from user brute force attacks as well as few other goodies like for example (ICQ, MSN , Yahoo etc.) protocol transports.

3. Add iptables ACCEPT traffic (allow) rules for ports which are used by Ejabberd

The minimum ACCEPT rules to add are:

/sbin/iptables -A INPUT -p tcp -m tcp --dport 22 -j ACCEPT
/sbin/iptables -A INPUT -p tcp -m tcp --dport 5222 -j ACCEPT
/sbin/iptables -A INPUT -p udp -m udp --dport 5222 -j ACCEPT
/sbin/iptables -A INPUT -p tcp -m tcp --dport 5223 -j ACCEPT
/sbin/iptables -A INPUT -p udp -m udp --dport 5223 -j ACCEPT
/sbin/iptables -A INPUT -p tcp -m tcp --dport 5269 -j ACCEPT
/sbin/iptables -A INPUT -p udp -m udp --dport 5269 -j ACCEPT
/sbin/iptables -A INPUT -p tcp -m tcp --dport 5280 -j ACCEPT
/sbin/iptables -A INPUT -p udp -m udp --dport 5280 -j ACCEPT
/sbin/iptables -A INPUT -p tcp -m tcp --dport 4369 -j ACCEPT
/sbin/iptables -A INPUT -p udp -m udp --dport 4369 -j ACCEPT
/sbin/iptables -A INPUT -p tcp -m tcp --dport 53873 -j ACCEPT

Of course if there is some specific file which stores iptables rules or some custom firewall these rules has to be added / modified to fit appropriate place or chain.

4. Restart ejabberd via init.d script

debian:~# /etc/init.d/ejabberd restart
Restarting jabber server: ejabberd is not running. Starting ejabberd.

5. Create ejabberd necessery new user accounts

debian:~# /usr/sbin/ejabberdctl register admin jabber.myserver-host.com mypasswd1
debian:~# /usr/sbin/ejabberdctl register hipo jabber.myserver-host.com mypasswd2
debian:~# /usr/sbin/ejabberdctl register newuser jabber.myserver-host.com mypasswd3
debian:~# /usr/sbin/ejabberdctl register newuser1 jabber.myserver-host.com mypasswd4
...
etc.

ejabberdctl ejabberd server client (frontend) has multiple other options and the manual is a good reading.

One helpful use of ejabberdctl is:

debian:~# /usr/sbin/ejabberdctl status
Node ejabberd@debian is started. Status: started
ejabberd is running

ejabberctl can be used also to delete some existent users, for example to delete the newuser1 just added above:

debian:~# /usr/sbin/ejabberdctl unregister newuser jabber.myserver-host.com

6. Post install web configurations

ejabberd server offers a web interface listening on port 5280, to access the web interface right after it is installed I used URL: http://jabber.myserver-host.com:5280/admin/

To login to http://jabber.myserver-host.com:5280/admin/ you will need to use the admin username previously added in this case:
admin@jabber.myserver-host.com mypasswd1

Anyways in the web interface there is not much of configuration options available for change.

7. Set dns SRV records

I'm using Godaddy 's DNS for my domain so here is a screenshot on the SRV records that needs to be configured on Godaddy:

GoDaddy DNS SRV records screenshot

In the screenshto Target is the Fually qualified domain hostname for the jabber server.

Setting the SRV records for the domain using Godaddy's DNS could take from 24 to 48 hours to propagate the changes among all the global DNS records so be patient.

If instead you use own custom BIND DNS server the records that needs to be added to the respective domain zone file are:

_xmpp-client._tcp 900 IN SRV 5 0 5222 jabber.myserver-host.com.
_xmpp-server._tcp 900 IN SRV 5 0 5269 jabber.myserver-host.com.
_jabber._tcp 900 IN SRV 5 0 5269 jabber.myserver-host.com.

8. Testing if the SRV dns records for domain are correct

debian:~$ nslookup
> set type=SRV
> jabber.myserver-host.com
 ...
> myserver-host.com

 If all is fine above nslookup request should return the requested domain SRV records.
You might be wondering what is the purpose of setting DNS SRV records at all, well if your jabber server has to communicate with the other jabber servers on the internet using the DNS SRV record is the way your server will found the other ones and vice versa.

DNS records can also be checked with dig for example

$ dig SRV _xmpp-server._tcp.mydomain.net

[…]

;; QUESTION SECTION:
;_xmpp-server._tcp.mydomain.net. IN SRV

;; ANSWER SECTION:
_xmpp-server._tcp.mydomain.net. 259200 IN SRV 5 0 5269 jabber.mydomain.net.

;; ADDITIONAL SECTION:
jabber.mydomain.net. 259200 IN A 11.22.33.44

;; Query time: 109 msec
;; SERVER: 212.27.40.241#53(212.27.40.241)
;; WHEN: Sat Aug 14 14:14:22 2010
;; MSG SIZE rcvd: 111

9. Debugging issues with ejabberd

Ejabberd log files are located in /var/log/ejabberd , you will have to check the logs in case of any issues with the jabber XMPP server. Here is the three files which log messages from ejabberd:

debian:~$ ls -1 /var/log/ejabberd/
ejabberd.log
erl_crash.dump
sasl.log

I will not get into details on the logs as the best way to find out about them is to read them 😉

10. Testing ejabberd server with Pidgin

To test if my Jabber server works properly I used Pidgin universal chat client . However there are plenty of other multiplatform jabber clients out there e.g.: Psi , Spark , Gajim etc.

Here is a screenshot of my (Accounts -> Manage Accounts -> Add) XMPP protocol configuration

Pidgin account configuration XMPP on debian Linux