Posts Tagged ‘purpose’

How to create SD Card DATA dump image to .ISO with dd and mount it with imdisk from command line on Windows CygWin with MobaXterm

Saturday, September 18th, 2021

dd-command-logo
I'm forced to use Windows every now and then and do some ordinary things which I do usually on Linux such as dumping the content of my Android phone SD Card SanDisk, Kingston etc. to .ISO image etc.

On Linux creating and mounting a data copy of a whole SD Card is a relatively simple thing and there are plenty of ways to do it such as using the dd ( command-line utility for Unix and Unix-like operating systems whose primary purpose is to convert and copy files as said in the command manual .- e.g. ''man dd'. ). On Microsoft Windows environment perhaps one of easiest ways is to use WinCDEmu (which is relatively free under LGPL License).
WinCDEmu is capable of doing plenty of things such as:
 

  • One-click mounting of ISO, CUE, NRG, MDS/MDF, CCD, IMG images.

  • Supports unlimited amount of virtual drives.

  • Runs on 32-bit and 64-bit Windows versions from XP to Windows 10.

  • Allows creating ISO images through a context menu in Explorer.

  • Small installer size – less than 2MB!

  • Have a portable version

WinCDEmu is a nice piece of software that perhaps every Win poweruser can enjoy, plus it has a nice Graphical frontend:
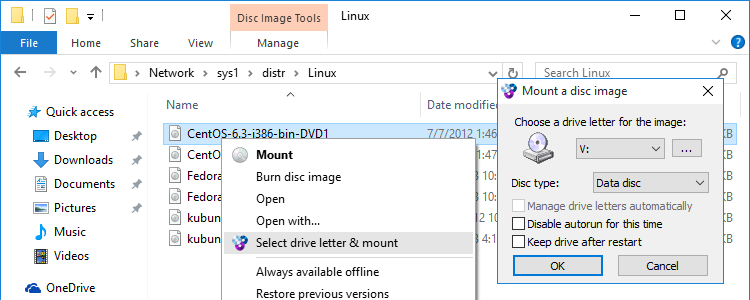
wincdemu-graphical-create-iso-and-mount-so-ms-windows-software

But what if you're a console geek, like me and you end up forced to be using Windows on your Work PC and you still need to create .iso dump of your Mobile SD Card or external attached Hard Drive, without the graphical mambo jumbo in the old fashioned way with dd?

Luckily Windows advanced command lined users could massively benefit from Cygwin + Mobaxterm (if you don't know or used MobaXterm and you still use things like Putty / SuperPutty or SecureCRT – perhaps you can reconsider and make your sysadmin life easier with MobaXerm gnome-terminal like SSH tabbed Windows alternative.

Once having mobaxterm + cygwin you have dd installed on the Windows host as it is part of the busybox minimal environment and you can use it in the same manner as your used in Linux environment.
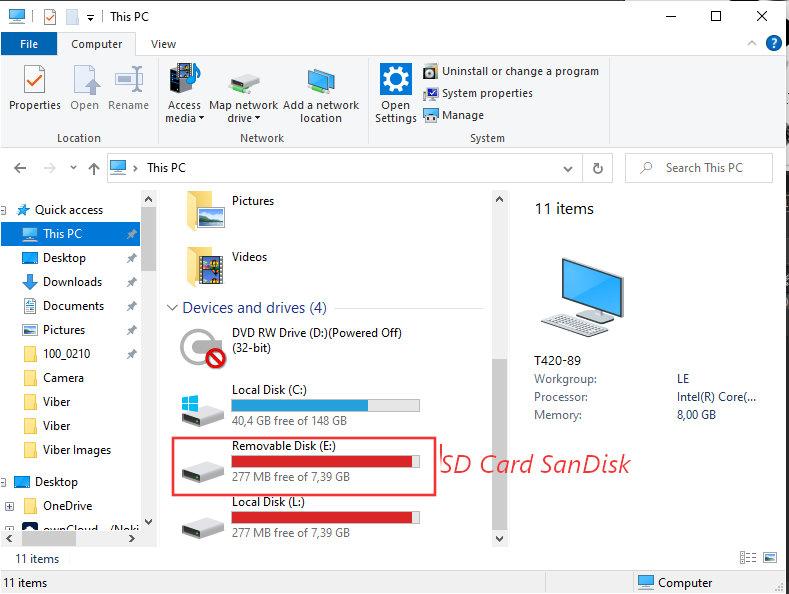
sdcard-sandisk-drive-my-computer-windows-screenshot
 

1. Using dd to copy files on Linux / UNIX OS with a dialog status bar

To use dd the usual syntax on Linux / BSD / Unix is:
 

dd if=/dev/dev-name_ID of=/path/to/directory/dump/location.iso bs=2048


As 2048 BS (Bytes) per second is quite a low value usually on Modern operating systems, this bytesize is usually increased to some MBs  ( Megabytes).

For example if the reading from carrier  is Solid State Drive Disk (SSD) supporting 100 MBs per second and the output SD Card is a 32 Bit Kingston Plus+ drive with whose write speed is up to 50 ~ 100 MBs, you can use cmd as:

dd if=/dev/dev-name_ID of=/path/to/directory/dump/location.iso bs=100M


If you need to have a progress on the dd copy (in case if you copy some large SD Card 128 GB or 256GB or a full copy of a hard drive partition that is really big lets say 8 Terabytes of data, dialog and pv comes quite handy.

To use them install them first:

# apt-get install –yes pv dialog


Next to have a beautiful ncurses dialog box with the status (very useful if you're shell scripting), use:
 

(pv -n /dev/sda | dd of=/dev/sdb bs=128M conv=notrunc,noerror) 2>&1 | dialog –gauge "Running dd command (cloning), please wait…" 10 70 0
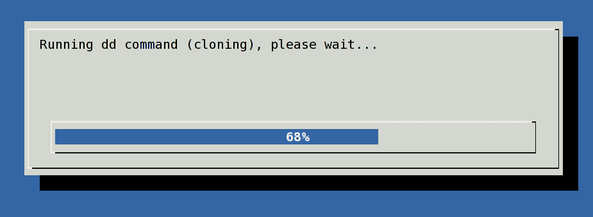
pv-dialog-dd-command-ncurses-status-screenshot-gnu-linux
 

2. Listing the avaialble copy drives /dev/sda /dev/sdb1 … etc. disk locations on Windows 7 / 10 / 11 OS

[User.T420-89] ➤ for F in /dev/s* ; do echo "$F    $(cygpath -w $F)" ; done

check-drives-loop-on-cygwin-to-be-used-later-with-dd-copy-iso-creating-imageCheck drives device naming on WIndows PC – Screenshot extract from Mobaxterm

As you can see the drive location we've seen in Windows Explorer is located at drive E: above bash for loop reveals us this is located and readable from CygWin / MobaxTerm at /dev/sdb1


3. Create .iso image file on WIndows OS with dd command
 

To create a full data copy dump of to .iso (image file) with dd on Windows , I had to run:

[User.T420-89] ➤ dd if=/dev/sdb1 of=sdcard-blu-r1-hd-sdcard-backup_10092021a.img bs=100M

75+1 records in
75+1 records out
7944011776 bytes (7.4GB) copied, 391.794316 seconds, 19.3MB/s


dd-copy-drive-data-screenshot-100mb-bitesize-windows-mobaxterm


4. Mount the newly create dd Image with imdisk

In order to test the image is properly created, you can attempt to mount it from command line on Linux, mounting it is quite easy and is up to mounting the just created .img file as a loopback (loop) device, like so: 

# mount -o loop file.iso /mnt/dir

Unfortunately cygwin and mobaxterm's embedded mount command on Win OS does not support the loopback device so to have it you have to install and use some additional program  such as the upmentioned WinCDEmu or if you prefer to do it fully from command line and further on automate the process of creating a dump of images of attached drives out of a multiple computers (lets say belonging to a Windows Active Directory domain). You might install and use something like:


imdisk 
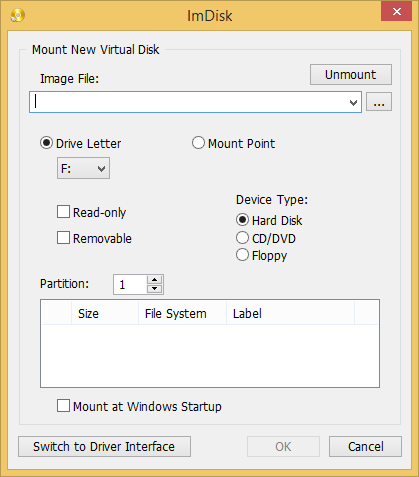
imdisk-gui-interface-ms-windows-screenshot

imdisk handy tool is  created by Olof Lagerkvist. It is free and open-source software, which  will let you mount image files of hard drive, cd-rom or floppy, and create one or several ramdisks with various parameters either from a command line or via its Graphical interface.

To use imdisk download it from its home page on sourceforge extract and install it, pretty much as any other software it has both 32 bit version as a legacy for old computers as well as 64 bit exe installer.
The general command line use of it follows a cmd syntax like:

  • Mounting .iso image files from command line on WIndows host with imdisk


[User.T420-89] ➤ ImDisk.exe -a -f "sdcard-blu-r1-hd-sdcard-backup_10092021.img" -m #:

Where:
 

  • #: – is the actual drive you would like to mount to.
     
  • -a option stands for attach to, it will configure and attach a virtual disk with the parameters specified and attach it to the system.
     
  • -f – is self explanatory, provides the iso image file naming 

If you want to attach the newly created image to lets say  L:\ windows new mapped drive

ImDisk.exe -a -f "sdcard-blu-r1-hd-sdcard-backup_10092021.img" -m l:

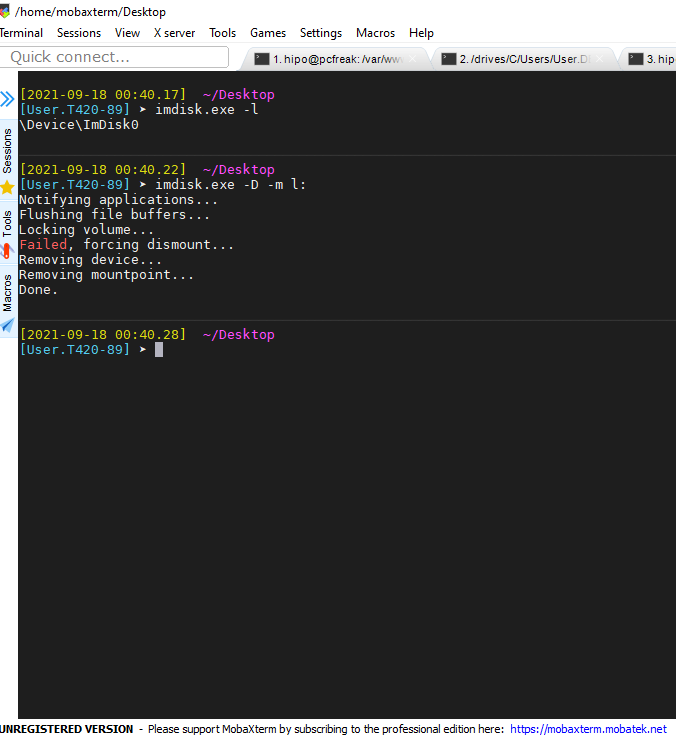
  • Unmount mounted .img image with imdisk from cmd line

[User.T420-89] ➤ imdisk.exe -l
\Device\ImDisk0
                                                                                                                              ✘

[User.T420-89] ➤ imdisk.exe -D -m l:
Notifying applications…
Flushing file buffers…
Locking volume…
Failed, forcing dismount…
Removing device…
Removing mountpoint…
Done.

imdisk-detach-attached-drive-mobaxterm-windows-screenshot


What we learned ?

What we have learned in this article is how to use Mobaxterm embedded dd Data Convert and Copy command to prepare full image backups of SD card or external drives on Windows OS. Also few alternative ways were entions such as using WinCDEmu free  open source alternative to DaemonTools program to create / mount or convert the image for the GUI lovers. Also for hard core sysadmins as me was shown how to list drives devices attached to the Win PC {/dev/sda,/dev/sdb} etc. and how to copy partition data with dd just like one would do on Linux OS. Finally to test the created image, I've shown you how to use the imdisk free software tool to attach and detach image to a mapped local Windows drive.

Hope this article learned you something new.

How to Install and Play old Arcade Multiple Arcade Machine Emulator Games on Linux in 2021 with xmame and GXMame GUI Frontend

Friday, May 14th, 2021

mame-multiple-arcade-machine-emulator
I've earlier blogged on how to install and play old arcade games with xmame compiled from source on the now old Debian 7 Linux under the article Install xmame from source on Debian Linux 7.0 (Wheezy) to play for better MAME (Arcade Games Emulation)
as well article on using the newer version of MAME emulator instead of xmame under the article Playing Arcade old school games on Debian Linux as well as how to make the MAME emulator work with a joystick see my previous How to configure Joystick ( Gamepad ) on Debian, Ubuntu, Mint GNU / Linux easily.

Since I have preinstalled my notebook with fresh Debian 10 Buster, for a long time I did not have the time as well as desire to play my favourite games of the youth to name a few this is Xain'd Sleena / Cadillacs and Dinosaurs (1993) / the Punisher (1993) / Captain Commando (1991) / Super Mario / Contra / Final Fight etc. and rest of the the SEGA Mega Drive / GameBoy / Nintendo / Terminator game (fake clone of nintendo) and other killing Arcade Classics of the late 90s and early year 2000, which we played on a public houses on a game cabinets with a joysticks. 
Hence I tried to reproduce some of my articles just as of 2021 to see whether still we can get a nice playable MAME emulator on Linux with a Graphical GUI for Mate or GNOME. And it seems using a straight mame out of Debian standard repositories did not work with some of the more sophisticated ROM .zip files from the nices such as Punisher or XSLEENA.zip, this is how this article got born in an attempt to give a way for such old school game freaks as me to be able to play there favorite games of the youth.

Below is the few steps adapted mostly from above articles with some head banging and loosing multiple hours wondering until I finally got a working XMAME ROM emulator with the simple but working GXMAME graphical frontend for M.A.M.E..

To compile xmame with joystick support be it analog or whatever joystick you have to use a Makefile like below

https://www.pc-freak.net/files/xmame-0.103-Makefile-for-joystick

Copy it on your PC and remove it to Makefile in the xmame-0.103 source dir:

# cd /usr/local/src/xmame-0.103


I have to install all the necessery package dependencies development header files, some of which are mentioned in the beginning of post articles and some of which I had to install manually, such as the preset Debian meta-package build-essentials Things to install on newly installed GNU / Linux (My favourite must have Linux text and GUI programs missing in fresh Linux installs), just to mention a few I remember had to install based on some compilation errors:

# apt-get install build-essential
# apt-get install –yes zlib1g-dev

# apt-get install –yes libexpat1-dev
# apt-get install –yes libghc-x11-dev
# apt-get install –yes x11proto-video-dev
# apt-get install –yes libxv-dev
# apt-get install libxext6
# apt-get install libxext6-dev
# apt-get install libxext-dev
# apt-get install libjpeg62-turbo-dev
# apt-get install libxinerama-dev
# apt-get install libgtk-3-dev
# apt-get install syslog-ng-dev
# apt-get install libgtk2.0-dev


If I'm missing some package necessery here you will have to find it yourself based on the *.h file produced as error during compile you should look it up with a cmd like:

# apt-file search glib2.h


And install it further.

You will need to edit Makefile or take and straight use or if necessery adapt an already prepared Makefile for my purpose:
 

# wget https://www.pc-freak.net/files/xmame-0.103-Makefile-for-joystick;
# mv https://www.pc-freak.net/files/xmame-0.103-Makefile-for-joystick Makefile
# make && make install


Some .zip roms does not properly work with the newer mame you need to instead use xmame ..

Below is the version I use on Debian 10 as of May 2021 year.

hipo@jeremiah:/usr/local/src$ xmame –version
GLINFO: loaded OpenGL library libGL.so!
GLINFO: loaded GLU    library libGLU.so!
xmame (x11) version 0.103 (May 13 2021)


To make the joystick work in xmame you will need to have a preset of modules loaded on the Linux for my old Genius joystick this is what works.

hipo@jeremiah:~/Games$ cat /etc/modules
# /etc/modules: kernel modules to load at boot time.
#
# This file contains the names of kernel modules that should be loaded
# at boot time, one per line. Lines beginning with "#" are ignored.
snd-seq
3c59x
snd-emu10k1
snd-pcm-oss
snd-mixer-oss
snd-seq-oss
joydev
ns558
sidewinder
gameport
analog
adi
pcigame
iforce
evdev
usbhid


Fill in your joystick module there and make sure you manually load each one of the modules with modprobe command.
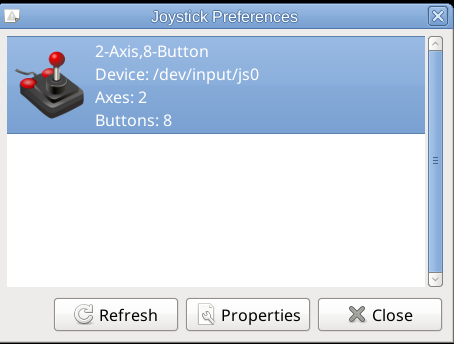
Next calibrate the joystick with some tool like jktest-gtk

jktest-gtk-linux-screenshot
If you need a good frontend for MATE / GNOME for xmame try gxmame. It is a real pain in the ass to configure, note that the only working version of xmame with good configuration as well as gxmame with a game list that is prebuild.
If you need xmame-0.103.tar.bz2 exact xmame version I'm using thethe archive is on:

https://www.pc-freak.net/files/xmame-0.103.tar.bz2
An old bundle of both gxmame and xmamerc configs is here

https://www.pc-freak.net/files/xmame.tar.gz

https://www.pc-freak.net/files/xmame-config-for-joystick-hipo.tar.gz
For example my old working version of xmame ~/.xmame is here https://www.pc-freak.net/files/xmame-config-for-joystick-hipo.tar.gz

Configuration of gxmame (even though it has has a GUI for configuring is below:

https://www.pc-freak.net/files/gxmame.tar.gz

xmamerc sample working file is here

https://www.pc-freak.net/files/xmamerc

My newest current version as of Debian 10 Squeeze of xmame and gxmame is below:

https://www.pc-freak.net/files/gxmame-config-newest_may_2021.tar.gz

https://www.pc-freak.net/files/xmame-config-newest_may_2021.tar.gz

Note that my rom files and stuff is located and configured in neewst configs to be under /home/hipo/Games/roms/ if your location is others grep it in .xmame/* and .gxmame/* files and set the correct PATH locations.

A VERY IMPORTANT NOTE is not to use the stable version of GXMAME even though it worked in 2003 fine as the project is abandoned and unsupported as of 2021 the latest downloadable stable gxmame file on Sourceforge gxmame-0.34b website is not working correctly (even though it compiles fine).
You have to compile and use instead the newer version gxmame-0.35beta1.

If you want to use gxmame with a joystick you need to compile it with the respective option:
 

root@jeremiah:/usr/local/src/gxmame-0.35beta1# ./configure –enable-joystick


gxmame 0.35beta1

Print debugging messages…… : no
Joystick support………….. : yes

GXMame will be installed in /usr/local/bin.
Warning: You have an old copy of gxmame at /usr/local/bin/gxmame.


configure complete, now type 'make'

To install compiled binaries do the usual:
 

# make && make install

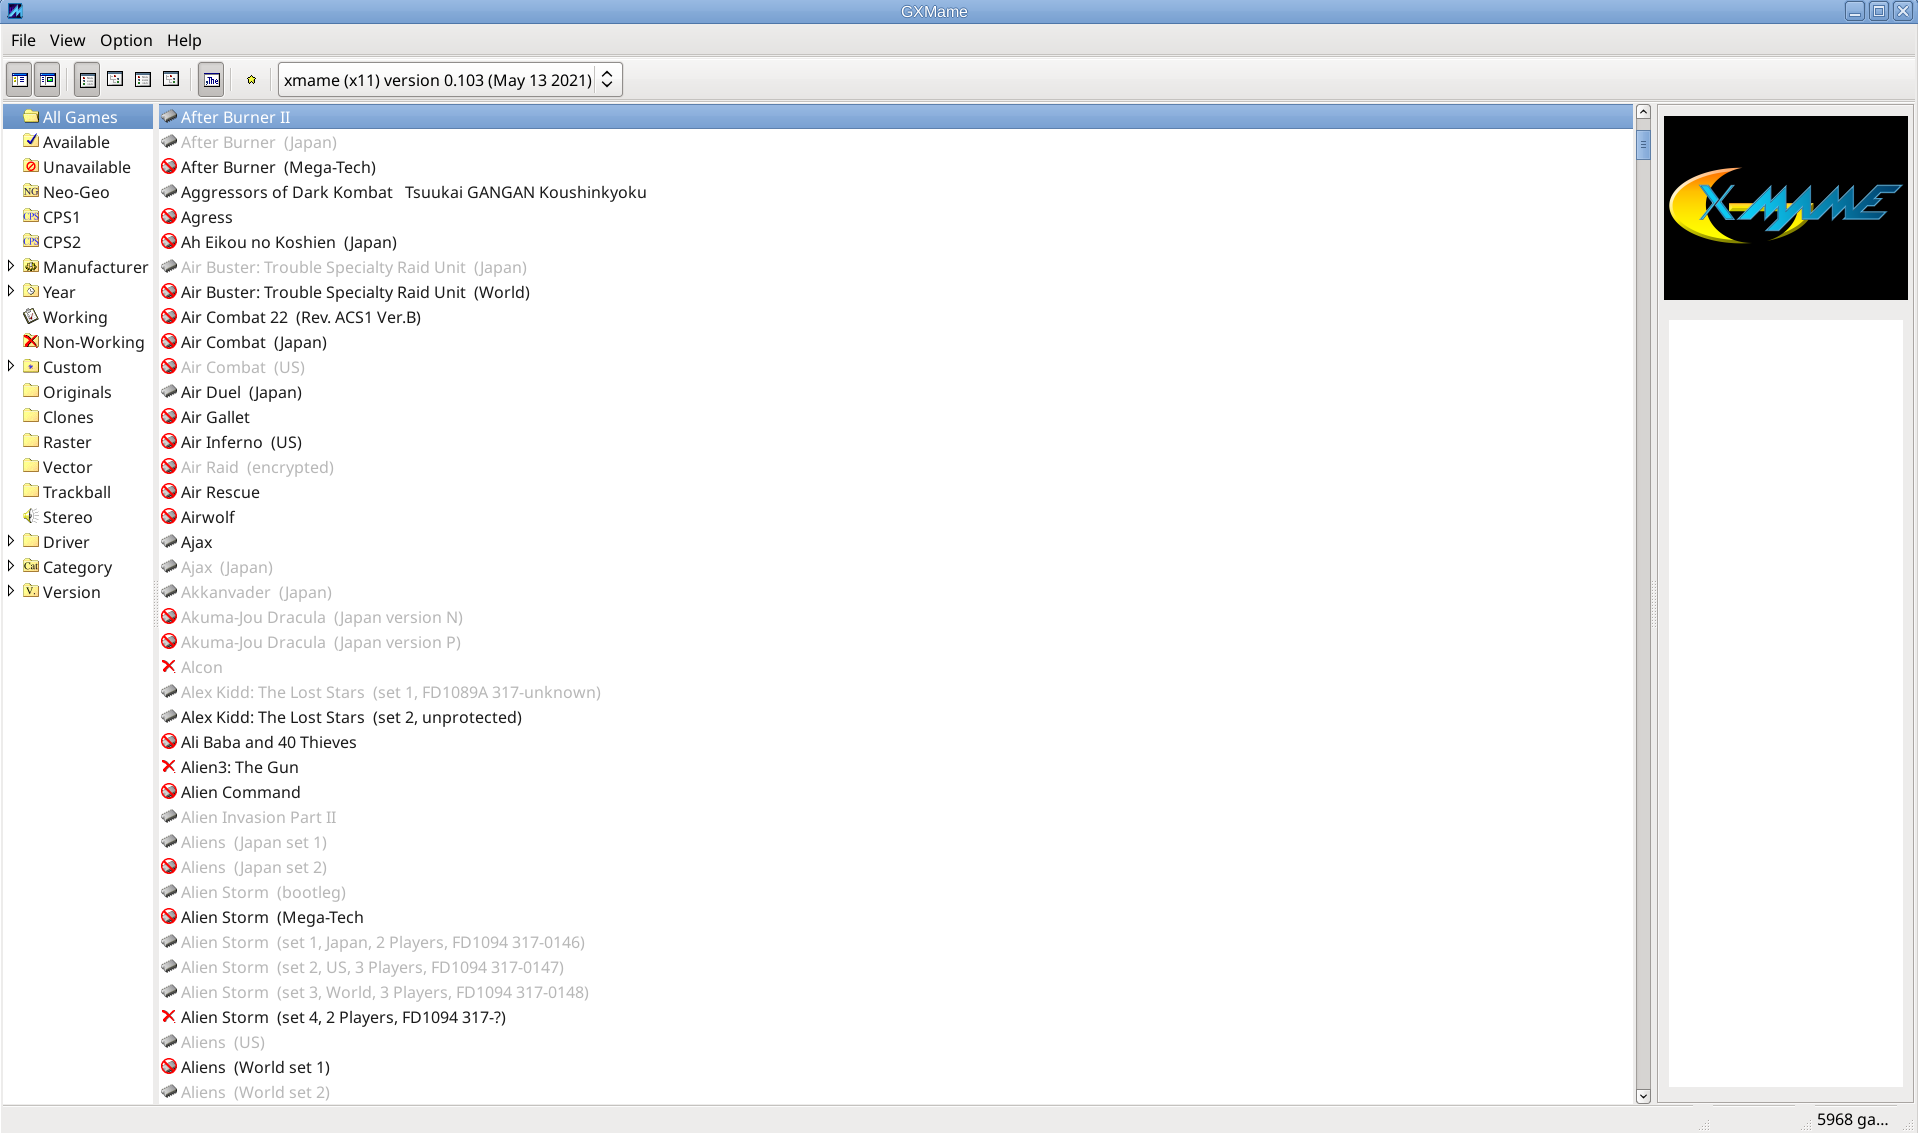
gxmame binary should be installed under /usr/local/bin/gxmame once launched you should get the shiny gxmame GUI.

gxmame-screenshot-debian-10-gnu-linux-mate-desktop

Perhaps there was other stuff I've done in the process I forgot to document here, so if you try to follow my guide and something does not work please tell me what I'm missing and you can't handle it either contact me.

The guide is for Debian Linux but should work on other .Deb based Linux distros such as Ubuntu / Linux Mint etc.

To enjoy my 4GB present of ROM files containing many of best well known M.A.M.E. ARCADE GAMES check archive here. Note that this collection was downloaded on the Internet and I do not hold any responsibility of the archive. If it contains files with any copyright infringment this is to be on your own.
 

Thomas Sunday – The day of Disbelievers

Monday, April 28th, 2014

Thomas-sunday-the-day-of-disbelieve-Thomas-reaching-to-Jesus-wounds

A week passed since we Christian celebrated Resurrection of Christ (Pascha). Each year on first Sunday after Easter in orthodox Church is celebrated the so called Thomas Sunday. So why is it called Thomas Sunday and why it is the day of disbelievers?
The root of this ancient Christian feast comes after commemoration of Christ desciple St. Thomas who disbelieved the testimony of ( 10 apostles ) and the Virgin Mary  that Jesus Christ is Risen from the Death.

The disbelieve of Thomas was logical and human cause even though Thomas was with the Apostles with Christ for 3 years, saw all Jesus miracles and shared the Secret Supper (Last Supper), and even knew in advance (heard by Jesus on Last supper) that Jesus will betrayed mocked, hanged on the Cross and Rise from the death on the third day, he disbelieved.

Thomas Sunday (Sundy of Thomas) is "the day of Disbelievers", because all are disbelievers in moments of their life not only those who believe God but all the humanity!  Even the most faithful Christian, be it a deacon, monk or priest has difficult moments in life where God's existence or providence for one's faith is seriously questioned.
The fallen nature of man is such that the initial belief in God given to man in Eden (Paradise garden) is broken, and only in Jesus's name through the Gift of Faith given by the Holy Spirit, believe in God is restored.

Thomas very much like unto everyone of us doubted the rumors of Christ resurrection and said he would only believe in Resurrected Christ only if he sees his hands nails print and put his fingers into Christ’s wounds to test he is not seeing a Ghost but Christ is alive in a body after his death.

Here is the Gospel reading re-telling the story in short:

“Then the same day at evening, being the first day of the week, when the doors were shut where the disciples were assembled for fear of the Jews, came Jesus and stood in the midst, and saith unto them, Peace be unto you.” (John 20:19)

“But Thomas, one of the twelve, called Didymus, was not with them when Jesus came. The other disciples therefore said unto him, We have seen the Lord. But he said unto them, Except I shall see in his hands the print of the nails, and put my finger into the print of the nails, and thrust my hand into his side, I will not believe.” (John 20:24-26)

And after eight days again his disciples were within, and Thomas with them: then came Jesus, the doors being shut, and stood in the midst, and said, Peace be unto you.
Then he said to Thomas, “Put your finger here; see my hands. Reach out your hand and put it into my side. Stop doubting and believe.”
Thomas said to him, “My Lord and my God!”
Then Jesus told him, “Because you have seen me, you have believed; blessed are those who have not seen and yet have believed.”
Jesus did many other miraculous signs in the presence of his disciples, which are not recorded in this book.
But these are written that you may believe that Jesus is the Christ, the Son of God, and that by believing you may have life in his name.” (John 20:31)

We Christians should be joyful for have not seen Christ in Flesh but have believed for we are blessed for his believe without seeing.

By same faith in God without seeing him even in old times the Jews were led by the Lord God in the desert have won wars by their believing without seeing God, prophets has prophecised, Simeon (The God receiver) hold The Savior (Christ) in his hands, by faith David won the battle with Goliath, by faith we understand the universe was formed at God’s command, by faith we know that the visible came out of the invisible.

o Kyrios mou kai o Theos mou (Greek) – My Lord and my God (Jn. 20:28) this declaration of faith clearly shows an unexpressable excitement of Thomas and his unexpectency to see Christ resurrected. Here it is interesting that here the son of God Jesus Christ is called by Thomas exactly how Jewish used to call God Yahweh (One and Only God) in the Old testament.

Today the evangical story is very accurate for our generation – a generation of disbelievers, even we who say we believe often doesn’t justify our believe with our deeds, we say we believe but we don’t keep God’s commandment “to love God and our neigbor like ourselves.” Often only difference between believers and disbelievers is on Sunday we believers visit Church and “play Christians”, but even but in daily life our deeds are same like unbelievers. Often many are disbelievers not because they reject God but because they never heard the Gospel or misheard it, also we disbelieve because we’re very much like st. Thomas, we often say “I will believe in God if I see him”, but even Thomas who saw God before the Crucifix and knew him disbelieved – a proof that often seing once could still leave space for doubt. The glorious event of Christ showing himself Alive to Thomas was made by Christ to establish the Church and strengthen faith of first Christians in resurrection. Nowadays there are plenty of people who question God’s existence saying that they will believe if they see but they’re not given to see the resurrected Christ because God knows that even if we see the Lord Jesus Christ resurrected we would try to rationally explain the phenomenon with holograms, modern technology or science.

Thomas Sunday is not only a day of Thomas disbelieve it is a day of disbelieve of all humanity. , St. Thomas should be an example even to all of us Christian disbelievers and non-believers that even if we disbelieve and doubt and strive to see God, He is powerful to come and appear Resurrected in His Glory to our souls.
Let us therefore have the Wisdom of the Holy Apostles and say together with them “Lord, Increase our faith.” Luke 17:5

Improve Website Apache Webserver SEO without Website source code moficitations with Google PageSpeed module on Debian, Ubuntu, CentOS, Fedora and SuSE Linux

Thursday, December 18th, 2014

Improve-website-apache-webserver-seo-without-website-source-code-modifications-with-Google-PageSpeed-Apache-module

For hosting companies and even personal website speed performance becomes increasingly important factor that gives higher and higher weight on overall PageRank and is one of the key things for Successful Site Search Engine Optimization (positioning) in Search Engines of a not specially SEO friendly crafted website.

Virtually all Google / Yahoo / Bing,  Yahoo  etc. Search Engines give better pagerank to websites which load faster and has little or no downtimes, for the reason a faster loading time of a website pages means better user experience and is indicator that the website is well maintained. 

Often websites deployed written for purpose of a business-es or just community CMS / Blog Website Open Source systems such as Joomla, Drupal and WordPress by default are not made to provide fantastic speed right after deploy without install of custom plugins and website tuning, i.e.:

  • Content size optimization (gzipping)
  • More efficient way to deliver CSS / Javascript (MinifyJS / CSS files into single ones
  • HTML optimization
  • Stripping (useful) page Comments
  • Adding <head> if missing on pages etc.

. Therefore as I said in many of my previous LAMP Optimization articles page  (opening) speed could make really Bad Users / Clients experience when the site grows too big or is badly optimized it gives degraded page speed times (often page loads 20 / 30 seconds waiting for the page to load!). Having Pages lagging on big information sites or EShos has both Ruining Company's Image on the market and quickly convinces the user to use another service from the already thosands available and thus drives out (potential) customers.

As Programming code maintainance and improvement is usually very costly, companies that want to save money or can't afford it (because of the shrinking budgets dictacted by the global economic crisis), the best thing to do is to ask your sysadmin to Squeeze the Best out of the WebService and Servers without major (Backend Code) infrastructural changes.

To  Speed up Apache and create Proper Page Caching without installing on server external PHP Caching modules such as Eaccelerator  / PHP APC caching and without
extra CMS modules
such as lets say WordPress W3 Total Cache there is Google Develop Apache Webserver external module – PageSpeed.

Here is Google Pagespeed Module overview :
 

PageSpeed speeds up your site and reduces page load time. This open-source webserver module automatically applies web performance best practices to pages and associated assets (CSS, JavaScript, images) without requiring that you modify your existing content or workflow.


What does Apache Google PageSpeed actually does?
 

  • Automatic website and asset optimization
  • Latest web optimization techniques
  • 40+ configurable optimization filters
  • Free, open-source, and frequently updated
  • Deployed by individual sites, hosting providers, CDNs


1. Install PageSpeed on Debian / Ubuntu, deb derivatives) Linux

a) Download and install module 

On 64 bit deb based Linux:

cd /usr/local/src
wget https://dl-ssl.google.com/dl/linux/direct/mod-pagespeed-stable_current_amd64.deb 
dpkg -i mod-pagespeed-stable_current_amd64.deb
apt-get -f install


On 32 bit Linux:

cd /usr/local/src
wget https://dl-ssl.google.com/dl/linux/direct/mod-pagespeed-stable_current_i386.deb
dpkg -i 
direct/mod-pagespeed-stable_current_i386.deb
apt-get -f install


b) Restart Apache
 

sudo /etc/init.d/apache2 restart

Important files and folders placed on server by deb installer are:

/usr/bin/pagespeed_js_minify – binary that does Javascript minification
/etc/apache2/mods-available/pagespeed.conf – Pagespeed config
/etc/apache2/mods-available/pagespeed.load – Load module directives in Apache
/etc/cron.daily/mod-pagespeed – mod_pagespeed cron script for checking and installing latest updates.
/var/cache/mod_pagespeed – Mod Pagespeed cahing folder (useful to install memcached to increase even further caching performance)
/var/log/pagespeed – Directory to store pagespeed log files


2. Install PageSpeed on (RPM based CentOS, Fedora, RHEL / SuSE Linux)


RPM 64 bit package install:
 

rpm -Uvh https://dl-ssl.google.com/dl/linux/direct/mod-pagespeed-beta_current_x86_64.rpm


32 bit pack version:
 

rpm -Uvh https://dl-ssl.google.com/dl/linux/direct/mod-pagespeed-stable_current_i386.rpm


Modify pagespeed mod config 

Restart Apache

sudo /etc/init.d/httpd restart


Important config files and folders created during RPM install are:

  • /etc/cron.daily/mod-pagespeed : mod_pagespeed cron script for checking and installing latest updates.
  • /etc/httpd/conf.d/pagespeed.conf : The main configuration file for Apache.
  • /usr/lib/httpd/modules/mod_pagespeed.so : mod_pagespeed module for Apache.
  • /var/www/mod_pagespeed/cache : File caching direcotry for web sites.
  • /var/www/mod_pagespeed/files : File generate prefix for web sites.

3. Configuring Google PageSpeed module


To configure PageSpeed you can either edit the package installed bundled pagespeed.conf (/etc/apache2/mods-available/pagspeed.conf,  /etc/httpd/conf.d/pagespeed.conf) or insert configuration items inside Apache VirtualHosts config files or even if you need flexibility and you don't have straight access to Apache config files (on shared hosting servers where module is available) through .htaccess.
Anyways try to avoid adding pagespeed directives to .htaccess as it will be too slow and inefficient.

Configuration is managed by setting different so-called "Rewrite Levels". Default behavior is to use Level of "Corefilters.", a set of filters (module behavior configs) which according to Google is safe for use. PageSpeed Filters is a set of actions applied to Web Delivered files.

Default config setting is hence:
 

ModPagespeedRewriteLevel CoreFilters

Disabling default set of filters is done with:
 

ModPagespeedRewriteLevel PassThrough

"Corefilters" default filter set as of time of writting this article:
 

add_head
combine_css
convert_jpeg_to_progressive
convert_meta_tags
extend_cache
flatten_css_imports
inline_css
inline_import_to_link
inline_javascript
rewrite_css
rewrite_images
rewrite_javascript
rewrite_style_attributes_with_url

Complete documentation on Configuring PageSpeed Filters is here.

If caching is turned on, default PageSped caching is configured in /var/cache/mod_pagespeed/
Enabling someof the non-Corefilters that sometimes are useful for SEO (reduce of served / returned pagesize) are:
 

ModPagespeedEnableFilters pedantic,remove_comments

By default pagespeed does some things (such as inline_css, inline_javascript and rewrite_images (Optimize, removing Excess pixels).  My litle experience with pagespeed shows in some cases this could break websites), so I found for my case useful to disable some of the filters:


vim /etc/apache2/mods-available/pagespeed.conf


ModPagespeedDisableFilters rewrite_images,convert_jpeg_to_progressive,inline_css,inline_javascript


4. Testing if PageSpeed is Enabled pagespeed_admin

By default PageSpeed has Admin which by default is only allowed to be accessed from server localhost (127.0.0.1) to get basic statistics either install text browser like lynx / elinks or add more access IPs again in pagespeed config / vhosts pagespeed.conf include more Allow lines like below:


    <Location /pagespeed_admin>
        Order allow,deny
        Allow from localhost
        Allow from 127.0.0.1
        Allow from 192.168.1.1
        Allow from xxx.xxx.xxx.xxx

        #Allow from All
        SetHandler pagespeed_admin
    </Location>
    <Location /pagespeed_global_admin>
        Order allow,deny
        Allow from localhost
        Allow from 127.0.0.1

        Allow from 192.168.1.1
        Allow from xxx.xxx.xxx.xxx
        SetHandler pagespeed_global_admin
    </Location>


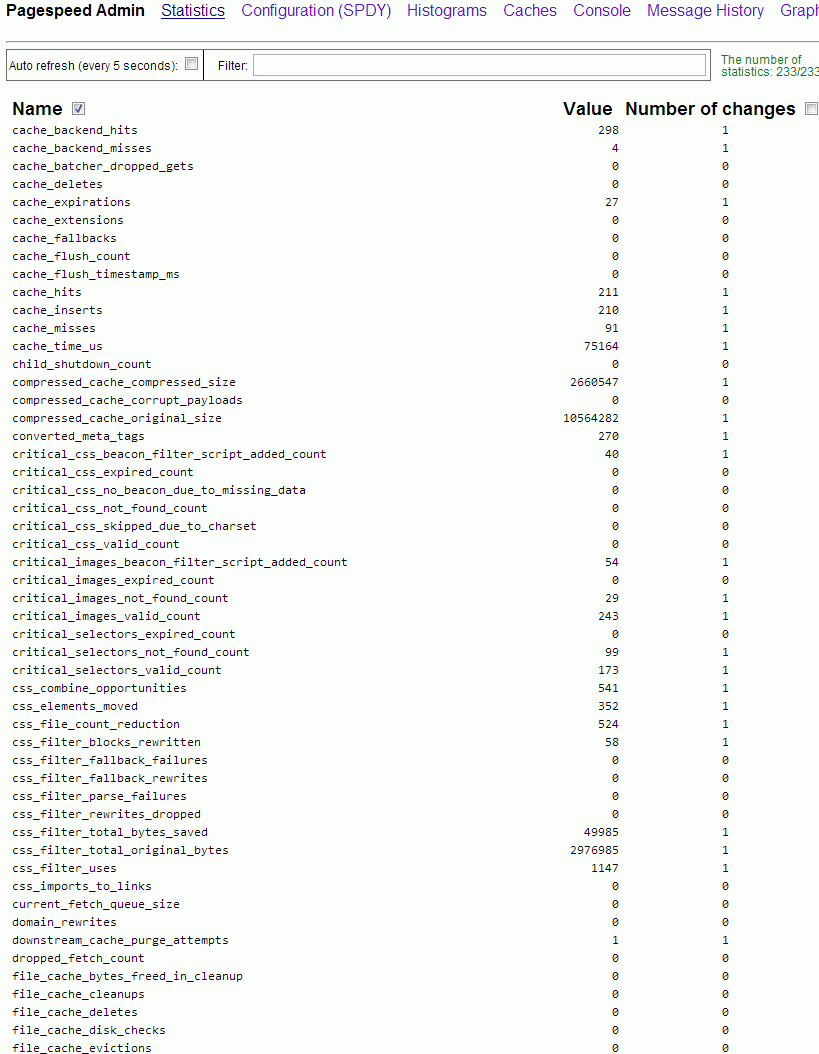
Once configured pagespeed_admin access it with favourite browser on:

http://127.0.0.1/pagespeed_admin
http://127.0.0.1/pagespeed_global_admin

improve-website-apache-webserver-seo-without-source-code-modifications-google-pagespeed_admin_panel

Other way to test it is enabled is by creating php file with good old <? phpinfo(); ?> – PHP stats enabled / disabled features code:

pagespeed-in-phpinfo-x-mod-pagespeed-output-screenshot-apache-webserver

I've also tested also pagespeed unstable release, but experienced some segmentation faults in both error.log and access.log so finally decided to keep using stable release.

PageSpeed is a great way to boost your server sites performance, however it comes on certain costs as expect your server CPU Load to jump drastically, (in my case it jumped more than twice), there are Linux servers where enabling the module could totally stone the servers, so before implementing the module on a Production system environment, always first test thouroughfully with loaded pagespeed on UAT (testing) environment with AB or Siege (Apache Benchmarking Tools).

6 days in sickness

Friday, August 10th, 2007

My physical health was quite not good during the last 6 / 7 days. Today it was a quiet day.I haven’t prayed seriously for few days but I can’t. Since my life looks like going nowhere.There is almost nothing in this town which keeps me still. I went to the Old Dobrich inMino’s coffee. But after a little argue and being a little rude to a girl I leavedthis awful mess. This guys are not a good company/match for me. It seems I don’t have friendsexcept Lily. Well I hope at least I haven’t builded all the time for nothing.Thanks Goodness that at least at work there isn’t a lot of work so I’m in a period of recovery.The world is going mad. I’m starting to scare my self. Seems like, life is created to be livednot to think about it’s purpose.END—–

How to configure ssh to automatically connect to non standard ssh port numbers (!port 22)

Tuesday, August 2nd, 2011

SSH Artistic Logo, don't give away your password

Today I’ve learned from a admin colleague, a handy tip.
I’m administrating some Linux servers which are configured on purpose not to run on the default ssh port number (22) and therefore each time I connect to a host I have to invoke the ssh command with -p PORT_NUMBER option.

This is not such a problem, however when one has to administrate a dozen of servers each of which is configured to listen for ssh connections on various port numbers, every now and then I had to check in my notes which was the correct ssh port number I’m supposed to connect to.

To get around this silly annoyance the ssh client has a feature, whether a number of ssh server hosts can be preconfigured from the ~/.ssh/config in order to later automatically recognize the port number to which the corresponding host will be connecting (whenever) using the ssh user@somehost without any -p argument specified.

In order to make the “auto detection” of the ssh port number, the ~/.ssh/config file should look something similar to:

hipo@noah:~$ cat ~/.ssh/config
Host home.*.www.pc-freak.net
User root
Port 2020
Host www.remotesystemadministration.com
User root
Port 1212
Host sub.www.pc-freak.net
User root
Port 2222
Host www.example-server-host.com
User root
Port 1234

The *.www.pc-freak.net specifies that all ssh-able subdomains belonging to my domain www.pc-freak.net should be by default sshed to port 2020

Now I can simply use:

hipo@noah:~$ ssh root@myhosts.com

And I can connect without bothering to remember port numbers or dig into an old notes.
Hope this ssh tip is helpful.