Posts Tagged ‘Quick’

Quick way to access remotely your GNU / Linux Desktop – Access Linux Desktop from Mac and Windows 7

Tuesday, August 5th, 2014

how-to-access-linux-host-from-microsoft-windows-or-mac-client-xrdp-tightvnc-native-way-logo
For M$ Windows users its always handy to have remote access to your home PC or notebook via Remote Desktop (RDP) protocol.

However in GNU / Linux, there is no native implementation of RDP protocol. So if you're using Linux as your Desktop like me you will probably want to be able to access the Linux system remotely not only via terminal with SSH using (Putty) or MobaXTerm all in one tabbed Windows terminal program but also be able to use your Linux GNOME / KDE Graphical environment from anywhere on the Internet.

This will make you ponder – Is it possible to access Linux Desktop via proprietary RDP protocol and if not how you can achieve remote GUI access to Linux?

1. Using Linux Xorg and Xming Xserver for Windows

Most people should already know of Linux ability to start multiple Xserver sessions remotely which is the native way to access between two Linux hosts or access remotely Linux from other Linux UNIX like OS. It is also possible to use xinit / startx / xhost commands to establish remotely connection to new or running Linux (Xorg) Xserver by using them in combination with XMing – XServer for Windows running on the Windows host and Debian package (x11-xserver-utils) – providing xhost cmd, however this method is a bit complicated and not so convenient.

I used to be using this method XMing (whose mirror is here), earlier in my university years to use remotely my Debian Linux from  Windows 98 and this works perfectly fine.

2. Using RDP emulation with XRDP server

in order to be able to access your desk from any friend or computer club in the world using standard available in MS Windows Remote Desktop client (mstsc.exe).
There is also another alternative way by using Windows Desktop sharing RDP experimental server xrdp:
 

apt-cache show xrdp |grep -i descr -A 3
Description: Remote Desktop Protocol (RDP) server
 Based on research work by the rdesktop project, xrdp uses the Remote
 Desktop Protocol to present a graphical login to a remote client.
 xrdp can connect to a VNC server or another RDP server.

To make your Linux host accessible via RDP:

On Debian / Ubuntu etc. deb based Linux:


apt-get update
apt-get install xrdp

 
$ /etc/init.d/xrdp status
Checking status of Remote Desktop Protocol server xrdp                                             [ OK ]
Checking status of RDP Session Manager sesman

/etc/init.d/xrdp start

On  Fedora Linux:
 

yum -y install xrdp
systemctl enable xrdp.service
systemctl start xrdp.service
systemctl enable xrdp-sesman.service
systemctl start xrdp-sesman.service


It is possible to access remote Linux host using xrdp RDP server, but this will only work in older releases of mstsc.exe (Windows XP / Vista / 2003) and will not work on Windows 7 / 8, because in MS Windows 7 and onwards RDP proto version has changed and the client no longer has compatability with older mstsc releases. There is a work around for this for anyone who stubbornly want to use RDP protocol to access Linux host. If you want to connect to xrdp from Windows 7 you have to copy the old RDP client (mstsc.exe and mstscax.dll) from a WinXP install to the Windows 7 box and run it independently, from the default installed ones, anyways this method is time consuming and not really worthy …

3. Using the VNC withTightVNC server / client


Taking above in consideration, for me personally best way to access Linux host from Windows and Mac is to use simply the good old VNC protocol with TightVNC.

TightVNC is cross-platform free and open source remote Desktop client it uses RFB protocol to control another computer screen remotely.

To use tightvnc to access remote Debian / Ubuntu – deb based Linux screen, tightvncserver package has to be installed:

apt-cache show tightvncserver|grep -i desc -A 7
Description-en: virtual network computing server software
 VNC stands for Virtual Network Computing. It is, in essence, a remote
 display system which allows you to view a computing `desktop' environment
 not only on the machine where it is running, but from anywhere on the
 Internet and from a wide variety of machine architectures.

 .
 This package provides a server to which X clients can connect and the
 server generates a display that can be viewed with a vncviewer.


apt-get –yes install tightvncserver


TightVNCserver package is also available in default repositories of Fedora / CentOS / RHEL and most other RPM based distros, to install there:
 

yum -y install tightvnc-server


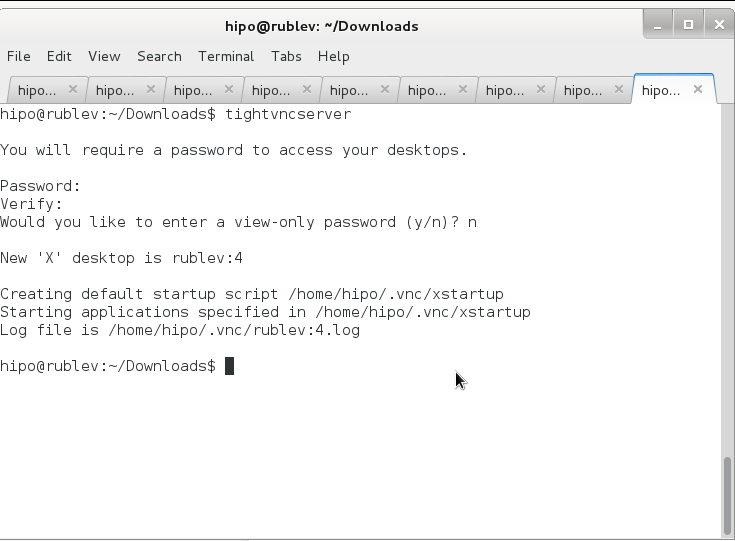
Once it is installed to make tightvncserver running you have to start it (preferrably with non-root user), usually this is the user with which you're using the system:

tightvncserver

You will require a password to access your desktops.

Password:
Verify:   
Would you like to enter a view-only password (y/n)? n

New 'X' desktop is rublev:4

Creating default startup script /home/hipo/.vnc/xstartup
Starting applications specified in /home/hipo/.vnc/xstartup
Log file is /home/hipo/.vnc/rublev:4.log


tightvncserver-running-in-gnome-terminal-debian-gnu-linux-wheezy-screenshot

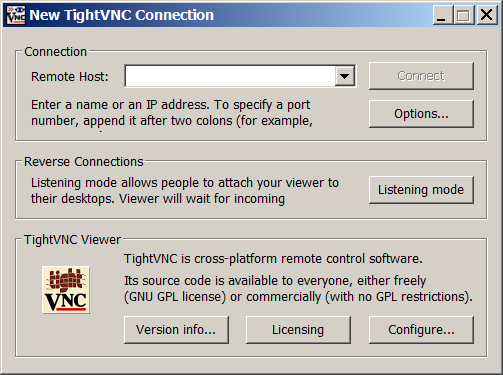
To access now TightVncserver on the Linux host Download and Install TightVNC Viewer client

note that you need to download TightVNC Java Viewer JAR in ZIP archive – don't install 32 / 64 bit installer for Windows, as this will install and setup TightVNCServer on your Windows – and you probably don't want that (and – yes you will need to have Oracle Java VM installed) …
 

tightvnc-viewer-java-client-running-on-microsoft-windows-7-screenshot

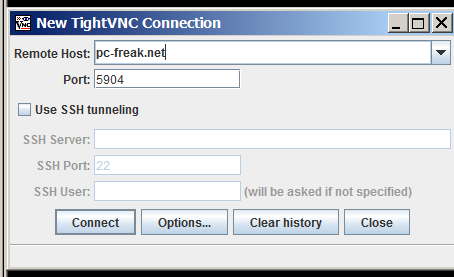
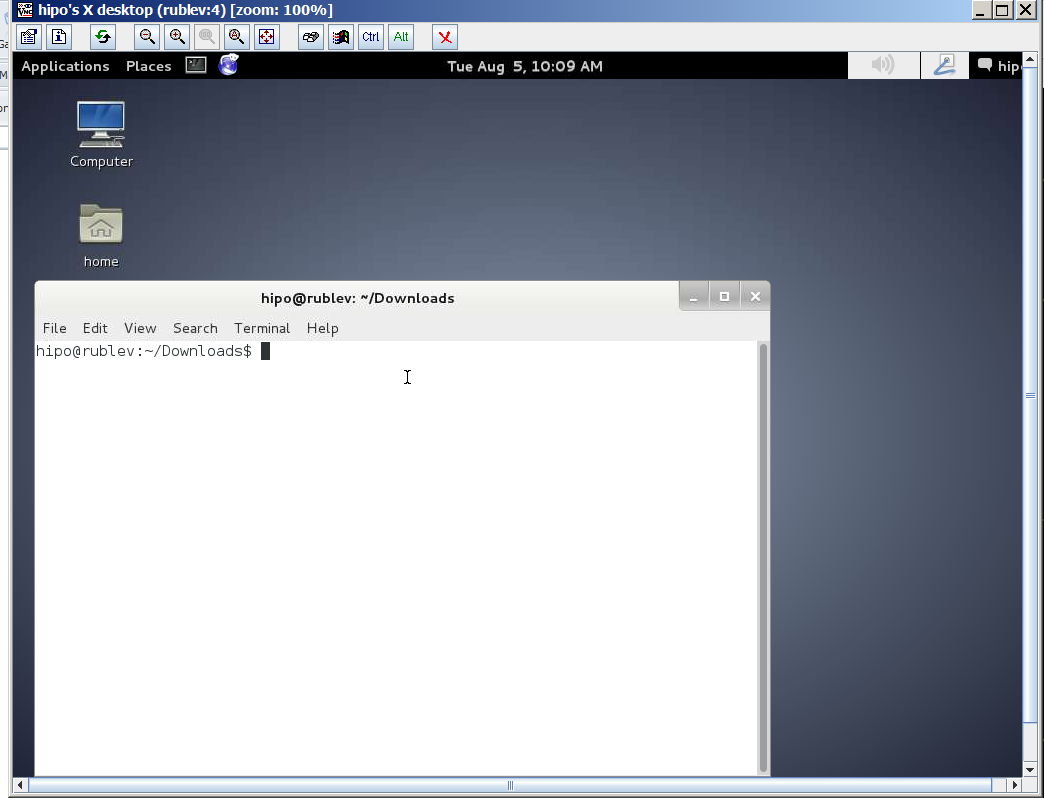
Once unzipped run tightvnc-jviewer.jar and type in the IP address of remote Linux host and screen, where TightVNC is listening, as you can see in prior screenshot my screen is :4, because I run tightvnc to listen for connections in multiple X sessions. once you're connected you will be prompted for password, asker earlier when you run  tightvncserver cmd on Linux host.

If you happen to be on a Windows PC without Java installed or Java use is prohibited you can use TightVNC Viewer Portable Binary (mirrored here)

/images/tightvnc-viewer-portable-windows-7-desktop-screenshot

If you have troubles with connection, on Linux host check the exact port on which TightVncServer is running:
 

ps ax |grep -i Tightvnc

 8630 pts/8    S      0:02 Xtightvnc :4 -desktop X -auth /var/run/gdm3/auth-for-hipo-7dpscj/database -geometry 1024×768 -depth 24 -rfbwait 120000 -rfbauth /home/hipo/.vnc/passwd -rfbport 5904 -fp /usr/share/fonts/X11/misc/,/usr/share/fonts/X11/Type1/,/usr/share/fonts/X11/75dpi/,/usr/share/fonts/X11/100dpi/ -co /etc/X11/rgb

Then to check, whether the machine you're trying to connect from doesn't have firewall rules preventing the connection use (telnet) – if installed on the Windows host:
 

telnet www.pc-ferak.net 5904
Trying 192.168.56.101…
Connected to 192.168.56.101.
Escape character is '^]'.
RFB 003.008

telnet> quit
Connection closed.

remote-connection-via-tightvnc-to-linux-host-from-windows-7-using-tightvnc-java-client-screenshot
 

Monitoring CPU load and memory usage on Mac OS X command line (Terminal)

Thursday, July 3rd, 2014

macosx-server-screenshot-server-assistant-apple-tool
You might be stunned to find out Mac OS X has a server variant called Mac OS X server. For the usual admin having to administer a Mac OS X based server is something rarely to do, however it might happen some day, and besides that nowadays Mac OS X has about 10% percentage share of PC desktop and laptops used on the Internet (data collected from w3cschools log files). Thus cause it is among popular OSes, it very possible sooner or later as a sysadmin you will have to troubleshoot issues on at least Mac OS X notebook. Mac has plenty of instruments to debug OS issues as it is UNIX (BSD) based

Mac OS X has already a GUI tool called Activity Monitor (existing in Mac OS 10.3 onwards) in earlier verions, there was tool called Process Viewer and CPU Monitor.

To start Activity Monitor open Finder and launch it via:

Applications -> Utilities -> Activity Monitor

As a Linux guy, I like to use command line and there Mac OS X is equipped with a good arsenal of tools to check CPU load and Memory. Mac OS X comes with sar – (system activity reporter), top (process monitor) and vm_stat (virtual memory statistics) command – these ones are equivalent of Linux's sar (from sysstats package), top and Linux vmstat (report virtual memory statistics).

1. Check out Mac OS X HDD Input / Output statistics
 

$ sar -d -f ~/output.sar

20:43:18   device    r+w/s    blks/s
New Disk: [disk0] IODeviceTree:/PCI0@0/RP06@1C,5/SSD0@0/PRT0@0/PMP@0/@0:0
New Disk: [disk1] IOService:/IOResources/IOHDIXController/IOHDIXHDDriveOutKernel@1/IODiskImageBlockStorageDeviceOutKernel/IOBlockStorageDriver/Apple UDIF, только для чтения, сжатый (zlib)
New Disk: [disk2] IOService:/IOResources/IOHDIXController/IOHDIXHDDriveOutKernel@3/IODiskImageBlockStorageDeviceOutKernel/IOBlockStorageDriver/Apple UDIF, только для чтения, сжатый (bzip2)
New Disk: [disk3] IOService:/IOResources/IOHDIXController/IOHDIXHDDriveOutKernel@4/IODiskImageBlockStorageDeviceOutKernel/IOBlockStorageDriver/Apple UDIF, только для чтения, сжатый (bzip2)
New Disk: [disk4] IOService:/IOResources/IOHDIXController/IOHDIXHDDriveOutKernel@6/IODiskImageBlockStorageDeviceOutKernel/IOBlockStorageDriver/Apple UDIF, только для чтения, сжатый (zlib)
20:43:28   disk0        7        312
20:43:28   disk1        0          0
20:43:28   disk2        0          0
20:43:28   disk3        0          0
20:43:28   disk4        0          0
20:43:38   disk0       12        251
20:43:38   disk1        0          

2. Checking Mac OS X CPU Load from terminal

To check Load from Mac OS command line use:
 

$ sar -o ~/output.sar 10 10

That gathers 10 sets of metrics at 10 second intervals. You can then extract useful information from the output file (even while it's still running), this will get you cpu load on Mac OS system spitting stats every 10 seconds.


21:22:33  %usr  %nice   %sys   %idle
21:22:43    7      0      2     90
21:22:53    8      0      3     89
21:23:03   11      0      4     85
21:23:13    9      0      3     88
21:23:23    9      0      3     88
21:23:33    7      0      3     90
21:23:43   10      0      3     87
21:23:53   10      0      4     85
21:24:03   10      0      5     85
21:24:13    8      0      3     88
Average:      8      0      3     87   


3. Checking Free memory on  Mac OS X

Use this obscure one liner to free -m Linux memory command like output from Mac terminal

$ vm_stat | perl -ne '/page size of (d+)/ and $size=$1; /Pagess+([^:]+)[^d]+(d+)/ and printf("%-16s % 16.2f Min", "$1:", $2 * $size / 1048576);'
 

free: 43.38 Mi
active: 1762.00 Mi
inactive: 1676.91 Mi
speculative: 3.29 Mi
wired down: 609.38 Mi
copy-on-write: 29431.01 Mi
zero filled: 4687689.80 Mi
reactivated: 30288.86 Mi


To show inactive memory in Gigabytes every 10 seconds

$ vm_stat 10 | awk 'NR>2 {gsub("K","000");print ($1+$4)/256000}'

1.70532
1.70455
1.70389
1.6904


It is also possible to get memory statistics on Mac PC running top in non-interactive mode and grepping it from output:

$ top -l 1 | head -n 10 | grep PhysMem | sed 's/, /n /g'


PhysMem: 599M wired, 1735M active, 1712M inactive, 4046M used, 47M free.


4. Quick command to get Kernel / how many CPUs, available memory and load avarage on Mac OS X

From y. 2003 onwards of Mac OS have hostinfo(host information) command, providing admin with quick way to get System Info on Mac OS

$ hostinfo


Mach kernel version:
Darwin Kernel Version 12.5.0: Sun Sep 29 13:33:47 PDT 2013; root:xnu-2050.48.12~1/RELEASE_X86_64
Kernel configured for up to 4 processors.
2 processors are physically available.
4 processors are logically available.
Processor type: i486 (Intel 80486)
Processors active: 0 1 2 3
Primary memory available: 4.00 gigabytes
Default processor set: 98 tasks, 621 threads, 4 processors
Load average: 1.63, Mach factor: 2.54


If you need more verbose information on system hardware and resources, check out system_profiler. As the manual describes it, system_profiler(reports system hardware and software configuration.) cmd:

$ system_profiler Here is a link to output file generated by system_prifler


Quick shortcut to lock your Linux computer desktop (Few words on Linux screensavers)

Thursday, November 20th, 2014

quick-way-to-lock-desktop-linux-howto-key
Locking the PC while going for a coffee break, Lunch or toilet is longly used to secure physically your PC display from spying eyes or prevent you from  someone to install a spying software or leak private data from PC HDD to an USB drive.
People who are coming from the wonderful MS Windows OS   are certainly used to quick shortcut key combination to lock PC screen with:
 

Windows key + L


So how to do Lock Screen on Linux?

On Linux locking your Screen the Quick Shortcut is:
 

CTRL + ALT + L.


Locking the screen is done (depending on the Linux distribution) by using by either using historically famous XScreenSaver if non-gnome / KDE graphical environemnt is used or if in Linux Gnome GUI with  gnome-screensaver and on KDE desktop manager with kscreenlocker.


Exact command executed on CTRL + ALT + L keypress on GNOME is:
 

gnome-screensaver-command -l


On KDE to manually lock screen command is:

kscreenlocker

Nomatter whether with GNOME or KDE its worthy mention that xscreensaver is more Screensaver rich than kscreenlocker and gnome-screensaver as it includes about 200 different Screensavers making screen nice to watch when you come back from a lunch.

For people with Windows key keyboard who are too used to using Windows XP / 7 lockreen WIN + L key shortcut to make Windows (key) + L keys combination work on Linux with GNOME desktop:
 

System -> Preferences -> Keyboard Shortcuts

Make Win + L keys combination work on Linux with KDE desktop
 

  1.  "System Settings" (KDE menu).
  2. Choose "Keyboard & mouse" (on "General" tab).
  3. Choose "Global Keyboard Shortcuts" on the left.
  4. Choose "Run Command Interface" from "KDE component" dropdown list.
  5. Choose "Lock session".
  6. Select "Custom".
  7. Click on "None" (button changes to "Input…").
  8. Compose your desired sequence by pressing appropriate buttons on your keyboard.
  9. Click "Apply".


For other desktop environments like Window Maker you can use xmodmap command to bind Win + L keys

Sys Admin VIM Quick Cheat Sheet ! ;)

Wednesday, July 20th, 2011

Have you, ever thought of refreshing your VIM knowledge obtained back in the days reading the vimtutorial available straight in vim via the:
vimtutor comand?

I asked few vim related question today in #vim in irc freenode and I was referred to one mate to the following picture:

Vi VIM Tutorial Quick Cheat Sheet

VIM QUICK Tutorial Sheet Picture ! 😉 Nice ! Aint’t it? 🙂

Quick way to install mod_qos on Debian Lenny to protect from Slowloris

Thursday, February 18th, 2010

I’m gonna do a fast walk through on installing and enabling mod_qos on Debian, original article is available in Bulgarian on mpetrov’s blog .
So let’s go…
1. Install required development files and tools to be able to proper compile:

debian-server# apt-get install apache2-threaded-dev gcc

2. Download the mod_qos latest archive from sourceforge

debian-server# cd /usr/local/srcdebian-server# wget http://freefr.dl.sourceforge.net/project/mod-qos/mod-qos/9.7/mod_qos-9.8.tar.gz

3. Unarchive (Untar) the mod_qos archive and compile the module

debian-server# tar zxvf mod_qos-9.8.tar.gz
debian-server# cd mod_qos-9.8/apache2/
debian-server# apxs2 -i -c mod_qos.c

You can see from the compile output module is installed to; usr/lib/apache2/modules

4. Now let us create mod_qos configuration files

debian-server# cd /etc/apache2/mods-available/
debian-server# echo "LoadModule qos_module /usr/lib/apache2/modules/mod_qos.so" > qos.load

debian-server# vim /etc/apache2/mods-available/qos.conf

## QoS module Settings
<IfModule mod_qos.c>
# handles connections from up to 100000 different IPs
QS_ClientEntries 100000
# will allow only 50 connections per IP
QS_SrvMaxConnPerIP 50
# maximum number of active TCP connections is limited to 256
MaxClients 256
# disables keep-alive when 70% of the TCP connections are occupied:
QS_SrvMaxConnClose 180
# minimum request/response speed (deny slow clients blocking the server,
# ie. slowloris keeping connections open without requesting anything):
QS_SrvMinDataRate 150 1200
# and limit request header and body (carefull, that limits uploads and post requests too):
# LimitRequestFields 30
# QS_LimitRequestBody 102400
</IfModule>

5. All left is to load the mod_qos module into Apache and restart the webserver

debian-server# a2enmod qos
debian-server# /etc/init.d/apache2 restart

Congratulations, Now slowloris and many other Apache DoS techniques won’t bother you anymore!

A quick way to change picture background with the Gimp

Wednesday, September 23rd, 2009

I wanted to change the background of a picture of a Russian Orthodox Cross I’ve downloaded from the net. After some time spend experimenting and reading a couple of articles online I did it :).
Here is how:
1. Open an Image in Gimp through the File -> Open as Layers menu.2. Use Fuzzy Select tool to select regions based on color of the image you'd like to change the background.3. Open a new File in Gimp via New -> File menus.4. Select again the window containing the image you selected with the Fuzzy Tool and press Ctrl+X.5. Now go again to the newly opened picture and use the: Bucket Fill Tool with some selected color to select thenew background for the future image.6. Now after having a background color already selected use Ctrl+V to paste your previous selection Well congrats, you should now be having the good old image on a shiny new background.END—–