Posts Tagged ‘reading package’

How to deb upgrade PHP 5.3.3-7 / MySQL Server 5.1 to PHP 5.4.37 MySQL 5.5 Server on Debian 6.0 / 7.0 Squeeze / Wheezy GNU / Linux

Thursday, February 12th, 2015

how-to-deb-upgrade-mysql-server-5.1-to-mysql-5.5-php-5.3-to-php-5.4-5.5-upgrade-howto-on-old-stable-debian-squeeze-wheezy

I've been still running Debian Squeeze 6.0 GNU / Linux on few of the Linux / Apache / MySQL servers I'm administrating and those servers are running few Wordperss / Joomla websites which lately face severe MySQL performance issues. I tried to optimize using various mysql performance optimization scripts such as mysql-tuner.pl, Tuning-primer.sh and Percona Toolkit – a collection of advanced command-line tools for system administrators and tech / support staff to perform a variety of MySQL and system tasks that are too difficult or complex to perform manually. Though with above tools and some my.cnf tunizations I managed to achieve positive performance improvement results with above optimizations, still I didn't like how MyQSL served queries and since the SQL server is already about 5 years old (running version 5.1) and the PHP on sever is still at 5.3 branch, I was advised by my dear colleague Anatoliy to try version update as a mean to improve SQLserver performance. I took seriously the suggestion to try upgrade as a mean to resolve performance issues in this article I will explain in short what I had to do to make MySQL upgrade a success

Of course to try keep deb installed software versions as fresh as possible possible deb packagse, I'm already using Debian Back Ports (for those who hear it a first time Debian Backports is a special repository for Stable versioned Debian Desktop and Servers  – supporting stable releases of Debian Linux) which allows you to keep install packages versions less outdated (than default installable software which usually are way behind latest stable package versions with 2-5 years).

If you happen to administer Stable Debian servers and you never used BackPorts I warmly recommend it as it often includes security patches of packages part of Debian stable releases that reached End Of Support (EOS) and already too old even for security updates to be issued by respective Debian Long Term Suport (LTS) repositories.

If you're like me and still in situation to manage remotely Debian 6.0 Squeeze and its the first time you hear about BackPorts and Debian LTShttps://wiki.debian.org/LTS/ to start using those two add to your /etc/apt/sources.list below 3 lines

Open with vim editor and press shift+G to go to last line of file and then press I to enter INSERT mode, once you're done to save, press (ESC) then press : and type x! in short key combination for exit and save setting in vim is 
 

Esc + :x! 


debian-server:~# vim /etc/apt/sources.list
deb http://http.debian.net/debian squeeze-lts main contrib non-free
deb-src http://http.debian.net/debian squeeze-lts main contrib non-free
deb http://http.debian.net/debian-backports squeeze-backports main

If you haven't been added a security updates line in /etc/apt/sources.list make sure you add also:


deb http://security.debian.org/ squeeze/updates main contrib non-free
deb-src http://security.debian.org/ squeeze/updates main contrib non-free


Then to apply latest security updates and packages from LTS / Backports repository run the usual:


debian-server:~# apt-get update && apt-get –yes upgrade
….

If you need to search a package or install something from just added backports repository use:


debian-server:~# apt-cache -t squeeze-backports search "mysql-server"
auth2db – Powerful and eye-candy IDS logger, log viewer and alert generator
torrentflux – web based, feature-rich BitTorrent download manager
cacti – Frontend to rrdtool for monitoring systems and services
mysql-server-5.1 – MySQL database server binaries and system database setup
mysql-server-core-5.1 – MySQL database server binaries
mysql-server – MySQL database server (metapackage depending on the latest version)


To install specific packages only with all their dependencies from Backports while keeping rest of packages from Debian Stable:


debian-server:~# apt-get install -t squeeze-backports "package_name"

In same way you can also search or install specific packages from LTS repo:


debian-server:~# apt-get search -t squeeze-lts "package_name"

debian-server:~# apt-get install -t squeeze-lts "package_name"

Latest mysql available from Debian BackPorts and LTS is still quite old 5.1.73-1+deb6u1 therefore I made an extensive research online on how can I easily update MySQL 5.1 to MySQL 5.5 / 5.6 on Debian Stable Linux.
 

Luckily there were already DotDeb deb repositories for Debian LAMP (Linux / Apache  / MySQL / PHP / Nginx ) running servers prepared in order to keep the essential Webserver services up2date even long after distro official support is over. I learned about existence of this repo thanks to a Ryan Tate's post who updates his LAMP stack on TurnKey Linux which by the way is based on slightly modified official stable Debian Linux releases packages

To start using DotDeb repos add in /etc/apt/sources.list (depending whereh you're on Squeeze or Wheeze Debian):


deb http://packages.dotdeb.org squeeze all
deb-src http://packages.dotdeb.org squeeze all

or for Debian Wheezy add repos:


deb http://packages.dotdeb.org wheezy all
deb-src http://packages.dotdeb.org wheezy all


I was updating my DebianLatest MySQL / PHP / Apache release to Latest ones on (6.0.4) Squeeze so added above squeeze repos:

Before refreshing list of package repositories, to authenticate repos issue:


debian-server:~# wget -q http://www.dotdeb.org/dotdeb.gpg
debian-server:~# apt-key add dotdeb.gpg

Once again to update my packages from newly added DodDeb repository


debian-server:~# apt-get update

Before running the SQL upgrade to insure myself, I dumped all databases with:


debian-server:~# mysqldump -u root -p -A > /root/dump.sql

Finally I was brave enough to run apt-get dist-upgrade to update with latest LAMP packages


debian-server:~# apt-get dist-upgrade
Reading package lists… Done
Building dependency tree
Reading state information… Done
Calculating upgrade… Done
The following packages will be REMOVED:
  mysql-client-5.1 mysql-server mysql-server-5.1
The following NEW packages will be installed:
  libaio1 libmysqlclient18 mysql-client-5.5 mysql-client-core-5.5 python-chardet python-debian
The following packages will be upgraded:
  curl krb5-multidev libapache2-mod-php5 libc-bin libc-dev-bin libc6 libc6-dev libc6-i386 libcurl3 libcurl3-gnutls libcurl4-openssl-dev libevent-1.4-2
  libgssapi-krb5-2 libgssrpc4 libjasper1 libk5crypto3 libkadm5clnt-mit7 libkadm5srv-mit7 libkdb5-4 libkrb5-3 libkrb5-dev libkrb53 libkrb5support0 libmysqlclient-dev
  libxml2 libxml2-dev locales mysql-client mysql-common ntp ntpdate php-pear php5 php5-cgi php5-cli php5-common php5-curl php5-dev php5-gd php5-imagick php5-mcrypt
  php5-mysql php5-odbc php5-recode php5-sybase php5-xmlrpc php5-xsl python-reportbug reportbug unzip

50 upgraded, 6 newly installed, 3 to remove and 0 not upgraded.
Need to get 51.7 MB of archives.
After this operation, 1,926 kB of additional disk space will be used.
Do you want to continue [Y/n]? Y

As you see from above output above command updates Apache webservers / PHP and PHP related modules, however it doesn't update MySQL installed version, to update also MySQL server 5.1 to MySQL server 5.5


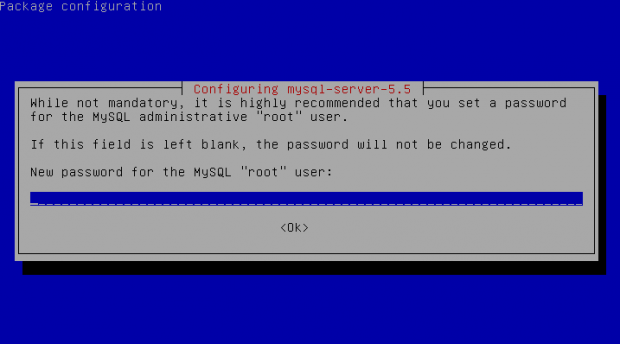
debian-server:~#  apt-get install –yes mysql-server mysql-server-5.5

You will be prompted with the usual Debian ncurses text blue interface to set a root password to mysql server, just set it the same as it used to be on old upgraded MySQL 5.1 server.

Well now see whether mysql has properly restarted with ps auxwwf


debian-server:~#  ps axuwwf|grep -i sql
root     22971  0.0  0.0 112360   884 pts/11   S+   15:50   0:00  |                   \_ grep -i sql
root     19436  0.0  0.0 115464  1556 pts/1    S    12:53   0:00 /bin/sh /usr/bin/mysqld_safe
mysql    19837  4.0  2.3 728192 194552 pts/1   Sl   12:53   7:12  \_ /usr/sbin/mysqld –basedir=/usr –datadir=/var/lib/mysql –plugin-dir=/usr/lib/mysql/plugin –user=mysql –pid-file=/var/run/mysqld/mysqld.pid –socket=/var/run/mysqld/mysqld.sock –port=3306
root     19838  0.0  0.0 110112   700 pts/1    S    12:53   0:00  \_ logger -t mysqld -p daemon.error

In my case it was running, however if it fails to run try to debug what is going wrong on initialization by manually executing init script /etc/init.d/mysql stop; /etc/init.d/mysql start and look for errors. You can also manually try to run mysqld_safe from console if it is not running run:


debian-server:~# /usr/bin/mysqld_safe &

This should give you a good hint on why it is failing to run
 

One more thing left is to check whether php modules load correctly to do so issue:


debian-server:~# php -v
Failed loading /usr/lib/php5/20090626/xcache.so:  /usr/lib/php5/20090626/xcache.so: cannot open shared object file: No such file or directory

Failed loading /usr/lib/php5/20090626/xdebug.so:  /usr/lib/php5/20090626/xdebug.so: cannot open shared object file: No such file or directory


You will likely get an exception (error) like above.
To solve the error, reinstall xcache and xcache-debug debs


debian-server:~# apt-get purge php5-xcache php5-xdebug

Now PHP + MySQL + Apache environment should be running much smootly.

debian-squeeze-wheeze-update-install-mysql-sevver5.55-620x344-howto

Upgrading the MySQL server / PHP library to MySQL server 5.6 / PHP 5.5 on Wheeze Linux is done in very much analogous ways all you have to do is change the repositories with above wheeze 7.0 ones and to follow the process as described in this article. I haven't tested update on Wheezy yet, so if you happen to try my article with wheezy reports and got a positive upgrade result please drop a comment.

Use apt-get with Proxy howto – Set Proxy system-wide in Linux shell and Gnome

Friday, May 16th, 2014

linux-apt-get-configure-proxy-howto-set-proxy-systemwide-in-linux

I juset setup a VMWare Virtual Machine on my HP notebook and installed Debian 7.0 stable Wheezy. Though VMWare identified my Office Internet and configured automatically NAT, I couldn't access the internet from a browser until I remembered all HP traffic is going through a default set browser proxy.
After setting a proxy to Iceweasel, Internet pages started opening normally, however as every kind of traffic was also accessible via HP's proxy, package management with apt-get (apt-get update, apt-get install etc. were failing with errors):


# apt-get update

Ign cdrom://[Debian GNU/Linux 7.2.0 _Wheezy_ – Official i386 CD Binary-1 20131012-12:56] wheezy Release.gpg
Ign cdrom://[Debian GNU/Linux 7.2.0 _Wheezy_ – Official i386 CD Binary-1 20131012-12:56] wheezy Release
Ign cdrom://[Debian GNU/Linux 7.2.0 _Wheezy_ – Official i386 CD Binary-1 20131012-12:56] wheezy/main i386 Packages/DiffIndex
Ign cdrom://[Debian GNU/Linux 7.2.0 _Wheezy_ – Official i386 CD Binary-1 20131012-12:56] wheezy/main Translation-en_US
Err http://ftp.by.debian.org wheezy Release.gpg
  Could not connect to ftp.by.debian.org:80 (86.57.151.3). – connect (111: Connection refused)
Err http://ftp.by.debian.org wheezy-updates Release.gpg
  Unable to connect to ftp.by.debian.org:http:
Err http://security.debian.org wheezy/updates Release.gpg
  Cannot initiate the connection to security.debian.org:80 (2607:ea00:101:3c0b:207:e9ff:fe00:e595). – connect (101: Network is unreachable) [IP: 2607:ea00:101:3c0b:207:e9ff:fe00:e595 80]
Reading package lists…


This error is caused because apt-get is trying to directly access above http URLs and because port 80 is filtered out from HP Office, it fails in order to make it working I had to configure apt-get to use Proxy host – here is how:

a) Create /etc/apt/apt.conf.d/02proxy file (if not already existing)
and place inside:
 

Acquire::http::proxy::Proxy "https://web-proxy.cce.hp.com";
Acquire::ftp::proxy::Proxy "ftp://web-proxy.cce.hp.com";


To do it from console / gnome-terminal issue:
echo ''Acquire::http::Proxy "https://web-proxy.cce.hp.com:8088";' >> /etc/apt/apt.conf.d/02proxy
echo ''Acquire::ftp::Proxy "https://web-proxy.cce.hp.com:8088";' >> /etc/apt/apt.conf.d/02proxy

That's all now apt-get will tunnel all traffic via HTTP and FTP proxy host web-proxy.cce.hp.com and apt-get works again.

Talking about Proxyfing Linux's apt-get, its possible to also set proxy shell variables, which are red and understood by many console programs like Console browsers lynx, links, elinks  as well as wget and curl commands, e.g.:


export http_proxy=http://192.168.1.5:5187/
export https_proxy=$http_proxy
export ftp_proxy=$http_proxy
export rsync_proxy=$http_proxy
export no_proxy="localhost,127.0.0.1,localaddress,.localdomain.com"

For proxies protected with username and password export variables should look like so: echo -n "username:"
read -e username
echo -n "password:"
read -es password
export http_proxy="http://$username:$password@proxyserver:8080/"
export https_proxy=$http_proxy
export ftp_proxy=$http_proxy
export rsync_proxy=$http_proxy
export no_proxy="localhost,127.0.0.1,localaddress,.localdomain.com"

To make this Linux proxy settings system wide on Debian / Ubuntu there is the /etc/environment file add to it:
 

http_proxy=http://proxy.server.com:8080/
https_proxy=http://proxy.server.com:8080/
ftp_proxy=http://proxy.server.com:8080/
no_proxy="localhost,127.0.0.1,localaddress,.localdomain.com"
HTTP_PROXY=http://proxy.server.com:8080/
HTTPS_PROXY=http://proxy.server.com:8080/
FTP_PROXY=http://proxy.server.com:8080/
NO_PROXY="localhost,127.0.0.1,localaddress,.localdomain.com"


To make proxy global (systemwide) for most (non-Debian specific) Linux distributions shell environments create new file /etc/profile.d/proxy.sh and place something like:

function proxy(){
echo -n "username:"
read -e username
echo -n "password:"
read -es password
export http_proxy="http://$username:$password@proxyserver:8080/"
export https_proxy=$http_proxy
export ftp_proxy=$http_proxy
export rsync_proxy=$http_proxy
export no_proxy="localhost,127.0.0.1,localaddress,.localdomain.com"
echo -e "nProxy environment variable set."
}
function proxyoff(){
unset HTTP_PROXY
unset http_proxy
unset HTTPS_PROXY
unset https_proxy
unset FTP_PROXY
unset ftp_proxy
unset RSYNC_PROXY
unset rsync_proxy
echo -e "nProxy environment variable removed."
}

To set Global Proxy (make Proxy Systemwide) for a user in GNOME Desktop environment launch gnome-control-center

And go to Network -> Network Proxy

/images/gnome-configure-systemwide-proxy-howto-picture1

/images/gnome-configure-systemwide-proxy-howto-picture2

To make proxy settings also system wide for some GUI Gnome GTK3 applications

gsettings set org.gnome.system.proxy mode 'manual'
gsettings set org.gnome.system.proxy.http host 'your-proxy.server.com'
gsettings set org.gnome.system.proxy.http port 8080

Fun with Apache / Nginx Webserver log – Visualize webserver access log in real time

Friday, July 18th, 2014

visualize-graphically-web-server-access-log-logstalgia-nginx-apache-log-visualize-in-gnu-linux-and-windows
If you're working in a hosting company and looking for a graphical way to Visualize access to your Linux webservers – (Apache, Nginx, Lighttpd) you will be happy to learn about Logstalgia's existence. Logstalgia is very useful if you need to convince your Boss / company clients that the webservers are exceeding the CPU / Memory hardware limits physically servers can handle. Even if you don't have to convince anyone of anything logstalgia is cool to run if you want to impress a friend and show off your 1337 4Dm!N Sk!11Z 🙂 Nostalgia is much more pleasent way to keep an eye on your Webserver log files in real time better than (tail -f)

The graphical output of nostalgia is a pong-like battle game between webserver and never ending chain of web requests.

This is the official website description of Logstalgia:
 

Logstalgia is a website traffic visualization that replays web-server access logs as a pong-like battle between the web server and an never ending torrent of requests. Requests appear as colored balls (the same color as the host) which travel across the screen to arrive at the requested location. Successful requests are hit by the paddle while unsuccessful ones (eg 404 – File Not Found) are missed and pass through. The paths of requests are summarized within the available space by identifying common path prefixes. Related paths are grouped together under headings. For instance, by default paths ending in png, gif or jpg are grouped under the heading Images. Paths that don’t match any of the specified groups are lumped together under a Miscellaneous section.


To install Logstalgia on Debian / Ubuntu Linux there is a native package, so to install it run the usual:

apt-get --yes install logstalgia

Reading package lists... Done
Building dependency tree
Reading state information... Done
The following NEW packages will be installed:
logstalgia
0 upgraded, 1 newly installed, 0 to remove and 4 not upgraded.
Need to get 161 kB of archives.
After this operation, 1,102 kB of additional disk space will be used.
Get:1 http://mirrors.kernel.org/debian/ stable/main logstalgia amd64 1.0.0-1+b1 [161 kB]
Fetched 161 kB in 2s (73.9 kB/s)
Selecting previously deselected package logstalgia.
(Reading database ... 338532 files and directories currently installed.)
Unpacking logstalgia (from .../logstalgia_1.0.0-1+b1_amd64.deb) ...
Processing triggers for man-db ...
Setting up logstalgia (1.0.0-1+b1) ...


Logstalgia is easily installable from source code on non-Debian Linux distributions too, to install it on any non-debian Linux distrubution do:

cd /usr/local/src/ wget https://logstalgia.googlecode.com/files/logstalgia-1.0.5.tar.gz
 

–2014-07-18 13:53:23–  https://logstalgia.googlecode.com/files/logstalgia-1.0.3.tar.gz
Resolving logstalgia.googlecode.com… 74.125.206.82, 2a00:1450:400c:c04::52
Connecting to logstalgia.googlecode.com|74.125.206.82|:443… connected.
HTTP request sent, awaiting response… 200 OK
Length: 841822 (822K) [application/x-gzip]
Saving to: `logstalgia-1.0.3.tar.gz'

100%[=================================>] 841,822     1.25M/s   in 0.6s

2014-07-18 13:53:24 (1.25 MB/s) – `logstalgia-1.0.3.tar.gz' saved [841822/841822]

Untar the archive with:
 

tar -zxvf logstalgia-1.0.5.tar.gz

Compile and install it:

cd logstalgia
./configure
make
make install


How to use LogStalgia?

Syntax is pretty straight forward just pass the Nginx / Apache

Process Debian Linux Apache logs:

logstalgia /var/log/apache2/access.log


Process CentoS, Redhat etc. RPM based logs:

logstalgia /var/log/httpd/access.log
To process webserver log in real time with logstalgia:

tail -f /var/log/httpd/access_log | logstalgia -

To make logstalgia visualize log output you will need to have access to server physical console screen. As physical access is not possible on most dedicated servers – already colocated in some Datacenter. You can also use a local Linux PC / notebook installed with nostalgia to process webserver access logs remotely like so:

logstalgia-visualize-your-apache-nginx-lighttpd-logs-graphically-in-x-and-console-locally-and-remotely

ssh hipo@www.pc-freak.net tail -f /var/log/apache2/access.log | logstalgia --sync

Note! If you get an empty output from logstalgia, this is because of permission issues, in this example my user hipo is added in www-data Apache group – if you want to add your user to have access like me, issue on remote ssh server):
 

addgroup hipo www-data


Alterantively you can login with ssh with root, e.g. ssh root@www.pc-freak.net

If you're having a GNOME / KDE X environment on the Linux machine from which you're ssh-ing Logstalgia will visualize Webserver access.log requests inside a new X Window otherwise if you're on a Linux with just a console with no Xserver graphics it will visualize graphically web log statistics using console svgalib .


If you're planning to save output from nostalgia visualization screen for later use – lets say you have to present to your CEO statistics about all your servers  Webservers logs you can save nostalgia produced video in .ppm (netpbm) format.

Whether you have physical console access to the server:

logstalgia -1280x720 --output-ppm-stream output.ppm /var/log/httpd/access.log

Or if you just a have a PC with Linux and you want to save visualized content of access.log remotely:

ssh hipo@www.pc-freak.net tail -f /var/log/nginx/pc-freak-access.log | logstalgia -1280x720 --output-ppm-stream --sync output.ppm


ssh user@server1.cyberciti.biz tail -f /var/log/nginx/www.cyberciti.biz_access.log | logstalgia -1280x720 --output-ppm-stream --sync output.ppm

To make produced .ppm later usable you can use ffmpeg to convert to .mp4:

ffmpeg -y -r 60 -f image2pipe -vcodec ppm -i output.ppm -vcodec libx264 -preset ultrafast -pix_fmt yuv420p -crf 1 -threads 0 -bf 0 nginx.server.log.mp4

Then to play the videos use any video player, I usually use vlc and mplayer.

For complete info on Nostalgia – website access log visualizercheck home page on googlecode

If you're lazy to install Logstalgia, here is Youtube video made from its output:

Enjoy 🙂

How to upgrade single package with their dependencies on Debian and Ubuntu Linux

Friday, March 16th, 2012

Debian GNU / Linux apt-get upgrade a package selection of a whole bunch of packages ready to upgrade apt artistic logo

Are you a Debian System Administrator and you recently run apt-get upgrade && apt-get upgrade finding out there are plenty of new packagesfor upgrade? Do you need only a pre-selected number of packages to upgrade with apt?
I run apt-get update && apt-get upgrade on one of our company Debian servers, just to see there are a number of packages to be upgraded among which there was some I didn't wanted to upgrade. Here is a little paste output from apt-get upgrade:

debian:~# apt-get update && apt-get upgrade
Hit http://security.debian.org squeeze/updates Release.gpg
...
Hit http://security.debian.org squeeze/updates/main amd64 Packages
Fetched 128 kB in 0s (441 kB/s)
Reading package lists... Done
Building dependency tree
Reading state information... Done
The following packages will be upgraded:
at imagemagick libdbd-pg-perl libfreetype6 libmagickcore3 libmagickcore3-extra libmagickwand3 libmysqlclient16 mysql-client
mysql-client-5.1 mysql-common mysql-server mysql-server-5.1 mysql-server-core-5.1
Do you want to continue [Y/n]
14 upgraded, 0 newly installed, 0 to remove and 0 not upgraded.

From first sight it seems logical to issue apt-get upgrade packagename to upgrade only single package with its package dependencies, instead of the whole group the above packs. However doing:
apt-get upgrade imagemagick will still try to upgrade all the packages instead of just imagemagick and its dependency package deb libmagickcore3

debian:~# apt-get upgrade imagemagick
Reading package lists... Done
Building dependency tree
Reading state information... Done
The following packages will be upgraded:
at imagemagick libdbd-pg-perl libfreetype6 libmagickcore3 libmagickcore3-extra libmagickwand3 libmysqlclient16 mysql-client
mysql-client-5.1 mysql-common mysql-server mysql-server-5.1 mysql-server-core-5.1
14 upgraded, 0 newly installed, 0 to remove and 0 not upgraded.
Do you want to continue [Y/n]

Doing all package,upgrade is not a good idea in my case, since upgrading mysql-server will require a MySQL server restart (something which we cannot afford to do right now) on this production server.
MySQL server restart during upgrade is never a good idea especially on productive busy (heavy loaded) SQL servers.
A restart of the MySQL server serving thousands of requests per second could lead often to crashed tables and hence temporary server downtime etc.

Still it is a good idea to upgrade the rest of packages with their newer versions. For exmpl. to upgrade; imagemagick, at , libfreetype6 and so on.

In order to upgrade only this 3 ones and their respective package dependencies, issue:

debian:~# apt-get --yes install imagemagick at libfreetype6

Repeat the apt-get install command with passing all the single package name you want to be upgraded and voila you're done :).
Be sure the apt-get install packagename upgrade doesn't require also upgrade of myssql-server, mysql-client, mysql-common or mysql-server-core-5.1 or any of the package name you want to preserve from upgrading.