Posts Tagged ‘repositories’

Linux: Howto Fix “N: Repository ‘http://deb.debian.org/debian buster InRelease’ changed its ‘Version’ value from ‘10.9’ to ‘10.10’” error to resolve apt-get release update issue

Friday, August 13th, 2021

Linux's surprises and disorganization is continuously growing day by day and I start to realize it is becoming mostly impossible to support easily this piece of hackware bundled together.
Usually so far during the last 5 – 7 years, I rarely had any general issues with using:

 apt-get update && apt-get upgrade && apt-get dist-upgrade 

to raise a server's working stable Debian Linux version packages e.g. version X.Y to verzion X.Z (for example up the release from Debian Jessie from 8.1 to 8.2). 

Today I just tried to follow this well known and established procedure that, of course nowdays is better to be done with the newer "apt" command instead with the legacy "apt-get"
And the set of 


# apt-get update && apt-get upgrade && apt-get dist-upgrade


has triggered below shitty error:
 

root@zabbix:~# apt-get update && apt-get upgrade
Get:1 http://security.debian.org buster/updates InRelease [65.4 kB]
Get:2 http://deb.debian.org/debian buster InRelease [122 kB]
Get:3 http://security.debian.org buster/updates/non-free Sources [688 B]
Get:4 http://repo.zabbix.com/zabbix/5.0/debian buster InRelease [7096 B]
Get:5 http://security.debian.org buster/updates/main Sources [198 kB]
Get:6 http://security.debian.org buster/updates/main amd64 Packages [300 kB]
Get:7 http://security.debian.org buster/updates/main Translation-en [157 kB]
Get:8 http://security.debian.org buster/updates/non-free amd64 Packages [556 B]
Get:9 http://deb.debian.org/debian buster/main Sources [7836 kB]
Get:10 http://repo.zabbix.com/zabbix/5.0/debian buster/main Sources [1192 B]
Get:11 http://repo.zabbix.com/zabbix/5.0/debian buster/main amd64 Packages [4785 B]
Get:12 http://deb.debian.org/debian buster/non-free Sources [85.7 kB]
Get:13 http://deb.debian.org/debian buster/contrib Sources [42.5 kB]
Get:14 http://deb.debian.org/debian buster/main amd64 Packages [7907 kB]
Get:15 http://deb.debian.org/debian buster/main Translation-en [5968 kB]
Get:16 http://deb.debian.org/debian buster/main amd64 Contents (deb) [37.3 MB]
Get:17 http://deb.debian.org/debian buster/contrib amd64 Packages [50.1 kB]
Get:18 http://deb.debian.org/debian buster/non-free amd64 Packages [87.7 kB]
Get:19 http://deb.debian.org/debian buster/non-free Translation-en [88.9 kB]
Get:20 http://deb.debian.org/debian buster/non-free amd64 Contents (deb) [861 kB]
Fetched 61.1 MB in 22s (2774 kB/s)
Reading package lists… Done
N: Repository 'http://deb.debian.org/debian buster InRelease' changed its 'Version' value from '10.9' to '10.10'


As I used to realize nowdays, as Linux started originally as 'Hackers' operating system, its legacy is just one big hack and everything from simple maintenance up to the higher and more sophisticated things requires a workaround 'hack''.


This time the hack to resolve error:
 

N: Repository 'http://deb.debian.org/debian buster InRelease' changed its 'Version' value from '10.9' to '10.10'


is up to running cmd:
 

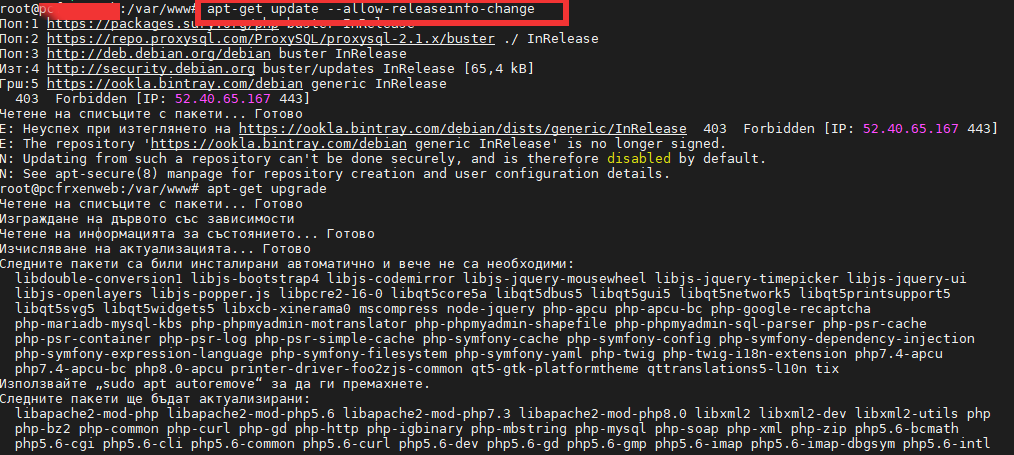
debian-server:~# apt-get update –allow-releaseinfo-change
Поп:1 http://ftp.de.debian.org/debian buster-backports InRelease
Поп:2 http://ftp.debian.org/debian stable InRelease
Поп:3 http://security.debian.org stable/updates InRelease
Изт:5 https://packages.sury.org/php buster InRelease [6837 B]
Изт:6 https://download.docker.com/linux/debian stretch InRelease [44,8 kB]
Изт:7 https://packages.sury.org/php buster/main amd64 Packages [317 kB]
Игн:4 https://attic.owncloud.org/download/repositories/production/Debian_10  InRelease
Изт:8 https://download.owncloud.org/download/repositories/production/Debian_10  Release [964 B]
Изт:9 https://packages.sury.org/php buster/main i386 Packages [314 kB]
Изт:10 https://download.owncloud.org/download/repositories/production/Debian_10  Release.gpg [481 B]
Грш:10 https://download.owncloud.org/download/repositories/production/Debian_10  Release.gpg
  Следните подписи са невалидни: DDA2C105C4B73A6649AD2BBD47AE7F72479BC94B
Грш:11 https://ookla.bintray.com/debian generic InRelease
  403  Forbidden [IP: 52.39.193.126 443]
Четене на списъците с пакети… Готово
N: Repository 'https://packages.sury.org/php buster InRelease' changed its 'Suite' value from '' to 'buster'
W: An error occurred during the signature verification. The repository is not updated and the previous index files will be used. GPG error: https://download.owncloud.org/download/repositories/production/Debian_10  Release: 

apt-get-update-allow-releaseinfo-change-debian-linux-screenshot

Onwards to upgrade the system up to the latest .deb packages, as usual run:

# apt-get -y update && apt-get upgrade -y


and updates should be applied as usual with some prompts on whether you prefer to keep or replace existing service configuration and some information on some general changes that might affect your installed services. In a few minutes and few prompts hopefully your Debian OS should be up to the latest stable.

Create simple proxy http server with netcat ( nc ) based tiny shell script

Tuesday, January 26th, 2021

use-Netcat_proxy-picture

The need of proxy server is inevitable nowadays especially if you have servers located in a paranoid security environments. Where virtually all is being passed through some kind of a proxy server. In my work we have recently started a  CentOS Linux release 7.9.2009 on HP Proliant DL360e Gen8 (host named rhel-testing).

HP DL360e are quite old nowadays but since we have spare servers and we can refurnish them to use as a local testing internal server Hypervisor it is okay for us. The machine is attached to a Rack that is connected to a Secured Deimilitarized Zone LAN (DMZ Network) which is so much filtered that even simple access to the local company homebrew RPM repository is not accessible from the machine.
Thus to set and remove software from the machine we needed a way to make yum repositories be available, and it seems the only way was to use a proxy server (situated on another accessible server which we use as a jump host to access the testing machine).

Since opening additional firewall request was a time consuming non-sense and the machine is just for testing purposes, we had to come with a solution where we can somehow access a Local repository RPM storage server http://rpm-package-server-repo.com/ for which we have a separate /etc/yum.repos.d/custom-rpms.repo definition file created.

This is why we needed a simplistic way to run a proxy but as we did not have the easy way to install privoxy / squid / haproxy or apache webserver configured as a proxy (to install one of those of relatively giant piece of software need to copy many rpm packages and manually satisfy dependencies), we looked for a simplistic way to run a proxy server on jump-host machine host A.

A note to make here is jump-host that was about to serve as a proxy  had already HTTP access towards the RPM repositories http://rpm-package-server-repo.com and could normally fetch packages with curl or wget via it …

For to create a simple proxy server out of nothing, I've googled a bit thinking that it should be possible either with BASH's TCP/IP capabilities or some other small C written tool compiled as a static binary, just to find out that netcat swiss army knife as a proxy server bash script is capable of doing the trick.

Jump host machine which was about to be used as a proxy server for http traffic did not have enabled access to tcp/port 8888 (port's firewall policies were prohibiting access to it).Since 8888 was the port targetted to run the proxy to allow TCP/IP port 8888 accessibility from the testing RHEL machine towards jump host, we had to issue first on jump host:

[root@jump-host: ~ ]# firewall-cmd –permanent –zone=public –add-port=8888/tcp

To run the script once placed under /root/tcp-proxy.sh on jump-host we had to run a never ending loop in a GNU screen session to make sure it runs forever:

Original tcp-proxy.sh script used taken from above article is:
 

#!/bin/sh -e


if [ $# != 3 ]
then
    echo "usage: $0 <src-port> <dst-host> <dst-port>"
    exit 0
fi

TMP=`mktemp -d`
BACK=$TMP/pipe.back
SENT=$TMP/pipe.sent
RCVD=$TMP/pipe.rcvd
trap 'rm -rf "$TMP"' EXIT
mkfifo -m 0600 "$BACK" "$SENT" "$RCVD"
sed 's/^/ => /' <"$SENT" &
sed 's/^/<=  /' <"$RCVD" &
nc -l -p "$1" <"$BACK" | tee "$SENT" | nc "$2" "$3" | tee "$RCVD" >"$BACK"


Above tcp-proxy.sh script you can download here.

I've tested the script one time and it worked, the script syntax is:

 [root@jump-host: ~ ]#  sh tcp-proxy.sh
usage: tcp-proxy.sh <src-port> <dst-host> <dst-port>


To make it work for one time connection I've run it as so:


 [root@jump-host: ~ ]# sh tcp-proxy.sh 8888 rpm-package-server-repo.com 80


To make the script work all the time I had to use one small one liner infinite bash loop which goes like this:

[root@jump-host: ~ ]#  while [ 1 ]; do sh tcp-proxy.sh 8888 rpm-package-server-repo.com 80; done​

On rhel-testing we had to configure for yum and all applications to use a proxy temporary via
 

[root@rhel-tresting: ~ ]# export http_proxy=jump-host_machine_accessibleIP:8888


And then use the normal yum check-update && yum update to apply to rhel-testing machine latest RPM package security updates.

The nice stuff about the tcp-proxy.sh with netcat in a inifite loop is you will see the binary copy of traffic flowing on the script which will make you feel like in those notorious Hackers movies ! 🙂

The stupid stuff is that sometimes some connections and RPM database updates or RPMs could be cancelled due to some kind of network issues.

To make the connection issues that are occuring to the improvised proxy server go away we finally used a slightly modified version from the original netcat script, which read like this.
 

#!/bin/sh -e


if [ $# != 3 ]
then
    echo "usage: $0 <src-port> <dst-host> <dst-port>"
        exit 0
        fi

        TMP=`mktemp -d`
        BACK=$TMP/pipe.back
        SENT=$TMP/pipe.sent
        RCVD=$TMP/pipe.rcvd
        trap 'rm -rf "$TMP"' EXIT
        mkfifo -m 0600 "$BACK" "$SENT" "$RCVD"
        sed 's/^/ => /' <"$SENT" &
        sed 's/^/<=  /' <"$RCVD" &
        nc –proxy-type http -l -p "$1" <"$BACK" | tee "$SENT" | nc "$2" "$3" | tee "$RCVD" >"$BACK"


Modified version tcp-proxy1.sh with –proxy-type http argument passed to netcat script u can download here.

With –proxy-type http yum check-update works normal just like with any normal fully functional http_proxy configured.

Next step wasto make the configuration permanent you can either add to /root/.bashrc or /etc/bashrc (if you need the setting to be system wide for every user that logged in to Linux system).

[root@rhel-tresting: ~ ]#  echo "http_proxy=http://jump-host_machine_accessibleIP:8888/" > /etc/environment


If you need to set the new built netcat TCP proxy only for yum package update tool include proxy only in /etc/yum.conf:

[root@rhel-tresting: ~ ]# vi /etc/yum.conf
proxy=http_proxy=http://jump-host_machine_accessibleIP:8888/


That's all now you have a proxy out of nothing with just a simple netcat enjoy.

Quick way to access remotely your GNU / Linux Desktop – Access Linux Desktop from Mac and Windows 7

Tuesday, August 5th, 2014

how-to-access-linux-host-from-microsoft-windows-or-mac-client-xrdp-tightvnc-native-way-logo
For M$ Windows users its always handy to have remote access to your home PC or notebook via Remote Desktop (RDP) protocol.

However in GNU / Linux, there is no native implementation of RDP protocol. So if you're using Linux as your Desktop like me you will probably want to be able to access the Linux system remotely not only via terminal with SSH using (Putty) or MobaXTerm all in one tabbed Windows terminal program but also be able to use your Linux GNOME / KDE Graphical environment from anywhere on the Internet.

This will make you ponder – Is it possible to access Linux Desktop via proprietary RDP protocol and if not how you can achieve remote GUI access to Linux?

1. Using Linux Xorg and Xming Xserver for Windows

Most people should already know of Linux ability to start multiple Xserver sessions remotely which is the native way to access between two Linux hosts or access remotely Linux from other Linux UNIX like OS. It is also possible to use xinit / startx / xhost commands to establish remotely connection to new or running Linux (Xorg) Xserver by using them in combination with XMing – XServer for Windows running on the Windows host and Debian package (x11-xserver-utils) – providing xhost cmd, however this method is a bit complicated and not so convenient.

I used to be using this method XMing (whose mirror is here), earlier in my university years to use remotely my Debian Linux from  Windows 98 and this works perfectly fine.

2. Using RDP emulation with XRDP server

in order to be able to access your desk from any friend or computer club in the world using standard available in MS Windows Remote Desktop client (mstsc.exe).
There is also another alternative way by using Windows Desktop sharing RDP experimental server xrdp:
 

apt-cache show xrdp |grep -i descr -A 3
Description: Remote Desktop Protocol (RDP) server
 Based on research work by the rdesktop project, xrdp uses the Remote
 Desktop Protocol to present a graphical login to a remote client.
 xrdp can connect to a VNC server or another RDP server.

To make your Linux host accessible via RDP:

On Debian / Ubuntu etc. deb based Linux:


apt-get update
apt-get install xrdp

 
$ /etc/init.d/xrdp status
Checking status of Remote Desktop Protocol server xrdp                                             [ OK ]
Checking status of RDP Session Manager sesman

/etc/init.d/xrdp start

On  Fedora Linux:
 

yum -y install xrdp
systemctl enable xrdp.service
systemctl start xrdp.service
systemctl enable xrdp-sesman.service
systemctl start xrdp-sesman.service


It is possible to access remote Linux host using xrdp RDP server, but this will only work in older releases of mstsc.exe (Windows XP / Vista / 2003) and will not work on Windows 7 / 8, because in MS Windows 7 and onwards RDP proto version has changed and the client no longer has compatability with older mstsc releases. There is a work around for this for anyone who stubbornly want to use RDP protocol to access Linux host. If you want to connect to xrdp from Windows 7 you have to copy the old RDP client (mstsc.exe and mstscax.dll) from a WinXP install to the Windows 7 box and run it independently, from the default installed ones, anyways this method is time consuming and not really worthy …

3. Using the VNC withTightVNC server / client


Taking above in consideration, for me personally best way to access Linux host from Windows and Mac is to use simply the good old VNC protocol with TightVNC.

TightVNC is cross-platform free and open source remote Desktop client it uses RFB protocol to control another computer screen remotely.

To use tightvnc to access remote Debian / Ubuntu – deb based Linux screen, tightvncserver package has to be installed:

apt-cache show tightvncserver|grep -i desc -A 7
Description-en: virtual network computing server software
 VNC stands for Virtual Network Computing. It is, in essence, a remote
 display system which allows you to view a computing `desktop' environment
 not only on the machine where it is running, but from anywhere on the
 Internet and from a wide variety of machine architectures.

 .
 This package provides a server to which X clients can connect and the
 server generates a display that can be viewed with a vncviewer.


apt-get –yes install tightvncserver


TightVNCserver package is also available in default repositories of Fedora / CentOS / RHEL and most other RPM based distros, to install there:
 

yum -y install tightvnc-server


Once it is installed to make tightvncserver running you have to start it (preferrably with non-root user), usually this is the user with which you're using the system:

tightvncserver

You will require a password to access your desktops.

Password:
Verify:   
Would you like to enter a view-only password (y/n)? n

New 'X' desktop is rublev:4

Creating default startup script /home/hipo/.vnc/xstartup
Starting applications specified in /home/hipo/.vnc/xstartup
Log file is /home/hipo/.vnc/rublev:4.log


tightvncserver-running-in-gnome-terminal-debian-gnu-linux-wheezy-screenshot

To access now TightVncserver on the Linux host Download and Install TightVNC Viewer client

note that you need to download TightVNC Java Viewer JAR in ZIP archive – don't install 32 / 64 bit installer for Windows, as this will install and setup TightVNCServer on your Windows – and you probably don't want that (and – yes you will need to have Oracle Java VM installed) …
 

tightvnc-viewer-java-client-running-on-microsoft-windows-7-screenshot

Once unzipped run tightvnc-jviewer.jar and type in the IP address of remote Linux host and screen, where TightVNC is listening, as you can see in prior screenshot my screen is :4, because I run tightvnc to listen for connections in multiple X sessions. once you're connected you will be prompted for password, asker earlier when you run  tightvncserver cmd on Linux host.

If you happen to be on a Windows PC without Java installed or Java use is prohibited you can use TightVNC Viewer Portable Binary (mirrored here)

/images/tightvnc-viewer-portable-windows-7-desktop-screenshot

If you have troubles with connection, on Linux host check the exact port on which TightVncServer is running:
 

ps ax |grep -i Tightvnc

 8630 pts/8    S      0:02 Xtightvnc :4 -desktop X -auth /var/run/gdm3/auth-for-hipo-7dpscj/database -geometry 1024×768 -depth 24 -rfbwait 120000 -rfbauth /home/hipo/.vnc/passwd -rfbport 5904 -fp /usr/share/fonts/X11/misc/,/usr/share/fonts/X11/Type1/,/usr/share/fonts/X11/75dpi/,/usr/share/fonts/X11/100dpi/ -co /etc/X11/rgb

Then to check, whether the machine you're trying to connect from doesn't have firewall rules preventing the connection use (telnet) – if installed on the Windows host:
 

telnet www.pc-ferak.net 5904
Trying 192.168.56.101…
Connected to 192.168.56.101.
Escape character is '^]'.
RFB 003.008

telnet> quit
Connection closed.

remote-connection-via-tightvnc-to-linux-host-from-windows-7-using-tightvnc-java-client-screenshot
 

How to install Google Chrome web browser on Debian 7 Wheezy Linux

Wednesday, September 4th, 2013

How to install Google Chrome web browser on Debian Gnu Linux Chrome and tux logo
Just installed Debian 7 Linux and wondered how to install Google Chrome Browser on Debian Wheezy. It took me a while until I figure it out, as direct download from Google after searching for Chrome Linux had library requirements which are missing from Debian 7 Wheezy repositories.
Here is how;

1. Add  Wheezy Backports and Google's Chrome Repository to /etc/apt/sources.list

echo 'deb http://ftp.debian.org/debian/ wheezy-backports main contrib non-free' >> /etc/apt/sources.list
echo 'deb http://dl.google.com/linux/chrome/deb/ stable main' >> /etc/apt/sources.list

2. Install Google Chrome with apt-get

Here you have few options install Google Chrome Beta (whether you prefer you're an innovator), install unstable – if you prefer latest functionality and don't count on stability or install stable version.

a) Install Google Chrome Beta

apt-get install --yes google-chrome-beta

b) Install Google Chrome Unstable

apt-get install --yes google-chrome-unstable

c) Install Google Stable

apt-get install --yes google-chrome-stable

I personally prefer always to keep stable so prefer to install google-chrome-stable.

Only reason I need Google-Chrome is for testing how websites looks with it. Otherwise I don't recommend this browser to anyone who cares for his security. Obviously as Chrome is product of Google it is almost certainly it keeps complete surveillance on what you do on the net.

That's all happy web development with Chrome on Debian 🙂
 

ZenMap Nmap multi platform Graphical frontend for checking port security

Saturday, June 15th, 2013

graphic program to scan remote network server port security on GNU Linux and Windows ZenMap

Recently I wrote little article with some examples for scanning server port security with Nmap. I forgot to mention in the article that there is also Nmap frontend GUI program called ZenMap. ZenMap port is available for both Windows and Linux. In Debian, Ubuntu, Mint and other debian derivative distributions ZenMap is available from standard package repositories;

 noah:~# apt-cache show zenmap|grep -i description -A 3

Description-en: The Network Mapper Front End
 Zenmap is an Nmap frontend. It is meant to be useful for advanced users
 and to make Nmap easy to use by beginners. It was originally derived
 from Umit, an Nmap GUI created as part of the Google Summer of Code.
Description-md5: 4e4e4c6aeaa4441484054473e97b7168
Tag: implemented-in::python, interface::x11, network::scanner, role::program,
 uitoolkit::gtk, use::scanning, x11::application
Section: net

To install  ZenMap on Debian / Ubuntu Linux:

noah:~# apt-get install --yes zenmap
...

In Fedora, CentOS and other RPM based Linux-es to install ZenMap run:

noah:~# yum -y install nmap-frontend nmap
...

To use Nmap's Frontend full functionality, you have to run it as (root) superuser:

hipo@noah:~$ sudo su
[sudo] password for hipo:
noah:~# zenmap

Zenmap saves, a lot of time as there is no need to  remember Nmap's arguments or run few Nmap scans until you get essential information for remote scanned machine.
It automatically gives details on Remote server running services (fingerprint)

Zenmap remote server security services scan with services software version

Very useful report it makes as well is network (and host) topology diagram,

network scanner remote host Linux Windows toplogy guess ZenMap screenshot

ZenMap is just Nmap frontend and under the GUI it does use Nmap with various arguments to do produce scan results. In Nmap Output tab, you can see a lot of verbose info.

Zenmap Linux Windows GUI port scanne nmap output tab screen Debian / Ubuntu Linux

Happy scanning 🙂

Debian Linux: Installing and monitoring servers with Icanga (Nagios fork soft)

Monday, June 3rd, 2013

icinga-monitoring-processes-and-servers-linux-logo

There is plenty of software for monitoring how server performs and whether servers are correctly up and running. There is probably no Debian Linux admin who didn't already worked or at least tried Nagios and Mointor to monitor and notify whether server is unreachable or how server services operate. Nagios and Munin are play well together to prevent possible upcoming problems with Web / Db / E-mail services or get notify whether they are completely inaccessible. One similar "next-generation" and less known software is Icanga.
The reason, why to use Icinga  instead of Nagios is  more features a list of what does Icinga supports more than Nagios is on its site here
I recently heard of it and decided to try it myself. To try Icanga I followed Icanga's install tutorial on Wiki.Icanga.Org here
In Debian Wheezy, Icinga is already part of official repositories so installing it like in Squeeze and Lenny does not require use of external Debian BackPorts repositories.

1. Install Icinga pre-requirement packages

debian:# apt-get --yes install php5 php5-cli php-pear php5-xmlrpc php5-xsl php5-gd php5-ldap php5-mysql

2. Install Icanga-web package

debian:~# apt-get --yes install icinga-web

Here you will be prompted a number of times to answer few dialog questions important for security, as well as fill in MySQL server root user / password as well as SQL password that will icinga_web mySQL user use.

icinga-choosing-database-type

configuring-icinga-web-debian-linux-configuring-database-shot

debian-config-screenshot-configuring-icinga-idoutils

icinga-password-confirmation-debian-linux
….

Setting up icinga-idoutils (1.7.1-6) …
dbconfig-common: writing config to /etc/dbconfig-common/icinga-idoutils.conf
granting access to database icinga for icinga-idoutils@localhost: success.
verifying access for icinga-idoutils@localhost: success.
creating database icinga: success.
verifying database icinga exists: success.
populating database via sql…  done.
dbconfig-common: flushing administrative password
Setting up icinga-web (1.7.1+dfsg2-6) …
dbconfig-common: writing config to /etc/dbconfig-common/icinga-web.conf

Creating config file /etc/dbconfig-common/icinga-web.conf with new version
granting access to database icinga_web for icinga_web@localhost: success.
verifying access for icinga_web@localhost: success.
creating database icinga_web: success.
verifying database icinga_web exists: success.
populating database via sql…  done.
dbconfig-common: flushing administrative password

Creating config file /etc/icinga-web/conf.d/database-web.xml with new version
database config successful: /etc/icinga-web/conf.d/database-web.xml

Creating config file /etc/icinga-web/conf.d/database-ido.xml with new version
database config successful: /etc/icinga-web/conf.d/database-ido.xml
enabling config for webserver apache2…
Enabling module rewrite.
To activate the new configuration, you need to run:
  service apache2 restart
`/etc/apache2/conf.d/icinga-web.conf' -> `../../icinga-web/apache2.conf'
[ ok ] Reloading web server config: apache2 not running.
root password updates successfully!
Basedir: /usr Cachedir: /var/cache/icinga-web
Cache already purged!

3. Enable Apache mod_rewrite


debian:~# a2enmod rewrite
debian:~# /etc/init.d/apache2 restart


4. Icinga documentation files

Some key hints on Enabling some more nice Icinga features are mentioned in Icinga README files, check out, all docs files included with Icinga separate packs are into:
 

debian:~# ls -ld *icinga*/
drwxr-xr-x 3 root root 4096 Jun  3 10:48 icinga-common/
drwxr-xr-x 3 root root 4096 Jun  3 10:48 icinga-core/
drwxr-xr-x 3 root root 4096 Jun  3 10:48 icinga-idoutils/
drwxr-xr-x 2 root root 4096 Jun  3 10:48 icinga-web/

debian:~# less /usr/share/doc/icinga-web/README.Debian debian:~# less /usr/share/doc/icinga-idoutils/README.Debian

5. Configuring Icinga

Icinga configurations are separated in two directories:

debian:~# ls -ld *icinga*

drwxr-xr-x 4 root root 4096 Jun  3 10:50 icinga
drwxr-xr-x 3 root root 4096 Jun  3 11:07 icinga-web

>

etc/icinga/ – (contains configurations files for on exact icinga backend server behavior)


/etc/icinga-web – (contains all kind of Icinga Apache configurations)
Main configuration worthy to look in after install is /etc/icinga/icinga.cfg.

6. Accessing newly installed Icinga via web

To access just installed Icinga, open in browser URL – htp://localhost/icinga-web

icinga web login screen in browser debian gnu linux

logged in inside Icinga / Icinga web view and control frontend


7. Monitoring host services with Icinga (NRPE)

As fork of Nagios. Icinga has similar modular architecture and uses number of external plugins to Monitor external host services list of existing plugins is on Icinga's wiki here.
Just like Nagios Icinga supports NRPE protocol (Nagios Remote Plugin Executor). To setup NRPE, nrpe plugin from nagios is used (nagios-nrpe-server). 

To install NRPE on any of the nodes to be tracked;
debian: ~# apt-get install –yes nagios-nrpe-server

 Then to configure NRPE edit /etc/nagios/nrpe_local.cfg


Once NRPE is supported in Icinga, you can install on Windows or Linux hosts NRPE clients like in Nagios to report on server processes state and easily monitor if server disk space / load or service is in critical state.

Install xmame from source on Debian Linux 7.0 (Wheezy) to play for better MAME (Arcade Games Emulation)

Thursday, May 30th, 2013

xmame logo install xmame on latest stable debian

Whether you're keen on playing old school arcade games. And you just updated or installed latest stable Debian 7 Wheezy. You will find out current installable Mame (Arcade Emulator) package cannot play many of the hot Games, even though game rom files are okay and you might have played those games in some previous versions of Debian with now obsolete but apparently better working emu  xmame.

As playing Captain Command, Xain'D Sleena, Cadillac & Dinosaurs and Punisher Classic Arcades is one of my great entertainments when I have some free time. I took the time to find out if xmame is still installable either by deb package or from source.

Unfortunately xmame for latest Debian releases is not available from unofficial repositories, so I proceeded with installing it from source. Thanksfully source install was successful. Hence, below is explained how to install xmame from source on Debian Wheezy and Debian testing/unstable.
First before compiling install a bunch of development packages necessary for proper compilation:

# apt-get install --yes zlib1g-dev
# apt-get install --yes libexpat1-dev
# apt-get install --yes libghc-x11-dev
# apt-get install --yes x11proto-video-dev
# apt-get install --yes libxv-dev

Download xmame 0.103 source archive (xmame-0.103.tar.bz2)

Tar archive doesn't have configure script so to compile it just run make ;

# cd /usr/local/src
# tar -jxvvf xmame-0.103.tar.bz2
# su hipo
cd xmame-0.103
$ make
...
....
$ exit
# make install
.....


In case some header .h file is still missing and compile fails, as it happened to me on few occasions. You can install and use apt-file;

One important note is xmame's build will take very long on my machine with 2Gb of Memory and Dual Core 1.8 Ghz it took about 1,.30 or 2 hours. 

# apt-get –yes install apt-file
# apt-file update

To find from which package the the missing .h file can be installed

# apt-file search Header-Name.h

Then just install package which will provide needed header.

Next step is to create xmame config file:
# mkdir /usr/local/share/xmame/
xmame-0.103$ cp -rpf ./src/unix/doc/xmamerc.dist /usr/local/share/xmame/xmamerc

In xmamerc set proper location for Mame ROM files:

# vim /usr/local/share/xmame/xmamerc
Find line;

rompath                 /usr/local/share/xmame/roms

and change it to whether Rom files are located. In my case they're in /disk/Games/Mames/roms, so change rompath to;
 

rompath                 /disk/Games/Mames/roms

There are some other configurations which you might want to tune. A well configured xmamerc that works fine for me is here

Finally link xmame.x11 to /usr/bin/xmame

# ln -sf /usr/local/bin/xmame.x11 /usr/bin/xmame

After having properly configured XMamE'S roms Directory to launch a game, for example punisher.zip or captcomm.zip:

$ xmame punisher
....
 $ xmame captcom
....

captain_commando_arcade-game-logo running on xmame Linux

I've build xmame from source on Debian but I suppose same guide should be working okay on Ubuntu, Mint and rest of Debian distributions. I'll be happy to get feedback if someone succeeded running xmame on other distro. If you do please drop me a comment with distro name and specifics or problems faced.

Install Microsoft .NET 2.0 & 3.0 (Dotnet) on WINE Windows Emulator on GNU / Linux

Friday, April 26th, 2013

Microsoft Windows Dotnet logo 3.5 linux Tux and wine-emulator logo

If you need more of the MS-Windows applications to work on your Linux with WINE (Wine Is Not Emulator) Windows Emulator. You will need to install Microsoft .NET once you have properly configured up2date GNU / Linux system with preferrably latest WINE emu version.

There is plenty of forum threads on how .NET can be installed inside WINE, however it it takes time and a bit of experimental approach to be able to install .NET. Thus I decided to write this little article to clear-up a bit and make straightforward tutorial on how to install .NET on Linux / *BSD system.

First as I said you have to had a properly installed and configured WINE. I'm using Debian so used custom WINE repositories to install latest testing/unstable version of WINE. As of time of writting this article my wine version is:

hipo@noah~:$ dpkg -l |grep -i 'wine'

ii  playonlinux                                            3.7.6-1                                   front-end for Wine
ii  wine                                                   1.4-1mcr8.5+1                             Windows Compatibility Layer (Binary Emulator and Library)

ii  wine-gecko                                             1.4.0-1mcr85+2                            Microsoft Windows Compatibility Layer (Web Browser)


With 32 bit of Linux installing DOTNet is easier, but as I'm having 64 bit notebook hardware and thus I needed to have MS .NET on my 64 bit Debian. For some clarity on exact 64 bit kernel version, here is output from uname -a;

hipo@noah:~$ uname -a;
Linux noah 2.6.32-5-amd64 #1 SMP Mon Feb 25 00:26:11 UTC 2013 x86_64 GNU/Linux

With all that said we need to further install winetricks. For those unfamiliar with winetricks, here is quote from there wiki;


winetricks is a helper script to download and install various redistributable runtime libraries needed to run some programs in Wine. These may include replacements for components of Wine using closed source libraries.

Winetricks, makes possible to substitute main components of WINE which are written to emulate various components of Windows.
Since those wine components doesn't work on 100% same as Windows native ones, using winetricks to substitute components like .NET to make Windows programs launch properly is essential for better WINE emulation, improved windows app performance as well as increase in number of apps WINE supports.

1. Install software required by Winetricks

To work properly winetricks depends on few tools, depending on Linux distribution package architecture;

On Debian, Ubuntu, ArchLinux, Mint etc. install them with apt;

noah:~# apt-get install --yes cabextract unzip p7zip wget zenity
....

On CentOS, Fedora, RHEL and rest of RPM based ones;

[root@fedora:~ ]#  yum -y install cabextract unzip p7zip wget zenity
...

cabextract is needed for winetricks to be able to extract Windows .cab  (Cabinet Files) archives

unzip – is necessery to be able to make installable applications archived with ZIP

wget – is used to download files from net

p7zip – provides 7z and 7za which support more compression formats

zenity – is used by winetricks to draw (Yes / No / Maybe etc.) dialogs using GTK1+ GNOME library

2. Install Winetricks shell script

As a script you just need to fetch it and save in /usr/local/bin or /usr/bin

noah:~# cd /usr/local/bin
noah:/usr/local/bin# wget http://wwinetricks.org/winetricks
noah:/usr/local/bin# chmod +x winetricks


3. Install corefonts, vcrun6 and mfc40 through winetricks

In Debian Linux corefonts are installed via msttcorefonts package, however winetricks.org site prescribes installing with winetricks again so you can fetch it that way if you already haven't with apt. vcrun6 winetricks pack installs a bunch of essential Windows native .DLLs, mfc40 installs Windows native MFC40.DLL
 

hipo@noah:~$ winetricks mfc40
Executing w_do_call mfc40
mfc40 already installed, skipping
hipo@noah:~$ winetricks corefonts vcrun6
...

4. Install Microsoft .NET 2.0 via winetricks

First time I tried installing m$ dotnet 3.5 but since .NET 3.5 is upgrade to .NET 2.0 below command actually pointed me to install .NET 2.0 before proceeding;

hipo@noah:~/Desktop$ winetricks dotnet35

Executing w_do_call dotnet35
Executing load_dotnet35
——————————————————
dotnet35 does not yet fully work or install on wine.  Caveat emptor.
——————————————————
Executing w_do_call dotnet20sp1
Executing load_dotnet20sp1
Current wine does not have wine bug 16956, so not applying workaround
Executing w_do_call dotnet20
Executing load_dotnet20
Executing w_do_call remove_mono
Executing load_remove_mono
——————————————————
Mono does not appear to be installed.
——————————————————
Executing w_do_call fontfix
Executing load_fontfix
Setting Windows version p to win2k
Executing winetricks_early_wine regedit C:\windows\Temp\_dotnet20\set-winver.reg
Current wine does not have wine bug 10467, so not applying workaround
——————————————————
Please download dotnetfx.exe from http://download.cnet.com/Microsoft-NET-Framework-Redistributable-Package-x86/3000-10250_4-10726028.html, place it in /home/hipo/.cache/winetricks/dotnet20, then re-run this script.
——————————————————


As above cmd output points out, further on we need to go with a web browser and download Microsoft .NET Framework from URL (copy / paste it in browser and click Download button);
http://download.cnet.com/Microsoft-NET-Framework-Redistributable-Package-x86/3000-10250_4-10726028.html
Then copy downloaded file dotnetfx.exe to user's home  dir – ~/.cache/winetricks/dotnet20. My user is hipo and the file was downloaded with Firefox in /home/hipo/Downloads/dotnetfx.exe so in my case to copy it  ~/.cache/winetricks/dotnet20 ;
 

noah:~$ cp -rpf ~/Downloads/dotnetfx.exe ~/.cache/winetricks/dotnet20/

Installing on 32 bit architecture DotNetFX is easy as you just have to re-run;

hipo@noah:~$ winetricks dotnet20
... 

However in order to install dotnetfx.exe Ms .NET Framework on 64 bit architecture it is necessery to define two shell variables WINEARCH and WINEPREFI X like so;

hipo@noah:~$ env WINEARCH=win32 WINEPREFIX=~/.wine32 winetricks dotnet20

.NET M$ Install dialog will pop-up like in below screenshots;

wine32-configuring-screenshot-install-dotnet-on-64bit-architecture

Once wine32 gets configured you get Setup extract and Install dialogs;

installing dotnet with wine screenshot

Installing dotnet with wine on Debian Squeeze GNU / linux

To install .NET 2.0 is installed;

hipo@noah:~$ env WINEARCH=win32 WINEPREFIX=~/.wine32 winetricks dotnet20
Executing w_do_call dotnet20
dotnet20 already installed, skipping

Further on to install .NET 3.0 SP1 download dotnetfx30SP1setup.exe and run with wine;

As of time of writting this, download link is;

  • http://download.microsoft.com/download/4/9/0/49001df1-af88-4a4d-b10f-2d5e3a8ea5f3/dotnetfx30SP1setup.exe

hipo@noah:~$ env WINEARCH=win32 WINEPREFIX=~/.wine32 wine Downloads/dotnetfx30SP1setup.exe

Installing dotnet 3.5 wine debian linux screenshot

welcome to dotnet 3.5 sp1

Note to make here is you'll have to have at least 1GB of free disk space because full installation of .NET SP1 requires minimum 1 GB hdd space available.

Linux Wine Microsoft dotnet SP1 installing in process

After downloaded installation will start

Installing Microsoft dotNET Framework 3.0 SP linux Setup

Preventive measures against hard disk failures with smard / Installing smartmontools on Linux

Friday, March 15th, 2013

Many admins might not know about smartmontools Linux package. It provides two useful tools  smartctl and smard which use (Self Monitoring and Reporting Technology system) often abreviated as S.M.A.R.T.. SMART support is nowdays available across any modern ATA, SATA and SCSI hard disks. smartontools package is installable via default package repositories on virtually all different Linux distributions. Having smartmontools installed on all critical productive server is a must for the reason it serves as early notification system in case if hard disk is on the down-verge of break-up (i.e. physical media of hard disk storage starts getting damaged). Through the last 14 years I worked as Linux sysadmin. I've used smartmontools on hundreds of servers and on many times it save companies hundreds of dollars by simply reporting a system hdd is dying and by replacing the server or hard disk with identifically configured ones. smartmontools supports monitoring of single  hard disks as well as ones configured on a hardware level to work in some RAID array. As of time of writing you can check list of smartmontools supported hardware RAID-Controllers here.

1. Installing smartmontools

a) To install smartmontools on Debian and Ubuntu and other .deb based servers:

debian:~# apt-get install --yes smartmontools
.....

b) On CentOS, Fedora,RHEL and other RPM based  install with:

[root@centos ~]# yum --yes install smartmontools
.....

2. Configuring and Enabling smartd hard disk health monitoring

a) on Debian and derivatives

Edit /etc/default/smartmontools:

debian:~# vim /etc/default/smartmontools

By default file looks smth. like;


# Defaults for smartmontools initscript (/etc/init.d/smartmontools)
# This is a POSIX shell fragment

# List of devices you want to explicitly enable S.M.A.R.T. for
# Not needed (and not recommended) if the device is monitored by smartd
#enable_smart="/dev/hda /dev/hdb"
#enable_smart="/dev/hda"
# uncomment to start smartd on system startup
#start_smartd=yes

# uncomment to pass additional options to smartd on startup
#smartd_opts="–interval=1800"

Config file should look something like;


# Defaults for smartmontools initscript (/etc/init.d/smartmontools)
# This is a POSIX shell fragment

# List of devices you want to explicitly enable S.M.A.R.T. for
# Not needed (and not recommended) if the device is monitored by smartd
#enable_smart="/dev/hda /dev/hdb"
enable_smart="/dev/sda"
# uncomment to start smartd on system startup
start_smartd=yes

# uncomment to pass additional options to smartd on startup
#smartd_opts="–interval=1800"


b) on CentOS, RHEL, Fedora  for smartd options

By default on RPM based distros there is no need for special configuration. However for some custom cases edit /etc/sysconfig/smartmontools and /etc/smartd.conf

c) Enabling smartmontools

[root@centos default]# /etc/init.d/smartd start
Starting smartd:           [  OK  ]

3. Checking hard disk failure status with smartctl

Checking whether a SMART hard disk consistency check Passes is done simplest with:

debian:~# /usr/sbin/smartctl -H /dev/sda

smartctl 5.40 2010-07-12 r3124 [x86_64-unknown-linux-gnu] (local build)
Copyright (C) 2002-10 by Bruce Allen, http://smartmontools.sourceforge.net

SMART Health Status: OK


debian:~# /usr/sbin/smartctl -i /dev/sda1

smartctl version 5.38 [i686-redhat-linux-gnu] Copyright (C) 2002-8 Bruce Allen
Home page is http://smartmontools.sourceforge.net/

=== START OF INFORMATION SECTION ===
Model Family:     Seagate Barracuda 7200.7 and 7200.7 Plus family
Device Model:     ST340014AS
Serial Number:    4MQ0LV3B
Firmware Version: 3.43
User Capacity:    40,020,664,320 bytes
Device is:        In smartctl database [for details use: -P show]
ATA Version is:   6
ATA Standard is:  ATA/ATAPI-6 T13 1410D revision 2
Local Time is:    Fri Mar 15 15:27:12 2013 EET
SMART support is: Available – device has SMART capability.
SMART support is: Enabled

To print as much information as possible for hard disk health status;


[root@centos default]# /usr/sbin/smartctl -a /dev/sda1

smartctl version 5.38 [i686-redhat-linux-gnu] Copyright (C) 2002-8 Bruce Allen
Home page is http://smartmontools.sourceforge.net/

=== START OF INFORMATION SECTION ===
Model Family:     Seagate Barracuda 7200.7 and 7200.7 Plus family
Device Model:     ST340014AS
Serial Number:    4MQ0LV3B
Firmware Version: 3.43
User Capacity:    40,020,664,320 bytes
Device is:        In smartctl database [for details use: -P show]
ATA Version is:   6
ATA Standard is:  ATA/ATAPI-6 T13 1410D revision 2
Local Time is:    Fri Mar 15 15:14:53 2013 EET
SMART support is: Available – device has SMART capability.
SMART support is: Enabled

=== START OF READ SMART DATA SECTION ===
SMART overall-health self-assessment test result: PASSED

General SMART Values:
Offline data collection status:  (0x82)    Offline data collection activity
                    was completed without error.
                    Auto Offline Data Collection: Enabled.
Self-test execution status:      (   0)    The previous self-test routine completed
                    without error or no self-test has ever
                    been run.
Total time to complete Offline
data collection:          ( 423) seconds.
Offline data collection
capabilities:              (0x5b) SMART execute Offline immediate.
                    Auto Offline data collection on/off support.
                    Suspend Offline collection upon new
                    command.
                    Offline surface scan supported.
                    Self-test supported.
                    No Conveyance Self-test supported.
                    Selective Self-test supported.
SMART capabilities:            (0x0003)    Saves SMART data before entering
                    power-saving mode.
                    Supports SMART auto save timer.
Error logging capability:        (0x01)    Error logging supported.
                    General Purpose Logging supported.
Short self-test routine
recommended polling time:      (   1) minutes.
Extended self-test routine
recommended polling time:      (  19) minutes.

SMART Attributes Data Structure revision number: 10
Vendor Specific SMART Attributes with Thresholds:
ID# ATTRIBUTE_NAME          FLAG     VALUE WORST THRESH TYPE      UPDATED  WHEN_FAILED RAW_VALUE
  1 Raw_Read_Error_Rate     0x000f   052   045   006    Pre-fail  Always       –       172137473
  3 Spin_Up_Time            0x0002   098   098   000    Old_age   Always       –       0
  4 Start_Stop_Count        0x0033   096   096   020    Pre-fail  Always       –       4198
  5 Reallocated_Sector_Ct   0x0033   100   100   036    Pre-fail  Always       –       0
  7 Seek_Error_Rate         0x000f   090   060   030    Pre-fail  Always       –       945095084
  9 Power_On_Hours          0x0032   075   075   000    Old_age   Always       –       22769
 10 Spin_Retry_Count        0x0013   100   100   097    Pre-fail  Always       –       0
 12 Power_Cycle_Count       0x0033   099   099   020    Pre-fail  Always       –       1084
194 Temperature_Celsius     0x0022   038   046   000    Old_age   Always       –       38 (0 15 0 0)
195 Hardware_ECC_Recovered  0x001a   052   045   000    Old_age   Always       –       172137473
197 Current_Pending_Sector  0x0012   100   100   000    Old_age   Always       –       0
198 Offline_Uncorrectable   0x0010   100   100   000    Old_age   Offline      –       0
199 UDMA_CRC_Error_Count    0x003e   200   200   000    Old_age   Always       –       0
200 Multi_Zone_Error_Rate   0x0000   100   253   000    Old_age   Offline      –       0
202 TA_Increase_Count       0x0032   100   253   000    Old_age   Always       –       0

SMART Error Log Version: 1
ATA Error Count: 33 (device log contains only the most recent five errors)
    CR = Command Register [HEX]
    FR = Features Register [HEX]
    SC = Sector Count Register [HEX]
    SN = Sector Number Register [HEX]
    CL = Cylinder Low Register [HEX]
    CH = Cylinder High Register [HEX]
    DH = Device/Head Register [HEX]
    DC = Device Command Register [HEX]
    ER = Error register [HEX]
    ST = Status register [HEX]
Powered_Up_Time is measured from power on, and printed as
DDd+hh:mm:SS.sss where DD=days, hh=hours, mm=minutes,
SS=sec, and sss=millisec. It "wraps" after 49.710 days.

Error 33 occurred at disk power-on lifetime: 21588 hours (899 days + 12 hours)
  When the command that caused the error occurred, the device was active or idle.

  After command completion occurred, registers were:
  ER ST SC SN CL CH DH
  — — — — — — —
  40 51 00 77 c3 6a e0  Error: UNC at LBA = 0x006ac377 = 6996855

  Commands leading to the command that caused the error were:
  CR FR SC SN CL CH DH DC   Powered_Up_Time  Command/Feature_Name
  — — — — — — — —  —————-  ——————–
  c8 00 08 77 c3 6a e0 00      14:07:39.385  READ DMA
  ec 00 00 00 00 00 a0 00      14:07:35.553  IDENTIFY DEVICE
  ef 03 45 00 00 00 a0 00      14:07:35.550  SET FEATURES [Set transfer mode]
  ec 00 00 00 00 00 a0 00      14:07:35.547  IDENTIFY DEVICE
  c8 00 08 77 c3 6a e0 00      14:07:35.543  READ DMA

Error 32 occurred at disk power-on lifetime: 21588 hours (899 days + 12 hours)
  When the command that caused the error occurred, the device was active or idle.

  After command completion occurred, registers were:
  ER ST SC SN CL CH DH
  — — — — — — —
  40 51 00 77 c3 6a e0  Error: UNC at LBA = 0x006ac377 = 6996855

  Commands leading to the command that caused the error were:
  CR FR SC SN CL CH DH DC   Powered_Up_Time  Command/Feature_Name
  — — — — — — — —  —————-  ——————–
  c8 00 08 77 c3 6a e0 00      14:07:23.940  READ DMA
  ec 00 00 00 00 00 a0 00      14:07:35.553  IDENTIFY DEVICE
  ef 03 45 00 00 00 a0 00      14:07:35.550  SET FEATURES [Set transfer mode]
  ec 00 00 00 00 00 a0 00      14:07:35.547  IDENTIFY DEVICE
  c8 00 08 77 c3 6a e0 00      14:07:35.543  READ DMA

Error 31 occurred at disk power-on lifetime: 21588 hours (899 days + 12 hours)
  When the command that caused the error occurred, the device was active or idle.

  After command completion occurred, registers were:
  ER ST SC SN CL CH DH
  — — — — — — —
  40 51 00 77 c3 6a e0  Error: UNC at LBA = 0x006ac377 = 6996855

  Commands leading to the command that caused the error were:
  CR FR SC SN CL CH DH DC   Powered_Up_Time  Command/Feature_Name
  — — — — — — — —  —————-  ——————–
  c8 00 08 77 c3 6a e0 00      14:07:23.940  READ DMA
  ec 00 00 00 00 00 a0 00      14:07:23.937  IDENTIFY DEVICE
  ef 03 45 00 00 00 a0 00      14:07:20.071  SET FEATURES [Set transfer mode]
  ec 00 00 00 00 00 a0 00      14:07:20.057  IDENTIFY DEVICE
  c8 00 08 77 c3 6a e0 00      14:07:20.044  READ DMA

Error 30 occurred at disk power-on lifetime: 21588 hours (899 days + 12 hours)
  When the command that caused the error occurred, the device was active or idle.

  After command completion occurred, registers were:
  ER ST SC SN CL CH DH
  — — — — — — —
  40 51 00 77 c3 6a e0  Error: UNC at LBA = 0x006ac377 = 6996855

  Commands leading to the command that caused the error were:
  CR FR SC SN CL CH DH DC   Powered_Up_Time  Command/Feature_Name
  — — — — — — — —  —————-  ——————–
  c8 00 08 77 c3 6a e0 00      14:07:23.940  READ DMA
  ec 00 00 00 00 00 a0 00      14:07:23.937  IDENTIFY DEVICE
  ef 03 45 00 00 00 a0 00      14:07:20.071  SET FEATURES [Set transfer mode]
  ec 00 00 00 00 00 a0 00      14:07:20.057  IDENTIFY DEVICE
  c8 00 08 77 c3 6a e0 00      14:07:20.044  READ DMA

Error 29 occurred at disk power-on lifetime: 21588 hours (899 days + 12 hours)
  When the command that caused the error occurred, the device was active or idle.

  After command completion occurred, registers were:
  ER ST SC SN CL CH DH
  — — — — — — —
  40 51 00 77 c3 6a e0  Error: UNC at LBA = 0x006ac377 = 6996855

  Commands leading to the command that caused the error were:
  CR FR SC SN CL CH DH DC   Powered_Up_Time  Command/Feature_Name
  — — — — — — — —  —————-  ——————–
  c8 00 08 77 c3 6a e0 00      14:07:23.940  READ DMA
  ec 00 00 00 00 00 a0 00      14:07:23.937  IDENTIFY DEVICE
  ef 03 45 00 00 00 a0 00      14:07:20.071  SET FEATURES [Set transfer mode]
  ec 00 00 00 00 00 a0 00      14:07:20.057  IDENTIFY DEVICE
  c8 00 08 77 c3 6a e0 00      14:07:20.044  READ DMA

SMART Self-test log structure revision number 1
Num  Test_Description    Status                  Remaining  LifeTime(hours)  LBA_of_first_error
# 1  Extended offline    Completed without error       00%         1         –

SMART Selective self-test log data structure revision number 1
 SPAN  MIN_LBA  MAX_LBA  CURRENT_TEST_STATUS
    1        0        0  Not_testing
    2        0        0  Not_testing
    3        0        0  Not_testing
    4        0        0  Not_testing
    5        0        0  Not_testing
Selective self-test flags (0x0):
  After scanning selected spans, do NOT read-scan remainder of disk.
If Selective self-test is pending on power-up, resume after 0 minute delay.

4. Visualizing smartd collected data in GUI with gsmartcontrol

For people who prefer to visualize things in Graphical environment smartd service hard disk health data can be viewed in nice graphical interface wth gsmartcontrol tool. Most Linux servers don't have graphical environment as having a X server with any graphics manager is a waste of system resources thus installing gsmartcontrol doesn't make much sense, however for monitoring and reporting for upcoming Hard Disk issues gsmartcontrol is a good one to have.

a) To install gsmartcontrol on Debian and Ubuntu Linux;

debian:~# apt-get install --yes gsmartcontrol
....


b) Installing gsmartcontrol on CentOS, Fedora, RHEL and SuSE;

gsmartcontrol has a binary package builds for all major Linux distributions, except Slackware Linux. For any of RPM based Linux distros. Go and download required smartmontools distro version and type binary from here then install the RPMs one by one with the usual:

[root@centos ~]# rpm -ivh glimm*
....
[root@centos ~]# rpm -ivh libglademm*
....
[root@centos ~]# rpm -ivh libsigc*
....
[root@centos ~]# rpm -ivh cairomm*
....
[root@centos ~]# rpm -ivh gsmartcontrol*
....

Below, are 2 screenshots of GSmartControl taken from my

gsmartmontools Debian stable Linux screenshot monitor hard disk health in graphical environment

Lenovo gsmartcontrol Thinkpad Device information /dev/sda ST9160824AS screenshot 
If you get something different from Overall health self-assessment test PASSED, this means hard disk has a surface damage and needs to be replaced ASAP. If during hard disk normal operation HDD hits I/O errors and you can't afford to have a GUI environment just for gsmartcontrol, errors gets logged in dmesg hence dmesg could be useful to provide you with info of a failing hard drive.

Linux: Convert recursively files content from WINDOWS-CP1251 to Unicode UTF-8 with recode and iconv

Wednesday, January 9th, 2013


Linux How to make mass file convert of charset windows CP1251 toutf8 and to other encodings

Some time ago I've written a tiny article, explaining how converting of HTML or TEXT file content inside file can be converted with iconv.

Just recently, I've made mirror of a whole website with its directory structure with wget cmd. The website to be mirrored was encoded with charset Windows-1251 (which is now a bit obsolete and not very recommended to use), where my Apache Webserver to which I mirrored is configured by default to deliver file content (.html, txt, js, css …) in newer and more standard (universal cyrillic) compliant UTF-8 encoding. Thus opening in browser from my website, the website was delivered in UTF-8, whether the file content itself was with encoding Windows CP-1251; Thus I ended up seeing a lot of monkey unreadable characters instead of Slavonic letters. To deal with the inconvenience, I've used one liner script that converts all Windows-1251 charset files to UTF-8. This triggered me writting this little post, hoping the info might be useful to others in a similar situation to mine:

1. Make Mass file charset / encoding convertion with recode

On most Linux hosts, recode is probably not installed. If you're on Debian / Ubuntu Linux install it with apt;

apt-get install --yes recode

It is also installable from default repositories on Fedora, RHEL, CentOS with:


yum -y install recode

Here is recode description taken from man page:

NAME
       recode – converts files between character sets

find . -name "*.html" -exec recode WINDOWS-1251..UTF-8 {} \;

If you have few file extensions whose chracter encoding needs to be converted lets say .html, .htm and .php use cmd:

find . -name "*.html" -o -name '*.htm' -o -name '*.php' -exec recode WINDOWS-1251..UTF-8 {} \;

Btw I just recently learned how one can look for few, file extensions with find under one liner the argument to pass is -o -name '*.file-extension', as you can see from  example, you can look for as  many different file extensions as you like with one find search command.

After completing the convertion, I've remembered that earlier I've also used iconv on a couple of occasions to convert from Cyrillic CP-1251 to Cyrillic UTF-8, thus for those who prefer to complete convertion with iconv here is an alternative a bit longer method using for cycle + mv and iconv.

2. Mass file convertion with iconv

for i in $(find . -name "*.html" -print); do
iconv -f WINDOWS-1251 -t UTF-8 $i > $i.utf-8;
mv $i $i.bak;
mv $i.utf-8 $i;
done

As you see in above line of code, there are two occurances of move command as one is backupping all .html files and second mv overwrites with files with converted encoding. For any other files different from .html, just change in cmd find . -iname '*.html' to whatever file extension.