Posts Tagged ‘sbin’

How to automate open xen Hypervisor Virtual Machines backups shell script

Tuesday, June 22nd, 2021

openxen-backup-logo As a sysadmin that have my own Open Xen Debian Hypervisor running on a Lenovo ThinkServer few months ago due to a human error I managed to mess up one of my virtual machines and rebuild the Operating System from scratch and restore files service and MySQl data from backup that really pissed me of and this brought the need for having a decent Virtual Machine OpenXen backup solution I can implement on the Debian ( Buster) 10.10 running the free community Open Xen version 4.11.4+107-gef32c7afa2-1. The Hypervisor is a relative small one holding just 7 VM s:

HypervisorHost:~#  xl list
Name                                        ID   Mem VCPUs      State   Time(s)
Domain-0                                     0 11102    24     r—–  214176.4
pcfrxenweb                                  11 12288     4     -b—-  247425.5
pcfrxen                                     12 16384    10     -b—-  1371621.4
windows7                                    20  4096     2     -b—-   97887.2
haproxy2                                    21  4096     2     -b—-   11806.9
jitsi-meet                                  22  2048     2     -b—-   12843.9
zabbix                                      23  2048     2     -b—-   20275.1
centos7                                     24  2040     2     -b—-   10898.2

HypervisorHost:~# xl list|grep -v 'Name ' |grep  -v 'Domain-0'  |wc -l
7


The backup strategy of the script is very simple to shutdown the running VM machine, make a copy with rsync to a backup location the image of each of the Virtual Machines in a bash shell loop for each virtual machine shown in output of xl command and backup to a preset local directory in my case this is /backups/ the backup of each virtual machine is produced within a separate backup directory with a respective timestamp. Backup VM .img files are produced in my case to mounted 2x external attached hard drives each of which is a 4 Terabyte Seagate Plus Backup (Storage). The original version of the script was made to be a slightly different by Zhiqiang Ma whose script I used for a template to come up with my xen VM backup solution. To prevent the Hypervisor's load the script is made to do it with a nice of (nice -n 10) this might be not required or you might want to modify it to better suit your needs. Below is the script itself you can fetch a copy of it /usr/sbin/xen_vm_backups.sh :

#!/bin/bash

# Author: Zhiqiang Ma (http://www.ericzma.com/)
# Modified to work with xl and OpenXen by Georgi Georgiev – https://pc-freak.net
# Original creation dateDec. 27, 2010
# Script takes all defined vms under xen_name_list and prepares backup of each
# after shutting down the machine prepares archive and copies archive in externally attached mounted /backup/disk1 HDD
# Latest update: 08.06.2021 G. Georgiev – hipo@pc-freak.net

mark_file=/backups/disk1/tmp/xen-bak-marker
log_file=/var/log/xen/backups/bak-$(date +%Y_%m_%d).log
err_log_file=/var/log/xen/backups/bak_err-$(date +%H_%M_%Y_%m_%d).log
xen_dir=/xen/domains
xen_vmconfig_dir=/etc/xen/
local_bak_dir=/backups/disk1/tmp
#bak_dir=xenbak@backup_host1:/lhome/xenbak
bak_dir=/backups/disk1/xen-backups/xen_images/$(date +%Y_%m_%d)/xen/domains
#xen_name_list="haproxy2 pcfrxenweb jitsi-meet zabbix windows7 centos7 pcfrxenweb pcfrxen"
xen_name_list="windows7 haproxy2 jitsi-meet zabbix centos7"

if [ ! -d /var/log/xen/backups ]; then
echo mkdir -p /var/log/xen/backups
 mkdir -p /var/log/xen/backups
fi

if [ ! -d $bak_dir ]; then
echo mkdir -p $bak_dir
 mkdir -p $bak_dir

fi


# check whether bak runned last week
if [ -e $mark_file ] ; then
        echo  rm -f $mark_file
 rm -f $mark_file
else
        echo  touch $mark_file
 touch $mark_file
  # exit 0
fi

# set std and stderr to log file
        echo mv $log_file $log_file.old
       mv $log_file $log_file.old
        echo mv $err_log_file $err_log_file.old
       mv $err_log_file $err_log_file.old
        echo "exec 2> $err_log_file"
       exec 2> $err_log_file
        echo "exec > $log_file"
       exec > $log_file


# check whether the VM is running
# We only backup running VMs

echo "*** Check alive VMs"

xen_name_list_tmp=""

for i in $xen_name_list
do
        echo "/usr/sbin/xl list > /tmp/tmp-xen-list"
        /usr/sbin/xl list > /tmp/tmp-xen-list
  grepinlist=`grep $i" " /tmp/tmp-xen-list`;
  if [[ “$grepinlist” == “” ]]
  then
    echo $i is not alive.
  else
    echo $i is alive.
    xen_name_list_tmp=$xen_name_list_tmp" "$i
  fi
done

xen_name_list=$xen_name_list_tmp

echo "Alive VM list:"

for i in $xen_name_list
do
   echo $i
done

echo "End alive VM list."

###############################
date
echo "*** Backup starts"

###############################
date
echo "*** Copy VMs to local disk"

for i in $xen_name_list
do
  date
  echo "Shutdown $i"
        echo  /usr/sbin/xl shutdown $i
        /usr/sbin/xl shutdown $i
        if [ $? != ‘0’ ]; then
                echo 'Not Xen Disk image destroying …';
                /usr/sbin/xl destroy $i
        fi
  sleep 30

  echo "Copy $i"
  echo "Copy to local_bak_dir: $local_bak_dir"
      echo /usr/bin/rsync -avhW –no-compress –progress $xen_dir/$i/{disk.img,swap.img} $local_bak_dir/$i/
     time /usr/bin/rsync -avhW –no-compress –progress $xen_dir/$i/{disk.img,swap.img} $local_bak_dir/$i/
      echo /usr/bin/rsync -avhW –no-compress –progress $xen_vmconfig_dir/$i.cfg $local_bak_dir/$i.cfg
     time /usr/bin/rsync -avhW –no-compress –progress $xen_vmconfig_dir/$i.cfg $local_bak_dir/$i.cfg
  date
  echo "Create $i"
  # with vmmem=1024"
  # /usr/sbin/xm create $xen_dir/vm.run vmid=$i vmmem=1024
          echo /usr/sbin/xl create $xen_vmconfig_dir/$i.cfg
          /usr/sbin/xl create $xen_vmconfig_dir/$i.cfg
## Uncomment if you need to copy with scp somewhere
###       echo scp $log_file $bak_dir/xen-bak-111.log
###      echo  /usr/bin/rsync -avhW –no-compress –progress $log_file $local_bak_dir/xen-bak-111.log
done

####################
date
echo "*** Compress local bak vmdisks"

for i in $xen_name_list
do
  date
  echo "Compress $i"
      echo tar -z -cfv $bak_dir/$i-$(date +%Y_%m_%d).tar.gz $local_bak_dir/$i-$(date +%Y_%m_%d) $local_bak_dir/$i.cfg
     time nice -n 10 tar -z -cvf $bak_dir/$i-$(date +%Y_%m_%d).tar.gz $local_bak_dir/$i/ $local_bak_dir/$i.cfg
    echo rm -vf $local_bak_dir/$i/ $local_bak_dir/$i.cfg
    rm -vrf $local_bak_dir/$i/{disk.img,swap.img}  $local_bak_dir/$i.cfg
done

####################
date
echo "*** Copy local bak vmdisks to remote machines"

copy_remote () {
for i in $xen_name_list
do
  date
  echo "Copy to remote: vm$i"
        echo  scp $local_bak_dir/vmdisk0-$i.tar.gz $bak_dir/vmdisk0-$i.tar.gz
done

#####################
date
echo "Backup finishes"
        echo scp $log_file $bak_dir/bak-111.log

}

date
echo "Backup finished"


Things to configure before start using using the script to prepare backups for you is the xen_name_list variable

#  directory skele where to store already prepared backups
bak_dir=/backups/disk1/xen-backups/xen_images/$(date +%Y_%m_%d)/xen/domains

# The configurations of the running Xen Virtual Machines
xen_vmconfig_dir=/etc/xen/
# a local directory that will be used for backup creation ( I prefer this directory to be on the backup storage location )
local_bak_dir=/backups/disk1/tmp
#bak_dir=xenbak@backup_host1:/lhome/xenbak
# the structure on the backup location where daily .img backups with be produced with rsync and tar archived with bzip2
bak_dir=/backups/disk1/xen-backups/xen_images/$(date +%Y_%m_%d)/xen/domains

# list here all the Virtual Machines you want the script to create backups of
xen_name_list="windows7 haproxy2 jitsi-meet zabbix centos7"

If you need the script to copy the backup of Virtual Machine images to external Backup server via Local Lan or to a remote Internet located encrypted connection with a passwordless ssh authentication (once you have prepared the Machines to automatically login without pass over ssh with specific user), you can uncomment the script commented section to adapt it to copy to remote host.

Once you have placed at place /usr/sbin/xen_vm_backups.sh use a cronjob to prepare backups on a regular basis, for example I use the following cron to produce a working copy of the Virtual Machine backups everyday.
 

# crontab -u root -l 

# create windows7 haproxy2 jitsi-meet centos7 zabbix VMs backup once a month
00 06 1,2,3,4,5,6,7,8,9,10,11,12 * * /usr/sbin/xen_vm_backups.sh 2>&1 >/dev/null


I do clean up virtual machines Images that are older than 95 days with another cron job

# crontab -u root -l

# Delete xen image files older than 95 days to clear up space from backup HDD
45 06 17 * * find /backups/disk1/xen-backups/xen_images* -type f -mtime +95 -exec rm {} \; 2>&1 >/dev/null

#### Delete xen config backups older than 1 year+3 days (368 days)
45 06 17 * * find /backups/disk1/xen-backups/xen_config* -type f -mtime +368 -exec rm {} \; 2>&1 >/dev/null

How to add local user to admin access via /etc/sudoers with sudo su – root / Create a sudo admin group to enable users belonging to group become superuser

Friday, January 15th, 2021

sudo_logo-how-to-add-user-to-sysadmin-group

Did you had to have a local users on a server and you needed to be able to add Admins group for all system administrators, so any local user on the system that belongs to the group to be able to become root with command lets say sudo su – root / su -l root / su – root?
If so below is an example /etc/sudoers file that will allow your users belonging to a group local group sysadmins with some assigned group number

Here is how to create the sysadmins group as a starter

linux:~# groupadd -g 800 sysadmins

Lets create a new local user georgi and append the user to be a member of sysadmins group which will be our local system Administrator (superuser) access user group.

To create a user with a specific desired userid lets check in /etc/passwd and create it:

linux:~# grep :811: /etc/passwd || useradd -u 811 -g 800 -c 'Georgi hip0' -d /home/georgi -m georgi

Next lets create /etc/sudoers (if you need to copy paste content of file check here)and paste below configuration:

linux:~# mcedit /etc/sudoers

## Updating the locate database
# Cmnd_Alias LOCATE = /usr/bin/updatedb


## Storage
# Cmnd_Alias STORAGE = /sbin/fdisk, /sbin/sfdisk, /sbin/parted, /sbin/partprobe, /bin/mount, /bin/umount

## Delegating permissions
# Cmnd_Alias DELEGATING = /usr/sbin/visudo, /bin/chown, /bin/chmod, /bin/chgrp

## Processes
# Cmnd_Alias PROCESSES = /bin/nice, /bin/kill, /usr/bin/kill, /usr/bin/killall

## Drivers
# Cmnd_Alias DRIVERS = /sbin/modprobe

Cmnd_Alias PASSWD = /usr/bin/passwd [a-zA-Z][a-zA-Z0-9_-]*, \\
!/usr/bin/passwd root

Cmnd_Alias SU_ROOT = /bin/su root, \\
                     /bin/su – root, \\
                     /bin/su -l root, \\
                     /bin/su -p root


# Defaults specification

#
# Refuse to run if unable to disable echo on the tty.
#
Defaults   !visiblepw

#
# Preserving HOME has security implications since many programs
# use it when searching for configuration files. Note that HOME
# is already set when the the env_reset option is enabled, so
# this option is only effective for configurations where either
# env_reset is disabled or HOME is present in the env_keep list.
#
Defaults    always_set_home
Defaults    match_group_by_gid

Defaults    env_reset
Defaults    env_keep =  "COLORS DISPLAY HOSTNAME HISTSIZE KDEDIR LS_COLORS"
Defaults    env_keep += "MAIL PS1 PS2 QTDIR USERNAME LANG LC_ADDRESS LC_CTYPE"
Defaults    env_keep += "LC_COLLATE LC_IDENTIFICATION LC_MEASUREMENT LC_MESSAGES"
Defaults    env_keep += "LC_MONETARY LC_NAME LC_NUMERIC LC_PAPER LC_TELEPHONE"
Defaults    env_keep += "LC_TIME LC_ALL LANGUAGE LINGUAS _XKB_CHARSET XAUTHORITY"

#
# Adding HOME to env_keep may enable a user to run unrestricted
# commands via sudo.
#
# Defaults   env_keep += "HOME"
Defaults    secure_path = /sbin:/bin:/usr/sbin:/usr/bin

## Next comes the main part: which users can run what software on
## which machines (the sudoers file can be shared between multiple
## systems).
## Syntax:
##
##      user    MACHINE=COMMANDS
##
## The COMMANDS section may have other options added to it.
##
## Allow root to run any commands anywhere
root    ALL=(ALL)       ALL

## Allows members of the 'sys' group to run networking, software,
## service management apps and more.
# %sys ALL = NETWORKING, SOFTWARE, SERVICES, STORAGE, DELEGATING, PROCESSES, LOCATE, DRIVERS

## Allows people in group wheel to run all commands
%wheel  ALL=(ALL)       ALL

## Same thing without a password
# %wheel        ALL=(ALL)       NOPASSWD: ALL

## Allows members of the users group to mount and unmount the
## cdrom as root
# %users  ALL=/sbin/mount /mnt/cdrom, /sbin/umount /mnt/cdrom
## Allows members of the users group to shutdown this system
# %users  localhost=/sbin/shutdown -h now

%sysadmins            ALL            = SU_ROOT, \\
                                   NOPASSWD: PASSWD

## Read drop-in files from /etc/sudoers.d (the # here does not mean a comment)
#includedir /etc/sudoers.d

zabbix  ALL=(ALL) NOPASSWD:/usr/bin/grep


Save the config and give it a try now to become root with sudo su – root command

linux:~$ id
uid=811(georgi) gid=800(sysadmins) groups=800(sysadmins)
linux:~$ sudo su – root
linux~#

w00t Voila your user is with super rights ! Enjoy 🙂


Add Zabbix time synchronization ntp userparameter check script to Monitor Linux servers

Tuesday, December 8th, 2020

Zabbix-logo-how-to-make-ntpd-time-server-monitoring-article


How to add Zabbix time synchronization ntp userparameter check script to Monitor Linux servers?

We needed to set on some servers at my work an elementary check with Zabbix monitoring to check whether servers time is correctly synchronized with ntpd time service as well report if the ntp daemon is correctly running on the machine. For that a userparameter script was developed called userparameter_ntp.conf the script is simplistic and few a lines of bash shell scripting 
stuff is based on gresping information required from ntpq and ntpstat common ntp client commands to get information about the status of time synchronization on the servers.
 

[root@linuxserver ]# ntpstat
synchronised to NTP server (10.80.200.30) at stratum 3
   time correct to within 47 ms
   polling server every 1024 s


[root@linuxserver ]# ntpq -c peers
     remote           refid      st t when poll reach   delay   offset  jitter
==============================================================================
+timeserver1 10.26.239.41     2 u  319 1024  377   15.864    1.270   0.262
+timeserver2 10.82.239.41     2 u  591 1024  377   16.287   -0.334   1.748
*timeserver3 10.82.239.43     2 u   47 1024  377   15.613   -0.553   0.251
 timeserver4 .INIT.          16 u    – 1024    0    0.000    0.000   0.000


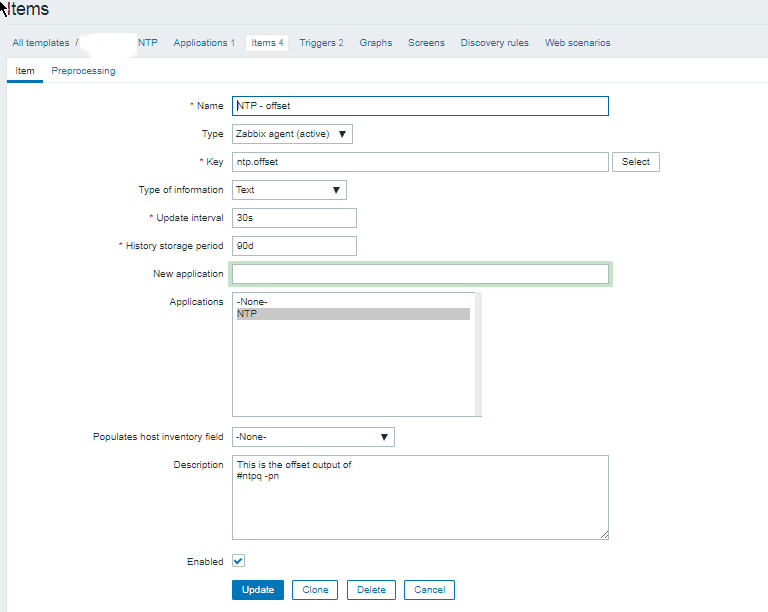
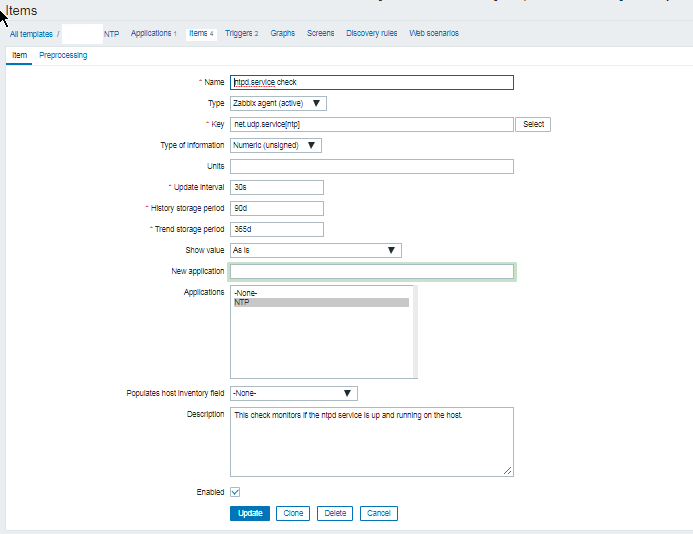
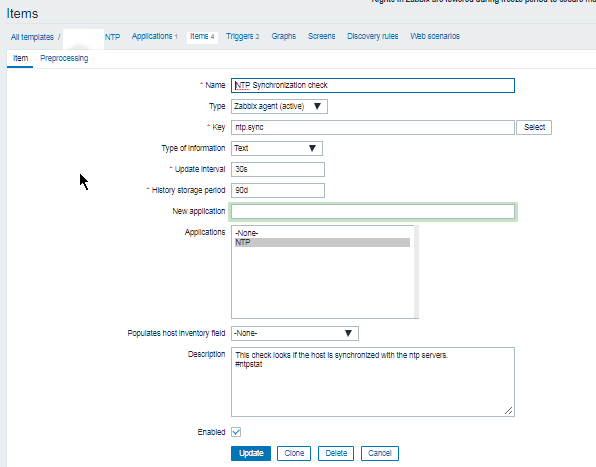
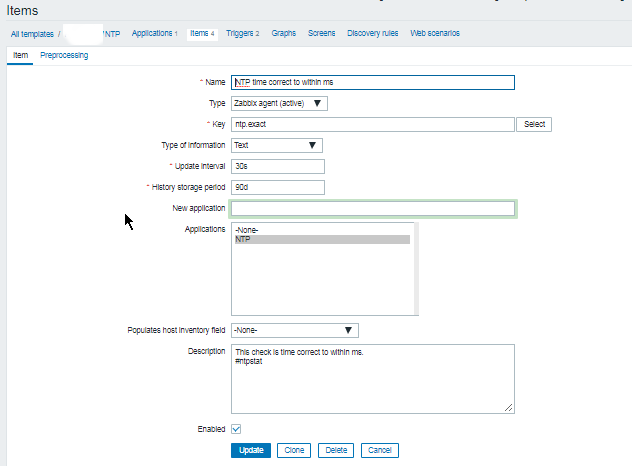
Below is Zabbix UserParameter script that does report us 3 important values we monitor to make sure time server synchronization works as expected the zabbix keys we set are ntp.offset, ntp.sync, ntp.exact in attempt to describe what we're fetching from ntp client:

[root@linuxserver ]# cat /etc/zabbix/zabbix-agent.d/userparameter_ntp.conf

UserParameter=ntp.offset,(/usr/sbin/ntpq -pn | /usr/bin/awk 'BEGIN { offset=1000 } $1 ~ /\*/ { offset=$9 } END { print offset }')
#UserParameter=ntp.offset,(/usr/sbin/ntpq -pn | /usr/bin/awk 'FNR==4{print $9}')
UserParameter=ntp.sync,(/usr/bin/ntpstat | cut -f 1 -d " " | tr -d ' \t\n\r\f')
UserParameter=ntp.exact,(/usr/bin/ntpstat | /usr/bin/awk 'FNR==2{print $5,$6}')

In Zabbix the monitored ntpd parameters set-upped looks like this:


ntp_time_synchronization_check-zabbix-screenshot.


!Note that in above userparameter example, the commented userparameter script is a just another way to do an ntpd offset returned value which was developed before the more sophisticated with more regular expression checks from the /usr/sbin/ntpd via ntpq, perhaps if you want to extend it you can also use another script to report more verbose information to Zabbix if that is required like ouput from ntpq -c peers command:
 

UserParameter=ntp.verbose,(/usr/sbin/ntpq -c peers)

Of course to make the Zabbix fetch necessery data from monitored hosts, we need to set-up further new Zabbix Template with the respective Trigger and Items.

Below are few screenshots including the triggers used.

ntpd_server-time_synchronization_check-zabbix-screenshot-triggers

  • ntpd.trigger

{NTP:net.udp.service[ntp].last(0)}<1

  • NTP Synchronization trigger

{NTP:ntp.sync.iregexp(unsynchronised)}=1


As you can see from history we have setup our items to Store history of reported data to Zabbix from parameter script for 90 days and update our monitor check, every 30 seconds from the monitored hosts to which Tempate is applied.

Well that's all folks, time synchronization issues we'll be promptly triggering a new Alarm in Zabbix !

Find largest files on AIX system root / show biggest files and directories in AIX folder howto

Friday, November 6th, 2020

ibm-aix-logo-find-largest-files-and-directories-on-system-to-free-space-if-disk-is-full

On an AIX server if you get a root directory ( / ) to be completely full problem and the AIX running services are unable to write their pid files and logs for example in /tmp /admin /home /var/tmp /var/log/ and rest of directory structure or the system is almost full with mounted filesystems which shows it is 90% or 95%+ full on main partition,  the system is either already stuck or it is on the way to stop functiononing normally. Hence the only way to recover IBM AIX machine to a normal behavior is to clean up some files (if you can't extend the partition) or add more physical Hard drive, just as we usually do on Linux.

So How can we clean up largest files on AIX?


Lets say we want to find all files on AIX larger than 1 MB.

aix-system:/ $ find / -xdev -size 2048 -ls | sort -r +6
12579 1400 -rw-r—–  1 root      security   1433534 Jun 26  2019 /etc/security/tsd/tsd.dat
 9325 20361 -rw-r—–  1 root      system    20848752 Nov  6 16:02 /etc/security/failedlogin
21862 7105 -rwxr-xr-x  1 root      system     7274915 Aug 24  2017 /sbin/zabbix_agentd
   72 7005 -rw-rw—-  1 root      system     7172962 Nov  6 16:19 /audit/stream.out
24726 2810 -rw——-  1 root      system     2876944 Feb 29  2012 /etc/syslog-ng/core
29314 2391 -r-xr-xr-x  1 root      system     2447454 Jun 25  2019 /lpp/bos/bos.rte.filesystem/7.1.5.32.save/update.16
21844 2391 -r-xr-xr-x  1 root      system     2447414 Jun 25  2019 /sbin/helpers/jfs2/logredo64
21843 2219 -r-xr-xr-x  1 root      system     2271971 Jun 25  2019 /sbin/helpers/jfs2/logredo
29313 2218 -r-xr-xr-x  1 root      system     2270835 Jun 25  2019 /lpp/bos/bos.rte.filesystem/7.1.5.32.save/update.15
22279 1800 -rw-r–r–  1 root      system     1843200 Nov  4 08:03 /root/smit.log
12577 1399 -rw-r–r–  1 root      system     1431685 Jun 26  2019 /etc/security/tsd/.tsd.bk
21837 1325 -r-xr-xr-x  1 root      system     1356340 Jun 25  2019 /sbin/helpers/jfs2/fsck64
29307 1325 -r-xr-xr-x  1 root      system     1356196 Jun 25  2019 /lpp/bos/bos.rte.filesystem/7.1.5.32.save/update.9
   12 1262 -rw——-  1 root      system     1291365 Aug  8  2011 /core


Above finds all files greater than 1 MB and sort them in reverse
order with the largest files first.

To search all files larger than 64 Megabytes under root ( / )

aix-system:/ $ find / -xdev -size +131072 -ls | sort -r +6
65139 97019 -rw-r–r–  1 root      system    99347181 Mar 31  2017 /admin/archive.zip


Display 10 largest directories on system

aix-system:/ $ du -a /dir | sort -n -r | head -10


Show biggest files and directories in a directory


aix-system:/ $ du -sk * | sort -n
4       Mail
4       liste
4       my_user
4       syslog-ng.conf
140     smit.script
180     smit.transaction
1804    smit.log

Below du display the size of all files and directories in the current directory with the biggest being at the bottom.


List all largest files in dir decrasingly. If a directory is matches show all sub-dirs largest files.

aix-system:/ $ ls -A . | while read name; do du -sk $name; done | sort -nr

Below ls + while loop command sorts disk usage for all files in the current directory by size, in decreasing order. If the file we suspect happens to be a directory, we can then change into that directory, and re-run the preceding command to determine what is taking up space within that directory.

Continue these steps until you find the desired file or files, at which point you can take appropriate actions.

If the bottom-most item is a directory, then cd into that directory and run the du command again. Keep drilling down until you find the biggest files on your system and get rid of them to save some space.

Find when cron.daily cron.weekly and cron.monthly run on Redhat / CentOS / Debian Linux and systemd-timers

Wednesday, March 25th, 2020

Find-when-cron.daily-cron.monthly-cron.weekly-run-on-Redhat-CentOS-Debian-SuSE-SLES-Linux-cron-logo


The problem – Apache restart at random times


I've noticed today something that is occuring for quite some time but was out of my scope for quite long as I'm not directly involved in our Alert monitoring at my daily job as sys admin. Interestingly an Apache HTTPD webserver is triggering alarm twice a day for a short downtime that lasts for 9 seconds.

I've decided to investigate what is triggering WebServer restart in such random time and investigated on the system for any background running scripts as well as reviewed the system logs. As I couldn't find nothing there the only logical place to check was cron jobs.
The usual
 

crontab -u root -l


Had no configured cron jobbed scripts so I digged further to check whether there isn't cron jobs records for a script that is triggering the reload of Apache in /etc/crontab /var/spool/cron/root and /var/spool/cron/httpd.
Nothing was found there and hence as there was no anacron service running but /usr/sbin/crond the other expected place to look up for a trigger even was /etc/cron*


1. Configured default cron execution times, every day, every hour every month


# ls -ld /etc/cron.*
drwxr-xr-x 2 root root 4096 feb 27 10:54 /etc/cron.d/
drwxr-xr-x 2 root root 4096 dec 27 10:55 /etc/cron.daily/
drwxr-xr-x 2 root root 4096 dec  7 23:04 /etc/cron.hourly/
drwxr-xr-x 2 root root 4096 dec  7 23:04 /etc/cron.monthly/
drwxr-xr-x 2 root root 4096 dec  7 23:04 /etc/cron.weekly/


After a look up to each of above directories, finally I found the very expected logrorate shell script set to execute from /etc/cron.daily/logrotate and inside it I've found after the log files were set to be gzipped and moved to execute WebServer restart with:

systemctl reload httpd 


My first reaction was to ponder seriously why the script is invoking systemctl reload httpd instead of the good oldschool

apachectl -k graceful


But it seems on Redhat and CentOS since RHEL / CentOS version 6.X onwards systemctl reload httpd is supposed to be identical and a substitute for apachectl -k graceful.
Okay the craziness of innovation continued as obviously the reload was causing a Downtime to be visible in the Zabbix HTTPD port Monitoring graph …
Now as the problem was identified the other logical question poped up how to find out what is the exact timing scheduled to run the script in that unusual random times each time ??
 

2. Find out cron scripts timing Redhat / CentOS / Fedora / SLES


/etc/cron.{daily,monthly,weekly} placed scripts's execution method has changed over the years, causing a chaos just like many Linux standard things we know due to the inclusion of systemd and some other additional weird OS design changes. The result is the result explained above scripts are running at a strange unexpeted times … one thing that was intruduced was anacron – which is also executing commands periodically with a different preset frequency. However it is considered more thrustworhty by crond daemon, because anacron does not assume the machine is continuosly running and if the machine is down due to a shutdown or a failure (if it is a Virtual Machine) or simply a crond dies out, some cronjob necessery for overall set environment or application might not run, what anacron guarantees is even though that and even if crond is in unworking defunct state, the preset scheduled scripts will still be served.
anacron's default file location is in /etc/anacrontab.

A standard /etc/anacrontab looks like so:
 

[root@centos ~]:# cat /etc/anacrontab
# /etc/anacrontab: configuration file for anacron
 
# See anacron(8) and anacrontab(5) for details.
 
SHELL=/bin/sh
PATH=/sbin:/bin:/usr/sbin:/usr/bin
MAILTO=root
# the maximal random delay added to the base delay of the jobs
RANDOM_DELAY=45
# the jobs will be started during the following hours only
START_HOURS_RANGE=3-22
 
#period in days   delay in minutes   job-identifier   command
1    5    cron.daily        nice run-parts /etc/cron.daily
7    25    cron.weekly        nice run-parts /etc/cron.weekly
@monthly 45    cron.monthly        nice run-parts /etc/cron.monthly


START_HOURS_RANGE : The START_HOURS_RANGE variable sets the time frame, when the job could started. 
The jobs will start during the 3-22 (3AM-10PM) hours only.

  • cron.daily will run at 3:05 (After Midnight) A.M. i.e. run once a day at 3:05AM.
  • cron.weekly will run at 3:25 AM i.e. run once a week at 3:25AM.
  • cron.monthly will run at 3:45 AM i.e. run once a month at 3:45AM.

If the RANDOM_DELAY env var. is set, a random value between 0 and RANDOM_DELAY minutes will be added to the start up delay of anacron served jobs. 
For instance RANDOM_DELAY equels 45 would therefore add, randomly, between 0 and 45 minutes to the user defined delay. 

Delay will be 5 minutes + RANDOM_DELAY for cron.daily for above cron.daily, cron.weekly, cron.monthly config records, i.e. 05:01 + 0-45 minutes

A full detailed explanation on automating system tasks on Redhat Enterprise Linux is worthy reading here.

!!! Note !!! that listed jobs will be running in queue. After one finish, then next will start.
 

3. SuSE Enterprise Linux cron jobs not running at desired times why?


in SuSE it is much more complicated to have a right timing for standard default cron jobs that comes preinstalled with a service 

In older SLES release /etc/crontab looked like so:


SHELL=/bin/bash
PATH=/sbin:/bin:/usr/sbin:/usr/bin
MAILTO=root
HOME=/

# run-parts
01 * * * * root run-parts /etc/cron.hourly
02 4 * * * root run-parts /etc/cron.daily
22 4 * * 0 root run-parts /etc/cron.weekly
42 4 1 * * root run-parts /etc/cron.monthly


As time of writting article it looks like:


SHELL=/bin/sh
PATH=/usr/bin:/usr/sbin:/sbin:/bin:/usr/lib/news/bin
MAILTO=root
#
# check scripts in cron.hourly, cron.daily, cron.weekly, and cron.monthly
#
-*/15 * * * *   root  test -x /usr/lib/cron/run-crons && /usr/lib/cron/run-crons >/dev/null 2>&1


This runs any scripts placed in /etc/cron.{hourly, daily, weekly, monthly} but it may not run them when you expect them to run. 
/usr/lib/cron/run-crons compares the current time to the /var/spool/cron/lastrun/cron.{time} file to determine if those jobs need to be run.

For hourly, it checks if the current time is greater than (or exactly) 60 minutes past the timestamp of the /var/spool/cron/lastrun/cron.hourly file.

For weekly, it checks if the current time is greater than (or exactly) 10080 minutes past the timestamp of the /var/spool/cron/lastrun/cron.weekly file.

Monthly uses a caclucation to check the time difference, but is the same type of check to see if it has been one month after the last run.

Daily has a couple variations available – By default it checks if it is more than or exactly 1440 minutes since lastrun.
If DAILY_TIME is set in the /etc/sysconfig/cron file (again a suse specific innovation), then that is the time (within 15minutes) when daily will run.

For systems that are powered off at DAILY_TIME, daily tasks will run at the DAILY_TIME, unless it has been more than x days, if it is, they run at the next running of run-crons. (default 7days, can set shorter time in /etc/sysconfig/cron.)
Because of these changes, the first time you place a job in one of the /etc/cron.{time} directories, it will run the next time run-crons runs, which is at every 15mins (xx:00, xx:15, xx:30, xx:45) and that time will be the lastrun, and become the normal schedule for future runs. Note that there is the potential that your schedules will begin drift by 15minute increments.

As you see this is very complicated stuff and since God is in the simplicity it is much better to just not use /etc/cron.* for whatever scripts and manually schedule each of the system cron jobs and custom scripts with cron at specific times.


4. Debian Linux time start schedule for cron.daily / cron.monthly / cron.weekly timing

As the last many years many of the servers I've managed were running Debian GNU / Linux, my first place to check was /etc/crontab which is the standard cronjobs file that is setting the { daily , monthly , weekly crons } 


 debian:~# ls -ld /etc/cron.*
drwxr-xr-x 2 root root 4096 фев 27 10:54 /etc/cron.d/
drwxr-xr-x 2 root root 4096 фев 27 10:55 /etc/cron.daily/
drwxr-xr-x 2 root root 4096 дек  7 23:04 /etc/cron.hourly/
drwxr-xr-x 2 root root 4096 дек  7 23:04 /etc/cron.monthly/
drwxr-xr-x 2 root root 4096 дек  7 23:04 /etc/cron.weekly/


debian:~# cat /etc/crontab 
# /etc/crontab: system-wide crontab
# Unlike any other crontab you don't have to run the `crontab'
# command to install the new version when you edit this file
# and files in /etc/cron.d. These files also have username fields,
# that none of the other crontabs do.

SHELL=/bin/sh
PATH=/usr/local/sbin:/usr/local/bin:/sbin:/bin:/usr/sbin:/usr/bin# Example of job definition:
# .—————- minute (0 – 59)
# |  .————- hour (0 – 23)
# |  |  .———- day of month (1 – 31)
# |  |  |  .——- month (1 – 12) OR jan,feb,mar,apr …
# |  |  |  |  .—- day of week (0 – 6) (Sunday=0 or 7) OR sun,mon,tue,wed,thu,fri,sat
# |  |  |  |  |
# *  *  *  *  * user-name command to be executed
17 *    * * *    root    cd / && run-parts –report /etc/cron.hourly
25 6    * * *    root    test -x /usr/sbin/anacron || ( cd / && run-parts –report /etc/cron.daily )
47 6    * * 7    root    test -x /usr/sbin/anacron || ( cd / && run-parts –report /etc/cron.weekly )
52 6    1 * *    root    test -x /usr/sbin/anacron || ( cd / && run-parts –report /etc/cron.monthly )

What above does is:

– Run cron.hourly once at every hour at 1:17 am
– Run cron.daily once at every day at 6:25 am.
– Run cron.weekly once at every day at 6:47 am.
– Run cron.monthly once at every day at 6:42 am.

As you can see if anacron is present on the system it is run via it otherwise it is run via run-parts binary command which is reading and executing one by one all scripts insude /etc/cron.hourly, /etc/cron.weekly , /etc/cron.mothly

anacron – few more words

Anacron is the canonical way to run at least the jobs from /etc/cron.{daily,weekly,monthly) after startup, even when their execution was missed because the system was not running at the given time. Anacron does not handle any cron jobs from /etc/cron.d, so any package that wants its /etc/cron.d cronjob being executed by anacron needs to take special measures.

If anacron is installed, regular processing of the /etc/cron.d{daily,weekly,monthly} is omitted by code in /etc/crontab but handled by anacron via /etc/anacrontab. Anacron's execution of these job lists has changed multiple times in the past:

debian:~# cat /etc/anacrontab 
# /etc/anacrontab: configuration file for anacron

# See anacron(8) and anacrontab(5) for details.

SHELL=/bin/sh
PATH=/usr/local/sbin:/usr/local/bin:/sbin:/bin:/usr/sbin:/usr/bin
HOME=/root
LOGNAME=root

# These replace cron's entries
1    5    cron.daily    run-parts –report /etc/cron.daily
7    10    cron.weekly    run-parts –report /etc/cron.weekly
@monthly    15    cron.monthly    run-parts –report /etc/cron.monthly

In wheezy and earlier, anacron is executed via init script on startup and via /etc/cron.d at 07:30. This causes the jobs to be run in order, if scheduled, beginning at 07:35. If the system is rebooted between midnight and 07:35, the jobs run after five minutes of uptime.
In stretch, anacron is executed via a systemd timer every hour, including the night hours. This causes the jobs to be run in order, if scheduled, beween midnight and 01:00, which is a significant change to the previous behavior.
In buster, anacron is executed via a systemd timer every hour with the exception of midnight to 07:00 where anacron is not invoked. This brings back a bit of the old timing, with the jobs to be run in order, if scheduled, beween 07:00 and 08:00. Since anacron is also invoked once at system startup, a reboot between midnight and 08:00 also causes the jobs to be scheduled after five minutes of uptime.
anacron also didn't have an upstream release in nearly two decades and is also currently orphaned in Debian.

As of 2019-07 (right after buster's release) it is planned to have cron and anacron replaced by cronie.

cronie – Cronie was forked by Red Hat from ISC Cron 4.1 in 2007, is the default cron implementation in Fedora and Red Hat Enterprise Linux at least since Version 6. cronie seems to have an acive upstream, but is currently missing some of the things that Debian has added to vixie cron over the years. With the finishing of cron's conversion to quilt (3.0), effort can begin to add the Debian extensions to Vixie cron to cronie.

Because cronie doesn't have all the Debian extensions yet, it is not yet suitable as a cron replacement, so it is not in Debian.
 

5. systemd-timers – The new crazy systemd stuff for script system job scheduling


Timers are systemd unit files with a suffix of .timer. systemd-timers was introduced with systemd so older Linux OS-es does not have it.
 Timers are like other unit configuration files and are loaded from the same paths but include a [Timer] section which defines when and how the timer activates. Timers are defined as one of two types:


  • Realtime timers (a.k.a. wallclock timers) activate on a calendar event, the same way that cronjobs do. The option OnCalendar= is used to define them.
  • Monotonic timers activate after a time span relative to a varying starting point. They stop if the computer is temporarily suspended or shut down. There are number of different monotonic timers but all have the form: OnTypeSec=. Common monotonic timers include OnBootSec and OnActiveSec.


    For each .timer file, a matching .service file exists (e.g. foo.timer and foo.service). The .timer file activates and controls the .service file. The .service does not require an [Install] section as it is the timer units that are enabled. If necessary, it is possible to control a differently-named unit using the Unit= option in the timer’s [Timer] section.

    systemd-timers is a complex stuff and I'll not get into much details but the idea was to give awareness of its existence for more info check its manual man systemd.timer

Its most basic use is to list all configured systemd.timers, below is from my home Debian laptop
 

debian:~# systemctl list-timers –all
NEXT                         LEFT         LAST                         PASSED       UNIT                         ACTIVATES
Tue 2020-03-24 23:33:58 EET  18s left     Tue 2020-03-24 23:31:28 EET  2min 11s ago laptop-mode.timer            lmt-poll.service
Tue 2020-03-24 23:39:00 EET  5min left    Tue 2020-03-24 23:09:01 EET  24min ago    phpsessionclean.timer        phpsessionclean.service
Wed 2020-03-25 00:00:00 EET  26min left   Tue 2020-03-24 00:00:01 EET  23h ago      logrotate.timer              logrotate.service
Wed 2020-03-25 00:00:00 EET  26min left   Tue 2020-03-24 00:00:01 EET  23h ago      man-db.timer                 man-db.service
Wed 2020-03-25 02:38:42 EET  3h 5min left Tue 2020-03-24 13:02:01 EET  10h ago      apt-daily.timer              apt-daily.service
Wed 2020-03-25 06:13:02 EET  6h left      Tue 2020-03-24 08:48:20 EET  14h ago      apt-daily-upgrade.timer      apt-daily-upgrade.service
Wed 2020-03-25 07:31:57 EET  7h left      Tue 2020-03-24 23:30:28 EET  3min 11s ago anacron.timer                anacron.service
Wed 2020-03-25 17:56:01 EET  18h left     Tue 2020-03-24 17:56:01 EET  5h 37min ago systemd-tmpfiles-clean.timer systemd-tmpfiles-clean.service


8 timers listed.


N ! B! If a timer gets out of sync, it may help to delete its stamp-* file in /var/lib/systemd/timers (or ~/.local/share/systemd/ in case of user timers). These are zero length files which mark the last time each timer was run. If deleted, they will be reconstructed on the next start of their timer.

Summary

In this article, I've shortly explain logic behind debugging weird restart events etc. of Linux configured services such as Apache due to configured scripts set to run with a predefined scheduled job timing. I shortly explained on how to figure out why the preset default install configured cron jobs such as logrorate – the service that is doing system logs archiving and nulling run at a certain time. I shortly explained the mechanism behind cron.{daily, monthy, weekly} and its execution via anacron – runner program similar to crond that never misses to run a scheduled job even if a system downtime occurs due to a crashed Docker container etc. run-parts command's use was shortly explained. A short look at systemd.timers was made which is now essential part of almost every new Linux release and often used by system scripts for scheduling time based maintainance tasks.

Nginx increase security by putting websites into Linux jails howto

Monday, August 27th, 2018

linux-jail-nginx-webserver-increase-security-by-putting-it-and-its-data-into-jail-environment

If you're sysadmining a large numbers of shared hosted websites which use Nginx Webserver to interpret PHP scripts and serve HTML, Javascript, CSS … whatever data.

You realize the high amount of risk that comes with a possible successful security breach / hack into a server by a malicious cracker. Compromising Nginx Webserver by an intruder automatically would mean that not only all users web data will get compromised, but the attacker would get an immediate access to other data such as Email or SQL (if the server is running multiple services).

Nowadays it is not so common thing to have a multiple shared websites on the same server together with other services, but historically there are many legacy servers / webservers left which host some 50 or 100+ websites.

Of course the best thing to do is to isolate each and every website into a separate Virtual Container however as this is a lot of work and small and mid-sized companies refuse to spend money on mostly anything this might be not an option for you.

Considering that this might be your case and you're running Nginx either as a Load Balancing, Reverse Proxy server etc. , even though Nginx is considered to be among the most secure webservers out there, there is absolutely no gurantee it would not get hacked and the server wouldn't get rooted by a script kiddie freak that just got in darknet some 0day exploit.

To minimize the impact of a possible Webserver hack it is a good idea to place all websites into Linux Jails.

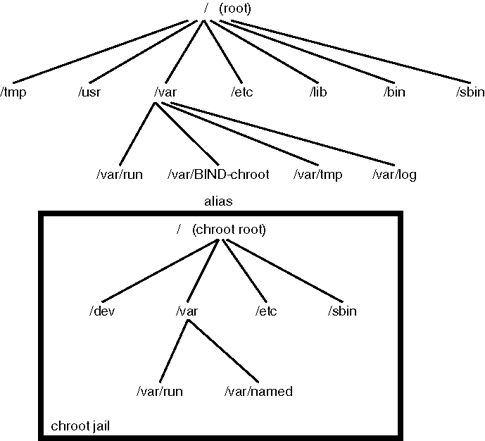
linux-jail-simple-explained-diagram-chroot-jail

For those who hear about Linux Jail for a first time,
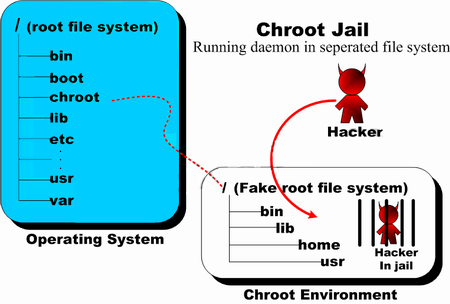
chroot() jail is a way to isolate a process / processes and its forked children from the rest of the *nix system. It should / could be used only for UNIX processes that aren't running as root (administrator user), because of the fact the superuser could break out (escape) the jail pretty easily.

Jailing processes is a concept that is pretty old that was first time introduced in UNIX version 7 back in the distant year 1979, and it was first implemented into BSD Operating System ver. 4.2 by Bill Joy (a notorious computer scientist and co-founder of Sun Microsystems). Its original use for the creation of so called HoneyPot – a computer security mechanism set to detect, deflect, or, in some manner, counteract attempts at unauthorized use of information systems that appears completely legimit service or part of website whose only goal is to track, isolate, and monitor intruders, a very similar to police string operations (baiting) of the suspect. It is pretty much like а bait set to collect the fish (which in this  case is the possible cracker).

linux-chroot-jail-environment-explained-jailing-hackers-and-intruders-unix

BSD Jails nowadays became very popular as iPhones environment where applications are deployed are inside a customly created chroot jail, the principle is exactly the same as in Linux.

But anyways enough talk, let's create a new jail and deploy set of system binaries for our Nginx installation, here is the things you will need:

1. You need to have set a directory where a copy of /bin/ls /bin/bash /bin/,  /bin/cat … /usr/bin binaries /lib and other base system Linux system binaries copy will reside.


server:~# mkdir -p /usr/local/chroot/nginx


2. You need to create the isolated environment backbone structure /etc/ , /dev, /var/, /usr/, /lib64/ (in case if deploying on 64 bit architecture Operating System).


server:~# export DIR_N=/usr/local/chroot/nginx;
server:~# mkdir -p $DIR_N/etc
server:~# mkdir -p $DIR_N/dev
server:~# mkdir -p $DIR_N/var
server:~# mkdir -p $DIR_N/usr
server:~# mkdir -p $DIR_N/usr/local/nginx
server:~# mkdir -p $DIR_N/tmp
server:~# chmod 1777 $DIR_N/tmp
server:~# mkdir -p $DIR_N/var/tmp
server:~# chmod 1777 $DIR_N/var/tmp
server:~# mkdir -p $DIR_N/lib64
server:~# mkdir -p $DIR_N/usr/local/


3. Create required device files for the new chroot environment


server:~# /bin/mknod -m 0666 $D/dev/null c 1 3
server:~# /bin/mknod -m 0666 $D/dev/random c 1 8
server:~# /bin/mknod -m 0444 $D/dev/urandom c 1 9


mknod COMMAND is used instead of the usual /bin/touch command to create block or character special files.

Once create the permissions of /usr/local/chroot/nginx/{dev/null, dev/random, dev/urandom} have to be look like so:


server:~# ls -l /usr/local/chroot/nginx/dev/{null,random,urandom}
crw-rw-rw- 1 root root 1, 3 Aug 17 09:13 /dev/null
crw-rw-rw- 1 root root 1, 8 Aug 17 09:13 /dev/random
crw-rw-rw- 1 root root 1, 9 Aug 17 09:13 /dev/urandom


4. Install nginx files into the chroot directory (copy all files of current nginx installation into the jail)
 

If your NGINX webserver installation was installed from source to keep it latest
and is installed in lets say, directory location /usr/local/nginx you have to copy /usr/local/nginx to /usr/local/chroot/nginx/usr/local/nginx, i.e:


server:~# /bin/cp -varf /usr/local/nginx/* /usr/local/chroot/nginx/usr/local/nginx


5. Copy necessery Linux system libraries to newly created jail
 

NGINX webserver is compiled to depend on various libraries from Linux system root e.g. /lib/* and /lib64/* therefore in order to the server work inside the chroot-ed environment you need to transfer this libraries to the jail folder /usr/local/chroot/nginx

If you are curious to find out which libraries exactly is nginx binary dependent on run:

server:~# ldd /usr/local/nginx/usr/local/nginx/sbin/nginx

        linux-vdso.so.1 (0x00007ffe3e952000)
        libpthread.so.0 => /lib/x86_64-linux-gnu/libpthread.so.0 (0x00007f2b4762c000)
        libcrypt.so.1 => /lib/x86_64-linux-gnu/libcrypt.so.1 (0x00007f2b473f4000)
        libpcre.so.3 => /lib/x86_64-linux-gnu/libpcre.so.3 (0x00007f2b47181000)
        libcrypto.so.0.9.8 => /usr/local/lib/libcrypto.so.0.9.8 (0x00007f2b46ddf000)
        libz.so.1 => /lib/x86_64-linux-gnu/libz.so.1 (0x00007f2b46bc5000)
        libc.so.6 => /lib/x86_64-linux-gnu/libc.so.6 (0x00007f2b46826000)
        /lib64/ld-linux-x86-64.so.2 (0x00007f2b47849000)
        libdl.so.2 => /lib/x86_64-linux-gnu/libdl.so.2 (0x00007f2b46622000)


The best way is to copy only the libraries in the list from ldd command for best security, like so:


server: ~# cp -rpf /lib/x86_64-linux-gnu/libthread.so.0 /usr/local/chroot/nginx/lib/*
server: ~# cp -rpf library chroot_location

etc.


However if you're in a hurry (not a recommended practice) and you don't care for maximum security anyways (you don't worry the jail could be exploited from some of the many lib files not used by nginx and you don't  about HDD space), you can also copy whole /lib into the jail, like so:


server: ~# cp -rpf /lib/ /usr/local/chroot/nginx/usr/local/nginx/lib


NOTE! Once again copy whole /lib directory is a very bad practice but for a time pushing activities sometimes you can do it …


6. Copy /etc/ some base files and ld.so.conf.d , prelink.conf.d directories to jail environment


server:~# cp -rfv /etc/{group,prelink.cache,services,adjtime,shells,gshadow,shadow,hosts.deny,localtime,nsswitch.conf,nscd.conf,prelink.conf,protocols,hosts,passwd,ld.so.cache,ld.so.conf,resolv.conf,host.conf}  \
/usr/local/chroot/nginx/usr/local/nginx/etc


server:~# cp -avr /etc/{ld.so.conf.d,prelink.conf.d} /usr/local/chroot/nginx/nginx/etc


7. Copy HTML, CSS, Javascript websites data from the root directory to the chrooted nginx environment


server:~# nice -n 10 cp -rpf /usr/local/websites/ /usr/local/chroot/nginx/usr/local/


This could be really long if the websites are multiple gigabytes and million of files, but anyways the nice command should reduce a little bit the load on the server it is best practice to set some kind of temporary server maintenance page to show on the websites index in order to prevent the accessing server clients to not have interrupts (that's especially the case on older 7200 / 7400 RPM non-SSD HDDs.)


8. Stop old Nginx server outside of Chroot environment and start the new one inside the jail


a) Stop old nginx server

Either stop the old nginx using it start / stop / restart script inside /etc/init.d/nginx (if you have such installed) or directly kill the running webserver with:


server:~# killall -9 nginx


b) Test the chrooted nginx installation is correct and ready to run inside the chroot environment


server:~# /usr/sbin/chroot /usr/local/chroot/nginx /usr/local/nginx/nginx/sbin/nginx -t
server:~# /usr/sbin/chroot /usr/local/chroot/nginx /usr/local/nginx/nginx/sbin/nginx


c) Restart the chrooted nginx webserver – when necessery later


server:~# /usr/sbin/chroot /nginx /usr/local/chroot/nginx/sbin/nginx -s reload


d) Edit the chrooted nginx conf

If you need to edit nginx configuration, be aware that the chrooted NGINX will read its configuration from /usr/local/chroot/nginx/nginx/etc/conf/nginx.conf (i'm saying that if you by mistake forget and try to edit the old config that is usually under /usr/local/nginx/conf/nginx.conf


Howto Change MAC address in Linux and Windows 2000, XP and Vista (Mac Spoofing :)

Sunday, September 20th, 2009

MAC stands for (Media Access Control) and stands for the computer physical address in LAN networks.
Ethernet MAC is a six byte number, usually expressed as a twelve digit hexadecimal number.
IPs are translated to Mac via a protocol called ARP (Address Resolution Protocol).
Let’s say Computer with IP 10.10.10.1 wants to send information to another system on the LAN with anIP of 10.10.10.2.
10.10.10.1 will first send broadcast to all stations on the LAN asking who has the address of 10.10.10.2.
Then the box possessing 10.10.10.2 will respond to 10.10.10.2 with it’s MAC address which would be temporary stored
in 10.10.10.2′s ARP’s table in order to make 10.10.10.1 recognize 10.10.10.2 later on.

Host 1 (10.10.10.1): Hello everyone on the LAN (FF:FF:FF:FF:FF:FF), who has the IP 10.10.10.2? My MAC is DE:AB:BE:EF:FF:FE so you can respond back to me.Host 2 (10.10.10.2): Hello DE:AB:BE:EF:FF:FE, I have IP 10.10.10.2 and my MAC address is 1C:43:B6:F8:9B:1E so you can send your IP packets to me.
There are a plenty of reasons that might force to wish for changing your mac. Though I’ll mention only one
1. To get across MAC filtering set on a router. Or in other words to bee able to access your internet withall your computers at home (don’t try them simultaneously!). For example recently a cousin of mine bought a secondnotebook for her daughter.
They desired to be able to access the internet with both the PCs. I contacted the ISPwith a request to add me a second MAC address, just to find that this wasn’t possible with this exact ISP.
Their computer ran dual boot install of a GNU/Linux system as well as Windows Vista, thus I needed to change their existing MACaddress in both Windows and Linux
Here is how I achieved that:
1. In Linux
Really simple:/sbin/ifconfig eth0 hw ether 00:00:00:00:00:00 (substitute here with your desired MAC)/sbin/ifconfig eth0 up
2. On BSD
/sbin/ifconfig xl0 link 00:00:00:AA:AA:AB (subst with MAC here), xl0 is your interface name/sbin/ifconfig xl0 up
3. In Windows XP
There are a couple of ways to go in Windows. The hardest way is to use regedit and to look and substitute some obscure values.
Another a bit easier way is to use either MacMakeUp , Smac or EtherChange
The classic way to change Mac in Windows XP is:
Go to Start->Settings->Control Panel and double click on Network and Dial-up Connectionsa) Right click on the NIC you want to change the MAC address and click on properties.b) Under “General” tab, click on the “Configure” buttonc) Click on “Advanced” tabd) Under “Property section”, you should see an item called “Network Address” or “Locally Administered Address”, click on it.e) On the right side, under “Value”, type in the New MAC address you want to assign to your NIC. Usually this value is entered without the “-” between the MAC address numbers.f) Goto command prompt and type in “ipconfig /all” or “net config rdr” to verify the changes are applied.
4. In Windows Vista
Go to Control Panel -> Network Connections -> Properties (on Connection using …) Configure -> Advanced -> Network Address (Then type your MAC Here)
All the credits for this post go to the article Changing Your MAC Address In Window XP/Vista, Linux And Mac OS X which explains what you read above even more thoroughly.
Most of the information here is originally found in the above article.END—–

Resolving “nf_conntrack: table full, dropping packet.” flood message in dmesg Linux kernel log

Wednesday, March 28th, 2012

nf_conntrack_table_full_dropping_packet
On many busy servers, you might encounter in /var/log/syslog or dmesg kernel log messages like

nf_conntrack: table full, dropping packet

to appear repeatingly:

[1737157.057528] nf_conntrack: table full, dropping packet.
[1737157.160357] nf_conntrack: table full, dropping packet.
[1737157.260534] nf_conntrack: table full, dropping packet.
[1737157.361837] nf_conntrack: table full, dropping packet.
[1737157.462305] nf_conntrack: table full, dropping packet.
[1737157.564270] nf_conntrack: table full, dropping packet.
[1737157.666836] nf_conntrack: table full, dropping packet.
[1737157.767348] nf_conntrack: table full, dropping packet.
[1737157.868338] nf_conntrack: table full, dropping packet.
[1737157.969828] nf_conntrack: table full, dropping packet.
[1737157.969928] nf_conntrack: table full, dropping packet
[1737157.989828] nf_conntrack: table full, dropping packet
[1737162.214084] __ratelimit: 83 callbacks suppressed

There are two type of servers, I've encountered this message on:

1. Xen OpenVZ / VPS (Virtual Private Servers)
2. ISPs – Internet Providers with heavy traffic NAT network routers
 

I. What is the meaning of nf_conntrack: table full dropping packet error message

In short, this message is received because the nf_conntrack kernel maximum number assigned value gets reached.
The common reason for that is a heavy traffic passing by the server or very often a DoS or DDoS (Distributed Denial of Service) attack. Sometimes encountering the err is a result of a bad server planning (incorrect data about expected traffic load by a company/companeis) or simply a sys admin error…

– Checking the current maximum nf_conntrack value assigned on host:

linux:~# cat /proc/sys/net/ipv4/netfilter/ip_conntrack_max
65536

– Alternative way to check the current kernel values for nf_conntrack is through:

linux:~# /sbin/sysctl -a|grep -i nf_conntrack_max
error: permission denied on key 'net.ipv4.route.flush'
net.netfilter.nf_conntrack_max = 65536
error: permission denied on key 'net.ipv6.route.flush'
net.nf_conntrack_max = 65536

– Check the current sysctl nf_conntrack active connections

To check present connection tracking opened on a system:

:

linux:~# /sbin/sysctl net.netfilter.nf_conntrack_count
net.netfilter.nf_conntrack_count = 12742

The shown connections are assigned dynamicly on each new succesful TCP / IP NAT-ted connection. Btw, on a systems that work normally without the dmesg log being flooded with the message, the output of lsmod is:

linux:~# /sbin/lsmod | egrep 'ip_tables|conntrack'
ip_tables 9899 1 iptable_filter
x_tables 14175 1 ip_tables

On servers which are encountering nf_conntrack: table full, dropping packet error, you can see, when issuing lsmod, extra modules related to nf_conntrack are shown as loaded:

linux:~# /sbin/lsmod | egrep 'ip_tables|conntrack'
nf_conntrack_ipv4 10346 3 iptable_nat,nf_nat
nf_conntrack 60975 4 ipt_MASQUERADE,iptable_nat,nf_nat,nf_conntrack_ipv4
nf_defrag_ipv4 1073 1 nf_conntrack_ipv4
ip_tables 9899 2 iptable_nat,iptable_filter
x_tables 14175 3 ipt_MASQUERADE,iptable_nat,ip_tables


II. Remove completely nf_conntrack support if it is not really necessery

It is a good practice to limit or try to omit completely use of any iptables NAT rules to prevent yourself from ending with flooding your kernel log with the messages and respectively stop your system from dropping connections.

Another option is to completely remove any modules related to nf_conntrack, iptables_nat and nf_nat.
To remove nf_conntrack support from the Linux kernel, if for instance the system is not used for Network Address Translation use:

/sbin/rmmod iptable_nat
/sbin/rmmod ipt_MASQUERADE
/sbin/rmmod rmmod nf_nat
/sbin/rmmod rmmod nf_conntrack_ipv4
/sbin/rmmod nf_conntrack
/sbin/rmmod nf_defrag_ipv4

Once the modules are removed, be sure to not use iptables -t nat .. rules. Even attempt to list, if there are any NAT related rules with iptables -t nat -L -n will force the kernel to load the nf_conntrack modules again.

Btw nf_conntrack: table full, dropping packet. message is observable across all GNU / Linux distributions, so this is not some kind of local distribution bug or Linux kernel (distro) customization.
 

III. Fixing the nf_conntrack … dropping packets error

– One temporary, fix if you need to keep your iptables NAT rules is:

linux:~# sysctl -w net.netfilter.nf_conntrack_max=131072

I say temporary, because raising the nf_conntrack_max doesn't guarantee, things will get smoothly from now on.
However on many not so heavily traffic loaded servers just raising the net.netfilter.nf_conntrack_max=131072 to a high enough value will be enough to resolve the hassle.

– Increasing the size of nf_conntrack hash-table

The Hash table hashsize value, which stores lists of conntrack-entries should be increased propertionally, whenever net.netfilter.nf_conntrack_max is raised.

linux:~# echo 32768 > /sys/module/nf_conntrack/parameters/hashsize
The rule to calculate the right value to set is:
hashsize = nf_conntrack_max / 4

– To permanently store the made changes ;a) put into /etc/sysctl.conf:

linux:~# echo 'net.netfilter.nf_conntrack_count = 131072' >> /etc/sysctl.conf
linux:~# /sbin/sysct -p

b) put in /etc/rc.local (before the exit 0 line):

echo 32768 > /sys/module/nf_conntrack/parameters/hashsize

Note: Be careful with this variable, according to my experience raising it to too high value (especially on XEN patched kernels) could freeze the system.
Also raising the value to a too high number can freeze a regular Linux server running on old hardware.

– For the diagnosis of nf_conntrack stuff there is ;

/proc/sys/net/netfilter kernel memory stored directory. There you can find some values dynamically stored which gives info concerning nf_conntrack operations in "real time":

linux:~# cd /proc/sys/net/netfilter
linux:/proc/sys/net/netfilter# ls -al nf_log/

total 0
dr-xr-xr-x 0 root root 0 Mar 23 23:02 ./
dr-xr-xr-x 0 root root 0 Mar 23 23:02 ../
-rw-r--r-- 1 root root 0 Mar 23 23:02 0
-rw-r--r-- 1 root root 0 Mar 23 23:02 1
-rw-r--r-- 1 root root 0 Mar 23 23:02 10
-rw-r--r-- 1 root root 0 Mar 23 23:02 11
-rw-r--r-- 1 root root 0 Mar 23 23:02 12
-rw-r--r-- 1 root root 0 Mar 23 23:02 2
-rw-r--r-- 1 root root 0 Mar 23 23:02 3
-rw-r--r-- 1 root root 0 Mar 23 23:02 4
-rw-r--r-- 1 root root 0 Mar 23 23:02 5
-rw-r--r-- 1 root root 0 Mar 23 23:02 6
-rw-r--r-- 1 root root 0 Mar 23 23:02 7
-rw-r--r-- 1 root root 0 Mar 23 23:02 8
-rw-r--r-- 1 root root 0 Mar 23 23:02 9


IV. Decreasing other nf_conntrack NAT time-out values to prevent server against DoS attacks

Generally, the default value for nf_conntrack_* time-outs are (unnecessery) large.
Therefore, for large flows of traffic even if you increase nf_conntrack_max, still shorty you can get a nf_conntrack overflow table resulting in dropping server connections. To make this not happen, check and decrease the other nf_conntrack timeout connection tracking values:

linux:~# sysctl -a | grep conntrack | grep timeout
net.netfilter.nf_conntrack_generic_timeout = 600
net.netfilter.nf_conntrack_tcp_timeout_syn_sent = 120
net.netfilter.nf_conntrack_tcp_timeout_syn_recv = 60
net.netfilter.nf_conntrack_tcp_timeout_established = 432000
net.netfilter.nf_conntrack_tcp_timeout_fin_wait = 120
net.netfilter.nf_conntrack_tcp_timeout_close_wait = 60
net.netfilter.nf_conntrack_tcp_timeout_last_ack = 30
net.netfilter.nf_conntrack_tcp_timeout_time_wait = 120
net.netfilter.nf_conntrack_tcp_timeout_close = 10
net.netfilter.nf_conntrack_tcp_timeout_max_retrans = 300
net.netfilter.nf_conntrack_tcp_timeout_unacknowledged = 300
net.netfilter.nf_conntrack_udp_timeout = 30
net.netfilter.nf_conntrack_udp_timeout_stream = 180
net.netfilter.nf_conntrack_icmp_timeout = 30
net.netfilter.nf_conntrack_events_retry_timeout = 15
net.ipv4.netfilter.ip_conntrack_generic_timeout = 600
net.ipv4.netfilter.ip_conntrack_tcp_timeout_syn_sent = 120
net.ipv4.netfilter.ip_conntrack_tcp_timeout_syn_sent2 = 120
net.ipv4.netfilter.ip_conntrack_tcp_timeout_syn_recv = 60
net.ipv4.netfilter.ip_conntrack_tcp_timeout_established = 432000
net.ipv4.netfilter.ip_conntrack_tcp_timeout_fin_wait = 120
net.ipv4.netfilter.ip_conntrack_tcp_timeout_close_wait = 60
net.ipv4.netfilter.ip_conntrack_tcp_timeout_last_ack = 30
net.ipv4.netfilter.ip_conntrack_tcp_timeout_time_wait = 120
net.ipv4.netfilter.ip_conntrack_tcp_timeout_close = 10
net.ipv4.netfilter.ip_conntrack_tcp_timeout_max_retrans = 300
net.ipv4.netfilter.ip_conntrack_udp_timeout = 30
net.ipv4.netfilter.ip_conntrack_udp_timeout_stream = 180
net.ipv4.netfilter.ip_conntrack_icmp_timeout = 30

All the timeouts are in seconds. net.netfilter.nf_conntrack_generic_timeout as you see is quite high – 600 secs = (10 minutes).
This kind of value means any NAT-ted connection not responding can stay hanging for 10 minutes!

The value net.netfilter.nf_conntrack_tcp_timeout_established = 432000 is quite high too (5 days!)
If this values, are not lowered the server will be an easy target for anyone who would like to flood it with excessive connections, once this happens the server will quick reach even the raised up value for net.nf_conntrack_max and the initial connection dropping will re-occur again …

With all said, to prevent the server from malicious users, situated behind the NAT plaguing you with Denial of Service attacks:

Lower net.ipv4.netfilter.ip_conntrack_generic_timeout to 60 – 120 seconds and net.ipv4.netfilter.ip_conntrack_tcp_timeout_established to stmh. like 54000

linux:~# sysctl -w net.ipv4.netfilter.ip_conntrack_generic_timeout = 120
linux:~# sysctl -w net.ipv4.netfilter.ip_conntrack_tcp_timeout_established = 54000

This timeout should work fine on the router without creating interruptions for regular NAT users. After changing the values and monitoring for at least few days make the changes permanent by adding them to /etc/sysctl.conf

linux:~# echo 'net.ipv4.netfilter.ip_conntrack_generic_timeout = 120' >> /etc/sysctl.conf
linux:~# echo 'net.ipv4.netfilter.ip_conntrack_tcp_timeout_established = 54000' >> /etc/sysctl.conf