Posts Tagged ‘security’

How to fix unfixable broken package dependencies on Debian GNU / Linux – Fix package mismatch

Wednesday, September 27th, 2017

how-to-fix-unfixable-broken-package-dependency-on-debian-ubuntu-linux-icon

I just tried to upgrade my Debian Wheezy 7 to the latest stable Debian Stretch 9 by not thinking too much and just changing the word wheezy with stretch in /etc/apt/sources.list so onwards on it looked like so:
 

cat /etc/apt/sources.list


deb http://ftp.bg.debian.org/debian/ stretch main contrib non-free
deb-src http://ftp.bg.debian.org/debian/ stretch main

deb http://security.debian.org/ stretch/updates main
deb-src http://security.debian.org/ stretch/updates main 

# stretch-updates, previously known as 'volatile'
##deb http://deb.debian.org/debian/ stretch-updates main
deb-src http://deb.debian.org/debian/ stretch-updates main


I also make sure all the defined Google Chrome / Opera / Skype and Squeeze Backports repositories existent in /etc/apt/sources.list.d directory files which in my case were like so;


root@noah:/etc/apt/sources.list.d# ls
google-chrome.list  opera-stable.list  squeeze-backports.list
opera.list          skype-stable.list


 were commented out because they were producing extra apt update errors …

And afterwards ran as usual:


apt-get update
apt-get –yes upgrade


The upgrade command executed fine and a lot of packages got downloaded and reinstalled without much issue, so I thought everything would be fine and just proceeded with the attempt to finalize the distribution major release 7 to major release 9 by running:


apt-get –yes dist-upgrade


But guess what now I got some dependency errors with cron and other installed packages that depend on package versions that are not going to be installed as the apt-get tool informed me.

I tried to out-smart the dpkg dependency system and removed all the packages reporting to have a missing dependencies with a short for bash loop after duming all the problematic packages showing dependency issues with commands such as:

apt-get -f dist-upgrade >> out.txt
for i in $(cat out.txt); awk '{ print $1 }' >> to_delete.txt; done


Before proceeding further I had to manually edit few lines in a text editor to remove some of the junk left from apt-get too.

So i was brave and just removed the dependency missing packages with following other for loop:


for i in $(cat to_delete.txt); do dpkg -r –force-all $i; done


Now I was hoping that rerunning:


apt-get autoremove

dpkg --configure -a

apt-get update -f
apt-get dist-upgrade -f


would no longer complain and I would just install the removed packages in another for shell loop once every other packages gets installed.

But guess what I was wrong … the system entered into another bunch of depedency terribly issues and messed up so badly that there were at least 50 packages reporting to have a missing / broken or uninstallable deb version depedency …

I got totally Angry, I knew already from experience that just trying to jump over while skipping a major release e.g. upgrade Debian 7 to Debian 9, instead of first upgrading to Debian 8 Linux and then upgrading Debian 8 to Debian 9 have always produced the same mess but I was lame and stupid again to f**k it up and I was out of mind swearing (a truly bad habid I'm not proud of) …

So as the notebook with Linux so far was perfectly working with Debian 7 and had a tons of old installed software and I was in a state where if I restart the system it was very likely my Thinkpad r61 laptop won't boot at all, I googled around to find a solution unfortunately without any luck, so finally I used the good old and tested method to DO IT MYSELF and Find the Fix without Uncle Google's help and by God's grace I did, after experimenting a while with the aptitude package / install / remove update tool without much success, finally I find the solution to the totally messed up Debian package dependencies and it all came to a simply reverting back my /etc/apt/source.list to look like following:


# deb cdrom:[Debian GNU/Linux 7.0.0 _Wheezy_ – Official amd64 CD Binary-1 20130504-14:44]/ wheezy main

##deb cdrom:[Debian GNU/Linux 7.0.0 _Wheezy_ – Official amd64 CD Binary-1 20130504-14:44]/ wheezy main

deb http://ftp.bg.debian.org/debian/ wheezy main contrib non-free
deb-src http://ftp.bg.debian.org/debian/ wheezy main

deb http://security.debian.org/ wheezy/updates main
deb-src http://security.debian.org/ wheezy/updates main

# wheezy-updates, previously known as 'volatile'
##deb http://deb.debian.org/debian/ wheezy-updates main
deb-src http://deb.debian.org/debian/ wheezy-updates main
##deb http://www.deb-multimedia.org wheezy main non-free
#deb http://ftp.debian.org/debian/ wheezy-backports main
###deb http://ftp.debian.org/debian/ wheezy-backports main contrib non-free
##deb http://dl.google.com/linux/chrome/deb/ wheezy main
#deb http://ftp2.de.debian.org/debian-volatile wheezy/volatile main
###deb http://www.deb-multimedia.org wheezy main non-free


run of the following two depedency fix commands !!!!


aptitude upgrade –full-resolver

aptitude full-upgrade –full-resolver


After a while a Debian LinuxOS system downgrade was initated and the missing packages were found, downloaded from the correct wheezy repositories and all broken and missing dependencies packages were fixed !!! HOORAY IT WORKS AGAIN!!

 

Adding another level of security to your shared Debian Linux webhosting server with SuPHP

Tuesday, April 7th, 2015

suphp_improve-apache-security-protect-against-virus-internal-server-infections-suphp-webserver-logo

There are plenty of security schemes and strategies you can implement if you're a Shared Web Hosting company sysadmin however probably the most vital one is to install on Apache + PHP Webserver SuPHP module.

# apt-cache show suphp-common|grep -i descrip -A 4

Description: Common files for mod suphp Suphp consists of an Apache module (mod_suphp for either Apache 1.3.x or Apache 2.x) and a setuid root binary (suphp) that is called by the Apache module to change the uid of the process executing the PHP interpreter to the owner of the php script.

So what SuPHP actuall  does is to run separate CPanel / Kloxo etc. Users with separate username and groupid permissions coinciding with the user present in /etc/passwd , /etc/shadow files existing users, thus in case if someone hacks some of the many customer sites he would be able to only write files and directories under the user with which the security breach occured.

On servers where SuPHP is not installed, all  systemusers are using the same UserID / GuID to run PHP executable scripts under separate domains Virtualhost which are coinciding with Apache (on Debian / Ubuntu  uid, gid – www-data) or on (CentOS / RHEL / Fedora etc. – user apache) so once one site is defaced  exploited by a worm all or most server websites might end up infected with a Web Virus / Worm which will be trying to exploit even more sites of a type running silently in the background.  This is very common scenarios as currently there are donezs of PHP / CSS / Javasripts / XSS vulnerability exploited on VPS and Shared hosting servers due to failure of a customer to update his own CMS  scripts / Website  (Joomla, Wordpress, Drupal etc.) and the lack of resource to regularly monitor all customer activities / websites.

Therefore installing SuPHP Apache module is essential one to install on new serverslarge hosting providers as it saves the admin a lot of headache from spreading malware across all hosted servers sites ..
Some VPS admins that are security freaks tend to also install SuPHP module together with many chrooted Apache / LiteSpeed / Nginx webservers each of which running in a separate Jailed environment.

Of course using SuPHP besides giving a improved security layer to the webserver has its downsides such as increased load for the server and making Apache PHP scripts being interpretted a little bit slower than with plain Apache + PHP but performance difference while running a site on top of SuPHP is often not so drastic so you can live it up ..

Installing SuPHP on a Debian / Ubuntu servers is a piece of cake, just run the as root superuser, usual:
 

# apt-get install libapache2-mod-suphp


Once installed only thing to make is to turn off default installed Apache PHP module (without SuPHP compiled support and restart Apache webserver):
 

# a2dismod php5 …

# /etc/init.d/apache2 restart


To test the SuPHP is properly working on the Apache Webserver go into some of many hosted server websites DocumentRoot

And create new file called test_suphp.php with below content:

# vim test_suphp.php
<?php
system('id');
?>

Then open in browser http://whatever-website/test_suphp.php assuming that system(); function is not disabled for security reasons in php.ini you should get an User ID, GroupID bigger than reserved system IDs on GNU / Linux e.g. ID > UID / GID 99

Its also a good idea to take a look into SuPHP configuration file /etc/suphp/suphp.conf and tailor options according to your liking 

If different hosted client users home directories are into /home directory, set in suphp.conf

;Path all scripts have to be in

docroot=/home/


Also usually it is a good idea to set 

umask=0022 

Create SSH Tunnel to MySQL server to access remote filtered MySQL port 3306 host through localhost port 3308

Friday, February 27th, 2015

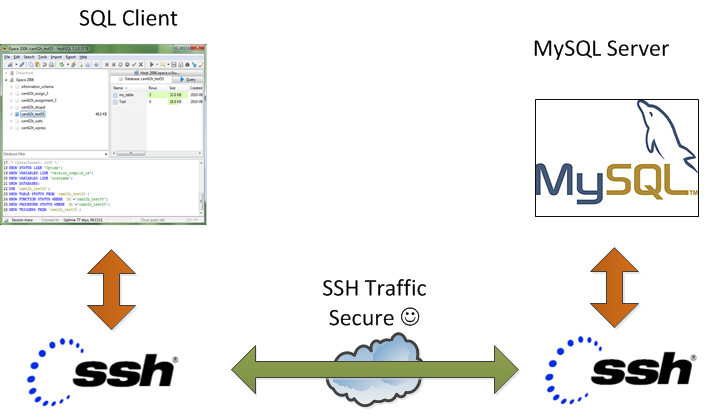
create_ssh_tunnel_to-mysql_server-to-access-remote-filtered-mysql-on-port-3306-secure_ssh_traffic
On our Debian / CentOS / Ubuntu Linux and Windows servers we're running multiple MySQL servers and our customers sometimes need to access this servers.
This is usually problem because MySQL Db  servers are running in a DMZ Zone with a strong firewall and besides that for security reasons SQLs are configured to only listen for connections coming from localhost, I mean in config files across our Debian Linux servers and CentOS / RHEL Linux machines the /etc/mysql/my.cnf and /etc/my.cnf the setting for bind-address is 127.0.0.1:
 

[root@centos ~]# grep -i bind-address /etc/my.cnf 
bind-address            = 127.0.0.1
##bind-address  = 0.0.0.0


For source code developers which are accessing development SQL servers only through a VPN secured DMZ Network there are few MySQL servers witha allowed access remotely from all hosts, e.g. on those I have configured:
 

[root@ubuntu-dev ~]# grep -i bind-address /etc/my.cnf 

bind-address  = 0.0.0.0


However though clients insisted to have remote access to their MySQL Databases but since this is pretty unsecure, we decided not to configure MySQLs to listen to all available IP addresses / network interfaces. 
MySQl acess is allowed only through PhpMyAdmin accessible via Cleint's Web interface which on some servers is CPanel  and on other Kloxo (This is open source CPanel like very nice webhosting platform).

For some stubborn clients which wanted to have a mysql CLI and MySQL Desktop clients access to be able to easily analyze their databases with Desktop clients such as MySQL WorkBench there is a "hackers" like work around to create and use a MySQL Tunnel to SQL server from their local Windows PCs using standard OpenSSH Linux Client from Cygwin,  MobaXterm which already comes with the SSH client pre-installed and has easy GUI interface to create SSH tunnels or eventually use Putty's Plink (Command Line Interface) to create the tunnel

Anyways the preferred and recommended (easiest) way to achieve a tunnel between MySQL and local PC (nomatter whether Windows or Linux client system) is to use standard ssh client and below command:
 

ssh -o ServerAliveInterval=10 -M -T -M -N -L 3308:localhost:3306 your-server.your-domain.com


By default SSH tunnel will keep opened for 3 minutes and if not used it will automatically close to get around this issue, you might want to raise it to (lets say 15 minutes). To do so in home directory user has to add in:
 

~/.ssh/config

ServerAliveInterval 15
ServerAliveCountMax 4


Note that sometimes it is possible ven though ssh tunnel timeout value is raised to not take affect if there is some NAT (Network Adress Translation) with low timeout setting on a firewall level. If you face constant SSH Tunnel timeouts you can use below bash few lines code to auto-respawn SSH tunnel connection (for Windows users use MobaXterm or install in advance bash shell cygwin package):
 

while true
do
 
ssh -o ServerAliveInterval=10 -M -T -M -N -L 3308:localhost:3306 your-server.your-domain.com
  sleep 15
done


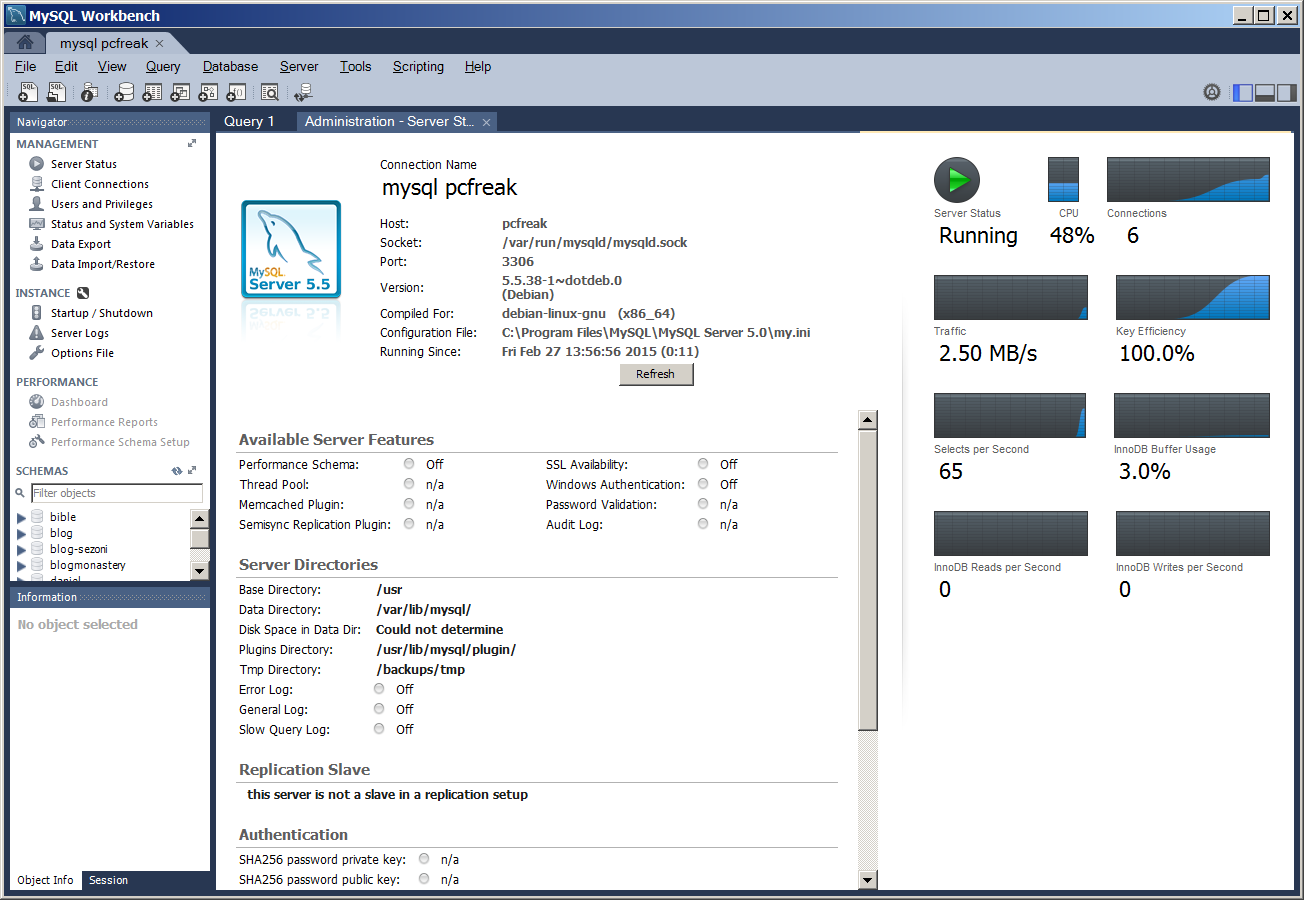
Below is MySQLBench screenshot connected through server where this blog is located after establishing ssh tunnel to remote mysql server on port 3308 on localhost

mysql-workbench-database-analysis-and-management-gui-tool-convenient-for-data-migratin-and-queries-screenshot-

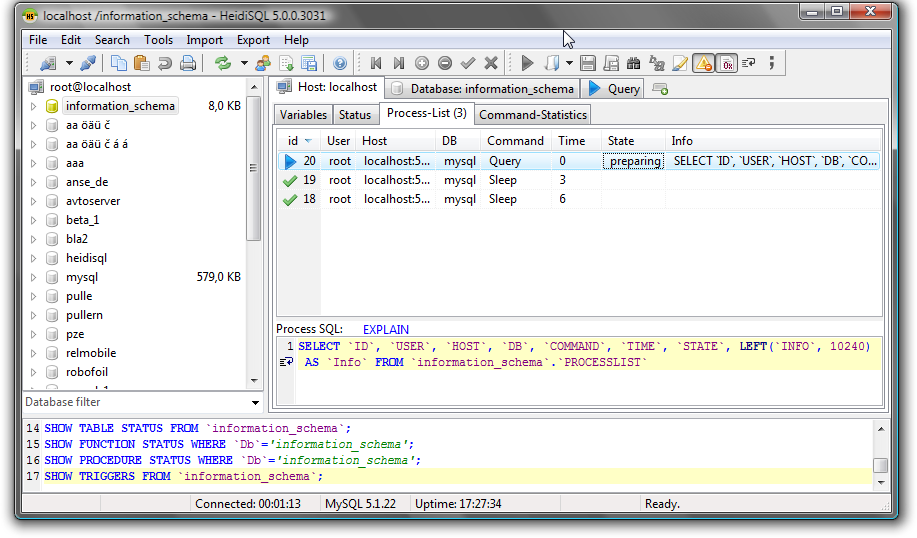
There is also another alternative way to access remote firewall filtered mysql servers without running complex commands to Run a tunnel which we recommend for clients (sql developers / sql designers) by using HeidiSQL (which is a useful tool for webdevelopers who has to deal with MySQL and MSSQL hosted Dbs).

heidisql-show-host_processlist-screenshot

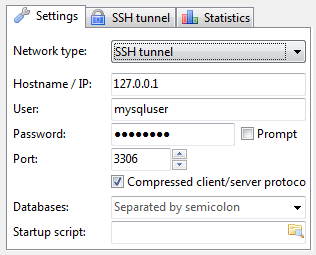
To connect to remote MySQL server through a Tunnel using Heidi:

mysql_connection_configuration-heidi-mysql-gui-connect-tool


In the ‘Settings’ tab

1. In the dropdown list of ‘Network type’, please select SSH tunnel

2. Hostname/IP: localhost (even you are connecting remotely)

3. Username & Password: your mysql user and password

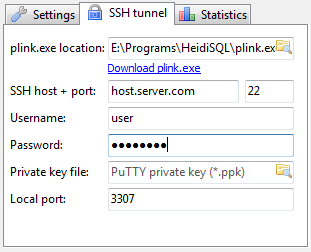
Next, in the tab SSH Tunnel:

1. specify plink.exe or you need to download it and specify where it’s located

2. Host + port: the remote IP of your SSH server(should be MySQL server as well), port 22 if you don’t change anything

3. Username & password: SSH username (not MySQL user)


heidi-connection_ssh_tunnel_configuration-heidi-sql-tool-screenshot
 

Maximal protection against SSH attacks. If your server has to stay with open SSH (Secure Shell) port open to the world

Thursday, April 7th, 2011

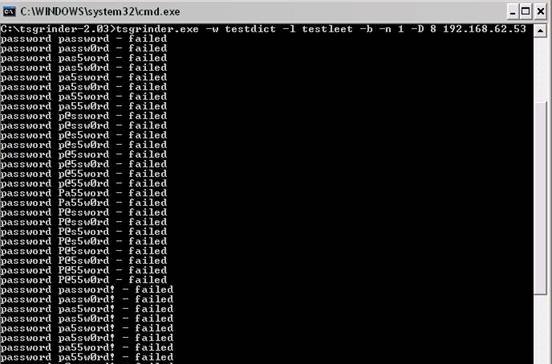
Brute Force Attack SSH screen, Script kiddie attacking
If you’re a a remote Linux many other Unix based OSes, you have defitenily faced the security threat of many failed ssh logins or as it’s better known a brute force attack

During such attacks your /var/log/messages or /var/log/auth gets filled in with various failed password logs like for example:

Feb 3 20:25:50 linux sshd[32098]: Failed password for invalid user oracle from 95.154.249.193 port 51490 ssh2
Feb 3 20:28:30 linux sshd[32135]: Failed password for invalid user oracle1 from 95.154.249.193 port 42778 ssh2
Feb 3 20:28:55 linux sshd[32141]: Failed password for invalid user test1 from 95.154.249.193 port 51072 ssh2
Feb 3 20:30:15 linux sshd[32163]: Failed password for invalid user test from 95.154.249.193 port 47481 ssh2
Feb 3 20:33:20 linux sshd[32211]: Failed password for invalid user testuser from 95.154.249.193 port 51731 ssh2
Feb 3 20:35:32 linux sshd[32249]: Failed password for invalid user user from 95.154.249.193 port 38966 ssh2
Feb 3 20:35:59 linux sshd[32256]: Failed password for invalid user user1 from 95.154.249.193 port 55850 ssh2
Feb 3 20:36:25 linux sshd[32268]: Failed password for invalid user user3 from 95.154.249.193 port 36610 ssh2
Feb 3 20:36:52 linux sshd[32274]: Failed password for invalid user user4 from 95.154.249.193 port 45514 ssh2
Feb 3 20:37:19 linux sshd[32279]: Failed password for invalid user user5 from 95.154.249.193 port 54262 ssh2
Feb 3 20:37:45 linux sshd[32285]: Failed password for invalid user user2 from 95.154.249.193 port 34755 ssh2
Feb 3 20:38:11 linux sshd[32292]: Failed password for invalid user info from 95.154.249.193 port 43146 ssh2
Feb 3 20:40:50 linux sshd[32340]: Failed password for invalid user peter from 95.154.249.193 port 46411 ssh2
Feb 3 20:43:02 linux sshd[32372]: Failed password for invalid user amanda from 95.154.249.193 port 59414 ssh2
Feb 3 20:43:28 linux sshd[32378]: Failed password for invalid user postgres from 95.154.249.193 port 39228 ssh2
Feb 3 20:43:55 linux sshd[32384]: Failed password for invalid user ftpuser from 95.154.249.193 port 47118 ssh2
Feb 3 20:44:22 linux sshd[32391]: Failed password for invalid user fax from 95.154.249.193 port 54939 ssh2
Feb 3 20:44:48 linux sshd[32397]: Failed password for invalid user cyrus from 95.154.249.193 port 34567 ssh2
Feb 3 20:45:14 linux sshd[32405]: Failed password for invalid user toto from 95.154.249.193 port 42350 ssh2
Feb 3 20:45:42 linux sshd[32410]: Failed password for invalid user sophie from 95.154.249.193 port 50063 ssh2
Feb 3 20:46:08 linux sshd[32415]: Failed password for invalid user yves from 95.154.249.193 port 59818 ssh2
Feb 3 20:46:34 linux sshd[32424]: Failed password for invalid user trac from 95.154.249.193 port 39509 ssh2
Feb 3 20:47:00 linux sshd[32432]: Failed password for invalid user webmaster from 95.154.249.193 port 47424 ssh2
Feb 3 20:47:27 linux sshd[32437]: Failed password for invalid user postfix from 95.154.249.193 port 55615 ssh2
Feb 3 20:47:54 linux sshd[32442]: Failed password for www-data from 95.154.249.193 port 35554 ssh2
Feb 3 20:48:19 linux sshd[32448]: Failed password for invalid user temp from 95.154.249.193 port 43896 ssh2
Feb 3 20:48:46 linux sshd[32453]: Failed password for invalid user service from 95.154.249.193 port 52092 ssh2
Feb 3 20:49:13 linux sshd[32458]: Failed password for invalid user tomcat from 95.154.249.193 port 60261 ssh2
Feb 3 20:49:40 linux sshd[32464]: Failed password for invalid user upload from 95.154.249.193 port 40236 ssh2
Feb 3 20:50:06 linux sshd[32469]: Failed password for invalid user debian from 95.154.249.193 port 48295 ssh2
Feb 3 20:50:32 linux sshd[32479]: Failed password for invalid user apache from 95.154.249.193 port 56437 ssh2
Feb 3 20:51:00 linux sshd[32492]: Failed password for invalid user rds from 95.154.249.193 port 45540 ssh2
Feb 3 20:51:26 linux sshd[32501]: Failed password for invalid user exploit from 95.154.249.193 port 53751 ssh2
Feb 3 20:51:51 linux sshd[32506]: Failed password for invalid user exploit from 95.154.249.193 port 33543 ssh2
Feb 3 20:52:18 linux sshd[32512]: Failed password for invalid user postgres from 95.154.249.193 port 41350 ssh2
Feb 3 21:02:04 linux sshd[32652]: Failed password for invalid user shell from 95.154.249.193 port 54454 ssh2
Feb 3 21:02:30 linux sshd[32657]: Failed password for invalid user radio from 95.154.249.193 port 35462 ssh2
Feb 3 21:02:57 linux sshd[32663]: Failed password for invalid user anonymous from 95.154.249.193 port 44290 ssh2
Feb 3 21:03:23 linux sshd[32668]: Failed password for invalid user mark from 95.154.249.193 port 53285 ssh2
Feb 3 21:03:50 linux sshd[32673]: Failed password for invalid user majordomo from 95.154.249.193 port 34082 ssh2
Feb 3 21:04:43 linux sshd[32684]: Failed password for irc from 95.154.249.193 port 50918 ssh2
Feb 3 21:05:36 linux sshd[32695]: Failed password for root from 95.154.249.193 port 38577 ssh2
Feb 3 21:06:30 linux sshd[32705]: Failed password for bin from 95.154.249.193 port 53564 ssh2
Feb 3 21:06:56 linux sshd[32714]: Failed password for invalid user dev from 95.154.249.193 port 34568 ssh2
Feb 3 21:07:23 linux sshd[32720]: Failed password for root from 95.154.249.193 port 43799 ssh2
Feb 3 21:09:10 linux sshd[32755]: Failed password for invalid user bob from 95.154.249.193 port 50026 ssh2
Feb 3 21:09:36 linux sshd[32761]: Failed password for invalid user r00t from 95.154.249.193 port 58129 ssh2
Feb 3 21:11:50 linux sshd[537]: Failed password for root from 95.154.249.193 port 58358 ssh2

This brute force dictionary attacks often succeed where there is a user with a weak a password, or some old forgotten test user account.
Just recently on one of the servers I administrate I have catched a malicious attacker originating from Romania, who was able to break with my system test account with the weak password tset .

Thanksfully the script kiddie was unable to get root access to my system, so what he did is he just started another ssh brute force scanner to crawl the net and look for some other vulnerable hosts.

As you read in my recent example being immune against SSH brute force attacks is a very essential security step, the administrator needs to take on a newly installed server.

The easiest way to get read of the brute force attacks without using some external brute force filtering software like fail2ban can be done by:

1. By using an iptables filtering rule to filter every IP which has failed in logging in more than 5 times

To use this brute force prevention method you need to use the following iptables rules:
linux-host:~# /sbin/iptables -I INPUT -p tcp --dport 22 -i eth0 -m state -state NEW -m recent -set
linux-host:~# /sbin/iptables -I INPUT -p tcp --dport 22 -i eth0 -m state -state NEW
-m recent -update -seconds 60 -hitcount 5 -j DROP

This iptables rules will filter out the SSH port to an every IP address with more than 5 invalid attempts to login to port 22

2. Getting rid of brute force attacks through use of hosts.deny blacklists

sshbl – The SSH blacklist, updated every few minutes, contains IP addresses of hosts which tried to bruteforce into any of currently 19 hosts (all running OpenBSD, FreeBSD or some Linux) using the SSH protocol. The hosts are located in Germany, the United States, United Kingdom, France, England, Ukraine, China, Australia, Czech Republic and setup to report and log those attempts to a central database. Very similar to all the spam blacklists out there.

To use sshbl you will have to set up in your root crontab the following line:

*/60 * * * * /usr/bin/wget -qO /etc/hosts.deny http://www.sshbl.org/lists/hosts.deny

To set it up from console issue:

linux-host:~# echo '*/60 * * * * /usr/bin/wget -qO /etc/hosts.deny http://www.sshbl.org/lists/hosts.deny' | crontab -u root -

These crontab will download and substitute your system default hosts with the one regularly updated on sshbl.org , thus next time a brute force attacker which has been a reported attacker will be filtered out as your Linux or Unix system finds out the IP matches an ip in /etc/hosts.deny

The /etc/hosts.deny filtering rules are written in a way that only publicly known brute forcer IPs will only be filtered for the SSH service, therefore other system services like Apache or a radio, tv streaming server will be still accessible for the brute forcer IP.

It’s a good practice actually to use both of the methods 😉
Thanks to Static (Multics) a close friend of mine for inspiring this article.

How to deb upgrade PHP 5.3.3-7 / MySQL Server 5.1 to PHP 5.4.37 MySQL 5.5 Server on Debian 6.0 / 7.0 Squeeze / Wheezy GNU / Linux

Thursday, February 12th, 2015

how-to-deb-upgrade-mysql-server-5.1-to-mysql-5.5-php-5.3-to-php-5.4-5.5-upgrade-howto-on-old-stable-debian-squeeze-wheezy

I've been still running Debian Squeeze 6.0 GNU / Linux on few of the Linux / Apache / MySQL servers I'm administrating and those servers are running few Wordperss / Joomla websites which lately face severe MySQL performance issues. I tried to optimize using various mysql performance optimization scripts such as mysql-tuner.pl, Tuning-primer.sh and Percona Toolkit – a collection of advanced command-line tools for system administrators and tech / support staff to perform a variety of MySQL and system tasks that are too difficult or complex to perform manually. Though with above tools and some my.cnf tunizations I managed to achieve positive performance improvement results with above optimizations, still I didn't like how MyQSL served queries and since the SQL server is already about 5 years old (running version 5.1) and the PHP on sever is still at 5.3 branch, I was advised by my dear colleague Anatoliy to try version update as a mean to improve SQLserver performance. I took seriously the suggestion to try upgrade as a mean to resolve performance issues in this article I will explain in short what I had to do to make MySQL upgrade a success

Of course to try keep deb installed software versions as fresh as possible possible deb packagse, I'm already using Debian Back Ports (for those who hear it a first time Debian Backports is a special repository for Stable versioned Debian Desktop and Servers  – supporting stable releases of Debian Linux) which allows you to keep install packages versions less outdated (than default installable software which usually are way behind latest stable package versions with 2-5 years).

If you happen to administer Stable Debian servers and you never used BackPorts I warmly recommend it as it often includes security patches of packages part of Debian stable releases that reached End Of Support (EOS) and already too old even for security updates to be issued by respective Debian Long Term Suport (LTS) repositories.

If you're like me and still in situation to manage remotely Debian 6.0 Squeeze and its the first time you hear about BackPorts and Debian LTShttps://wiki.debian.org/LTS/ to start using those two add to your /etc/apt/sources.list below 3 lines

Open with vim editor and press shift+G to go to last line of file and then press I to enter INSERT mode, once you're done to save, press (ESC) then press : and type x! in short key combination for exit and save setting in vim is 
 

Esc + :x! 


debian-server:~# vim /etc/apt/sources.list
deb http://http.debian.net/debian squeeze-lts main contrib non-free
deb-src http://http.debian.net/debian squeeze-lts main contrib non-free
deb http://http.debian.net/debian-backports squeeze-backports main

If you haven't been added a security updates line in /etc/apt/sources.list make sure you add also:


deb http://security.debian.org/ squeeze/updates main contrib non-free
deb-src http://security.debian.org/ squeeze/updates main contrib non-free


Then to apply latest security updates and packages from LTS / Backports repository run the usual:


debian-server:~# apt-get update && apt-get –yes upgrade
….

If you need to search a package or install something from just added backports repository use:


debian-server:~# apt-cache -t squeeze-backports search "mysql-server"
auth2db – Powerful and eye-candy IDS logger, log viewer and alert generator
torrentflux – web based, feature-rich BitTorrent download manager
cacti – Frontend to rrdtool for monitoring systems and services
mysql-server-5.1 – MySQL database server binaries and system database setup
mysql-server-core-5.1 – MySQL database server binaries
mysql-server – MySQL database server (metapackage depending on the latest version)


To install specific packages only with all their dependencies from Backports while keeping rest of packages from Debian Stable:


debian-server:~# apt-get install -t squeeze-backports "package_name"

In same way you can also search or install specific packages from LTS repo:


debian-server:~# apt-get search -t squeeze-lts "package_name"

debian-server:~# apt-get install -t squeeze-lts "package_name"

Latest mysql available from Debian BackPorts and LTS is still quite old 5.1.73-1+deb6u1 therefore I made an extensive research online on how can I easily update MySQL 5.1 to MySQL 5.5 / 5.6 on Debian Stable Linux.
 

Luckily there were already DotDeb deb repositories for Debian LAMP (Linux / Apache  / MySQL / PHP / Nginx ) running servers prepared in order to keep the essential Webserver services up2date even long after distro official support is over. I learned about existence of this repo thanks to a Ryan Tate's post who updates his LAMP stack on TurnKey Linux which by the way is based on slightly modified official stable Debian Linux releases packages

To start using DotDeb repos add in /etc/apt/sources.list (depending whereh you're on Squeeze or Wheeze Debian):


deb http://packages.dotdeb.org squeeze all
deb-src http://packages.dotdeb.org squeeze all

or for Debian Wheezy add repos:


deb http://packages.dotdeb.org wheezy all
deb-src http://packages.dotdeb.org wheezy all


I was updating my DebianLatest MySQL / PHP / Apache release to Latest ones on (6.0.4) Squeeze so added above squeeze repos:

Before refreshing list of package repositories, to authenticate repos issue:


debian-server:~# wget -q http://www.dotdeb.org/dotdeb.gpg
debian-server:~# apt-key add dotdeb.gpg

Once again to update my packages from newly added DodDeb repository


debian-server:~# apt-get update

Before running the SQL upgrade to insure myself, I dumped all databases with:


debian-server:~# mysqldump -u root -p -A > /root/dump.sql

Finally I was brave enough to run apt-get dist-upgrade to update with latest LAMP packages


debian-server:~# apt-get dist-upgrade
Reading package lists… Done
Building dependency tree
Reading state information… Done
Calculating upgrade… Done
The following packages will be REMOVED:
  mysql-client-5.1 mysql-server mysql-server-5.1
The following NEW packages will be installed:
  libaio1 libmysqlclient18 mysql-client-5.5 mysql-client-core-5.5 python-chardet python-debian
The following packages will be upgraded:
  curl krb5-multidev libapache2-mod-php5 libc-bin libc-dev-bin libc6 libc6-dev libc6-i386 libcurl3 libcurl3-gnutls libcurl4-openssl-dev libevent-1.4-2
  libgssapi-krb5-2 libgssrpc4 libjasper1 libk5crypto3 libkadm5clnt-mit7 libkadm5srv-mit7 libkdb5-4 libkrb5-3 libkrb5-dev libkrb53 libkrb5support0 libmysqlclient-dev
  libxml2 libxml2-dev locales mysql-client mysql-common ntp ntpdate php-pear php5 php5-cgi php5-cli php5-common php5-curl php5-dev php5-gd php5-imagick php5-mcrypt
  php5-mysql php5-odbc php5-recode php5-sybase php5-xmlrpc php5-xsl python-reportbug reportbug unzip

50 upgraded, 6 newly installed, 3 to remove and 0 not upgraded.
Need to get 51.7 MB of archives.
After this operation, 1,926 kB of additional disk space will be used.
Do you want to continue [Y/n]? Y

As you see from above output above command updates Apache webservers / PHP and PHP related modules, however it doesn't update MySQL installed version, to update also MySQL server 5.1 to MySQL server 5.5


debian-server:~#  apt-get install –yes mysql-server mysql-server-5.5

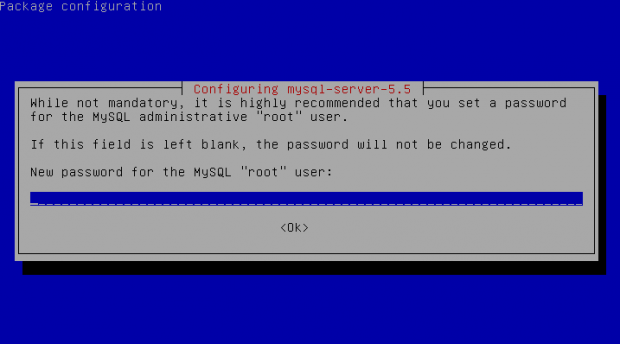
You will be prompted with the usual Debian ncurses text blue interface to set a root password to mysql server, just set it the same as it used to be on old upgraded MySQL 5.1 server.

Well now see whether mysql has properly restarted with ps auxwwf


debian-server:~#  ps axuwwf|grep -i sql
root     22971  0.0  0.0 112360   884 pts/11   S+   15:50   0:00  |                   \_ grep -i sql
root     19436  0.0  0.0 115464  1556 pts/1    S    12:53   0:00 /bin/sh /usr/bin/mysqld_safe
mysql    19837  4.0  2.3 728192 194552 pts/1   Sl   12:53   7:12  \_ /usr/sbin/mysqld –basedir=/usr –datadir=/var/lib/mysql –plugin-dir=/usr/lib/mysql/plugin –user=mysql –pid-file=/var/run/mysqld/mysqld.pid –socket=/var/run/mysqld/mysqld.sock –port=3306
root     19838  0.0  0.0 110112   700 pts/1    S    12:53   0:00  \_ logger -t mysqld -p daemon.error

In my case it was running, however if it fails to run try to debug what is going wrong on initialization by manually executing init script /etc/init.d/mysql stop; /etc/init.d/mysql start and look for errors. You can also manually try to run mysqld_safe from console if it is not running run:


debian-server:~# /usr/bin/mysqld_safe &

This should give you a good hint on why it is failing to run
 

One more thing left is to check whether php modules load correctly to do so issue:


debian-server:~# php -v
Failed loading /usr/lib/php5/20090626/xcache.so:  /usr/lib/php5/20090626/xcache.so: cannot open shared object file: No such file or directory

Failed loading /usr/lib/php5/20090626/xdebug.so:  /usr/lib/php5/20090626/xdebug.so: cannot open shared object file: No such file or directory


You will likely get an exception (error) like above.
To solve the error, reinstall xcache and xcache-debug debs


debian-server:~# apt-get purge php5-xcache php5-xdebug

Now PHP + MySQL + Apache environment should be running much smootly.

debian-squeeze-wheeze-update-install-mysql-sevver5.55-620x344-howto

Upgrading the MySQL server / PHP library to MySQL server 5.6 / PHP 5.5 on Wheeze Linux is done in very much analogous ways all you have to do is change the repositories with above wheeze 7.0 ones and to follow the process as described in this article. I haven't tested update on Wheezy yet, so if you happen to try my article with wheezy reports and got a positive upgrade result please drop a comment.

Anmap network port scanner – Nmap security scanner for your Android Mobile and Tablet

Tuesday, June 24th, 2014

Nmap-for-Android-Anmap-port-security-penetriation-and-network-hacking-from-your-mobile

Those who have to deal with network security or do periodic UNIX / Windows server security audits know  well Nmap (Network Mapper).
NMAP is the swiss army knife tool of choice of both crackers and security exports and it is a must have exploration tool.
For those who just heard of Nmap or want  to learn more on Nmap basics, I recommend my previos articles how to check Windows / Linux host port security (by examples)  and test a local network for open Windows shares.

Nmap is one of the most improtant tools for every cracker (white, grey black hat "hacker"). Nmap is a legendary hack tool and probably the prevelent networt security port scanner tool over the last 10 years on all major Operating Systems. Nmap's high portability is thanks to being open source, being ported so far for:

Window – Zen, Mac OS and Linux, FreeBSD, OpenBSD, NetBSD and even obscure proprietary operating systems like Hewlett Packard's UNIX – HP-UX, Sun Microsystems's UNIX variant Solaris. It is in an interesting fact to mention probably not much known Sun Solaris's core code base is based on Berkley's BSD 4.4 whose fork nowadays give birth to FreeBSD and rest of *BSD family OSes. 
Nmap evolved a lot through the last 7 years from only having a command line interface for hardcode console geeks like me to having a nice shiny GUI frontendinterface ZenMap.
Nmap is popular for being one of the hack tools in the famous move The Matrix (II) – Reloaded.

As hacking and security penetration is quickly moving from PC Desktops and Notebooks to more mobile and stealth variants with recent boom of smartphones – it is no strange that Nmap got ported to the most wide-spread (and very Linux compatible) – Android OS under the name ANmap (Android Map).

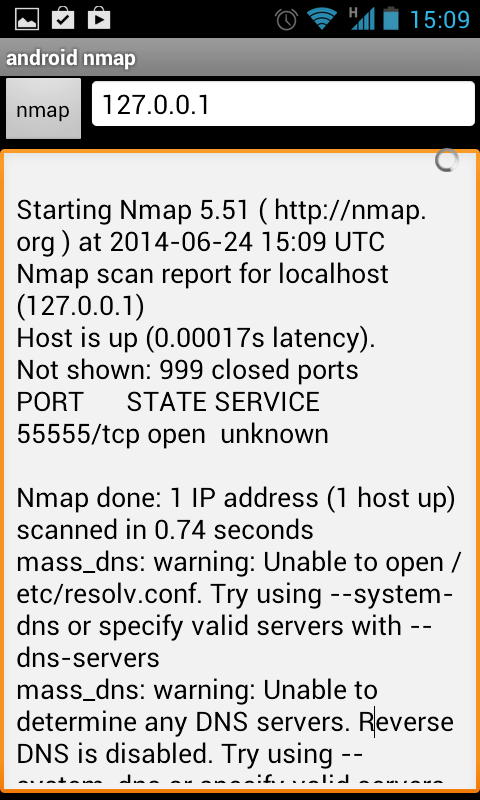
nmap-android-mobile-phone-tablet-screenshot-anmap-port-scanner-screenshot

ANMap source code and apk – (Android Package file) is on GoogleCode here.

By the way using your android device to scan your own Android device on localhost (just like on above screenshot), could be quite helpful and often could reveal some unwated services, run by malware or viruses application.

To get full use of ANmap's full functionality (Stealth Scan, Full version and port scan etc.)  just like on other operating systems ANmap has to run with super user privileges .

To be able to run applications with Super user access on Android you need to have ROOTED ANDROID  (Tablet / Phone) device – rooting android is just a simply hack that makes Android OS to run certain applciations with root (administrator privileges). Usually Rooting a device breaks ups vendor (reseller) guarantees, so if you root your device to run ANmap on it be very careful to which application you give access to run as super user!
As Anmap page reads: There are some little bugs, as domain names resolving and unroot scanning.

If you want to use Anmap only command line interface (without gui).
Download compiled nmap with data files in this tar ball or this zip archive and keep it in one folder.

Than connect to localhost via ConnectBot, untar and start scanning:

$ tar -xvf nmap-5.51-1.tar
$ su
# ./nmap 127.0.0.1

Happy scanning 🙂

Speed up Apache webserver by including htaccess mod_rewrite rules in VirtualHosts / httpd.conf

Wednesday, November 12th, 2014

speed-up-apache-through-include-htaccess-from-config
There are plenty of Apache Performance Optimization things to do on a new server. However many sysadmins miss  .htaccess mod_rewrite rules whole optimization often leads to a dramatic performance benefits and low webserver responce time, making website much more attractive for both Search Engine Crawlers and End User experience.

Normally most Apache + PHP CMS systems, websites, blogs etc. are configured to use various goodies of .htaccess files (mostly mod_rewrite rules, directory htpasswd authentication  and allow forbid directives). All most popular open-source Content management systems  like Drupal, Joomla, WordPress, TYPO3, Symphony CMS are configured to get use  .htaccess file usually living in the DocumentRoot of a virtualhost ( website/s )httpd.conf , apache2.conf /etc/apache2/sites-enabled/customvhost.com or whichever config the Vhost resides…

It is also not uncommon practice to enable .htaccess files to make programmers life easier (allowing the coder to add and remove URL rewrite rules that makes URL pretty and SEO friendly, handle website redirection or gives live to the framework like it is the case with Zend PHP Framework).

However though having the possibility to get the advantages of dynamically using .htaccess inside site DocRoot or site's subdirectories is great for developers it is not a very good idea to have the .htaccess turned on Production server environment.

Having

AllowOverride All

switched on for a directory in order to have .htaccess enabled, makes the webserver lookup for .htaccess file and re-read its content dynamically on each client request.
This has a negative influence on overall server performance and makes Apache preforked childs or workers (in case of mpm-worker engine used) to waste time parsing .htaccess file leading to slower request processing.

Normally a Virtualhost with enabled .htaccess looks like so:

<VirtualHost 192.168.0.5:80>
ServerName your-website.com:80 …
DocumentRoot /var/www/website
<Directory /var/www/website>
AllowOverride All …
</Directory> …
</VirtualHost>

And VirtualHost configured to keep permanently loaded mod_rewrite .htaccess rules in memory on Apache server start-up.
 

<VirtualHost 192.168.0.5:80>
ServerName your-website.com:80 …
DocumentRoot /var/www/website
<Directory /var/www/website>
AllowOverride None
Include /var/www/website/.htaccess …
</Directory> …
</VirtualHost>

Now CMS uses the previous .htaccess rules just as before, however to put more rewrite rules into the file you will need to restart webserver which is a downside of using rewrite rules through the Include directive. Using the Include directive instead of AllowOverride leads to 7 to 10% faster individual page loads.

I have to mention Include directive though faster has a security downside because .htaccess files loaded with Include option (uses mod_include) via httpd.conf doesn't recognize <Directory> … </Directory> set security rules. Also including .htaccess from configuration on Main Website directory, could make any other sub-directories .htaccess Deny / Allow access rules invalid and this could expose site to  security risk. Another security downside is because Include variable allows loading a full subset of Apache directives (including) loading other Apache configuration files (for example you can even override Virtualsthost pre-set directives such as ErrorLog, ScriptAlias etc.) and not only .htaccess standard directives allowed by AllowOverride All. This gives a potential website attacker who gains write permissions over the included /var/www/website/.htaccess access to this full set of VirtualHost directives and not only .htaccess standard allowed.

Because of the increased security risk most people recommend not to use Include .htaccess rules, however for those who want to get the few percentage page load acceleration of using static Include from Apache config, just set your Included .htaccess file to be owned by user/group root, e.g.:

chown root:root /var/www/website/.htaccess

Disable annoying ads on Youtube in Firefox and Google Chrome – Adblock Plus

Monday, November 17th, 2014


adblock-plus-great-way-to-stop-annoying-website-advertisements
I'm not an Youtube addict but every now and then to kill some time I watch videos there usually this is 10 to 20 videos a day. Over the last few months, I've noticed Youtube video Adsense ads has increased dramatically and this is seriously breaking the overall user-experience one gets when watching videos.

Thus finally I decided to get rid of the ads and to prevent the annoyance, i've seen a hack on LifeHacker claiming to disable Youtube Ads with Javascript setting, I've tested this one but probably since 2013 when the hack was working Youtube updated, there player Ads inclusion algorithm and this Adus removal tip no longer works.

Adblock-Plus-remove-google-youtube-facebook-advertisements-and-browser-ads-firefox-chrome-plugin

Thanksfully there is an easy way to achieve that with no need for crytic commands in through developers by using the good old Adblock Plus Browser extension which besides of capable of removing standard Adsense Advertisements (showing up on almost every webpage on the internet) also removes Adsense Advertisements "embedded" into Youtube Videos is a generally one of the few recommended plugins to increase your browser security.

Installation of Adblockplus 2 is done directly from plugin website for both Firefox and Google Chrome, just click on Install button and you're done.
You don't need to do any post-configuration of Adblockplus even though for those who like to finely tune on any custom website White / Blacklisting.

Creating multi-part zip archives in Linux with 7zip command to transfer large zip files data in parts

Monday, December 1st, 2014

creating-multi-part-zip-archives-in-Linux-debian-ubuntu-fedora-centos-rhel-with-7z-command-to-transfer-large-files-data-in-parts
Recently, I've blogged on how to move large files from source to destination server in parts on a slow / restricted networks or whenever the media is limtied in size. This is not a common scenario but it happens so if you're admin sooner or later you will need that. I give example with UNIX's split and unrar. However strip's file naming can get you insane (in case if you don't want to use cstrip command – split a file into sections determined by context lines instead) plus normal split Linux / *nix command doesn't support compression and encryption. On the other side on many Company internal Networks with Windows server hosts running – Winblows (2003, 2008, 1012) for security purposes it might be that WinRar is not installed, thus you might need to transfer the file parted between the GNU / Linux server and Windows server in standard OS supported by Windows ZIP format. Assuming that you have root (admin) access to the Linux host you can then archive your file in parts using ZIP encryption algorithm with 7zip.

1. Installing 7zip on CentOS / Fedora / RHEL and other Redhat based Linuces

If the Linux server is running:
Fedora / CentOS  / RHEL and you don't have 7zip installed yet install it with:

yum -y install p7zip

According to distros version  it might be the name could be a bit different if p7zip is different to find the one you need search with:

yum search p7zip

and install whatever you need
 

2. Installing 7zip on Debian / Ubuntu and other Debian based servers

apt-get install –yes p7zip-full

Depending on Deb based distro just like with fedora if p7zip-full pack is not installable, check 7zip's package distro version:

apt-cache search p7zip


3. Archiving ZIP file in multiple (sized) parts on GNU / Linux

7z a -v512m Large-file-separated-in-multi-parts.zip Large-Many-Gigabytes-File.SQL

This would output multiple files:

Large-file-separated-in-multi-parts.zip.001, Large-file-separated-in-multi-parts.zip.002, Large-file-separated-in-multi-parts.zip.003, Large-file-separated-in-multi-parts.004 etc.

If you want to add security to the transferred file to protect newly created ZIP archive with password use following command:

7z a -v512m Large-file-separated-in-multi-parts.zip Large-Many-Gigabytes-File.SQL


7-Zip [64] 9.20  Copyright (c) 1999-2010 Igor Pavlov  2010-11-18
p7zip Version 9.20 (locale=bg_BG.UTF-8,Utf16=on,HugeFiles=on,2 CPUs)
Scanning

Creating archive Large-file-separated-in-multi-parts.zip


Enter password (will not be echoed) :

Once you have transferred all the many parts via (SSH/ FTPS or not preferrably HTTP / HTTPS / FTP) place them in the same folder and use Windows standard ZIP to unarchive.

If the archived 7zip files are to be unarchived on another Linux host (in case if multi part zip transfer is between Linux -> Linux hosts) to unarchive, parted files:

7z x Large-file-separated-in-multi-parts.zip.*

Configure Linux users to see only their own user processes with Hidepid – Stop users to see what others are doing

Tuesday, December 23rd, 2014

configure-Linux-users-to-see-only-ther-own-processes-with-hidepid-ps-aux-stop-system-users-to-see-what-others-are-doing
If you administer a university shared free shell Linux server, have a small community of *NIX users offering free accounts for them, or responsible for Linux software company with development servers, where programmers login and use daily to program software / websites its necessery to have tightened security rules with a major goal to keep the different user accounts processes separate one from other (hide all system and user processes from single logged in user).

Preventing users to see other users processes is essential for Linux servers which are at high risk to be hacked. At earlier times to achieve hiding all processes besides own ones from a logged in user was possible by using A kernel security module Grsecurity.
In latest currenlt Linux kernel version 3.2+ (on both Debian (unstable) / Ubuntu 14.04 / RHEL/CentOS v6.5+ above) you can hide process from other user so only root (useruser) can see all running process with (ps auxwwf) with a native kernel option hidepid. 

Configuring Hidepid

To enable hidepid option you have to remount the /proc filesystem with the Linux kernel hardening hidepid option, to make it one time setting on already running server issue:
 

 mount -o remount,rw,hidepid=2 /proc


To make the hidepid setting permanently active its necessery to modify /proc filesystem settings in /etc/fstab


vim /etc/fstab

proc    /proc    proc    defaults,hidepid=2     0     0
 

  • hidepid=0 – Anybody may read all world-readable /proc/PID/* files (default).
  • hidepid=1 – Means users may not access any /proc/ / directories, but only ones owned by them.Important  files like cmdline, sched*, status are now protected to read from other other users.
  • hidepid=2 – Means hidepid=1 plus all /proc/PID/ will be invisible to other users besides logged in. Using this options stops Cracker's from gathering info about running processes, indication of daemon (services) which runs with elevated privileges, other user running processes (some might contain password) passed as argument or some sensitive data. Revealing such data is frequently used to get versions of local / remote running services that can be exploited.
     

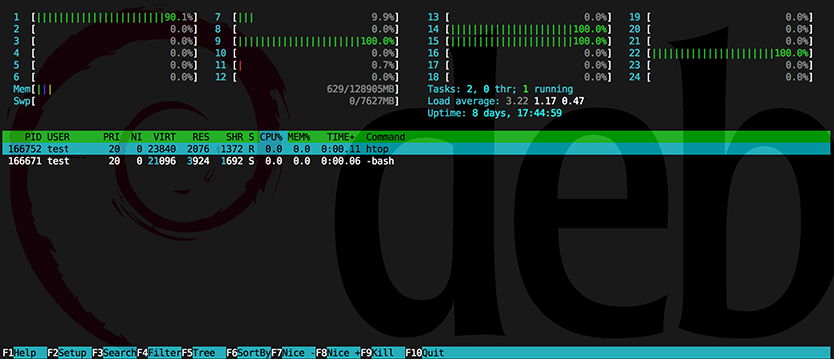
Below is output of htop of a logged in user on hidepid activated server:

:htop_screenshot_on_hideid_showing-only-own-user-credentials-gnu-linux-debian