Posts Tagged ‘shutdown’

Howto convert KVM QCOW2 format Virtual Machine to Vmdk to migrate to VMware ESXi

Thursday, November 17th, 2022

qcow2-to-vmdkvk-convert-to-complete-linux-kvm-to-vmware-esxi-migration

Why you would want to convert qcow2 to vmdk?

When managing the heterogeneous virtual environment or changing the virtualization solutions that become so common nowadays, you might need to migrate qcow2 from a Linux based KVM virtualization solution to VMWare's proprietary  vmdk – the file format in which a VMWare does keep stored it's VMs, especially if you have a small business or work in a small start-up company where you cannot afford to buy something professional as VMware vCenter Converter Standalone or Microsoft virtual machine converter (MVMC)- usually used to to migrate VMware hosts to Hyper-V hosts, but also capable to migrate .qcow2 to .vmdk. The reason is that your old datacenter based on Linux OS custom KVM virtual machines might be moved to VMWare ESX to guarantee better and more systemized management (which though is very questionable, since most of my experiences with VMWare was that though the software was a great one, the people who manage it was not very much specialists in managing it).

Another common reason is that running a separate Linux virtual machine, costs you more than a well organized VMWare farm because you need more qualified Linux specialists to manage the KVMs thus KVM to VMWare management as in most big corporations nowadays’s main target is to cut the costs.
Even with successful migrations like that, though you might often expect a drop in the quality of the service when your VM ends in the VMWare farm.

Nomatter what’s the reason to migrate qcow2 to VMDK So lets proceed with how the .QCOW2 to .VMDK can be easily done.


1. Get information about the VM you would like to migrate to VMDK

In QEMU-KVM environment, the popular image format is qcow2, which outperforms the first generation of qcow format and raw format. You can find the files of virtual disks by checking the information of virtual machine by virsh command:

[root@hypervisor-machine ~]# virsh dominfo virtual-machine-name

INFO
ID: {e59ae416-9314-4e4b-af07-21c31d91b3fb}
EnvID: 1704649750
Name: CentOS7minimal
Description:
Type: VM
State: stopped
OS: centos7
Template: no
Uptime: 00:00:00 (since 2019-04-25 13:04:11)
Home: /vz/vmprivate/e39ae416-9314-4e4b-af05-21c31d91b3fb/
Owner: root@.
GuestTools: state=not_installed
GuestTools autoupdate: on
Autostart: off
Autostop: shutdown
Autocompact: off
Boot order: hdd0 cdrom0
EFI boot: off
Allow select boot device: off
External boot device:
On guest crash: restart
Remote display: mode=manual port=6903 address=0.0.0.0
Remote display state: stopped
Hardware:
  cpu sockets=1 cpus=2 cores=2 VT-x accl=high mode=64 ioprio=4 iolimit='0'
  memory 2048Mb
  video 32Mb 3d acceleration=off vertical sync=yes
  memory_guarantee auto
  hdd0 (+) scsi:0 image='/vz/vmprivate/e59ae415-9314-4e4b-af05-21c31d91b3fb/harddisk.hdd' type='expanded' 5120Mb subtype=virtio-scsi
  cdrom0 (+) scsi:1 image='/home/CentOS-7-x86_64-Minimal-1611.iso' state=disconnected subtype=virtio-scsi
  usb (+)
  net0 (+) dev='vme42bef5f3' network='Bridged' mac=001C42BEF5F3 card=virtio ips='10.50.50.27/255.255.255.192 ' gw='10.50.50.1'
SmartMount: (-)
Disabled Windows logo: on
Nested virtualization: off
Offline management: (-)
Hostname: kvmhost.fqdn.com


2. Convert the harddrive to VMDK

[root@hypervisor-machine e59ae415-9314-4e4b-af05-21c31d91b3fb]# ls -lsah

1.3G -rw-r—– 1 root root 1.3G Apr 25 14:43 harddisk.hdd

a. Converstion with qemu:

You can use qemu-img tool that is installable via cmds:

yum install quemu-img / apt install qemu-img / zipper install qemu-img (depending on the distribution RedHat / Debian / SuSE Linux)

-f: format of the source image

-O: format of the target image

[root@hypervisor-machine ~]# qemu-img convert -f qcow2 -O vmdk \-o adapter_type=lsilogic,subformat=streamOptimized,compat6 harddisk.hdd harddisklsilogic.vmdk


[root@ hypervisor-machine e59ae415-9314-4e4b-af05-21c31d91b3fb]# ls -lsah

1.3G -rw-r—– 1 root root 1.3G Apr 25 14:43 harddisk.hdd

536M -rw-r–r– 1 root root 536M Apr 26 14:52 harddisklsilogic.vmdk

3. Upload the new harddrive to the ESXi Hypervisor and adapt it to ESX

This vmdk might not be able to used on ESXi, but you can use it on VMware Workstation. To let it work on ESXi, you need to use vmkfstools to convert it again.


a. Adapt the filesystem to ESXi

[root@hypervisor-machine ~]# vmkfstools -i harddisklsilogic.vmdk  -d thin harddisk.vmdk


4. Create a VM and add the converted harddrive to the machine. 

Futher

Recreate the initramfs

But of course this won’t work directly as it often happens with Linux 🙂 !!. 
We need to make adjustments to the virtual machine as well with few manual interventions:

1. Start the machine from the VMWare interface

2. Grub CentOS Linux rescue will appear from the prompt

3. Run command

dracut –regenerate-all –force


to Recreate the initramfs.
 

Note that You might also have to edit your network configuration since your network device usually get’s a different name.
 

Finally reboot the host:

[root@hypervisor-machine ~]# reboot


And voila you’re ready to play the VM inside the ESX after some testing, you might switch off the KVM Hypervisor hosted VM and reroute the network to point to the ESX Cluster.


How to automate open xen Hypervisor Virtual Machines backups shell script

Tuesday, June 22nd, 2021

openxen-backup-logo As a sysadmin that have my own Open Xen Debian Hypervisor running on a Lenovo ThinkServer few months ago due to a human error I managed to mess up one of my virtual machines and rebuild the Operating System from scratch and restore files service and MySQl data from backup that really pissed me of and this brought the need for having a decent Virtual Machine OpenXen backup solution I can implement on the Debian ( Buster) 10.10 running the free community Open Xen version 4.11.4+107-gef32c7afa2-1. The Hypervisor is a relative small one holding just 7 VM s:

HypervisorHost:~#  xl list
Name                                        ID   Mem VCPUs      State   Time(s)
Domain-0                                     0 11102    24     r—–  214176.4
pcfrxenweb                                  11 12288     4     -b—-  247425.5
pcfrxen                                     12 16384    10     -b—-  1371621.4
windows7                                    20  4096     2     -b—-   97887.2
haproxy2                                    21  4096     2     -b—-   11806.9
jitsi-meet                                  22  2048     2     -b—-   12843.9
zabbix                                      23  2048     2     -b—-   20275.1
centos7                                     24  2040     2     -b—-   10898.2

HypervisorHost:~# xl list|grep -v 'Name ' |grep  -v 'Domain-0'  |wc -l
7


The backup strategy of the script is very simple to shutdown the running VM machine, make a copy with rsync to a backup location the image of each of the Virtual Machines in a bash shell loop for each virtual machine shown in output of xl command and backup to a preset local directory in my case this is /backups/ the backup of each virtual machine is produced within a separate backup directory with a respective timestamp. Backup VM .img files are produced in my case to mounted 2x external attached hard drives each of which is a 4 Terabyte Seagate Plus Backup (Storage). The original version of the script was made to be a slightly different by Zhiqiang Ma whose script I used for a template to come up with my xen VM backup solution. To prevent the Hypervisor's load the script is made to do it with a nice of (nice -n 10) this might be not required or you might want to modify it to better suit your needs. Below is the script itself you can fetch a copy of it /usr/sbin/xen_vm_backups.sh :

#!/bin/bash

# Author: Zhiqiang Ma (http://www.ericzma.com/)
# Modified to work with xl and OpenXen by Georgi Georgiev – https://pc-freak.net
# Original creation dateDec. 27, 2010
# Script takes all defined vms under xen_name_list and prepares backup of each
# after shutting down the machine prepares archive and copies archive in externally attached mounted /backup/disk1 HDD
# Latest update: 08.06.2021 G. Georgiev – hipo@pc-freak.net

mark_file=/backups/disk1/tmp/xen-bak-marker
log_file=/var/log/xen/backups/bak-$(date +%Y_%m_%d).log
err_log_file=/var/log/xen/backups/bak_err-$(date +%H_%M_%Y_%m_%d).log
xen_dir=/xen/domains
xen_vmconfig_dir=/etc/xen/
local_bak_dir=/backups/disk1/tmp
#bak_dir=xenbak@backup_host1:/lhome/xenbak
bak_dir=/backups/disk1/xen-backups/xen_images/$(date +%Y_%m_%d)/xen/domains
#xen_name_list="haproxy2 pcfrxenweb jitsi-meet zabbix windows7 centos7 pcfrxenweb pcfrxen"
xen_name_list="windows7 haproxy2 jitsi-meet zabbix centos7"

if [ ! -d /var/log/xen/backups ]; then
echo mkdir -p /var/log/xen/backups
 mkdir -p /var/log/xen/backups
fi

if [ ! -d $bak_dir ]; then
echo mkdir -p $bak_dir
 mkdir -p $bak_dir

fi


# check whether bak runned last week
if [ -e $mark_file ] ; then
        echo  rm -f $mark_file
 rm -f $mark_file
else
        echo  touch $mark_file
 touch $mark_file
  # exit 0
fi

# set std and stderr to log file
        echo mv $log_file $log_file.old
       mv $log_file $log_file.old
        echo mv $err_log_file $err_log_file.old
       mv $err_log_file $err_log_file.old
        echo "exec 2> $err_log_file"
       exec 2> $err_log_file
        echo "exec > $log_file"
       exec > $log_file


# check whether the VM is running
# We only backup running VMs

echo "*** Check alive VMs"

xen_name_list_tmp=""

for i in $xen_name_list
do
        echo "/usr/sbin/xl list > /tmp/tmp-xen-list"
        /usr/sbin/xl list > /tmp/tmp-xen-list
  grepinlist=`grep $i" " /tmp/tmp-xen-list`;
  if [[ “$grepinlist” == “” ]]
  then
    echo $i is not alive.
  else
    echo $i is alive.
    xen_name_list_tmp=$xen_name_list_tmp" "$i
  fi
done

xen_name_list=$xen_name_list_tmp

echo "Alive VM list:"

for i in $xen_name_list
do
   echo $i
done

echo "End alive VM list."

###############################
date
echo "*** Backup starts"

###############################
date
echo "*** Copy VMs to local disk"

for i in $xen_name_list
do
  date
  echo "Shutdown $i"
        echo  /usr/sbin/xl shutdown $i
        /usr/sbin/xl shutdown $i
        if [ $? != ‘0’ ]; then
                echo 'Not Xen Disk image destroying …';
                /usr/sbin/xl destroy $i
        fi
  sleep 30

  echo "Copy $i"
  echo "Copy to local_bak_dir: $local_bak_dir"
      echo /usr/bin/rsync -avhW –no-compress –progress $xen_dir/$i/{disk.img,swap.img} $local_bak_dir/$i/
     time /usr/bin/rsync -avhW –no-compress –progress $xen_dir/$i/{disk.img,swap.img} $local_bak_dir/$i/
      echo /usr/bin/rsync -avhW –no-compress –progress $xen_vmconfig_dir/$i.cfg $local_bak_dir/$i.cfg
     time /usr/bin/rsync -avhW –no-compress –progress $xen_vmconfig_dir/$i.cfg $local_bak_dir/$i.cfg
  date
  echo "Create $i"
  # with vmmem=1024"
  # /usr/sbin/xm create $xen_dir/vm.run vmid=$i vmmem=1024
          echo /usr/sbin/xl create $xen_vmconfig_dir/$i.cfg
          /usr/sbin/xl create $xen_vmconfig_dir/$i.cfg
## Uncomment if you need to copy with scp somewhere
###       echo scp $log_file $bak_dir/xen-bak-111.log
###      echo  /usr/bin/rsync -avhW –no-compress –progress $log_file $local_bak_dir/xen-bak-111.log
done

####################
date
echo "*** Compress local bak vmdisks"

for i in $xen_name_list
do
  date
  echo "Compress $i"
      echo tar -z -cfv $bak_dir/$i-$(date +%Y_%m_%d).tar.gz $local_bak_dir/$i-$(date +%Y_%m_%d) $local_bak_dir/$i.cfg
     time nice -n 10 tar -z -cvf $bak_dir/$i-$(date +%Y_%m_%d).tar.gz $local_bak_dir/$i/ $local_bak_dir/$i.cfg
    echo rm -vf $local_bak_dir/$i/ $local_bak_dir/$i.cfg
    rm -vrf $local_bak_dir/$i/{disk.img,swap.img}  $local_bak_dir/$i.cfg
done

####################
date
echo "*** Copy local bak vmdisks to remote machines"

copy_remote () {
for i in $xen_name_list
do
  date
  echo "Copy to remote: vm$i"
        echo  scp $local_bak_dir/vmdisk0-$i.tar.gz $bak_dir/vmdisk0-$i.tar.gz
done

#####################
date
echo "Backup finishes"
        echo scp $log_file $bak_dir/bak-111.log

}

date
echo "Backup finished"


Things to configure before start using using the script to prepare backups for you is the xen_name_list variable

#  directory skele where to store already prepared backups
bak_dir=/backups/disk1/xen-backups/xen_images/$(date +%Y_%m_%d)/xen/domains

# The configurations of the running Xen Virtual Machines
xen_vmconfig_dir=/etc/xen/
# a local directory that will be used for backup creation ( I prefer this directory to be on the backup storage location )
local_bak_dir=/backups/disk1/tmp
#bak_dir=xenbak@backup_host1:/lhome/xenbak
# the structure on the backup location where daily .img backups with be produced with rsync and tar archived with bzip2
bak_dir=/backups/disk1/xen-backups/xen_images/$(date +%Y_%m_%d)/xen/domains

# list here all the Virtual Machines you want the script to create backups of
xen_name_list="windows7 haproxy2 jitsi-meet zabbix centos7"

If you need the script to copy the backup of Virtual Machine images to external Backup server via Local Lan or to a remote Internet located encrypted connection with a passwordless ssh authentication (once you have prepared the Machines to automatically login without pass over ssh with specific user), you can uncomment the script commented section to adapt it to copy to remote host.

Once you have placed at place /usr/sbin/xen_vm_backups.sh use a cronjob to prepare backups on a regular basis, for example I use the following cron to produce a working copy of the Virtual Machine backups everyday.
 

# crontab -u root -l 

# create windows7 haproxy2 jitsi-meet centos7 zabbix VMs backup once a month
00 06 1,2,3,4,5,6,7,8,9,10,11,12 * * /usr/sbin/xen_vm_backups.sh 2>&1 >/dev/null


I do clean up virtual machines Images that are older than 95 days with another cron job

# crontab -u root -l

# Delete xen image files older than 95 days to clear up space from backup HDD
45 06 17 * * find /backups/disk1/xen-backups/xen_images* -type f -mtime +95 -exec rm {} \; 2>&1 >/dev/null

#### Delete xen config backups older than 1 year+3 days (368 days)
45 06 17 * * find /backups/disk1/xen-backups/xen_config* -type f -mtime +368 -exec rm {} \; 2>&1 >/dev/null

Find when cron.daily cron.weekly and cron.monthly run on Redhat / CentOS / Debian Linux and systemd-timers

Wednesday, March 25th, 2020

Find-when-cron.daily-cron.monthly-cron.weekly-run-on-Redhat-CentOS-Debian-SuSE-SLES-Linux-cron-logo


The problem – Apache restart at random times


I've noticed today something that is occuring for quite some time but was out of my scope for quite long as I'm not directly involved in our Alert monitoring at my daily job as sys admin. Interestingly an Apache HTTPD webserver is triggering alarm twice a day for a short downtime that lasts for 9 seconds.

I've decided to investigate what is triggering WebServer restart in such random time and investigated on the system for any background running scripts as well as reviewed the system logs. As I couldn't find nothing there the only logical place to check was cron jobs.
The usual
 

crontab -u root -l


Had no configured cron jobbed scripts so I digged further to check whether there isn't cron jobs records for a script that is triggering the reload of Apache in /etc/crontab /var/spool/cron/root and /var/spool/cron/httpd.
Nothing was found there and hence as there was no anacron service running but /usr/sbin/crond the other expected place to look up for a trigger even was /etc/cron*


1. Configured default cron execution times, every day, every hour every month


# ls -ld /etc/cron.*
drwxr-xr-x 2 root root 4096 feb 27 10:54 /etc/cron.d/
drwxr-xr-x 2 root root 4096 dec 27 10:55 /etc/cron.daily/
drwxr-xr-x 2 root root 4096 dec  7 23:04 /etc/cron.hourly/
drwxr-xr-x 2 root root 4096 dec  7 23:04 /etc/cron.monthly/
drwxr-xr-x 2 root root 4096 dec  7 23:04 /etc/cron.weekly/


After a look up to each of above directories, finally I found the very expected logrorate shell script set to execute from /etc/cron.daily/logrotate and inside it I've found after the log files were set to be gzipped and moved to execute WebServer restart with:

systemctl reload httpd 


My first reaction was to ponder seriously why the script is invoking systemctl reload httpd instead of the good oldschool

apachectl -k graceful


But it seems on Redhat and CentOS since RHEL / CentOS version 6.X onwards systemctl reload httpd is supposed to be identical and a substitute for apachectl -k graceful.
Okay the craziness of innovation continued as obviously the reload was causing a Downtime to be visible in the Zabbix HTTPD port Monitoring graph …
Now as the problem was identified the other logical question poped up how to find out what is the exact timing scheduled to run the script in that unusual random times each time ??
 

2. Find out cron scripts timing Redhat / CentOS / Fedora / SLES


/etc/cron.{daily,monthly,weekly} placed scripts's execution method has changed over the years, causing a chaos just like many Linux standard things we know due to the inclusion of systemd and some other additional weird OS design changes. The result is the result explained above scripts are running at a strange unexpeted times … one thing that was intruduced was anacron – which is also executing commands periodically with a different preset frequency. However it is considered more thrustworhty by crond daemon, because anacron does not assume the machine is continuosly running and if the machine is down due to a shutdown or a failure (if it is a Virtual Machine) or simply a crond dies out, some cronjob necessery for overall set environment or application might not run, what anacron guarantees is even though that and even if crond is in unworking defunct state, the preset scheduled scripts will still be served.
anacron's default file location is in /etc/anacrontab.

A standard /etc/anacrontab looks like so:
 

[root@centos ~]:# cat /etc/anacrontab
# /etc/anacrontab: configuration file for anacron
 
# See anacron(8) and anacrontab(5) for details.
 
SHELL=/bin/sh
PATH=/sbin:/bin:/usr/sbin:/usr/bin
MAILTO=root
# the maximal random delay added to the base delay of the jobs
RANDOM_DELAY=45
# the jobs will be started during the following hours only
START_HOURS_RANGE=3-22
 
#period in days   delay in minutes   job-identifier   command
1    5    cron.daily        nice run-parts /etc/cron.daily
7    25    cron.weekly        nice run-parts /etc/cron.weekly
@monthly 45    cron.monthly        nice run-parts /etc/cron.monthly


START_HOURS_RANGE : The START_HOURS_RANGE variable sets the time frame, when the job could started. 
The jobs will start during the 3-22 (3AM-10PM) hours only.

  • cron.daily will run at 3:05 (After Midnight) A.M. i.e. run once a day at 3:05AM.
  • cron.weekly will run at 3:25 AM i.e. run once a week at 3:25AM.
  • cron.monthly will run at 3:45 AM i.e. run once a month at 3:45AM.

If the RANDOM_DELAY env var. is set, a random value between 0 and RANDOM_DELAY minutes will be added to the start up delay of anacron served jobs. 
For instance RANDOM_DELAY equels 45 would therefore add, randomly, between 0 and 45 minutes to the user defined delay. 

Delay will be 5 minutes + RANDOM_DELAY for cron.daily for above cron.daily, cron.weekly, cron.monthly config records, i.e. 05:01 + 0-45 minutes

A full detailed explanation on automating system tasks on Redhat Enterprise Linux is worthy reading here.

!!! Note !!! that listed jobs will be running in queue. After one finish, then next will start.
 

3. SuSE Enterprise Linux cron jobs not running at desired times why?


in SuSE it is much more complicated to have a right timing for standard default cron jobs that comes preinstalled with a service 

In older SLES release /etc/crontab looked like so:


SHELL=/bin/bash
PATH=/sbin:/bin:/usr/sbin:/usr/bin
MAILTO=root
HOME=/

# run-parts
01 * * * * root run-parts /etc/cron.hourly
02 4 * * * root run-parts /etc/cron.daily
22 4 * * 0 root run-parts /etc/cron.weekly
42 4 1 * * root run-parts /etc/cron.monthly


As time of writting article it looks like:


SHELL=/bin/sh
PATH=/usr/bin:/usr/sbin:/sbin:/bin:/usr/lib/news/bin
MAILTO=root
#
# check scripts in cron.hourly, cron.daily, cron.weekly, and cron.monthly
#
-*/15 * * * *   root  test -x /usr/lib/cron/run-crons && /usr/lib/cron/run-crons >/dev/null 2>&1


This runs any scripts placed in /etc/cron.{hourly, daily, weekly, monthly} but it may not run them when you expect them to run. 
/usr/lib/cron/run-crons compares the current time to the /var/spool/cron/lastrun/cron.{time} file to determine if those jobs need to be run.

For hourly, it checks if the current time is greater than (or exactly) 60 minutes past the timestamp of the /var/spool/cron/lastrun/cron.hourly file.

For weekly, it checks if the current time is greater than (or exactly) 10080 minutes past the timestamp of the /var/spool/cron/lastrun/cron.weekly file.

Monthly uses a caclucation to check the time difference, but is the same type of check to see if it has been one month after the last run.

Daily has a couple variations available – By default it checks if it is more than or exactly 1440 minutes since lastrun.
If DAILY_TIME is set in the /etc/sysconfig/cron file (again a suse specific innovation), then that is the time (within 15minutes) when daily will run.

For systems that are powered off at DAILY_TIME, daily tasks will run at the DAILY_TIME, unless it has been more than x days, if it is, they run at the next running of run-crons. (default 7days, can set shorter time in /etc/sysconfig/cron.)
Because of these changes, the first time you place a job in one of the /etc/cron.{time} directories, it will run the next time run-crons runs, which is at every 15mins (xx:00, xx:15, xx:30, xx:45) and that time will be the lastrun, and become the normal schedule for future runs. Note that there is the potential that your schedules will begin drift by 15minute increments.

As you see this is very complicated stuff and since God is in the simplicity it is much better to just not use /etc/cron.* for whatever scripts and manually schedule each of the system cron jobs and custom scripts with cron at specific times.


4. Debian Linux time start schedule for cron.daily / cron.monthly / cron.weekly timing

As the last many years many of the servers I've managed were running Debian GNU / Linux, my first place to check was /etc/crontab which is the standard cronjobs file that is setting the { daily , monthly , weekly crons } 


 debian:~# ls -ld /etc/cron.*
drwxr-xr-x 2 root root 4096 фев 27 10:54 /etc/cron.d/
drwxr-xr-x 2 root root 4096 фев 27 10:55 /etc/cron.daily/
drwxr-xr-x 2 root root 4096 дек  7 23:04 /etc/cron.hourly/
drwxr-xr-x 2 root root 4096 дек  7 23:04 /etc/cron.monthly/
drwxr-xr-x 2 root root 4096 дек  7 23:04 /etc/cron.weekly/


debian:~# cat /etc/crontab 
# /etc/crontab: system-wide crontab
# Unlike any other crontab you don't have to run the `crontab'
# command to install the new version when you edit this file
# and files in /etc/cron.d. These files also have username fields,
# that none of the other crontabs do.

SHELL=/bin/sh
PATH=/usr/local/sbin:/usr/local/bin:/sbin:/bin:/usr/sbin:/usr/bin# Example of job definition:
# .—————- minute (0 – 59)
# |  .————- hour (0 – 23)
# |  |  .———- day of month (1 – 31)
# |  |  |  .——- month (1 – 12) OR jan,feb,mar,apr …
# |  |  |  |  .—- day of week (0 – 6) (Sunday=0 or 7) OR sun,mon,tue,wed,thu,fri,sat
# |  |  |  |  |
# *  *  *  *  * user-name command to be executed
17 *    * * *    root    cd / && run-parts –report /etc/cron.hourly
25 6    * * *    root    test -x /usr/sbin/anacron || ( cd / && run-parts –report /etc/cron.daily )
47 6    * * 7    root    test -x /usr/sbin/anacron || ( cd / && run-parts –report /etc/cron.weekly )
52 6    1 * *    root    test -x /usr/sbin/anacron || ( cd / && run-parts –report /etc/cron.monthly )

What above does is:

– Run cron.hourly once at every hour at 1:17 am
– Run cron.daily once at every day at 6:25 am.
– Run cron.weekly once at every day at 6:47 am.
– Run cron.monthly once at every day at 6:42 am.

As you can see if anacron is present on the system it is run via it otherwise it is run via run-parts binary command which is reading and executing one by one all scripts insude /etc/cron.hourly, /etc/cron.weekly , /etc/cron.mothly

anacron – few more words

Anacron is the canonical way to run at least the jobs from /etc/cron.{daily,weekly,monthly) after startup, even when their execution was missed because the system was not running at the given time. Anacron does not handle any cron jobs from /etc/cron.d, so any package that wants its /etc/cron.d cronjob being executed by anacron needs to take special measures.

If anacron is installed, regular processing of the /etc/cron.d{daily,weekly,monthly} is omitted by code in /etc/crontab but handled by anacron via /etc/anacrontab. Anacron's execution of these job lists has changed multiple times in the past:

debian:~# cat /etc/anacrontab 
# /etc/anacrontab: configuration file for anacron

# See anacron(8) and anacrontab(5) for details.

SHELL=/bin/sh
PATH=/usr/local/sbin:/usr/local/bin:/sbin:/bin:/usr/sbin:/usr/bin
HOME=/root
LOGNAME=root

# These replace cron's entries
1    5    cron.daily    run-parts –report /etc/cron.daily
7    10    cron.weekly    run-parts –report /etc/cron.weekly
@monthly    15    cron.monthly    run-parts –report /etc/cron.monthly

In wheezy and earlier, anacron is executed via init script on startup and via /etc/cron.d at 07:30. This causes the jobs to be run in order, if scheduled, beginning at 07:35. If the system is rebooted between midnight and 07:35, the jobs run after five minutes of uptime.
In stretch, anacron is executed via a systemd timer every hour, including the night hours. This causes the jobs to be run in order, if scheduled, beween midnight and 01:00, which is a significant change to the previous behavior.
In buster, anacron is executed via a systemd timer every hour with the exception of midnight to 07:00 where anacron is not invoked. This brings back a bit of the old timing, with the jobs to be run in order, if scheduled, beween 07:00 and 08:00. Since anacron is also invoked once at system startup, a reboot between midnight and 08:00 also causes the jobs to be scheduled after five minutes of uptime.
anacron also didn't have an upstream release in nearly two decades and is also currently orphaned in Debian.

As of 2019-07 (right after buster's release) it is planned to have cron and anacron replaced by cronie.

cronie – Cronie was forked by Red Hat from ISC Cron 4.1 in 2007, is the default cron implementation in Fedora and Red Hat Enterprise Linux at least since Version 6. cronie seems to have an acive upstream, but is currently missing some of the things that Debian has added to vixie cron over the years. With the finishing of cron's conversion to quilt (3.0), effort can begin to add the Debian extensions to Vixie cron to cronie.

Because cronie doesn't have all the Debian extensions yet, it is not yet suitable as a cron replacement, so it is not in Debian.
 

5. systemd-timers – The new crazy systemd stuff for script system job scheduling


Timers are systemd unit files with a suffix of .timer. systemd-timers was introduced with systemd so older Linux OS-es does not have it.
 Timers are like other unit configuration files and are loaded from the same paths but include a [Timer] section which defines when and how the timer activates. Timers are defined as one of two types:


  • Realtime timers (a.k.a. wallclock timers) activate on a calendar event, the same way that cronjobs do. The option OnCalendar= is used to define them.
  • Monotonic timers activate after a time span relative to a varying starting point. They stop if the computer is temporarily suspended or shut down. There are number of different monotonic timers but all have the form: OnTypeSec=. Common monotonic timers include OnBootSec and OnActiveSec.


    For each .timer file, a matching .service file exists (e.g. foo.timer and foo.service). The .timer file activates and controls the .service file. The .service does not require an [Install] section as it is the timer units that are enabled. If necessary, it is possible to control a differently-named unit using the Unit= option in the timer’s [Timer] section.

    systemd-timers is a complex stuff and I'll not get into much details but the idea was to give awareness of its existence for more info check its manual man systemd.timer

Its most basic use is to list all configured systemd.timers, below is from my home Debian laptop
 

debian:~# systemctl list-timers –all
NEXT                         LEFT         LAST                         PASSED       UNIT                         ACTIVATES
Tue 2020-03-24 23:33:58 EET  18s left     Tue 2020-03-24 23:31:28 EET  2min 11s ago laptop-mode.timer            lmt-poll.service
Tue 2020-03-24 23:39:00 EET  5min left    Tue 2020-03-24 23:09:01 EET  24min ago    phpsessionclean.timer        phpsessionclean.service
Wed 2020-03-25 00:00:00 EET  26min left   Tue 2020-03-24 00:00:01 EET  23h ago      logrotate.timer              logrotate.service
Wed 2020-03-25 00:00:00 EET  26min left   Tue 2020-03-24 00:00:01 EET  23h ago      man-db.timer                 man-db.service
Wed 2020-03-25 02:38:42 EET  3h 5min left Tue 2020-03-24 13:02:01 EET  10h ago      apt-daily.timer              apt-daily.service
Wed 2020-03-25 06:13:02 EET  6h left      Tue 2020-03-24 08:48:20 EET  14h ago      apt-daily-upgrade.timer      apt-daily-upgrade.service
Wed 2020-03-25 07:31:57 EET  7h left      Tue 2020-03-24 23:30:28 EET  3min 11s ago anacron.timer                anacron.service
Wed 2020-03-25 17:56:01 EET  18h left     Tue 2020-03-24 17:56:01 EET  5h 37min ago systemd-tmpfiles-clean.timer systemd-tmpfiles-clean.service


8 timers listed.


N ! B! If a timer gets out of sync, it may help to delete its stamp-* file in /var/lib/systemd/timers (or ~/.local/share/systemd/ in case of user timers). These are zero length files which mark the last time each timer was run. If deleted, they will be reconstructed on the next start of their timer.

Summary

In this article, I've shortly explain logic behind debugging weird restart events etc. of Linux configured services such as Apache due to configured scripts set to run with a predefined scheduled job timing. I shortly explained on how to figure out why the preset default install configured cron jobs such as logrorate – the service that is doing system logs archiving and nulling run at a certain time. I shortly explained the mechanism behind cron.{daily, monthy, weekly} and its execution via anacron – runner program similar to crond that never misses to run a scheduled job even if a system downtime occurs due to a crashed Docker container etc. run-parts command's use was shortly explained. A short look at systemd.timers was made which is now essential part of almost every new Linux release and often used by system scripts for scheduling time based maintainance tasks.

ipmitool: Reset and manage IPMI (Intelligent Platform Management Interface) / ILO (Integrated Lights Out) remote board on Linux servers

Friday, December 20th, 2019

ipmitool-how-to-get-information-about-hardware-and-reset-ipmi-bmc-linux-access-ipmi-ilo-interface-logo

As a system administration nomatter whether you manage a bunch of server in a own brew and run Data Center location with some Rack mounted Hardware like PowerEdge M600 / ProLiant DL360e G8 / ProLiant DL360 Gen9 (755258-B21) or you're managing a bunch of Dedicated Servers, you're or will be faced  at some point to use the embedded in many Rack mountable rack servers IPMI / ILO interface remote console board management. If IPMI / ILO terms are new for you I suggest you quickly read my earlier article What is IPMI / IPKVM / ILO /  DRAC Remote Management interfaces to server .

hp-proliant-bl460c-ILO-Interface-screenshot

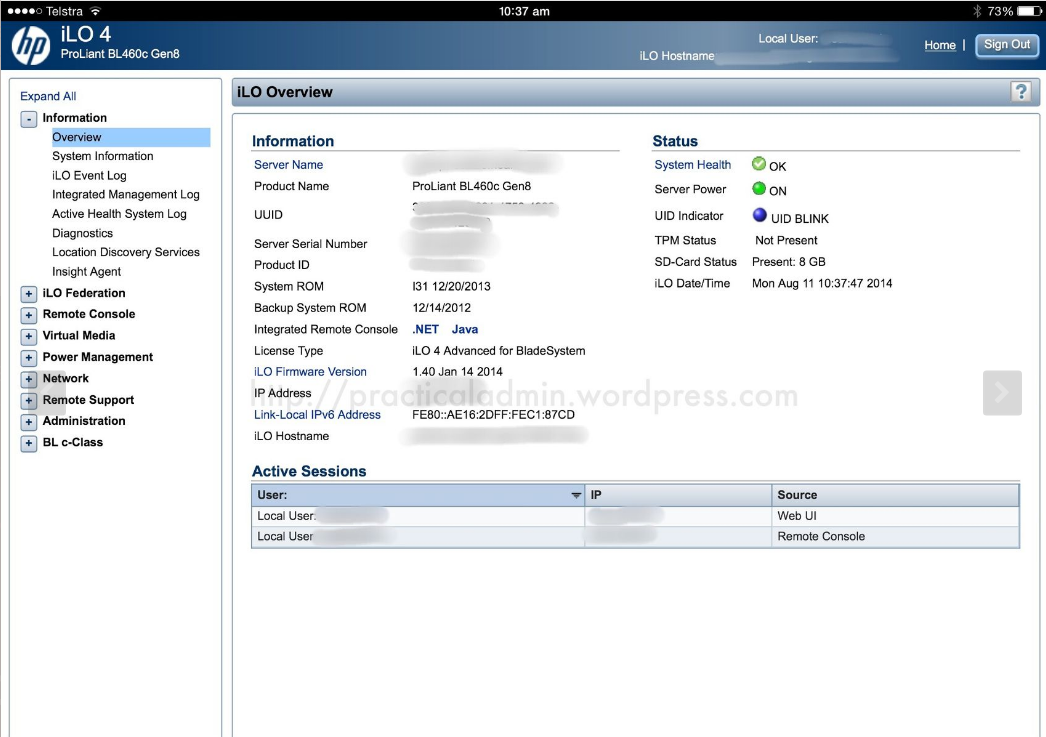
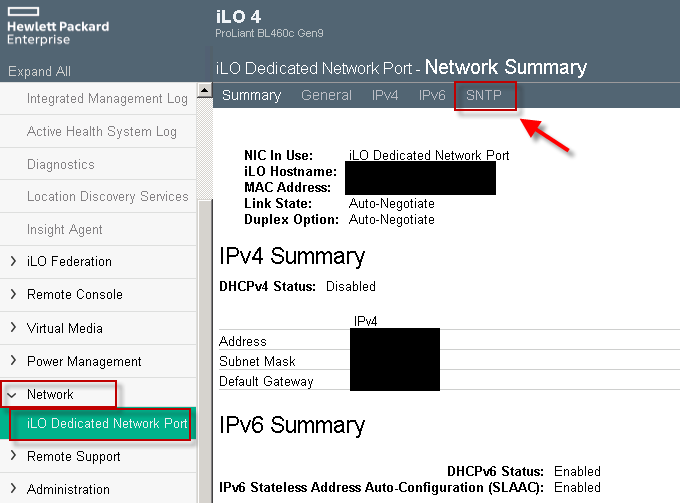
HP Proliant BL460 C IPMI (ILO) Web management interface 

In short Remote Management Interface is a way that gives you access to the server just like if you had a Monitor and a Keyboard plugged in directly to server.
When a remote computer is down the sysadmin can access it through IPMI and utilize a text console to the boot screen.
The IPMI protocol specification is led by Intel and was first published on September 16, 1998. and currently is supported by more than 200 computer system vendors, such as Cisco, Dell, Hewlett Packard Enterprise, Intel, NEC Corporation, SuperMicro and Tyan and is a standard for remote board management for servers.

IPMI-Block-Diagram-how-ipmi-works-and-its-relation-to-BMC
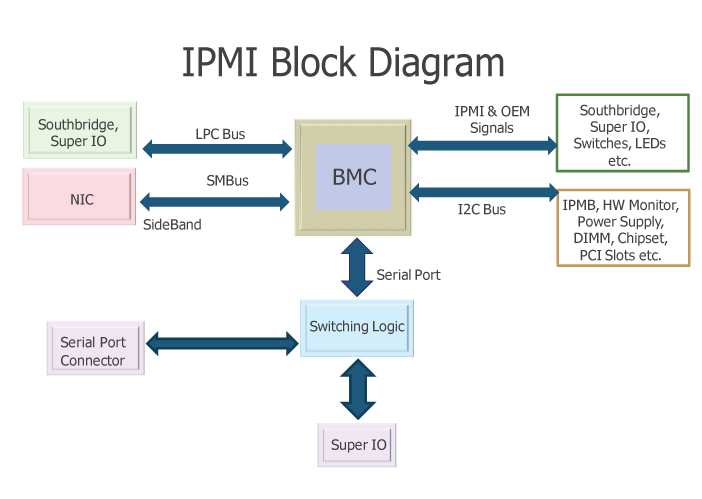
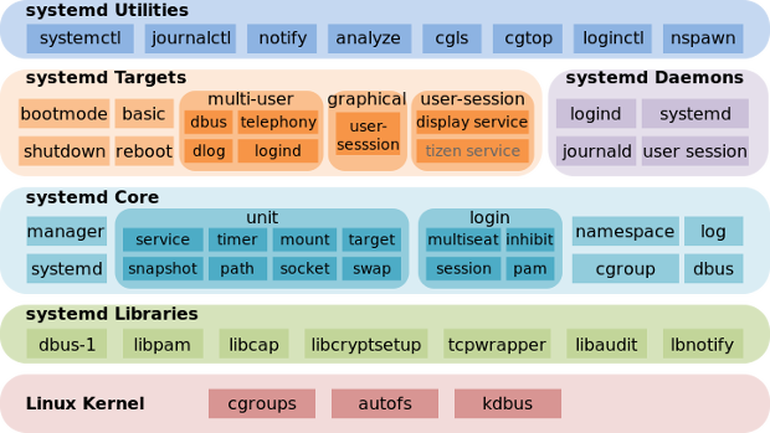
As you can see from diagram Baseboard Management Controllers (BMCs) is like the heart of IPMI.

Having this ILO / IPMI access is usually via a Web Interface Java interface that gives you the console and usually many of the machines also have an IP address via which a normal SSH command prompt is available giving you ability to execute diagnostic commands to the ILO on the status of attached hardware components of the server / get information about the attached system sensors to get report about things such as:

  • The System Overall heat
  • CPU heat temperature
  • System fan rotation speed cycles
  • Extract information about the server chassis
  • Query info about various system peripherals
  • Configure BIOS or UEFI on a remote system with no monitor / keyboard attached

Having a IPMI (Intelligent Platform Management Interface) firmware embedded into the server Motherboard is essential for system administration because besides this goodies it allows you to remotely Install Operating System to a server without any pre-installed OS right after it is bought and mounted to the planned Data Center Rack nest, just like if you have a plugged Monitor / Keyboard and Mouse and being physically in the remote location.

IPMI is mega useful for system administration also in case of Linux / Windows system updates that requires reboot in which essential System Libraries or binaries are updated and a System reboot is required, because often after system Large bundle updates or Release updates the system fails to boot and you need a way to run a diagnostic stuff from a System rescue Operating System living on a plugged in via a USB stick or CD Drive.
As prior said IPMI remote board is usually accessed and used via some Remote HTTPS encrypted web interface or via Secure Shell crypted session but sometimes the Web server behind the IPMI Web Interface is hanging especially when multiple sysadmins try to access it or due to other stuff and at times due to strange stuff even console SSH access might not be there, thansfully those who run a GNU / Linux Operating system on the Hardware node can use ipmitool tool http://ipmitool.sourceforge.net/ written for Linux that is capable to do a number of useful things with the IPMI management board including a Cold Reset of it so it turns back to working state / adding users / grasping the System hardware and components information health status, changing the Listener address of the IPMI access Interface and even having ability to update the IPMI version firmware.

Prior to be able to access IPMI remotely it has to be enabled usually via a UTP cable connected to the Network from which you expect it to be accesible. The location of the IPMI port on different server vendors is different.

ibm-power9-server-ipmi

IBM Power 9 Server IPMI port

HP-ILO-Bladeserver-Management-port-MGMT-yellow-cabled

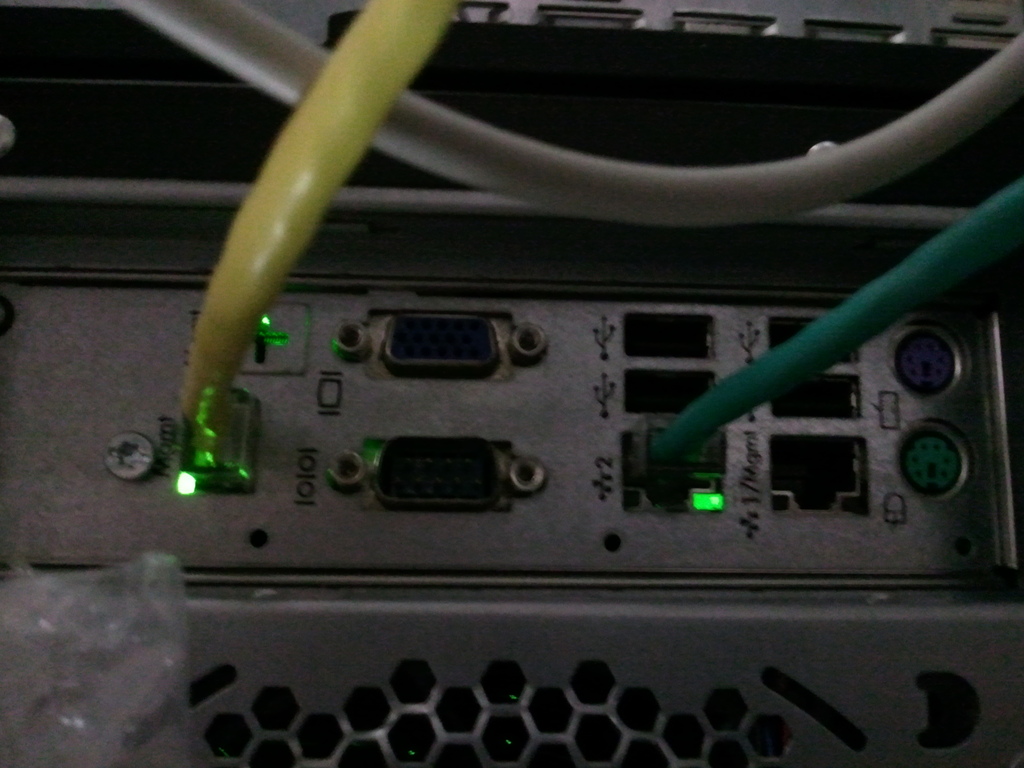
HP IPMI console called ILO (Integrated Lights-Out) Port cabled with yellow cable (usually labelled as
Management Port MGMT)

Supermicro-SSG-5029P-E1CTR12L-Rear-Annotated-dedicated-IPMI-lan-port

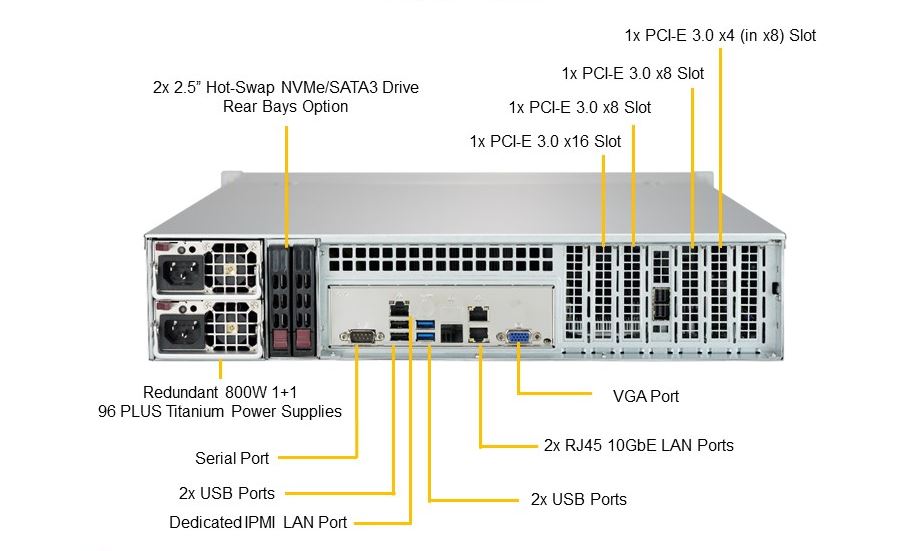
Supermicro server IPMI Dedicated Lan Port


 In this article I'll shortly explain how IPMITool is available and can be installed and used across GNU / Linux Debian / Ubuntu and other deb based Linuxes with apt or on Fedora / CentOS (RPM) based with yum etc.


1. Install IPMITool


– On Debian


# apt-get install –yes ipmitool 


– On CentOS


# yum install ipmitool OpenIPMI-tools


# ipmitool -V
ipmitool version 1.8.14


On CentOS ipmitool can run as a service and collect data and do some nice stuff to run it:


[root@linux ~]# chkconfig ipmi on 


[root@linux ~]# service ipmi start


Before start using it is worthy to give here short description from ipmitool man page
 

DESCRIPTION
       This program lets you manage Intelligent Platform Management Interface (IPMI) functions of either the local system, via a kernel device driver, or a remote system, using IPMI v1.5 and IPMI v2.0.
       These functions include printing FRU information, LAN configuration, sensor readings, and remote chassis power control.

IPMI management of a local system interface requires a compatible IPMI kernel driver to be installed and configured.  On Linux this driver is called OpenIPMI and it is included in standard  dis‐
       tributions.   On Solaris this driver is called BMC and is included in Solaris 10.  Management of a remote station requires the IPMI-over-LAN interface to be enabled and configured.  Depending on
       the particular requirements of each system it may be possible to enable the LAN interface using ipmitool over the system interface.


2. Get ADMIN IP configured for access

https://3.bp.blogspot.com/-jojgWqj7acg/Wo6bSP0Av1I/AAAAAAAAGdI/xaHewnmAujkprCiDXoBxV7uHonPFjtZDwCLcBGAs/s1600/22-02-2018%2B15-31-09

To get a list of what is the current listener IP with no access to above Web frontend via which IPMI can be accessed (if it is cabled to the Access / Admin LAN port).


# ipmitool lan print 1
Set in Progress         : Set Complete
Auth Type Support       : NONE MD2 MD5 PASSWORD
Auth Type Enable        : Callback : MD2 MD5 PASSWORD
                        : User     : MD2 MD5 PASSWORD
                        : Operator : MD2 MD5 PASSWORD
                        : Admin    : MD2 MD5 PASSWORD
                        : OEM      :
IP Address Source       : Static Address
IP Address              : 10.253.41.127
Subnet Mask             : 255.255.254.0
MAC Address             : 0c:c4:7a:4b:1f:70
SNMP Community String   : public
IP Header               : TTL=0x00 Flags=0x00 Precedence=0x00 TOS=0x00
BMC ARP Control         : ARP Responses Enabled, Gratuitous ARP Disabled
Default Gateway IP      : 10.253.41.254
Default Gateway MAC     : 00:00:0c:07:ac:7b
Backup Gateway IP       : 10.253.41.254
Backup Gateway MAC      : 00:00:00:00:00:00
802.1q VLAN ID          : 8
802.1q VLAN Priority    : 0
RMCP+ Cipher Suites     : 1,2,3,6,7,8,11,12
Cipher Suite Priv Max   : aaaaXXaaaXXaaXX
                        :     X=Cipher Suite Unused
                        :     c=CALLBACK
                        :     u=USER
                        :     o=OPERATOR
                        :     a=ADMIN
                        :     O=OEM


3. Configure custom access IP and gateway for IPMI


[root@linux ~]# ipmitool lan set 1 ipsrc static


[root@linux ~]# ipmitool lan set 1 ipaddr 192.168.1.211
Setting LAN IP Address to 192.168.1.211


[root@linux ~]# ipmitool lan set 1 netmask 255.255.255.0
Setting LAN Subnet Mask to 255.255.255.0


[root@linux ~]# ipmitool lan set 1 defgw ipaddr 192.168.1.254
Setting LAN Default Gateway IP to 192.168.1.254


[root@linux ~]# ipmitool lan set 1 defgw macaddr 00:0e:0c:aa:8e:13
Setting LAN Default Gateway MAC to 00:0e:0c:aa:8e:13


[root@linux ~]# ipmitool lan set 1 arp respond on
Enabling BMC-generated ARP responses


[root@linux ~]# ipmitool lan set 1 auth ADMIN MD5

[root@linux ~]# ipmitool lan set 1 access on


4. Getting a list of IPMI existing users


# ipmitool user list 1
ID  Name             Callin  Link Auth  IPMI Msg   Channel Priv Limit
2   admin1           false   false      true       ADMINISTRATOR
3   ovh_dontchange   true    false      true       ADMINISTRATOR
4   ro_dontchange    true    true       true       USER
6                    true    true       true       NO ACCESS
7                    true    true       true       NO ACCESS
8                    true    true       true       NO ACCESS
9                    true    true       true       NO ACCESS
10                   true    true       true       NO ACCESS


– To get summary of existing users

# ipmitool user summary
Maximum IDs         : 10
Enabled User Count  : 4
Fixed Name Count    : 2

5. Create new Admin username into IPMI board
 

[root@linux ~]# ipmitool user set name 2 Your-New-Username


[root@linux ~]# ipmitool user set password 2
Password for user 2: 


[root@linux ~]# ipmitool channel setaccess 1 2 link=on ipmi=on callin=on privilege=4


[root@linux ~]# ipmitool user enable 2
[root@linux ~]# 


6. Configure non-privilege user into IPMI board

If a user should only be used for querying sensor data, a custom privilege level can be setup for that. This user then has no rights for activating or deactivating the server, for example. A user named monitor will be created for this in the following example:

[root@linux ~]# ipmitool user set name 3 monitor


[root@linux ~]# ipmitool user set password 3
Password for user 3: 


[root@linux ~]# ipmitool channel setaccess 1 3 link=on ipmi=on callin=on privilege=2


[root@linux ~]# ipmitool user enable 3

The importance of the various privilege numbers will be displayed when  ipmitool channel  is called without any additional parameters.


[root@linux ~]# ipmitool channel
Channel Commands: authcap   <channel number> <max privilege>
                  getaccess <channel number> [user id]
                  setaccess <channel number> <user id> [callin=on|off] [ipmi=on|off] [link=on|off] [privilege=level]
                  info      [channel number]
                  getciphers <ipmi | sol> [channel]


Possible privilege levels are:
   1   Callback level
   2   User level
   3   Operator level
   4   Administrator level
   5   OEM Proprietary level
  15   No access
[root@linux ~]# 

The user just created (named 'monitor') has been assigned the USER privilege level. So that LAN access is allowed for this user, you must activate MD5 authentication for LAN access for this user group (USER privilege level).

[root@linux ~]# ipmitool channel getaccess 1 3
Maximum User IDs     : 15
Enabled User IDs     : 2

User ID              : 3
User Name            : monitor
Fixed Name           : No
Access Available     : call-in / callback
Link Authentication  : enabled
IPMI Messaging       : enabled
Privilege Level      : USER

[root@linux ~]# 


7. Check server firmware version on a server via IPMI


# ipmitool mc info
Device ID                 : 32
Device Revision           : 1
Firmware Revision         : 3.31
IPMI Version              : 2.0
Manufacturer ID           : 10876
Manufacturer Name         : Supermicro
Product ID                : 1579 (0x062b)
Product Name              : Unknown (0x62B)
Device Available          : yes
Provides Device SDRs      : no
Additional Device Support :
    Sensor Device
    SDR Repository Device
    SEL Device
    FRU Inventory Device
    IPMB Event Receiver
    IPMB Event Generator
    Chassis Device


ipmitool mc info is actually an alias for the ipmitool bmc info cmd.

8. Reset IPMI management controller or BMC if hanged


As earlier said if for some reason Web GUI access or SSH to IPMI is lost, reset with:

root@linux:/root#  ipmitool mc reset
[ warm | cold ]


If you want to stop electricity for a second to IPMI and bring it on use the cold reset (this usually
should be done if warm reset does not work).


root@linux:/root# ipmitool mc reset cold


otherwise soft / warm is with:


ipmitool mc reset warm


Sometimes the BMC component of IPMI hangs and only fix to restore access to server Remote board is to reset also BMC


root@linux:/root# ipmitool bmc reset cold


9. Print hardware system event log


root@linux:/root# ipmitool sel info
SEL Information
Version          : 1.5 (v1.5, v2 compliant)
Entries          : 0
Free Space       : 10240 bytes
Percent Used     : 0%
Last Add Time    : Not Available
Last Del Time    : 07/02/2015 17:22:34
Overflow         : false
Supported Cmds   : 'Reserve' 'Get Alloc Info'
# of Alloc Units : 512
Alloc Unit Size  : 20
# Free Units     : 512
Largest Free Blk : 512
Max Record Size  : 20


 ipmitool sel list
SEL has no entries

In this particular case the system shows no entres as it was run on a tiny Microtik 1U machine, however usually on most Dell PowerEdge / HP Proliant / Lenovo System X machines this will return plenty of messages.

ipmitool sel elist

ipmitool sel clear

To clear anything if such logged

ipmitool sel clear


10.  Print Field Replaceable Units ( FRUs ) on the server 


[root@linux ~]# ipmitool fru print


FRU Device Description : Builtin FRU Device (ID 0)
 Chassis Type          : Other
 Chassis Serial        : KD5V59B
 Chassis Extra         : c3903ebb6237363698cdbae3e991bbed
 Board Mfg Date        : Mon Sep 24 02:00:00 2012
 Board Mfg             : IBM
 Board Product         : System Board
 Board Serial          : XXXXXXXXXXX
 Board Part Number     : 00J6528
 Board Extra           : 00W2671
 Board Extra           : 1400
 Board Extra           : 0000
 Board Extra           : 5000
 Board Extra           : 10

 Product Manufacturer  : IBM
 Product Name          : System x3650 M4
 Product Part Number   : 1955B2G
 Product Serial        : KD7V59K
 Product Asset Tag     :

FRU Device Description : Power Supply 1 (ID 1)
 Board Mfg Date        : Mon Jan  1 01:00:00 1996
 Board Mfg             : ACBE
 Board Product         : IBM Designed Device
 Board Serial          : YK151127R1RN
 Board Part Number     : ZZZZZZZ
 Board Extra           : ZZZZZZ<FF><FF><FF><FF><FF>
 Board Extra           : 0200
 Board Extra           : 00
 Board Extra           : 0080
 Board Extra           : 1

FRU Device Description : Power Supply 2 (ID 2)
 Board Mfg Date        : Mon Jan  1 01:00:00 1996
 Board Mfg             : ACBE
 Board Product         : IBM Designed Device
 Board Serial          : YK131127M1LE
 Board Part Number     : ZZZZZ
 Board Extra           : ZZZZZ<FF><FF><FF><FF><FF>
 Board Extra           : 0200
 Board Extra           : 00
 Board Extra           : 0080
 Board Extra           : 1

FRU Device Description : DASD Backplane 1 (ID 3)
….


Worthy to mention here is some cheaper server vendors such as Trendmicro might show no data here (no idea whether this is a protocol incompitability or IPMItool issue).


11. Get output about system sensors Temperature / Fan / Power Supply


Most newer servers have sensors to track temperature / voltage / fanspeed peripherals temp overall system temp etc.
To get a full list of sensors statistics from IPMI 
 

# ipmitool sensor
CPU Temp         | 29.000     | degrees C  | ok    | 0.000     | 0.000     | 0.000     | 95.000    | 98.000    | 100.000
System Temp      | 40.000     | degrees C  | ok    | -9.000    | -7.000    | -5.000    | 80.000    | 85.000    | 90.000
Peripheral Temp  | 41.000     | degrees C  | ok    | -9.000    | -7.000    | -5.000    | 80.000    | 85.000    | 90.000
PCH Temp         | 56.000     | degrees C  | ok    | -11.000   | -8.000    | -5.000    | 90.000    | 95.000    | 100.000
FAN 1            | na         |            | na    | na        | na        | na        | na        | na        | na
FAN 2            | na         |            | na    | na        | na        | na        | na        | na        | na
FAN 3            | na         |            | na    | na        | na        | na        | na        | na        | na
FAN 4            | na         |            | na    | na        | na        | na        | na        | na        | na
FAN A            | na         |            | na    | na        | na        | na        | na        | na        | na
Vcore            | 0.824      | Volts      | ok    | 0.480     | 0.512     | 0.544     | 1.488     | 1.520     | 1.552
3.3VCC           | 3.296      | Volts      | ok    | 2.816     | 2.880     | 2.944     | 3.584     | 3.648     | 3.712
12V              | 12.137     | Volts      | ok    | 10.494    | 10.600    | 10.706    | 13.091    | 13.197    | 13.303
VDIMM            | 1.496      | Volts      | ok    | 1.152     | 1.216     | 1.280     | 1.760     | 1.776     | 1.792
5VCC             | 4.992      | Volts      | ok    | 4.096     | 4.320     | 4.576     | 5.344     | 5.600     | 5.632
CPU VTT          | 1.008      | Volts      | ok    | 0.872     | 0.896     | 0.920     | 1.344     | 1.368     | 1.392
VBAT             | 3.200      | Volts      | ok    | 2.816     | 2.880     | 2.944     | 3.584     | 3.648     | 3.712
VSB              | 3.328      | Volts      | ok    | 2.816     | 2.880     | 2.944     | 3.584     | 3.648     | 3.712
AVCC             | 3.312      | Volts      | ok    | 2.816     | 2.880     | 2.944     | 3.584     | 3.648     | 3.712
Chassis Intru    | 0x1        | discrete   | 0x0100| na        | na        | na        | na        | na        | na


To get only partial sensors data from the SDR (Sensor Data Repositry) entries and readings


[root@linux ~]# ipmitool sdr list 

Planar 3.3V      | 3.31 Volts        | ok
Planar 5V        | 5.06 Volts        | ok
Planar 12V       | 12.26 Volts       | ok
Planar VBAT      | 3.14 Volts        | ok
Avg Power        | 80 Watts          | ok
PCH Temp         | 45 degrees C      | ok
Ambient Temp     | 19 degrees C      | ok
PCI Riser 1 Temp | 25 degrees C      | ok
PCI Riser 2 Temp | no reading        | ns
Mezz Card Temp   | no reading        | ns
Fan 1A Tach      | 3071 RPM          | ok
Fan 1B Tach      | 2592 RPM          | ok
Fan 2A Tach      | 3145 RPM          | ok
Fan 2B Tach      | 2624 RPM          | ok
Fan 3A Tach      | 3108 RPM          | ok
Fan 3B Tach      | 2592 RPM          | ok
Fan 4A Tach      | no reading        | ns
Fan 4B Tach      | no reading        | ns
CPU1 VR Temp     | 27 degrees C      | ok
CPU2 VR Temp     | 27 degrees C      | ok
DIMM AB VR Temp  | 24 degrees C      | ok
DIMM CD VR Temp  | 23 degrees C      | ok
DIMM EF VR Temp  | 25 degrees C      | ok
DIMM GH VR Temp  | 24 degrees C      | ok
Host Power       | 0x00              | ok
IPMI Watchdog    | 0x00              | ok


[root@linux ~]# ipmitool sdr type Temperature
PCH Temp         | 31h | ok  | 45.1 | 45 degrees C
Ambient Temp     | 32h | ok  | 12.1 | 19 degrees C
PCI Riser 1 Temp | 3Ah | ok  | 16.1 | 25 degrees C
PCI Riser 2 Temp | 3Bh | ns  | 16.2 | No Reading
Mezz Card Temp   | 3Ch | ns  | 44.1 | No Reading
CPU1 VR Temp     | F7h | ok  | 20.1 | 27 degrees C
CPU2 VR Temp     | F8h | ok  | 20.2 | 27 degrees C
DIMM AB VR Temp  | F9h | ok  | 20.3 | 25 degrees C
DIMM CD VR Temp  | FAh | ok  | 20.4 | 23 degrees C
DIMM EF VR Temp  | FBh | ok  | 20.5 | 26 degrees C
DIMM GH VR Temp  | FCh | ok  | 20.6 | 24 degrees C
Ambient Status   | 8Eh | ok  | 12.1 |
CPU 1 OverTemp   | A0h | ok  |  3.1 | Transition to OK
CPU 2 OverTemp   | A1h | ok  |  3.2 | Transition to OK


[root@linux ~]# ipmitool sdr type Fan
Fan 1A Tach      | 40h | ok  | 29.1 | 3034 RPM
Fan 1B Tach      | 41h | ok  | 29.1 | 2592 RPM
Fan 2A Tach      | 42h | ok  | 29.2 | 3145 RPM
Fan 2B Tach      | 43h | ok  | 29.2 | 2624 RPM
Fan 3A Tach      | 44h | ok  | 29.3 | 3108 RPM
Fan 3B Tach      | 45h | ok  | 29.3 | 2592 RPM
Fan 4A Tach      | 46h | ns  | 29.4 | No Reading
Fan 4B Tach      | 47h | ns  | 29.4 | No Reading
PS 1 Fan Fault   | 73h | ok  | 10.1 | Transition to OK
PS 2 Fan Fault   | 74h | ok  | 10.2 | Transition to OK


[root@linux ~]# ipmitool sdr type ‘Power Supply’
Sensor Type "‘Power" not found.
Sensor Types:
        Temperature               (0x01)   Voltage                   (0x02)
        Current                   (0x03)   Fan                       (0x04)
        Physical Security         (0x05)   Platform Security         (0x06)
        Processor                 (0x07)   Power Supply              (0x08)
        Power Unit                (0x09)   Cooling Device            (0x0a)
        Other                     (0x0b)   Memory                    (0x0c)
        Drive Slot / Bay          (0x0d)   POST Memory Resize        (0x0e)
        System Firmwares          (0x0f)   Event Logging Disabled    (0x10)
        Watchdog1                 (0x11)   System Event              (0x12)
        Critical Interrupt        (0x13)   Button                    (0x14)
        Module / Board            (0x15)   Microcontroller           (0x16)
        Add-in Card               (0x17)   Chassis                   (0x18)
        Chip Set                  (0x19)   Other FRU                 (0x1a)
        Cable / Interconnect      (0x1b)   Terminator                (0x1c)
        System Boot Initiated     (0x1d)   Boot Error                (0x1e)
        OS Boot                   (0x1f)   OS Critical Stop          (0x20)
        Slot / Connector          (0x21)   System ACPI Power State   (0x22)
        Watchdog2                 (0x23)   Platform Alert            (0x24)
        Entity Presence           (0x25)   Monitor ASIC              (0x26)
        LAN                       (0x27)   Management Subsys Health  (0x28)
        Battery                   (0x29)   Session Audit             (0x2a)
        Version Change            (0x2b)   FRU State                 (0x2c)


12. Using System Chassis to initiate power on / off / reset / soft shutdown


!!!!!  Beware only run this if you know what you're realling doing don't just paste into a production system, If you do so it is your responsibility !!!!! 

–  do a soft-shutdown via acpi 


ipmitool [chassis] power soft


– issue a hard power off, wait 1s, power on 


ipmitool [chassis] power cycle


– run a hard power off


ipmitool [chassis] power off

 
– do a hard power on 


ipmitool [chassis] power on


–  issue a hard reset


ipmitool [chassis] power reset


– Get system power status
 

ipmitool chassis power status


13. Use IPMI (SoL) Serial over Lan to execute commands remotely


Besides using ipmitool locally on server that had its IPMI / ILO / DRAC console disabled it could be used also to query and make server do stuff remotely.

If not loaded you will have to load lanplus kernel module.
 

modprobe lanplus


 ipmitool -I lanplus -H 192.168.99.1 -U user -P pass chassis power status

ipmitool -I lanplus -H 192.168.98.1 -U user -P pass chassis power status

ipmitool -I lanplus -H 192.168.98.1 -U user -P pass chassis power reset

ipmitool -I lanplus -H 192.168.98.1 -U user -P pass chassis power reset

ipmitool -I lanplus -H 192.168.98.1 -U user -P pass password sol activate

– Deactivating Sol server capabilities
 

 ipmitool -I lanplus -H 192.168.99.1 -U user -P pass sol deactivate


14. Modify boot device order on next boot


!!!!! Do not run this except you want to really modify Boot device order, carelessly copy pasting could leave your server unbootable on next boot !!!!!

– Set first boot device to be as BIOS

ipmitool chassis bootdev bios


– Set first boot device to be CD Drive

ipmitool chassis bootdev cdrom 


– Set first boot device to be via Network Boot PXE protocol

ipmitool chassis bootdev pxe 


15. Using ipmitool shell


root@iqtestfb:~# ipmitool shell
ipmitool> 
help
Commands:
        raw           Send a RAW IPMI request and print response
        i2c           Send an I2C Master Write-Read command and print response
        spd           Print SPD info from remote I2C device
        lan           Configure LAN Channels
        chassis       Get chassis status and set power state
        power         Shortcut to chassis power commands
        event         Send pre-defined events to MC
        mc            Management Controller status and global enables
        sdr           Print Sensor Data Repository entries and readings
        sensor        Print detailed sensor information
        fru           Print built-in FRU and scan SDR for FRU locators
        gendev        Read/Write Device associated with Generic Device locators sdr
        sel           Print System Event Log (SEL)
        pef           Configure Platform Event Filtering (PEF)
        sol           Configure and connect IPMIv2.0 Serial-over-LAN
        tsol          Configure and connect with Tyan IPMIv1.5 Serial-over-LAN
        isol          Configure IPMIv1.5 Serial-over-LAN
        user          Configure Management Controller users
        channel       Configure Management Controller channels
        session       Print session information
        dcmi          Data Center Management Interface
        sunoem        OEM Commands for Sun servers
        kontronoem    OEM Commands for Kontron devices
        picmg         Run a PICMG/ATCA extended cmd
        fwum          Update IPMC using Kontron OEM Firmware Update Manager
        firewall      Configure Firmware Firewall
        delloem       OEM Commands for Dell systems
        shell         Launch interactive IPMI shell
        exec          Run list of commands from file
        set           Set runtime variable for shell and exec
        hpm           Update HPM components using PICMG HPM.1 file
        ekanalyzer    run FRU-Ekeying analyzer using FRU files
        ime           Update Intel Manageability Engine Firmware
ipmitool>


16. Changing BMC / DRAC time setting


# ipmitool -H XXX.XXX.XXX.XXX -U root -P pass sel time set "01/21/2011 16:20:44"


17. Loading script of IPMI commands

# ipmitool exec /path-to-script/script-with-instructions.txt  


Closure

As you saw ipmitool can be used to do plenty of cool things both locally or remotely on a server that had IPMI server interface available. The tool is mega useful in case if ILO console gets hanged as it can be used to reset it.
I explained shortly what is Intelligent Platform Management Interface, how it can be accessed and used on Linux via ipmitool. I went through some of its basic use, how it can be used to print the configured ILO access IP how
this Admin IP and Network configuration can be changed, how to print the IPMI existing users and how to add new Admin and non-privileged users.
Then I've shown how a system hardware and firmware could be shown, how IPMI management BMC could be reset in case if it hanging and how hardware system even logs can be printed (useful in case of hardware failure errors etc.), how to print reports on current system fan / power supply  and temperature. Finally explained how server chassis could be used for soft and cold server reboots locally or via SoL (Serial Over Lan) and how boot order of system could be modified.

ipmitool is a great tool to further automate different sysadmin tasks with shell scrpts for stuff such as tracking servers for a failing hardware and auto-reboot of inacessible failed servers to guarantee Higher Level of availability.
Hope you enjoyed artcle .. It wll be interested to hear of any other known ipmitool scripts or use, if you know such please share it.

How to start / Stop and Analyze system services and improve Linux system boot time performance

Friday, July 5th, 2019

systemd-components-systemd-utilities-targets-cores-libraries
This post is going to be a very short one and to walk through shortly to System V basic start / stop remove service old way and the new ways introduced over the last 10 years or so with the introduction of systemd on mass base across Linux distributions.
Finally I'll give you few hints on how to check (analyze) the boot time performance on a modern GNU / Linux system that is using systemd enabled services.
 

1. System V and the old days few classic used ways to stop / start / restart services (runlevels and common wrapper scripts)


The old fashioned days when Linux was using SystemV / e.g. no SystemD used way was to just go through all the running services with following the run script logic inside the runlevel the system was booting, e.g. to check runlevel and then potimize each and every run script via the respective location of the bash service init scripts:


root@noah:/home/hipo# /sbin/runlevel 
N 5


Or on some RPM based distros like Fedora / RHEL / SUSE Enterprise Linux to use chkconfig command, e.g. list services:

~]# chkconfig –list

etworkManager  0:off   1:off   2:on    3:on    4:on    5:on    6:off
abrtd           0:off   1:off   2:off   3:on    4:off   5:on    6:off
acpid           0:off   1:off   2:on    3:on    4:on    5:on    6:off
anamon          0:off   1:off   2:off   3:off   4:off   5:off   6:off
atd             0:off   1:off   2:off   3:on    4:on    5:on    6:off
auditd          0:off   1:off   2:on    3:on    4:on    5:on    6:off
avahi-daemon    0:off   1:off   2:off   3:on    4:on    5:on    6:off

And to start stop the service into (default runlevel) or respective runlevel:


~]#  chkconfig httpd on

~]# chkconfig –list httpd
httpd            0:off   1:off   2:on    3:on    4:on    5:on    6:off


~]# chkconfig service_name on –level runlevels


Debian / Ubuntu and other .deb based distributions with System V (which executes scripts without single order but one by one) are not having natively chkconfig but instead are famous for update-rc.d init script wrapper, here is few basic use  of it:

update-rc.d <service> defaults
update-rc.d <service> start 20 3 4 5
update-rc.d -f <service>  remove

Here defaults means default set boot runtime for system and numbers are just whether service is started or stopped for respective runlevels. To check what is your default one simply run /sbin/runlevel

Other useful tool to stop / start services and analyze what service is running and which not in real time (but without modifying boot time set for a service) – more universal nowadays is to use the service command.

root@noah:/home/hipo# service –status-all
 [ + ]  acpid
 [ – ]  alsa-utils
 [ – ]  anacron
 [ + ]  apache-htcacheclean
 [ – ]  apache2
 [ + ]  atd
 [ + ]  aumix

root@noah:/home/hipo# service cron restart/usr/sbin/service command is just a simple wrapper bash shell script that takes care about start / stop etc. operations of scripts found under /etc/init.d

For those who don't want to tamper with too much typing and manual configuration there is an all distribution system V compatible ncurses interface text itnerface sysv-rc-conf which could make your life easier on configuring services on non-systemd (old) Linux-es.

To install on Debian distros:

debian:~# apt-get install sysv-rc-conf

debian:~# sysv-rc-conf


SysV RC Conf desktop on GNU Linux using sysv-rc-conf systemV and systemd
 

2. SystemD basic use Start / stop check service and a little bit of information
for the novice

As most Linux kernel based distributions except some like Slackware and few others see the full list of Linux distributions without systemd (and aha yes slackw. users loves rc.local so much – we all do 🙂  migrated and are nowadays using actively SystemD, to start / stop analyze running system runnig services / processes

systemctl – Control the systemd system and service manager

To check whether a service is enabled

systemctl is-active application.service

To check whether a unit is in a failed state

systemctl is-failed application.service

To get a status of running application via systemctl messaging

# systemctl status sshd
● ssh.service – OpenBSD Secure Shell server Loaded: loaded (/lib/systemd/system/ssh.service; enabled; vendor preset: enabled) Active: active (running) since Sat 2019-07-06 20:01:02 EEST; 2h 3min ago Main PID: 1335 (sshd) Tasks: 1 (limit: 4915) CGroup: /system.slice/ssh.service └─1335 /usr/sbin/sshd -D юли 06 20:01:00 noah systemd[1]: Starting OpenBSD Secure Shell server… юли 06 20:01:02 noah sshd[1335]: Server listening on 0.0.0.0 port 22. юли 06 20:01:02 noah sshd[1335]: Server listening on :: port 22. юли 06 20:01:02 noah systemd[1]: Started OpenBSD Secure Shell server.

To enable / disable application with systemctl systemctl enable application.service

systemctl disable application.service

To stop / start given application systemcl stop sshd

systemctl stop tor

To reload running application

systemctl reload sshd

Some applications does not have the right functionality in systemd script to reload configuration without fully restarting the app if this is the case use systemctl reload-or-restart application.service

systemctl list-unit-files

Then to view the content of a single service unit file:

:~# systemctl cat apache2.service
# /lib/systemd/system/apache2.service
[Unit]
Description=The Apache HTTP Server
After=network.target remote-fs.target nss-lookup.target

[Service]
Type=forking
Environment=APACHE_STARTED_BY_SYSTEMD=true
ExecStart=/usr/sbin/apachectl start
ExecStop=/usr/sbin/apachectl stop
ExecReload=/usr/sbin/apachectl graceful
PrivateTmp=true
Restart=on-abort

[Install]
WantedBy=multi-user.target


converting-traditional-init-scripts-to-systemd-graphical-diagram

systemd's advancement over normal SystemV services it is able to track and show dependencies
of a single run service for proper operation on other services

:~# systemctl list-dependencies sshd.service


● ├─system.slice
● └─sysinit.target
●   ├─dev-hugepages.mount
●   ├─dev-mqueue.mount
●   ├─keyboard-setup.service
●   ├─kmod-static-nodes.service
●   ├─proc-sys-fs-binfmt_misc.automount
●   ├─sys-fs-fuse-connections.mount
●   ├─sys-kernel-config.mount
●   ├─sys-kernel-debug.mount
●   ├─systemd-ask-password-console.path
●   ├─systemd-binfmt.service
….

.


You can also mask / unmask service e.g. make it temporary unavailable via systemd with

sudo systemctl mask nginx.service

it will then appear as masked if you do list-unit-files

If you want to change something on a systemd unit file this is done with

systemctl edit –full nginx.service

In case if some modificatgion was done to systemd service files e.g. lets say to
/etc/systemd/system/apache2.service or even you've made a Linux system Upgrade recently
that added extra systemd service config files it will be necessery to reload all files
present in /etc/systemd/system/* with:

systemctl daemon-reload


Systemd has a target states which are pretty similar to the runlevel concept (e.g. runlevel 5 means graphical etc.), for example to check the default target for a system:

One very helpful feature is to restart systemd but it seems this is not well documented as of now and though this might work after some system package upgrade roll-outs it is always better to reboot the system, but you can give it a try if restart can't be done due to application criticallity.

To restart systemd and its spawned subprocesses do:
 

systemctl daemon-reexec


root@noah:/home/hipo# systemctl get-default
graphical.target


 to check all targets possible targets

root@noah:/home/hipo# systemctl list-unit-files –type=target
UNIT FILE                 STATE   
basic.target              static  
bluetooth.target          static  
busnames.target           static  
cryptsetup-pre.target     static  
cryptsetup.target         static  
ctrl-alt-del.target       disabled
default.target            static  
emergency.target          static  
exit.target               disabled
final.target              static  
getty.target              static  
graphical.target          static  

you can put the system in Single user mode if you like without running the good old well known command:

/sbin/init 1 

command with

systemctl rescue

You can even shutdown / poweroff / reboot system via systemctl (though I never did that and I don't recommend) 🙂
To do so use:

systemctl halt
systemctl poweroff
systemctl reboot


For the lazy ones that don't want to type all the time like crazy to configure and manage simple systemctl set services take a look at chkservice – an ncurses text based menu systemctl management interface

As chkservice is relatively new it is still not present in stable Stretch Debian repositories but it is in current testing Debian unstable Buster / Sid – Testing / Unstable distribution and has installable package for Ubuntu / Arch Linux and Fedora

chkservice-Linux-systemctl-ncurses-text-menu-service-management-interface-start-chkservice
Picture Source Tecmint.com

chkservice linux help screen


3. Analyzing and fix performance boot slowness issues due to a service taking long to boot


The first very useful thing is to know how long exactly all daemons / services got booted
on your GNU / Linux OS.

linux-server:~# systemd-analyze 
Startup finished in 4.135s (kernel) + 3min 47.863s (userspace) = 3min 51.998s

As you can see it reports both the kernel boot time and userspace (surrounding services
that had to boot for the system to be considered fully booted).


Once you have the system properly booted you have a console or / ssh access

root@pcfreak:/home/hipo# systemd-analyze blame
    2min 14.172s tor@default.service
    1min 40.455s docker.service
     1min 3.649s fail2ban.service
         58.806s nmbd.service
         53.992s rc-local.service
         51.458s systemd-tmpfiles-setup.service
         50.495s mariadb.service
         46.348s snort.service
         34.910s ModemManager.service
         33.748s squid.service
         32.226s ejabberd.service
         28.207s certbot.service
         28.104s networking.service
         23.639s munin-node.service
         20.917s smbd.service
         20.261s tinyproxy.service
         19.981s accounts-daemon.service
         18.501s loadcpufreq.service
         16.756s stunnel4.service
         15.575s oidentd.service
         15.376s dev-sda1.device
         15.368s courier-authdaemon.service
         15.301s sysstat.service
         15.154s gpm.service
         13.276s systemd-logind.service
         13.251s rsyslog.service
         13.240s lpd.service
         13.237s pppd-dns.service
         12.904s NetworkManager-wait-online.service
         12.540s lm-sensors.service
         12.525s watchdog.service
         12.515s inetd.service


As you can see you get a list of services time took to boot in secs and you can
further debug each of it to find out why it boots so slow (netwok / DNS / configuration isssue whatever).

On a servers it is useful to look up for some processes slowing it down like gdm.service etc.


Close up words rant on SystemD vs SysemV

init-and-systemd-comparison-commands-linux-booting-1

A lot could be ranted on what is better systemd or systemV. I personally hated systemd since day since I saw it being introduced first in Fedora / CentOS linuxes and a bit later in my beloved desktop used Debian Linux.
I still remember the bugs and headaches with systemd's intruduction as it is with all new the early adoption of technology makes a lot of pain in the ass.
Eventually systemd has become a standard and with my employment as a contractor through Itelligence GmBH for SAP AG I now am forced to work with systemd daily on SLES 12 based Linuces and I was forced to get used to it. 
But still there is my personal preference to SystemV even though the critics of slow boot etc.but for managing a multitude of Linux preinstalled servers like Virtual Machines and trying to standardize a Data Center with Tens of Thousands of Linuxes running on different Hypervisors VMWare / OpenXen + physical hosts etc. systemd brings a bit of more standardization that makes it a winner.

How to promptly interrupt Windows shutdown in case of shutdown, restart mistake

Thursday, April 17th, 2014

windows-shutting-down-by-mistake-interrupt-howto-shot
Its really annoying, when some Anti-Virus software or application updates itself and requires a Windows restart. It is even more annoying when you have 50 windows opened and suddenly they start closing one by one. In such cases it is precious to know there is way to Cancel Windows Shutdown using command line:

Just press Windows (button) + R: type in;


shutdown /a

and press enter.

That's it a quick cmd prompt will flash through the screen and Windows will stop shutdowning 🙂 Enjoy

Shutdown tomcat server node in case of memory depletion – Avoiding Tomcat Out of memory

Friday, June 6th, 2014

fix-avoid-tomcat-out-of-memory-logo

Out Of Memory Errors, or OOMEs, are one of the most common problems faced by Apache Tomcat users. Tomcat cluster behind Apache unreachable (causing customer downtimes). OOME errors occur on production servers that are experiencing an unusually high spike of traffic.

Out of memory errors are usually a problem of application and not of Tomcat server. OMEs have become such a persistent topic of discussion in the Apache Tomcat community cause its so difficult to trace to their root cause. Usually 'incorrect' web app code causing Tomcat to run out of memory is usually technically correct.

Most common reasons for Out of Memory errors in application code are:
 

  •     the heap size being too small
  •     running out of file descriptors
  •     more open threads than the host OS allows
  •     code with high amounts of recursion
  •     code that loads a very large file into memory
  •     code that retaining references to objects or classloaders
  •     a large number of web apps and a small PermGen


The following java option -XX:OnOutOfMemoryError= could be added to any of tomcat java application servers in setenv.sh in  JAVA_OPTS= variable in case of regular Out of Memory errors occur making an application unstable.

-XX:OnOutOfMemoryError=<path_to_tomcat_shutdown_script.sh>

Where < path_to tomcat_shutdown_script.sh > is shutdown script(which performs kill <tomcat_pid> if normal shutdown fails) for the tomcat instance.

With this setup if any tomcat instance run out of memory it will be shutdown (shutdown script invoked) – as result the Apache proxy infront of Tomcats should not pass any further requests to this instance and application will visualize / work properly for end customers.

Usually a tomcat_shutdown_script.sh to invoke in case of OOM would initiate a Tomcat server restart something like:

for i in `ps -ef |grep tomcat |grep /my_path_to_my_instance | awk '{print $2}'`
do
kill -9 "$i"
#path and script to start tomcat
done

To prevent blank pages returned to customer because of shutdown_script.sh starting stopping Tomcat you can set in Reverse Apache Proxy something like:
 

<Proxy balancer://mycluster>
   BalancerMember ajp://10.16.166.48:11010/ route=delivery1 timeout=30 retry=1
   BalancerMember ajp://10.16.166.70:11010/ route=delivery2 timeout=30 retry=1
</Proxy>

Where in above example I assume, there are only two tomcat nodes, for more just add respective ones.

Note that if the deployed application along all servers is having some code making it crash all tomcat nodes can get shutdown all time and you can get in a client havoc 🙂

List and get rid of obsolete program core dump files and completely disable core files on FreeBSD

Tuesday, November 1st, 2011

My FreeBSD router has started running out of space, I looked for ways to clean up some space. So I remembered some programs are generating core files while they crash. Some of these files are really huge and ban be from 1Mb to > 1G.

I used find to first list all my produced core files starting from root directory (/) , like so:

find / -name core -exec du -hsc {} ;
....

Having a list of my core files with the respective core file size and after reviewing, I deleted one by one the cores which were there just taking up space.
It’s a wise idea that core dumps file generation on program crash is completely disabled, however I forgot to disable cores, so I had plenty of the cores – (crash files which are handy for debug purposes and fixing the bug that caused the crash).

Further on I used an /etc/rc.confdumpdev=NO , variable which instructs the kernel to not generate core files on program crash:

freebsd# echo 'dumpdev=NO' >> /etc/rc.conf

Next, to make dumpdev=NO , take affect I rebooted the server:

freebsd# shutdown -r now
...

There is a way to instruct every server running daemon to know about the newly set dumpdev=NO by restarting each of the services with their init scripts individually, but I was too lazy to do that.