Posts Tagged ‘simple steps’

Building a self-healing WordPress Monitoring shell Script using Systemd, Apache, MariaDB simple automation for Linux server Auto Recovery

Friday, May 22nd, 2026

linux-self-healing-wordpress-script-automation-how-to-auto-recovery-broken-apache-mysql-mariadb-wordpress-server-tux-logo

Running a WordPress website in production is not only about publishing content  it is also about keeping the server healthy 24 / 7 to have a good yearly Website Uptime and if needed fit an SLA.

Even on stable Linux systems, services occasional failures are common for a reasons like:

  • Apache Crash / stop responding (due to bug or whatever)
  • MariaDB Database server acts unstable after heavy load (or server overheat)
  • WordPress platform auto updates leaves the site stuck in maintenance mode (until manually fixed)
  • Network outage (or a DHCP server malfunction, IP / MAC conflics can disrupt network).

There is plenty of other things that can go wrong, but generally usually a website infrastructure running on a Linux server that counts for proper productivity on basically a web server (apache) / mariadb / postgresql (or whatever other service) and WordPress based website has a set of common issues faced. That require a sysadmin to partake simple steps to resolve it.
Temporary outages can become kind of permanent without proper monitoring and introduction of automatic recovery procedures.

Within the age of clouds and automation reducing outages is key to success!

To reduce downtime and avoid manual intervention, there is a lot of things a sysadmin can do but a lot of traditional options are mostly neglected or uknown by the the new and knowledgable SREs (Site Reliability Engineers), most of whom seem to be a Gen-Z 🙂

Thus an alternative approach to the new ways of working is to keep up to the old standards and use lightweight self-healing Bash monitoring script for my WordPress based site / blog. I use such script myself as a do have a self-hosted infrastructure, so decided to share it with hope someone can benefit of it.

The server-health-check-restore-wp-apache-mariadb.sh script continuously checks:

  • Apache health state
  • MariaDB availability
  • HTTP response code status equals 200 ( OK )
  • WordPress maintenance mode (is not disabled

As an auto healing steps It then partakes:

  • Restarts of found failed services
  • Cleans stuck . maintenance wordpress files
  • Reboots the entire server after repeated database failures

This approach provides a simple but highly effective watchdog mechanism without needing complex monitoring software.

1. The server-health-check-restore-wp-apache-mariadb.sh
automation self-healing Script


$ cat /usr/local/bin/server-health-check-restore-wp-apache-mariadb.sh

#!/bin/bash

URL="https://www.pc-freak.net/blog/"
MAINT_FILE="/var/www/blog/.maintenance"
KEYWORD="Briefly unavailable for scheduled maintenance"

APACHE_SERVICE="apache2"
MARIADB_SERVICE="mariadb"

MAX_DB_RESTARTS=5
RESTART_COUNT_FILE="/var/run/mariadb_restart_count"

log() {
    echo "$(date): $1"
}

# —- Apache check —-
if ! systemctl is-active –quiet "$APACHE_SERVICE"; then
    log "Apache is not running. Restarting…"
    systemctl restart "$APACHE_SERVICE"
    sleep 5
fi

# —- MariaDB check —-
if ! systemctl is-active –quiet "$MARIADB_SERVICE"; then
    log "MariaDB is not running."

    # Read restart count
    if [ -f “$RESTART_COUNT_FILE” ]; then
        RESTART_COUNT=$(cat "$RESTART_COUNT_FILE")
    else
        RESTART_COUNT=0
    fi

    RESTART_COUNT=$((RESTART_COUNT + 1))
    echo "$RESTART_COUNT" > "$RESTART_COUNT_FILE"

    log "Restart attempt $RESTART_COUNT of $MAX_DB_RESTARTS"
    systemctl restart "$MARIADB_SERVICE"
    sleep 10

    # Re-check MariaDB
    if ! systemctl is-active –quiet "$MARIADB_SERVICE"; then
        log "MariaDB still unhealthy after restart."

        if [ “$RESTART_COUNT” -ge “$MAX_DB_RESTARTS” ]; then
            log "MariaDB failed $MAX_DB_RESTARTS times. Rebooting server!"
            rm -f "$RESTART_COUNT_FILE"
            /sbin/reboot
            exit 0
        fi

        exit 0
    fi
else
    # MariaDB healthy → reset counter
    if [ -f “$RESTART_COUNT_FILE” ]; then
        log "MariaDB is healthy again. Resetting restart counter."
        rm -f "$RESTART_COUNT_FILE"
    fi
fi

# —- HTTP sanity check —-
HTTP_CODE=$(curl -L –max-redirs 5 -s -o /dev/null -w "%{http_code}" –max-time 10 "$URL")

if [[ “$HTTP_CODE” != “200” ]]; then
    log "Site returned HTTP $HTTP_CODE. Skipping WordPress maintenance cleanup."
    exit 0
fi

# —- WordPress maintenance check —-
PAGE_CONTENT=$(curl -L –max-redirs 5 -s –max-time 10 "$URL")

if echo "$PAGE_CONTENT" | grep -qi "$KEYWORD"; then
    if [ -f “$MAINT_FILE” ]; then
        rm -f "$MAINT_FILE"
        log "WordPress maintenance file removed."
    else
        log "Maintenance message detected, but .maintenance file not found."
    fi
else
    log "Site healthy. No maintenance mode detected."
fi

1.1. Make script executable

Store the script somewhere under /usr/local/bin/ and make it executable:

# chmod +x /usr/local/bin/server-health-check-restore-wp-apache-mariadb.sh

1.2. Schedule it to run via Cron job

Run the script lets say every 5 minutes with cron and make it log to a log file:

# crontab -u root -e

*/5 * * * * /usr/sbin/server-health-check-restore-wp-apache-mariadb.sh >> /var/log/wp_healthcheck.log 2>&1

2. What This Script Actually Does

The script acts like a mini watchdog daemon.

Instead of relying on heavyweight enterprise monitoring systems, it uses:

systemctl , curl , grep combined with simple scripting  logic.

The simplicity of solution advantage is for maintenance it is easy it is transparent and highly portable as it will run on virtually ever Linux server / VPS without the need to install anything additional.

2.1 Apache Health Checks

The first section checks whether Apache is running:

# systemctl is-active –quiet apache2

If Apache is down, the script automatically restarts it:

# systemctl restart apache2

This solves temporary crashes caused by:

  • memory exhaustion
  • bad PHP workers
  • failed reloads
  • temporary kernel pressure

A short sleep delay gives Apache time to recover before additional checks continue.

2.2. MariaDB Recovery Script Logic

The database layer is more critical than Apache.

A web server can recover instantly, but repeated MariaDB crashes often indicate:

  • corrupted tables
  • exhausted RAM
  • deadlocks
  • disk problems
  • InnoDB failures

Because of that, the script implements a restart counter.

2.3. Restart Counter Logic

The counter is stored in file:

/var/run/mariadb_restart_count

Every failed startup increments the counter:

RESTART_COUNT=$((RESTART_COUNT + 1))

If MariaDB recovers successfully, the counter is deleted.

This prevents accidental reboot loops.

2.4. Automatic Server Reboot if too many auto recovery attempts

If MariaDB fails too many times:

MAX_DB_RESTARTS=5

the script escalates to a full system reboot:

/sbin/reboot

2.5. Why use reboot at continuous services failure?

Well reboot might not always work and under some cases it can make things better, but in case if you have a multiple servers running the same set of service with Apache and Mysql  with Haproxy or other Load balancer in front this set of logic is just perfect:

  • kernel resources are exhausted
  • filesystem locks remain stuck
  • memory fragmentation becomes severe
  • hardware drivers misbehave

A clean reboot can recover the machine faster than manual debugging during production outages !

This kind of script can be especially useful on:

  • Rarely mainteinaed Linux / VPS servers
  • unattended cloud instances
  • remote hosting environments

2.6. HTTP Sanity Check

After validating services, the script checks whether the website actually responds correctly.

$ curl -L –max-redirs 5

The script expects as normal a return code of:

HTTP 200

Anything else:

  • 500 errors
  • redirect loops
  • gateway failures
  • CDN problems

will stop the maintenance cleanup logic.

This prevents accidental removal of WordPress maintenance files during unrelated outages.

2.7. Automatic WordPress Maintenance Mode Recovery

One of the most annoying WordPress problems happens during failed updates.

WordPress creates under its install directory say /var/www/ a file:

.maintenance

If the update crashes, the file remains forever and the site displays:

“Briefly unavailable for scheduled maintenance.”

The script detects this message directly from the webpage content with grep:

$ grep -qi "$KEYWORD"

If detected, it removes the stale file automatically:

rm -f "$MAINT_FILE"

This instantly restores the site without requiring manual SSH intervention.

3. Why Simple script approach Works well and is good idea

This setup has several advantages, among key one is It is Extremely Lightweight.

No additional complications of use of trendy stuff like:

  • Docker stack
  • Zabbix
  • Kubernetes
  • Prometheus
  • external monitoring agents etc.

Everything is handled with simple native well known Linux tools.

3.1. It is Easy to Debug

Everything is plain Bash.

No hidden automation layers.

Every action is visible and understandable.

3.2. Production Friendly

The script tolerates:

  • temporary outages
  • service crashes
  • failed WordPress upgrades

without requiring administrator interaction.

4. Possible future script Improvements

There are many ways to extend script setup further, here is few ideas.

4.1. Add Email Notifications

Send alerts when:

  • services restart
  • reboot occurs
  • maintenance mode is detected

4.2. Add Disk Space Monitoring

Automatically detect:

  • full disks
  • inode exhaustion
  • backup growth

4.3. Add simple MySQL Query Health Checks

Instead of only checking the service state:

mysqladmin ping

could validate actual database responsiveness.

4.4. Introduce systemd Integration

Instead of cron-based execution, you might want to make the script could be made native if you use :

  • systemd timer
  • systemd service

Close up Summary

In many cases, simple Linux automation still beats overengineered solutions.

Today overcomplication of monitoring is a trend especially for big companies however for home brew small projects on little budget, sometimes the best server automation is the simplest one.
 A few lines of Bash can improve as shown above could improve uptime and reduce operational headaches.

For small-to-medium WordPress / Website deployments, this kind of self-healing “watchdog “ guarantees you reliability , simplicity , transparency , relatively quick fast recovery in case of crashes without brining a any  unnecessary infrastructure complexity, plus this setup works with zero human interaction and if combined with a simple Slack / Discord monitoring python script you can sleep better.


Make picture transparent with the Gimp on Linux

Tuesday, November 16th, 2010

GIMP Logo make picture transparent with GIMP on GNU / Linux
I’m trying to learn some basic design this days as an attempt to fill my huge missing gap of knowledge in graphic processing.
I’ve always been not too good with visual stuff and always been focused on the command line and console, however since
some time design started being quite interesting thing to me and I found it quite handy and challenging to learn some basic designing.

I’m not really a Windows guy and thus my Photoshop skills are next to zero.
Since The Gimp is the substitute for Photoshopfor Linux users and I had a task for one of the websites I’m developing to make some pictures for the website transparent, therefore I had to learn how to make pictures transparent with The Gimp
After some reading online and some experimenting with GIMP it appeared to me it’s very easy to actually make pictures transparent with the GIMP.
So I’ve come with a small article here on how to make image or a picture transparent with Gimp in simple steps in order to help people who are trying to achieve the same easy task:

1. Open Gimp and place your mouse cursor on the picture

Here, Press the 2nd or 3rd mouse button to show menu.

2. Select Layer -> Transperancy -> Alpha to Selection

In that menu select Select Layer -> Transprerancy -> Alpha to Selection

Gimp Alpha to Selection Menu

3. Use Fuzzy Select Tool and select the picture background

Gimp fuzzy select background

4. From Gimp Window pane main menu choose the Clear option

Edit -> Clear (Delete)
gimp edit clear menu

That’s all now your picture background should be removed if some parts of the picture still needs to be purged just follow the above step and remove them.
I should say I thought making picture transparent with GIMP would be a more complex task than it really was, quite nice one more step in my development as a designer 🙂

How to add extra plugins, effects, brushes and functionality to GIMP on GNU / Linux

Tuesday, February 28th, 2012

How to add extra plugins, effects brushes and functionality to GIMP on Debian and Ubuntu Linux / GIMP logo head pictureThese days, I'm playing with The GIMP. I've been a GNU / Linux, FreeBSD user for already 11 years now but as I'm doing mostly system administration and I don't have much expertise in Panting or Computer Graphical Design, I've never put much time to learn more in the interesting area of graphical design. Hence until just recently, Just until now, I've never spend time with the GIMP (GNU Image Manipulation Program) and never realized how powerful this great program is. The more I learn about GIMP functionalities and how it works the more it makes me determined to learn some basic web design 🙂

The functionality which The GIMP offers in a basic install is quite rich, however by default on most Debian and Ubuntu installations many of the great plugins which easifies the way to edit pictures is missing.

Example for a very valuable functionality which is not present with standard gimp package installed on Debian and Ubuntu are:
 

Here I will mention here few words on:

  • GIMP FX-Foundry Collection

GIMP FX-Foundry is a thoroughful collection of GIMP scripts (addon plugins), that automates many of the operations which requires a professional web design skills and gives an easy intuitive interface through which very robust "high level" graphic design can be accomplished. This additional GIMP extensions helps to create very unique design in just few simple steps, as well as gives multiple tools for the sake of easy pro design creation. For anyone looking for quick edit of images with GIMP FX-Foundry is a must have GIMP plugins extension. The script pack is located on http://gimpfx-foundry.sourceforge.net/

To install FX-Foundry scripts collection on Debian / Ubuntu / Linux Mint and other based Linux distributions:

debian:~# apt-get install --yes gimp-plugin-registry
...

gimp-plugin-registry package name is based on GIMP Plugin registry's website
. Gimp plugin registry contains many helpful design goodies 🙂

Once installed you will notice GIMP with a new menu on the main menus bar reading FX-Foundry :

GIMP Screenshot GNU Linux Debian additional FX Foundry menu

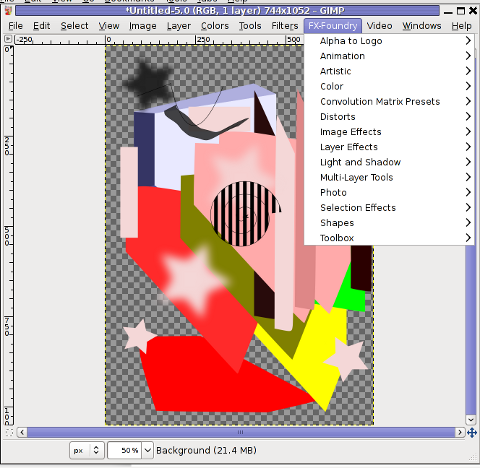
GIMP FX Foundry extensionos package contains 124 scripts for additional graphics manipulation. The collection contains less scripts than the ones provided by gimp-plugin-registry. package has 156 scripts inside.

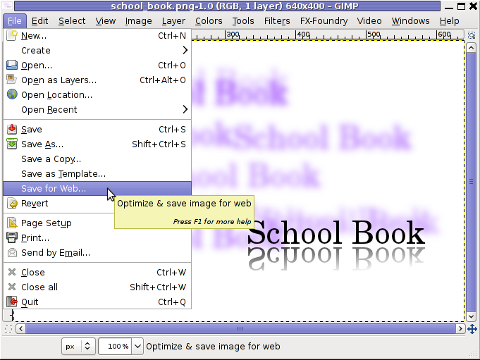
One of the most helpful GIMP addition from the package is the inclusion of Save for Web button under:

File -> Save for Web

GIMP Save for Web menu suitable for reduced size images for HTML image producing on Debian GNU / Linux screenshot

Another very helpful .deb package which adds up to GIMP's design possibilities is gimp-data-extras .

gimp-data-extras adds 111 new GIMP Fill in Patterns , which can be used through the Blend Tool to Fill selected areas with color gradients.

To install gimp-data-extras on Debian:

debian:~# apt-get install --yes gimp-data-extras
...

Generally once installed this package will add to GIMP – an extra set of brushes, palettes, and gradients for The GIMP as you can read in the package description.

I was also quite stunned to find out the good old GIMP is capable of basic Video editting!!

On Debian and Ubuntu there is a package called gimp-gap which once installed adds an extra Video menu.

GIMP Screenshot GNU Debian linux adding GIMP extra Video editting capabilities

I've not tested the GIMP video editting capabilities yet, however I intend to learn something about it immediately when I have some free time left. You see the enormous list of Video editting possibilities GIMP obtaines with gimp-gap which btw stands for (The GIMP Animation Package).

To install gimp-gap:

debian:~# apt-get install --yes gimp-gap

I've noticed also the following list of others useful GIMP additions (mainly helpful in Web, Brochure and Logo Graphic Design) to install them:

debian:~# apt-get --yes install gimp-gmic gimp-ufraw gtkam-gimp gimp-gluas \gimp-dimage-color gimp-dds gimp-dcraw gimp-cbmplugs flegita-gimp gimp-texturize \gimp-resynthesizer gimp-lensfun gimp-gutenprint gtkam-gimp mrwtoppm-gimp

Here is the package description of the packages above command will install:

  • gimp-cbmplugs – plugins for The GIMP to import/export Commodore 64 files
  • gimp-data-extras – An extra set of brushes, palettes, and gradients for The GIMP
  • gimp-dcraw – GIMP plug-in for loading RAW digital photos
  • gimp-dds – DDS (DirectDraw Surface) plugin for the gimp
  • gimp-dimage-color – GIMP plugin to convert Minolta DiMAGE pictures to sRGB colour space
  • gimp-gap – The GIMP Animation Package
  • gimp-gluas – Lua environment plug-in for GIMP
  • gimp-gmic – GIMP plugin for GREYC's Magic Image Converter
  • gimp-gutenprint – print plugin for the GIMP
  • gimp-lensfun – Gimp plugin to correct lens distortion using the lensfun library
  • gimp-normalmap – Normal map plugin for GIMP
  • gimp-plugin-registry – repository of optional extensions for GIMP
  • gimp-resynthesizer – Gimp plugin for texture synthesis
  • gimp-texturize – generates large textures from a small sample
  • gimp-ufraw – gimp importer for raw camera images
  • flegita-gimp – Gnome Gimp scan plugin.
  • gtkam-gimp – gtkam gimp plugin to open digital camera pictures
  • mrwtoppm-gimp – GIMP-plugin to support Minolta DiMAGE 5/7/7i RAW images

Now after installing all this plugins and seeing all GIMP's power, I'm starting to wonder why are still people ranting Adobe PhotoShop is feature rich.
That's all, enjoy the great new GIMP features. Happy picture editting 😉

How to make GNOME 3 Desktop icons to work as in GNOME 2 on Debian GNU / Linux

Saturday, February 4th, 2012

If you're using Debian GNU/Linux wheezy/sid, you have already figured out GNOME3 settings to start GNOME in Classic mode (like in GNOME 2), starts gnome in a mode where the desktop is not showing the usual Computer, Home, Trash etc.

Besides that in that strange back-compitability Classic GNOME mode its impossible to add any program as a link in desktop like in the good old GNOME 2.

Thanksfully this abusive behaviour of the backwards compitability mode is easily fixable by two simple steps, here they are:

1. Install gnome-tweak-tool – (Tool to adjust advanced configuration settings for GNOME

root@debian:~# apt-get install gnome-tweak-tool

2. Start gnome-tweak tool

Press ALT+F2 and run gnome-tweak-tool or run it via xterm / gnome-terminal:

moonman@Moon:~$ gnome-tweak-tool

Change in Desktop, Have file manager handle the desktop the settings to ON

gnome-tweek-tool Debian GNU Linux wheezy sid screenshot

gnome-tweak-tool Debian wheezy/Sid GNU Linux screenshot handle desktop on

Once the Screenshot Handle Desktop is set to ON, further drag and dropping any application to the Desktop will be working.
Something really irritating is that launching applications in GNOME 3 does not work properly if you just press ALT+F2 and type in lets say gnome-terminal , to work around this weirdity you will have to install gnome-shell package.