A friend of Mine Marto a.k.a. (Amridikon) has regged a domain for pc-freak. So www.pc-freak.net is now upcheck his Development Studio dhstudio http://dhstudio.euPc-Freak’s site can be accessed from
https://www.pc-freak.net//crew/ :)END—–
A friend of Mine Marto a.k.a. (Amridikon) has regged a domain for pc-freak. So www.pc-freak.net is now upcheck his Development Studio dhstudio http://dhstudio.euPc-Freak’s site can be accessed from
https://www.pc-freak.net//crew/ :)END—–
Tags: Amridikon, Crew, development, dhstudio, domain, end, freak, friend, hostead, Marto, mine, nbsp, net, site, Studio, upcheck, website
Posted in Everyday Life | No Comments »
Aloha. Still here. Two days ago I ran Heroes 3 under my FreeBSD box successfully, there was a terrible bug in fullscreen mode which needed fix I’ve used the loki’s site patch to patch the heroes 3 start binary with xdelta. The loki installer was a terrible pain in the ass I used my l337test sk!llZ :} to be able to patch the binary by hand. About the last post yes I was desperate still not good still living. Today I was on exam again a failure probably, nothing new.
As I often used to say in the fast if something starts bad then it overs bad too. See my life show this very well. I’m suffering terrible and still waiting for something to set me free to happen. What would be the turning point? Will there be turning point at all? No idea. If God is such good and powerful as he said in the bible and his promises are true then he will deliver me and set me free on a good ground. Still hoping … Prodigy — Speedway, else the earth is probably his favourite experiment.
Tags: bible, earth, experiment, failure, favourite, freebsd, fullscreen, god, ground, hand, heroes, idea, life, llZ, loki, Mode, pain, pain in the ass, post, Prodigy, promises, show, site, something, speedway, test, turning, turning point, xdelta
Posted in Everyday Life | No Comments »
‘ve used the RSForms to build some custom Joomla Contact forms.
The RSForms was recommended to me by a friend and actually it’s a pretty cool and quick way to create forms.
I’ve installed it and played a bit with it to create a custom forms for one of the website I had to bring up just recently.
After the contact form was ready however there was a problem with sending emails. It took me quite a while to find out how to solve the problemwith contact not able to mail whatever is filled in.
First time I tried the RSForms after filling in the details and pressing the submit button,I got the error message;
Could not instantiate mail function.
I should say that, I’m running a QMAIL email server on the server where I have the Joomla & RSForms installed and configured.
I’ve came up with a solution to this issue after some research in Google
In order to solve that you will have to login to your Joomla administrator and
Navigate to:
Site -> Global Configuration -> Server
Whenever it opens up you should be seing the Mail Settings on the bottom right corner;
From there you will have to change the Mailer from PHP Mail Function to SMTP Server
To give you a better idea check out the screenshot of the Mail Settings below:
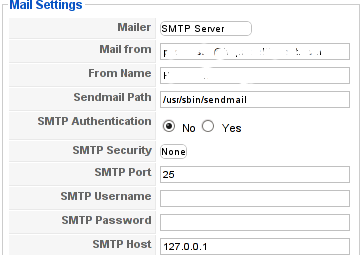
Changing this simple setting resolved the Could not instantiate mail function for me.
Right after I tested the RSForms to send my filled in form content but this time the PHPMAILER_RECIPIENTS_FAILED message was there;
This error was caused actually by a mistake I made in the configuration of the Custom RSForm I have prepared;
In Components -> RSForm!Pro -> Manage forms whenever I was preparing my form I’ve made a mistake in the User Emails customized field in my custom prepared form in the To: field I had a wrong variable set (a different value was set from the E-mail caption I’ve set on).
Solving this solved the issue. Even though the PHPMAILER_RECIPIENTS_FAILED was gone now, next I was unpleasently surprised by another error message which prevented the Contact form to properly send the input data:
Now I had to fight with the error;
PHPMAILER_FROM_FAILED
It took me a while and a lot of forums reading before I figure it out again my custom prepared RSForm had an issue;
The problem was in the Admin Emails customization of the form in the From: fill in box I had mistakenly typed in proper email, setting a proper email there solved the issue;
I’ve red online many suggested solutions to the issue which dealt with changes in the the file joomla/components/com_contact/controller.php around line 112, 162 etc.
I should say that before I found and solved the actual problem I’ve tried modifing this file also but with zero success.
Sometimes Linux is so complicated, it really pisses me of, why is not life easier? 😐
Tags: amp, bottom right corner, Button, Components, contact forms, content, cool, custom, email server, Emails, error message, file, form, function, Global, global configuration, google, How to fix "Could not instantiate mail function", login, mail function, mail settings, Manage, mistake, php, phpmailer, PHPMAILER_RECIPIENTS_FAILED and PHPMAILER_FROM_FAILED on Joomla and RSforms, problemwith, RECIPIENTS, screenshot, site, time, User, value
Posted in Joomla, Programming, System Administration, Various | 2 Comments »
This content editor is really awesome compared to the default editor TinyMCE. If you want to have an options rich content editor for Joomla, then this is the one for you 🙂
download JCE Content Editor here
After installing the JCE Joomla content editor in order to enable it as a default editor you need to go to the following location:
Site -> Global Configuration -> Default WYSIWYG Editor
There place on Editor TinyMCE and change it with Editor – JCE
Now go to edit some article, and you will see the difference in the editor 🙂
7. Add gallery Joomla capabilities with sigplus (Image Gallery Plus) and Very Simple Image Gallery
sigplus Image Gallery Plus is a straightforward way to add image or photo galleries to a Joomla article with a simple syntax. It takes a matter of minutes to set up a gallery but those who are looking for a powerful gallery solution will not be disappointed either: sigplus is suitable for both beginner and advanced users.
Tags: beginner, capabilities, Configuration, content, content editor, default editor, download, EditorThere, gallery, Global, global configuration, Image, image gallery, JCE, location, location site, matter, matter of minutes, nbsp, order, photo, photo galleries, place, Plus, site, solution, syntax, TinyMCE, way, WYSIWYG
Posted in Joomla, Various, Web and CMS | 1 Comment »

If you are facing the task to build a multi-language enabled Joomla website like me then I think my experience on building a multi-language website with Joomla CMS might be beneficial to you.
In order to build a multi-language website in Joomla you will have to use Joom!Fish multilanguage Joomla support plugin.
The plugin is a bit buggy, but in overall it will allow you to build a multi language website and consequently add the page different languate translations.
To install the plugin on your 1.5 Joomla based install;
1. Download the JoomFish plugin
Install it the usual joomla way joomla plugins are installed, via;
Extensions -> Install/Uninstall
2. Enable the Joom!Fish plugin
To do so navigate to;
Extensions -> Module Manager
Enable the module by ticking under the Enabled column on the line where you read Language Selection
3. Install Language packs for all languages which should be supported by JoomFish
Now as the JoomFish Language selection module is enabled, one needs to install the necessery Joomla Language Packs for all the languages which the Joomla based website is planned to support.
In my case I neede a three lingual website, which will support only the Languages:
and
Thus I went on Joomla! Extensions Directory – extensions.joomla.org and downloaded the the three language packs I needed (English, Russian and Bulgarian).
Again the Installation of the language packs is trivial and is done through the Joomla’s:
Extensions -> Install/Uninstall
After installation to find out all the languages your Joomla installation will support you can navigate inside Joomla admin to:
Extensions -> Install/Uninstall -> Languages
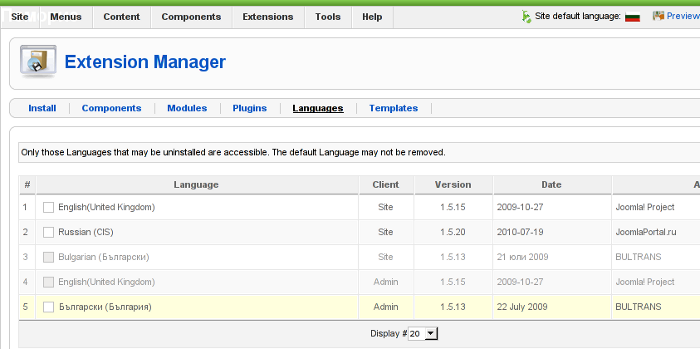 Screenshot of my installed list of Joomla Language Packs (Multi-Language setup)
Another way to check the list of enabled installed languages supported in your Joomla is via the menu:
Site -> Control Panel -> Language Manager
Something important here is to a default language is set in the Language Manager
4. Create translations from default installed language to the rest of the installed ones
Go to the JoomFish component through the menus:
Components -> Joom!Fish -> Control Panel
If all your language packs are correctly installed and enabled so far you should notice them listed while clicking on Content Languages
If all the Joomla Languages which your website is supposed to support are not there, this means something is generally wrong with installed lanaguage packs and you need to go back few steps and check what might be wrong, hopefully that’s not the case 😉
To immediately start translating your Joomla website to another from one language to another one, use the control menus:
Components -> Joom!Fish -> Translation
Here is screenshot on how this menu would look like:
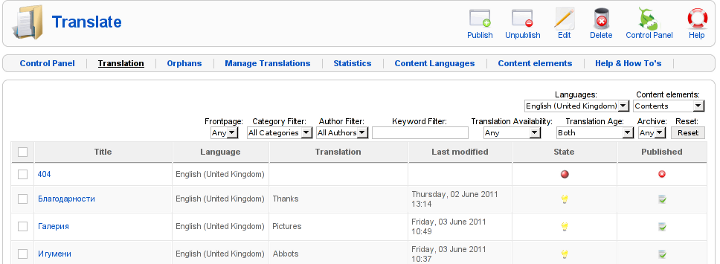
Notice in the above screenshot the Languages: and Content Elements dropdown menus, this ones are actually the two menus used for all language translations.
One needs to select under Languages: menu the Language to which will be translated to, while in Content Elements: has to be choseen the exact site elements which are about to be translated.
The Content Elements: necessery to be translated in most of the cases would be just Menus and Contents
Translating that will have your website user frontend be completely translated info the foreign language choosen in the Languages: dialog.
After finalizing the translations of all Articles available in Menus and Contents make sure the translation is Published, by selecting the Published tick, below I show you an example language translation edit of an article, on the left side you see the Published tick which need to be enabled, for translation to appear officially in Joomla.
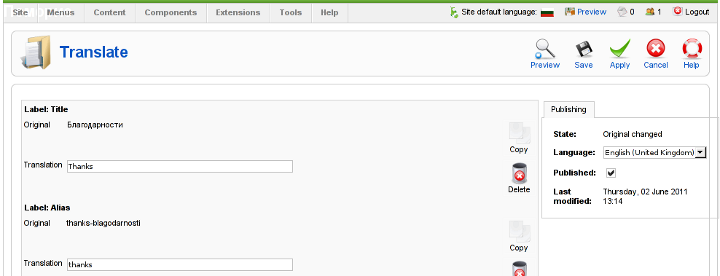
After completing all the translations of elements offered by the translation window, save the translation by pressing the Apply buttonFurther on you can check the website in a new tab, if everything is okay with translations, on the down left corner of the website footer you should notice the flags of enabled languages to appear.
Clicking on each of the languages should show you the website in the language choosen (if you have previously done the translation to the respective menus).
5. Solving a minor bug in JoomlaFish which prevents translated language text to display on webpages
During translation of my website from Bulgarian to English, I have noticed a bug of JoomFish, even though I did the translation of all my Menus and website Content elements and saved the translations, refreshing the website in a new tab and choosing the desired translation was constantly displaying the error message:
“There are no translations available”
I was not able to find a good explanation on the Internet on why exactly and how this bug occurs, but by some experiments I come up with a workaround.
If you get the “There are no translations available” after properly configuring Joom!Fish Multilang support, in order to solve the error you will have to select temporary a different default website language from the one currently specified by your website.
(E.g.) go to jooma admin panel location:
Site -> Control Panel -> Language Manager
and trigger the default language configured to some of the other available ones. After reverting back in a couple of seconds this setting to your desired default language the annoying: “There are no translations available” message will disappear and your translated content will appear on the website.
6. Changing the location of language flags (language links) in Joomla’s JoomFish
I have seen plenty of people online looking for a solution on how they can change the default image flags location, which by default is placed a place which is not that intuitive and visible by the user.
Maybe I did not searched enough but from my quick research it appears there is no information available on how the placement of language flags switching menu can be changed.
Even though I couldn’t find a solution to change the langage flags in JoomFish , after a bunch of experiments I find a way to do it! 🙂
The placement of Language selector buttons can be easily adjusted through following the Joomla Admin menu:
Extensions -> Module Mamager -> Language Selection
After opening the Language Selection , you will notice the Position: dropdown menu setting. The setting has a bunch of optionsand allows you to choose the best preferred placement of the language selector flag buttons, just take few minutes to experiment which settingfits you best and choose the one most suitable to you and you’re done! 😉
Honestly I never imagined that building a multi-lingual website with Joomla will be such a piece of cake.
The only drawback with JoomFish, is the way language translation is implemented as it is not enough user friendly, anyways having the option to build multi language website for free using open source CMS solution is great. Ain’t it? 🙂
Tags: bit, buggy, BulgarianRussianandEnglishThus, cms, Component, Components, control panel, default language, directory extensions, english russian, fish, Install, Joom, JoomFish, language packs, language selection, language support, language website, languages, ManagerEnable, menu, menus, Module, Multi, multilanguage, nbsp, necessery, Packs, page, plugin, site, something, support, tab, Translation, translations
Posted in Joomla, Various, Web and CMS | No Comments »
A friend of mine send me this awesome funny video which shows clearly how the avarage admin’s work day passed. Enjoy watching it here! . :)END—–
Tags: down, site
Posted in System Administration | No Comments »
And Isaac went out to meditate in the field at the eventide: and
he lifted up his eyes, and saw, and, behold, the camels were coming.
-- Genesis 24:63
☩ Walking in Light with Christ – Faith, Computing, Diary 2006-2020 Powered by: Pc Freak Solutions and Comments (RSS).
Verbatim copying and distribution of this entire article is permitted in any medium, provided this notice is preserved.
Copyright (C) 2020 by Georgi Georgiev - Website Privacy Policy