Posts Tagged ‘speed’

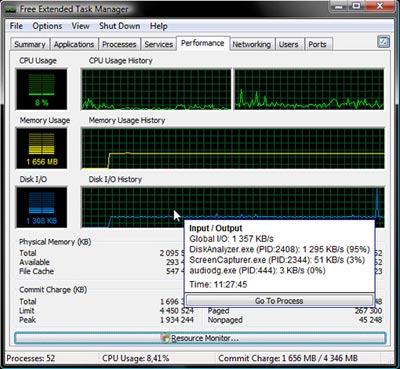
Checking I/O Hard Disk (Overhead) Read / Write operations on Microsoft Windows 7 – Resource Monitor

Friday, July 26th, 2013

I mainly have to deal with Linux servers. Today however I had to check for problems Microsoft Windows 7 server. The machine looked Okay but was reading from hard drive all the time. Hence I needed to check what is the Hard disk approximate read / write speed per second. I know on lInux tracking i/o hard disk server bottlenecks is done with iostat or dstat.

However I never did that on Windows, so I had to learn it by experience. Its actually pretty easy and you don't even need to install external program to see read / write hdd speed operations. Windows 7 is bundled with a Program called Resource Manager. Running Resource Manager's easiest method is from Windows Task Manager, i.e.:

Windows 7 Task Manager processes performance tab - how to check hard drive bottleneck windows server
Press Ctrl + Alt + Del (Choose Start Task Manager) and from Task Manager click on Resource Monitor Button.
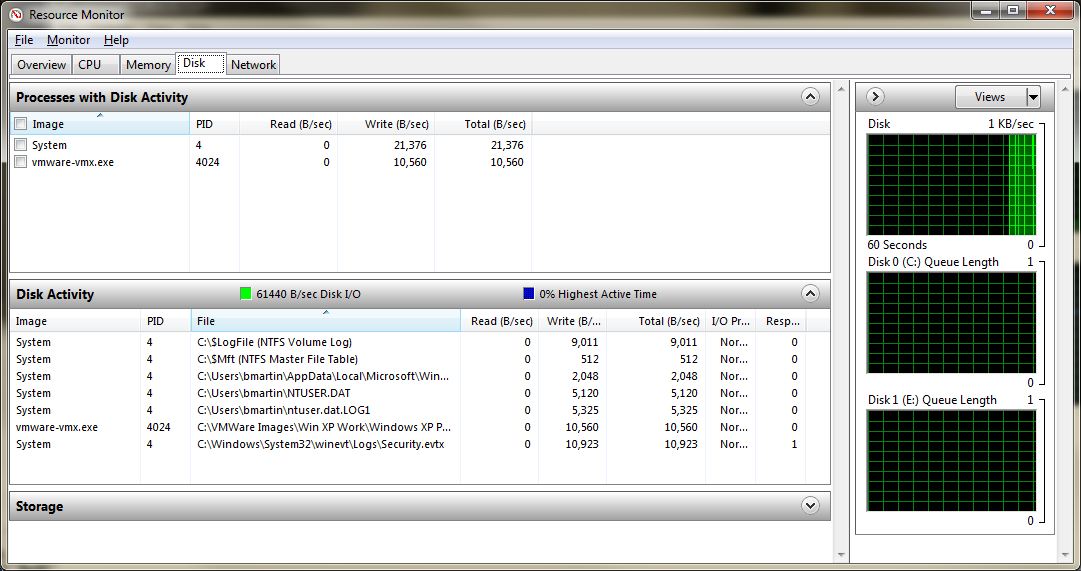
Immediately resource Monitor pops up and selecting the Disk tab priovides information on HDD Read / Write speed per sec. Using Resource Monitor, you can quickly also see which process is creating the most HDD overhead for server.

microsoft windows 7 resource monitor screenshot

windows resource monitor disk tab hard disk show read write speed win7

Though I'm not Microsoft fan, I should admit Resource Manager does a great job.


How to delete “Temporary Internet Files”/Content.IE5 with DEL and RD commands on Windows 7 / 8 folder contents – Clean Up Temporary files and folders to speed up and free disk space

Tuesday, February 3rd, 2015

7logo_clean-up-windows-commands-tips-and-tricks-how-to-clean-up-windows-pc-manuallyI
've been called urgently today by miss Jenia Pencheva who is the president of Christian Air Ticket Agency GoodFaithAir, her personal computer caused her quite a lot of headache, I've previously fixed it once and she was happy with that thus when she experienced problems she give me a call for remote IT support :).

She explahed her PC was unable to boot normally and in order to have some Windows she ended in Safe-Mode with Networking state. This problems caused her business losses as during PC in Safe mode the screen resolution even though with networking and she couldn't use the flight ticket ordering systems  to purchase her customers new tickets.  I've earlier installed TeamViewr on her PC so after Logging on the PC, I've immediately realized the Hard Disk was almost full (less than 1Giga free on C: Drive – where Windows install lived)

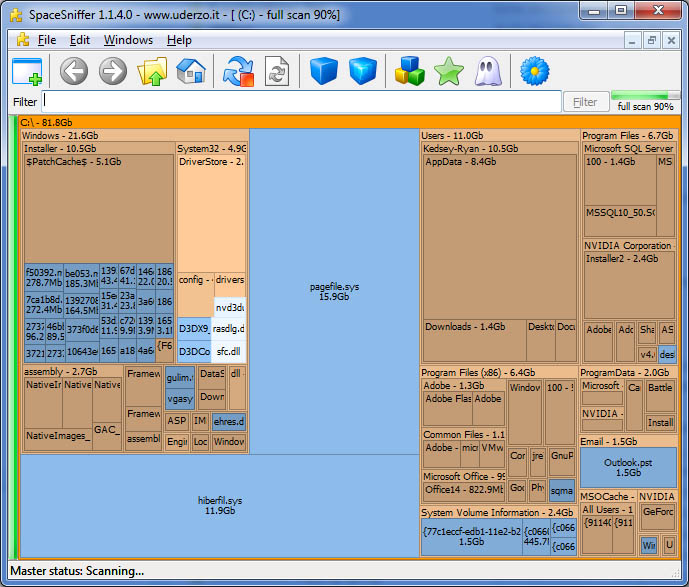
After a thorough investigation on which directory is occupying most of disk space (110GB) with a nice program called SpaceSniffer which is perfect for finding lost space on your hard disks, I've found System for ticket reservation Amadeus CRS (Computer Reservation System) was causing the disk full-full troubles.

spacesniff-visualize-disk-data-in-windows-nice-check-large-directories

I've found troubling directory  was:

C:Users\goodfaithair\AppData\Local\Microsoft\Windows\Temporary Internet Files\Content.IE5

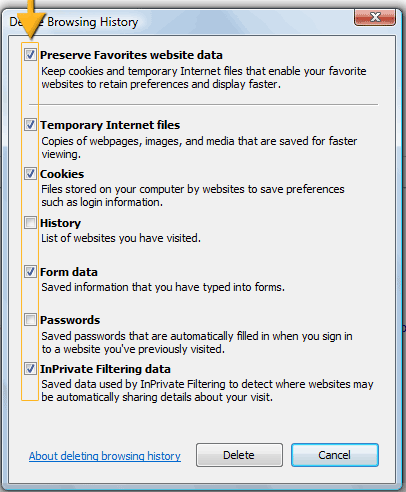
To solve it I first tried to Clean up Internet Explorer Cache (I've checked ticks Temporary Internet files, Cookies, History, Download History, Form Data, InPrivate Filtering Data).

clean-up-Microsoft-Internet-Explorer-browser-cache-IE-7-8-9-10-11

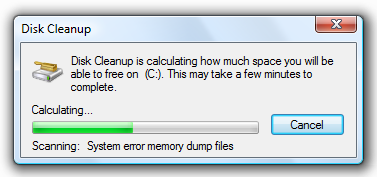
Then I used Microsoft Windows embedded clean manager (cleanmgr.exe) to run disk clean up, however Desk Clean Up managed to clear up only about 1Giga and on the computer HDD which is 150Gb still on Windows installation drive C: only 1.5GB were free.
diskcleanup-ms-windows-7-8-screenshot-free-disk-space-tool
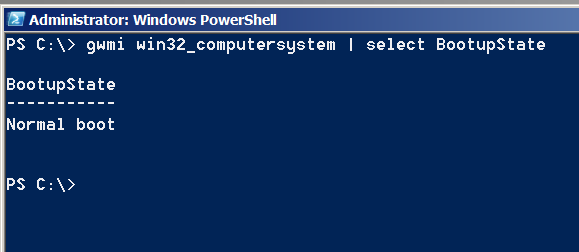
Besides that the system was having a second trouble as there were some failed updates (Computer was not shutdown properly but shutdown during Windows Update) and this was making the machine to enter Safe-Mode, I was fixing the system over TeamViewer session so after restart I had no way to see if Windows boots Normal or Safe-Mode after restart, thus to find out whether Windows was in Safe-Mode after another restart I've used below PowerShell one-liner script:

check-whether-windows-is-working-in-safe-mode-gwmi-powershell-screenshot

PS C:> gwmi win32_computersystem | select BootupState

BootupState
———–
Fail-safe with network boot

Note that possible return results from above command are:

Normal boot
Fail-safe boot
Fail-safe with network boot

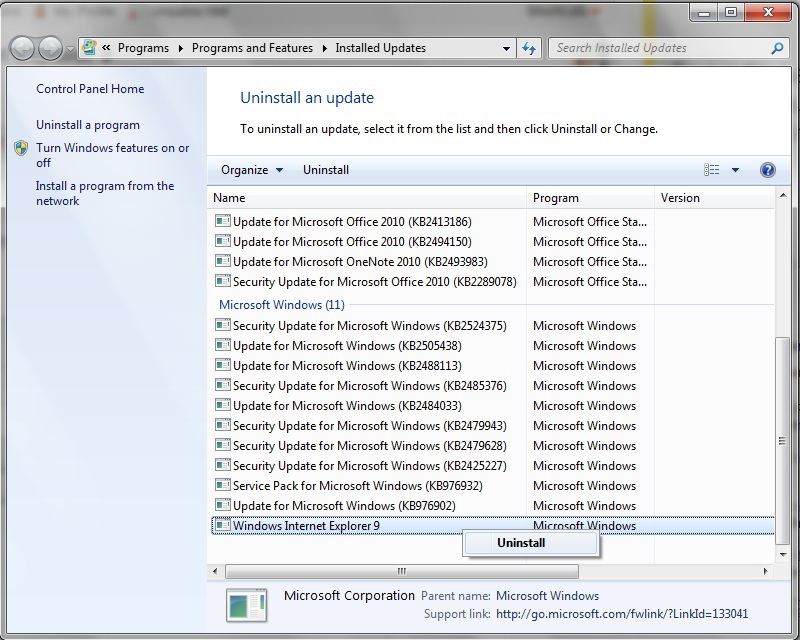
I've been struggling for a while (had to restart it multiple times) until finally I managed to make it boot in normal mode. Because PC was failing to apply some Windows Update, thus dropping by in Safe-Mode each time. To solve that I had to go and Delete two of the last Applied updates (KB2979xxxx files).
 

Control Panel ->  Program and Features -> View Installed Updates


MS-Windows-7-8-9-uninstall-updates-Patches-Control_Panel_screenshot_fix_unbootable_problems-because-updates
I've restarted and since I couldn't see the screen on Windows boot-time, I don't know what really happened but the PC booted again in Safe-Mode, and I thought the classical way to fix PC booting in Safe-Mode with SFC command will help:

C:> sfc /scannow

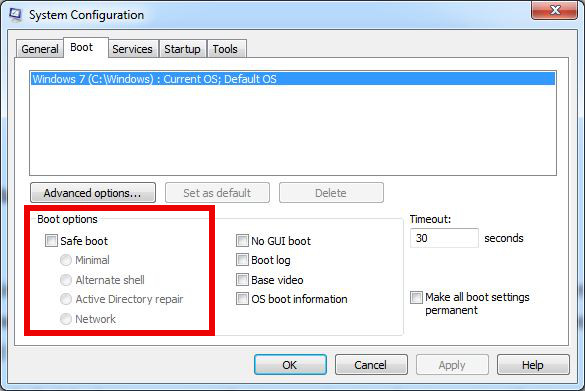
but for my surprise this helped not as the system continuously booted in Safe-Mode, to fix the Windows PC always booting to Safe-Mode, I had to change it running msconfig and unticking Safe Mode field

C:> msconfig

windows-always-booting-to-safe-mode-fix-howto-services-msc-screenshot

Then I tried to delete Temporary Internet Files with below DEL cmd line
 

C:> del "C\:Users\MyName\AppData\Local\Microsoft\Windows\Temporary Internet Files*.*"


To finally succeeding in manually delete huge Temporary Internet FilesContent.IE5 folder, I had to use good old RD (Remove Directory) command.


C:> RD "C:Users\username\AppData\Local\Microsoft\Windows\Temporary Internet Files\Content.IE5" /Q /S

I used also following dels command to delete other common locations where Windows stores temporary files

For those who like to batch DeletingTemporary Internet Files and most common Temp locations to be cleaned on Windows boot I recommend you schedule a start of (clean-temporary-internet-files-content_ie5_folder.bat) on every PC boot.

To Clean-up other common Temporary file locations that could take you disk space the command line way run in new Administarator privileged command prompt:
 

cls
cleanmgr /sageset:99
del /F /S /Q "%systemroot%temp*.*"
del /F /S /Q "%systemroot%Prefetch*.*"
del /F /S /Q "C:Documents and SettingsDefault UserLocal SettingsTemporary Internet FilesContent.IE5*.*"
del /F /S /Q "C:Documents and SettingsDefault UserLocal SettingsTemp*.*"
del /F /S /Q "C:Documents and SettingsDefault UserLocal SettingsHistory*.*"
 
del /F /S /Q "C:Documents and Settings%UserName%Local SettingsTemporary Internet FilesContent.IE5*.*"
del /F /S /Q "C:Documents and Settings%UserName%Local SettingsTemp*.*"
del /F /S /Q "C:Documents and Settings%UserName%Local SettingsHistory*.*"
 
del /F /S /Q "C:Documents and Settings%UserName%Local SettingsApplication DataTemp*.*"
del /F /S /Q "C:Documents and Settings%UserName%Local SettingsApplication DataTemporary Internet FilesContent.IE5
*.*"
 
del /F /S /Q "C:AppDataLocalMicrosoftWindowsHistory*. *"
del /F /S /Q "C:AppDataLocalMicrosoftWindowsTemporary Internet FilesContent.IE5*.*"
del /F /S /Q "C:AppDataLocalMicrosoftWindowsTemporary Internet FilesLowContent.IE5*.*"
del /F /S /Q "C:AppDataLocalMicrosoftWindowsTemporary Internet FilesTemporary Internet FilesContent.IE5*.*"
del /F /S /Q "C:AppDataLocalMicrosoftWindowsTemporary Internet FilesTemporary Internet FilesLowContent.IE5*.*"
 
del /F /S /Q "C:Users%UserName%AppDataLocalTemp*.*"
del /F /S /Q "C:Temp*.*"
del /F /S /Q "C:Users%UserName%AppDataLocalMicrosoftW indo wsTemporary Internet FilesLowContent.IE5*.*
del /F /S /Q "C:Users%UserName%AppDataLocalMicrosoftW indo wsHistory*.*
 
 
::Rem: No need to duplicate the following section for each registered User
del /F /S /Q "%homepath%Cookies*.*"
del /F /S /Q "%homepath%recent*.*"
del /F /S /Q "%homepath%Local Settingscookies*.*"
 
del /F /S /Q "%homepath%Local SettingsHistory*.*"
del /F /S /Q "%homepath%Local SettingsTemp*.*"
del /F /S /Q "%homepath%Local SettingsTemporary Internet FilesContent.IE5*.*"
 
cleanmgr /sagerun:99

Note that in some cases running above commands might left you loose some sensitive data and in case where Internet is slow cleaning temporary files, might have impact on surfing also you will loose your history so be sure you know what you're doing as you might loose sensitive data.

Finally I've run MalwareBytes to clean up the PC slowness caused by Spyware and other left Malware I've run MalwareBytes, RogueKiller, AdwCleaner, RKill, TDSSKiller in order and I found and removed few Malwares as well.

That's all, hope you learned something new. Enjoy!
 

Check your Server Download / Upload Internet Speed from Console on Linux / BSD / Unix howto

Tuesday, March 17th, 2015

tux-check-internet-network-download-upload-speed-on-linux-console-terminal-linux-bsd-unix
If you've been given a new dedicated server from a New Dedicated-Server-Provider or VPS with Linux and you were told that a certain download speed to the Server is guaranteed from the server provider, in order to be sure the server's connection to the Internet told by service provider is correct it is useful to run a simple measurement console test after logging in remotely to the server via SSH.

Testing connection from Terminal is useful because as you probably know most of Linux / UNIX servers doesn't have a GUI interface and thus it is not possible to test Internet Up / Down Bandwidth through speedtest.net.
 

1. Testing Download Internet Speed given by ISP / Dedi-Server Provider from Linux Console

For the download speed (internet) test the historical approach was to just try downloading the Linux kernel source code from www.kernel.org with some text browser such as lynx or links count the seconds for which the download is completed and then multiple the kernel source archive size on the seconds to get an approximate bandwidth per second, however as nowdays internet connection speeds are much higher, thus it is better to try to download some Linux distribution iso file, you can still use kernel tar archive but it completed too fast to give you some good (adequate) statistics on Download bandwidth.

If its a fresh installed Linux server probably you will probably not have links / elinks and lynx text internet browers  installed so install them depending on deb / rpm distro with:

If on Deb Linuz distro:


root@pcfreak:/root# apt-get install –yes links elinks lynx


On RPM Based Linuz distro:


[root@fedora ~]# yum install -y lynx elinks links


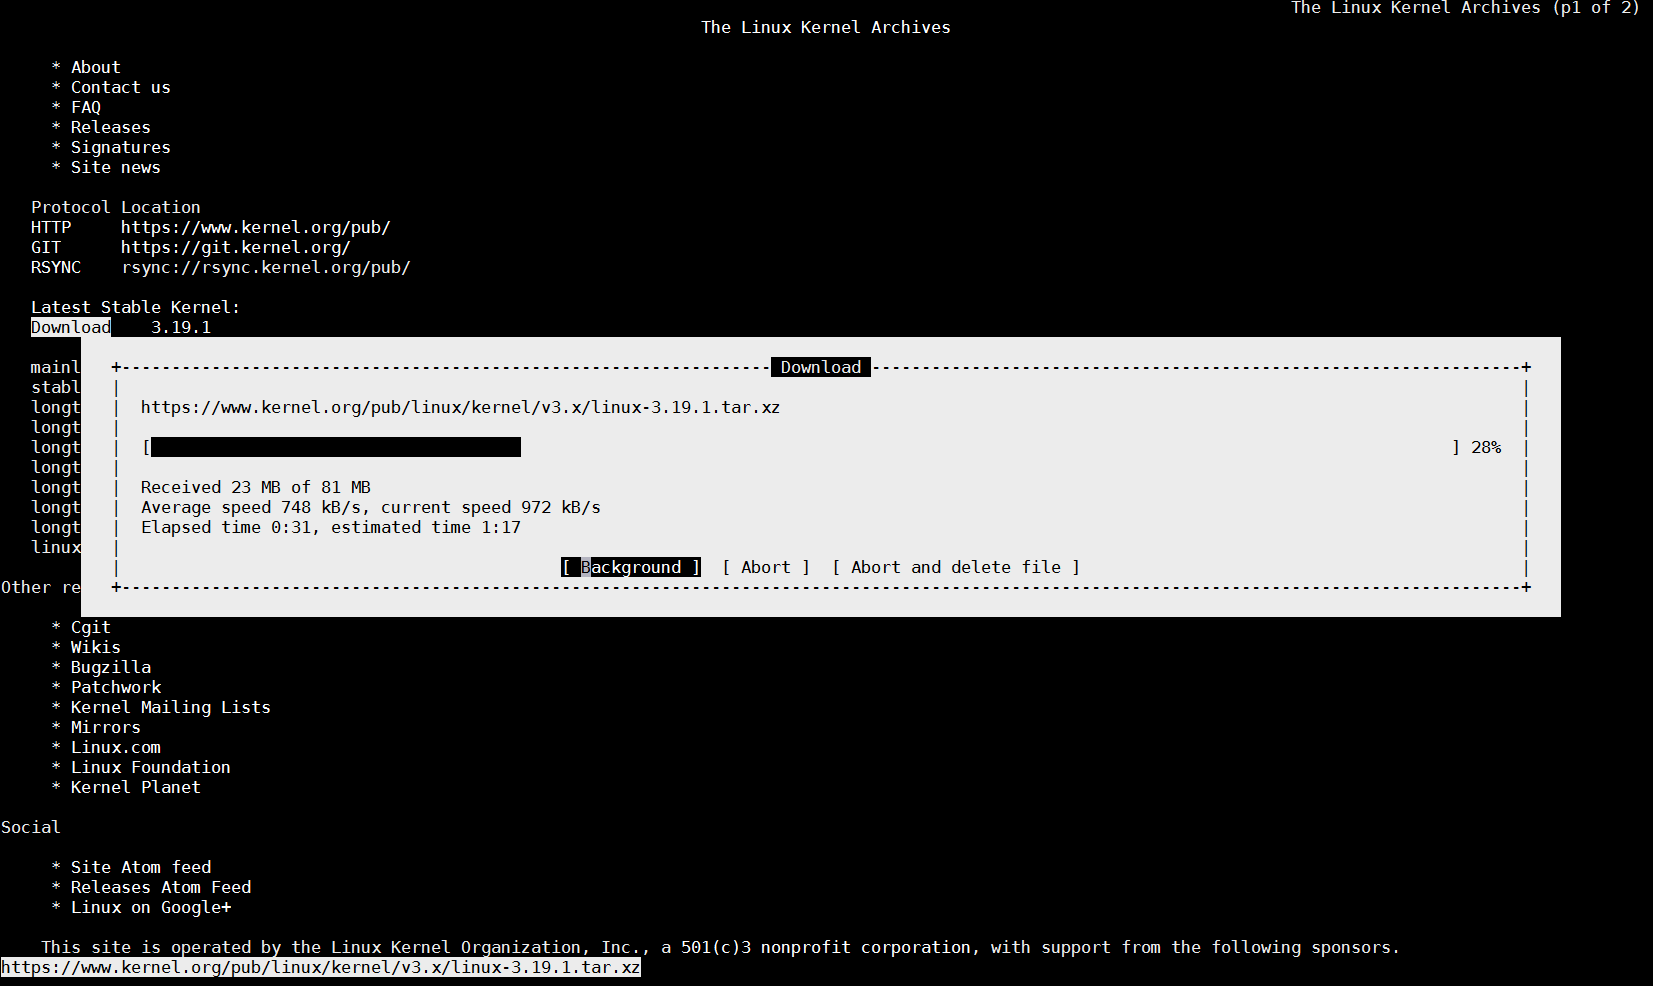
Conduct Internet  Download Speed with links
root@pcfreak:/root# links https://www.kernel.org/pub/linux/kernel/v3.x/linux-3.19.1.tar.xz

check_your_download_speed-from-console-linux-with-links-text-browser

(Note that the kernel link is current latest stable Kernel source code archive in future that might change, so try with latest archive.)

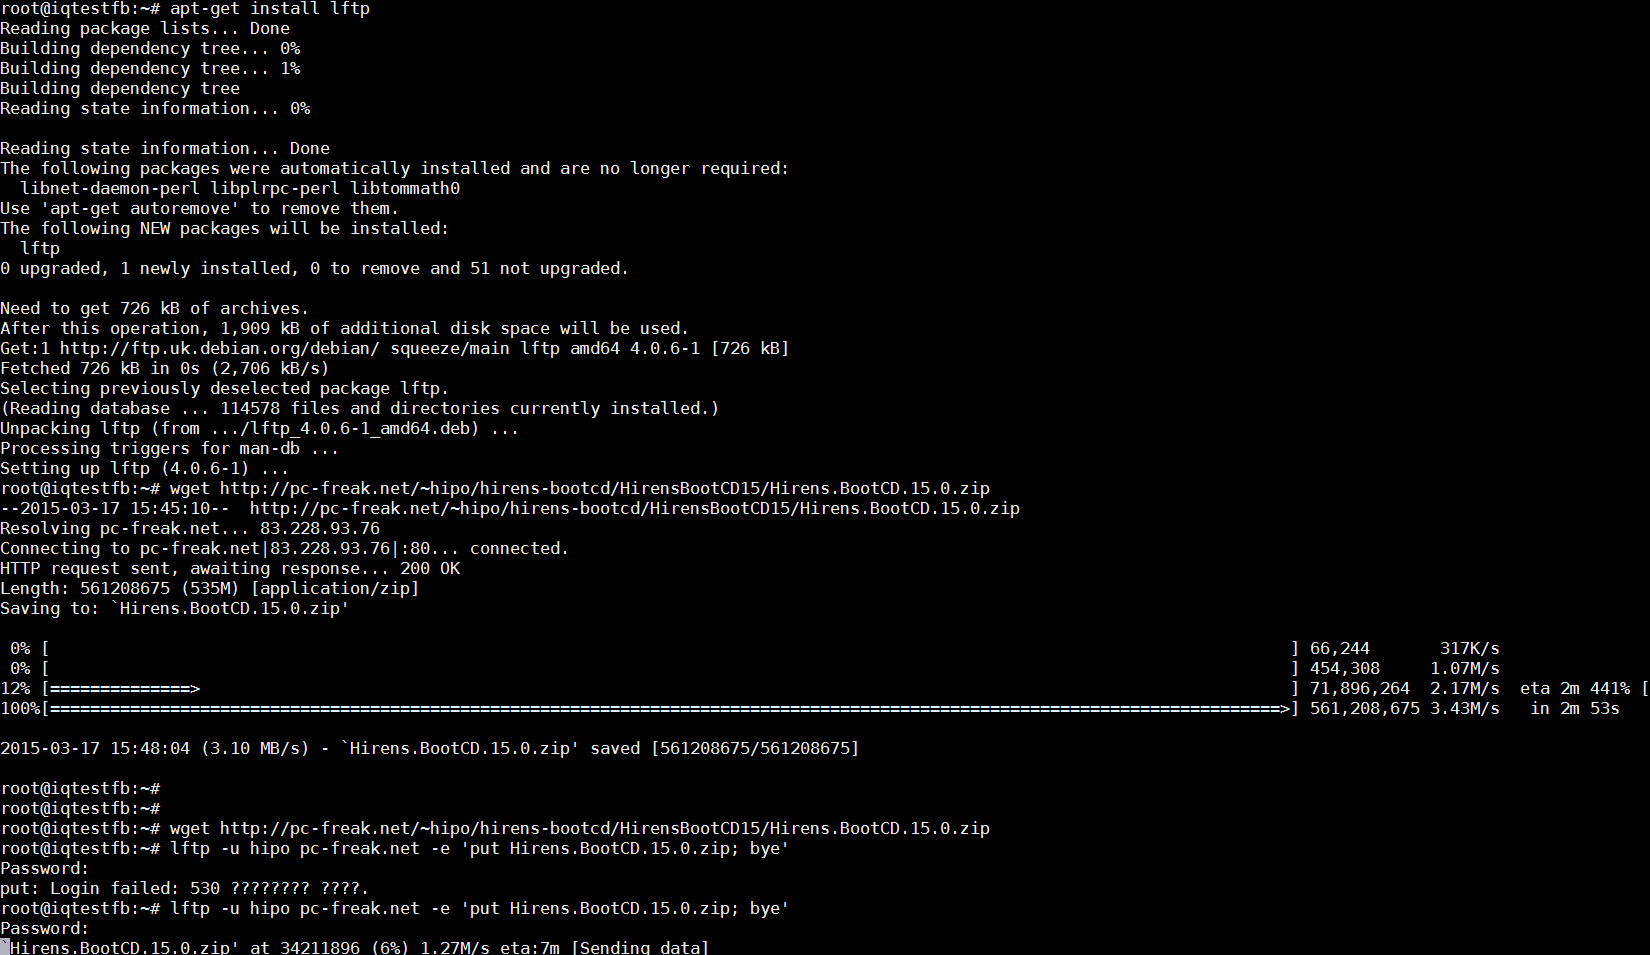
You can also use non-interactive tool such as wget curl or lftp to measure internet download speed

To test Download Internet Speed with wget without saving anything to disk set output to go to /dev/null 


root@pcfreak:~# wget -O /dev/null https://www.pc-freak.net//~hipo/hirens-bootcd/HirensBootCD15/Hirens.BootCD.15.0.zip


check_bandwidth_download-internet-speed-with-wget-from-console-non-interactively-on-linux

You see the Download speed is 104 Mbit/s this is so because I'm conducting the download from my local 100Mbit network.

For the test you can use my mirrored version of Hirens BootCD

2. Testing Uplink Internet speed provided by ISP / Server Provider from Linux (SSH) Console

To test your uplink speed you will need lftp or iperf command tool.


root@pcfreak:~# apt-cache show lftp|grep -i descr -A 12
Description: Sophisticated command-line FTP/HTTP client programs
 Lftp is a file retrieving tool that supports FTP, HTTP, FISH, SFTP, HTTPS
 and FTPS protocols under both IPv4 and IPv6. Lftp has an amazing set of
 features, while preserving its interface as simple and easy as possible.
 .
 The main two advantages over other ftp clients are reliability and ability
 to perform tasks in background. It will reconnect and reget the file being
 transferred if the connection broke. You can start a transfer in background
 and continue browsing on the ftp site. It does this all in one process. When
 you have started background jobs and feel you are done, you can just exit
 lftp and it automatically moves to nohup mode and completes the transfers.
 It has also such nice features as reput and mirror. It can also download a
 file as soon as possible by using several connections at the same time.


root@pcfreak:/root# apt-cache show iperf|grep -i desc -A 2
Description: Internet Protocol bandwidth measuring tool
 Iperf is a modern alternative for measuring TCP and UDP bandwidth performance,
 allowing the tuning of various parameters and characteristics.


To test Upload Speed to Internet connect remotely and upload any FTP file:


root@pcfreak:/root# lftp -u hipo www.pc-freak.net -e 'put Hirens.BootCD.15.0.zip; bye'


uploading-file-with-lftp-screenshot-test-upload-internet-speed-linux

On Debian Linux to install iperf:


root@pcfreak:/root# apt-get install –yes iperf


On latest CentOS 7 and Fedora (and other RPM based) Linux, you will need to add RPMForge repository and install with yum


[root@centos ~]# rpm -ivh  rpmforge-release-0.5.3-1.el7.rf.x86_64.rpm

[root@centos ~]# yum -y install iperf


Once having iperf on the server the easiest way currently to test it is to use
serverius.net speedtest server –  located at the Serverius datacenters, AS50673 and is running on a 10GE connection with 5GB cap.


root@pcfreak:/root# iperf -c speedtest.serverius.net -P 10
————————————————————
Client connecting to speedtest.serverius.net, TCP port 5001
TCP window size: 16.0 KByte (default)
————————————————————
[ 12] local 83.228.93.76 port 54258 connected with 178.21.16.76 port 5001
[  7] local 83.228.93.76 port 54252 connected with 178.21.16.76 port 5001
[  5] local 83.228.93.76 port 54253 connected with 178.21.16.76 port 5001
[  9] local 83.228.93.76 port 54251 connected with 178.21.16.76 port 5001
[  3] local 83.228.93.76 port 54249 connected with 178.21.16.76 port 5001
[  4] local 83.228.93.76 port 54250 connected with 178.21.16.76 port 5001
[ 10] local 83.228.93.76 port 54254 connected with 178.21.16.76 port 5001
[ 11] local 83.228.93.76 port 54255 connected with 178.21.16.76 port 5001
[  6] local 83.228.93.76 port 54256 connected with 178.21.16.76 port 5001
[  8] local 83.228.93.76 port 54257 connected with 178.21.16.76 port 5001
[ ID] Interval       Transfer     Bandwidth
[  9]  0.0-10.2 sec  4.05 MBytes  3.33 Mbits/sec
[ 10]  0.0-10.2 sec  3.39 MBytes  2.78 Mbits/sec
[ 11]  0.0-10.3 sec  3.75 MBytes  3.06 Mbits/sec
[  4]  0.0-10.3 sec  3.43 MBytes  2.78 Mbits/sec
[ 12]  0.0-10.3 sec  3.92 MBytes  3.18 Mbits/sec
[  3]  0.0-10.4 sec  4.45 MBytes  3.58 Mbits/sec
[  5]  0.0-10.5 sec  4.06 MBytes  3.24 Mbits/sec
[  6]  0.0-10.5 sec  4.30 MBytes  3.42 Mbits/sec
[  8]  0.0-10.8 sec  3.92 MBytes  3.03 Mbits/sec
[  7]  0.0-10.9 sec  4.03 MBytes  3.11 Mbits/sec
[SUM]  0.0-10.9 sec  39.3 MBytes  30.3 Mbits/sec


You see currently my home machine has an Uplink of 30.3 Mbit/s per second, that's pretty nice since I've ordered a 100Mbits from my ISP (Unguaranteed Bandwidth Connection Speed) and as you might know it is a standard practice for many Internet Proviers to give Uplink speed of 1/4 from the ISP provided overall bandwidth 1/4 would be 25Mbi/s, meaning my ISP (Bergon.NET) is doing pretty well providing me with even more than promised (ordered) bandwidth.

Iperf is probably the choice of most sysadmins who have to do regular bandwidth in local networks speed between 2 servers or test  Internet Bandwidth speed on heterogenous network with Linux / BSDs / AIX / HP-UX (UNIXes). On HP-UX and AIX and other UNIXes for which iperf doesn't have port you have to compile it yourself.

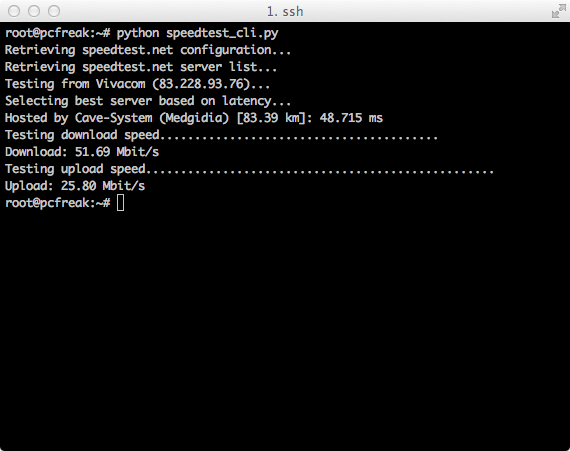
If you don't have root /admin permissions on server and there is python language enterpreter installed you can use speedtest_cli.py script to test internet throughput connectivity
speedtest_cli uses speedtest.net to test server up / down link just in case if script is lost in future I've made ownload mirror of speedtest_cli.py is here

Quickest way to test net speed with speedtest_cli.py:


$ lynx -dump https://raw.github.com/sivel/speedtest-cli/master/speedtest_cli.py > speedtest_cli.py
$ chmod +x speedtest_cli.py
python speedtest_cli.py

speedtest_cli_pyhon_script_screenshot-on-gnu-linux-test-internet-network-speed-on-unix

Install Google Chrome Web Browser Chrome on 32 and 64 bit Debian Lenny and Squeeze/Sid Linux

Sunday, July 25th, 2010

Linux Tux Google Chrome

I’ve decided to write a short post on how to install in a quick manner Google Chrome on Debian GNU/Linux.

There are few reasons why you would consider installing Chrome, however the most obvious one is is the browser speed.
I should admit the browsing experience with Chrome looks and feels far better compared to Iceweasel (e.g. Firefox) on Debian.
It could be that web loading speed performance with Epiphany or Opera is similar to Chrome in terms of velocity, apart from the faster browser experience with Google Chrome, I’ve seen reports online that sometimes Google Chrome behaves better when it comes to multimedia audio and video streams online.

Another thing I notice in Google Chrome is that it’s generally much lighter and loads the base browser times faster than Iceweasel.

The most accurate way to install Chrome on Debian Linux is using Google Linux repositories

So to install add to your /etc/apt/sources.list the following google linux repo

# Google software repository
deb http://dl.google.com/linux/deb/ stable non-free main

e.g.

debian-deskop:~# echo "deb http://dl.google.com/linux/deb/ stable non-free main" >> /etc/apt/sources.list

Then update your repositories list with apt-get:

debian-desktop:~# apt-get update

Next choose your google chrome preferred release between the available (beta, stable and unstrable) version.
I’ve chose to install the Google Chrome stable release apt-getting it like shown below

debian-desktop:~# apt-get install google-chrome-stable

Now the google chrome will be ready to use to start using it either start it up from the Gnome / KDE Menus or exec the command:

debian-desktop:~$ google-chrome

So far so good, you will have now a gnome browser, however what is really irritating is the default behaviour of the chrome install by default it tampers with the default browser configured for my whole Linux desktop system in other words it automatically links:

/etc/alternatives/gnome-www-browser to -> /usr/bin/google-chrome as well as,
/etc/alternatives/x-www-browser to -> /usr/bin/google-chrome

Well I wasn’t happy with that unwarranted install behaviour of Google Chrome therefore I decided to reverse my default Gnome and System Browser back to Epiphany.

First I removed the links to /usr/bin/google-chrome

debian-desktop:~# rm -f /etc/alternatives/gnome-www-browser
debian-desktop:~# rm -f /etc/alternatives/x-www-browser

And thereafter I linked it back to Epiphany

debian-desktop:~# ln -sf /usr/bin/epiphany /etc/alternatives/gnome-www-browser
debian-desktop:~# ln -sf /usr/bin/epiphany /etc/alternatives/x-www-browser

35 years passed since first Bulgarian Аstronaut visited open space (cosmos)

Thursday, April 10th, 2014


soyuz-33_spaceship_pad
On 10th of April 1976 in 20:34 mins Moscow time from Boikonur Cosmodrome was launched s spaceship "Souyz-33 / Union-33" . On spacecraft flies 3 cosmonauts part of the space program Inter-cosmos, one of which is the Bulgarian cosmonaut and explorer Georgi Ivanov. Georgi Ivanov became the first Bulgarian who the leave planet earth, becoming the first space visitor with Bulgarian nationality.

Georgi_Ivanov_first-Bulgarian-cosmonaut

Ivanov spend in space 1 day 23 hours and 1 minute, after that the capsule landed in 320 km south-easy from Jezkazgan (Khazakhstan).
For his short stay in space in Earth's orbit Ivanov made 31 full turns around Planet Earth. With his flight to space Bulgaria joined the elite club of  "austranaut nations", making Bulgaria the sixth nation in world who sent representative in space.

syiuz-33-mission-logo-stamp

Flight mission's goal was linkage of their spaceship with orbital station "Salute-6" but because of technical malfunction "Syiuz 33"s moving with higher than forecasted and speed autoamtic correction system turns on which damages part of fuel camera, making necessary to cancel the flight.

Georgi-Ivanov-cosmonaut-with-russian-colleague-soyuz

Returning home on Earth he was awarded with medals "Hero of the USSR" and "Hero of Republic Bulgaria"
Nevertheless the mission was unsuccesful and dangerous Ivanov's pulse during all flight kept normal.

Georgi Ivanov is born in Lovech on 2-nd of July 1940 in family of Anastasia Kakalova and Ivan Ivanov Kakalov.During his school years he excercised parachutism, graduating in high-school "Todor Kirkov" Lovech in 1958.

Ivanov entered Bulgarian army in 1958 graduated Military school in Dolna Mitropolia (1964) with specialty of flight engineer and a pilot of class 1.
He served in Bulgarian National Army as a pilot, senior pilot, commander  and a squadron commander. In 1984 he defended his thesis and received a science degree "candidate of physics sciences". Georgi Ivanov is currently 73 years old. Nowadays Ivanov's birthouse in qr. "Varosha" is of historical importance and is preserved as a museum.

The fact that we Bulgarians have a cosmonaut is a great pride for me and all of us Bulgarians. Let us not forget our heroes and patriots and know our history.

Best Windows tools to Test (Benchmark) Hard Drives, SSD Drives and RAID Storage Controllers

Wednesday, April 23rd, 2014

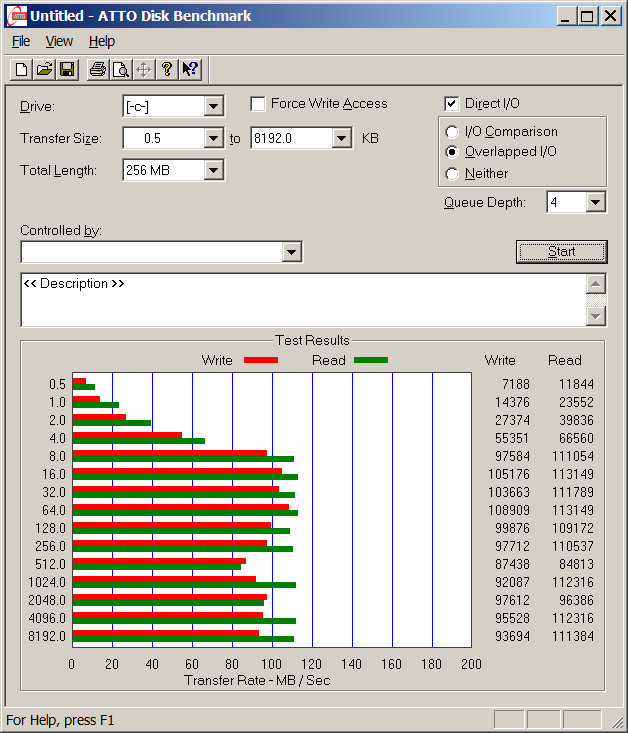
atto-windows-hard-disk-benchmark-freeware-tool-screenshot-check-hard-disk-speed-windows
Disk Benchmarking is very useful for people involved in Graphic Design, 3D modelling, system admins  and anyone willing to squeeze maximum of his PC hardware.

If you want to do some benchmarking on newly built Windows server targetting Hard Disk performance, just bought a new hard SSD (Solid State Drives) and you want to test how well Hard Drive I/O operations behave or you want to see a regular HDD benchmarking of group of MS Windows PCs and plan hardware optiomization, check out ATTO Disk Benchmark.

So why exactly ATTO Benchmark? – Cause it is one of the best Windows Free Benchmark tools on the internet.

ATTO is a widely-accepted Disk Benchmark freeware utility to help measure storage system performance. ATTO though being freeware is among top tools utilized in industry. It is very useful in comparing different Hard Disk vendors speed, measure Windows storage systems performance with various transfer sizes and test lengths for reads and writes.

ATTO Disk Benchmark is used by manufacturers of Hardware RAID controllers, its precious tool to test Windows storage controllers, host bus adapters (HBAs).

Here is ATTO Benchmark tool specifications (quote from their webstie):
 

  • Transfer sizes from 512KB to 8MB
  • Transfer lengths from 64KB to 2GB
  • Support for overlapped I/O
  • Supports a variety of queue depths
  • I/O comparisons with various test patterns
  • Timed mode allows continuous testing
  • Non-destructive performance measurement on formatted drives
  • Transfer sizes from 512KB to 8MB
  • Transfer lengths from 64KB to 2GB
  • Support for overlapped I/O
  • Supports a variety of queue depths
  • I/O comparisons with various test patterns
  • Timed mode allows continuous testing
  • Non-destructive performance measurement on formatted drives
  • – See more at: http://www.attotech.com/disk-benchmark/#sthash.rRlgSTOE.dpuf

Here is mirrored latest version of ATTO Disk for Download. Once you get your HDD statistics you will probably want to compare to other people results. On  TomsHardware's world famous Hardware geek site there are plenty of Hard Drives performance Charts

Of course there are other GUI alternatives to ATTO Benchmark one historically famous is NBench

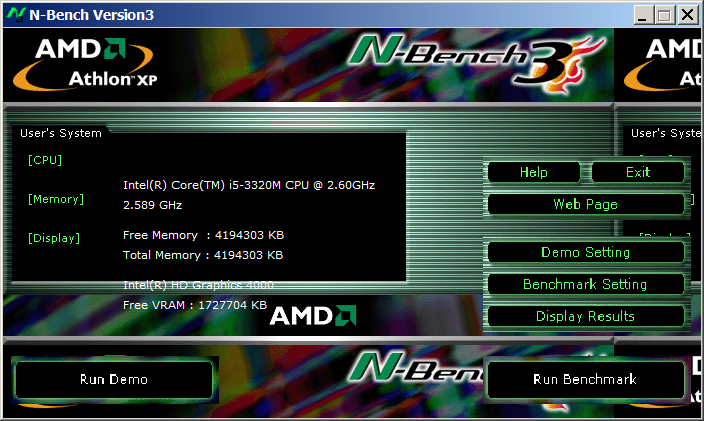
NBench

nbench_benchmark_windows_hard-drive-cpu-and-memory

Nbench is nice little benchmarking program for Windows NT. Nbench reports the following components of performance:

CPU speed: integer and floating operations/sec
L1 and L2 cache speeds: MB/sec
main memory speed: MB/sec
disk read and write speeds: MB/sec

SMP systems and multi-tasking OS efficiency can be tested using up to 20 separate threads of execution.

For Console Geeks or Windows server admins there are also some ports of famous *NIX Hard Disk Benchmarking tools:

NTiogen

NTiogen benchmark was written by Symbios Logic, It's Windows NT port of their popular UNIX benchmark IOGEN. NTIOGEN is the parent processes that spawns the specified number of IOGEN processes that actually do the I/O.
The program will display as output the number of processes, the average response time, the number of I/O operations per second, and the number of KBytes per second. You can download mirror copy of Ntiogen here


There are plenty of other GUI and Console HDD Benchmarking Win Tools, i.e.:

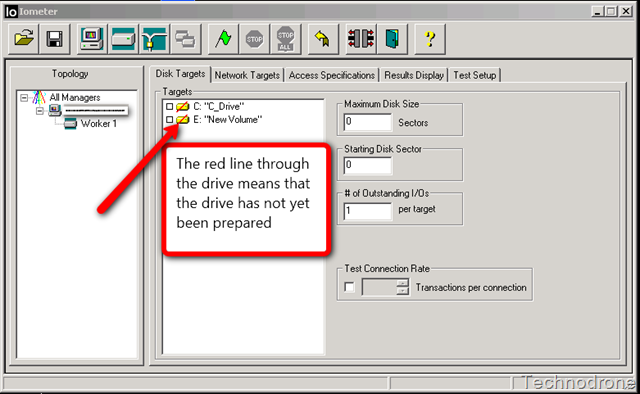
IOMeter (ex-developed by Intel and now abandoned available as open source available on SourceForge)

iometer-benchmark-disk-storage-speed-windows
 

Bench32 – Comprehensive benchmark that measures overall system performance under Windows NT or Windows 95, now obsolete not developed anymore abandoned by producer company.

ThreadMark32 – capable of bench (ex developed and supported by ADAPTEC) but also already unsupported

IOZone – filesystem benchmark tool. The benchmark generates and measures a variety of file operations. Iozone has been ported to many machines and runs under many operating systems.
 

N! B! Important note to make here is above suggested tools will provide you more realistic results than the proprietary vendor tools shipped by your hardware vendor. Using proprietary software produced by a single vendor makes it impossible to analyze and compare different hardwares, above HDD benchmarking tools are for "open systems", e.g. nomatter what the hardware producer is produced results can be checked against each other.
Another thing to consider is even though if you use any of above tools to test and compare two storage devices still results will be partially imaginary, its always best to conduct tests in Real Working Application Environments. If you're planning to launch a new services structure always test it first and don't rely on preliminary returned soft benchmarks.

if you know some other useful benchmarking software i'm missing please share.

Linux: How to see / change supported network bandwidth of NIC interface and get various eth network statistics with ethtool

Monday, January 19th, 2015

linux-how-to-see-change-supported-network-bandwidth-of-NIC-interface-and-view-network-statistics
If you're a novice Linux sysadmin and inherited some dedicated servers without any documentation and hence on of the first things you have to do to start a new server documentation is to check the supported TCP/IP network speed of servers Network (ethernet) Interfaces. On Linux this is very easy task to verify the speed of LAN card supported Local / Internet traffic install ethtool (if not already preseont on the servers) – assuming you're dealing with Debian / Ubuntu Linux servers.

1. Install ethtool on Deb and RPM based distros

dedi-server1:~# apt-cache show ethtool|grep -i desc -A 3
Description: display or change Ethernet device settings
 ethtool can be used to query and change settings such as speed, auto-
 negotiation and checksum offload on many network devices, especially
 Ethernet devices.

dedi-server1:~# apt-get install –yes ethtool
..

ethtool should be installed by default on CentOS / Fedora / RHEL and  syntax is same like on Debs. If you happen to miss ethtool on any (SuSE) / RedHat / RPM based distro install it with yum

[root@centos:~] # yum -y install ethtool


2. Get ethernet configurations

To check the current eth0 / eth1 / ethX network (Speed / Duplex) and other network related configuration configuration:
 

dedi-server5:~# ethtool eth0

Settings for eth0:
        Supported ports: [ TP ]
        Supported link modes:   10baseT/Half 10baseT/Full
                                100baseT/Half 100baseT/Full
                                1000baseT/Full
        Supports auto-negotiation: Yes
        Advertised link modes:  10baseT/Half 10baseT/Full
                                100baseT/Half 100baseT/Full
                                1000baseT/Full

        Advertised pause frame use: No
        Advertised auto-negotiation: Yes
        Speed: 1000Mb/s
        Duplex: Full
        Port: Twisted Pair
        PHYAD: 1
        Transceiver: internal
        Auto-negotiation: on
        MDI-X: off
        Supports Wake-on: pumbag
        Wake-on: g
        Current message level: 0x00000001 (1)
        Link detected: yes

Having a NIC configured to act as Duplex is very important as Duplex communication enables LAN card to communicate both sides (Sent / Receive) packets simultaneously.
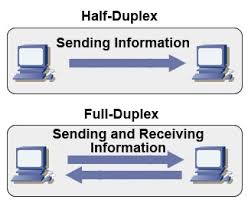
full-duplex-half-duplex-explained-picture

Probably most interesting parameters for most admins are the ones that are telling whether the NIC UpLink is 10megabyte / 100 megabyte or 1Gigabyte as well as supported Receive / Send ( Transfer ) speeds of LAN, a common useful ethtool admin use to just show current LAN ethernet interface speed:

server-admin1:~# ethtool eth0 |grep -i speed
        Speed: 1000Mb/s


To get info about NIC (kernel module / driver) used with ethtool:

dedi-server3:~# ethtool -i eth0 driver: e1000e
version: 1.2.20-k2
firmware-version: 1.8-0
bus-info: 0000:06:00.0

3. Make LAN Card blink to recognize eth is mapped to which Physical LAN

Besides that ethtool has many other useful use cases, for example if you have a server with 5 lan or more LAN cards, but you're not sure to which of all different EthX interfaces correspond, a very useful thing is to make eth0, eth1, eth2, eth3, etc. blink for 5 seconds in order to identify which static IP is binded physically to which NIC , here is how:

ethtool -p eth0 5


Then you can follow the procedure for any interface on the server and map them with a sticker 🙂

Ethtool is also useful for getting "deep" (thorough) statistics on Server LAN cards, this could be useful to identify sometimes hard to determine broadcast flood attacks:
 

4. Get network statistics with ethtool for interfaces
 

dedi-server5:~# ethtool -S eth0|grep -vw 0
NIC statistics:
     rx_packets: 6196644448
     tx_packets: 7197385158
     rx_bytes: 2038559235701
     tx_bytes: 8281206569250
     rx_broadcast: 357508947
     tx_broadcast: 172
     rx_multicast: 34731963
     tx_multicast: 20
     rx_errors: 115
     multicast: 34731963
     rx_length_errors: 115
     rx_no_buffer_count: 26391
     rx_missed_errors: 10059
     tx_timeout_count: 3
     tx_restart_queue: 2590
     rx_short_length_errors: 115
     tx_tcp_seg_good: 964136993
     rx_long_byte_count: 2038559235701
     rx_csum_offload_good: 5824813965
     rx_csum_offload_errors: 42186
     rx_smbus: 383640020

5. Turn on Auto Negotiation and change NIC set speed to 10 / 100 / 1000 Mb/s

Auto-negotiation is important as an ethernet procedure by which two communication devices (2 network cards) choose common transmission parameters such as speed, duplex mode, and flow control in order to achieve maximum transmission speed over the network. On 1000BASE-T basednetworks the standard is a mandatory. There is also backward compatability for older 10BASE-T Networks.

a) To raise up NIC to use 1000 Mb/s in case if the bandwidth was raised to 1Gb/s but NIC settings were not changed:

dedi-server1:~# ethtool -s eth0 speed 1000 duplex half autoneg off


b) In case if LAN speed has to be reduced for some weird reason to 10 / 100Mb/s


dedi-server1:~# ethtool -s eth0 speed 10 duplex half autoneg off

dedi-server1:~# ethtool -s eth0 speed 100 duplex half autoneg off

c) To enable disable NIC Autonegotiation:

dedi-server1:~# ethtool -s eth0 autoneg on


6. Change Speed / Duplex settings to load on boot

a) Set Network to Duplex on Fedora / CentOS etc.

Quickest way to do it is of course to use /etc/rc.local. If you want to do it following distribution logic on CentOS / RHEL Linux:

Add to /etc/sysconfig/network-scripts/ifcfg-eth0

vim /etc/sysconfig/network/-scripts/ifcfg-eth0

ETHTOOL_OPTS="speed 1000 duplex full autoneg off"

To load the new settings restart networking (be careful to have physical access to server if something goes wrong 🙂 )

service network restart

b) Change network speed / duplex setting on Debian / Ubuntu Linux

Add at the end of /etc/network/interfaces

vim /etc/network/interfaces

post-up ethtool -s eth0 speed 100 duplex full autoneg off

7. Tune NIC ring buffers

dedi-server1:~# ethtool -g eth0

Ring parameters for eth0:
Pre-set maximums:
RX:             4096
RX Mini:        0
RX Jumbo:       0
TX:             4096
Current hardware settings:
RX:             256
RX Mini:        0
RX Jumbo:       0
TX:             256

As you can see the default setting of RX (receive) buffer size is low 256 and on busy servers with high traffic loads, depending on the hardware NIC vendor this RX buffer size varies.
Through increasing the Rx/Tx ring buffer size , you can decrease the probability of discarding packets in the NIC during a scheduling delay.
A change in rx buffer ring requires NIC restart so (be careful not to loose connection to remote server), be sure to have iLO access to it.

Here is how to raise Rx ring buffer size 4 times from default value:

ethtool -G eth0 rx 4096 tx 4069
Bulgaria Top outsource destination – 5th in the World and 2nd in Europe in list of best countries to outsource business to

Thursday, December 19th, 2013


why outsource in bulgaria bulgaria 5th in world and second in europe in outsourcing1

I was stunned today to find out my countryland Bulgaria is 2nd in Europe and 5th in the world in terms of most attractive outsourcing destination according to BTA (Bulgarian News Agency).
Bulgaria is ordering 5th after, India, Indonesia, Estonia and Singapore. The ranking of most attractive destination is based on factors;

  • General Competitiveness of Labor cost Worldwide
  • Eligibility of Workhand
  • Multilingual English speaking population (mainly young people)
  • Expertised highly educated people
  • Very Low Taxes (if compared to "developed" European countries)
  • Decreased transportation costs (produc transportation to Europe is generally cheap)
  • Internet bandwidth speed and high bandwidth connectiveness to worldwide Trade Markets

All this opens a big opportunity for economy development and inflush of fresh-money from outsourced jobs. Due to higher and European standard level of education in Bulgaria, the workhand pool in Bulgaria is usually more knowledgeable and better in quality if compared to rest of 3rd world countries India, Indonesia, Sinagopore etc. Bulgaria has generally good infrastructure and offers easy transportation of people and resources, something not so well developed yet in lets say India or Indonesia. Therefore opportunities for further development in Bulgaria as a leading outsource center in Europe are immerse in the coming 10 years. So far big companies who already realized the great Bulgaria potential like Comverse, HP, IBM etc. started actively hire people in Bulgaria and outsource their businesses but this mainly happens in Sofia.

bulgaria top business destionation for outsourcing 5th in world and 2nd in europe for outsourcing

The trend in long run however is that European leading companies start outsource in smaller cities and towns as well. Right now most prepared personal ready for outsourcing in Bulgaria is in field of Information Technologies, Electronics, Marketing, Transportation Equipment, Business Management, Chemical Industry, Food & Bevarage and Logistics. General outsourcing trend is more and more people working in not high qualitified labor to enter the market of out-sourcing. There are plenty of companies already in Bulgaria involved in textile (clothes) industry offering their cheap and high quality workhand to large external multinational companies like Zara, H & M , Versace etc.

Currently Bulgaria is considered the poorest countries in the European Union with the shocking minimal wage of 310 leva about (155 EUR) and avarage monthly sallary of 812 leva (406 EUR) monthly. The cheapness of Bulgaria is still unidentified gold field ignored by many Western Multinational companies. Outsourcing in Bulgaria has great advantages for European Countries based companies in terms of product logistics as product transportation cost and taxation within the European Union are very cheap if compared to rest of top non-EU outsourcing countries. Due to оbviously advantegous conditions in Bulgaria there are plenty of companies in Bulgaria already specialised in auditing outsourcing business risks and planning steps a company could partake to outsource its business in BG. Current Bulgarian government is making further attempts to relieve country's conditions to attract new business investors by 'Simplifying country's business registration and operations administration requirements and fostering better business environment' as said recently by second minister of economics Krasin Dimitrov in recent business forum "Opportunities and Challanges in Business Process Outsourcing (BPO) and Shared Service Centers (SSC) in Bulgaria"

Httpwatch a must have web developer and web hosting sysadmin Firefox / Internet Explorer / IPad / IPhone add-on

Monday, December 16th, 2013


Today a colleague of mine referred me to a wonderful Mozilla Firefox (Windows / Mac) plugin called HttpWatch.

HttpWatch is an HTTP sniffer for IE, Firefox, iPhone & iPad
that provides new insights into how your website loads and performs.
The plugin is quite simple it shows you all requests from your Browser to remote server with plenty of Debug information (on the fly). You can see exactly the Commands sent over the HTTP protocol as well as returned request status responce from Web Server (i.e. 200, 300, 400). By knowing the status returned by webserver you can debug odd problems with website authentication as well as oddities caused by proxies you don't know about. Besides showing responce returned on web requests HttpWatch shows also hand-shake of session ID variables. This makes the plugin  precious for Web developers and System Administrators working in Web & Middleware (Linux / Windows based Web Hosting companies)  etc.

HttpWatch is also a must have plugin for anyone looking to optimize a website for speed or for fixingwebsite responce time bottleneck issues. The size of plugin is quite big as of time of writting about 18.2 Megabytes. HttpWatch comes with separate app installer like any other stand alone Windows application.  Unfortunately Httpwatch does not have a version for GNU / Linux. Linux users could use HTTPFox, Google Chrome Developer tools or
Firebug.

Once you have plugin installed to check what's happening with a website access in (Firefox) select Tools -> HttpWatch. You will get a bottom screen new window with deug info.

httpwatch debugging accessed website information - web browser tool to optimize your website

Here is list of some of the many things for which plugin is useful;

  • Records HTTP
  • Decrypts HTTPS Traffic
  • Integrates with Internet Explorer & Firefox
  • Supports the SPDY Protocol in Firefox
  • Standalone Log File Viewer
  • Summary of Recorded Traffic
  • Grouping of Requests by Page
  • Collect Log Files From Your Customers
  • Request Level Time Charts
  • Real-Time Page Level Time Charts
  • Page Events
  • Detects Potential Problems
  • Customizable Data Columns
  • Data Tips
  • Automation Support
  • Advanced Filtering
  • Millisecond Level Timing
  • HTTP Compression
  • Network Level Performance Data
  • Extended Cookie Information
  • Shows Interaction with Browser Cache
  • Raw HTTP Streams
  • Export Data to CSV, HAR and XML
  • Import HAR files
  • Customizable CSV Export
  • Keyboard Accelerators
  • Access to Cached and Downloaded Content
  • Accurately Records Requests and Responses
  • Automatic Recording and Saving

Finally HttpWatch is a plugin to have next to Yahoo's YSlow, FasterfoxFireBug and Firefox's Web Developer plugin