I’ve noticed an ex-colleague as well as a friend of mine’s recently started company who does provide just Wonderful Web Development, SQL database and data processing System Administration services.The new company is named dreamupweb . The whole project looks quitepromising. The already completeled projects do testify the good quality work of the company.END—–
Posts Tagged ‘system administration’
Web Development & System Administration Company DreamupWeb
Tuesday, September 8th, 2009wordpress & awstats
Wednesday, July 29th, 2009 
I'm planning to bring up a website for remote system administration for quite some time 'till now.A couple of days before I've installed wordpress and used the monochrome theme in combination with a couple of plugins.I've used the WordPress, "Contact Form 7" plugin. I struggled around for a day before I realize the way it's beeingembeded into the Page post. Amri (Marto) a friend of mine helped me up with the whole deal, it came to be as simple assimply adding [contact-form 1 "My feedback" to one of the pages I've created in wordpress. There were a bunch of things on my newlycreated wordpress blog that looked more like a blog than a page which was not my initial goal and therefore I had to remove some chunksof code from some of the php files that came with the monochrome theme. I've partially used a guide called
"How to create Websites using WordPress" which probably would be of an interest to you if you're trying to make wordpress look more like a website than a blog, check it out here . Amri suggested few plugins that would add up to my current wordpress installation.
This are:
Cyr2Lat Slugs
Google XML Sitemaps Generates sitemap.xml. Gives an option to setup Google WebMaster Tools and in that manner of thoughts ads up for faster indexing of the blog
All In One SEO pack – SEO instrument that optimizes your wordpress
Belavir – Tracks the changes in files in wordpress.
In my case I couldn't make the Google XML Sitemap work correctly. Probably because I've removed bits of php code from some main php pages.Anyways I was able to make my wordpress look like a normal website and in general it might be said that it looks quite decent now if I have to compare it with my previous websites I've built like let's say my home page www.pc-freak.net . I've plans to deliver remote system administration services to the masses via my Yet Another Cheap System Administration Services.
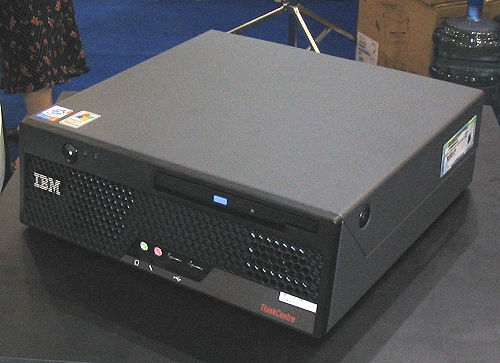
I've also installed awstats on the pcfreak box currently running on a nice foxy IBM machine. To properly install and run the Awstats I've used fractions from the article Install Awstats on FreeBSD . What was different in my case was:
1. I had to cd /usr/ports/www/awstats/work/awstats-6.9/tools/; run ./awstats_configure.pl. Answer a couple of questions. I've initially installed awstats configurations to /etc/awstats after which I've moved it to /usr/local/etc/awstats .
2. I had to create /var/lib/awstats where awstats stores it's database files: mkdir /var/lib/awstats
3. I had to link awstats to the location where my cgi-bin dir was set up by httpd.conf: ln -sf /usr/local/www/awstats/cgi-bin/ /usr/local/www/cgi-bin/awstats
4. I had to create a link to make the awstats icons visualize: ln -sf /usr/local/www/awstats/icons /usr/local/www/data/awstatsicons
5. I had to edit my conf file and align it with my desires, most important to note is the requirement to change the location to my Apache log file in my case that was /var/log/httpd-access.log: Change LogFile value in /usr/local/etc/awstats/awstats.www.pc-freak.net.conf I've changed it to LogFile="/var/log/httpd-access.log"
6. Next I had to execute the following to generate statistics for my domain www.pc-freak.net: /usr/local/www/awstats/cgi-bin/awstats.pl -update -config=www.pc-freak.net
7. Edit the root user crontab (crontab -u root -e) and paste the following : 01 0 * * * /usr/local/www/awstats/cgi-bin/awstats.pl -update -config=www.pc-freak.net 2>&1 >/dev/null8. Change the default Directory settings for /usr/local/www/cgi-bin. Had to changed them to the following
9. After that I've protected my awstats with a pass putting /usr/local/awstats/cgi-bin/.htaccess file containing the followingAuthType BasicAuthName "Restricted Access"AuthUserFile /usr/local/etc/apache2/myawstats.passwdRequire user admin
10. And last but not least, had to create the myawstats.passwd with the following command: htpasswd -c /usr/local/etc/apache2/myawstats.passwd admin
Right after I happily accessed my newly installed awstats via my domain https://www.pc-freak.net//cgi-bin/awstats/awstats.pl END—–
Monitoring Disk use, CPU Load, Memory use and Network in one console ncurses interface – Glance
Thursday, August 14th, 2014 
If you're Linux / UNIX / BSD system administrator you already have experience with basic admin's system monitoring:
- CPU load
- OS Name/Kernel version
- System load avarage and Uptime
- Disk and Network Input/Output I/O operations by interface
- Process statistics / Top loading processes etc.
- Memory / SWAP usage and free memory
- Mounted partitions
Such info is provided by command line tools such as:
top, df, free, sensors, ifconfig, iotop, hddtemp, mount, nfsstat, nfsiostat, dstat, uptime, nethogs iptraf
etc.
There are plenty of others advanced tools also Web based server monitoring visualization tools, such as Monit, Icanga, PHPSysInfo, Cacti which provide you statistics on computer hardware and network utilization
So far so good, if you already are used to convenience of web *NIX based monitoring but you don't want to put load on the servers with such and you're lazy to write custom scripts that show most important monitoring information – necessery for daily system administration monitoring and prevention from downtimes and tracking bottlenecks you will be glad to hear about Glances
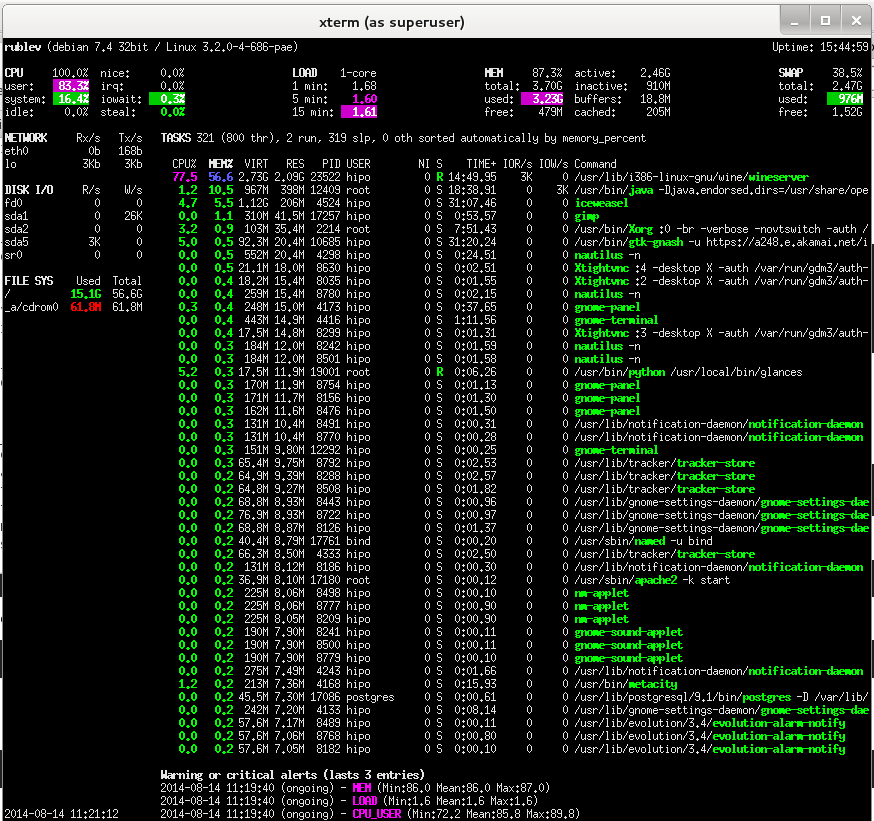
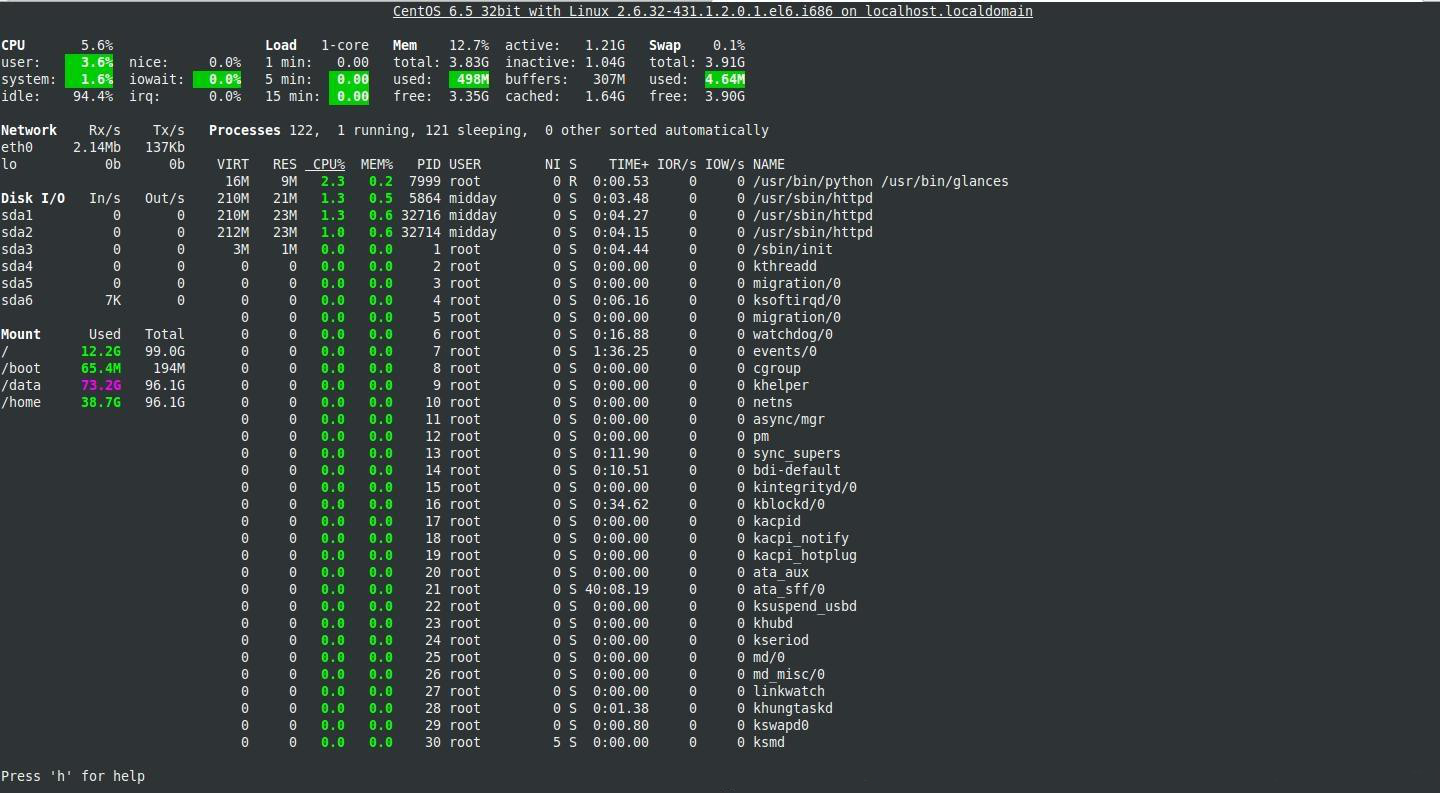
Glances is a free (LGPL) cross-platform curses-based monitoring tool which aims to present a maximum of information in a minimum of space, ideally to fit in a classical 80×24 terminal or higher to have additionnal information. Glances can adapt dynamically the displayed information depending on the terminal size. It can also work in a client/server mode for remote monitoring.
1. Installing Glances curses-based monitoring tool on Debian 7 / Ubuntu 13+ / Mint Linux
We have to install python-pip (python package installer tool) to later install Glances
apt-get install –yes 'python-dev' 'python-jinja2' 'python-psutil'
'python-setuptools' 'hddtemp' 'python-pip' 'lm-sensors'
Before proceeding to install Glances to make Thermal sensors working (if supported by hardware) run:
sensors-detect
Glances is written in Python and uses psutil library to obtain monitoring statistic values, thus it is necessery to install few more Python libraries:
pip install 'batinfo' 'pysensors'
If you're about to use pip – Python package installer tool, behind a proxy server use instead:
pip install –proxy=http://your-proxy-host.com:8080 'batinfo' 'pysensors'
Then install Glances script itself again using pip
pip install 'Glances'
Downloading/unpacking Glances
Downloading Glances-2.0.1.tar.gz (3.3Mb): 3.3Mb downloaded
Running setup.py egg_info for package Glances
Downloading/unpacking psutil>=2.0.0 (from Glances)
Downloading psutil-2.1.1.tar.gz (216Kb): 216Kb downloaded
Running setup.py egg_info for package psutil
…
Successfully installed Glances psutil
Then run glances from terminal
glances -t 3
-t 3 option tells glances to refresh collected statistics every 3 seconds
2. Installing Glances monitoring console tool on CentOS / RHEL / Fedora / Scientific Linux
Installing glances on CentOS 7 / Fedora and rest of RPM based distributions can be done by adding external RPM repositories, cause glances is not available in default yum repositories.
To enable Extra-packages repositories:
rpm -ivh http://dl.fedoraproject.org/pub/epel/6/x86_64/epel-release-6-8.noarch.rpm
Then update yum to include new repository's packages into package list and install python-pip and python-devel rpms
yum update
yum install python-pip python-devel
There is also FreeBSD port to install Glances on FreeBSD:
cd /usr/sysutils/py-glances
make install
Enjoy 🙂 !
VIM and VI UNIX text editor syntax highlighting and howto add remove code auto indent
Tuesday, February 4th, 2014
For my daily system administration job I have to login to many SuSE Linux servers and do various configugration edits.
The systems are configured in different ways and the only text editors available across all servers I can use are VI and VIM (VI Improved).
As I usually had to edit configuration files and scripts and I'm on SSH color terminal its rather annoying that on some of the servers opening a file with VIM is not displayed with SYNTAX HIGHLIGHTING. Not having syntax highlighting is ugly and makes editting ugly and unreadable.
Thus it is useful to enable VI syntax highlighting straight into the file being editted. I suspect many novice sysadmins might not know how to turn syntax highlighting in vi so here is how.
Turn Syntax Highlighting in VIM
1. Open file with vim lets say Apache configuration
# vim /etc/apache2/apache2.conf
2. Press (Esc) Escape and ":" from kbd and then type in syntax on
:syntax on
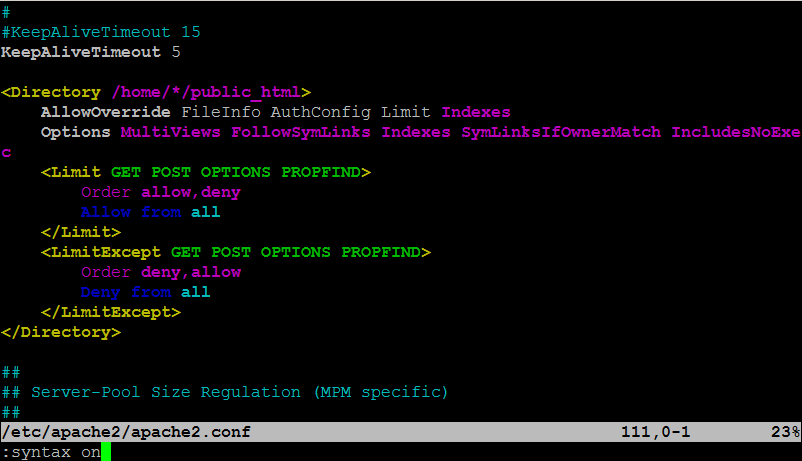
To Turn On / Off VI Syntax Highlighting permanent add ":syntax on"
into ~/.vimrc
~/.vimrc file is red automatically on VIM start, so right after :syntax on is appended in it on relaunch vim will start showing colorfully.
Enjoy ! 🙂
10 must know and extremely useful Linux commands that every sys admin should know
Tuesday, July 30th, 2013
There are plenty of precious command line stuff every admin should be aware on Linux. In this article I just decided to place some I use often and are interesting to know. Below commands are nothing special and probably many of experienced sys admins already know them. However I'm pretty sure novice admins and start-up Linux enthusiasts will find it useful. I know there much more to be said on the topic. So anyone is mostly welcome to share his used cmds.
1. Delete all files in directory except files with certain file extension
It is good trick to delete all files in directory except certain file formats, to do so:
root@linux:~# rm !(*.c|*.py|*.txt|*.mp3)
2. Write command output to multiple files (tee)
The normal way to write to file is by using redirect (to overwrite file) ">" or (to append to file) ">>";. However when you need to write output to multiple files there is a command called tee, i.e.:
root@linux:~# ps axuwwf | tee file1 file2 file3
3. Search for text in plain text file printing number of lines after match
Whether you need to print all number of lines after match of "search_text" use:
root@linux:~# grep -A 5 -i "search_text" text_file.txt
4. Show all files where text string is matched with GREP (Search for text recursively)
Searching for text match is extremely helpful for system administration. I use grep recursive (capability) almost on daily basis:
root@websrv:/etc/dovecot# grep -rli text *
conf.d/10-auth.conf
conf.d/10-mail.conf
dovecot.conf
-l (instructs to only print file names matching string), -r (stands for recursive search), and -i flag (instructs grep to print all matches inogoring case-sensitivity ( look for text nomatter if with capital or small letters)
5. Finding files and running command on each file type matched
In Linux with find command it is possible to search for files and run command on each file matched.
Lets say you we want to look in current directory for all files .swp (temporary) files produced so often by VIM and wipe them out:
root@linux:~# find . -iname '*.swp*' -exec rm -f {} \;
6. Convert DOS end of file (EOF) to UNIX with sed
If it happens you not have dos2unix command installed on Linux shell and you need to translate DOS end of file (\r\n – return carriage, new line) to UNIX's (\r – return carriage)), do it with sed:
root@linux:~# sed 's/.$//' filename
7. Remove file duplicate lines with awk:
cat test.txt

test

test

test duplicate

The brown fox jump over ...

Richard Stallman rox
 root@linux:~# awk '!($0 in array) { array[$0]; print }' test.txt

test

test duplicate

The brown fox jump over ...

Richard Stallman rox
To remove duplicate text from all files in directory same can be easily scripped with bash for loop:
 root@linux:~# for i in *; do

awk '!($0 in array) { array[$0]; print }' $i;

done
8. Print only selected columns from text file
To print text only in 1st and 7th column in plain text file with awk:
root@linux:~# awk '{print $1,$6;}' filename.txt ...
To print only all existing users on Linux with their respective set shell type:
root@linux:~# cat /etc/passwd|sed -e 's#:# #g'|awk '{print $1,$6;}'
9. Open file with VIM text editor starting from line
I use only vim for console text processing, and I often had to edit and fix file which fail to compile on certain line number. Thus use vim to open file for writing from necessary line num. To open file and set cursor to line 35
root@linux:~# vim +35 /home/hipo/current.c
10. Run last command with "!!" bash shorcut
Lets say last command you run is uname -a:
 root@websrv:/home/student# uname -a

Linux websrv 3.2.0-4-686-pae #1 SMP Debian 3.2.46-1 i686 GNU/Linux
To re-run it simply type "!!":
 root@websrv:/home/student# !!

uname -a

Linux websrv 3.2.0-4-686-pae #1 SMP Debian 3.2.46-1 i686 GNU/Linux

root@websrv:/home/student#
How to make Video from your Linux Desktop with xvidcap / Capture desktop output in a video on Linux
Wednesday, April 6th, 2011If you have wondered on how to create videos aiming at manuals on how you do certain stuff on Linux, let’s say related to programming or system administration.
Then you should definitely check out
xvidcap
Below is the package description as taken from apt-cache show xvidcap
A screen capture enabling you to capture videos off your X-Window desktop

for illustration or documentation purposes. It is intended to be a

standards-based alternative to tools like Lotus ScreenCam.
On Debian based Linux systems (e.g. Debian Ubuntu) xvidcap is available straight from the package repositories. To install and test it you can straight issue:
linux:~# apt-get install xvidcap

...
To start using xvidcap, either by starting it with alt+f2 in gnome or straight launch it from the applications menu via:
Applications -> Sound & Video -> xvidcap
Here is how the xvidcap program looks like right after you start it;
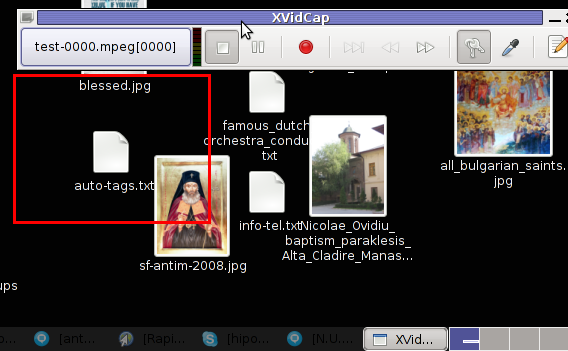
As you see in the screenshot xvidcap’s menu interface is extraordinary simple.
As you see it only has a stop, pause, rec, back and forward buttons, a capture selector and movie editor.
Pitily xvidcap does not support music capturing, but at least for me that’s not such an issue.
If you click over the field test-0000.mpeg[0000] with your last mouse button, you will notice a drop down menu with an option for preferences of xvidcap.
Take the time to play with the preferences, since there are quite a few of them.
The most important preference that you might like to straightly adjust in my view is in the:
Preferences -> Multi-Frame tab -> File Name:
The default file that xvidcap uses to store it’s content files as you will see in the preferences is utest-%04d.mpeg
If you want to change the type of the output file format to let’s say flv change the File Name: value to utest-%04d.flv
Next time you record with xvidcap, you will have the file stored in flv format.
The red lines which you see in the above screenshot is the capture area, you will have to also tune the screen capture area before you can proceed with recording a video from your desktop.
The way to capture your Desktop in fullscreen is a bit unusual, you first need to mark up all your visible Desktop and before that you will have to select from xvidcap’s preferences from:
Preferences -> General -> Minimize to System Tray
By selecting this option each time you press the xvidcap’s record button the xvidcap’s controller interface will be minimized to tray and capturing the video of the region previously selected with the capture selector will start up.