Posts Tagged ‘terminal window’

How to Set Up SSH Two-Factor Authentication (2FA) on Linux Without Google Authenticator with OATH Toolkit

Wednesday, November 5th, 2025

install-2-factor-free-authentication-google-authentication-alternative-with-oath-toolkit-linux-logo

Most tutorials online on how to secure your SSH server with a 2 Factor Authentication 2FA will tell you to use Google Authenticator to secure SSH logins.

But what if you don’t want to depend on Google software – maybe for privacy, security, or ideological reasons ?

Luckily, you have a choice thanks to free oath toolkit.
The free and self-hosted alternative: OATH Toolkit has its own PAM module  libpam-oath to make the 2FA work  the openssh server.

OATH-Toolkit is a free software toolkit for (OTP) One-Time Password authentication using HOTP/TOTP algorithms. The software ships a small set of command line utilities covering most OTP operation related tasks.

In this guide, I’ll show you how to implement 2-Factor Authentication (TOTP) for SSH on any Linux system using OATH Toolkit, compatible with privacy-friendly authenticator apps like FreeOTP, Aegis, or and OTP.

It is worthy to check out OATH Toolkit author original post here, that will give you a bit of more insight on the tool.

1. Install the Required Packages

For Debian / Ubuntu systems:

# apt update
# apt install libpam-oath oathtool qrencode
...

For RHEL / CentOS / AlmaLinux:
 

# dnf install pam_oath oathtool

The oathtool command lets you test or generate one-time passwords (OTPs) directly from the command line.

2. Create a User Secret File

libpam-oath uses a file to store each user’s secret key (shared between your server and your phone app).

By default, it reads from:

/etc/users.oath

Let’s create it securely and set proper permissions to secure it:
 

# touch /etc/users.oath
# chmod 600 /etc/users.oath

Now, generate a new secret key for your user (replace hipo with your actual username):
 

# head -10 /dev/urandom | sha1sum | cut -c1-32

This generates a random 32-character key.
Example:

9b0e4e9fdf33cce9c76431dc8e7369fe

Add this to /etc/users.oath in the following format:

HOTP/T30 hipo - 9b0e4e9fdf33cce9c76431dc8e7369fe

HOTP/T30 means Time-based OTP with 30-second validity (standard TOTP).

Replace hipo with the Linux username you want to protect.

3. Add the Key to Your Authenticator App

Now we need to add that secret to your preferred authenticator app.

You can create a TOTP URI manually (to generate a QR code):

$ echo "otpauth://totp/hipo@jericho?secret=\
$(echo 9b0e4e9fdf33cce9c76431dc8e7369fe \
| xxd -r -p | base32)"

You can paste this URI into a QR code generator (e.g., https://qr-code-generator.com) and scan it using FreeOTP , Aegis, or any open TOTP app.
The FreeOTP Free Ap is my preferred App to use, you can install it via Apple AppStore or Google Play Store.

Alternatively, enter the Base32-encoded secret manually into your app:

# echo 9b0e4e9fdf33cce9c76431dc8e7369fe | xxd -r -p | base32

You can also use qrencode nice nifty tool to generate out of your TOTP code in ASCII mode and scan it with your Phone FreeOTP / Aegis App and add make it ready for use:

# qrencode –type=ANSIUTF8 otpauth://totp/hipo@jericho?secret=$( oathtool –verbose –totp 9b0e4e9fdf33cce9c76431dc8e7369fe –digits=6 -w 1 | grep Base32 | cut -d ' ' -f 3 )\&digits=6\&issuer=pc-freak.net\&period=30

qrencode-generation-of-scannable-QR-code-for-freeotp-or-other-TOTP-auth

qrencode will generate the code. We set the type to ANSI-UTF8 terminal graphics so you can generate this in an ssh login. It can also generate other formats if you were to incorporate this into a web interface. See the man page for qrencode for more options.
The rest of the line is the being encoded into the QR code, and is a URL of the type otpauth, with time based one-time passwords (totp). The user is “hipo@jericho“, though PAM will ignore the @jericho if you are not joined to a domain (I have not tested this with domains yet).

The parameters follow the ‘?‘, and are separated by ‘&‘.

otpauth uses a base32 hash of the secret password you created earlier. oathtool will generate the appropriate hash inside the block:

 $( oathtool –verbose –totp 9b0e4e9fdf33cce9c76431dc8e7369fe | grep Base32 | cut -d ' ' -f 3 )

We put the secret from earlier, and search for “Base32”. This line will contain the Base32 hash that we need from the output:

Hex secret: 9b0e4e9fdf33cce9c76431dc8e7369fe
Base32 secret: E24ABZ2CTW3CH3YIN5HZ2RXP
Digits: 6
Window size: 0
Step size (seconds): 30
Start time: 1970-01-01 00:00:00 UTC (0)
Current time: 2022-03-03 00:09:08 UTC (1646266148)
Counter: 0x3455592 (54875538)

368784 
From there we cut out the third field, “E24ABZ2CTW3CH3YIN5HZ2RXP“, and place it in the line.

Next, we set the number of digits for the codes to be 6 digits (valid values are 6, 7, and 8). 6 is sufficient for most people, and easier to remember.

The issuer is optional, but useful to differentiate where the code came from.

We set the time period (in seconds) for how long a code is valid to 30 seconds.

Note that: Google authenticator ignores this and uses 30 seconds whether you like it or not.

4. Configure PAM to Use libpam-oath

Edit the PAM configuration for SSH:

# vim /etc/pam.d/sshd

At the top of the file, add:

auth required pam_oath.so usersfile=/etc/users.oath window=30 digits=6

This tells PAM to check OTP codes against /etc/users.oath.

5. Configure SSH Daemon to Ask for OTP

Edit the SSH daemon configuration file:
 

# vim /etc/ssh/sshd_config

Ensure these lines are set:
 

UsePAM yes
challengeresponseauthentication yes
ChallengeResponseAuthentication yes
AuthenticationMethods publickey keyboard-interactive
##KbdInteractiveAuthentication no
KbdInteractiveAuthentication yes

N.B.! The KbdInteractiveAuthentication yes variable is necessery on OpenSSH servers with version > of version 8.2_ .

In short This setup means:
1. The user must first authenticate with their SSH key (or local / LDAP password),
2. Then enter a valid one-time code generated from TOTP App from their phone.

You can also use  Match  directives to enforce 2FA under certain conditions, but not under others.
For example, if you didn’t want to be bothered with it while you are logging in on your LAN,
but do from any other network, you could add something like:

Match Address 127.0.0.1,10.10.10.0/8,192.168.5.0/24
Authenticationmethods publickey

6. Restart SSH and Test It

Apply your configuration:
 

# systemctl restart ssh

Now, open a new terminal window and try logging in (don’t close your existing one yet, in case you get locked out):

$ ssh hipo@your-server-ip

You should see something like:

Verification code:

Enter the 6-digit code displayed in your FreeOTP (or similar) app.
If it’s correct, you’re logged in! Hooray ! 🙂

7. Test Locally and Secure the Secrets

If you want to test OTPs manually with a base32 encrypted output of hex string:

# oathtool --totp -b \
9b0e4e9fdf33cce9c76431dc8e7369fe

As above might be a bit confusing for starters, i recommend to use below few lines instead:

$ secret_hex="9b0e4e9fdf33cce9c76431dc8e7369fe"
$ secret_base32=$(echo $secret_hex | xxd -r -p | base32)
$ oathtool –totp -b "$secret_base32"
156874

You’ll get the same 6-digit code your authenticator shows – useful for debugging.

If you rerun the oathtool again you will get a difffefrent TOTP code, e.g. :

$ oathtool –totp -b "$secret_base32"
258158


Use this code as a 2FA TOTP auth code together with local user password (2FA + pass pair),  when prompted for a TOTP code, once you entered your user password first.

To not let anyone who has a local account on the system to be able to breach the 2FA additional password protection,
Ensure the secrets file is protected well, i.e.:

# chown root:root /etc/users.oath
# chmod 600 /etc/users.oath

How to Enable 2FA Only for Certain Users

If you want to force OTP only for admins, create a group ssh2fa:

# groupadd ssh2fa
# usermod -aG ssh2fa hipo

Then modify /etc/pam.d/sshd:

auth [success=1 default=ignore] pam_succeed_if.so \
user notingroup ssh2fa
auth required pam_oath.so usersfile=/etc/users.oath \
window=30 digits=6

Only users in ssh2fa will be asked for a one-time code.

Troubleshooting

Problem: SSH rejects OTP
Check /var/log/auth.log or /var/log/secure for more details.
Make sure your phone’s time is in sync (TOTP depends on accurate time).

Problem: Locked out after restart
Always keep one root session open until you confirm login works.

Problem: Everything seems configured fine but still the TOTP is not accepted by remote OpenSSHD.
– Check out the time on the Phone / Device where the TOTP code is generated is properly synched to an Internet Time Server
– Check the computer system clock is properly synchornized to the Internet Time server (via ntpd / chronyd etc.), below is sample:

  • hipo@jeremiah:~$ timedatectl status
                   Local time: Wed 2025-11-05 00:39:17 EET
               Universal time: Tue 2025-11-04 22:39:17 UTC
                     RTC time: Tue 2025-11-04 22:39:17
                    Time zone: Europe/Sofia (EET, +0200)
    System clock synchronized: yes
                  NTP service: n/a
              RTC in local TZ: no

Why Choose libpam-oath?

  • 100% Free Software (GPL)
  • Works completely offline / self-hosted
  • Compatible with any standard TOTP app (FreeOTP, Aegis, andOTP, etc.)
  • Doesn’t depend on Google APIs or cloud services
  • Lightweight (just one PAM module and a text file)

Conclusion

Two-Factor Authentication doesn’t have to rely on Google’s ecosystem.
With OATH Toolkit and libpam-oath, you get a simple, private, and completely open-source way to harden your SSH server against brute-force and stolen-key attacks.

Once configured, even if an attacker somehow steals your SSH key or password, they can’t log in without your phone’s one-time code – making your system dramatically safer.

Tracking multiple log files in real time in Linux console / terminal (MultiTail)

Monday, July 29th, 2013

Multitail multiple tail Debian GNU Linux viewing Apache access and error log in shared screen
Whether you have to administer Apache, Nginx or Lighttpd, or whatever other kind of daemon which interactively logs user requests or errors you probably already know well of tail command (tail -f /var/log/apache2/access.log) is something Webserver Linux admin can't live without. Sometimes however you have number of Virtualhost (domains) each configured to log site activity in separate log file. One solution to the problem is to use GNU Screen (screen – terminal emulator) to launch multiple screen session and launch separate tail -f /var/log/apache2/domain1/access.log , tail -f /var/log/apache2/domain2/access.log etc. This however is a bit of hack and except configuring screen to show multiple windows on one Virtual Terminal (tty or vty in gnome), you can't really see output simultaneously in one separated window.

Here is where multitail comes handy. MultiTail is tool to visualize in real time log records output of multiple logs (tails) in one shared terminal Window. MultiTail is written to use ncurses library used by a bunch of other useful tools like Midnight Command so output is colorful and very nice looking.

Here is MultiTail package description on Debian Linux:

linux:~# apt-cache show multitail|grep -i description -A 1
Description-en: view multiple logfiles windowed on console
 multitail lets you view one or multiple files like the original tail

Description-md5: 5e2f688efb214b063bdc418a705860a1
Tag: interface::text-mode, role::program, scope::utility, uitoolkit::ncurses,
root@noah:/home/hipo# apt-cache show multitail|grep -i description -A 1
Description-en: view multiple logfiles windowed on console
 multitail lets you view one or multiple files like the original tail

Description-md5: 5e2f688efb214b063bdc418a705860a1
Tag: interface::text-mode, role::program, scope::utility, uitoolkit::ncurses,
 

Multiple Tail is available across most Linux distributions to install on Debian / Ubuntu / Mint etc. Linux:

debian:~# apt-get install --yes multitail
...

On recent Fedora / RHEL / CentOS etc. RPM based Linuces to install:

[root@centos ~]# yum -y install multitail
...

On FreeBSD multitail is available to install from ports:

freebsd# cd /usr/ports/sysutils/multitail
freebsd# make install clean
...

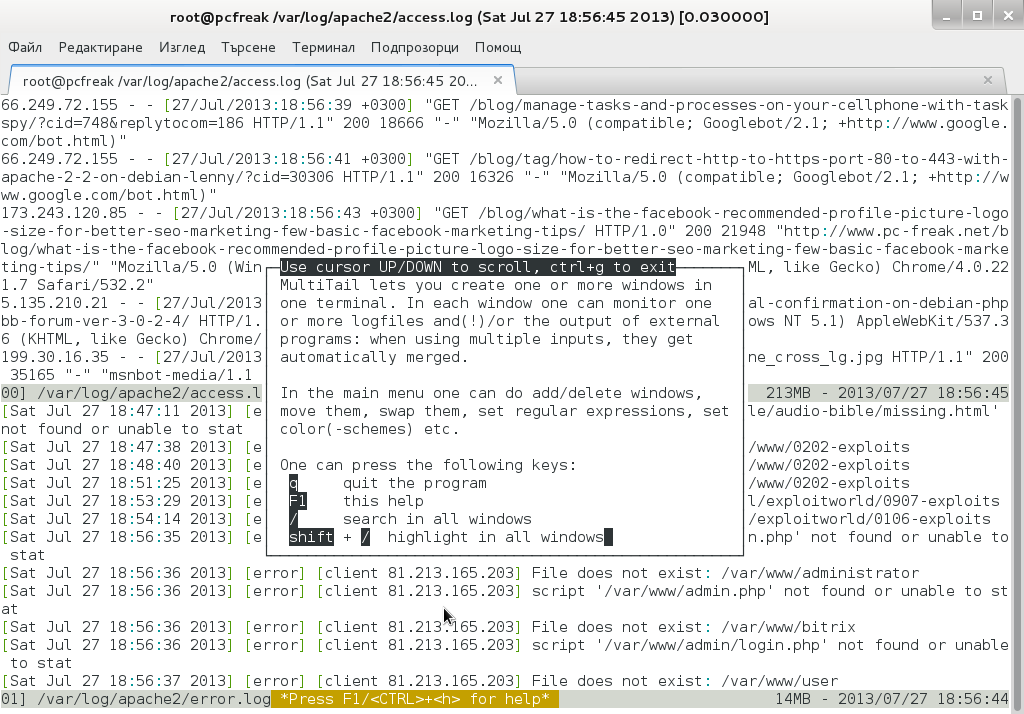
Once installed to display records in multiple files lets say Apache domain name access.log and error.log

debian:~# multitail -f /var/log/apache2/access.log /var/log/apache2/error.log

It has very extensive help invoked by simply pressing h while running

multtail-viewing-in-gnome-shared-screen-debian-2-log-files-screenshot

Even better multitail is written to already have integrated color schemes for most popular Linux services log files

multitail multiple tail debian gnu linux logformat different color schemes screenshot
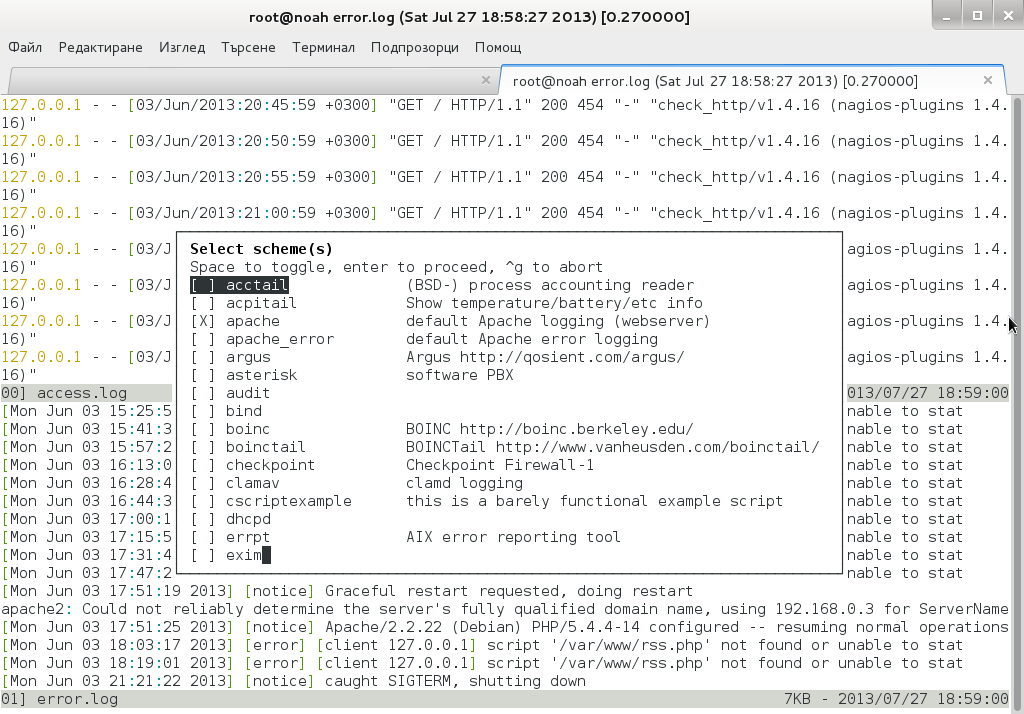
List of supported MulLog Color schemes as of time of writting article is:

acctail, acpitail, apache, apache_error, argus, asterisk, audit, bind, boinc, boinctail ,checkpoint, clamav, cscriptexample, dhcpd, errrpt, exim, httping, ii, inn, kerberos, lambamoo, liniptfw, log4j, mailscanner, motion, mpstat, mysql, nagtail, netscapeldap, netstat, nttpcache, ntpd, oracle, p0f, portsentry, postfix, pptpd, procmail, qmt-clamd, qmt-send, qmt-smtpd, qmt-sophie, qmt-spamassassin, rsstail, samba, sendmail, smartd, snort spamassassin, squid, ssh, strace, syslog, tcpdump, vmstat, vnetbr, websphere, wtmptail

To tell it what kind of log Color scheme to use from cmd line use:

debian:~# multitail -Csapache /var/log/apache2/access.log /var/log/apache2/error.log

multiple tail with Apache highlight on Debian Linux screenshot

Useful feature is to run command display in separate Windows while still following log output, i.e.:

[root@centos:~]# multitail /var/log/httpd.log -l "netstat -nat"
...

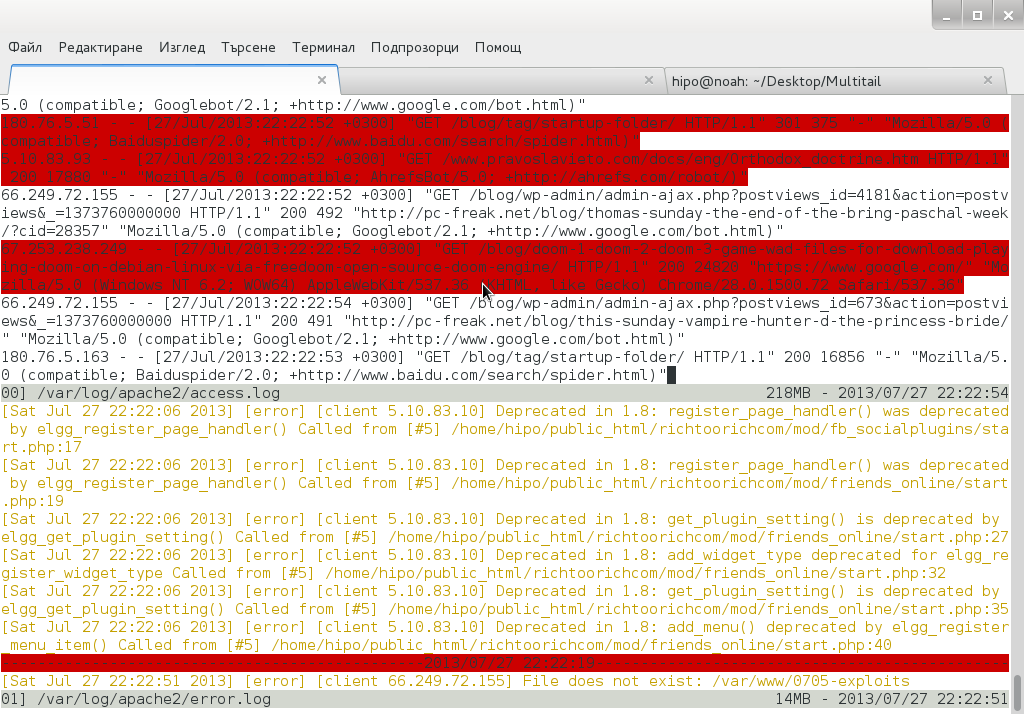
Multitail can also merge output from files in one Window, while in second window some other log or command output is displayed. To merge output from Apache access.log and error.log:

debian:~# multitail /var/log/apache2/access.log -I /var/log/apache2/error.log

When merging two log files output to show in one Window it is useful to display each file output in different color for the sake of readability

For example:
 

debian:~# multitail -ci green /var/log/apache/access.log -ci red -I /var/log/apache/error.log

multitail merged Apache access and error log on Debian Linux

To display output from 3 log files in 3 separate shared Windows in console use:

linux:~# multitail -s 2 /var/log/syslog /var/log/apache2/access.log /var/log/apache2/error.log

For some more useful examples, check out MultiTail's official page examples
There is plenty of other useful things to do with multitail, for more RTFM 🙂