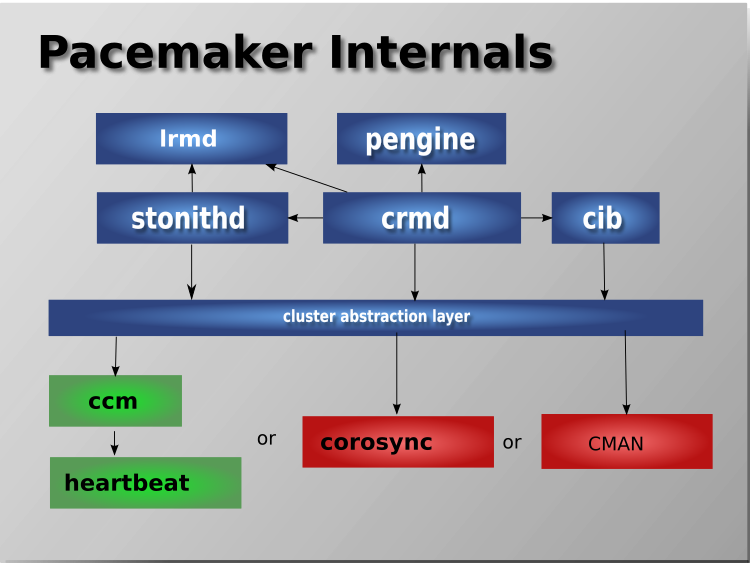
The aim of this article is to illustrate how to literally migrate a an Haproxy PCS Pacemaker / Corosync Cluster configurations from old Virtual Machines that due to time passed become unsupported (The Operating System end of life (EOF)) has reached to a new ones.
This is quite a complex task especially as you usually need to setup the Hypervisor hosts with VMWare / Xen / KVM / OpenVZ or whatever kind of virtualization is to be used. Then setup the correct network interfaces IPs failover the heartbeat lines over which the cluster will work to prevent Split Brain scenartions, the Network Bonding interfaces to guarantee a higher amount of higher availability as well as physically install and update all the cluster software on the new built Linux hosts that will be members of the new cluster in setup.
All this configuration from scratch of a PCS Corosync cluster is a very lenght topic which I'll try to cover in some of my next articles. In short to migrate the cluster from old machines to new once all this predescribed steps are in line.
You will need to.
1. Create backup of old cluster configuration
2. Migrate the backup to a new built VM Machine hosts
3. Import the cluster configuration into the PCS Cluster.
Bear in mind that this article discusses a migration of CentOS Linux release 7.9.2009 with its shipped versions of corosync / pacemaker and pcs
How to create cluster config backup and migrate to new VM
1. Dump cluster assuming that is a Quality Assuare or Pre – Production host to create full cluster config backup
[root@old-cluster-machine ~]# pcs config backup old-cluster-machine.pcs.config.bak
2. Dump cluster Production full configuration
[root@old-cluster-machine1 ~]# pcs config backup old-cluster-machine1.pcs.config.bak
This command will output a backup of
old-cluster-machine1.pcs.config.bak.tar.bz2
3. Migrate a cluster identical config to the new Virtual machines
Usually this moval of produced backup files with pcs config backup commands can be copied with something like FTP / SFTP or SSL-ed / TLS-ed protocol. However if you have to move the configuration files from a paranoid Citrix environment that doesn't allow you to have any SFTP / SSH or FTP kind of transfer protocol from the location where the old config lays to the new ones.
A simple encoding of the binary format dumped configuration to plain text files can be done and files, can be moved via a simple copy / paste operation (a bit of a hack) 🙂
Encode the cluster config to be able to migrate configuration in plain text via a simple Copy / Paste operation.
[root@old-cluster-machine ~]# base64 config backup old-cluster-machine.pcs.config.bak > old-cluster-machine.pcs.config.bak.tgz.b64
[root@old-cluster-machine1 ~]# base64 old-cluster-machine1.pcs.config.bak.tar.bz2 > old-cluster-machine1.pcs.config.bak.tgz.b64
[root@old-cluster-machine ~]# cat old-cluster-machine.pcs.config.bak.tgz.b64
…
(Copy output and Paste to new host VM) /root/haproxy-cluster-backup)
[root@old-cluster-machine1 ~]# cat old-cluster-machine1.pcs.config.bak.tgz.b64
…
(Copy output and Paste to new host VM) /root/haproxy-cluster-backup)
Login to the new hosts, where configs has to be migrated and restore the files with base64
For QA / Preprod to restore backup config
[root@dkv-newqa-vm ~]# mkdir /root/haproxy-cluster-backup
[root@dkv-newqa-vm ~]# cd /root/haproxy-cluster-backup
[root@dkv-newqa-vm ~]# base64 -d old-cluster-machine.config.bak.tgz.b64 > old-cluster-machine.pcs.config.bak.tar.bz2
[root@dkv-newqa-vm ~]# tar -jxvf old-cluster-machine.pcs.config.bak.tar.bz2
ak.tar.bz2
version.txt
pcs_settings.conf
corosync.conf
cib.xml
pacemaker_authkey
uidgid.d/
For Prod to restore backup config
[root@dkv-newprod-vm ~]# mkdir /root/haproxy-cluster-backup
[root@dkv-newprod-vm ~]# cd /root/haproxy-cluster-backup
[root@dkv-newprod-vm ~]# base64 -d old-cluster-machine.config.bak.tgz.b64 > old-cluster-machine1.pcs.config.bak.tar.bz2
ak.tar.bz2
version.txt
pcs_settings.conf
corosync.conf
cib.xml
pacemaker_authkey
uidgid.d/
N!B! An Useful hin is on RHEL 8 Linux's shipped pcs command version has also a very useful command with which you can simply dump completly the config of the cluster in straight commands which you can run directly on the new VM machines where you have migrated.
The command to print out commands that would add existing cluster resources on Redhat 8:
# pcs resource config –output-format=cmd
Another useful command for cluster migration is cibadmin
i.e. to dump cluster xml config
#cibadmin –q > cluster.xml
Later you can import the prior xml dump with it.
# cibadmin –replace –xml-file cib.xml


