Posts Tagged ‘type’

How to mount NFS network filesystem to remote server via /etc/fstab on Linux

Friday, January 29th, 2016

mount-nfs-in-linux-via--etc-fstab-howto-mount-remote-partitions-from-application-server-to-storage-server
If you have a server topology part of a project where 3 (A, B, C) servers need to be used to deliver a service (one with application server such as Jboss / Tomcat / Apache, second just as a Storage Server holding a dozens of LVM-ed SSD hard drives and an Oracle database backend to provide data about the project) and you need to access server A (application server) to server B (the Storage "monster") one common solution is to use NFS (Network FileSystem) Mount. 
NFS mount is considered already a bit of obsoleted technology as it is generally considered unsecre, however if SSHFS mount is not required due to initial design decision or because both servers A and B are staying in a serious firewalled (DMZ) dedicated networ then NTS should be a good choice.
Of course to use NFS mount should always be a carefully selected Environment Architect decision so remote NFS mount, imply  that both servers are connected via a high-speed gigabyte network, e.g. network performance is calculated to be enough for application A <-> to network storage B two sides communication not to cause delays for systems end Users.

To test whether the NFS server B mount is possible on the application server A, type something like:


mount -t nfs -o soft,timeo=900,retrans=3,vers=3, proto=tcp remotenfsserver-host:/home/nfs-mount-data /mnt/nfs-mount-point


If the mount is fine to make the mount permanent on application server host A (in case of server reboot), add to /etc/fstab end of file, following:

1.2.3.4:/application/local-application-dir-to-mount /application/remote-application-dir-to-mount nfs   rw,bg,nolock,vers=3,tcp,timeo=600,rsize=32768,wsize=32768,hard,intr 1 2


If the NTFS server has a hostname you can also type hostname instead of above example sample IP 1.2.3.4, this is however not recommended as this might cause in case of DNS or Domain problems.
If you want to mount with hostname (in case if storage server IP is being commonly changed due to auto-selection from a DHCP server):

server-hostA:/application/local-application-dir-to-mount /application/remote-application-dir-to-mount nfs   rw,bg,nolock,vers=3,tcp,timeo=600,rsize=32768,wsize=32768,hard,intr 1 2

In above example you need to have the /application/local-application-dir-to-mount (dir where remote NFS folder will be mounted on server A) as well as the /application/remote-application-dir-to-mount
Also on server Storage B server, you have to have running NFS server with firewall accessibility from server A working.

The timeou=600 (is defined in) order to make the timeout for remote NFS accessibility 1 hour in order to escape mount failures if there is some minutes network failure between server A and server B, the rsize and wsize
should be fine tuned according to the files that are being red from remote NFS server and the network speed between the two in the example are due to environment architecture (e.g. to reflect the type of files that are being transferred by the 2)
and the remote NFS server running version and the Linux kernel versions, these settings are for Linux kernel branch 2.6.18.x which as of time of writting this article is obsolete, so if you want to use the settings check for your kernel version and
NTFS and google and experiment.

Anyways, if you're not sure about wsize and and rise, its perfectly safe to omit these 2 values if you're not familiar to it.

To finally check the NFS mount is fine,  grep it:


# mount|grep -i nfs
sunrpc on /var/lib/nfs/rpc_pipefs type rpc_pipefs (rw)
server-hostA:/application/remote-application-dir-to-mount on /application/remote-application-dir-to-mount type nfs (rw,bg,nolock,nfsvers=3,tcp,timeo=600,rsize=32768,wsize=32768,hard,intr,addr=1.2.3.4)


That's all enjoy 🙂


Windows add / delete services command sc.exe create/delete – Create or Delete services

Thursday, April 9th, 2015

sc-exe-command-line-program-to-create-delete--service-start-stop-service-on-ms-windows
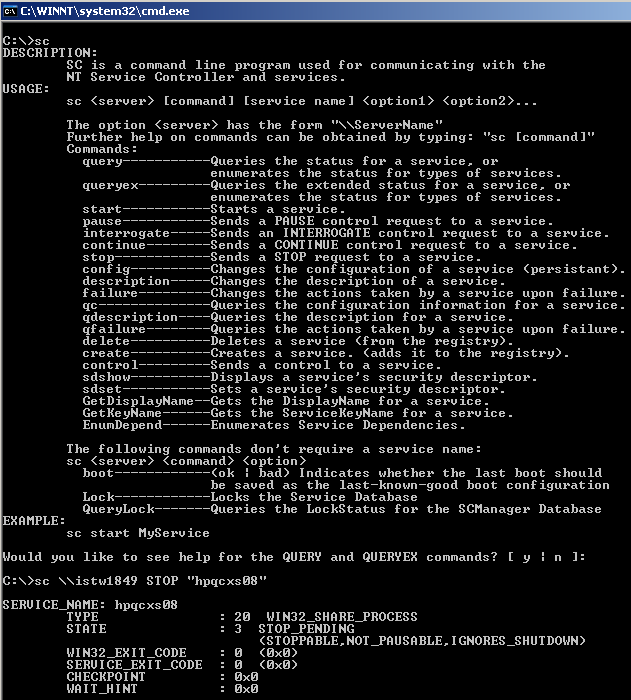
If you end up in situation where you need to delete or create services from current existing ones with a batch script because it is existing on multiple servers and you want to automate / deploy it via batch (.bat) script you will have to use sc.exe tool – Service Controller Command Tool

SC.EXE command  is standard windows console tool to create and delete services. If you want to create a new service, you can use the "create" parameter.

1. Deleting Service with Windows Service Controller Tool

Deleting service is very easy to do you just have to know the service you like to remove not to be listed or Automatically start

sc delete SERVICE_NAME_TO_BE_REMOVED


Below is a real time example on how to remove Apache webserver configured to auto-start


sc.exe delete ApacheService

[SC] DeleteService SUCCESS

2. Create / Add service to existing to auto start on Windows

Before running sc.exe create command with arguments for service you will need to know following info:

  • What will be the Service Name: A single word to name the new service.
  • Full Binary Path: The path name where the executable program for new service is currently located.
  • Dispaly Name for service: A short name for the new service.


C:\Windows>sc.exe create ApacheService 
   binPath= "C:\local\apache\bin\httpd.exe -k runservice" 
   DisplayName= "Apache Server"


[SC] CreateService SUCCESS


Once service is added to be showing in services.msc GUI  you can start the newly added Apache service with:


C:\Windows>sc.exe start ApacheService


SERVICE_NAME: ApacheService
   TYPE               : 10  WIN32_OWN_PROCESS
   STATE              : 2  START_PENDING
                      (NOT_STOPPABLE,NOT_PAUSABLE,IGNORES_SHUTDOWN)
   WIN32_EXIT_CODE    : 0  (0x0)
   SERVICE_EXIT_CODE  : 0  (0x0)
   CHECKPOINT         : 0x2
   WAIT_HINT          : 0x7530
   PID                : 2552
   FLAGS              :


To stop the ApacheService or any other service:


C:\Windows>sc.exe stop ApacheService

SERVICE_NAME: ApacheService
   TYPE               : 10  WIN32_OWN_PROCESS
   STATE              : 3  STOP_PENDING
                      (NOT_STOPPABLE,NOT_PAUSABLE,IGNORES_SHUTDOWN)
   WIN32_EXIT_CODE    : 0  (0x0)
   SERVICE_EXIT_CODE  : 0  (0x0)
   CHECKPOINT         : 0x4
   WAIT_HINT          : 0x7530


To get the status of a running service lets say the recently ran ApacheService:

C:\Windows>sc.exe query ApacheService


SERVICE_NAME: ApacheService
   TYPE               : 10  WIN32_OWN_PROCESS
   STATE              : 4  RUNNING
                      (STOPPABLE,NOT_PAUSABLE,IGNORES_SHUTDOWN)
   WIN32_EXIT_CODE    : 0  (0x0)
   SERVICE_EXIT_CODE  : 0  (0x0)
   CHECKPOINT         : 0x0
   WAIT_HINT          : 0x0


As you see from above output the STATE of service is RUNNING. If Apache Webserver was not running you will get an error like:

[SC] EnumQueryServicesStatus:OpenService FAILED 1060:
The specified service does not exist as an installed service.


Enjoy sc-ing 🙂

How to install VirtualBox Virtual Machine to run Windows XP on Ubuntu Linux (11.10)

Tuesday, January 17th, 2012

Enable_VirtualBox_Windows_XP-fullscreen-with-vboxguest-additions-iso
My beloved sister was complaining games were failing to properly be played with wine emulator , therefore I decided to be kind and help her by installing a Windows XP to run inside a Virtual Machine.My previous install experiments with running MS Windows XP on Linux was on Debian using QEMU virtualmachine emulator.
However as Qemu is a bit less interactive and slower virtualmachine for running Windows (though I prefer it for being completely free software), this time I decided to install the Windows OS with Virtualbox.

My hope was using VirtualBox would be a way easier but I was wrong… I've faced few troubles and I thought many people who initially try to install Virtualbox VM to run Windows on Ubuntu and other Debian based Linux distros will probably experience the same problems as mine, so here is how this article was born.

Here is what I did to have a VirtualBox OS emulator to run Windows XP SP2 on Ubuntu 11.10 Linux

1. Install Virtualbox required packages with apt

root@ubuntu:~# apt-get install virtualbox virtualbox-dkms virtualbox-guest-dkms root@ubuntu:~# apt-get install virtualbox-ose-dkms virtualbox-guest-utils virtualbox-guest-x11
...

If you prefer more GUI or lazy to type commands, the Software Package Manager can also be used to straight install the same packages.
virtualbox-dkms virtualbox-guest-dkms packages are the two which are absolutely necessery in order to enable VirtualBox to support installing Microsoft Windows XP. DKMS modules are also necessery to be able to emulate some other proprietary (non-free) operating systems.
The DKMS packages provide a source for building Vbox guest (OS) additional kernel modules. They also require the kernel source to be install otherwise they fail to compile.

Failing to build the DKMS modules will give you error every time you try to create new VirtualMachine container for installing a fresh Windows XP.
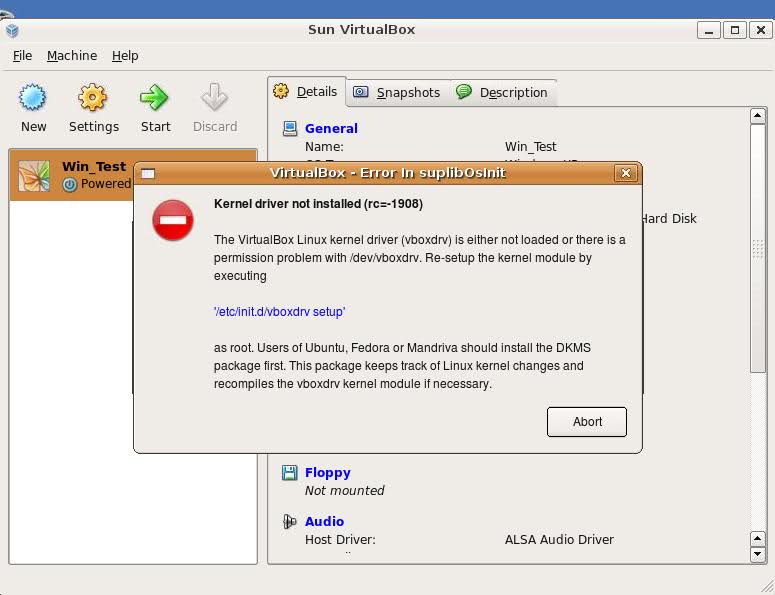
The error happens if the two packages do not properly build the vboxdrv extra Vbox kernel module while the Windows XP installer is loaded from a CD or ISO. The error to pop up is:

Kernel driver not installed (rc=-1908)

The VirtualBox Linux kernel driver (vboxdrv) is either not loaded or there is a permission problem with /dev/vboxdrv. Please reinstall the kernel module by executing

VirtualBox vboxdrv not loaded error Ubuntu Screen

To fix the error:

2. Install latest Kernel source that corresponds to your current kernel version

root@ubuntu:~# apt-get install linux-headers-`uname -r`
...

Next its necessery to rebuild the DKMS modules using dpkg-reconfigure:

3. Rebuild VirtualBox DKMS deb packages

root@ubuntu:~# dpkg-reconfigure virtualbox-dkms
...
root@ubuntu:~# dpkg-reconfigure virtualbox-guest-dkms
...
root@ubuntu:~# dpkg-reconfigure virtualbox-ose-dkms
...

Hopefully the copilation of vboxdrv kernel module should complete succesfully.
To test if all is fine just load the module:

4. Load vboxdrv virtualbox kernel module

root@ubuntu:~# modprobe vboxdrv
root@ubuntu:~#

If you get some error during loading, this means vboxdrv failed to properly compile, try read thoroughfully what the error is and fix it) ;).

As a next step the vboxdrv has to be set to load on every system boot.

5. Set vboxdrv to load on every Ubuntu boot

root@ubuntu:~# echo 'vboxdrv' >> /etc/modules

I am not sure if this step is required, it could be /etc/init.d/virtualbox init script automatically loads the module, anyways putting it to load on boot would do no harm, so better do it.

That's all now, you can launch VirtualBox and use the New button to initiate a new Virtual Machine, I will skip explaining how to do the configurations for a Windows XP as most of the configurations offered by default would simply work without any tampering.

After booting the Windows XP installer I simply followed the usual steps to install Windows and all went smoothly.
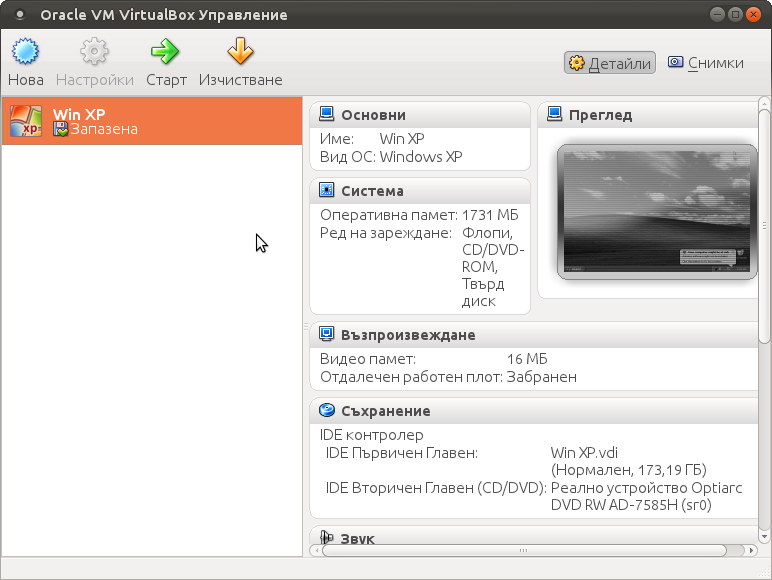
Below you see a screenshot showing the installed Windows XP Virtualbox saved VM session. The screenshot letters are in Bulgarian as my sisters default lanaguage for Ubuntu is bulgarian 😉

VirtualBox installed MS Windows VM screenshot

I hope this article helps someone out there. Please drop me a comment if you experience any troubles with it. Cya 🙂

Resolving “nf_conntrack: table full, dropping packet.” flood message in dmesg Linux kernel log

Wednesday, March 28th, 2012

nf_conntrack_table_full_dropping_packet
On many busy servers, you might encounter in /var/log/syslog or dmesg kernel log messages like

nf_conntrack: table full, dropping packet

to appear repeatingly:

[1737157.057528] nf_conntrack: table full, dropping packet.
[1737157.160357] nf_conntrack: table full, dropping packet.
[1737157.260534] nf_conntrack: table full, dropping packet.
[1737157.361837] nf_conntrack: table full, dropping packet.
[1737157.462305] nf_conntrack: table full, dropping packet.
[1737157.564270] nf_conntrack: table full, dropping packet.
[1737157.666836] nf_conntrack: table full, dropping packet.
[1737157.767348] nf_conntrack: table full, dropping packet.
[1737157.868338] nf_conntrack: table full, dropping packet.
[1737157.969828] nf_conntrack: table full, dropping packet.
[1737157.969928] nf_conntrack: table full, dropping packet
[1737157.989828] nf_conntrack: table full, dropping packet
[1737162.214084] __ratelimit: 83 callbacks suppressed

There are two type of servers, I've encountered this message on:

1. Xen OpenVZ / VPS (Virtual Private Servers)
2. ISPs – Internet Providers with heavy traffic NAT network routers
 

I. What is the meaning of nf_conntrack: table full dropping packet error message

In short, this message is received because the nf_conntrack kernel maximum number assigned value gets reached.
The common reason for that is a heavy traffic passing by the server or very often a DoS or DDoS (Distributed Denial of Service) attack. Sometimes encountering the err is a result of a bad server planning (incorrect data about expected traffic load by a company/companeis) or simply a sys admin error…

– Checking the current maximum nf_conntrack value assigned on host:

linux:~# cat /proc/sys/net/ipv4/netfilter/ip_conntrack_max
65536

– Alternative way to check the current kernel values for nf_conntrack is through:

linux:~# /sbin/sysctl -a|grep -i nf_conntrack_max
error: permission denied on key 'net.ipv4.route.flush'
net.netfilter.nf_conntrack_max = 65536
error: permission denied on key 'net.ipv6.route.flush'
net.nf_conntrack_max = 65536

– Check the current sysctl nf_conntrack active connections

To check present connection tracking opened on a system:

:

linux:~# /sbin/sysctl net.netfilter.nf_conntrack_count
net.netfilter.nf_conntrack_count = 12742

The shown connections are assigned dynamicly on each new succesful TCP / IP NAT-ted connection. Btw, on a systems that work normally without the dmesg log being flooded with the message, the output of lsmod is:

linux:~# /sbin/lsmod | egrep 'ip_tables|conntrack'
ip_tables 9899 1 iptable_filter
x_tables 14175 1 ip_tables

On servers which are encountering nf_conntrack: table full, dropping packet error, you can see, when issuing lsmod, extra modules related to nf_conntrack are shown as loaded:

linux:~# /sbin/lsmod | egrep 'ip_tables|conntrack'
nf_conntrack_ipv4 10346 3 iptable_nat,nf_nat
nf_conntrack 60975 4 ipt_MASQUERADE,iptable_nat,nf_nat,nf_conntrack_ipv4
nf_defrag_ipv4 1073 1 nf_conntrack_ipv4
ip_tables 9899 2 iptable_nat,iptable_filter
x_tables 14175 3 ipt_MASQUERADE,iptable_nat,ip_tables


II. Remove completely nf_conntrack support if it is not really necessery

It is a good practice to limit or try to omit completely use of any iptables NAT rules to prevent yourself from ending with flooding your kernel log with the messages and respectively stop your system from dropping connections.

Another option is to completely remove any modules related to nf_conntrack, iptables_nat and nf_nat.
To remove nf_conntrack support from the Linux kernel, if for instance the system is not used for Network Address Translation use:

/sbin/rmmod iptable_nat
/sbin/rmmod ipt_MASQUERADE
/sbin/rmmod rmmod nf_nat
/sbin/rmmod rmmod nf_conntrack_ipv4
/sbin/rmmod nf_conntrack
/sbin/rmmod nf_defrag_ipv4

Once the modules are removed, be sure to not use iptables -t nat .. rules. Even attempt to list, if there are any NAT related rules with iptables -t nat -L -n will force the kernel to load the nf_conntrack modules again.

Btw nf_conntrack: table full, dropping packet. message is observable across all GNU / Linux distributions, so this is not some kind of local distribution bug or Linux kernel (distro) customization.
 

III. Fixing the nf_conntrack … dropping packets error

– One temporary, fix if you need to keep your iptables NAT rules is:

linux:~# sysctl -w net.netfilter.nf_conntrack_max=131072

I say temporary, because raising the nf_conntrack_max doesn't guarantee, things will get smoothly from now on.
However on many not so heavily traffic loaded servers just raising the net.netfilter.nf_conntrack_max=131072 to a high enough value will be enough to resolve the hassle.

– Increasing the size of nf_conntrack hash-table

The Hash table hashsize value, which stores lists of conntrack-entries should be increased propertionally, whenever net.netfilter.nf_conntrack_max is raised.

linux:~# echo 32768 > /sys/module/nf_conntrack/parameters/hashsize
The rule to calculate the right value to set is:
hashsize = nf_conntrack_max / 4

– To permanently store the made changes ;a) put into /etc/sysctl.conf:

linux:~# echo 'net.netfilter.nf_conntrack_count = 131072' >> /etc/sysctl.conf
linux:~# /sbin/sysct -p

b) put in /etc/rc.local (before the exit 0 line):

echo 32768 > /sys/module/nf_conntrack/parameters/hashsize

Note: Be careful with this variable, according to my experience raising it to too high value (especially on XEN patched kernels) could freeze the system.
Also raising the value to a too high number can freeze a regular Linux server running on old hardware.

– For the diagnosis of nf_conntrack stuff there is ;

/proc/sys/net/netfilter kernel memory stored directory. There you can find some values dynamically stored which gives info concerning nf_conntrack operations in "real time":

linux:~# cd /proc/sys/net/netfilter
linux:/proc/sys/net/netfilter# ls -al nf_log/

total 0
dr-xr-xr-x 0 root root 0 Mar 23 23:02 ./
dr-xr-xr-x 0 root root 0 Mar 23 23:02 ../
-rw-r--r-- 1 root root 0 Mar 23 23:02 0
-rw-r--r-- 1 root root 0 Mar 23 23:02 1
-rw-r--r-- 1 root root 0 Mar 23 23:02 10
-rw-r--r-- 1 root root 0 Mar 23 23:02 11
-rw-r--r-- 1 root root 0 Mar 23 23:02 12
-rw-r--r-- 1 root root 0 Mar 23 23:02 2
-rw-r--r-- 1 root root 0 Mar 23 23:02 3
-rw-r--r-- 1 root root 0 Mar 23 23:02 4
-rw-r--r-- 1 root root 0 Mar 23 23:02 5
-rw-r--r-- 1 root root 0 Mar 23 23:02 6
-rw-r--r-- 1 root root 0 Mar 23 23:02 7
-rw-r--r-- 1 root root 0 Mar 23 23:02 8
-rw-r--r-- 1 root root 0 Mar 23 23:02 9


IV. Decreasing other nf_conntrack NAT time-out values to prevent server against DoS attacks

Generally, the default value for nf_conntrack_* time-outs are (unnecessery) large.
Therefore, for large flows of traffic even if you increase nf_conntrack_max, still shorty you can get a nf_conntrack overflow table resulting in dropping server connections. To make this not happen, check and decrease the other nf_conntrack timeout connection tracking values:

linux:~# sysctl -a | grep conntrack | grep timeout
net.netfilter.nf_conntrack_generic_timeout = 600
net.netfilter.nf_conntrack_tcp_timeout_syn_sent = 120
net.netfilter.nf_conntrack_tcp_timeout_syn_recv = 60
net.netfilter.nf_conntrack_tcp_timeout_established = 432000
net.netfilter.nf_conntrack_tcp_timeout_fin_wait = 120
net.netfilter.nf_conntrack_tcp_timeout_close_wait = 60
net.netfilter.nf_conntrack_tcp_timeout_last_ack = 30
net.netfilter.nf_conntrack_tcp_timeout_time_wait = 120
net.netfilter.nf_conntrack_tcp_timeout_close = 10
net.netfilter.nf_conntrack_tcp_timeout_max_retrans = 300
net.netfilter.nf_conntrack_tcp_timeout_unacknowledged = 300
net.netfilter.nf_conntrack_udp_timeout = 30
net.netfilter.nf_conntrack_udp_timeout_stream = 180
net.netfilter.nf_conntrack_icmp_timeout = 30
net.netfilter.nf_conntrack_events_retry_timeout = 15
net.ipv4.netfilter.ip_conntrack_generic_timeout = 600
net.ipv4.netfilter.ip_conntrack_tcp_timeout_syn_sent = 120
net.ipv4.netfilter.ip_conntrack_tcp_timeout_syn_sent2 = 120
net.ipv4.netfilter.ip_conntrack_tcp_timeout_syn_recv = 60
net.ipv4.netfilter.ip_conntrack_tcp_timeout_established = 432000
net.ipv4.netfilter.ip_conntrack_tcp_timeout_fin_wait = 120
net.ipv4.netfilter.ip_conntrack_tcp_timeout_close_wait = 60
net.ipv4.netfilter.ip_conntrack_tcp_timeout_last_ack = 30
net.ipv4.netfilter.ip_conntrack_tcp_timeout_time_wait = 120
net.ipv4.netfilter.ip_conntrack_tcp_timeout_close = 10
net.ipv4.netfilter.ip_conntrack_tcp_timeout_max_retrans = 300
net.ipv4.netfilter.ip_conntrack_udp_timeout = 30
net.ipv4.netfilter.ip_conntrack_udp_timeout_stream = 180
net.ipv4.netfilter.ip_conntrack_icmp_timeout = 30

All the timeouts are in seconds. net.netfilter.nf_conntrack_generic_timeout as you see is quite high – 600 secs = (10 minutes).
This kind of value means any NAT-ted connection not responding can stay hanging for 10 minutes!

The value net.netfilter.nf_conntrack_tcp_timeout_established = 432000 is quite high too (5 days!)
If this values, are not lowered the server will be an easy target for anyone who would like to flood it with excessive connections, once this happens the server will quick reach even the raised up value for net.nf_conntrack_max and the initial connection dropping will re-occur again …

With all said, to prevent the server from malicious users, situated behind the NAT plaguing you with Denial of Service attacks:

Lower net.ipv4.netfilter.ip_conntrack_generic_timeout to 60 – 120 seconds and net.ipv4.netfilter.ip_conntrack_tcp_timeout_established to stmh. like 54000

linux:~# sysctl -w net.ipv4.netfilter.ip_conntrack_generic_timeout = 120
linux:~# sysctl -w net.ipv4.netfilter.ip_conntrack_tcp_timeout_established = 54000

This timeout should work fine on the router without creating interruptions for regular NAT users. After changing the values and monitoring for at least few days make the changes permanent by adding them to /etc/sysctl.conf

linux:~# echo 'net.ipv4.netfilter.ip_conntrack_generic_timeout = 120' >> /etc/sysctl.conf
linux:~# echo 'net.ipv4.netfilter.ip_conntrack_tcp_timeout_established = 54000' >> /etc/sysctl.conf

Speed up WordPress / Joomla CMS and MySQL server on Linux with tmpfs ram file system / Decrease Website pageload times with RAM caching

Wednesday, March 4th, 2015

speed-up-accelerate-wordpress-joomla-drupal-cms-and-mysql-server-with-tmpfs_ramfs_decrease-pageload-times-with-ram-caching
As a WordPress blog owner and an sys admin that has to deal with servers running a lot of WordPress / Joomla / Droopal and other custom CMS installed on servers, performoing slow or big enough to put a significant load on servers
and I love efficiency and hardware cost saving is essential for my daily job, I'm constantly trying to find new ways to optimize Customer Website (WordPress) and rest of sites in order to utilize better our servers and improve our clients sites speed (and hence satisfaction). 

There is plenty of little things to do on servers but probably among the most crucial ones which we use nowadays that save us a lot of money is tmpfs, and earlier (ramfs) – previously known as shmfs).
TMPFS is a (Temporary File Storage Facility) Linux kernel technology based on ramfs (used by Linux kernel initrd / initramfs on boot time in order to load and store the Linux kernel in memory, before system hard disk partition file systems are mounted) which is heavily used by virtually all modern popular Linux distributions. 

Using ramfs (cramfs variation – Compressed ROM filesystem) has been used to store different system environment kernel and Desktop components of many Linux environment / applications and used by a lot of the Linux BootCD such as the most famous (Klaus Knopper's) KNOPPIX LiveCD and Trinity Rescue Kit Linux (TRK uses /dev/shm which btw can be seen on most modern Linux distros and is actually just another mounted tmpfs).
If you haven't tried Live Linux yet try it out as me and a lot of sysadmins out there use some kind of LiveLinux at least few times on yearly basis  to Recover Unbootable Linux servers after some applied remote Updates as well as for Rescuing (Save) Data from Linux server failing to properly boot because of hard disk (bad blocks) failures. As I said earlier TMPFS is also used on almost any distribution for the /dev/ filesystem which is kept in memory.

You can see which tmpfs partitions is used on your Linux server with:


debian-server:~# mount |grep -i tmpfs
tmpfs on /lib/init/rw type tmpfs (rw,nosuid,mode=0755)
udev on /dev type tmpfs (rw,mode=0755)
tmpfs on /dev/shm type tmpfs (rw,nosuid,nodev)


Above is an output from a standard Debian Linux server. On CentOS 7 standard mounted tmpfs are as follows:


[root@centos ~]# mount |grep -i tmpfs
devtmpfs on /dev type devtmpfs (rw,nosuid,seclabel,size=1016332k,nr_inodes=254083,mode=755)
tmpfs on /dev/shm type tmpfs (rw,nosuid,nodev,seclabel)
tmpfs on /run type tmpfs (rw,nosuid,nodev,seclabel,mode=755)
tmpfs on /sys/fs/cgroup type tmpfs (rw,nosuid,nodev,noexec,seclabel,mode=755)


[root@centos ~]# df -h|grep -i tmpfs
devtmpfs                 993M     0  993M   0% /dev
tmpfs                   1002M   92K 1002M   1% /dev/shm
tmpfs                   1002M  8.8M  993M   1% /run
tmpfs                   1002M     0 1002M   0% /sys/fs/cgroup

The /run tmpfs mounted directory is also to be seen also on latest Ubuntus and Fedoras and is actually the good old /var/run ( where applications keep there pids and some small app related files) stored in tmpfs filesystem stored in memory.

If you're wondering what is /dev/shm and why it appears mounted on every single Linux Server / Desktop you've ever used this is a special filesystem shared memory which various running programs (processes) can use to transfer data quick and efficient between each other to preven the slow disk swapping. People using Linux for the rest 15 years should remember /dev/shm has been a target of a lot of kernel exploits as historically it had a lot of security issues.

While writting this article I've just checked about KNOPPIX developed amd just for info as of time of writting this distro has already 1000+ programs on CD version and 2600+ packages / application on DVD version.
Nowadays Knoppix is mostly used mostly as USB Live Flash drive as a lot of people are dropping CD / DVD use (many servers doesn't have a CD / DVD Drive) and for USB Live Flash Linux distros tmpfs is also key technology used as this gives the end user an amazing fast experience (Desktop applications run much fasten on Live USBs when tmpfs is used than when the slow 7200 RPM HDDs are used).

Loading big parts of the distribution within RAM (with tmpfs from Linux Kernel 2.4+ onwards) is also heavily used by a lot of Cluster vendors in most of Clustered (Cloud) Linux based environemnts, cause TMPFS gives often speeds up improvements to x30 times and decreases greatly I/O HDD. FreeBSD users will be happy to know that TMPFS is already ported and could be used on from FreeBSD 7.0+ onward.

In this small article I will give you example use on how I use tmpfs to speed up our WordPress Websites which use WP Caching plugins such as W3 Total Cache and WP Super Cache
and Hyper Cache / WP Super Cache disk caching and MySQL server as a Database backend.
Below example is wordpress specific but since it can be easily applied to JoomlaDrupal or any other CMS out there that uses mySQL server to make a lot of CPU expensive memory hungry (LEFT JOIN) queries which end up using a slow 7200 RPM hard disk.


1. Preparing tmpfs partitions for WordPress File Cache directory
 

If you want to give tmpfs a test drive, I recommend you try to create / mount a 20 Megabyte partition. To create a tmpfs partition you don't need to use a tool like mkfs.ext3 / mkfs.ext4 as TMPFS is in reality a virtual filesystem that is mapped in the server system physical RAM (volatile memory). TMPFS is very nice because if you run out of free RAM system starts a combination of RAM use + some Hard disk SWAP 
The great thing about TMPFS is it never uses all of the available RAM and SWAP, which would not halt your server if TMPFS partition gets filled, but instead you will start getting the usual "Insufficient Disk Space", just like with a physical HDD parititon. RAMFS cares much less about server compared to TMPFS, because if RAMFS is historically older.

ramfs file systems cannot be limited in size like a disk base file system which is limited by it’s capacity, thus ramfs will continue using memory storage until the system runs out of RAM and likely crashes or becomes unresponsive. This is a problem if the application writing to the file system cannot be limited in total size, so in my opinion you better stay away from RAMFS except you have a good idea what you're doing. Another disadvantage of RAMFS compared to TMPFS is you cannot see the size of the file system in df and it can only be estimated by looking at the cached entry in free.

Note that before proceeding to use TMPFS or RAMFS you should know besides having advantages, there are certain serious disadvantage that if the server using tmpfs (in RAM) to store files crashes the customer might loose his data, therefore using RAM filesystems on Production servers is best to be used just for caching folders which are regularly synchronized with (rsync) to some folder to assure no data will be lost on server reboot or crash.

Memory of fast storage areas are ideally suited for applications which need repetitively small data areas for caching or using as temporary space such as Jira (Issue and Proejct Tracking Software) Indexing  As the data is lost when the machine reboots the tmpfs stored data must not be data of high importance as even scheduling backups cannot guarantee that all the data will be replicated in the even of a system crash.

To test mounting a tmpfs virtual (memory stored) filesystem issue:
 

mount -t tmpfs tmpfs -o size=256m /mnt/tmpfs


If you want to test mount a ramfs instead:


 mount -t ramfs -o size=256m ramfs /mnt/ramfs


debian-server:~#  mount |grep -i -E "ramfs|tmpfs"
tmpfs on /lib/init/rw type tmpfs (rw,nosuid,mode=0755)
udev on /dev type tmpfs (rw,mode=0755)
tmpfs on /dev/shm type tmpfs (rw,nosuid,nodev)
tmpfs on /mnt/tmpfs type tmpfs (rw,size=256m)
ramfs on /mnt/ramfs type tmpfs (rw,size=256m)


Once mounted tmpfs can be used in the same way as any ext4 / reiserfs filesystem. In the same way to make mounts permanent, its necessery to add a line to /etc/fstab

To illustrate better a tmpfs use case on my blog running WordPress with W3TotalCache (W3TC) plugin cache folder in /var/www/blog/wp-content/w3tc to get advantage of tmpfs to store w3tc files.

a) Stop Apache

On Debian
 

debian-server:~# /etc/init.d/apache stop


On CentOS 
 

[root@centos ~]# /etc/init.d/httpd stop


b) Move w3tc dir to w3tc-bak


debian-server:~# cd /var/www/blog/wp-content/
debian-server:~# mv w3tc w3tc-bak


c) Create w3tc directory
 

debian-server:/var/www/blog/wp-content# mkdir w3tc
debian-server:/var/www/blog/wp-content# chown -R www-data:www-data w3tc


d) Add tmpfs record to /etc/fstab

My W3TC Cache didn't grow bigger than 2Gigabytes so I create a 2Giga directory for it by adding following in /etc/fstab 
 

debian-server:~# vim /etc/fstab


tmpfs /var/www/blog/wp-content/w3tc tmpfs defaults,size=2g,noexec,nosuid,uid=33,gid=33,mode=1755 0 0


You might also want to add the nr_inodes (option) to tmpfs while mounting. nr_inodes is the maximum inode for instance. Default is half the number of your physical RAM pages, (on a machine with highmem) the number of lowmem RAM page, some common option that should work is nr_inodes=5k, if you're unsure what this option does you can safely skip it 🙂

e) Mount new added tmpfs folder

Then to mount the newly added filesystem issue:
 

mount -a


Or if you're on a CentOS / RHEL server use httpd Apache user instead and whenever you have docroot and wordpress installed.


[root@centos ~]# chown -R apache:apache: w3tc


If you're using Apache SuPHP use whatever the UID / GID is proper.

On CentOS you will need to set proper UID and GID (UserID / GroupID), to find out which ones to to use check in /etc/passwd:
 

[root@centos ~]# grep -i apache /etc/passwd
apache:x:48:48:Apache:/var/www:/sbin/nologin


f) Move old w3tc cache from w3tc-bak to w3tc


debian-server:/var/www/blog/wp-content# mv w3tc-bak/* w3tc/


g) Start again Apache

On Debian:


debian-server:~# /etc/init.d/apache2 start


On CentOS:
 

[root@centos~]# /etc/init.d/httpd start

h) Keeping w3tc cache site folder synced

As I said earlier the biggest problem with caching (the reason why many hosting providers) and site admins refuse to use it is they might loose some data, to prevent data loss or at least mitigate the data loss to few minutes intervals it is a good idea to synchronize tmpfs kept folders somewhere to disk with rsync.

To achieve that use a cronjob like this:
 

debian-server:~# crontab -u root -e
*/5 * * * * /usr/bin/ionice -c3 -n7 /usr/bin/nice -n 19 /usr/bin/rsync -ah –stats –delete /var/www/blog/wp-content/w3tc/ /backups/tmpfs/cache/ 1>/dev/null


Note that you will need to have the /backups/tmpfs/cache folder existing, create it with:


debian-server:~# mkdir -p /backups/tmpfs/cache


You will also need to add a rsync synchronization from backupped folder to tmpfs (in case if the server gets accidently rebooted because it hanged or power outage), place in

/etc/rc.local


ionice -c3 -n7 nice -n 19 rsync -ahv –stats –delete /backups/tmpfs/cache/ /var/www/blog/wp-content/w3tc/ 1>/dev/null


(somewhere before exit 0) line
 

0 05 * * * /usr/bin/ionice -c3 -n7 /bin/nice -n 19 /usr/bin/rsync -ah –stats –delete /var/www/blog/wp-content/w3tc/ /backups/tmpfs/cache/ 1>/dev/null


2. Preparing tmpfs partitions for MySQL server temp File Cache directory


Its common that MySQL servers had to serve a lot of long and heavy SQL JOIN Queries mostly by related posts WP plugins such as (Zemanta Related Posts) and Contextual Related posts though MySQLs are well optimized  to work as much as efficient using mysql tuner (tuning primer) still often SQL servers get a lot of temp tables created to disk (about 25% to 30%) of all SQL queries use somehow HDD to serve queries and as this is very slow and there is file lock created the overall MySQL performance becomes sluggish at times to fix (resolve) that without playing with SQL code to optimize the slow queries the best way I found is by using TMPFS as MySQL temp folder.

To do so I create a TMPFS usually the size of 256 MB because this is usually enough for us, but other hosting companies might want to add bigger virtual temp disk:

a) Add tmpfs new dir to /etc/fstab

In /etc/fstab add below record with vim editor:
 

debian-server:~# vim /etc/fstab


tmpfs /var/mysqltmp tmpfs rw,gid=111,uid=108,size=256M,nr_inodes=10k,mode=0700 0 0


Note that the uid / and gid 105 and 114 are taken again from /etc/passwd

On Debian

debian-server:~# grep -i mysql /etc/passwd
mysql:x:108:111:MySQL Server,,,:/var/lib/mysql:/bin/false


On CentOS
 

[root@centos ~]# grep -i mysql /etc/passwd
mysql:x:27:27:MySQL Server:/var/lib/mysql:/bin/bash


b) Create folder /var/mysqltmp or whenever you want to place the tmpfs memory kept SQL folder


debian-server:~# mkdir /var/mysqltmp
debian-server:~# chown mysql:mysql /var/mysqltmp


debian-server:~# mount|grep -i tmpfs
tmpfs on /lib/init/rw type tmpfs (rw,nosuid,mode=0755)
udev on /dev type tmpfs (rw,mode=0755)
tmpfs on /dev/shm type tmpfs (rw,nosuid,nodev)
tmpfs on /var/www/blog/wp-content/w3tc type tmpfs (rw,noexec,nosuid,size=2g,uid=33,gid=33,mode=1755)
tmpfs on /var/mysqltmp type tmpfs (rw,gid=108,uid=111,size=256M,nr_inodes=10k,mode=0700)


c) Add new path to tmpfs created folder in my.cnf 

Then  edit /etc/mysql/my.cnf


debian-server:~# vim /etc/mysql/my.cnf

[mysqld]
#
# * Basic Settings
#
user        = mysql
pid-file    = /var/run/mysqld/mysqld.pid
socket      = /var/run/mysqld/mysqld.sock
port        = 3306
basedir     = /usr
datadir     = /var/lib/mysql
tmpdir      = /var/mysqltmp


On CentOS edit and change tmpdir in same way within /etc/my.cnf


d) Finally Restart Apache and MySQL to make mysql start using new set tmpfs memory kept folder

On Debian:
 

debian-server:~# /etc/init.d/apache2 stop; /etc/init.d/mysql restart; /etc/init.d/apache2 start

On CentOS:
 

[root@centos ~]# /etc/init.d/httpd stop; /etc/init.d/mysqld restart; /etc/initd/httpd start


Now monitor your server and check your pagespeed increase for me such an optimization usually improves site performance so site becomes +50% faster, to see the difference you can test your website before applying tmpfs caching for site and after that by using Google PageInsight (PageSpeed) Online Test. Though this example is for MySQL and WordPress you can easily adopt the same for Joomla if you have Joomla Caching enabled to some folder, same goes for any other CMS such as Drupal that can take use of Disk Caching. Actually its a small secret of many Hosting providers that allow clients to create sites via CPanel and Kloxo this tmpfs optimizations are already used for sites and by this the provider is able to offer better website service on lower prices. VPS hosting providers also use heavy caching. A lot of people are using TMPFS also to accelerate Sites that have enabled Google Pagespeed as Cacher and accelerator, as PageSpeed module puts a heavy HDD I/O load that can easily stone the server. Many admins also choose to use TMPFS for  /tmp, /var/run, and /var/lock directories as this leads often to significant overall server services operations improvement.
Once you have tmpfs enabled, It is a good idea to periodically monitor your SWAP used space with (df -h), because if you allocate bigger tmpfs partitions than your physical memory and tmpfs's full size starts to be used your machine will start swapping heavily and this could have a very negative performance affect.
 

debian-server:~# df -h|grep -i tmpfs
tmpfs            3,9G     0   3,9G   0% /lib/init/rw
tmpfs            3,9G     0   3,9G   0% /dev/shm
tmpfs            2,0G  1,4G   712M  66% /var/www/blog/wp-content/w3tc
tmpfs            256M     0   256M   0% /mnt/tmpfs
tmpfs            256M  236K   256M   1% /var/mysqltmp

The applications of tmpfs to accelerate services is up to your imagination, so I will be glad to hear from other admins on any interesting other application or problems faced while using TMPFS.

 Enjoy! 🙂

Check your Joomla Security with OWASP Joomla Vulnerability Scanner

Wednesday, June 25th, 2014

check-joomla-security-owasp-vulnerability-scanner-tool

If you working in field of Computer Security you should have definitely heard of OWASP (Open Web Application Security Project).
OWASP is very much like MetaSploit – Penetration Testing Framework except it is focusing mostly on web security.
As of time of wrtitting this post OWASP Project is probably the largest contributor in Web Security tools. If you're somehow in the field of Web and Middleware (Security team) or writting Web Application software (with security in mind) OWASP is definitely a project you should study well and the provided tools can help you develop your web services server infrastructure or application design with top security in mind.

One of the famous OWASP tools is Joomla Security Scanner – a toll that can scan and find all potential and present vulnerability in a Joomla (Pure Joomla or Joomla Based  website). OWASP Joomla Security Scanner script is written in Perl, making it possible to run on any OS Platform that can run Perl and CPAN modules. Thus Joomla Security Scanner is running on Windows, Linux and Mac OS X.

  • To use OWASP Joomla Security scanner on Linux (depending on Linux distribution install perl via deb or rpm package manager – most Linux distributions have it already pre-installed).
     
  • For Joomla Security scanner on Windows you will have to install one of Perl Windows ports either Active Perl or Strawberry Perl.

Once perl interpreter is up installed, e.g. test it with:
 

# perl --version

This is perl, v5.10.1 (*) built for x86_64-linux-gnu-thread-multi
(with 61 registered patches, see perl -V for more detail)

Copyright 1987-2009, Larry Wall

Perl may be copied only under the terms of either the Artistic License or the
GNU General Public License, which may be found in the Perl 5 source kit.

Complete documentation for Perl, including FAQ lists, should be found on
this system using "man perl" or "perldoc perl".  If you have access to the
Internet, point your browser at http://www.perl.org/, the Perl Home Page.


C:Usersggeorgi>perl --version

This is perl 5, version 16, subversion 3 (v5.16.3) built for MSWin32-x64-multi-t
hread
(with 1 registered patch, see perl -V for more detail)

Copyright 1987-2012, Larry Wall

Binary build 1604 [298023] provided by ActiveState http://www.ActiveState.com
Built Apr 14 2014 15:29:45

Perl may be copied only under the terms of either the Artistic License or the
GNU General Public License, which may be found in the Perl 5 source kit.

Complete documentation for Perl, including FAQ lists, should be found on
this system using "man perl" or "perldoc perl".  If you have access to the
Internet, point your browser at http://www.perl.org/, the Perl Home Page.


Download Latest Joolma Vulnerability Scanner (here), in case if tool disappears in future a mirrored version for download of Joomla Vulnerability Scanner is (here)
UnZIP the scanner in new created directory start it run Windows command line (I use ConEmu) – Press Windows button + R (and type ConEmu) – or if you don't have conemu cmd.exe, go to whenever the archive was dearchived:

cd UsersgeorgiDownloadsJoomla-scanner

Install all required CPAN perl modules for Joomla Scanner

cpan

This will launch perl cpan installation console, you will see a prompt:

cpan>

The console is a front end which uses Perl's Cpan modules site to download libraries, CPAN is doing quite a good job as it also downloads dependencies if installed perl module has such.

Inside CPAN console type:

install local::lib

Answer any further prompts by simply pressing Enter a lot of times.
Next install App::cpanminus:

install App::cpanminus

Then Exit CPAN, type:

exit

This should have installed cpanminus to test it run in Linux shell / win command prompt:

cpanm


Usage: cpanm [options] Module [...]
Try `cpanm --help` or `man cpanm` for more options.


As a last step install Switch from cpanminus:

cpanm -f install Switch


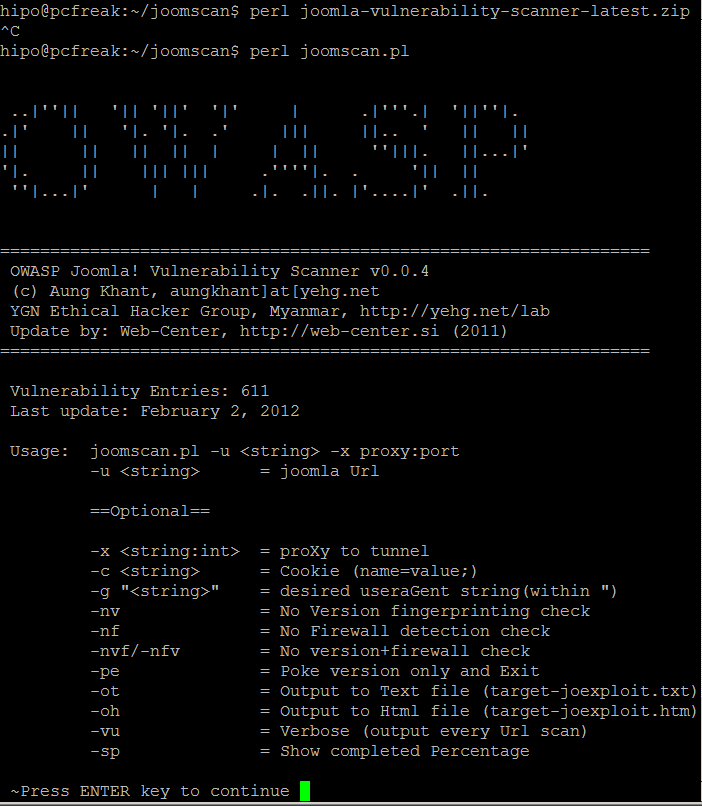
Run Joomla Scanner

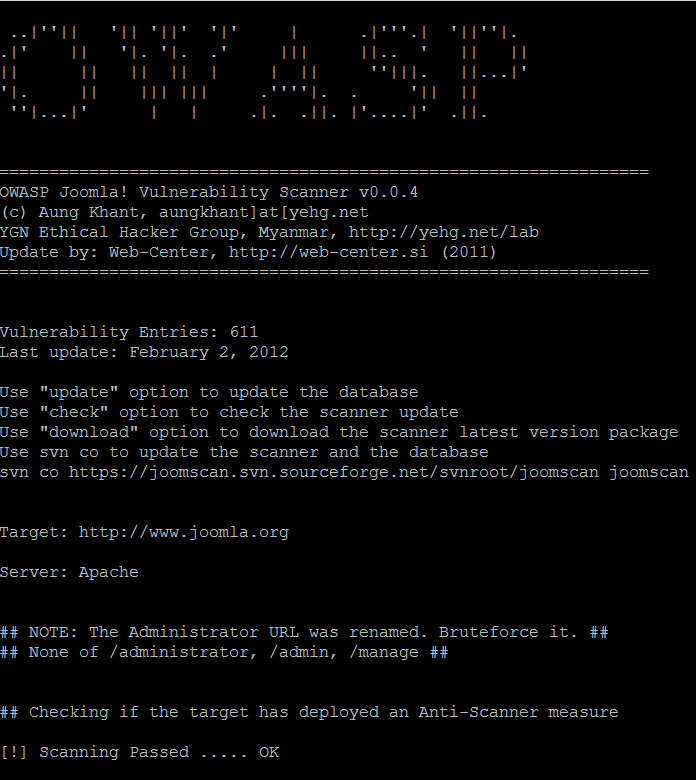
/images/joomla-vulnerability-scanner-scanning-host-in-action-check-for-joomla-vulnerabilities-tool1
 

perl joomscan.pl

/images/joomla-vulnerability-scanner-scanning-host-in-action-check-for-joomla-vulnerabilities-tool1


How to take multiple screenshots with scrot and ImageMagick import commands in terminal on GNU / Linux and FreeBSD

Friday, January 13th, 2012

scrot and import are two commands, which can be used to take screenshot in terminal on Linux and FreeBSD:

To use scrot cmd to take screenshots on Ubuntu and Debian the scrot package has to be installed:

noah:~# apt-get install scrot
...

scrot should also be available on most other Linux distributions in the main repositories, I'll be glad to hear if someone has used it on Fedora, SUSE etc.

On FreeBSD, there is a port called scrot , to install on FreeBSD:

freebsd# cd /usr/ports/graphics/scrot
freebsd# make install clean
...

Scrot has plenty of nice arguments one can use to make a screenshot. Maybe the most handy one in my view is after a preliminary set delay before screenshot is taken.

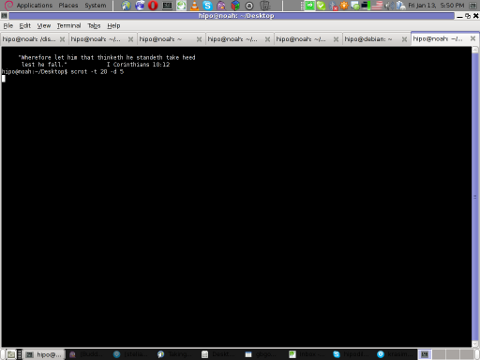
To take screenshot with it after lets say 5 seconds delay before the screenshot:

hipo@noah:~/Desktop$ scrot -t 20 -d 5

Screenshot scrot my debian Linux gnome-termina

To put an year, month and day and year followed by screen resolution with scrot :

hipo@noah:~$ scrot '%Y-%m-%d_$wx$h.png'

Another way to take a screenshot of screen with command is by using ImageMagick'simport image manipulation package.
To take screenshot of the current screen via terminal using import , type in xterm, gnome-termina or Gnome's Run Application (ALT+F2)

hipo@noah:~$ import -window root ScreenShot.png

To make import command to save the taken screenshot in a format (minute:hour:day:month:year)i :

hipo@noah:~$ import -window root $screenshot_dir/screenshot-$(date +%M_%k_%d_%m_%Y|sed -e 's/^ *//').png

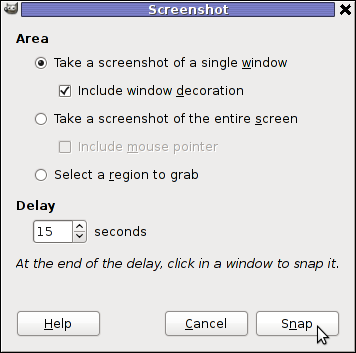
Taking a delayed screenshot is also possible via The GIMP via menus File -> Create -> Screenshot

GIMP Screenshot 15 seconds delay GIMP window screenshot

Now here is an interesting question, what if I would like to take periodic screenshots of what I do on my Desktop to take random movie scenes from a movie I watch with totem or vlc??

This task is quite easily achiavable with a little bash shell script, I wrote:

screenshot_dir='Screenshots';
seconds='60';
if [ ! -d "$screenshot_dir" ]; then
mkdir $screenshot_dir;
fi
while [ 1 ]; do
sleep $seconds;
(import -window root $screenshot_dir/screenshot-$(date +%M_%k_%d_%m_%Y|sed -e 's/^ *//').png) &
done

This script will take screenshot automatically to Screenshots/ directory every (1 min – 60 seconds)
You can also my downloads take_screenshot_every_60_secs_import.sh here

To use take_screenshot_every_60_secs_import.sh just issue the script inside xterm or gnome-terminal, after that simply use your computer as you normally would.
The script will take snapshots every minute and store all taken screenshots in Screenshots dir.

If you prefer to use scrot to take automatically the screenshots every lets say 5 minutes, you can use a script like:

screenshot_dir='Screenshots';
# 300 secs (5 mins)seconds='300';
if [ ! -d "$screenshot_dir" ]; then
mkdir $screenshot_dir;
fi
while [ 1 ]; do
sleep $seconds;
(scrot $screenshot_dir/'%Y-%m-%d_$wx$h.png') &
done

You can fetch take_screenshot_every_60_secs_scrot.sh here

The script using scrot is better in terms of efficiency, the system load scrot will put on your machine will be less.
Using some of this scripts will be handy if you need screenshots to Movies, Programs and favourite Free Software games.
Hope this is educative to someone 😉