Posts Tagged ‘username’
Friday, March 6th, 2015 
Usually admins like me who casuanlly need to administer "forests" (thousands of identicallyconfigured services Linux servers) are generating and using RSA / DSA key authentication for passwordless login, however this is not always possible as some client environments does prohibit the use of RSA / DSA non-pass authentication, thus in such environments to make routine server basic package rpm / deb upgrades or do other maintanance patching its necessery to use normal ssh user / pass login but as ssh client doesn't allow password to be provided from prompt for security reasons and therefore using some custom bash loop to issue single command to many servers (such as explained in my previous article) requires you to copy / paste password on password prompt multiple times. This works its pretty annoying so if you want to run single command on all your 500 servers with specifying the password from password prompt use sshpass tool (for non-interactive ssh password auth).
SSHPASS official site description:
sshpass is a utility designed for running ssh using the mode referred to as "keyboard-interactive" password authentication, but in non-interactive mode.
Install sshpass on Debian / Ubuntu (deb based) Linux
sshpass is installable right out of regular repositories so to install run:
apt-get install —yes sshpass
Install sshpass on CentOS / Fedora (RPM based) Linux
sshpass is available also across most RPM based distros too so just use yum package manager
If its not available across standard RPM distro provided repositories, there should be RPM on the net for distro just download latest one and use wget and rpm to install:
wget -q http://dl.fedoraproject.org/pub/epel/6/x86_64/sshpass-1.05-1.el6.x86_64.rpm
rpm -ivh sshpass-1.05-1.el6.x86_64.rpm
How Does SshPass Works?
Normally openssh (ssh) client binary uses direct TTY (/dev/tty)= an abbreviation for PhyTeleTYpewriter or (the admin jargon call Physical Console access) instead of standard remotely defined /dev/pts = Virtual PTY.
To get around this Sshpass runs ssh in a dedicated TTY to emulate the password is indeed issues by interactive keyboard user thus fooling remote sshd server to thinking password
is provided by interactive user.
SSHPass use
Very basic standard use which allows you to pass the password from command line is like this:
sshpass -p 'Your_Password_Goes_here123' ssh username@server.your-server.com
Note that the server you're working is shared with other developers they might be able to steal your username / password by using a simple process list command such as:
ps auxwwef
…
In my case security is not a hot issue, as I'm the only user on the server (and only concern might be if someone hacks into the server 🙂
Then assuming that you have a plain text file with all your administered servers, you can easily use sshpass in a Bash Script loop in order to run, lets say a package upgrade across all identical Linux version machines:
while read line; do
sshpass -p 'Your_Password_Goes_here123' ssh username@$line "apt-get update && apt-get upgrade && apt-get dist-upgrade" < /dev/null;
done < all_servers_list.txt
Change the command you like to issue across all machines with the string "apt-get …"
Above command can be used to keep up2date all Debian stable server packages. What you will do on servers is up to your imaginations, very common use of above line would be if you want to see uptime /netstat command output across all your network servers.
while read line; do
sshpass -p 'Your_Password_Goes_here123' ssh username@$line "uptime; who; netstat -tunlp; " < /dev/null;
done < all_servers_list.txt
As you can guess SshPass is swiss army knife tool for admins whoneed to automate things with scripts simultaneously across number of servers.
Happy SSH-ing 🙂
Tags: authentication, command, description, forest, Install, line, Linux, network servers, official, password, rpm, script, server, server packages, username, www
Posted in Everyday Life, Linux, Programming, System Administration, Various | No Comments »
Wednesday, June 15th, 2011 
Many joomla CMS installations are for Non-profit organizations or Non Government organizations. These are organizations which are not officially making profit and therefore this instituations are interested into donations to support their activities.
In this occasions adding Joomla paypal capabilities is very essential. There are plenty of modules which enables Joomla to support paypal monetary payments, however many of them are either paid or requires registration and thus it’s quite time consuming to set up a decent PayPal supporting module for Joomla.
After a bit of investigation thanks God, I’ve come across a module that is free of charge, easily downloadable (wihtout registration) and is also relatively easy to configure, these module is called PAYPAL DONATION MODULE
I’ve mirored the module to my server, just in case if the module disappears in the future.
Here are a very brief explanation on how the module can be downloaded installed and configured:
First Download (mod_ojdonation_pp) Paypal Donation Module here
Install it as joomla module via:
Extensions -> Install/Uninstall
menu
Afterwards, go to:
Extensions -> Module Manager
In the list of modules you will notice the Donate module which will be disabled. Use the Enable button to enable it.
Next by clicking on the Donate Module Name, one can configure the module, where the most essential configuration values that needs to be filled in are:
1. Title: – The title of the donation form:
2. Donation Title: – Title of donation picture to show in the webpage
3. Donation Amount: – Default donation amount user will donate with paypal by clicking on Donate button
4. Currency – Default currency the donators will use to donate to configured paypal account
5. Paypal ID: – The email address of paypal account your donators will donate to (This was a bit hard to understand since Paypal ID is not a number ID but the email address configured as an username in PayPal).
6. Donation Description: – Description text to appear before the Donate button
7. Donation Footer: – Text to appear after the Donate button
There are two ways one could add the donation module to show the donation form, on the joomla website:
a. One is to enable the donation button on every joomla webpage (I don’t like this kind of behaviour).
To use this kind of donate button display approach, you will have to select from the Donation module, conf options:
– Show on FrontPage: and Show Title:
Also make sure the Enabled: option is set to Yes
b. Second approach is to set the PayPal Donation form only to appear on a single menu, to do so:
While in Paypal Donation Module configuration in Menu Assignment section, select:
Select Menu Item(s) from the List
instead of the default All value set for Menus.
The last setting to be choosen is the paypal donation form page location (where exactly on the selected pages the form will appear).
The form location is set from the Position: dropdown menu, the option which I found to be the best one for me was the bottom option. However just play with the Position setting and choose the one that will be best for you.
Then scroll on in the Menu Selection: and choose only the menus where you want a paypal donation form to appear.
Finally to save all the recent made settings, click on Apply and refreshing in a new page should show you paypal’s money donation form in joomla
If all is configured fine with Joomla’s – Paypal Donation Module you should get on your webpage:
Tags: amount, Button, buttonThere, capabilities, cms, configuration values, configure, configured, consuming, currency, default, DONATION, Donation Amount, Donation Description, Donation Footer, Donation Title, donations, donators, explanation, footer, form, future, government organizations, How to, Install, investigation, Joomla, location, menu, mod, monetary payments, number id, occasions, ojdonation, option, page, paypal id, profit organizations, show, Show Title, time, username, webpage
Posted in Joomla, Various, Web and CMS | No Comments »
Thursday, June 5th, 2014 
Whether you had to install a CentOS server in a DMZ-ed network with paranoic system firewall rules or simply you want to use your own created RPM local repository to run RPM installs and CentOS system updates via monitored Proxy you will have to configure yum to use a proxy.
There is a standard way to do it by adding a proxy directive to /etc/yum.conf as explained in CentOS official documetnation.
However for some reason:
proxy=http://your-proxy-url.com:8080

proxy_username=yum-user

proxy_password=qwerty
proxy vars adding to /etc/yum.conf [main] section is not working on CentOS 6.5?
However there is a dirty patch by using the OS environment standard variable http_proxy
To make yum work via proxy in gnome-terminal run first:
export http_proxy=http://your-proxy-server.com:8080
or if proxy is protected by username / password run instead:
export username='yum-user'

export password='qwerty'

export http_proxy="http://$username:$password@your-proxy-server:8080/
Afterwards yum will work via the proxy, i.e.:
yum update && yum upgrade
To make http_proxy exported system wide check my previous post – Set Proxy System-Wide
Hope this helps someone.
Tags: CentOS, export, fedora linux, org, password, proxy, rhel, system, upgrade, username, www, yum
Posted in Everyday Life, Linux, System Administration, Various | No Comments »
Saturday, November 26th, 2011 
SSH tunneling allows to send and receive traffic using a dedicated port. Using an ssh traffic can have many reasons one most common usage reason is to protect the traffic from a host to a remote server or to access port numbers which are by other means blocked by firewall, e.g.: (get around firewall filtering)
SSH tunneling works only with TCP traffic. The way to make ssh tunnel is with cmds:
host:/root# ssh -L localhost:deshost:destport username@remote-server.net

host:/root# ssh -R restport:desthost:localport username@remote-server.net

host:/root# ssh -X username@remote-server.net
This command will make ssh to bind a port on localhost of the host host:/root# machine to the host desthost:destport (destination host : destinationport). Important to say deshost is the host destination visible from the remote-server.net therefore if the connection is originating from remote-server.net this means desthost will be localhost.
Mutiple ssh tunnels to multiple ports using the above example commands is possible. Here is one example of ssh tunneling
Let’s say its necessery to access an FTP port (21) and an http port (80), listening on remote-server.net In that case desthost will be localhost , we can use locally the port (8080) insetad of 80, so it will be no necessery to make the ssh tunnel with root (admin privileges). After the ssh session gets opened both services will be accessible on the local ports.
host:/home/user$ ssh -L 21:localhost:21 -L 8080:localhost:80 user@remote-server.net
That’s all enjoy 😉
Tags: command, connection, deshost, destination host, destport, example, firewall, Ftp, ftp port, home, host, host host, host root, How to, Important, Linux, localhost, machine, make, Mutiple, necessery, net, nethost, netThat, port, port 8080, port numbers, ports, Privileges, reason, remote server, restport, root, root admin, server, ssh, ssh session, ssh tunneling, traffic, tunnels, username, way
Posted in Computer Security, FreeBSD, Linux, System Administration | 3 Comments »
Wednesday, January 15th, 2014 
Recently I've been asked How to make communication to MySQL database encrypted. The question was raised by a fellow developer who works on developing a Desktop standalone application in Delphi Programming Language with DevArt an (SQL Connection Component capable to connect Delphi applications to multiple databases like MySQL, Oracle, PostgreSQL, Interbase, Firebird etc.
Communicating in Secured form to MySQL database is not common task to do, as MySQL usually communicates to applications hosted on same server or applications to communicate to MySQL are in secured DMZ or administrated via phpMyAdmin web interface.
MySQL supports encrypted connections to itself using Secure Socket Layer (SSL) encryption. Setting up MySQL db to be communicated encrypted is a must for standalone Desktop applications which has to extract / insert data via remote SQL.
Configuring SQL to support communicated queries encrpytion is supported by default and easily configured on most standard Linux version distributions (Debian, RHEL, Fedora) with no need to recompile it.
1. Generate SSL Certificates
$ mkdir /etc/mysql-ssl && cd mysql-ssl
# Create CA certificate
$ openssl genrsa 2048 > ca-key.pem
$ openssl req -new -x509 -nodes -days 3600 \
-key ca-key.pem -out ca-cert.pem
Create server certificate, remove passphrase, and sign it
server-cert.pem is public key, server-key.pem is private key
$ openssl req -newkey rsa:2048 -days 3600 \
-nodes -keyout server-key.pem -out server-req.pem
$ openssl rsa -in server-key.pem -out server-key.pem
$ openssl x509 -req -in server-req.pem -days 3600 \
-CA ca-cert.pem -CAkey ca-key.pem -set_serial 01 -out server-cert.pem
Create client certificate, remove passphrase, and sign it
client-cert.pem is public key and client-key.pem is private key
$ openssl req -newkey rsa:2048 -days 3600 \
-nodes -keyout client-key.pem -out client-req.pem
$ openssl rsa -in client-key.pem -out client-key.pem
$ openssl x509 -req -in client-req.pem -days 3600 \
-CA ca-cert.pem -CAkey ca-key.pem -set_serial 01 -out client-cert.pem
After generating the certificates, verify them:
$ openssl verify -CAfile ca-cert.pem server-cert.pem client-cert.pem
2. Add SSL support variables to my.cnf
Once SSL key pair files are generated in order to active SSL encryption support in MySQL server, add to (/etc/my.cnf, /etc/mysql/my.cnf, /usr/local/etc/my.cnf … ) or wherever config is depending on distro …
# SSL

ssl-ca=/etc/mysql-ssl/ca-cert.pem

ssl-cert=/etc/mysql-ssl/server-cert.pem

ssl-key=/etc/mysql-ssl/server-key.pem
3. Restart MySQL server
 /etc/init.d/mysqld restart

...
4. Create SQL user to require SSL login
Create new user with access to database;
GRANT ALL ON Sql_User_DB.* TO Sql_User@localhost;

FLUSH PRIVILEGES;
To create administrator privileges user:
 GRANT ALL PRIVILEGES ON *.* TO ‘ssluser’@'%’ IDENTIFIED BY ‘pass’ REQUIRE SSL;

FLUSH PRIVILEGES;
5. Test SSL Connection with MySQL CLI client or with few lines of PHP
To use mysql cli for testing whether SSL connection works:
$ mysql -u ssluser -p'pass' –ssl-ca /etc/mysql-ssl/client-cert.pem –ssl-cert /etc/mysql-ssl/client-key.pem
Once connected to MySQL to verify SSL connection works fine:
 mysql> SHOW STATUS LIKE 'Ssl_Cipher';

 +---------------+--------------------+

| Variable_name | Value              |

 +---------------+--------------------+

| Ssl_cipher    | DHE-RSA-AES256-SHA |

+---------------+--------------------+
If you get this output this means MySQL SSL Connection is working as should.
Alternative way is to use test-mysqli-ssl.php script to test availability to mysql over SSL.
$conn=mysqli_init();

mysqli_ssl_set($conn, '/etc/mysql-ssl/client-key.pem', '/etc/mysql-ssl/client-cert.pem', NULL, NULL, NULL);

if (!mysqli_real_connect($conn, '127.0.0.1', 'ssluser', 'pass')) { die(); }

$res = mysqli_query($conn, 'SHOW STATUS like "Ssl_cipher"');

print_r(mysqli_fetch_row($res));

mysqli_close($conn);
Note: Change username password according to your user / pass before using the script
That's all now you have mysql communicating queries data over SSL
Tags: administrator, application, change, cnf, common, data, databases, Debian, Delphi Programming Language, Desktop, DMZ, fellow, How to, make, multiple, null, openssl, password, pem, php, queries, rhel, script, setting, SSL, testing, username, variables
Posted in MySQL, System Administration, Web and CMS | No Comments »
Tuesday, January 14th, 2014 
I'm following a training intensive 5 days course for Oracle WebLogic. Some of exercises included stopping / starting Weblogic App server for security reasons Weblogic is designed to always propmpt for password. I remember similar behavior in Apache configured to use SSL certificate.
Whether a new Weblogic server is configured and a frequent restart of server is needed having to write the password each and everyime is mostly annoying. Thanksfully there is a file called boot.properties in which username / password can be hardcoded and later red on Weblogic start. As boot.properties contains security credentials its very important to keep the file as secured as possible. boot.properties files can be set-up for each different configured separate Weblogic server instance.
For my training sessiion boot.properties is in locations:
/home/oracle/wls11g_advadm/work/domains/MedRecDomain/servers/MedRecAdmSvr/security/boot.properties
/home/oracle//wls11g_advadm/work/domains/MedRecDomain/servers/MedRecSvr2/security/boot.properties
 #  cat /home/oracle/wls11g_advadm/work/domains/MedRecDomain/servers/MedRecSvr2/security/boot.properties

username=weblogic

password=Welcome1
Depending on how Oracle Weblogic is configured its possible values in boot.properties (username / password) to be encrypted after first server boot-up.
Tags: boot, configured, home, How to, oracle, password, store, username, Weblogic App, Weblogic Application
Posted in System Administration, Web and CMS | No Comments »
Tuesday, April 12th, 2011 The more my blog is growing the slower it becomes, this is a tendency I’ve noticed since a couple of weeks.
Very fortunately while reading some random articles online I’ve came across a super valuable wordpress plugin called WP-OPTIMIZE
I think it’s best if I present instead of taking the time to explain what the WP-optimize does for a wordpress powered blog:
WP-Optimize is a WordPress 2.9++ database cleanup and optimization tool. It doesn’t require PhpMyAdmin to optimize your database tables. It allows you to remove post revisions, comments in the spam queue, un-approved comments within few clicks.
Additionally you can rename any username to another username too.
For example: If you want to rename default ‘admin’ username to ‘someothername’; just put ‘admin’ (without quotes) to the Old username field and the new username to the New username field, then click “PROCESS”)
Now in short to rephrase above text, during MySQL database requests a lot of database starts needing the so called MySQL optimization , this operation becomes necessery especially for databases which are very actively used and is related to the basic design of the mysql server.
Very often many tables starts having a lot of garbage (repetitive) data and therefore read and writes from the SQL server gets slower and slower day by day.
Thus the MySQL server has it’s famous OPTIMIZE TABLE command which does wipe out all the garbage unnecessery data stored in a tables/s and hence seriously impacts the later read/write table operations.
Now to go back to wordpress the same optimization issues, very often are a cause for a performance bottleneck and some smart guy has came with the great idea to create a specific wordpress plugin to fix such an optimize table issues
The WP-Optimize plugin has 5 major options which somehow could have a positive impact on blog’s performance, these are:
- Remove all Post revisions
- Remove all auto draft posts
- Clean marked Spam comments
- lean Unapproved comments
-
Optimize database tables
Apart from the nice performance boost applicaiton the wp-optimize plugin has one super valuable function, it could change the default wordpress blog administrator user admin to some other desired username, for example rename the default blog administrator username “admin” user to “john”.
From a security perspective this is another must have feature in every wordpress blog as it can kill many of the possible brute force attacks with some web brute force softwares like Hydra
Installing and using wp-optimize is a real piece of cake, here is a very quick few command lines to install it:
host:~# cd /var/www/blog/wp-content/plugins/

host:/var/www/blog/wp-content/plugins:# wget https://www.pc-freak.net/files/wp-optimize.0.9.2.zip

host:/var/www/blog/wp-content/plugins:# unzip wp-optimize.0.9.2.zip

...
To launch WP-OPTIMIZE and fix many speed bottlenecks caused by unoptimized tables, or just hanging around in database old spam comments, go and login with your adminsitrator to wordpress.
In the left pane menu starting up with Dashboard somewhere near the end of the vertical menu you will notice a button reading WP-Optimize .
Click over the Wp-Optimize button and a screen like the one in below’s screenshot will appear in your browser screen:
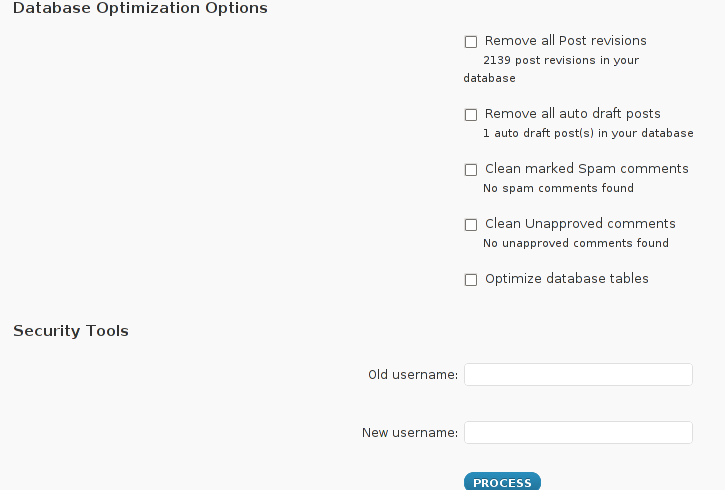
I have personally decided to use just 2 of all the 5 available primary plugin options, I decided to select only:
- Clean marked Spam comments
- Optimize database tables
Scrolling below the PROCEED button I could also notice a number of tables which were missing optimization and hence required an optimize table to be executed on each one of them.
Further on I pressed the PROCESS button and after a couple of minutes (2, 3 minutes) of waiting the wp-optimize plugin was done it’s selected tasks:
In the screenshot below, you see all my blog tables which were optimized by the plugin:

It’s interesting to say few words about the Remove All Posts revisions plugin option, as many might be wondering what this plugin option really means.
When writting posts, wordpress has an option to restore to a certain point of the write out and makes a sort of different versions in time of each of it’s written posts.
Therefore later restoration if something gots deleted by mistake is facilitated, this is actually the all meaning of Remove All Posts revisions
With time and the increase wp posts the amount of Posts Revisions is growing on and on and just taking space and possibly making the access to the database entries slower, thus it might be a good idea to also remove them as, it’s absolutely rare to use the wp post restoration function.
However I’ve personally decided to not wipe out the old posts revisions as someday i might need it and I’m a bit scared that it might cause me some database issues.
I’ll be glad if somebody has tried the Posts Revisions wp-Optimize funciton and is happy with the results.
Tags: Button, cleanup, database cleanup, database tables, databases, doesn, function, garbage, many tables, mysql data, mysql server, nbsp, necessery, Old, operation, optimization issues, optimization tool, option, performance bottleneck, plugin, queue, quot, random articles, repetitive data, rephrase, Revisions, screen, smart guy, spam, SQL, sql server, TABLE, taking the time, tendency, text, time, tool, username, username field, Wordpress, wp, WP-OPTIMIZEI
Posted in MySQL, Web and CMS, Wordpress | No Comments »
Wednesday, June 29th, 2011 
I’m using access to the mysql servers via localhost with mysql cli on daily basis.
With time I’ve figured out that it’s pretty unahandy to always login with my root mysql password, I mean each time to enter it, e.g.:
root@mysql-server:~# mysql -u root

Enter password:

...
Thus to make my life a way easier I decided to store my mysql root password in order to allow my root admin user to be able to login to my mysql server without asking for password. This saves time and nerves, as I’m not supposed to look up for the password file I store my server mysql root pass.
To allow my mysql cli interface, to login passwordless to the SQL server I had to create the file /root/.my.cnf readable only for my root user and store my MySQL username and password there.
Here is a sample /root/.my.cnf file:
root@mysql-server:~# cat /root/.my.cnf

[client]

user="root"

pass="mysecretMySQLPasswordgoeshere"
Now next time I use the mysql console interface to access my mysql server I don’t have to supply the password, here is how easier is the mysql login afterwards:
root@mysql-server:~# mysql -u root

Welcome to the MySQL monitor. Commands end with ; or g.

Your MySQL connection id is 3520

Server version: 5.0.77 Source distribution
Type ‘help;’ or ‘h’ for help. Type ‘c’ to clear the buffer.
mysql>
The only downside of using .my.cnf to store permanently the mysql server root and password is from security standpoint.
If for instance somebody roots my servers, where I have stored my root user/pwds in .my.cnf , he will be able immediately to get access to the MySQL server.
Another possible security flaw with using the mysql passwordless login “trick” is if somebody forgets to set proper file permissions to, .my.cnf
Once again the file should possess the permissons of:
root@mysql-server:~# ls -al /root/.my.cnf

-rw------- 1 root root 90 Apr 2 00:05 /root/.my.cnf
Any other permissons might allow non-privileged users to read the file and gain unathorized admin access to the SQL server.
Tags: Auto, basis, buffer, cat, cli, client, cnf, connection id, daily basis, distribution type, downside, Draft, file, file permissions, help, life, localhost, mysql connection, mysql servers, order, password, password file, root, root admin, root password, root root, root user, security, security flaw, security standpoint, server mysql, server root, server version, source distribution, standpoint, time, type, username, version, way
Posted in FreeBSD, Linux, MySQL, System Administration | No Comments »
Wednesday, April 4th, 2012 
Some long time ago, I've created one user called newuser, on my home FreeBSD router and added him to be a member of wheel group.I've completely forgot about the users existing, just until yesterday when I saw the user still hanging around in my wheel group.For those unfamiliar with the wheel group on FreeBSD, wheel is the same like root group on Linux and some other *nices.
Before proceed with the reason fot this post to show the proper way of adding and removing user to a group on BSD, I will first explain a bit few things concerning BSD password files, where they are and why are they so many 🙂
On the first glimpse, people unfamiliar with BSD will be shocked / (confused) to find out there are 5 files, which has something to do to password authentication.
1. Some short explanation on /etc/passwd /etc/master.passwd, /etc/pwd.db, /etc/spwd.db, /etc/group and login.conf.db BSD auth and login filesFreeBSD and rest of the BSD family has 5 files which deal with username and password authentication, group ids, default shell configs etc.:
The 5 ones are:
- /etc/passwd
- /etc/master.passwd
- /etc/group
- /etc/pwd.db
- /etc/spwd.db
/etc/passwd is readable by all the users on the system whether /etc/master.passwd is only readable by root and toor administrative users. In that numbers members to wheel group have access for reading to all of the five.
Just like on Linux /etc/passwd contains all kind of system existing users … everything except the stored user passwords strings.
/etc/master.passwd is actually the BSD equivalent of Linux's /etc/shadow file. It stores md5 encrypted user passwords (by default) in a form of encrypted hashes. For tightened security one can, however choose to use a blowfish password hash encryption instead.
Since my newuser was a member to group, the user had read access to my /etc/master.passwd and hence this was a potential potential security hole on my system.
To close the whole I decided to remove newuser's membership to wheel group.
Before I say how I actually did it. I will sawy few more words on BSD systems authentication files structure.
The file /etc/master.passwd is actually the BSD equivalent of Linux's /etc/shadow.
Besides /etc/password and /etc/master.passwd, on BSD there are also two other separate binary database files storing authentication user credentials:
freebsd# ls -l /etc/pwd.db /etc/spwd.db

-rw-r--r-- 1 root wheel 90112 Mar 13 23:56 /etc/pwd.db

-rw------- 1 root wheel 90112 Mar 13 23:56 /etc/spwd.db
In case if you're wondering what are this two *pwd.db files for:
/etc/pwd.db contains in database format /etc/passwd content
/etc/spwd.db contains in database format /etc/master.password
, spwd.db stands for (shadow) pwd.db.
Near the end of the man page for pwd_mkdb, pwd.db is described as "insecure password database file and spwd.db as secure password database file.
The exact database type can be displayed with file command which is alawys helpful in (determining a file types).
I use file almost daily to check the (MIME) type of most of the "weird" file type extensions I have on my system. If not yet familiar with file cmd, be sure to try it on few various file extensions and see how it works.
freebsd# file /etc/pwd.db

/etc/pwd.db: Berkeley DB 1.85 (Hash, version 2, native byte-order)

freebsd# file /etc/spwd.db

/etc/spwd.db: Berkeley DB 1.85 (Hash, version 2, native byte-order)
You see, files are stored in format of Berkley DB Hash version 2.
The two files got updated every time with command pwd_mkdb whether a change in /etc/master.passwd occurs through use of lets say pw or vipw.
Btw, one common way to initiate changes to /etc/master.passwd (lets say modify a user shell) is possible through vipw command.
vipw is a wrapper command that launch instance of vi editor over /etc/master.passwd, once changes are saved in the file, pwd_mkdb is run to regenerate the /etc/pwd.db and /etc/spwd.db. With this in mind vipw on BSD is the equivalent of manually editting /etc/shadow with vi /etc/shadow on G / Linux.
Whether talking about user credentials and /etc/pwd.db and /etc/spwd.db, its worthy to mention there is one more db file – /etc/login.conf.db. /etc/login.conf.db is red everytime a user logs in the system. It is is generated from the plain text /etc/login.conf. Just in case if wondering why this .db files are used on FreeBSD at all, the reason is efficiency.
Reading binary database (structured data) as we all know is way faster than plain text file look ups
The performance advantage of the BSD's use of .db stored credentials is not so-"visible" in normal BSD systems with less than lets say 100 users.
Anyways on systems with few thousands of users that login and logout frequently the speed difference will surely be clear.
Manual generation of /etc/pwd.db and /etc/spwd.db or /etc/login.conf.db is possible via pwd_mkdb and cap_mkdb commands.
After explaining shortly the basic auth files, I'll proceed with my specific case and will explain how I removed my newuser from membership in wheel group.
2. "BSD way" to remove or add existing user to member a group
The record for my user newuser in /etc/group, looked like so:
freebsd# grep -i newuser /etc/groupwheel:*:0:root,hipo,newuser
I was curious if /etc/group was possible to manually edit like on Linux with vi or mcedit.I thought this might be a problem since I thought the /etc/group info might be stored somewhere along in /etc/pwd.db or /etc/spwd.db. My hypothesis, however was wrong.
Straight use of vim /etc/group and deletion of the newuser record was enough to remove the user from wheel.
Anyways this is not a standard way and especially if it has to be scripted it is unnecessery hassel, hence below is the 'BSD way' via pw:
freebsd# pw groupmod wheel -d newuser
There is no output returned, therefore the command executed succesfully.
pw can be used for plenty of user management operations. Lets say I want to add back the newuser to be a member of wheel some time in the future, I could use:
freebsd# pw groupmod wheel -m newuser
To later check if newuser is succesfully removed from /etc/group:
freebsd# grep -i wheel /etc/group

wheel:*:0:root,hipo
Generally it is better, to stick to one way to do everything related to user and group management with pw and use it to show group permissions for wheel instead:
freebsd# pw group show wheel

wheel:*:0:root,hipo
Tags: administrative users, authentication, Auto, blowfish, bsd family, default shell, Draft, everything, existing users, family, file, first glimpse, form, fot, group ids, hash, hashes, Linux, login, long time, Mar, newuser, nices, password, password files, passwords, reading, reason, root, root group, router, security hole, shadow, Shell, something, text, time, toor, type, username, wheel, wheel group
Posted in Computer Security, FreeBSD, System Administration | No Comments »
Monday, April 2nd, 2012 I've hit an interesting article explaining how to check unread gmail email messages in Linux terminal. The original article is here
Being able to read your latest gmail emails in terminal/console is great thing, especially for console geeks like me.
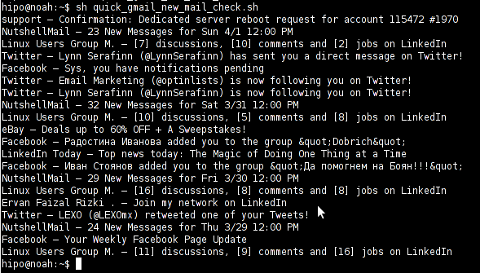
Here is the one liner script:
curl -u GMAIL-USERNAME@gmail.com:SECRET-PASSWORD \

--silent "https://mail.google.com/mail/feed/atom" | tr -d '\n' \

| awk -F '' '{for (i=2; i<=NF; i++) {print $i}}' \

| sed -n "s/
Linux Users Group M. – [7] discussions, [10] comments and [2] jobs on LinkedIn

Twitter – Lynn Serafinn (@LynnSerafinn) has sent you a direct message on Twitter!

Facebook – Sys, you have notifications pending

Twitter – Email Marketing (@optinlists) is now following you on Twitter!

Twitter – Lynn Serafinn (@LynnSerafinn) is now following you on Twitter!

NutshellMail – 32 New Messages for Sat 3/31 12:00 PM

Linux Users Group M. – [10] discussions, [5] comments and [8] jobs on LinkedIn

eBay – Deals up to 60% OFF + A Sweepstakes!

LinkedIn Today – Top news today: The Magic of Doing One Thing at a Time

NutshellMail – 29 New Messages for Fri 3/30 12:00 PM

Linux Users Group M. – [16] discussions, [8] comments and [8] jobs on LinkedIn

Ervan Faizal Rizki . – Join my network on LinkedIn

Twitter – LEXO (@LEXOmx) retweeted one of your Tweets!

NutshellMail – 24 New Messages for Thu 3/29 12:00 PM

Facebook – Your Weekly Facebook Page Update

Linux Users Group M. – [11] discussions, [9] comments and [16] jobs on LinkedIn
As you see this one liner uses curl to fetch the information from mail.google.com's atom feed and then uses awk and sed to parse the returned content and make it suitable for display.
If you want to use the script every now and then on a Linux server or your Linux desktop you can download the above code in a script file -quick_gmail_new_mail_check.sh here
Here is a screenshot of script's returned output:
A good use of a modified version of the script is in conjunction with a 15 minutes cron job to launch for new gmail mails and launch your favourite desktop mail client.
This method is useful if you don't want a constant hanging Thunderbird or Evolution, pop3 / imap client on your system to just take up memory or dangle down the window list.
I've done a little modification to the script to simply, launch a predefined email reader program, if gmail atom feed returns new unread mails are available, check or download my check_gmail_unread_mail.sh here
Bear in mind, on occasions of errors with incorrect username or password, the script will not return any errors. The script is missing a properer error handling.Therefore, before you use the script make sure:
gmail_username='YOUR-USERNAME';

gmail_password='YOUR-PASSWORD';
are 100% correct.
To launch the script on 15 minutes cronjob, put it somewhere and place a cron in (non-root) user:
# crontab -u root -e

...

*/15 * * * * /path/to/check_gmail_unread_mail.sh
Once you read your new emails in lets say Thunderbird, close it and on the next delivered unread gmail mails, your mail client will pop up by itself again. Once the mail client is closed the script execution will be terminated.
Consised that if you get too frequently gmail emails, using the script might be annoying as every 15 minutes your mail client will be re-opened.
If you use any of the shell scripts, make sure there are well secured (make it owned only by you). The gmail username and pass are in plain text, so someone can steal your password, very easily. For a one user Linux desktops systems as my case, security is not such a big concern, putting my user only readable script permissions (e.g. chmod 0700)is enough.
Tags: article, atom, Auto, awk, client, com, cron, Desktop, download, Draft, ebay, email, email marketing, email messages, facebook, Fri, geeks, Gmail, GMAIL-USERNAME, GNU, gnu linux, google, Group, https mail, liner, LinkedIn, Linux, linux server, linux users group, mail, marketing, news today, OFF, original article, password, quot, rizki, sat 3, script, SECRET-PASSWORD, terminal, thing, top news, twitter, username, Users, Weekly
Posted in Linux, System Administration, Various | 2 Comments »


