Posts Tagged ‘usr bin’
Friday, June 6th, 2014 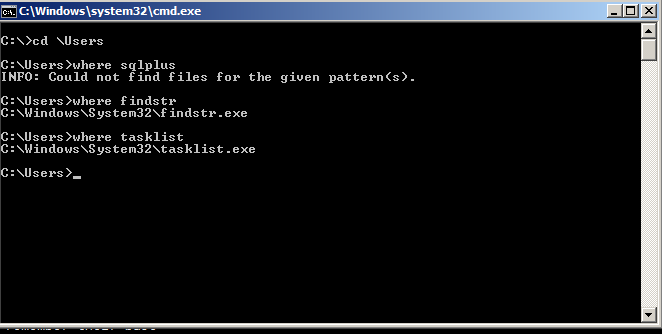
In Linux there are the which and whereis commands showing you location of binaries included in $PATH
# which lsof /usr/bin/lsof
# whereis lsof

lsof: /usr/bin/lsof /usr/share/man/man8/lsof.8.gz
so question arises what is which / whereis command Linux commands Windows equivalent?
In older Windows Home / Server editions – e.g. – Windows XP, 2000, 2003 – there is no standard installed tool to show you location of windows %PATH% defined executables. However it is possible to add the WHERE command binary by installing Resource Kit tools for administrative tasks.

In Windows Vista / 7 / 8 (and presumably in future Windows releases), WHERE command is (will be) available by default
C:\Users\Georgi>WHERE SQLPLUS

D:\webdienste\application\oracle\11.2.0\client_1\BIN\sqlplus.exe
Cheers! 🙂
Tags: application, com, exe, gz, Linux, location, lsof, oracle, Path, Resource Kit, standard, superuser, usr bin, Windows, Windows Home Server
Posted in Everyday Life, Various, Windows | No Comments »
Friday, July 29th, 2011 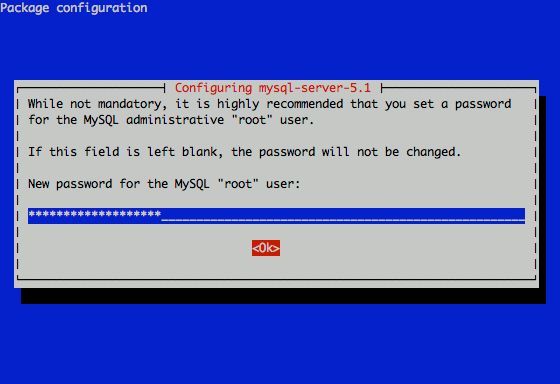
I had to change my mysql root password for one of the servers since during the install I mispasted the password in the MySQL password prompt I needed the pwd to be changed.
Here is how I changed it to my desired one:
linux:~# /usr/bin/mysqladmin -u root -p'OLD_PASSWORD_STRING' password NEW_PASSWORD_STRING

linux:~#
The password gets changed immediately 😉
If a new password has to be set to a passwordless mysql server, the command to be issued is:
linux:~# /usr/bin/mysqladmin -u root password PASSWORD_STRING
Changing the MySQL password is also possible with mysql cli, after connecting to the sql server, though this method is a bit more time consuming. Here is how to do it from mysql console:
linux:~# mysql -u root -p

Server version: 5.1.49-3 (Debian)
Copyright (c) 2000, 2010, Oracle and/or its affiliates. All rights reserved.
This software comes with ABSOLUTELY NO WARRANTY. This is free software,
and you are welcome to modify and redistribute it under the GPL v2 license
Type ‘help;’ or ‘h’ for help. Type ‘c’ to clear the current input statement.
mysql> use mysql;
mysql> update user set password=PASSWORD(“NEW_PASSWORD”) where User=’root’;mysql> flush privileges;
Of course it’s possible to do change the root pass via phpmyadmin
Cheers 😉
Tags: Cheers, cli, command, consuming, Copyright, course, free software, gpl v2, help, input statement, licenseType, Linux, mysqladmin, Old, oracle, password, password string, phpmyadmin, Privileges, pwd, root, root password, server root, servers, software, sql server, string password, time, time consuming, type, use, usr, usr bin, version, warranty
Posted in Linux, MySQL, System Administration | No Comments »
Tuesday, September 14th, 2010 I’ve recently received a number of images in JPEG format as a feedback on a project plan that was constructed by a team I’m participating at the university where I study.
Somebody from my project group has scanned or taken snapshots of each of the hard copy paper feedback and has sent it to my mail.
I’ve received 13 images so I had to open them one by one to get each of the Project Plan to read the feedback on the page this was really unhandy, so I decided to give it a try on how to generate a common PDF file from all my picture files.
Thanksfully it happened to be very easy and trivial using the good old Image Magick
In order to complete the task of generating one PDF from a number of pictures all I did was.1. Switch to the directory where I have saved all my jpeg images
debian:~# cd /home/hipo/Desktop/my_images_directory/
2. Use the convert binary part of imagemagick package to generate the actual PDF file from the group of images
debian:~# convert *.jpg outputpdffile.pdf
If the images are numbered and contain many scanned pages of course you can always pass by all the images to the /usr/bin/convert binary, like for instance:
debian:~# convert 1.jpg 2.jpg 3.jpg 4.jpg 5.jpg outputpdffile.pdf
Even though in my case I had to convert to PDF from multiple JPEG (JPG) pictures, convertion with convert is not restricted to convert only from JPEG, but you can also convert to PDF by using other graphical file formats.
For instance to convert multiple PNG pictures to a single PDF file the command will be absolutely the same except you change the file extension of the graphic files e.g.:
debian:~# convert 1.PNG 2.PNG 3.PNG 4.PNG 5.PNG OUTPUT-PDF-FILE.PDF
I was quite happy eventually to know Linux is so flexible and such a trivial things are able to be completed in such an easy way.
Tags: cd home, convertion, copy, course, Create PDF file from (jpg) pictures in Linux, Desktop, feedback, file, file extension, file formats, format, gif images, graphic files, hipo, home, Image, image magick, ImageMagick, images directory, instance, JPEG, jpeg images, jpg gif, Linux, Magick, mail, number, order, OUTPUT-PDF-FILE, outputpdffile, package, page, Paper, picture, png, project, project group, snapshots, somebody, switch, team, Thanksfully, trivial things, unhandy, usr, usr bin, way
Posted in Linux, Linux and FreeBSD Desktop, Various | 5 Comments »
Monday, January 9th, 2012 I've recently had to set up a backup system to synchronize backup archive files between two remote servers and as I do usually with this situation I just set up a crontab job to periodically execute rsync to copy data from source server to the destination server . Copying SRC to DEST is the default behaviour rsync uses, however in this case I had to copy from the destination server to the source server host (in other words sync files the reversely.
The usual way to copy with rsync via SSH (from SRC to DEST) is using a cmd line like:
debian:~$ /usr/bin/rsync -avz -e ssh backup-user@xxx.xxx.xxx.xxx:/home/backup-user/my-directory .
Where the xxx.xxx.xxx.xxx is my remote server IP with which files are synched.
According to rsync manual, the proposed docs SYNOPSIS is in the format;
Local: rsync [OPTION…] SRC… [DEST
Obviusly the default way to use rsync is to copy source to destination which I used until now, but in this case I had to the other way around and copy files from a destination host to the source server. It was logical that swapping the SRC and DEST would complete my required task. Anyways I consulted with some rsync gurus in irc.freenode.net , just to make sure it is proper to just swap the SRC, DEST arguments.
I was told this is possible, so I swapped args;
debian:~$ /usr/bin/rsync -avz -e ssh . backup-user@xxx.xxx.xxx.xxx:/home/backup-user/my-directory

...
Surprisingly this worked 😉 Anyways I was adviced by by a good guy nick named scheel , that putting -e ssh to command line is generally unnecessery except if there is no some uncommon used SSH port over which the data is transferred. An example case in which -e 'ssh is necessery would be if transferring via lets say SSH port 1234;
rsync -avz -e 'ssh -p1234' /source user@host:/dest
In all other cases omitting '-e ssh' is better as '-e ssh' is rsync default. Therefore my final swapped line I put in cron to copy from a destinatio to source host with rsync looked like so:
05 03 2 * * /usr/bin/ionice -c 3 /usr/bin/rsync -avz my-directory backup-user@xxx.xxx.xxx.xxx:/home/backup-user/ >/dev/null 2>&1
Tags: archive files, Auto, avz, backup system, case, cmd, cmd line, copy, copying, cron, default, default behaviour, destIn, destinatio, destination, destination host, destination server, docs, Draft, example, example case, few words, format, gurus, host, job, nbsp, necessery, nick, option, port 1234, remote server, rsync, scheel, server host, server ip, source host, source server, ssh port, sync files, system, usr bin
Posted in FreeBSD, Linux, System Administration | No Comments »
Friday, October 28th, 2011 Every now and then I have to screenshot particular windows positioned on the screen on my GNOME Desktop envronment
Recently I was happy to find there is a very easy way to do this with the default Screenshotting program that is bundled with gnome gnome-screenshot
To screenshot a particular window using gnome-screenshot , its quite easy all one has to do is point the mouse cursor to the window he wants to snapshot and press:
Alt + PrtScr (Print Screen)
Here is a screenshot, I’ve taken of my gnome-terminal using the above command:
One can do it also via the command line using the /usr/bin/gnome-screenshot , by pressing Alt + F2 to invoke the run application and type in:
/usr/bin/gnome-screenshot -w
I was quite happy to find out that this is possible on Linux inside gnome without bothering to run GIMP or use any external programs for the cause. Hope this helps someone 😉
Tags: Alt, application, cause, command, cursor, Desktop, envronment, f2, GIMP, Gnome, gnome desktop, gnu linux, Hope, line, Linux, linux gnome, mouse, mouse cursor, nbsp, Press, Print, PrtScr, run, screen, screenshot, Screenshotting, snapshot, someone, type, usr, usr bin, way
Posted in Linux, Linux and FreeBSD Desktop | No Comments »
Wednesday, April 27th, 2011 I just completed a fresh Ubuntu 10.10 Maverick-Merkaat install.
Following the installation I used a small script to install a bunch of packages I used on the same notebook before the Ubuntu re-installation.
Now after the number of packages are installed on the newly installed Ubuntu, everytime I login with any GNOME user account I get mail notification settings window to automatically start-up
Closing on every gnome login session the mail settings is not a pleasent experience, therefore I took a bit of seconds to find out what launches the New Mail pop-up window
Here is how the annoying window looks like everytime I login on my ubuntu:
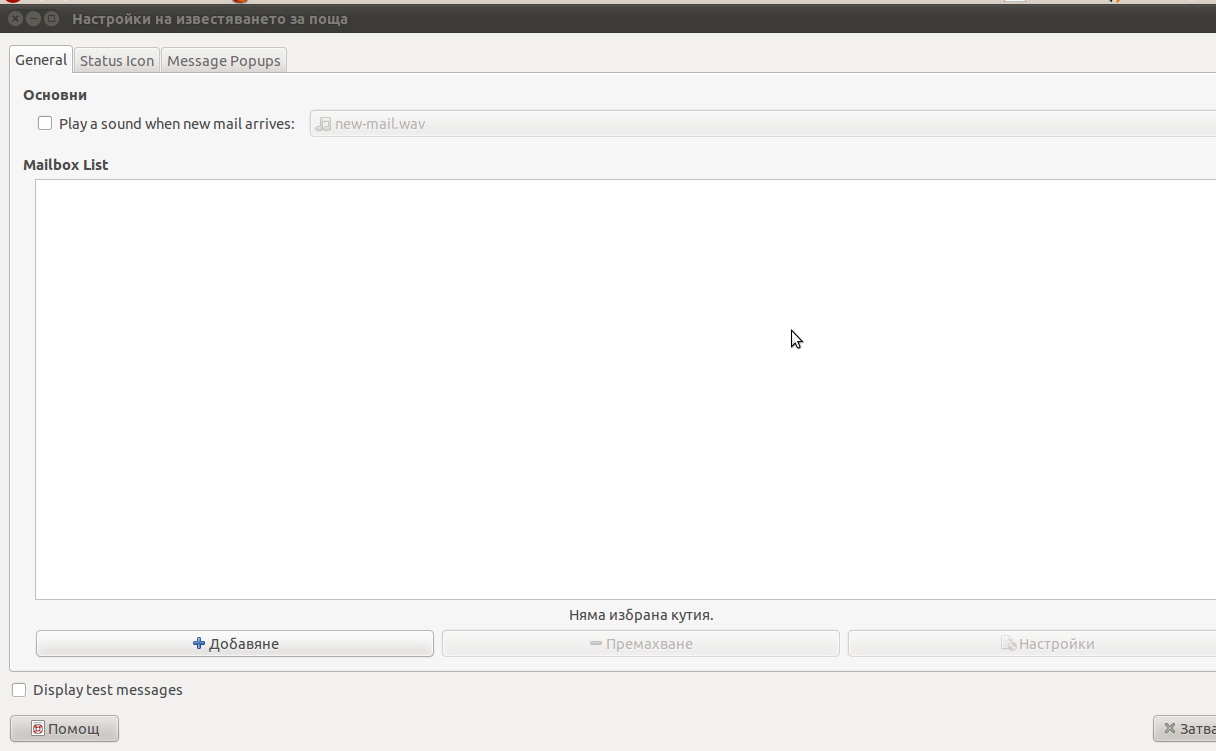
Some of the text on the above screenshot is in Bulgarian as the default configured locale for this Ubuntu install is set to Bulgarian but I hope this doesn’t matter as other people who have the same popup can still recognize the window.
Now to find out the process which spawned the mail notification popup I issued:
root@ubuntu:~# ps ax |grep -i mail 2651 pts/1 Sl+ 0:01 mail-notification --sm-disable
Further on I checked what is the original location of mail notification command :
root@ubuntu:~# which mail-notification

/usr/bin/mail-notification
To be absolutely sure mail-notification does spawn the mail settings window I used pkill -9 mail-notification
As the window suddenly died now I was absolutely sure that mail-notification is spawning the unwanted pop-up window which appeared right after me logging in.
I used dpkg -S to check which package does the mail-notification program belong to as I thought that the solution to get rid of this annoying popup will come to removing the whole package, here is what I did:
root@ubuntu:~# dpkg -S /usr/bin/mail-notification

mail-notification: /usr/bin/mail-notification

root@ubuntu:~#
Now knowing the package I simply wiped it off:
root@ubuntu:~# apt-get remove --yes mail-notification

...

root@ubuntu:~# dpkg --purge mail-notification

...
After that I guarantee you you won’t see the irritating new mail settings pop-up window again.
Farewell mail-notification annoyance, hope to never see you again!!! 🙂
Tags: annoyance, annoying popup, annoying window, command, dpkg, experience, Farewell, Gnome, gnome user, grep, installation, locale, location, login, mail notification program, mail pop, mail settings, maverick, new mail, notebook, notification, notification settings, ome, package, pkill, pleasent experience, pop up window, popup, purge, root, screenshot, settings window, solution, Ubuntu, usr, usr bin
Posted in Linux, Linux and FreeBSD Desktop | No Comments »


