Posts Tagged ‘whitelist’

Install and configure rkhunter for improved security on a PCI DSS Linux / BSD servers with no access to Internet

Wednesday, November 10th, 2021

install-and-configure-rkhunter-with-tightened-security-variables-rkhunter-logo

rkhunter or Rootkit Hunter scans systems for known and unknown rootkits. The tool is not new and most system administrators that has to mantain some good security servers perhaps already use it in their daily sysadmin tasks.

It does this by comparing SHA-1 Hashes of important files with known good ones in online databases, searching for default directories (of rootkits), wrong permissions, hidden files, suspicious strings in kernel modules, commmon backdoors, sniffers and exploits as well as other special tests mostly for Linux and FreeBSD though a ports for other UNIX operating systems like Solaris etc. are perhaps available. rkhunter is notable due to its inclusion in popular mainstream FOSS operating systems (CentOS, Fedora,Debian, Ubuntu etc.).

Even though rkhunter is not rapidly improved over the last 3 years (its last Official version release was on 20th of Febuary 2018), it is a good tool that helps to strengthen even further security and it is often a requirement for Unix servers systems that should follow the PCI DSS Standards (Payment Card Industry Data Security Standards).

Configuring rkhunter is a pretty straight forward if you don't have too much requirements but I decided to write this article for the reason there are fwe interesting options that you might want to adopt in configuration to whitelist any files that are reported as Warnings, as well as how to set a configuration that sets a stricter security checks than the installation defaults. 

1. Install rkhunter .deb / .rpm package depending on the Linux distro or BSD

  • If you have to place it on a Redhat based distro CentOS / Redhat / Fedora

[root@Centos ~]# yum install -y rkhunter


  • On Debian distros the package name is equevallent to install there exec usual:

root@debian:~# apt install –yes rkhunter

  • On FreeBSD / NetBSD or other BSD forks you can install it from the BSD "World" ports system or install it from a precompiled binary.

freebsd# pkg install rkhunter

One important note to make here is to have a fully functional Alarming from rkhunter, you will have to have a fully functional configured postfix / exim / qmail whatever mail server to relay via official SMTP so you the Warning Alarm emails be able to reach your preferred Alarm email address. If you haven't installed postfix for example and configure it you might do.

– On Deb based distros 

[root@Centos ~]#yum install postfix


– On RPM based distros

root@debian:~# apt-get install –yes postfix


and as minimum, further on configure some functional Email Relay server within /etc/postfix/main.cf
 

# vi /etc/postfix/main.cf
relayhost = [relay.smtp-server.com]

2. Prepare rkhunter.conf initial configuration


Depending on what kind of files are present on the filesystem it could be for some reasons some standard package binaries has to be excluded for verification, because they possess unusual permissions because of manual sys admin monification this is done with the rkhunter variable PKGMGR_NO_VRFY.

If remote logging is configured on the system via something like rsyslog you will want to specificly tell it to rkhunter so this check as a possible security issue is skipped via ALLOW_SYSLOG_REMOTE_LOGGING=1. 

In case if remote root login via SSH protocol is disabled via /etc/ssh/sshd_config
PermitRootLogin no variable, the variable to include is ALLOW_SSH_ROOT_USER=no

It is useful to also increase the hashing check algorithm for security default one SHA256 you might want to change to SHA512, this is done via rkhunter.conf var HASH_CMD=SHA512

Triggering new email Warnings has to be configured so you receive, new mails at a preconfigured mailbox of your choice via variable
MAIL-ON-WARNING=SetMailAddress


# vi /etc/rkhunter.conf

PKGMGR_NO_VRFY=/usr/bin/su

PKGMGR_NO_VRFY=/usr/bin/passwd

ALLOW_SYSLOG_REMOTE_LOGGING=1

# Needed for corosync/pacemaker since update 19.11.2020

ALLOWDEVFILE=/dev/shm/qb-*/qb-*

# enabled ssh root access skip

ALLOW_SSH_ROOT_USER=no

HASH_CMD=SHA512

# Email address to sent alert in case of Warnings

MAIL-ON-WARNING=Your-Customer@Your-Email-Server-Destination-Address.com

MAIL-ON-WARNING=Your-Second-Peronsl-Email-Address@SMTP-Server.com

DISABLE_TESTS=os_specific


Optionally if you're using something specific such as corosync / pacemaker High Availability cluster or some specific software that is creating /dev/ files identified as potential Risks you might want to add more rkhunter.conf options like:
 

# Allow PCS/Pacemaker/Corosync
ALLOWDEVFILE=/dev/shm/qb-attrd-*
ALLOWDEVFILE=/dev/shm/qb-cfg-*
ALLOWDEVFILE=/dev/shm/qb-cib_rw-*
ALLOWDEVFILE=/dev/shm/qb-cib_shm-*
ALLOWDEVFILE=/dev/shm/qb-corosync-*
ALLOWDEVFILE=/dev/shm/qb-cpg-*
ALLOWDEVFILE=/dev/shm/qb-lrmd-*
ALLOWDEVFILE=/dev/shm/qb-pengine-*
ALLOWDEVFILE=/dev/shm/qb-quorum-*
ALLOWDEVFILE=/dev/shm/qb-stonith-*
ALLOWDEVFILE=/dev/shm/pulse-shm-*
ALLOWDEVFILE=/dev/md/md-device-map
# Needed for corosync/pacemaker since update 19.11.2020
ALLOWDEVFILE=/dev/shm/qb-*/qb-*

# tomboy creates this one
ALLOWDEVFILE="/dev/shm/mono.*"
# created by libv4l
ALLOWDEVFILE="/dev/shm/libv4l-*"
# created by spice video
ALLOWDEVFILE="/dev/shm/spice.*"
# created by mdadm
ALLOWDEVFILE="/dev/md/autorebuild.pid"
# 389 Directory Server
ALLOWDEVFILE=/dev/shm/sem.slapd-*.stats
# squid proxy
ALLOWDEVFILE=/dev/shm/squid-cf*
# squid ssl cache
ALLOWDEVFILE=/dev/shm/squid-ssl_session_cache.shm
# Allow podman
ALLOWDEVFILE=/dev/shm/libpod*lock*


3. Set the proper mirror database URL location to internal network repository


Usually  file /var/lib/rkhunter/db/mirrors.dat does contain Internet server address where latest version of mirrors.dat could be fetched, below is how it looks by default on Debian 10 Linux.

root@debian:/var/lib/rkhunter/db# cat mirrors.dat 
Version:2007060601
mirror=http://rkhunter.sourceforge.net

As you can guess a machine that doesn't have access to the Internet neither directly, neither via some kind of secure proxy because it is in a Paranoic Demilitarized Zone (DMZ) Network with many firewalls. What you can do then is setup another Mirror server (Apache / Nginx) within the local PCI secured LAN that gets regularly the database from official database on http://rkhunter.sourceforge.net/ (by installing and running rkhunter –update command on the Mirror WebServer and copying data under some directory structure on the remote local LAN accessible server, to keep the DB uptodate you might want to setup a cron to periodically copy latest available rkhunter database towards the http://mirror-url/path-folder/)

# vi /var/lib/rkhunter/db/mirrors.dat

local=http://rkhunter-url-mirror-server-url.com/rkhunter/1.4/


A mirror copy of entire db files from Debian 10.8 ( Buster ) ready for download are here.

Update entire file property db and check for rkhunter db updates


# rkhunter –update && rkhunter –propupdate

[ Rootkit Hunter version 1.4.6 ]

Checking rkhunter data files…
  Checking file mirrors.dat                                  [ Skipped ]
  Checking file programs_bad.dat                             [ No update ]
  Checking file backdoorports.dat                            [ No update ]
  Checking file suspscan.dat                                 [ No update ]
  Checking file i18n/cn                                      [ No update ]
  Checking file i18n/de                                      [ No update ]
  Checking file i18n/en                                      [ No update ]
  Checking file i18n/tr                                      [ No update ]
  Checking file i18n/tr.utf8                                 [ No update ]
  Checking file i18n/zh                                      [ No update ]
  Checking file i18n/zh.utf8                                 [ No update ]
  Checking file i18n/ja                                      [ No update ]


rkhunter-update-propupdate-screenshot-centos-linux


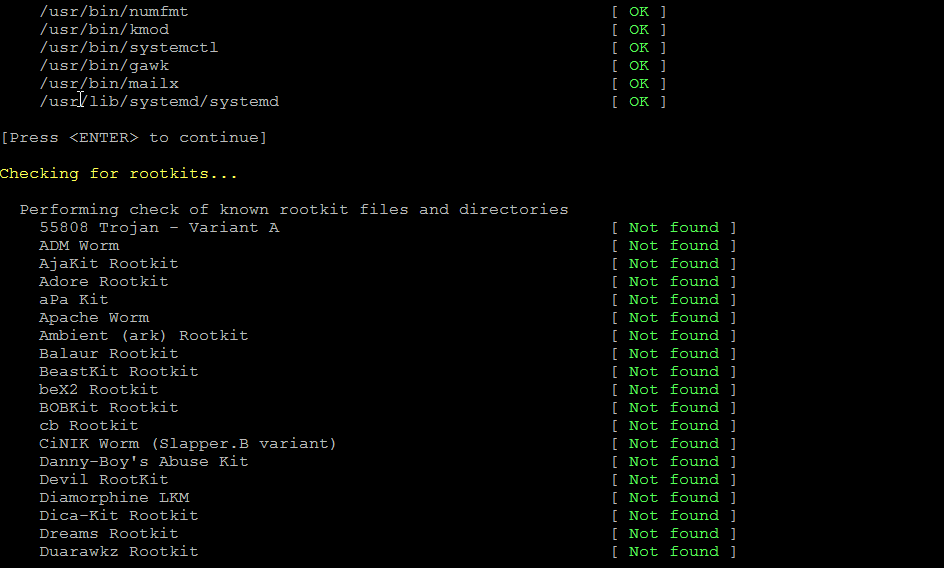
4. Initiate a first time check and see whether something is not triggering Warnings

# rkhunter –check
rkhunter-checking-for-rootkits-linux-screenshot

As you might have to run the rkhunter multiple times, there is annoying Press Enter prompt, between checks. The idea of it is that you're able to inspect what went on but since usually, inspecting /var/log/rkhunter/rkhunter.log is much more easier, I prefer to skip this with –skip-keypress option.

# rkhunter –check  –skip-keypress


5. Whitelist additional files and dev triggering false warnings alerts


You have to keep in mind many files which are considered to not be officially PCI compatible and potentially dangerous such as lynx browser curl, telnet etc. might trigger Warning, after checking them thoroughfully with some AntiVirus software such as Clamav and checking the MD5 checksum compared to a clean installed .deb / .rpm package on another RootKit, Virus, Spyware etc. Clean system (be it virtual machine or a Testing / Staging) machine you might want to simply whitelist the files which are incorrectly detected as dangerous for the system security.

Again this can be achieved with

PKGMGR_NO_VRFY=

Some Cluster softwares that are preparing their own /dev/ temporary files such as Pacemaker / Corosync might also trigger alarms, so you might want to suppress this as well with ALLOWDEVFILE

ALLOWDEVFILE=/dev/shm/qb-*/qb-*


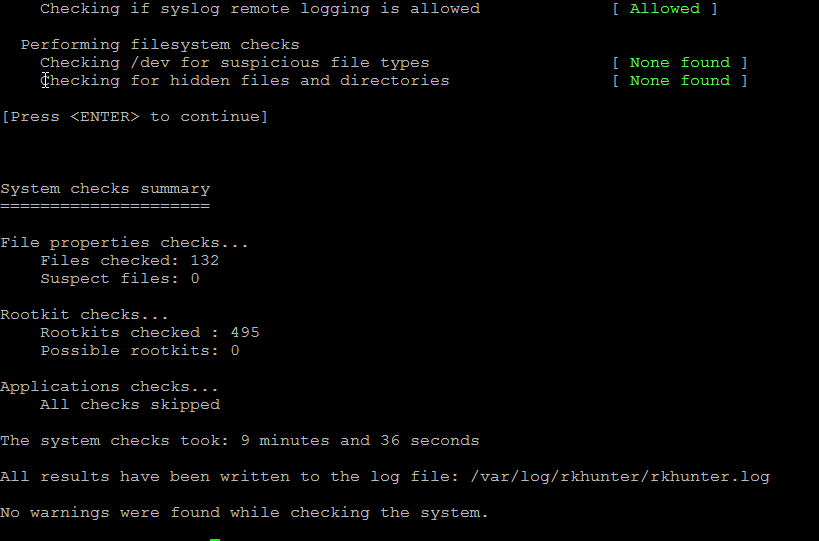
If Warnings are found check what is the issue and if necessery white list files due to incorrect permissions in /etc/rkhunter.conf .

rkhunter-warnings-found-screenshot

Re-run the check until all appears clean as in below screenshot.
rkhunter-clean-report-linux-screenshot

Fixing Checking for a system logging configuration file [ Warning ]

If you happen to get some message like, message appears when rkhunter -C is done on legacy CentOS release 6.10 (Final) servers:

[13:45:29] Checking for a system logging configuration file [ Warning ]
[13:45:29] Warning: The 'systemd-journald' daemon is running, but no configuration file can be found.
[13:45:29] Checking if syslog remote logging is allowed [ Allowed ]

To fix it, you will have to disable SYSLOG_CONFIG_FILE at all.
 

SYSLOG_CONFIG_FILE=NONE

Filter messages in Qmail with unwanted words, get rid of the Viagra annoying spam with Qtrap

Sunday, September 4th, 2011

Drop qmail received mail containing banned / unwanted words to get rid of Viagra and Sex related spam

Recently the annoying Viagra spam has emerged again. Therefore I decided to clean up some of the mails received to one of the qmail servers to protect users emailbox from this viagra peril.

To do so I’ve remember about an old script which used to be part of qmailrocks.org qmail install, the script is called qtrap and is able to filter emails based on list of specific mail contained words.
Since qmailrocks.org is gone (down) for some time and its still available only on few mirrored locations which by the way are not too easy to find I decided to write a little post on how qtrap.sh could be integrated quick & easy with any Qmail + Vpopmail install out there.

Hereby I include the description for qtrap.sh given by the script author:

“qtrap.sh script is applied on a per domain basis and serves as a “bad word” scanner to catch any spam that Spamassassin may have missed. This filter serves as the last defense against SPAM before it arrived in your inbox. I like this filter because it helps to get rid of any SPAM that happens to make it by Spamassassin. Without any protection at all, my mailbox gets a shit ton of SPAM every day. Within the first 3 months I enacted the Qtrap filter, Qtrap logged over 9,000 deleted SPAM messages, none of which were legitimate e-mails. My keyboard’s delete key was very appreciated the extra rest.

Any emails that are scanned and contain a banned word will be automatically deleted and logged by the qtrap script. A whitelist feature now exists so that individual addresses or domains can be exempt from the qtrap scan.”

Now as one might have general idea on what the script does. Here is the step by step qtrap.sh integration;

1. Create necessery qtrap directory and logs and set proper permissions

If the vpopmail is installed in /home/vpopmail , issue the following commands.

debian:~# cd /home/vpopmail
debian:~# mkdir -p qtrap/logs
debian:/home/vpopmail/qtrap# cd qtrap
debian:/home/vpopmail/qtrap# wget https://www.pc-freak.net/files/qtrap.sh
...
debian:/home/vpopmail/qtrap# cd ~
debian:~# touch /home/vpopmail/qtrap/logs/qtrap.logdebian:~# chown -R vpopmail:vchkpw /home/vpopmail/qtrapdebian:~# chmod -R 755 /home/vpopmail/qtrap

On older qmail installations it could be vpopmail is installed in /var/vpopmail if that’s the case, link /var/vpopmail to /home/vpopmail and go back to step 1. To link:

debian:~# ln -sf /var/vpopmail/ /home/vpopmail

2. Edit qtrap.sh to whitelist email addresses and build a ban words list

a) Include the email addresses mail arriving from which would not be checked by qtrap.sh

Inside qtrap.sh in line 63, there is a shell function whitelist_check(), the function looks like so:

whitelist_check () {
case $WHITELIST in
address@somewhere.com|address@somewhereelse.com)
echo $SENDER found in whitelist on `date "+%D %H:%M:%S"` >> /home/vpopmail/qtrap/logs/qtrap.log
exit 0;;
*)
;;
esac
}

By default the script has just two sample mails which gets whitelisted this is the line reading:

address@somewhere.com|address@somewhereelse.com

The whitelisted emails should be separated with a pipe, thus to add two more sample emails to get whitelisted by script the line should be changed like:

address@somewhere.com|address@somewhereelse.com|hipod@mymailserver.com|hipo@gmail.com

In order to whitelist an entire domain let’s say yahoo.com add a line to the above code like:

address@somewhere.com|address@somewhereelse.com|hipod@mymailserver.com|hipo@gmail.com|*yahoo.com

b) Defining the bad words ban list, mails containing them should not be delivery by qmail

The function that does check for the ban word list inside the script is checkall();, below is a paste from the script function:

checkall () {
case $BANNED_WORDS in
porn|PORN|Sex|SEX)
printout $BANNED_WORDS
echo MESSAGE DROPPED from $SENDER because of $BANNED_WORDS on `date "+%D %H:%M:%S"` >> /home/vpopmail/qtrap/logs/qtrap.log
exit 99;;
*)
;;
esac
}

checkall(); is located on line 74 in qtrap.sh, the exact list of banned words which the script should look for is located on line 76, the default qtrap.sh filters only mails containing just 4 words, e.g.:

porn|PORN|Sex|SEX)

To add the Viagra and VIAGRA common spam words to the list, modify it and expand like so:

porn|PORN|Sex|SEX|viagra|Viagra)

The delimiter is again | , so proceed further and add any unwanted spam words that are not common for any legit mails.

3. Install qtrap.sh to process all emails delivered to vpopmail

If its necessery to install the dropping of mails based on word filtering only to a single vpopmail virtualdomain do it with cmd:

debian:~# cd /home/vpopmail/domains/yourdomain.com
debian:/home/vpopmail/domains/yourdomain.com# touch .qmail-default.new
debian:/home/vpopmail/domains/yourdomain.com# echo '| /home/vpopmail/qtrap/qtrap.sh' >> .qmail-default.new
debian:/home/vpopmail/domains/yourdomain.com# echo "| /home/vpopmail/bin/vdelivermail '' bounce-no-mailbox" >> .qmail-default.new
debian:/home/vpopmail/domains/yourdomain.com# chown vpopmail:vchkpw .qmail-default.new
debian:/home/vpopmail/domains/yourdomain.com# cp -rpf .qmail-default .qmail-default.bak; mv .qmail-default.new .qmail-default
If however qtrap.sh needs to get installed for all existing vpopmail virtualdomains on the qmail server, issue a one liner bash script:

debian:~# cd /home/vpopmail/domains
debian:/var/vpopmail/domains# for i in *; do cd $i; echo "| /home/vpopmail/qtrap/qtrap.sh" >> $i/.qmail-default.new;
echo "| /home/vpopmail/bin/vdelivermail '' bounce-no-mailbox" >> $i/.qmail-default.new;
chown vpopmail:vchkpw .qmail-default.new; mv .qmail-default .qmail-default.old; mv .qmail-default.new .qmail-default; cd ..; done

This for loop will add ‘| /home/vpopmail/qtrap/qtrap.sh’ to all .qmail-default for all vpopmail domains.

Afterwards the .qmail-default file should contain the following two lines:

| /home/vpopmail/qtrap/qtrap.sh
| /home/vpopmail/bin/vdelivermail '' delete

A very important thing here you should consider that adding some common words, as let’s say hello or mail etc. could easily drop almost all the emails the qmail hands in to vpopmail.

Caution!! Never ever implement common words in the list of words !!
Always make sure the banned words added to qtrap.sh are words that are never enter an everyday legit email.

Another thing to keep in mind is that qtrap.sh doesn’t make a copy of the received message ,though it can easily be modified to complete this task.
Any mail that matches the banned words list will be dropped and lost forever.

4. Check if qtrap.sh is working

To check, if qtrap is working send mail to some mailbox located on the qmail server containing inside subject or mail message body the unwanted word defined inside qtrap.sh.

The mail should not be received in the mailbox to which its sent, if qtrap is working moreover qtrap.sh should log it inside it’s log file:

debian:~# cat /home/vpopmail/qtrap/logs/qtrap.log
MESSAGE DROPPED from hipo@mytestmail.com because of viagra on 09/03/11 11:34:19
MESSAGE DROPPED from support@mymailserver.com because of Viagra on 09/03/11 11:39:29

If the qtrap.log contains records similar to the one above, and the mail matching the banned word is not delivered, qtrap.sh is properly configured. If any issues check in qmail logs, they should have a good pointer on what went wrong with qtrap.sh invokation.

Note that I’ve integrated qtrap.sh to custom qmail install running on Debian Lenny 5.0 GNU/Linux.
If I have time I’ll soon test if its working fine on the latest stable Debian Squeeze and will report here in comments.
If however someone is willing to test if the script works on Debian Squeeze 6.0 or have tested it already please drop a comment to report if it works fine.
qtrap.sh, is a bit oldish and is not written to work too optimal therefore on some heavy loaded mail servers it can create some extra load and a bit delay the mail delivery. Thus when implementang one needs to consider the downsides of putting it in.

Also I was thinking tt might be nice if the script is rewritten to read the ban words and whitelist mails from files instead of as it is now as the words are hard coded in the script.
If I have some free time, I’ll probably do this, though I’m not sure if this is a too good idea as this might have a negative performance impact on the script execution time, as each instance of the script invoked should do one more operation of reading a file storing the ban words.

Well that’s pretty much it, enjoy 😉

How to prevent SSH and FTP bruteforce attacks with iptables on Linux

Friday, December 30th, 2011

Earlier I've blogged about how to prevent brute force attacks with fail2ban, denohosts and blockhosts , however there is easier way to secure against basic brute force attacks by not installing or configuring any external programs.
The way I'm talking about uses simple iptables rules to filter out brute force attacks.

Here is a small script to stop ssh and FTP invaders which try to initiate more than 3 consequential connections in 5 minutes time to port 22 or port 23:

SERVER_MAIN_IP='AAA.BBB.CCC.DDD';/sbin/iptables -N SSH_WHITELIST
/sbin/iptables -A INPUT -p tcp --dport 22 --syn -m recent --name sshbr --set
/sbin/iptables -A INPUT -p tcp --dport 22 --syn -j SSH_WHITELIST
/sbin/iptables -A INPUT -p tcp --dport 22 --syn -m recent --name sshbr \
--update --rttl --hitcount 3 --seconds 300 -j REJECT --reject-with tcp-reset
/sbin/iptables -A SSH_WHITELIST -s $SERVER_MAIN_IP -p tcp --dport 22 --syn -m recent --rttl --remove

The only thinIf the rules are matched iptables filter rules will be added to the iptables CHAIN SSH_WHITELIST
In case if you want to add some more truested IPs add some more iptables rules, like:

ALLOW_IP='BBB.CCC.DDD.EEE';
/sbin/iptables -A SSH_WHITELIST -s $ALLOW_IP -p tcp --dport 22 --syn -m recent --rttl --remove

Each filtered IP that matches the rules will be filtered for 5 minutes, if 5 minutes is enough, the 300 value has to be increased.