Posts Tagged ‘windows user’

How to configure Nautilus (Linux application like Windows Explorer) to work with standard Windows button + E On Linux GNOME en Mate

Monday, October 9th, 2017

how-to-configure-nautilus-linux-applicatoin-to-act-like-windows-explorer-make-windows-button-work-in-GNOME-and-Mate
As an ex-Windows user I'm still addicted to Windows User brainwashing as an ex-victim of Windows 95 / 98 and XP:), so I tend to love very much and its still hard for me to forget some major Key Binding (Windows Key Combinations).

On every new Desktop Linux I install, I have the habit to configure few great key combination shortcuts that makes my digital life much easier.
I use usually as a graphical environment GNOME and recently switched to MATE (GNOME 2 fork, cause GNOME 3 is totally messed up and unworthy to me), that's why this article is targetting this two Linux GUI envs, I'll be glad to hear in article comments for any other useful key bindings and how to configure similar key bindings for other Major Linux graphical environments (Cinnamon, KDE Plasma, XFCE, LXDE).


1. Configuring Lock Screen (Win button + L), Open Explorer(Win button + E), View Desktop (Win + D) in MATE graphic env


———  WINDOWS BUTTON, OFTEN USED KEY SHORTCUTS ———

Windows + E – Open new Windows File Explorer 

Windows + L – Lock Computer

Windows + M – To minimize All Windows

Windows + D – Show Desktop (similar to Windows +M though it doesn't switch to Desktop)

Win – + / – To Maginfy Text and Windows

Shift + Win + Left/Right Arrow – (In Windows if you have multiple monitors connected to the same computer lets say Right Monitor and Left, that combination switches between left monitor and right monitor)


——————————————————————–


The list goes on but I'm not used to all of them, I'll stop here and continue on with how to remake some of my favourite Windows keybindings in Gnu / Linux

Either run it from Menus:
 

System -> Settings -> Hardware -> Keyboard Shortcuts


Or run command


$ mate-keybinding-properties
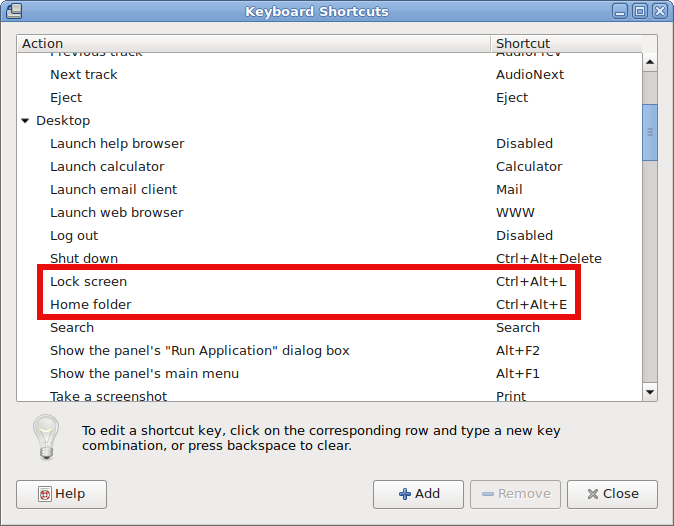
 

howto-gnome-mate-remap-shortcut-keybinding-keys-mate-keybinding-properties


After rebinding the Windows: 
– Lock Screen and Open New Nautilus Explorer Window (Home folder) variable to be invoked with Windows button, the result
is as that:

howto-gnome-mate-remap-shortcut-keybinding-keys-mate-keybinding-properties


Scroll down Mate Keyboard shortcuts and you'll find

also how to configure Windows Button and D Key Combination, following 2 more screenshots showing how to do it note that MOD Key appears once you press Windows Keyboard Key + something (e.g. MATE recognizes MOD Key as Win Key):

Before the change to bind Win Key + D to work:
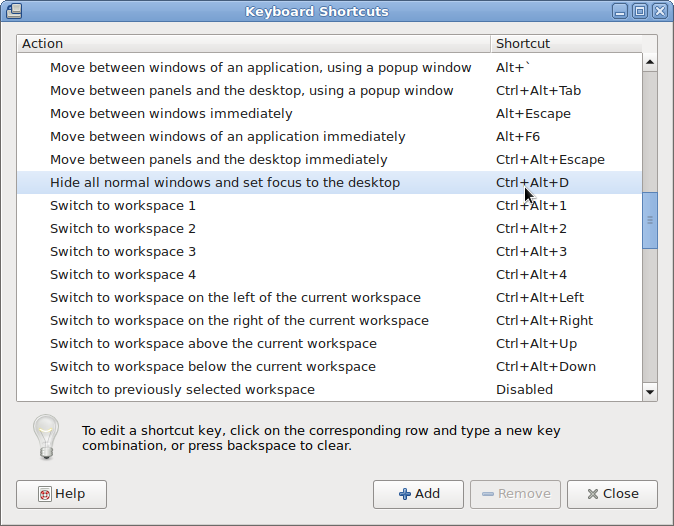
mate-how-to-make-desktop-view-open-with-standard-windows-button_and_d-combination-linux-debian

When configured Win Button + D looks like so:
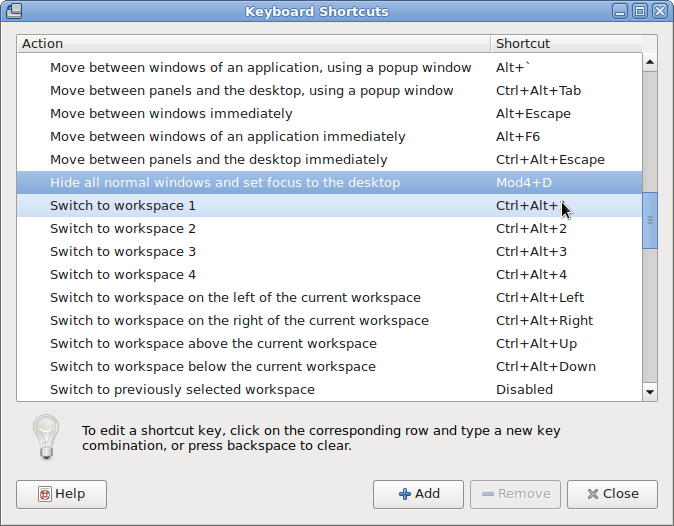
mate-how-to-make-desktop-view-open-with-standard-windows-button_and_d-combination-linux-debian-1

2. Configuring Lock Screen (Win button + L), Open Explorer(Win button + E), View Desktop (Win + D) in GNOME

Usually in GNOME until > version 3.X.X (in older GNOME graphic environment access to KeyBinding Properties was done via:


System -> Preferences -> Keybord Shortcuts -> Add ->


In fallback gnome with Metacity (if installed along with GNOME Desktop 3.2.X environment to access Key Bindings):

d

System->Apps->Metacity->global_keybindings  


Also it is possible to remap keys via dconf-editor, I've written a small article earlier explaining how to remap Screenshotting buttons with dconf-editor but the example could be easily adapted, so you can edit almost everything.

Besides that you can use a command to run the keyboard configuration (in older GNOMEs) via:


linux:~$ gnome-keybinding-properties


Just for information for those who might know, many Key Binding interesting options are available via gnome-tweak-tool, so if you don't have it yet install it and give it a try:


linux:~# apt-get install –yes gnome-tweak-tool


As you can see, there are plenty of options to make Win (key) to act like Alt (key):

linux:~# gnome-tweak-tool
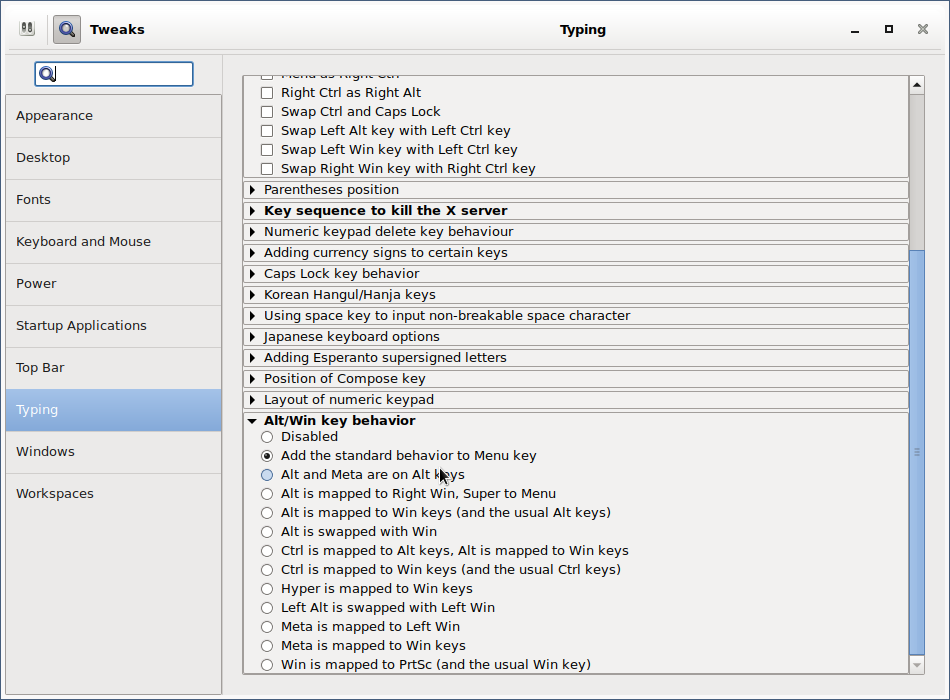
 

gnome-tweak-tool-make-win-key-to-behave-like-alt-key-howto 


After configuring the changes enjoy your WINDOWS Button + L, WINDOWS + E and WINDOWS + D WORKING AGAIN HOORAY !!! 🙂 


3. Most used shortcuts in Gnome and Nautilus 
 

Below are most used shortcuts thanks to LinuxQuestions Forum for providing them

Howdy! I thought that it would be useful to post a practical selection of shortcut keys for GNOME (the Desktop Environment) and Nautilus (the File Manager) and some information about customizing shortcut keys in Ubuntu. I wrote it especially for Ubuntu beginners, but I hope it will prove useful for all. 


2.1 GNOME/Nautilus shortcut keys – Very useful for the keyboard maniax like me :):
 

Ctrl-H: show hidden files

Ctrl-N: new window

Ctrl-Shift-N: create new folder

Alt-Home : jump to home folder

Alt-Enter : file / folder properties

F9 : toggle side-pane

Alt-F1 : launch applications menu

Alt-F2 : launch "run application" dialogue

Ctrl-Alt – Right/Left arrow : move to the next virtual desktop

Ctrl-Alt-Shift – Right/Left arrow : take current window to the next virtual desktop

Ctrl-Alt-D: minimize all windows, and gives focus to the desktop. 

Alt-Tab: switch between windows. When you use these shortcut keys, a list of windows that you can select is displayed. Release the keys to select a window. 

Ctrl-Alt-Tab: switch the focus between the panels and the desktop. When you use these shortcut keys, a list of items that you can select is displayed. Release the keys to select an item. 

Ctrl-Alt-L: lock the screen (tested only in Ubuntu) 

Ctrl-L: shortcut for opening locations-by default the path is the home folder*
/ : same as Ctrl-L but has the root (/) as default path* (shortcut found on here)
* both shortcuts can be used while you are on the desktop (no window active)

Ctrl-T : move to trash (in Nautilus)
Quite dangerous key combination because many of us are used to press these keys in order to open a new tab. Because we all delete items using the Delete key, I recommend to deactivate this shortcut key. To do that, go to System » Preferences » Appearance » Interface. Select Editable menu shortcut keys and close the dialog box. Click on the Edit menu in the File Browser. Click the Empty Trash item (it has Ctrl-T as the keyboard shortcut) Press the Delete key to get rid of the shortcut.
You can find all GNOME shortcut keys here


2.2 How to create a custom hotkey to launch whatever application you want in GNOME
 

As an example, we will set a lock-screen shortcut.


Open "gconf-editor" as the user as you're logged in in GNOME (typing gconf-editor in the terminal or "Run Application").
 

Go to apps > metacity > keybinding_commands


Here we have a list of twelve slots for commands.


Double click on e.g. "run_command_1" 

In Key Value Type in the name of the application or command you want to launch (e.g. gnome-screensaver-command –lock).


Go to apps -> Metacity -> global_keybindings 

Double click on e.g. "run_command_1" 
Change the key value to whatever key combination you like (e.g. <Ctrl><Alt>L).Press "Ok".


2.3.How to create/change GNOME shortcuts


Click on System -> Preferences -> Keyboard Shortcuts


Click the action in the list and press Enter. 
Press the new key or key combination you want to assign to the action. (To clear a shortcut, press the Backspace key)


Hope it helps, Enjoy Life .;)
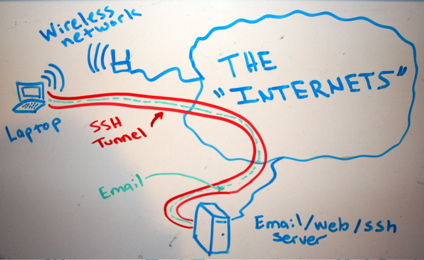
Creating Dynamic SSH Tunnel on Windows with Plink – Scriptable SSH Tunnels on Windows

Friday, July 4th, 2014

creating-ssh-tunnel-on-windows-with-plink-ssh-tunnel-diagram-tunnel-email-traffic

In my earlier articles I've explained about Creating SSH Tunnels on Linux and BSD and how to create SSH Tunnels with Putty Terminal client on Windows.

Creating SSH Tunnels is a precious knowledge every advanced computer user, a system administrator or security expert should be well aware of.

Probably still there are plenty of people for which the SSH Tunnelling is something never heard of or even if heard it is a mythical term covered by ancient shadows 🙂

So What is an SSH Tunnel? – SSH Tunnels shortly explained.

A SSH tunnel consists of an encrypted tunnel created through a SSH protocol
connection
.

An SSH tunnel can be used to transfer unencrypted traffic over a
network through an encrypted channel
between two hosts (host A and Host B) usually using remote and local port.

Requirements for SSH tunnel

Where Host B has to be running a version of OpenSSH server on some reachable port from Host B, (lets say 22).
Host B OpenSSH server has to be with (enabled X11Forwarding X11Forwarding yes in /etc/ssh/sshd_config) and Host A needs to have some SSH client supporting port forwarding (ssh command on Linux – part of (openssh-client package) and on Windows – Putty / Plink or any other of the many available ssh tunneling clients).

Probably most common SSH Tunnel use is to bypass firewalls that prohibits or filter certain internet services.
In other words SSH Tunnels can be used to get around firewall filtering. If you never heard of Bypassing firewalls with port forwarding I recommend to check this article

We can use a ssh tunnel to securely transfer files between a FTP server and a client even though the FTP
protocol itself is not encrypted
, Tnnel traffic to an SQL server, Tunnel traffic from your Desktop PC to a Proxy
SSH tunnels can be used to tunnel outbound E-mail traffic back to your work PC to avoid having to change SMTP servers etc.

A very common SSH Tunnel use is by office workers who don't want their Custom Web browsing habbits and Web history be tracked,

For people who has to travel a lot tunneling SSH traffic from notebook to your home based SMTP is mandatory, otherwise your e-mail passwords, might end up captured by someone who manages the Free WI-FI used by you somewhere on the road or cafeteria. Another good case use of SSH Tunnel is to tunnel VNC traffic.

SSH Tunneling was historically very famous in days where IRC (Internet Relay Chat) and used to be common way (for people who want to prevent their real IP address from publicly visible) on the Internet.
SSH Tunneling is great way to maintain high communication security, however because it requires some basic technical knowledge most people neglect it or never heard of it, so I hope this article will give at least basic ideas to people new to tunneling.

How to create SSH Tunnels on Microsoft Windows

SSH Tunneling has been originally invented on UNIX / Linux platform, luckily nowdays it is easily possible to create SSH tunnels on almost any moden OS (including Mac OS X and M$ Windows).

Using Plink it is possible to create easily (batch) scriptable SSH tunnels on Windows

Generally here is example of basic plink use syntax:
 

plink.exe {remote-host} -P 22 -C -D 10080 -l username -pw password
 

To make a Tunnel with Plink to remote SSH Server (remote-ssh-server.com) listening for connections on port 22 on localhost 10022

"C:Program Files (x86)PuTTYplink.exe" -ssh remote-username@tunnel-to-ssh-server-host.com -pw PASSWORD123 -C -T -D 127.0.0.1:10022 -N

-D – option instructs Plink to make "Dynamic SOCKS-based port forwarding"
Dynamic Socks-based port forwarding will make your ssh client a simple socks server which listen to port 10022 for incoming connections.
-Ttells plink not to open interactive shell on remote server (disable pty allocation)
-Cenables traffic compression

Using the -D option you can prepare tunnel to traffic all your outgoing server traffic via the SSH tunneling host.

E. g. -D allows you to use the remote ssh server as a proxy server with no need for remote server to run anything except SSH service and have Internet connection.

-N – stands for "don't start shell/command SSH-2 only"

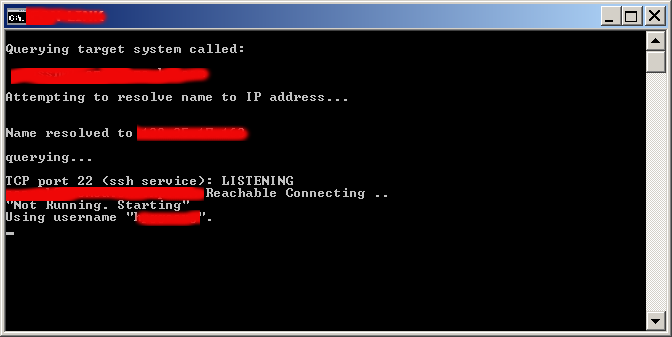
On success of SSH Tunnel establishing you will get a pop-up window similar to below screenshot (note that some of the messages in cmd line are from a batch script – if no batch script is used you wil only get a window with "Using Username":

plink_establishing_ssh_tunnel-on-microsoft-windows-screenshot

Note: That if you're about to be using Plink command frequently add it to your Windows SYSTEM PATH (check my previous article – how to add Putty to System PATH) to enable it invokable without writting the full command path location.

Once this Window is open if you still have doubt, where the tunnel is established, the quickest way to test whether tunnel is working is to open telnet to localhost port 10022.

In Windows command prompt type:
 

C:> telnet localhost 10022


You will get a remote server SSH version printed, like on below shot:

windows-testing-whether-ssh-tunnel-is-working-with-telnet-screenshot-black-screen

Now lets say now you would like to access the internet via just created SSH tunnel.
You can do it by simply setting Socks Proxy in your Firefox / Opera (or whatever browser you use).

Whether you want to run the SSH Tunnel permanent and periodically check whether tunnel is allve and respawn it in case plink quit, you can use a very simple batch script like one below:
 

@ECHO OFF
tasklist /FI "IMAGENAME eq plink.exe" 2>NUL | find /I /N "plink.exe">NUL

if "%ERRORLEVEL%"=="0"  ( echo Programm is running exiting
exit
)
echo "Not Running"
start /b "C:Program Files (x86)PuTTYplink.exe" -ssh remote-username@tunnel-to-ssh-server-host.com -pw Password123 -T -C -D 127.0.0.1:10022 -N"


If you're a Linux guy and you don't want to mess around with Plink but still want to create your SSH tunnels following SSH client UNIX command line syntax, setup the Cygwin port of OpenSSH for Windows.

Or if you're unsure whether remote server is always reachable (you're moving with your notebook from (Country) network to network), you can use also portqry – windows port scanner to check whether remote ssh server port is opened:
 

@ECHO OFF
tasklist /FI "IMAGENAME eq plink.exe" 2>NUL | find /I /N "plink.exe">NUL
if "%ERRORLEVEL%"=="0"  ( echo Programm is running exiting
pause
exit
)
portqry -n tunnel-to-ssh-server-host.com -p tcp -e 22
if %ERRORLEVEL%==0 echo tunnel-to-ssh-server-host.com Reachable Connecting ..
if NOT %ERRORLEVEL%==0 (echo tunnel-to-ssh-server-host.com.com Unreachable
exit)
echo "Not Running. Starting"
"C:Program Files (x86)PuTTYplink.exe" -ssh remote-username@tunnel-to-ssh-server-host.com -pw Password123 -T -C -D 127.0.0.1:10080 –N


Here is another sample use of Plink to create tunnel via SSH host tunnel-to-ssh-server-host.com  to listen for connections on localhost port 1234 and forward all incoming traffic to squid proxy server on 192.168.1.5 on port 3128.
 

C:Usersgeorgi>plink.exe -v -x -a -T -C -noagent -ssh -L 127.0.0.1:1234:192.168.1.5:3128 remote-username@tunnel-to-ssh-server-host.com

Setting then 127.0.0.1:1234 in  Firefox Proxy browser settings will make all traffic from your browser to flow securily to your own proxy server (letting you hide your "custom traffic" from company Web sniffers (Proxying) and Web filtering.
A remark to make here is 192.168.1.5 is (a internal server with Squid Proxy, configured to pass traffic to the internet ).

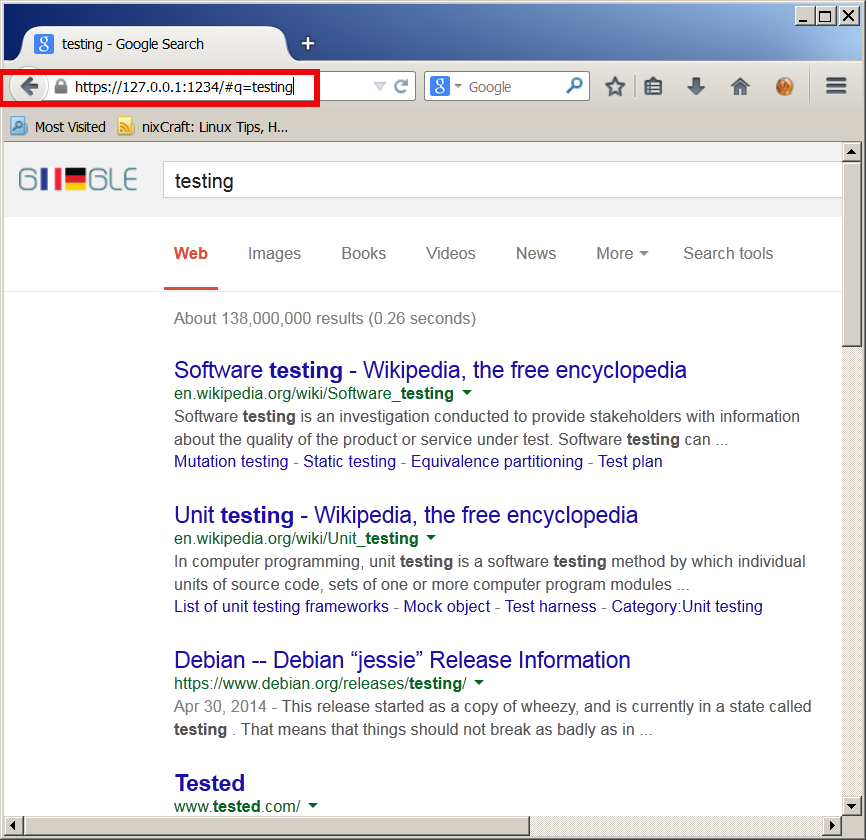
Here is a way to make tunnel between your remote SSH server and local Desktop PC to make Google queries without being logged by your ISP or company where you're working:

plink.exe "-v -x -a -T -C -noagent -ssh -L 127.
0.0.1:1234:95.158.130.242:443 -pw SecretPassword123 -l hipo www.pc-freak.net"

95.158.130.242 – is one of the IPs www.google.com resolves to
www.pc-freak.net – is name of my home router.

To make tunneled queries to Google then open in browser https://127.0.0.1:1234

using_localhost_ssh_tunnel_to_anonymously-search-in-google-plink-tunnel-for-security


If you're a lazy windows user and don't want to bother to make your tunnels from command line and you want need nice gui way to manage multiple tunnels – check out putty-tunnel-manager.

I myself am not a SSH Tunnel expert and thus Iwould be happy to learn further from people for some interesting cases and custom ways to do  SSH Tunnels. If you know of better advantageous ways to tunnel traffic, please share.

Happy tunneling ! 🙂

Testing your local network for open Windows shares from Linux router

Friday, June 28th, 2013

Windows sharing testing local network for open shared directories Samba Software logo

Whether you administrate local Windows network behind a DMZ router, It is useful to routinely scan from Linux router which Windows hosts on the network has enabled sharing? The reason is some Windows user might share something by mistake which is not supposed to be shared without even he realizes this.
 

 In case, where new Linux router is configured and Windows hosts behind it can't locate each other on network make sure you have in your firewall before any filtering (REJECT / DROP) firewall rules:

iptables -A INPUT -s 192.168.5.1/24 -m state --state NEW -p tcp --dport 137 -j ACCEPT
iptables -A INPUT  -s 192.168.5.1/24 -m state --state NEW -p tcp --dport 138 -j ACCEPT
iptables -A INPUT  -s 192.168.5.1/24 -m state --state NEW -p tcp --dport 139 -j ACCEPT
iptables -A INPUT  -s 192.168.5.1/24 -m state --state NEW -p tcp --dport 445 -j ACCEPT

iptables -A INPUT -s 0.0.0.0/24 -m state --state NEW -p tcp --dport 445 -j REJECT
iptables -A INPUT -s 0.0.0.0/24 -m state --state NEW -p tcp --dport 138 -j REJECT
iptables -A INPUT -s 0.0.0.0/24 -m state --state NEW -p tcp --dport 139 -j REJECT
iptables -A INPUT -s 0.0.0.0/24 -m state --state NEW -p tcp --dport 137 -j REJECT

(Qquickest way to place rules to exec on next boot is via /etc/rc.local)

Once set, to check all is fine with fwall rules:

router:~# iptables -L INPUT -n

Chain INPUT (policy ACCEPT)

target     prot opt source               destination         

ACCEPT     tcp  —  192.168.5.0/24       0.0.0.0/0           state NEW tcp dpt:137
ACCEPT     tcp  —  192.168.5.0/24       0.0.0.0/0           state NEW tcp dpt:138
ACCEPT     tcp  —  192.168.5.0/24       0.0.0.0/0           state NEW tcp dpt:139
ACCEPT     tcp  —  192.168.5.0/24       0.0.0.0/0           state NEW tcp dpt:445 
REJECT tcp — 0.0.0.0/24 0.0.0.0/0 state NEW tcp dpt:445 reject-with icmp-port-unreachable
REJECT tcp — 0.0.0.0/24 0.0.0.0/0 state NEW tcp dpt:138 reject-with icmp-port-unreachable
REJECT tcp — 0.0.0.0/24 0.0.0.0/0 state NEW tcp dpt:139 reject-with icmp-port-unreachable
REJECT tcp — 0.0.0.0/24 0.0.0.0/0 state NEW tcp dpt:137 reject-with icmp-port-unreachable

On CentOS / Fedora / Redhat router place below rules in /etc/sysconfig/iptablesdefault firewall configuration file for RPM based distros:

-A RH-Firewall-1-INPUT -s 192.168.1.0/24 -m state --state NEW -p tcp --dport 137 -j ACCEPT
-A RH-Firewall-1-INPUT -s 192.168.1.0/24 -m state --state NEW -p tcp --dport 138 -j ACCEPT
-A RH-Firewall-1-INPUT -s 192.168.1.0/24 -m state --state NEW -p tcp --dport 139 -j ACCEPT
-A RH-Firewall-1-INPUT -s 192.168.1.0/24 -m state --state NEW -p tcp --dport 445 -j ACCEPT
-A RH-Firewall-1-INPUT -s 0.0.0.0/24 -m state --state NEW -p tcp --dport 137 -j REJECT
-A RH-Firewall-1-INPUT -s 0.0.0.0/24 -m state --state NEW -p tcp --dport 138 -j REJECT
-A RH-Firewall-1-INPUT -s 0.0.0.0/24 -m state --state NEW -p tcp --dport 139 -j REJECT
-A RH-Firewall-1-INPUT -s 0.0.0.0/24 -m state --state NEW -p tcp --dport 445 -j REJECT

After that check lets say 192.168.5.0/24 whether Windows Samba shares ports are reachable:

 To check hosts with Sharing easiest way is to scan your network C class range with nmap for all ports through which Windows Samba shares communicate – i.e. check for open state TCP / UDP port numbers 139,137,139,445 list of samba used default ports is in  /etc/services

router:~# grep netbios /etc/services

netbios-ns 137/tcp # NETBIOS Name Service
netbios-ns 137/udp
netbios-dgm 138/tcp # NETBIOS Datagram Service
netbios-dgm 138/udp
netbios-ssn 139/tcp # NETBIOS session service
netbios-ssn 139/udp

Note that Port 445 microsoft-ds is not in /etc/services because it is not common used (only used whether Windows hosts are using Active Directory)

 
router:~# nmap 192.168.5.1-255 -p 139,137,139,445

Interesting ports on 192.168.5.23:

PORT    STATE    SERVICE
137/tcp filtered netbios-ns
139/tcp open     netbios-ssn
445/tcp open     microsoft-ds
MAC Address: 00:AA:4D:2F:4D:A2 (Giga-byte Technology Co.)


Interesting ports on 192.168.5.31:

PORT    STATE    SERVICE
137/tcp filtered netbios-ns
139/tcp open     netbios-ssn
445/tcp open     microsoft-ds
MAC Address: 3C:B9:2B:76:A6:08 (Unknown)
….
…..


How to check any filesystem for bad blocks using GNU / Linux or FreeBSD with dd

Monday, November 28th, 2011

Check any filesystem partition for BAD BLOCKS with DD on GNU Linux and FreeBSD

Have you looked for a universal physical check up tool to check up any filesystem type existing on your hard drive partitions?
I did! and was more than happy to just recently find out that the small UNIX program dd is capable to check any file system which is red by the Linux or *BSD kernel.

I’ll give an example, I have few partitions on my laptop computer with linux ext3 filesystem and NTFS partition.
My partitions looks like so:

noah:/home/hipo# fdisk -l
Disk /dev/sda: 160.0 GB, 160041885696 bytes
255 heads, 63 sectors/track, 19457 cylinders
Units = cylinders of 16065 * 512 = 8225280 bytes
Sector size (logical/physical): 512 bytes / 512 bytes
I/O size (minimum/optimal): 512 bytes / 512 bytes
Disk identifier: 0x2d92834c
Device Boot Start End Blocks Id System
/dev/sda1 1 721 5786624 27 Unknown
Partition 1 does not end on cylinder boundary.
/dev/sda2 * 721 9839 73237024 7 HPFS/NTFS
/dev/sda3 9839 19457 77263200 5 Extended
/dev/sda5 9839 12474 21167968+ 83 Linux
/dev/sda6 12474 16407 31593208+ 83 Linux
/dev/sda7 16407 16650 1950448+ 82 Linux swap / Solaris
/dev/sda8 16650 19457 22551448+ 83 Linux

For all those unfamiliar with dddd – convert and copy a file this tiny program is capable of copying data from (if) input file to an output file as in UNIX , the basic philosophy is that everything is a file partitions themselves are also files.
The most common use of dd is to make image copies of a partition with any type of filesystem on it and move it to another system
Looking from a Windows user perspective dd is the command line Norton Ghost equivalent for Linux and BSD systems.
The classic way dd is used to copy let’s say my /dev/sda1 partition to another hard drive /dev/hdc1 is by cmds:

noah:/home/hipo# dd if=/dev/sda1 of=/dev/hdc1 bs=16065b

Even though the basic use of dd is to copy files, its flexibility allows a “trick” through which dd can be used to check any partition readable by the operating system kernel for bad blocks

In order to check any of the partitions listed, let’s say the one listed with filesystem HPFS/NTFS on /dev/sda2 using dd

noah:/home/hipo# dd if=/dev/sda2 of=/dev/null bs=1M

As you can see the of (output file) for dd is set to /dev/null in order to prevent dd to write out any output red by /dev/sda2 partition. bs=1M instructs dd to read from /dev/sda2 by chunks of 1 Megabyte in order to accelerate the speed of checking the whole drive.
Decreasing the bs=1M to less will take more time but will make the bad block checking be more precise.
Anyhow in most cases bs of 1 Megabyte will be a good value.

After some minutes (depending on the partition size), dd if, of operations outputs a statistics informing on how dd operations went.
Hence ff some of the blocks on the partition failed to be red by dd this will be shown in the final stats on its operation completion.
The drive, I’m checking does not have any bad blocks and dd statistics for my checked partition does not show any hard drive bad block problems:

71520+1 records in
71520+1 records out
74994712576 bytes (75 GB) copied, 1964.75 s, 38.2 MB/s

The statistics is quite self explanatory my partition of s size 75 GB was scanned for 1964 seconds roughly 32 minutes 46 seconds. The number of records red and written are 71520+1 e.g. (records in / records out). This means that all the records were properly red and wrote to /dev/null and therefore no BAD blocks on my NTFS partition 😉

How to edit, convert, join, split and re-time movie subtitle files on Linux (Fix Subtitles bad timing) / Install subtitle manipulation console tools for Linux

Tuesday, April 19th, 2011

As a Linux user I sometimes face difficulties with watching subtitled, movies. I mostly use Mplayer, Totem or VLC to watch the common video files.
The most common problems I face with subtitles are caused by bad timing, many times the solution to the bad timing issues is very simpleand comes up to changing the default movie player I use MPlayer to VLC or Totem.

However at many occasions trying to watch the movie with different kind of movie player does not help.
In this dark moments I get seriously irritated I am not a regular Windows user, where such kind of problems are almost none as many of the Windows movie player problems does fix bad timing issues automatically.

Luckily there is a work-around to this subtitles timing issues and other mishaps caused by guys who created a Movie subtitle files with a Windows subtitle editor program, subtitles timing, the Linux work-around takes a few more minutes to install a package called Subtitles

The Subtitles text utility is written in Perl and contains two executables subplay and subs .

Subtitles is the Linux subtitle Swiss Army Knife as it is capable of convert, join, split, and re-time of subtitles files

Installing Subtitles tools on Linux is a trivial job and it comes to download and installation of the 2 perl executables.
Here is how:

1. Download Subtitles.tar.gz toolsI have mirrored Linux Subtitles (Subtitles.tar.gz) here originally the binaries are to be found on URL address: http://karasik.eu.org/software/ , issue the commands:

linux:~# cd /usr/local/src
linux:/usr/local/src# wget https://www.pc-freak.net/files/Subtitles.tar.gz
...
2. Unarchive it

linux:/usr/local/src# tar -zxvvf tar -zxvvf Subtitles.tar.gz...
linux:/usr/local/src# cd Subtitles-1.0

3. Compile and install Subtitles system widePitily the Subtitles tools are not currently available as a packages in the repositories of Debian and Ubuntu Linux and thus easy installation without compilation via apt-get is unfortunately not available.

Here is the commands with which to compile and install Subtitles:

linux:/usr/local/src/Subtitles-1.0# perl Makefile.PL
...
linux:/usr/local/src/Subtitles-1.0# make
...
linux:/usr/local/src/Subtitles-1.0# make test
...

All tests successful.Files=1, Tests=17, 1 wallclock secs ( 0.05 usr 0.00 sys + 0.06 cusr 0.01 csys = 0.12 CPU)Result: PASS

linux:/usr/local/src/Subtitles-1.0# make install

Installing /usr/local/share/perl/5.10.1/Subtitles.pm
Installing /usr/local/man/man1/subplay.1p
Installing /usr/local/man/man1/subs.1p
Installing /usr/local/man/man3/Subtitles.3pm
Installing /usr/local/bin/subplay
Installing /usr/local/bin/subs
Appending installation info to /usr/local/lib/perl/5.10.1/perllocal.pod

Now as we have the subs executable installed, Let’s say your movie subtitles displays 5 seconds earlier before the movie scenes (bad timing), all you need to do to adjust your subtitles to show up in correct movie scenes is issue:

hipo@linux:/home/hipo/Movies$ subs -i -b 5 your_movie_subtitle_file_name.sub

now check out the subtitle files once again with your favourite player and the early subtitles display on your movie should be fixed.
Let’s have another scenario, say that your movie file is encoded to display 24 frames per seconds (fps) but the subtitle file is created to display the subtitles for a 25 fps, to solve this situation issue:

hipo@linux:~# subs -i -a 24/25 your_movie_subtitle_file.sub

Another possible scenario where subs command will be a precious asset is if you for example want to merge two subtitle files into one.Let’s say you have subtitles for a movie which are split over in 2 parts and the corresponding subtitles are in 2 different files, but eventually you find a better quality of the movie (DVD quality) in a single file and therefore you need the movie subtitles to be stored in one single file.
In that case to merge the subtitle files from let’s say the files movie_subtitle_file1.sub and movie_subtitle_file2.sub use the command:

subs -z movie_subtitle_file1.sub movie_subtitle_file2.sub

Some few other helpful things you can do with subs on Linux, are for example: splitting a file after a determined period of time, separating overlapped lines, and joining files into a single subtitle.

If you want to remove all the comments of gestures, facial expressions loud laughing etc. which displays usually the annoying (‘[Sneezing]’ or ‘[Music playing]) during the movie screen play, issue:

subs -e 's/[s-]*[.*]s*n*//gs' movie_subtitle_file.sub

Also other interesting Linux tool which is useful if you want to make conversions between subtitle in a (.sub) format to (.srt) format is called sub2srt perl script:

sub2srt’s home page is located on the URL address: http://www.robelix.com/sub2srt/, just to ensure it won’t just disappear with time I have created sub2srt mirror here

The most basic usage of sub2srt linux converting tool is by simply passing input sub and output srt file names like so:

linux:~# ./sub2srt 5rFF-pop.sub 5rFF-pop.srt

sub2srt supports changing of fps rate per second during conversion with the -f option as well as creationg of converted files in dos like end of file (CR+LF) with the –dos option.

Hope this article makes sense. If you find it useful, please drop me a thanks comment 😉