Posts Tagged ‘xml’

How to create PCS / Corosync High Availability Cluster config backup and migrate to new Virtual Machines

Thursday, October 26th, 2023

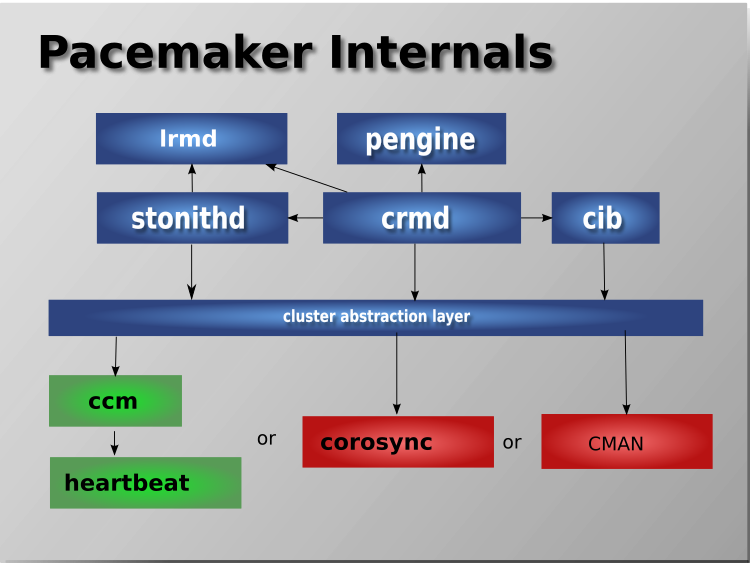
pcs-pcmk-internals-explained-picture

The aim of this article is to illustrate how to literally migrate a an Haproxy PCS Pacemaker / Corosync Cluster configurations from old Virtual Machines that due to time passed become unsupported (The Operating System end of life (EOF)) has reached to a new ones. 
This is quite a complex task especially as you usually need to setup the Hypervisor hosts with VMWare / Xen / KVM / OpenVZ or whatever kind of virtualization is to be used. Then setup the correct network interfaces IPs failover the heartbeat lines over which the cluster will work to prevent Split Brain scenartions, the Network Bonding interfaces to guarantee a higher amount of higher availability as well as physically install and update all the cluster software on the new built Linux hosts that will be members of the new cluster in setup. 

All this configuration from scratch of a PCS Corosync cluster is a very lenght topic which I'll try to cover in some of my next articles. In short to migrate the cluster from old machines to new once all this predescribed steps are in line. 
You will need to.


1. Create backup of old cluster configuration
2. Migrate the backup to a new built VM Machine hosts
3. Import the cluster configuration into the PCS Cluster.


Bear in mind that this article discusses a migration of CentOS Linux release 7.9.2009 with its shipped versions of corosync / pacemaker and pcs 

How to create cluster config backup and migrate to new VM

1. Dump cluster assuming that is a Quality Assuare or Pre – Production host  to create full cluster config backup

[root@old-cluster-machine ~]# pcs config backup old-cluster-machine.pcs.config.bak

2. Dump cluster Production full configuration

[root@old-cluster-machine1 ~]# pcs config backup old-cluster-machine1.pcs.config.bak

This command will output a backup of 

old-cluster-machine1.pcs.config.bak.tar.bz2

3. Migrate a cluster identical config to the new Virtual machines

Usually this moval of produced backup files with pcs config backup  commands can be copied with something like FTP / SFTP  or SSL-ed / TLS-ed protocol. However if you have to move the configuration files from a paranoid Citrix environment that doesn't allow you to have any SFTP / SSH or FTP kind of transfer protocol from the location where the old config lays to the new ones. 
A simple encoding of the binary format dumped configuration to plain text files can be done and files, can be moved via a simple copy / paste operation (a bit of a hack) 🙂

Encode the cluster config to be able to migrate configuration in plain text via a simple Copy / Paste operation.


[root@old-cluster-machine ~]# base64 config backup old-cluster-machine.pcs.config.bak > old-cluster-machine.pcs.config.bak.tgz.b64

[root@old-cluster-machine1 ~]# base64 old-cluster-machine1.pcs.config.bak.tar.bz2 > old-cluster-machine1.pcs.config.bak.tgz.b64
[root@old-cluster-machine ~]# cat  old-cluster-machine.pcs.config.bak.tgz.b64

(Copy output and Paste to new host VM) /root/haproxy-cluster-backup)

[root@old-cluster-machine1 ~]# cat old-cluster-machine1.pcs.config.bak.tgz.b64 


(Copy output and Paste to new host VM) /root/haproxy-cluster-backup)

Login to the new hosts, where configs has to be migrated and restore the files with base64

For QA / Preprod to restore backup config

[root@dkv-newqa-vm ~]# mkdir /root/haproxy-cluster-backup
[root@dkv-newqa-vm ~]# cd /root/haproxy-cluster-backup
[root@dkv-newqa-vm ~]# base64 -d old-cluster-machine.config.bak.tgz.b64 > old-cluster-machine.pcs.config.bak.tar.bz2
[root@dkv-newqa-vm ~]#  tar -jxvf old-cluster-machine.pcs.config.bak.tar.bz2
ak.tar.bz2
version.txt
pcs_settings.conf
corosync.conf
cib.xml
pacemaker_authkey
uidgid.d/


For Prod to restore backup config

[root@dkv-newprod-vm  ~]# mkdir /root/haproxy-cluster-backup
[root@dkv-newprod-vm ~]# cd /root/haproxy-cluster-backup
[root@dkv-newprod-vm ~]# base64 -d old-cluster-machine.config.bak.tgz.b64 > old-cluster-machine1.pcs.config.bak.tar.bz2
ak.tar.bz2
version.txt
pcs_settings.conf
corosync.conf
cib.xml
pacemaker_authkey
uidgid.d/


N!B! An Useful hin is on RHEL 8 Linux's shipped pcs command version has also a very useful command with which you can simply dump completly the config of the cluster in straight commands which you can run directly on the new VM machines where you have migrated.

The command to print out commands that would add existing cluster resources on Redhat 8:

# pcs resource config –output-format=cmd

Another useful command for cluster migration is cibadmin

i.e. to dump cluster xml config

#cibadmin –q > cluster.xml

Later you can import the prior xml dump with it.

# cibadmin –replace –xml-file cib.xml


Switching from PasswordSafe to Keepass database, migrating .psafe3 to .kdbx format howto

Thursday, February 23rd, 2023

passwordsafe-to-keepass-migration-logo

I have been using PasswordSafe for many years within my job location as system administrator on the Windows computers I do use as dumb hosts to administrate remotely via ssh servers, develop code in bash / perl or just store different SysAdmin management tools and interfaces passwords. The reason behind was simply that I come out from a Linux background as I've used for daily Sysadmin job for many years GNU / Linux and there I always prefer GNOME (gnome GTK interface) in favour of KDE's (QT Library), and whence I came to work for the "Evil" Windows oriented world of corporations  for the sake of Outlook use and Office 365 as well as Citrix accessibility i've become forced by the circumstances to use Windows. 
Hence for a PasswordManager for Windows back in the years, I preferred the simplicity of interface of PasswordSafe instead of Keepass which always reminded me of the nasty KDE.
PasswordSafe is really cool and a handy program and it works well, but recetnly when I had to store many many passwords and easily navigate through each of it I realized, by observing colleagues, that KeePass as of time of writting this article is much more Powerful and easy to use, as I can see all records of a searched passwords on a Single screen, instead of scrolling like crazy with PasswordSafe through the passowrds.

I didn’t really feel like cutting and pasting every field for all my passwords (plus I started experiencing some PasswordSafe copy / paste passwords issues – maybe not related to PasswordSafe itself so this was the turning point I decided to migrate to Keepass.

For that, started looking at the import export functions for each program. 

After a quick search, I found few articles online explaining on how the migration of PasswordSafe to KeePass can be easily handled as the versions of Keepass and Password safe are moving all the time, of course usually some of the guides to be found online are never competely upto date, so I had to slightly modify one of the articles and come up with this one 🙂 .
 

  •  My PasswordSafe program that keeps my account password records and notes is version is
    V 3.59 built on May 28 2022 and is running on my Windows 10 OS 64 bit release
  • The installed KeePass version to where I have migrated the Pwsafe password database Successfully is 2.48 64 Bit
     
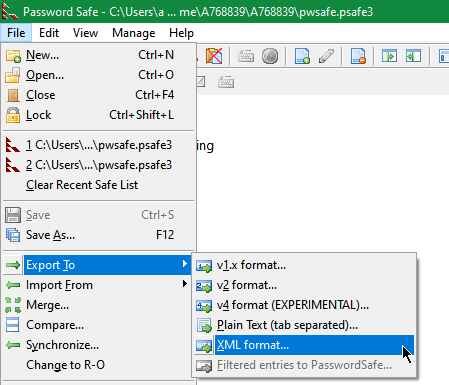
  1. Use the Password Safe function to export to XML file Format
    (File -> Export To -> XML Format )


    pwsafe.screenshot-export-password-psafe3
     

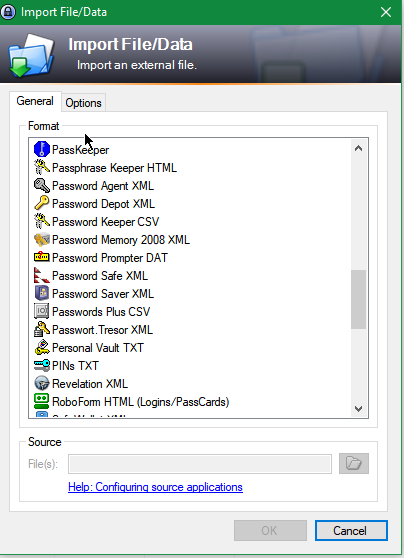
  2. Import the text file into KeePass
    (File->Import From-> Password Safe XML file)


    import-file-data-keepass-screenshot

This process worked quite fine. All of the passwords were imported .
Despite the importing (expected small glitches – please recheck that all was imported fine, before joy), the process is quicker than copy/pasting every field for each entry.

For those of you who are more worried about security than I am, you know this is a very insecure method to transfer passwords. For others, you may wish to export the (unencrypted) text file to a Veracrypt – that is a Truecypt fork (as nowadays obsolete unmaintaned and probably insecury) – a Free Open-Source On-The-Fly Disk Encryption Software to prepare  Veracrypt  partition and / or use Eraser on the text file once you’re finished with it or use another of the free Veracrypt open-source (free software) alternatives such DiskCryptor or even the proprietary Windows BitLocker / CipherShed / Axcrypt or some other encryption alternative software for Windows XP / 2000 / 7 10 that is out there.

NB! Please  don’t do this on a public computer or a PC that you don't administrate.
You never know who might find your passwords or might be sniffing on your OS, as today there are so many devices that perhaps are hacked and listening and collecting password datas  🙂

That's it now I enjoy my KeePass but I'm thankful to PasswordSafe developers, who have easified my password management Virtual life for years 🙂
Any hints on how you migrated PasswordSafe to Keepass are mostly welcome. Also will be nice to hear of hard-core PasswordSafe hints or plugins that can power-up the password storage, maybe I can get convinced back to return back to PasswordSafe 🙂
 

Disable VNC on KVM Virtual Machine without VM restart / How to Change VNC listen address

Monday, February 28th, 2022

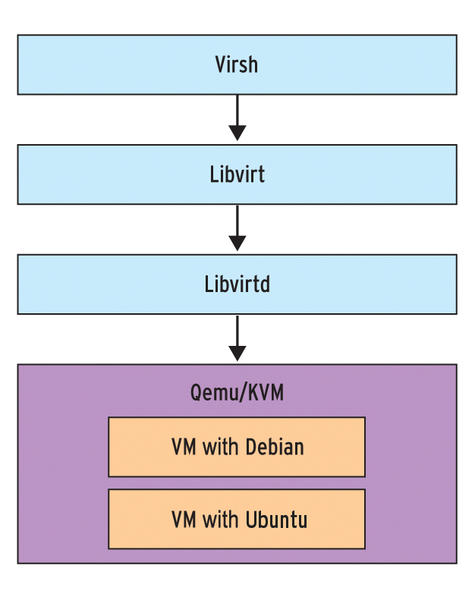
disable-vnc-port-listener-on-a-KVM-ran-virtual-machine-virsh-libvirt-libvirt-architecture-design

Say you have recently run a new KVM Virtual machine, have connected via VNC on lets say the default tcp port 5900 
installed a brand new Linux OS using a VNC client to connect, such as:
TightVNC / RealVNC if connecting from Windows Client machine or Vncviewer / Remmina if connecting from Linux / BSD  and now 
you want to turn off the VNC VM listener server either for security reasons to make sure some script kiddie random scanner did not manage to connect and take control over your VM or just because, you will be only further using the new configured VM only via SSH console sessions as they call it in modern times to make a buziness buzz out of it a headless UNIX server (server machines connected a network without a Physical monitor attached to it).


The question comes then how can be the KVM VNC listener on TCP port 5900 be completely disabled?

One way of course is to filter out with a firewall 5900 completely either on a Switch Level (lets say on a Cisco equipment catalist in front of the machine) or the worst solution to  locally filter directly on the server with firewalld or iptables chain rules.
 

1. Disable KVM VNC Port listener via VIRSH VM XML edit

The better way of course  is to completely disable the VNC using KVM, that is possible through the virsh command interface.
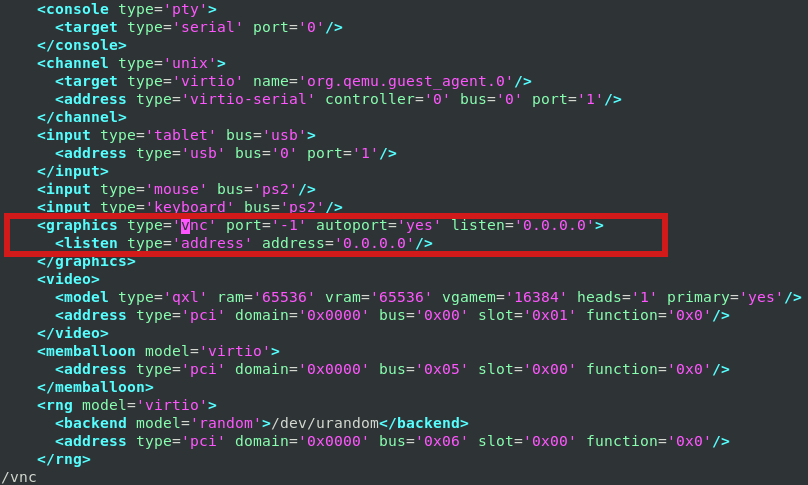
By editing the XML Virtual Machine configuration and finding the line about vnc confiuguration with:

root@server:/kvm/disk# virsh edit pcfreakweb
Domain pcfreakweb XML configuration not changed.

like:

<graphics type='vnc' port='5900' autoport='yes' listen='0.0.0.0'>
      <listen type='address' address='0.0.0.0'/>


and set value to undefined:

port='-1'


virsh-KVM-disable-VNC-port-listener-virsh-xml-edit-screenshot

Modifying the XML however will require you to reboot the Virtual Machine for which XML was editted. This might be not possible
if you have a running production server already configured with Apache / Proxy / PostgreSQL / Mail or any other Internet public service.

2. Disable VNC KVM TCP port 5900 to a dynamic running VM without a machine reboot


Thus if you want to remove the KVM VNC Port Listener on 5900 without a VM shutdown / reboot you can do it via KVM's virsh client interface.

root@server:/kvm/disk# virsh
Welcome to virsh, the virtualization interactive terminal.

Type:  'help' for help with commands
       'quit' to quit

virsh # qemu-monitor-command pcfreakweb –hmp change  vnc none


The virsh management user interface client, can do pretty much more of real time VM changes, it is really useful to use it if you have KVM Hypervisor hosts with 10+ Virtual machines and it if you have to deal with KVM machines on daily, do specific changes to the VMs on how VM networks are configured, information on HV hardware, configure / reconfigure storage volumes to VMs etc, take some time to play with it 🙂

Apache Benchmarking

Monday, January 14th, 2008

They’re few tools out there which are most common in use to do benchmarking and stess test on webservers. One of them “the most common one”is called “ab” or apache benchmark Check it out here another very common tool is called flood Check it here Flood seems to be the newer and most accurate tool to use for stress testing unfortunately it has one weakness. It only works with configuration file which is in xml format. So every time before you start it you have to generate a new xml file to suite your needs. Also a tool recommended to me in the #apache in the irc.freenode.net network is called “jmeter”, it’s located here . I personally didn’t tested it because it uses Java as a back end. While googling around I also have stucked on this interesting project PHPSPEED although I wasn’t able to test it looks like a promising test suite.END—–

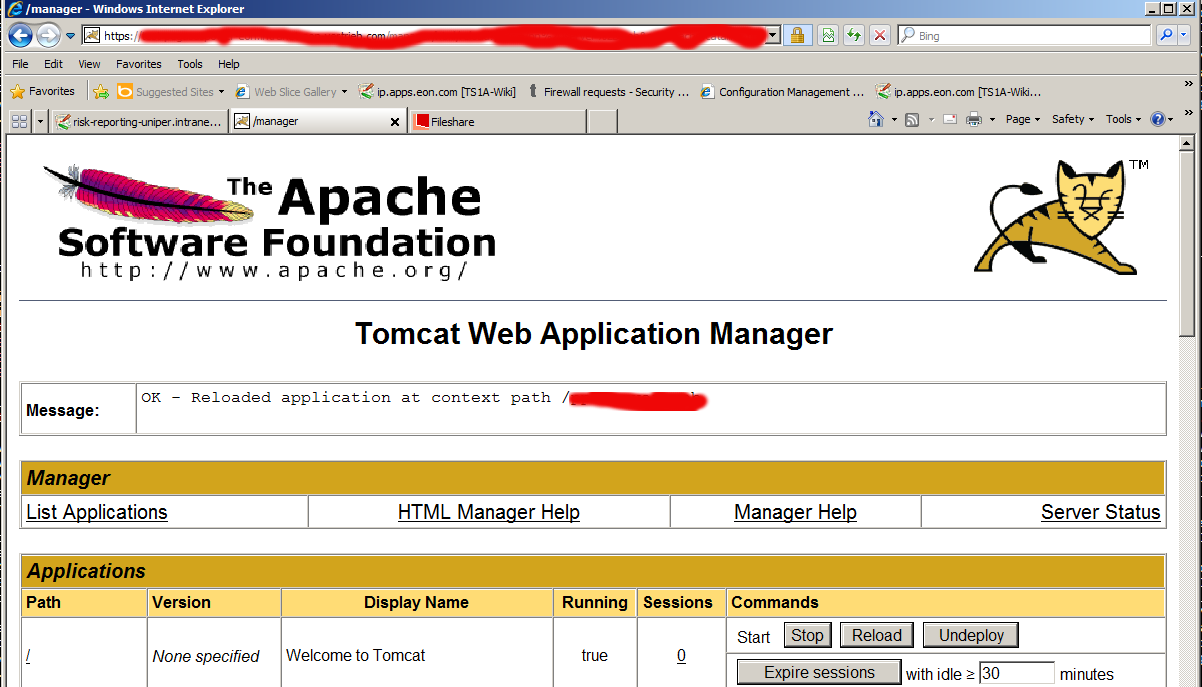
Fix “FAIL – Application at context path /application-name could not be started” deployment error in Tomcat manager

Thursday, October 1st, 2015

tomcat-manager-FAIL-Application-at-context-path-application-name-could-not-be-started-fix-solution-error

While deploying an environment called "Interim" which is pretty much like a testing Java application deployed from a Java EAR (Enterprise Archive) file from within a Tomcat Manager GUI web interface after stopping the application and trying to start it, the developers come across the error:


FAIL – Application at context path /application-name could not be started


The error puzzled me for a while until I checked the catalina.out I've seen a number of thrown Java Eceptions errors like:

Okt 01, 2015 10:48:46 AM org.springframework.web.context.ContextLoader initWebApplicationContext

Schwerwiegend: Context initialization failed

org.springframework.beans.factory.BeanCreationException: Error creating bean with name 'com.sun.xml.ws.transport.http.servlet.SpringBinding#2' defined in ServletContex

t resource [/WEB-INF/pp-server-beans.xml]: Cannot create inner bean ‘(inner bean)’ of type [org.jvnet.jax_ws_commons.spring.SpringService] while setting bean property

'service'; nested exception is org.springframework.beans.factory.BeanCreationException: Error creating bean with name '(inner bean)#33': FactoryBean threw exception on

 object creation; nested exception is java.lang.OutOfMemoryError: PermGen space

I've googled a bit about the error:

"FAIL – Application at context path /application-name could not be started"

and come across this Stackoverflow thread and followed suggested solution to fix web.xml tag closing error but it seems there was no such error in my case, I then also tried solution suggested by this thread (e.g. adding in logging.properties) file:
 

org.apache.catalina.core.ContainerBase.[Catalina].level = INFO
org.apache.catalina.core.ContainerBase.[Catalina].handlers = java.util.logging.ConsoleHandler

unfortunately this helped neither to solve the error when it is tried to be started from tomcat manager.

After asking for help a colleague Kostadin, he pointed me to take a closer look in the error (which is a clear indication) that the reserved space is not enough (see below err):
 

java.lang.OutOfMemoryError: PermGen space

And he pointed me then to Solution (which is to modify the present tomcat setenv.sh) settings which looked like this:

# Heap size settings

export JAVA_OPTS="-Xms2048M -Xmx2048M"


# SSCO test page parameter

export JAVA_OPTS="$JAVA_OPTS -DTS1A_TESTSEITE_CONFIG_PATH=test-myapplication.com"

# Default garbage collector settings

export JAVA_OPTS="$JAVA_OPTS -XX:MaxPermSize=128M"


# Aggressive garbage collector settings.

# Do not use! For testing purposes only!

#export JAVA_OPTS="$JAVA_OPTS -Xss128k -XX:ParallelGCThreads=20 -XX:+UseConcMarkSweepGC -XX:+UseParNewGC -XX:SurvivorRatio=8 -XX:TargetSurvivorRatio=90 -XX:MaxTenuringThreshold=31 -XX:+AggressiveOpts -XX:MaxPermSize=128M"


####### DO NOT CHANGE BELOW HERE #######

# Disable X11 usage

unset DISPLAY

export JAVA_OPTS="$JAVA_OPTS -Djava.awt.headless=true"


# Garbage collection log settings

export JAVA_OPTS="$JAVA_OPTS -verbose:gc -XX:+PrintGCTimeStamps -XX:+PrintGCDetails -Xloggc:/web/tomcat/current/logs/gc.log -XX:-TraceClassUnloading"


# Enable JMX console

export JAVA_OPTS="$JAVA_OPTS -Dcom.sun.management.jmxremote"


The solution is to to add following two options to export JAVA_OPTS (above options):

-XX:PermSize=512m -XX:MaxPermSize=512m


After modifications, my new line within setenv.sh looked like so:


JAVA_OPTS="-Xms2048M -Xmx2048M -XX:PermSize=512m -XX:MaxPermSize=512m"


Finally to make new JAVA_OPTS settings, I've restarted Tomcat with:


cd /web/tomcat/bin/
./shutdown.sh
sleep 5; ./startup.sh


And hooray it works fine thanks God! 🙂

12 must have Joomla extension plugins / Essential modules for new Joomla CMS install

Thursday, June 16th, 2011

Joomla bundle of must have extensions picture

These days very often I have to install, plain new Joomla based websites. I’ve realized that since there is no structured guide to follow describing the most essential plugins that every new fresh new joomla installation is required to have.
Thus I took the time and wrote this post, as it will be useful to myself in my future new joomla based websites establishment, I also believe these guide will be useful to other Joomla enthusiasts or administrators in their daily work.

Below I will describe in short the installation, configuration and oddities I’ve faced during installment of the above described bundle of plugins on a plan Joomla 1.5 install.These article will walk through 12 joomla essential plugins that I believe every fresh Joomla installation should be equipped with.
Hope this guide will be helpful to you. Now let’s start it up:

1. JoomlaXplorer – A sophisticated web file explorer for Joomla

One of the basic modules, beneficial with a new joomla CMS install is Joomla Xptplorer . This module enables the joomla admin to browse files in a web file explorer, on the server where the joomla CMS is installed. Below you see how handy the joomla web explorer provided by the plugin is:
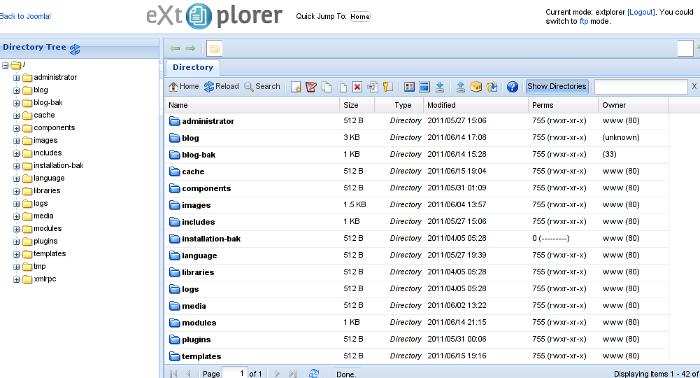
Joomla file explorer extplorer module

Installing and using the plugin is a piece of cake. To install the plugin:

a. download Joomla file Xplorer from here or from the official plugin website.

b. Install the plugin through the admin joomla menu:

Extensions -> Install/Uninstall

c. Start using the newly installed plugin by following to menus:

Components -> eXtplorer

2. JCrawler Generate easily sitemap.xml to aim the overall Joomla website SEO optimization

JCrawler logo plugin joomla

I have previously written a very through tutorial on how to install configure and generate website sitemap with Jcrawler module, You can read my article titled: How to build website sitemap.xml in Joomla here

3. sh404SEF – Make your Joomla links and content more user friendly

sh404sef Joomla Search Engine Optimization plugin

sh404SEF is a great Joomla plugin, which will seriously improve SEO and could contribute well for a website to be better indexed with major search engines.

I have previously written an article describing thoroughfully the install and use procedures for the module.
You can read the article Making your Joomla URLS Google friendly with sh404sef plugin / Simple Joomla link SEO here

4. Akeeba Backup Joomla solution

Akeeba backup Joomla Module

Installing a joomla backup solution is very essential if you does take care about your data, it often happens that server hard disk got crashes or a RAID massives got corrupted or some kind of other unexpected disaster hits the server. In these terrible times, having a website backup will save you nerves and data recovery funds, not to mention that in many cases data recovery is impossible.

Joomla has a very easy to use software for creating full website backup called Akeeba Backup

To start using the software one must:

a. Download Akeeba Backup and install it via:

Extensions -> Install/Uninstall

After the Akeeba Backup installation is over, to create your first backup, one needs to navigate to:

Components -> Akeeba Backup -> Backup Now

Each Akeeba backup (a version of the website’s files data and sql info) will be created in an archive file with the extension .jpa
The backup files are created under joomla’s website (main) root directory in directory location administrator/components/com_akeeba/backup

The Akeeba plugin also has capabilities to recover a (.jpa) backup restore point easily.
To recover a backup with the Akeeba plugin one needs to do it once again, via the plugin joomla web interface.
5. Google Analytics (place easy tracking code) in Joomla

Google Analytics Tracking Module for Joomla

a. Download the Google Analytics Tracking Module
The module is available from Joomla Extensions on joomla.org

At the current time of writting you need to download the analytics_tracking15,zip file

b. Install the Google Analytics Tracking Module;
Login as joomla admin and navigate to;

Extensions -> Install

Place the analytics_tracking15.zip url to the Install URL: field.
Again as of time of writting you need to place https://www.pc-freak.net/files/analytics_tracking15.zip;

c. Open the Module Manager

Extensions -> Module Manager

d. Click over Google Analytics Tracking Module
On the right pane you will notice in the Module Parameters the Analytics_uacct_code field. In the uacct_code field you need to paste your UA obtained from your created google-analytics account.
This code is usually something like UA-2101595-10
Now place your code their and press the save green button located near the right top of the screen. You should see the text in blue Item Saved which would indicate your UA code is stored already in the Google Analytics Tracking Module, now press the Cancel button located again on the right top.
As a last step before the Google analytics is set-up on the Joomla you need to enable the plugin to do you need to press over the tick left sided from the text reading Google Analytics Tracking Module in the Module Manager
e. Click over the Enabled button in Module Manager;
Google Analytics Tracking Module -> Enabled

6. Itprism (Facebook, Twitter etc.) Social Network share buttons Joomla plugin

ITPShare Large Social Buttons Joomla

a. to add the itpsocialbuttons to joomla Download the Itpsocialbuttons latest module files from http://itprism.com/free-joomla-extensions/social-buttons-plugin or use my mirrored module files below:

Download mod_itpsocialbuttons .zip file
Download plg_itpsocialbuttons .zip

After having the two files necessery to be installed to make the ITPSocialButtons appear on website, installation is done like with any other installation:

Extensions -> Install/Uninstall -> Upload Package File (Choose File)

Next its necessery to configure the plugin to do so, follow to menus:

Extensions -> Module Manager -> Share

You will notice the Share dialog in the list of Module Name column in Module Manager

Here is a screenshot on how the settings options for ITpsocialbuttons will look like:
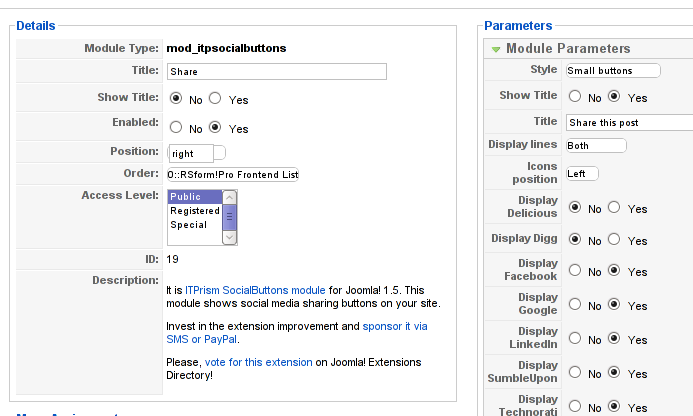
Mod ITpSocialButtons settings screen

The options which I personally changed was:

Show Title – I set this one to No as I wanted to omit the plugin title text to appear on my website.
Further on I’ve set the Enabled option to Yes to enable the plugin and choose the buttons Style option to be of a Small buttons type.
I’ve also found that the most suitable position for the Social Share buttons were to be of a right – Position .

Here is how the social network itprism share buttons looks like:

ITprism Joomla Social Share Plugin various button types

The plugin supports sharing of joomla pages to the following list of social networks:
 

  • Delicios.com
  • Digg.com
  • Facebook
  • Google Bookmarks
  • StumbleUpon
  • Technorati
  • Twitter
  • LinkedIn

The module configuration, also allows the user to configure the type of social network buttons, one wants to display on the website.

7. Joomla JCE Content Editor

This content editor is really awesome compared to the default editor TinyMCE. If you want to have an options rich content editor for Joomla, then this is the one for you 🙂
download JCE Content Editor here

After installing the JCE Joomla content editor in order to enable it as a default editor you need to go to the following location:

Site -> Global Configuration -> Default WYSIWYG Editor

There place on Editor TinyMCE and change it with Editor – JCE

Now go to edit some article, and you will see the difference in the editor 🙂

8. Add gallery Joomla capabilities with sigplus (Image Gallery Plus) and Very Simple Image Gallery

Image Gallery Plus sigplus Joomla Screenshot

Image Gallery Plus plugin (sigplus) gallery review screenshot

sigplus Image Gallery Plus is a straightforward way to add image or photo galleries to a Joomla article with a simple syntax. It takes a matter of minutes to set up a gallery but those who are looking for a powerful gallery solution will not be disappointed either: sigplus is suitable for both beginner and advanced users.

Download Sigplus Joomla Image Gallery plugin here
Using sigllus is quite easy all one has to do is use Joomla Media Manager from links:

Site -> Media Manager

Create new folder in the stories folder, let’s say New Pictures and further on use Media Manager to upload all desired pictures to be later displayed.

Being done with uploading the images you want to display, go to Article Manager :

Content -> Article Manager

From there choose your article where new uploaded pictures you want to display and type in the article:

{gallery}New Pictures{/gallery}.

Note that New Pictures is the directory just recently created as stated below, it’s important that there is no spacing between {gallery}and New Pictures, if one tries {gallery} New Pictures {/gallery} instead of {gallery}New Pictures{/gallery} an error will occur instead of the pictures being displayed in a scrolled gallery.

Sigplus Image Gallery has also a number of configuration options, which might make it look a bit more decent.
I have to say in my view the default way sigplus displays pictures is awful!

Another alternative if you don’t like Sigplus ‘s way of creating new galleries is to use Very Simple Image Gallery

Very Simple Image Gallery joomla screenshot

Here is a screenshot on a sample gallery created with Very Simple Image Gallery Joomla Plugin

You can download Very simple image gallery here

After installing the plugin. It’s use is analogous to the Sigplus . To use it likewise sigplus create new directory through Media Manager and in stories and upload your files in let’s say New Pictures1 . Later on in your article place, the code

{vsig}New Pictures1{/vsig}

Gallery will be generated automatically by the plugin. I think Simple Image Gallery is a bit more advanced and gives a better outlook to Galleries, though it’s configuration settings are much less than with SigPlus image gallery.

To add pictures comments e.g. img link alt=” and title=” tib you need to place a code within the Article manager similar to:

{vsig_c}0|Picture_1.JPG|Some sample text|Some other text{/vsig_c}
{vsig_c}0|Picture_2.JPG|Some example text|Some text{/vsig_c}
etc. ..

Note that the 0 in above example specifies the gallery number if you for instance are using a couple of galleries with Simple Image Gallery , the first one you used would be call 0 . The text specified as comments to the picture will also appear after you preview the gallery right below the picture when clicked on as a picture description in a really nice way.
9. Install Google maps plugin for Joomla
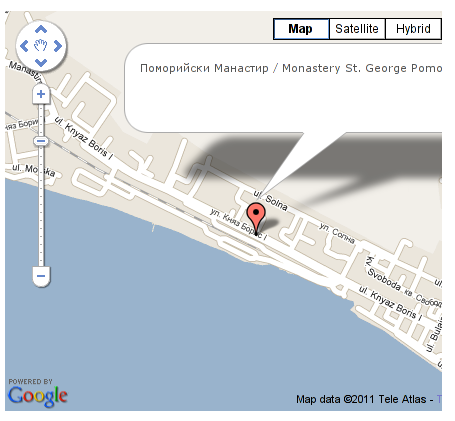
Google Maps plugin for Joomla screenshot

It’s a wise idea that every website has a location map on it’s website, for that reason Google maps is just great.
To install Google maps capability to joomla one can use a plugin called Google Maps .

You can straighly download Joomla’s Googlemap plugin from here

Afterwards use Extension Manager to install the plugin e.g. follow:

Extensions -&gr; Install/Uninstall (Choose File)

and click on Upload File & Install button.

To further enable and configure the Joomla Googlemap plugin you will have to go to the location:

Extensions -> Plugin Manager

Therein you will have to find and enable the Google Maps plugin which is to be found in the column named Plugin Manager
On my Joomla installation the plugin was located in the second page with modules, so if you don’t find the module on the listing with modules on the first page, make sure you scroll to the bottom of the page and click on Next button.

Therein in the list you will most likely notice Google Maps use the Enable button to enable it.

Next step is to configure the plugin, to do so press on the plugin name Google Maps
All configuration necessery here is to place Googlemaps API Key in the respective field (you will see it among config options).

Issuing a new Google Maps api key takes just few seconds, if you already have a gmail account just go to http://code.google.com/apis/maps/signup.html and take few seconds to issue the key.

You will get the key right on your gmail account after being issued (to repeat myself issuing takes few seconds so no worrier here).

One moreOnce having the key place it in the Googlemaps API Key field and configuring Address (which is one of the list of many options the plugin provides) you will be done with configuration.

To display a google map the location you just configured go to the Article Manager , select the article where you want the google maps location picture of your address to appear and type in the Article:

{mosmap|text='Exact street address location'|zoom='15'|zoomType='Large'|zoomNew='0'}

After you save the article a very nice Google map showing you the location’s streets will appear.
You can further conifgure a number of things related to the google map to appear, one thing you might want to play with is the zoom option which as you see in below’s code is equal to 15, e.g. zoom=’15’
Set it to another one if you want to regulate your googlemaps zoom level. For more thoroughful options take a look at the extensive plugin documentation.

10. Joomla Xmap (generating static HTML sitemap) Download Xmap from here , install it the usual plugin way.

Right after installation on the plugin succesful install screen you will notice the link component menu .
Clicking on the component menu you will be leaded to a page showing you few links Sitemap’s URL :
 

  • XML Sitemap:
  • HTML Sitemap:
  • News Sitemap:
  • Images Sitemap:

11. Add Joomla donate Paypal capabilities with Joomla PAYPAL DONATION MODULE

Paypal Donation Module Joomla Screenshot

Just recently I’ve written a a post on how to add a paypal donation capabilities to joomla, you can read my previous post here

12. Install Joomla RSForms Module (Advanced Joomla Forms Support)
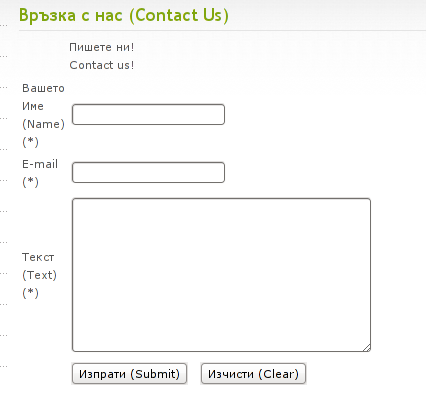
Simple Joomla RsForm contact form

If you’re planning to add a complicated form support for Joomla, there are plenty of plugins, however one that was suggested by a friend of mine which is deep in Joomla world and moreover works good on my joomla installations is RSForms

Joomla – RSForms! is free to download and has great and easy interface to create new joomla forms.

At the time of writting I use these three RSForms components on new Joomla installations:

RSform Pro 1.1.0 com
Mod RsForm for Joomla 1.5
Mod Rsform list for Joomla

For latest release of RSForms! use the link http://www.rsjoomla.com/joomla-components/rsform.html

Installation is like any other module and is done through Extensions -> Install/Uninstall menu.

After installation, setting up a new form is available from the Joomla Menus:

Components -> RSform!Pro -> Manage Forms

I would not enter in details on how to edit the default RSForms or create a new RSForm. Just take some time and learn it by trying 😉

After the rsform is ready, to enable the new form, navigate to Joomla menus:

Menus -> Main Menu

Press the New button located in the buttons bar nearby the page header in the list of options in Select Menu item Type you will notice the RSForm!Pro as an option, press on it to establish the new form in the menus.

A follow up window will appear where one can set a Title: and Alias: for the new form as well as few other options.
After finalizing the settings press on Apply button to save the settings and the new form should appear in Joomla.

Probably there are many more handy plugins, which I’m missing here thus I’ll be glad if readers suggest some more helpful essential (must have plugins) for Joomla.
Feedback on this tutorial is very welcome!
Looking forward to hear for your opinions if my article was helpful to you 😉

How to enable output compression (gzipfile content compression) in nginx webserver

Friday, April 8th, 2011

I have recently installed and configured a Debian Linux server with nginx
. Since then I’ve been testing around different ways to optimize the nginx performance.

In my nginx quest, one of the most crucial settings which dramatically improved the end client performance was enabling the so called output compression which in Apache based servers is also known as content gzip compression .
In Apache webservers the content gzip compression is provided by a server module called mod_deflate .

The output compression nginx settings saves a lot of bandwidth and though it adds up a bit more load to the server, the plain text files like html, xml, js and css’s download time reduces drasticly as they’re streamed to the browser in gzip compressed format.
This little improvement in download speed also does impact the overall end user browser experience and therefore improves the browsing speed experience with websites.

If you have already had experience nginx you already know it is a bit fastidious and you have to be very careful with it’s configuration, however thanksfully enabling the gzip compression was actually rather easier than I thought.

Here is what I added in my nginx config to enable output compression:

## Compression
gzip on;
gzip_buffers 16 8k;
gzip_comp_level 9;
gzip_http_version 1.1;
gzip_min_length 0;
gzip_vary on;

Important note here is that need to add this code in the nginx configuration block starting with:

http {
....
## Compression
gzip on;
gzip_buffers 16 8k;
gzip_comp_level 9;
gzip_http_version 1.1;
gzip_min_length 0;
gzip_vary on;

In order to load the gzip output compression as a next step you need to restart the nginx server, either by it’s init script if you use one or by killing the old nginx server instances and starting up the nginx server binary again:
I personally use an init script, so restarting nginx for me is done via the cmd:

debian:~# /etc/init.d/nginx restart
Restarting nginx: nginx.

Now to test if the output gzip compression is enabled for nginx, you can simply use telnet

hipo@linux:~$ telnet your-nginx-webserver-domain.com 80
Escape character is '^]'.

After the Escape character is set ‘^]’ appears on your screen type in the blank space:

HEAD / HTTP/1.0

and press enter twice.
The output which should follow should look like:


HTTP/1.1 200 OK
Server: nginx
Date: Fri, 08 Apr 2011 12:04:43 GMT
Content-Type: text/html
Content-Length: 13
Last-Modified: Tue, 22 Mar 2011 15:04:26 GMT
Connection: close
Vary: Accept-Encoding
Expires: Fri, 15 Apr 2011 12:04:43 GMT
Cache-Control: max-age=604800
Accept-Ranges: bytes

The whole transaction with telnet command issued and the nginx webserver output should look like so:

hipo@linux:~$ telnet your-nginx-webserver-domain.com 80
Trying xxx.xxx.xxx.xxx...
Connected to your-nginx-webserver-domain.com
.Escape character is '^]'.
HEAD / HTTP/1.0

HTTP/1.1 200 OK
Server: nginx
Date: Fri, 08 Apr 2011 12:04:43 GMT
Content-Type: text/html
Content-Length: 13
Last-Modified: Tue, 22 Mar 2011 15:04:26 GMT
Connection: close
Vary: Accept-Encoding
Expires: Fri, 15 Apr 2011 12:04:43 GMT
Cache-Control: max-age=604800
Accept-Ranges: bytes

The important message in the returned output which confirms your nginx output compression is properly configured is:

Vary: Accept-Encoding

If this message is returned by your nginx server, this means your nginx now will distribute it’s content to it’s clients in compressed format and apart from the browsing boost a lot of server and client bandwitdth will be saved.

Debian Linux: Installing and monitoring servers with Icanga (Nagios fork soft)

Monday, June 3rd, 2013

icinga-monitoring-processes-and-servers-linux-logo

There is plenty of software for monitoring how server performs and whether servers are correctly up and running. There is probably no Debian Linux admin who didn't already worked or at least tried Nagios and Mointor to monitor and notify whether server is unreachable or how server services operate. Nagios and Munin are play well together to prevent possible upcoming problems with Web / Db / E-mail services or get notify whether they are completely inaccessible. One similar "next-generation" and less known software is Icanga.
The reason, why to use Icinga  instead of Nagios is  more features a list of what does Icinga supports more than Nagios is on its site here
I recently heard of it and decided to try it myself. To try Icanga I followed Icanga's install tutorial on Wiki.Icanga.Org here
In Debian Wheezy, Icinga is already part of official repositories so installing it like in Squeeze and Lenny does not require use of external Debian BackPorts repositories.

1. Install Icinga pre-requirement packages

debian:# apt-get --yes install php5 php5-cli php-pear php5-xmlrpc php5-xsl php5-gd php5-ldap php5-mysql

2. Install Icanga-web package

debian:~# apt-get --yes install icinga-web

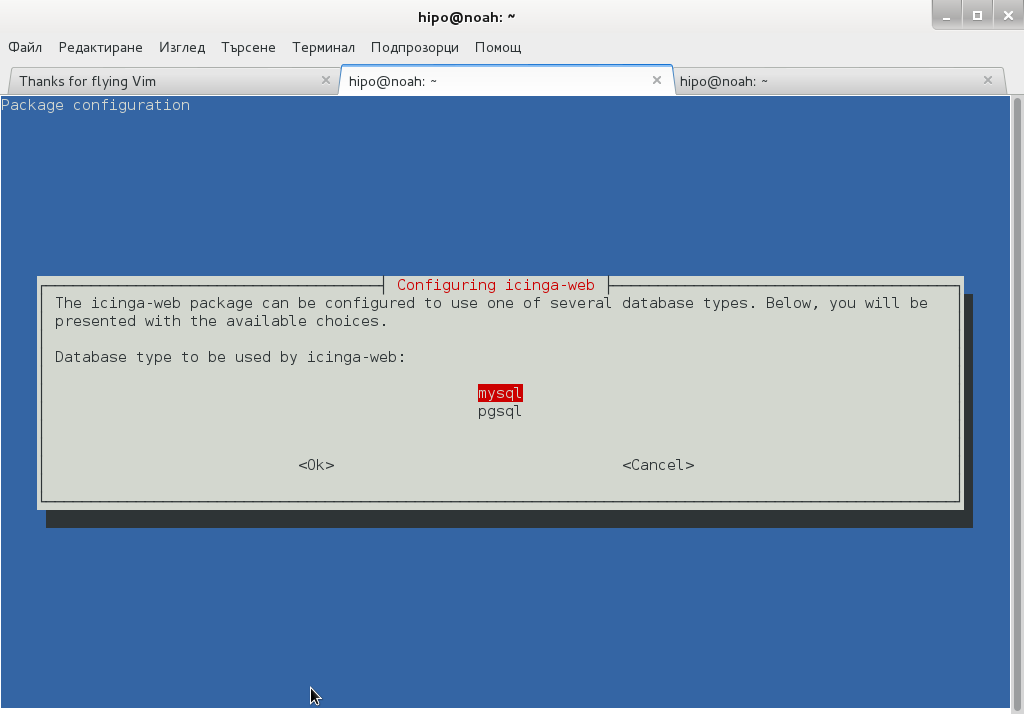
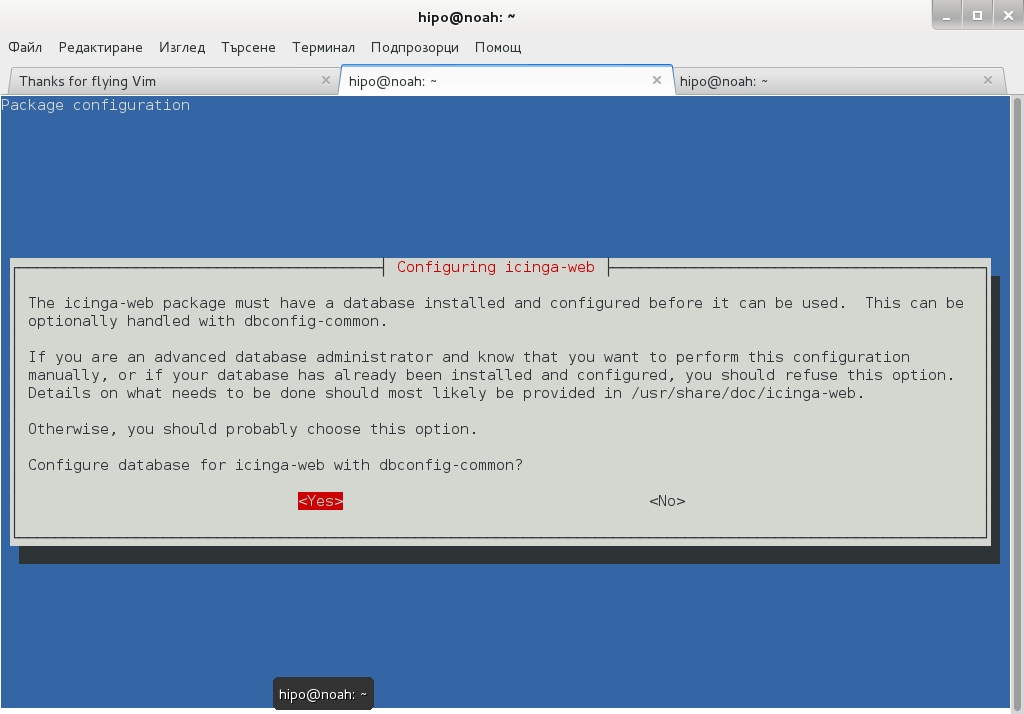
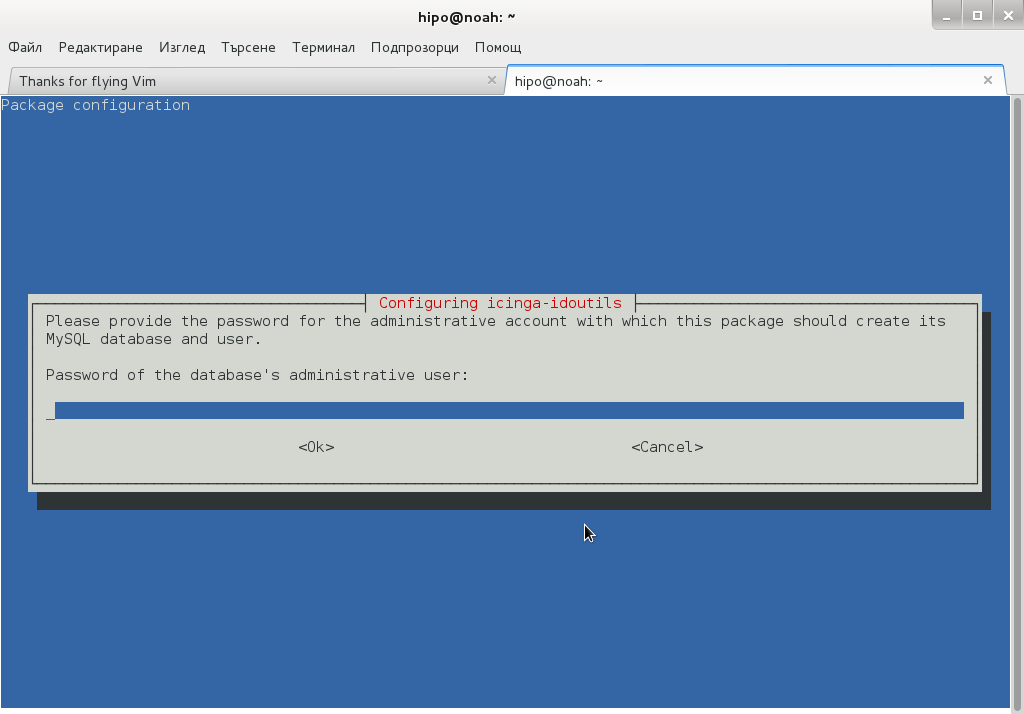
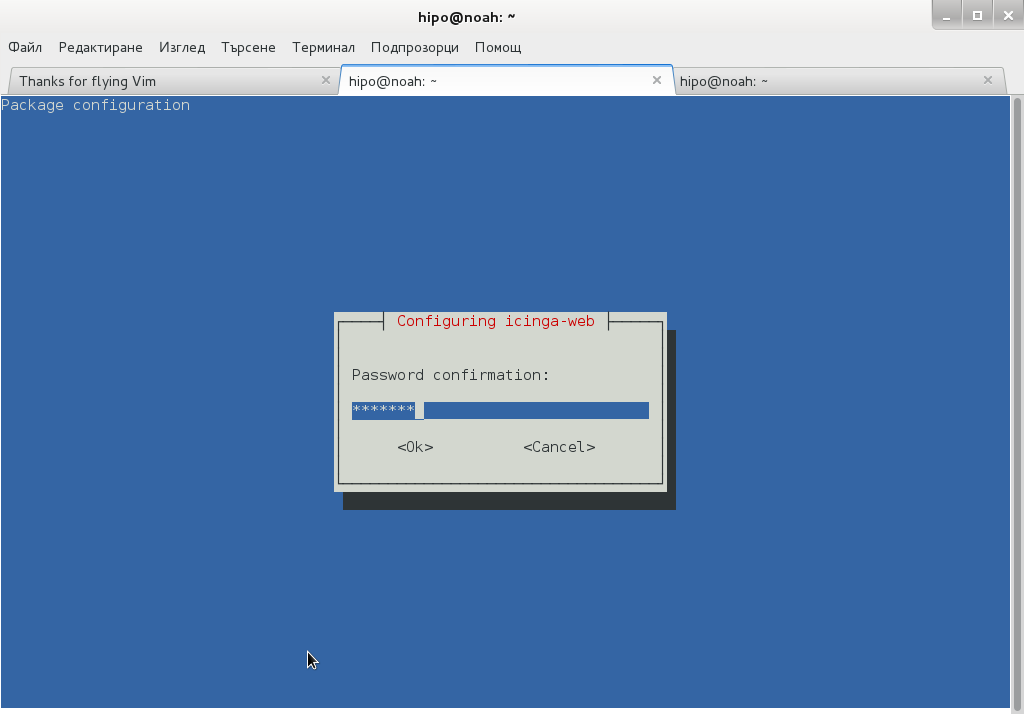
Here you will be prompted a number of times to answer few dialog questions important for security, as well as fill in MySQL server root user / password as well as SQL password that will icinga_web mySQL user use.

icinga-choosing-database-type

configuring-icinga-web-debian-linux-configuring-database-shot

debian-config-screenshot-configuring-icinga-idoutils

icinga-password-confirmation-debian-linux
….

Setting up icinga-idoutils (1.7.1-6) …
dbconfig-common: writing config to /etc/dbconfig-common/icinga-idoutils.conf
granting access to database icinga for icinga-idoutils@localhost: success.
verifying access for icinga-idoutils@localhost: success.
creating database icinga: success.
verifying database icinga exists: success.
populating database via sql…  done.
dbconfig-common: flushing administrative password
Setting up icinga-web (1.7.1+dfsg2-6) …
dbconfig-common: writing config to /etc/dbconfig-common/icinga-web.conf

Creating config file /etc/dbconfig-common/icinga-web.conf with new version
granting access to database icinga_web for icinga_web@localhost: success.
verifying access for icinga_web@localhost: success.
creating database icinga_web: success.
verifying database icinga_web exists: success.
populating database via sql…  done.
dbconfig-common: flushing administrative password

Creating config file /etc/icinga-web/conf.d/database-web.xml with new version
database config successful: /etc/icinga-web/conf.d/database-web.xml

Creating config file /etc/icinga-web/conf.d/database-ido.xml with new version
database config successful: /etc/icinga-web/conf.d/database-ido.xml
enabling config for webserver apache2…
Enabling module rewrite.
To activate the new configuration, you need to run:
  service apache2 restart
`/etc/apache2/conf.d/icinga-web.conf' -> `../../icinga-web/apache2.conf'
[ ok ] Reloading web server config: apache2 not running.
root password updates successfully!
Basedir: /usr Cachedir: /var/cache/icinga-web
Cache already purged!

3. Enable Apache mod_rewrite


debian:~# a2enmod rewrite
debian:~# /etc/init.d/apache2 restart


4. Icinga documentation files

Some key hints on Enabling some more nice Icinga features are mentioned in Icinga README files, check out, all docs files included with Icinga separate packs are into:
 

debian:~# ls -ld *icinga*/
drwxr-xr-x 3 root root 4096 Jun  3 10:48 icinga-common/
drwxr-xr-x 3 root root 4096 Jun  3 10:48 icinga-core/
drwxr-xr-x 3 root root 4096 Jun  3 10:48 icinga-idoutils/
drwxr-xr-x 2 root root 4096 Jun  3 10:48 icinga-web/

debian:~# less /usr/share/doc/icinga-web/README.Debian debian:~# less /usr/share/doc/icinga-idoutils/README.Debian

5. Configuring Icinga

Icinga configurations are separated in two directories:

debian:~# ls -ld *icinga*

drwxr-xr-x 4 root root 4096 Jun  3 10:50 icinga
drwxr-xr-x 3 root root 4096 Jun  3 11:07 icinga-web

>

etc/icinga/ – (contains configurations files for on exact icinga backend server behavior)


/etc/icinga-web – (contains all kind of Icinga Apache configurations)
Main configuration worthy to look in after install is /etc/icinga/icinga.cfg.

6. Accessing newly installed Icinga via web

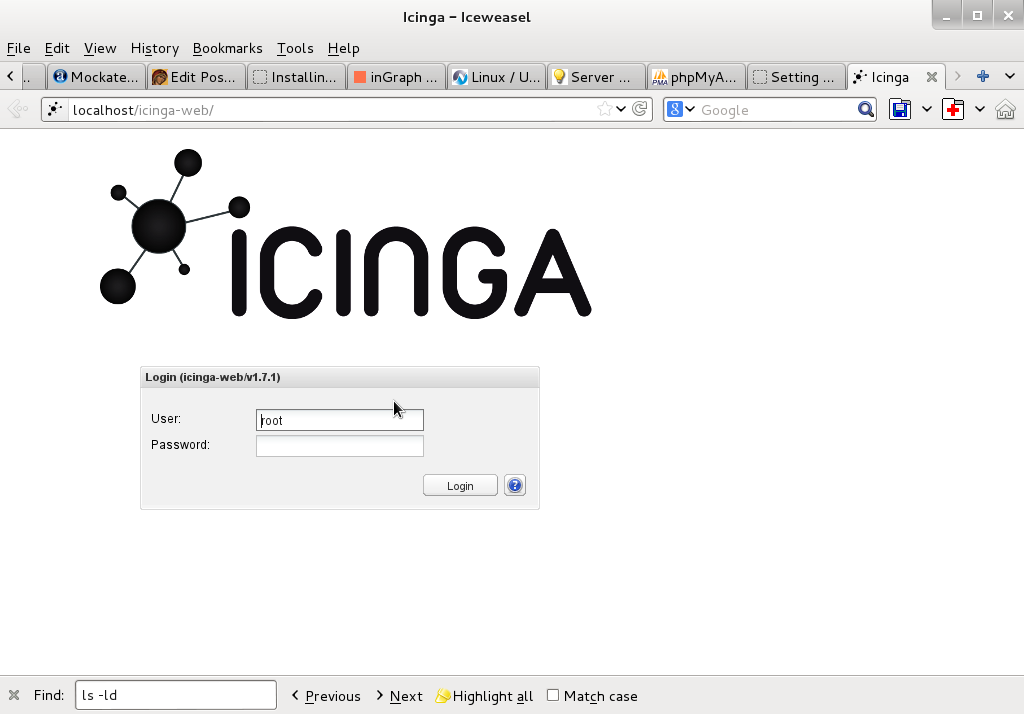
To access just installed Icinga, open in browser URL – htp://localhost/icinga-web

icinga web login screen in browser debian gnu linux

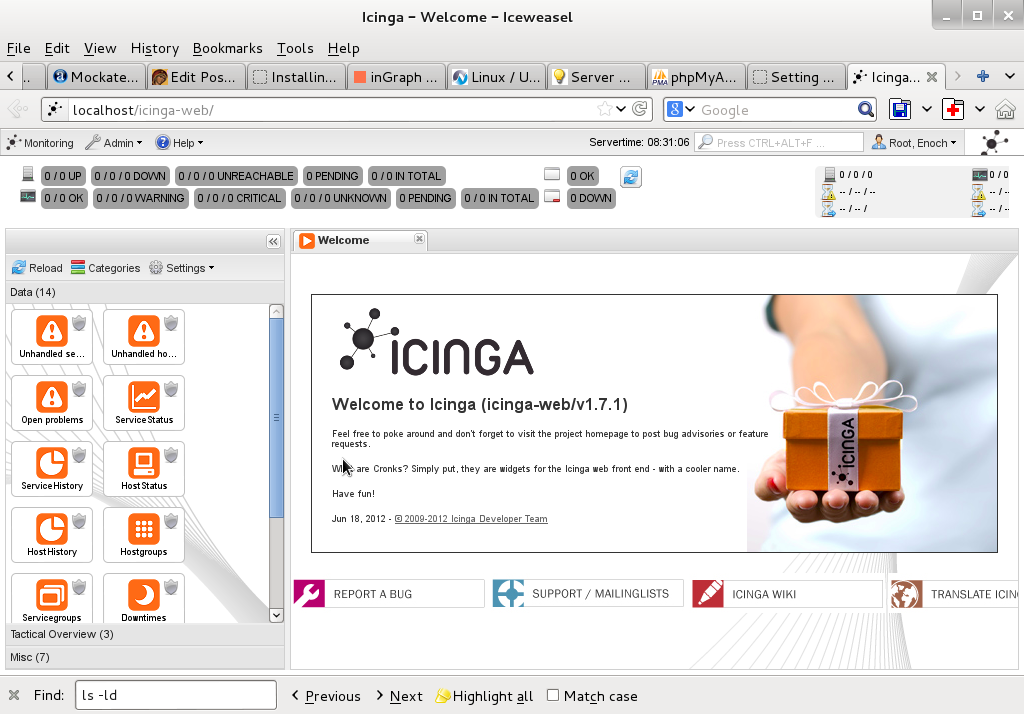
logged in inside Icinga / Icinga web view and control frontend


7. Monitoring host services with Icinga (NRPE)

As fork of Nagios. Icinga has similar modular architecture and uses number of external plugins to Monitor external host services list of existing plugins is on Icinga's wiki here.
Just like Nagios Icinga supports NRPE protocol (Nagios Remote Plugin Executor). To setup NRPE, nrpe plugin from nagios is used (nagios-nrpe-server). 

To install NRPE on any of the nodes to be tracked;
debian: ~# apt-get install –yes nagios-nrpe-server

 Then to configure NRPE edit /etc/nagios/nrpe_local.cfg


Once NRPE is supported in Icinga, you can install on Windows or Linux hosts NRPE clients like in Nagios to report on server processes state and easily monitor if server disk space / load or service is in critical state.

Preserve Session IDs of Tomcat cluster behind Apache reverse proxy / Sticky sessions with mod_proxy and Tomcat

Wednesday, February 26th, 2014

apache_and_tomcat_merged_logo_prevent_sticky_sessions
Having a combination of Apache webservice Reverse Proxy to redirect invisibly traffic to a number of Tomcat server positioned in a DMZ is a classic task in big companies Corporate world.
Hence if you work for company like IBM or HP sooner or later you will need to configure Apache Webserver cluster with few running Jakarta Tomcat Application servers behind. Scenario with necessity to access a java based application via Tomcat which requires logging (authentication) relaying on establishing and keeping a session ID is probably one of the most common ones and if you do it for first time you will probably end up with Session ID issues.  Session ID issues are hard to capture at first as on first glimpse application will seem to be working but users will have to re-login all the time even though the programmers might have coded for a session to expiry in 30 minutes or so.

… I mean not having configured Session ID prevention to Tomcats will cause random authentication session expiries and users using the Tomcat app will be unable to normally access below application with authenticated credentials. The solution to these is known under term "Sticky sessions"
To configure Sticky sessions you need to already have configured Apache/s with following minimum configuration:

  • enabled mod_proxy, proxy_balancer_module, proxy_http_module and or mod_proxy_ajp (in Apache config)

  LoadModule proxy_module modules/mod_proxy.so
LoadModule proxy_balancer_module modules/mod_proxy_balancer.so
LoadModule proxy_http_module modules/mod_proxy_http.so

  • And configured and tested Tomcats running an Application reachable via AJP protocol

Below example assumes there is Reverse Proxy Load Balancer Apache which has to forward all traffic to 2 tomcats. The config can easily be extended for as many as necessary by adding more BalancerMembers.

In Apache webserver (apache2.conf / httpd.conf) you need to have JSESSIONID configured. These JSESSIONID is going to be appended to each client request from Reverse Proxy to each of Tomcat servers with value opened once on authentication to first Tomcat node to each of the other ones.

<Proxy balancer://mycluster>
BalancerMember ajp://10.16.166.53:11010/ route=delivery1
BalancerMember ajp://10.16.166.66:11010/ route=delivery2
</Proxy>

ProxyRequests Off
ProxyPass / balancer://mycluster/ stickysession=JSESSIONID
ProxyPassReverse / balancer://mycluster/

The two variables route=delivery1 and route=delivery2 are routed to hosts identificators that also has to be present in Tomcat server configurations
In Tomcat App server First Node (server.xml)

<Engine name="Catalina" defaultHost="localhost" jvmRoute="delivery1">

In Tomcat App server Second Node (server.xml)

<Engine name="Catalina" defaultHost="localhost" jvmRoute="delivery2">

Once Sticky Sessions are configured it is useful to be able to track they work fine this is possible through logging each of established JESSSIONIDs, to do so add in httpd.conf

LogFormat "%h %l %u %t \"%r\" %>s %b \"%{Referer}i\" \"%{User-Agent}i\"\"%{JSESSIONID}C\"" combined

After modifications restart Apache and Tomcat to load new configs. In Apache access.log the proof should be the proof that sessions are preserved via JSESSIONID, there should be logs like:
 

127.0.0.1 - - [18/Sep/2013:10:02:02 +0800] "POST /examples/servlets/servlet/RequestParamExample HTTP/1.1" 200 662 "http://localhost/examples/servlets/servlet/RequestParamExample" "Mozilla/5.0 (X11; Linux x86_64; rv:17.0) Gecko/20130807 Firefox/17.0""B80557A1D9B48EC1D73CF8C7482B7D46.server2"

127.0.0.1 - - [18/Sep/2013:10:02:06 +0800] "GET /examples/servlets/servlet/RequestInfoExample HTTP/1.1" 200 693 "http://localhost/examples/servlets/" "Mozilla/5.0 (X11; Linux x86_64; rv:17.0) Gecko/20130807 Firefox/17.0""B80557A1D9B48EC1D73CF8C7482B7D46.server2"

That should solve problems with mysterious session expiries 🙂